
現實使用 Codable 上遇到的 Decode 問題場景總匯(上)
從基礎到進階,深入使用 Decodable 滿足所有可能會遇到的問題場景

Photo by Gustas Brazaitis
前言
因應後端 API 升級需要調整 API 處理架構,近期趁這個機會一併將原本使用 Objective-C 撰寫的網路處理架構更新成 Swift;因語言不同,也不在適合使用原本的 Restkit 幫我們處理網路層應用,但不得不說 Restkit 的功能包山包海非常強大,在專案中也用得活靈活現,基本沒有太大的問題;但相對的非常笨重、幾乎已不再維護、純 Objective-C;未來勢必也要更換的。
Restkit 幾乎幫我們處理完所有網路請求相關會需要到的功能,從基本的網路處理、API 呼叫、網路處理,到 Response 處理 JSON String to Object 甚至是 Object 存入 Core Data 它都能一起處理實打實的一個 Framework 打十個。
隨著時代的演進,目前的 Framework 已不在主打一個包全部,更多的是靈活、輕巧、組合,增加更多彈性創造更多變化;因此再替換成 Swift 語言的同時,我們選擇使用 Moya 作為網路處理部分的套件,其他我們需要的功能再選擇其他方式進行組合。
正題
關於 JSON String to Object Mapping 部分,我們使用 Swift 自帶的 Codable (Decodable) 協議 & JSONDecoder 進行處理;並拆分 Entity/Model 加強權責區分、操作及閱讀性、另外 Code Base 混 Objective-C 和 Swift 也要考量進去。
* Encodable 的部份省略、範例均只展示實作 Decodable,大同小異,可以 Decode 基本也能 Encode。
開始
假設我們初始的 API Response JSON String 如下:
{
  "id": 123456,
  "comment": "是告五人,不是五告人!",
  "target_object": {
    "type": "song",
    "id": 99,
    "name": "披星戴月的想你"
  },
  "commenter": {
    "type": "user",
    "id": 1,
    "name": "zhgchgli",
    "email": "[email protected]"
  }
}
由上範例我們可以拆成:User/Song/Comment 三個 Entity & Model,讓我們組合能複用,為方便展示先將 Entity/Model 寫在同個檔案。
User:
// Entity:
struct UserEntity: Decodable {
    var id: Int
    var name: String
    var email: String
}

//Model:
class UserModel: NSObject {
    init(_ entity: UserEntity) {
      self.id = entity.id
      self.name = entity.name
      self.email = entity.email
    }
    var id: Int
    var name: String
    var email: String
}
Song:
// Entity:
struct SongEntity: Decodable {
    var id: Int
    var name: String
}

//Model:
class SongModel: NSObject {
    init(_ entity: SongEntity) {
      self.id = entity.id
      self.name = entity.name
    }
    var id: Int
    var name: String
}
Comment:
// Entity:
struct CommentEntity: Decodable {
    enum CodingKeys: String, CodingKey {
      case id
      case comment
      case targetObject = "target_object"
      case commenter
    }

    var id: Int
    var comment: String
    var targetObject: SongEntity
    var commenter: UserEntity
}

//Model:
class CommentModel: NSObject {
    init(_ entity: CommentEntity) {
      self.id = entity.id
      self.comment = entity.comment
      self.targetObject = SongModel(entity.targetObject)
      self.commenter = UserModel(entity.commenter)
    }
    var id: Int
    var comment: String
    var targetObject: SongModel
    var commenter: UserModel
}
JSONDecoder:
let jsonString = "{ \"id\": 123456, \"comment\": \"是告五人,不是五告人!\", \"target_object\": { \"type\": \"song\", \"id\": 99, \"name\": \"披星戴月的想你\" }, \"commenter\": { \"type\": \"user\", \"id\": 1, \"name\": \"zhgchgli\", \"email\": \"[email protected]\" } }"
let jsonDecoder = JSONDecoder()
do {
    let result = try jsonDecoder.decode(CommentEntity.self, from: jsonString.data(using: .utf8)!)
} catch {
    print(error)
}
CodingKeys Enum?
當我們的 JSON String Key Name 與 Entity Object Property Name 不相匹配時可以在內部加一個 CodingKeys 枚舉進行對應,畢竟後端資料源的 Naming Convention 不是我們可以控制的。
case PropertyKeyName = "後端欄位名稱"
case PropertyKeyName //不指定則預設使用 PropertyKeyName 為後端欄位名稱
一旦加入 CodingKeys 枚舉,則必須列舉出所有非 Optional 的欄位,不能只列舉想要客製的 Key。
另外一種方式是設定 JSONDecoder 的 keyDecodingStrategy,若 Response 資料欄位與 Property Name 僅為 snake_case <-> camelCase 區別,可直接設定 .keyDecodingStrategy = .convertFromSnakeCase 就能自動匹配 Mapping。
let jsonDecoder = JSONDecoder()
jsonDecoder.keyDecodingStrategy = .convertFromSnakeCase
try jsonDecoder.decode(CommentEntity.self, from: jsonString.data(using: .utf8)!)
回傳資料是陣列時:
struct SongListEntity: Decodable {
    var songs:[SongEntity]
}
為 String 加上約束:
struct SongEntity: Decodable {
  var id: Int
  var name: String
  var type: SongType

  enum SongType {
    case rock
    case pop
    case country
  }
}
適用於有限範圍的字串類型,寫成 Enum 方便我們傳遞、使用;若出現為列舉的值會 Decode 失敗!
善用泛型包裹固定結構:
假設多筆回傳的 JSON String 固定格式為:
{
  "count": 10,
  "offset": 0,
  "limit": 0,
  "results": [
    {
      "type": "song",
      "id": 1,
      "name": "1"
    }
  ]
}
即可用泛型方式包裹起來:
struct PageEntity<E: Decodable>: Decodable {
    var count: Int
    var offset: Int
    var limit: Int
    var results: [E]
}
使用: PageEntity<Song>.self
Date/Timestamp 自動 Decode:
設定 JSONDecoder 的 dateDecodingStrategy
.secondsSince1970/.millisecondsSince1970: unix timestamp.deferredToDate: 蘋果的 timestamp,罕用,不同於 unix timestamp,這是從 2001/01/01 起算.iso8601: ISO 8601 日期格式.formatted(DateFormatter): 依照傳入的 DateFormatter Decode Date.custom: 自訂 Date Decode 邏輯
.cutstom 範例:假設 API 會回傳 YYYY/MM/DD 和 ISO 8601 兩種格式,兩中都要能 Decode:
var dateFormatter = DateFormatter()
var iso8601DateFormatter = ISO8601DateFormatter()

let decoder: JSONDecoder = JSONDecoder()
decoder.dateDecodingStrategy = .custom({ (decoder) -> Date in
    let container = try decoder.singleValueContainer()
    let dateString = try container.decode(String.self)

    //ISO8601:
    if let date = iso8601DateFormatter.date(from: dateString) {
        return date
    }

    //YYYY-MM-DD:
    dateFormatter.dateFormat = "yyyy-MM-dd"
    if let date = dateFormatter.date(from: dateString) {
        return date
    }

    throw DecodingError.dataCorruptedError(in: container, debugDescription: "Cannot decode date string \(dateString)")
})

let result = try jsonDecoder.decode(CommentEntity.self, from: jsonString.data(using: .utf8)!)
*DateFormatter 在 init 時非常消耗性能,盡可能重複使用。
基本 Decode 常識:
- Decodable Protocol 內的欄位類型(struct/class/enum),都須實作 Decodable Protocol;亦或是在 init decoder 時賦予值
- 欄位類型不相符時會 Decode 失敗
- Decodable Object 中欄位設為 Optional 的話則為可有可無,有給就 Decode
- Optional 欄位可接受: JSON String 無欄位、有給但給 nil
- 空白、0 不等於 nil,nil 是 nil;弱型別的後端 API 需注意!
- 預設 Decodable Object 中有列舉且非 Optional 的欄位,若 JSON String 沒給會 Decode 失敗(後續會說明如何處理)
- 預設 遇到 Decode 失敗會直接中斷跳出,無法單純跳過有誤的資料(後續會說明如何處理)

進階使用
到此為止基本的使用已經完成了,但現實世界不會那麼簡單;以下列舉幾個進階會遇到的場景並提出適用 Codable 的解決方案,從這邊開始我們就無法靠原始的 Decode 幫我們補 Mapping 了,要自行實作 init(from decoder: Decoder) 客製 Decode 操作。
*這邊暫時先只展示 Entity 的部分,Model 還用不到。
init(from decoder: Decoder)
init decoder,必須賦予所有非 Optional 的欄位初始值(就是 init 啦!)。
自訂 Decode 操作時,我們需要從 decoder 中取得 container 出來操作取值, container 有三種取得內容的類型。
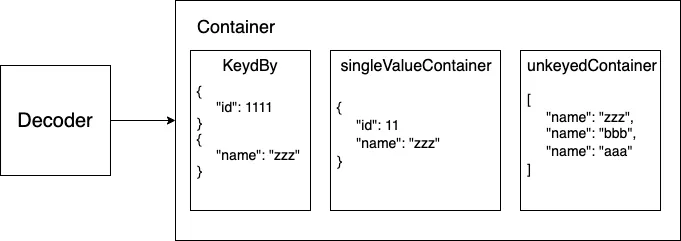
第一種 container(keyedBy: CodingKeys.self) 依照 CodingKeys 操作:
struct SongEntity: Decodable {
    var id: Int
    var name: String

    enum CodingKeys: String, CodingKey {
      case id
      case name
    }

    init(from decoder: Decoder) throws {
        let container = try decoder.container(keyedBy: CodingKeys.self)
        self.id = try container.decode(Int.self, forKey: .id)
        //參數 1 接受支援:實作 Decodable 的類別
        //參數 2 CodingKeys

        self.name = try container.decode(String.self, forKey: .name)
    }
}
第二種 singleValueContainer 將整包取出操作(單值):
enum HandsomeLevel: Decodable {
    case handsome(String)
    case normal(String)
    init(from decoder: Decoder) throws {
        let container = try decoder.singleValueContainer()
        let name = try container.decode(String.self)
        if name == "zhgchgli" {
            self = .handsome(name)
        } else {
            self = .normal(name)
        }
    }
}

struct UserEntity: Decodable {
    var id: Int
    var name: HandsomeLevel
    var email: String

    enum CodingKeys: String, CodingKey {
        case id
        case name
        case email
    }
}
適用於 Associated Value Enum 欄位類型,例如 name 還自帶帥氣程度!
第三種 unkeyedContainer 將整包視為一包陣列:
struct ListEntity: Decodable {
    var items:[Decodable]
    init(from decoder: Decoder) throws {
        var unkeyedContainer = try decoder.unkeyedContainer()
        self.items = []
        while !unkeyedContainer.isAtEnd {
            //unkeyedContainer 內部指針會自動在 decode 操作後指向下一個對象
            //直到指向結尾即代表遍歷結束
            if let id = try? unkeyedContainer.decode(Int.self) {
                items.append(id)
            } else if let name = try? unkeyedContainer.decode(String.self) {
                items.append(name)
            }
        }
    }
}

let jsonString = "[\"test\",1234,5566]"
let jsonDecoder = JSONDecoder()
let result = try jsonDecoder.decode(ListEntity.self, from: jsonString.data(using: .utf8)!)
print(result)
適用不固定類型的陣列欄位。
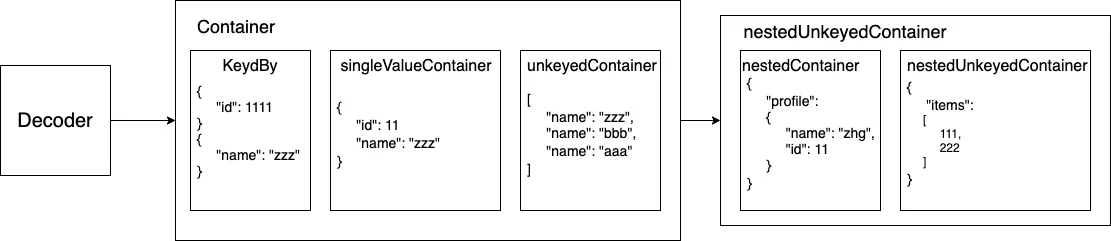
Container 之下我們還能使用 nestedContainer / nestedUnkeyedContainer 對特定欄位操作:
*將資料欄位扁平化(類似 flatMap)
struct ListEntity: Decodable {

    enum CodingKeys: String, CodingKey {
        case items
        case date
        case name
        case target
    }

    enum PredictKey: String, CodingKey {
        case type
    }

    var date: Date
    var name: String
    var items: [Decodable]
    var target: Decodable

    init(from decoder: Decoder) throws {
        let container = try decoder.container(keyedBy: CodingKeys.self)

        self.date = try container.decode(Date.self, forKey: .date)
        self.name = try container.decode(String.self, forKey: .name)

        let nestedContainer = try container.nestedContainer(keyedBy: PredictKey.self, forKey: .target)

        let type = try nestedContainer.decode(String.self, forKey: .type)
        if type == "song" {
            self.target = try container.decode(SongEntity.self, forKey: .target)
        } else {
            self.target = try container.decode(UserEntity.self, forKey: .target)
        }

        var unkeyedContainer = try container.nestedUnkeyedContainer(forKey: .items)
        self.items = []
        while !unkeyedContainer.isAtEnd {
            if let song = try? unkeyedContainer.decode(SongEntity.self) {
                items.append(song)
            } else if let user = try? unkeyedContainer.decode(UserEntity.self) {
                items.append(user)
            }
        }
    }
}
存取、Decode 不同階層的物件,範例展示 target/items 使用 nestedContainer flat 出 type 再依照 type 去做對應的 decode。
Decode & DecodeIfPresent
- DecodeIfPresent: Response 有給資料欄位時才會進行 Decode(Codable Property 設 Optional 時)
- Decode:進行 Decode 操作,若 Response 無給資料欄位會拋出 Error
*以上只是簡單介紹一下 init decoder、container 有哪些方法、功能,看不懂也沒關係,我們直接進入現實場景;在範例中感受組合起來的操作方式。
現實場景
回到原本的範例 JSON String。
場景1. 假設今天對誰留言可能是對歌曲或對人留言, targetObject 欄位可能的對象是 User 或 Song ? 那該如何處理?
{
  "results": [
    {
      "id": 123456,
      "comment": "是告五人,不是五告人!",
      "target_object": {
        "type": "song",
        "id": 99,
        "name": "披星戴月的想你"
      },
      "commenter": {
        "type": "user",
        "id": 1,
        "name": "zhgchgli",
        "email": "[email protected]"
      }
    },
    {
      "id": 55,
      "comment": "66666!",
      "target_object": {
        "type": "user",
        "id": 1,
        "name": "zhgchgli"
      },
      "commenter": {
        "type": "user",
        "id": 2,
        "name": "aaaa",
        "email": "[email protected]"
      }
    }
  ]
}
方式 a.
使用 Enum 做為容器 Decode。
struct CommentEntity: Decodable {

    enum CodingKeys: String, CodingKey {
      case id
      case comment
      case targetObject = "target_object"
      case commenter
    }

    var id: Int
    var comment: String
    var targetObject: TargetObject
    var commenter: UserEntity

    enum TargetObject: Decodable {
        case song(SongEntity)
        case user(UserEntity)

        enum PredictKey: String, CodingKey {
            case type
        }

        enum TargetObjectType: String, Decodable {
            case song
            case user
        }

        init(from decoder: Decoder) throws {
            let container = try decoder.container(keyedBy: PredictKey.self)
            let singleValueContainer = try decoder.singleValueContainer()
            let targetObjectType = try container.decode(TargetObjectType.self, forKey: .type)

            switch targetObjectType {
            case .song:
                let song = try singleValueContainer.decode(SongEntity.self)
                self = .song(song)
            case .user:
                let user = try singleValueContainer.decode(UserEntity.self)
                self = .user(user)
            }
        }
    }
}
我們將 targetObject 的屬性換成 Associated Value Enum,在 Decode 時才決定 Enum 內要放什麼內容。
核心實踐是建立一個符合 Decodable 的 Enum 做為容器,decode 時先取關鍵欄位出來判斷(範例 JSON String 中的 type 欄位),若為 Song 則使用 singleValueContainer 將整包解成 SongEntity ,若為 User 亦然。
要使用時再從 Enum 中取出:
//if case let
if case let CommentEntity.TargetObject.user(user) = result.targetObject {
    print(user)
} else if case let CommentEntity.TargetObject.song(song) = result.targetObject {
    print(song)
}

//switch case let
switch result.targetObject {
case .song(let song):
    print(song)
case .user(let user):
    print(user)
}
方式 b.
改宣告欄位屬性為 Base Class。
struct CommentEntity: Decodable {
    enum CodingKeys: String, CodingKey {
      case id
      case comment
      case targetObject = "target_object"
      case commenter
    }
    enum PredictKey: String, CodingKey {
        case type
    }

    var id: Int
    var comment: String
    var targetObject: Decodable
    var commenter: UserEntity

    init(from decoder: Decoder) throws {
        let container = try decoder.container(keyedBy: CodingKeys.self)
        self.id = try container.decode(Int.self, forKey: .id)
        self.comment = try container.decode(String.self, forKey: .comment)
        self.commenter = try container.decode(UserEntity.self, forKey: .commenter)

        //
        let targetObjectContainer = try container.nestedContainer(keyedBy: PredictKey.self, forKey: .targetObject)
        let targetObjectType = try targetObjectContainer.decode(String.self, forKey: .type)
        if targetObjectType == "user" {
            self.targetObject = try container.decode(UserEntity.self, forKey: .targetObject)
        } else {
            self.targetObject = try container.decode(SongEntity.self, forKey: .targetObject)
        }
    }
}
原理差不多,但這邊先使用 nestedContainer 衝進去 targetObject 拿 type 出來判斷,再決定 targetObject 要解析成什麼類型。
要使用時再 Cast :
if let song = result.targetObject as? Song {
  print(song)
} else if let user = result.targetObject as? User {
  print(user)
}
場景2. 假設資料陣列欄位放多種類型的資料該如何 Decode?
{
  "results": [
    {
      "type": "song",
      "id": 99,
      "name": "披星戴月的想你"
    },
    {
      "type": "user",
      "id": 1,
      "name": "zhgchgli",
      "email": "[email protected]"
    }
  ]
}
struct ListEntity: Decodable {
    enum CodingKeys: String, CodingKey {
        case results
    }
    enum PredictKey: String, CodingKey {
        case type
    }

    var results:[Decodable]
    init(from decoder: Decoder) throws {
        let container = try decoder.container(keyedBy: CodingKeys.self)
        var nestedUnkeyedContainer = try container.nestedUnkeyedContainer(forKey: .results)

        self.results = []
        while !nestedUnkeyedContainer.isAtEnd {
            let type = try nestedUnkeyedContainer.nestedContainer(keyedBy: PredictKey.self).decode(String.self, forKey: .type)
            if type == "song" {
                results.append(try nestedUnkeyedContainer.decode(SongEntity.self))
            } else {
                results.append(try nestedUnkeyedContainer.decode(UserEntity.self))
            }
        }
    }
}
結合上述提到的 nestedUnkeyedContainer +場景1. 的解決方案即可;這邊也能改用 場景1. 的 a.解決方案 ,用 Associated Value Enum 存取值。
場景3. JSON String 欄位有給值時才 Decode
[
  {
    "type": "song",
    "id": 99,
    "name": "披星戴月的想你"
  },
    {
    "type": "song",
    "id": 11
  }
]
struct TargetEntity: Decodable {
    enum CodingKeys: String, CodingKey {
        case type
        case id
        case name
    }
    var type: String
    var id: Int
    var name: String

    init(from decoder: Decoder) throws {
        let container = try decoder.container(keyedBy: CodingKeys.self)
        self.id = try container.decode(Int.self, forKey: .id)
        self.type = try container.decode(String.self, forKey: .type)

        //方式 1:
        self.name = try container.decodeIfPresent(String.self, forKey: .name) ?? ""
        //或方式 2:
        self.name = (try? container.decode(String.self, forKey: .name)) ?? "" //not good
    }
}

let jsonString = "[ { \"type\": \"song\", \"id\": 99, \"name\": \"披星戴月的想你\" }, { \"type\": \"song\", \"id\": 11 } ]"
let jsonDecoder = JSONDecoder()
let result = try jsonDecoder.decode([TargetEntity].self, from: jsonString.data(using: .utf8)!)
使用 decodeIfPresent 進行 decode。
場景4. 陣列資料略過 Decode 失敗錯誤的資料
{
  "results": [
    {
      "type": "song",
      "id": 99,
      "name": "披星戴月的想你"
    },
    {
      "error": "errro"
    },
    {
      "type": "song",
      "id": 19,
      "name": "帶我去找夜生活"
    }
  ]
}
如前述,Decodable 預設是所有資料剖析都正確才能 Mapping 輸出;有時會遇到後端給的資料不穩定,給一長串 Array 但就有幾筆資料缺了欄位或欄位類型不符導致 Decode 失敗;造成整包全部失敗,直接 nil。
struct ResultsEntity: Decodable {
    enum CodingKeys: String, CodingKey {
        case results
    }
    var results: [SongEntity]

    init(from decoder: Decoder) throws {
        let container = try decoder.container(keyedBy: CodingKeys.self)
        var nestedUnkeyedContainer = try container.nestedUnkeyedContainer(forKey: .results)

        self.results = []
        while !nestedUnkeyedContainer.isAtEnd {
            if let song = try? nestedUnkeyedContainer.decode(SongEntity.self) {
                self.results.append(song)
            } else {
                let _ = try nestedUnkeyedContainer.decode(EmptyEntity.self)
            }
        }
    }
}

struct EmptyEntity: Decodable { }

struct SongEntity: Decodable {
    var type: String
    var id: Int
    var name: String
}

let jsonString = "{ \"results\": [ { \"type\": \"song\", \"id\": 99, \"name\": \"披星戴月的想你\" }, { \"error\": \"errro\" }, { \"type\": \"song\", \"id\": 19, \"name\": \"帶我去找夜生活\" } ] }"
let jsonDecoder = JSONDecoder()
let result = try jsonDecoder.decode(ResultsEntity.self, from: jsonString.data(using: .utf8)!)
print(result)
解決方式也類似 場景2.的解決方案 ; nestedUnkeyedContainer 遍歷每個內容,並進行 try? Decode,如果 Decode 失敗則使用 Empty Decode 讓 nestedUnkeyedContainer 的內部指針繼續執行。
*此方法有點 workaround,因我們無法對
nestedUnkeyedContainer命令跳過,且nestedUnkeyedContainer必須有成功 decode 才會繼續執行;所以才這樣做,看 swift 社群有人提增加 moveNext() ,但目前版本尚未實作。
場景5. 有的欄位是我程式內部要使用的,而非要 Decode
方式a. Entity/Model
這邊就要提一開始說的,我們拆分 Entity/Model 的功用了;Entity 單純負責 JSON String to Entity(Decodable) Mapping;Model initWith Entity,實際程式傳遞、操作、商業邏輯都是使用 Model。
struct SongEntity: Decodable {
    var type: String
    var id: Int
    var name: String
}

class SongModel: NSObject {
    init(_ entity: SongEntity) {
        self.type = entity.type
        self.id = entity.id
        self.name = entity.name
    }

    var type: String
    var id: Int
    var name: String

    var isSave:Bool = false //business logic
}
拆分 Entity/Model 的好處:
- 權責分明,Entity: JSON String to Decodable, Model: business logic
- 一目瞭然 mapping 了哪些欄位看 Entity 就知道
- 避免欄位一多全喇在一起
- Objective-C 也可用 (因 Model 只是 NSObject、struct/Decodable Objective-C 不可見)
- 內部要使用的商業邏輯、欄位放在 Model 即可
方式b. init 處理
列出 CodingKeys 並排除內部使用的欄位,init 時給預設值或欄位有給預設值或設為 Optional,但都不是好方法,只是可以 run 而已。
[2020/06/26 更新] — 下篇 場景6.API Response 使用 0/1 代表 Bool,該如何 Decode?
[2020/06/26 更新] — 下篇 場景7.不想要每每都要重寫 init decoder
[2020/06/26 更新] — 下篇 場景8.合理的處理 Response Null 欄位資料
綜合場景範例
綜合以上基本使用及進階使用的完整範例:
{
  "count": 5,
  "offset": 0,
  "limit": 10,
  "results": [
    {
      "id": 123456,
      "comment": "是告五人,不是五告人!",
      "target_object": {
        "type": "song",
        "id": 99,
        "name": "披星戴月的想你",
        "create_date": "2020-06-13T15:21:42+0800"
      },
      "commenter": {
        "type": "user",
        "id": 1,
        "name": "zhgchgli",
        "email": "[email protected]",
        "birthday": "1994/07/18"
      }
    },
    {
      "error": "not found"
    },
    {
      "error": "not found"
    },
    {
      "id": 2,
      "comment": "哈哈,我也是!",
      "target_object": {
        "type": "user",
        "id": 1,
        "name": "zhgchgli",
        "email": "[email protected]",
        "birthday": "1994/07/18"
      },
      "commenter": {
        "type": "user",
        "id": 1,
        "name": "路人甲",
        "email": "[email protected]",
        "birthday": "2000/01/12"
      }
    }
  ]
}
import Foundation
//

let jsonString = """
{
  "count": 3,
  "offset": 0,
  "limit": 10,
  "results": [
    {
      "id": 123456,
      "comment": "是告五人,不是五告人!",
      "target_object": {
        "type": "song",
        "id": 99,
        "name": "披星戴月的想你",
        "create_date": "2020-06-13T15:21:42+0800"
      },
      "commenter": {
        "type": "user",
        "id": 1,
        "name": "zhgchgli",
        "email": "[email protected]",
        "birthday": "1994/07/18"
      }
    },
    {
      "error": "not found"
    },
    {
      "error": "not found"
    },
    {
      "id": 2,
      "comment": "哈哈,我也是!",
      "target_object": {
        "type": "user",
        "id": 1,
        "name": "zhgchgli",
        "email": "[email protected]",
        "birthday": "1994/07/18"
      },
      "commenter": {
        "type": "user",
        "id": 1,
        "name": "路人甲",
        "email": "[email protected]",
        "birthday": "2000/01/12"
      }
    }
  ]
}
"""
//
// Entity:
struct SongEntity: Decodable {
    enum CodingKeys: String, CodingKey {
        case type
        case id
        case name
        case createDate = "create_date"
    }
    var type: String
    var id: Int
    var name: String
    var createDate: Date
}

struct UserEntity: Decodable {
    var type: String
    var id: Int
    var name: String
    var email: String
    var birthday: Date
}

struct CommentEntity: Decodable {
    enum CodingKeys: String, CodingKey {
        case id
        case comment
        case commenter
        case targetObject = "target_object"
    }
    enum PredictKey: String, CodingKey {
        case type
    }
    enum ObjectType: String, Decodable {
        case song
        case user
    }
    var id: Int
    var comment: String
    var commenter: UserEntity
    var targetObject: Decodable

    init(from decoder: Decoder) throws {
        let container = try decoder.container(keyedBy: CodingKeys.self)
        self.id = try container.decode(Int.self, forKey: .id)
        self.comment = try container.decode(String.self, forKey: .comment)
        self.commenter = try container.decode(UserEntity.self, forKey: .commenter)

        //targetObject cloud be UserEntity or SongEntity
        let targetObjectNestedContainer = try container.nestedContainer(keyedBy: PredictKey.self, forKey: .targetObject)
        let type = try targetObjectNestedContainer.decode(ObjectType.self, forKey: .type)
        switch type {
        case .song:
            self.targetObject = try container.decode(SongEntity.self, forKey: .targetObject)
        case .user:
            self.targetObject = try container.decode(UserEntity.self, forKey: .targetObject)
        }
    }
}

struct EmptyEntity: Decodable { }

struct PageEntity<E: Decodable>: Decodable {
    enum CodingKeys: String, CodingKey {
        case count
        case offset
        case limit
        case results
    }
    var count: Int
    var offset: Int
    var limit: Int
    var results: [E]

    init(from decoder: Decoder) throws {
        let container = try decoder.container(keyedBy: CodingKeys.self)
        self.count = try container.decode(Int.self, forKey: .count)
        self.offset = try container.decode(Int.self, forKey: .offset)
        self.limit = try container.decode(Int.self, forKey: .limit)

        var nestedUnkeyedContainer = try container.nestedUnkeyedContainer(forKey: .results)

        self.results = []
        while !nestedUnkeyedContainer.isAtEnd {
            if let entity = try? nestedUnkeyedContainer.decode(E.self) {
                self.results.append(entity)
            } else {
                let _ = try nestedUnkeyedContainer.decode(EmptyEntity.self)
            }
        }
    }
}

// Model:
class UserModel: NSObject {
    var type: String
    var id: Int
    var name: String
    var email: String
    var birthday: Date
    init(_ entity: UserEntity) {
        self.type = entity.type
        self.id = entity.id
        self.name = entity.name
        self.email = entity.email
        self.birthday = entity.birthday
    }
}

class SongModel: NSObject {
    var type: String
    var id: Int
    var name: String
    var createDate: Date
    init(_ entity: SongEntity) {
        self.type = entity.type
        self.id = entity.id
        self.name = entity.name
        self.createDate = entity.createDate
    }
}

class CommentModel: NSObject {
    var id: Int
    var comment: String
    var commenter: UserModel
    var targetObject: NSObject?

    var displayMessage: String //simulation business logic

    init(_ entity: CommentEntity) {
        self.id = entity.id
        self.comment = entity.comment
        self.commenter = UserModel(entity.commenter)
        if let userEntity = entity.targetObject as? UserEntity {
            self.targetObject = UserModel(userEntity)
        } else if let songEntity = entity.targetObject as? SongEntity {
            self.targetObject = SongModel(songEntity)
        }
        self.displayMessage = "\(entity.commenter.name):\(entity.comment)"
    }
}
//

let jsonDecoder = JSONDecoder()
let iso8601DateFormatter = ISO8601DateFormatter()
var dateFormatter = DateFormatter()

jsonDecoder.dateDecodingStrategy = .custom({ (decoder) -> Date in
    let container = try decoder.singleValueContainer()
    let dateString = try container.decode(String.self)

    //ISO8601:
    if let date = iso8601DateFormatter.date(from: dateString) {
        return date
    }

    //YYYY-MM-DD:
    dateFormatter.dateFormat = "yyyy/MM/dd"
    if let date = dateFormatter.date(from: dateString) {
        return date
    }

    throw DecodingError.dataCorruptedError(in: container, debugDescription: "Cannot decode date string \(dateString)")
})

do {
    let pageEntity = try jsonDecoder.decode(PageEntity<CommentEntity>.self, from: jsonString.data(using: .utf8)!)
    let comments = pageEntity.results.compactMap { CommentModel($0) }
    comments.forEach { (comment) in
        print(comment.displayMessage)
    }
} catch {
    print(error)
}
Output:
zhgchgli:是告五人,不是五告人!
路人甲:哈哈,我也是!
完整範例演示如上!
(下)篇&其他場景已更新:
總結
選擇使用 Codable 的好處,第一當然是因為原生,不用怕後續無人維護、還有寫起來漂亮;但相對的限制較嚴格、比較不能靈活解 JSON String,不然就是要如本文做更多的事去完成、還有效能其實不比使用其他 Mapping 套件優(Decodable 依然使用Objective 時代的 NSJSONSerialization 進行解析),但我想在後續的更新中或許蘋果會對此進行優化,那時我們也不必更動程式。
文中場景、範例或許有些很極端,但有時候遇到了也沒辦法;當然希望一般情況下單純的 Codable 就能滿足我們的需求;但有了以上招式之後應該沒有打不倒的問題了!
感謝 @saiday 大大技術支援。

留言 · Comments