Firebase Firestore|Functions 快速打造測試用 API 服務教學與推播統計實作
針對開發者面臨後端推播統計不準確與 Server 壓力問題,解析如何運用 Firebase Firestore 與 Functions 快速搭建可測試的 API 服務,並示範完整 RESTful API 範例及分散式計數器設計,提升推播點擊率統計精準度與系統穩定性。
基於 SEO 考量,本文標題與描述經 AI 調整,原始版本請參考內文。
文章目錄
使用 Firebase Firestore + Functions 快速搭建可供測試的 API 服務
當推播統計遇上 Firebase Firestore + Functions
Photo by Carlos Muza
前言
推播精確統計功能
最近想為 APP 導入的功能,未實作前我們只能從後端 Post 資料給 APNS/FCM 的成功與否當作推播基數並記錄推播點擊,計算出「點擊率」;但此方法其實非常不準確,基數包含許多無效裝置,APP 已刪除的(不一定會馬上失效)、關閉推播權限的在後端 Post 時都還是會得到成功的回傳。
在 iOS 10 之後可以透過實踐 Notification Service Extension 在推播橫幅出現時的時機點偷偷 Call API 回傳做統計;好處是非常精準,只有在使用者推播橫幅有出現才會 Call;如果 APP 刪除、關閉通知、通知沒開橫幅,都不會有動作,橫幅等於有出現推播訊息,用此當推播基數然後再算上點擊數就能得到「精確的點擊率」。
詳細原理及實作方式可參考之前的文章:「 i OS ≥ 10 Notification Service Extension 應用 (Swift) 」
目前測試下來 APP 的 Loss 率應該是 0%,實際常見應用像是 Line 的訊息點對點加解密(推播的訊息是加密過的,在手機收到才解密然後顯示出來)。
問題
APP 端的功其實不大,iOS/Android 都只要實作類似的功能(但 Android 如果要考慮中國市場就比較麻煩,要為更平台實作推播框架內容);比較大的功是後端還有 Server 的壓力處理,因為推播一次出去會同時 Call API 回傳紀錄,可能會塞爆 Server 的 max connection 如果又是使用 RDBMS 儲存記錄可能會更嚴重,如果發現統計數有 Loss 多半發生在此環節。
這邊可以以 log 寫檔案方式做紀錄,要查詢時在自行做統計顯示。
另外,後來想想一次出去同時回來的情境,數量可能沒有想像中的大;因為發推播也不會一口氣發個十萬百萬筆,也是幾筆幾筆批次發送;只要能扛住批次發出去同時回來的數量即可!
Prototype
因原先有問題中的考量,後端需要花功力研究修改且市場也不一定在意做出來的成效;所以想說先用能使用的資源弄個 Prototype 出來試試水溫。
這邊選擇的是 APP 幾乎都會使用的 Firebase 服務,其中的 Functions 和 Firestore 功能。
Firebase Functions
Functions 是 Google 提供的 serverless 服務,只需撰寫好程式邏輯,Google 自動幫你弄好伺服器、執行環境,也不用去管伺服器擴充及流量的問題。
Firebase Functions 其實就是 Google Cloud Functions 但只能使用 JavaScript (node.js) 撰寫,沒試過但如果用 Google Cloud Functions 選擇用其他語言撰寫然後同樣 import Firebase 服務我想應該也能用。
用在 API 就是我可以寫一個 node.js 檔案,得到一個實體 URL (ex: my-project.cloudfunctions.net/getUser),自行撰寫取得 Request 資訊和給予相應的 Response 邏輯。
之前寫過一篇關於 Google Functions 的文章「 使用 Python+Google Cloud Platform+Line Bot 自動執行例行瑣事 」
Firebase Functions 必須啟用 Blaze 專案(用多少、付多少)才能使用。
Firebase Firestore
Firebase Firestore ,NoSql 資料庫,用來存放、管理數據。
結合 Firebase Functions 可在 Request 時 import Firestore 進來操作資料庫,然後Response 給使用者,就能搭建簡單的 Restful API 服務!
動手實作開始!
安裝 node.js 環境
這邊建議使用 NVM,node.js 版本管理工具進行安裝管理(像 python 用 pyenv)。
到 NVM Github 專案複製安裝 shell script:
1
curl -o- https://raw.githubusercontent.com/nvm-sh/nvm/v0.37.2/install.sh | bash
如果安裝過程出現錯誤,請確認有 ~/.bashrc 或 ~/.zshrc 檔案,沒有可用 touch ~/.bashrc 或 touch ~/.zshrc 建立檔案然後再跑一下 install script。
再來就可以使用 nvm install node 安裝最新版的 node.js。
可下 npm --version 確認 npm 安裝成功、安裝版本:
部署 Firebase Functions
安裝 Firebase-tools:
1
npm install -g firebase-tools
安裝成功後,第一次使用請先輸入:
1
firebase login
完成 Firebase 登入驗證。
啟動專案:
1
firebase init
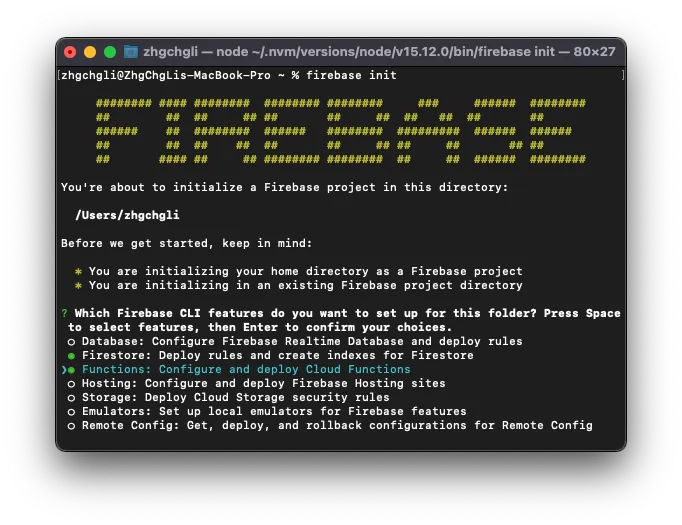
記下 Firebase init 所在路徑:
1
You're about to initialize a Firebase project in this directory:
這邊可以選擇要安裝的 Firebase CLI 工具,按 「↑」「↓」進行選擇,「空白鍵」進行選擇;這邊可以只選擇「Functions」或連「Firestore」一起選擇安裝。
=== Functions Setup
- 語言選擇「 JavaScript 」
- 關於「use ESLint to catch probable bugs and enforce style」語法 style 檢查 , YES / NO 都可 。
- install dependencies with npm? YES
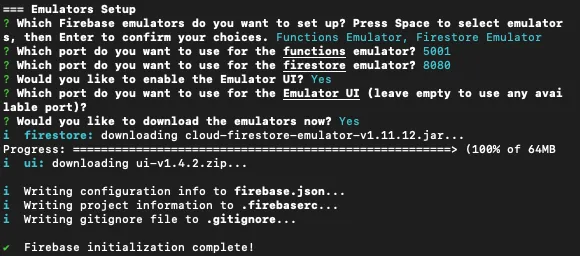
===Emulators Setup
可在本地環境測試 Functions、Firestore 功能及設定,不會算在使用度且不需等到部署上線才能測試。
依個人需求安裝,我有裝但沒有用...因為只是小功能而已。
Coding!
前往上述記下的路徑,找到 functions 資料夾 ,用編輯器打開裡面的 index.js 檔案。
index.js:
1
2
3
4
5
6
7
8
9
10
11
12
const functions = require('firebase-functions');
const admin = require('firebase-admin');
admin.initializeApp();

exports.hello = functions.https.onRequest((req, res) => {
    const targetID = req.query.targetID
    const action = req.body.action
    const name = req.body.name

    res.send({"targetID": targetID, "action": action, "name": name});
    return
})
貼上以上內容,我們定義了一個路徑接口 /hello 然後會回傳 URL Query ?targetID= 、 POST action 、 name 參數資訊。
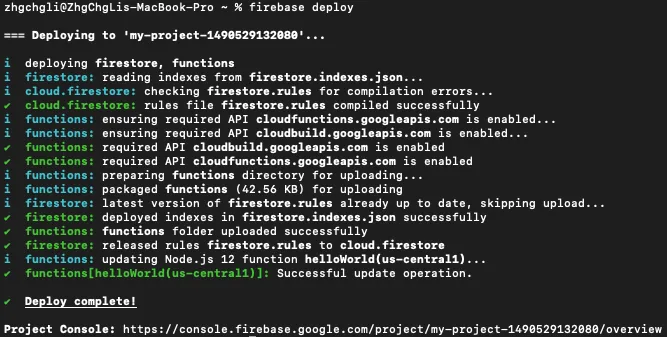
修改&儲存完成後回到 console 下:
1
firebase deploy
以後的每次修改都記得要回來下
firebase deploy指令,才會生效。
開始驗證&部署到 Firebase…
可能需要稍等一下, Deploy complete! 後你的第一個 Request & Response 網頁就完成了!
這時候可以回到 Firebase -> Functions 頁面:
就會看到剛剛撰寫的接口和網址位置。
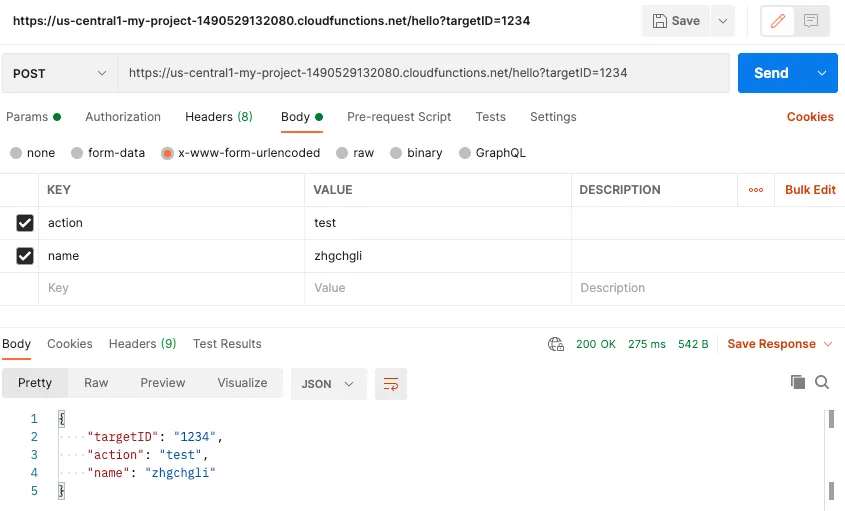
複製下方網址貼到 PostMan 測試:
POST Body 記得選擇
x-www-form-urlencoded。
成功!
Log
我們可以在程式碼中使用:
1
functions.logger.log("log:", value);
進行 Log 紀錄。
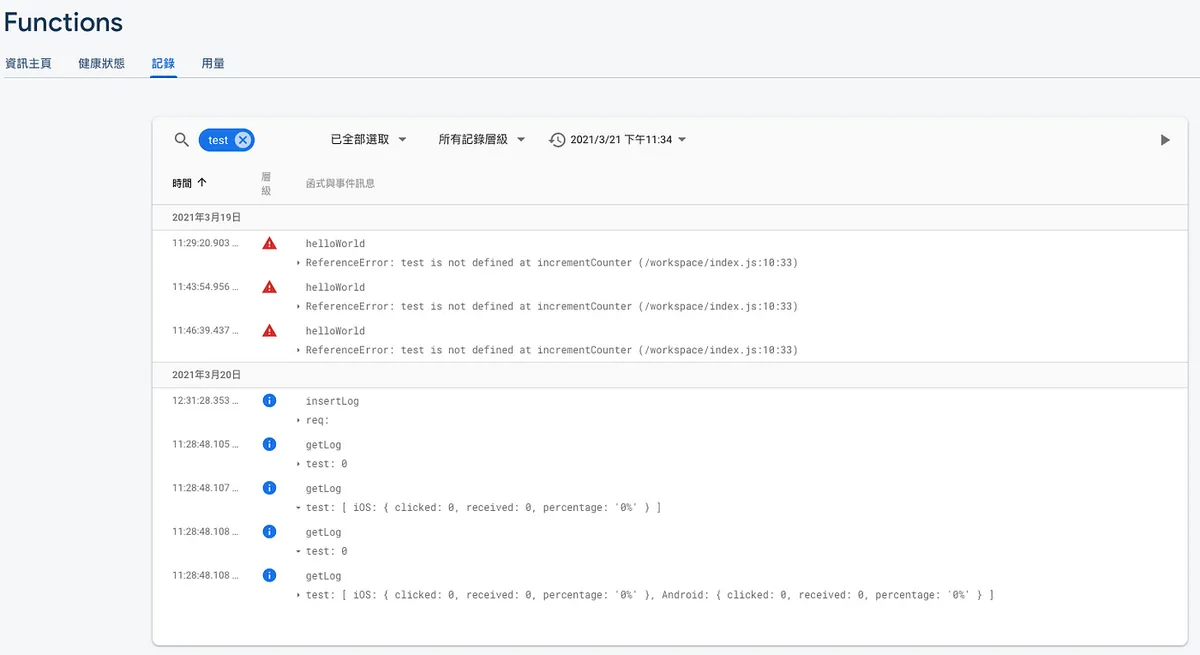
並可在 Firebase -> Functions -> 紀錄中查看 log 結果:
Example Goal
建立一個可新增、修改、刪除、查詢文章和按讚的 API
我們希望能達成 Restful API 的功能設計,所以不能再使用上面範例的純 Path 方式,要改藉用 Express 框架達成。
POST 新增文章
index.js:
1
2
3
4
5
6
7
8
9
10
11
12
13
14
15
16
17
18
19
20
21
22
23
24
25
const functions = require('firebase-functions');
const admin = require('firebase-admin');
const express = require('express');
const cors = require('cors');
const app = express();

admin.initializeApp();
app.use(cors({ origin: true }));

// Insert
app.post('/', async (req, res) => { // 這邊的 POST 指的是 HTTP Method POST
    const title = req.body.title;
    const content = req.body.content;
    const author = req.body.author;

    if (title == null || content == null || author == null) {
        return res.status(400).send({"message":"參數錯誤!"});
    }

    var post = {"title":title, "content":content, "author": author, "created_at": new Date()};
    await admin.firestore().collection('posts').add(post);
    res.status(201).send({"message":"新增成功!"});
});

exports.post= functions.https.onRequest(app); // 這邊的 POST 指的是 /post 路徑
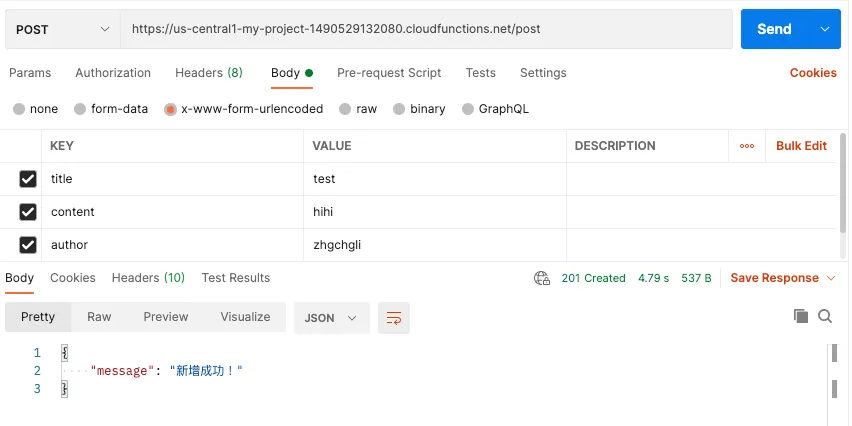
現在我們改用 Express 來處理網路請求,這邊先新增一個 路徑 / 的 POST 方法,最後一行表示路徑都在 /post 之下,再來我們會加上修改、刪除的 API。
下 firebase deploy 部署成功後,回到 Post Man 測試:
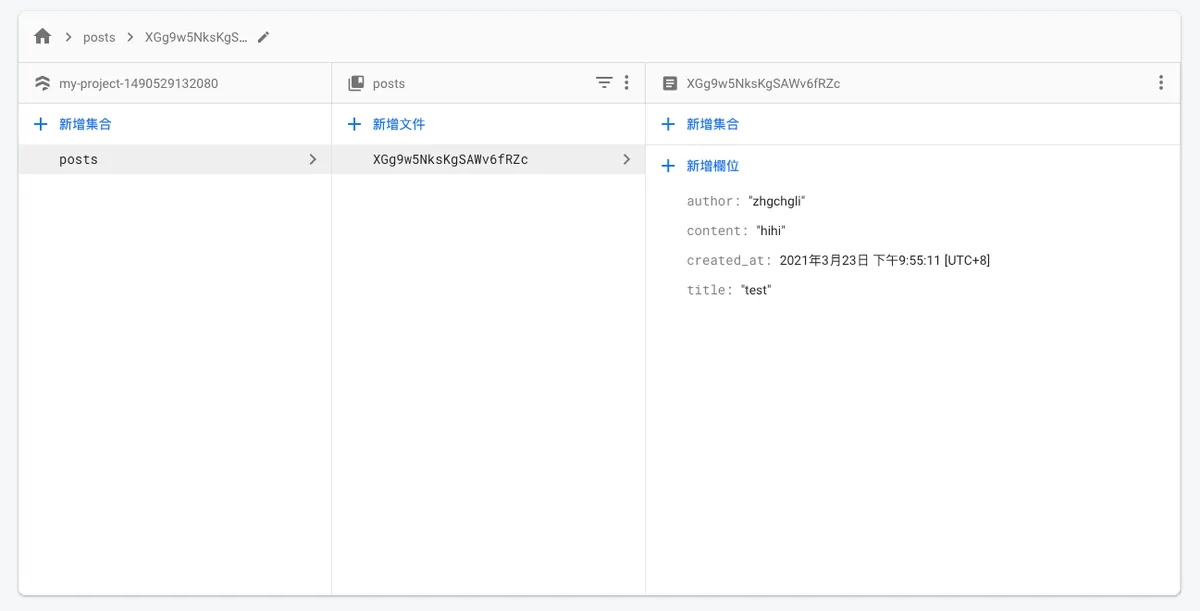
Post Man 打成功後可以再到 Firebase -> Firestore 檢查一下資料是否有正確寫入:
PUT 修改文章
index.js:
1
2
3
4
5
6
7
8
9
10
11
12
13
14
15
16
17
18
19
20
21
22
23
24
25
26
27
28
const functions = require('firebase-functions');
const admin = require('firebase-admin');
const express = require('express');
const cors = require('cors');
const app = express();

admin.initializeApp();
app.use(cors({ origin: true }));

// Update
app.put("/:id", async (req, res) => {
    const title = req.body.title;
    const content = req.body.content;
    const author = req.body.author;
    const doc = await admin.firestore().collection('posts').doc(req.params.id).get();

    if (!doc.exists) {
        return res.status(404).send({"message":"找不到文章!"});
    } else if (title == null || content == null || author == null) {
        return res.status(400).send({"message":"參數錯誤!"});
    }

    var post = {"title":title, "content":content, "author": author};
    await admin.firestore().collection('posts').doc(req.params.id).update(post);
    res.status(200).send({"message":"修改成功!"});
});

exports.post= functions.https.onRequest(app);
部署&測試方式如新增,Post Man Http Method 記得改成 PUT 。
DELETE 刪除文章
index.js:
1
2
3
4
5
6
7
8
9
10
11
12
13
14
15
16
17
18
19
20
21
22
const functions = require('firebase-functions');
const admin = require('firebase-admin');
const express = require('express');
const cors = require('cors');
const app = express();

admin.initializeApp();
app.use(cors({ origin: true }));

// Delete
app.delete("/:id", async (req, res) => {
    const doc = await admin.firestore().collection('posts').doc(req.params.id).get();

    if (!doc.exists) {
        return res.status(404).send({"message":"找不到文章!"});
    }

    await admin.firestore().collection("posts").doc(req.params.id).delete();
    res.status(200).send({"message":"文章成功!"});
})

exports.post= functions.https.onRequest(app);
部署&測試方式如新增,Post Man Http Method 記得改成 DELETE 。
新增、修改、刪除做完了,來做查詢!
SELECT 查詢文章
index.js:
1
2
3
4
5
6
7
8
9
10
11
12
13
14
15
16
17
18
19
20
21
22
23
24
25
26
27
28
29
30
31
32
33
const functions = require('firebase-functions');
const admin = require('firebase-admin');
const express = require('express');
const cors = require('cors');
const app = express();

admin.initializeApp();
app.use(cors({ origin: true }));

// Select List
app.get('/', async (req, res) => {
    const posts = await admin.firestore().collection('posts').get();
    var result = [];
    posts.forEach(doc => {
      let id = doc.id;
      let data = doc.data();
      result.push({"id":id, ...data})
    });
    res.status(200).send({"result":result});
});

// Select One
app.get("/:id", async (req, res) => {
    const doc = await admin.firestore().collection('posts').doc(req.params.id).get();

    if (!doc.exists) {
        return res.status(404).send({"message":"找不到文章!"});
    }

    res.status(200).send({"result":{"id":doc.id, ...doc.data()}});
});

exports.post= functions.https.onRequest(app);
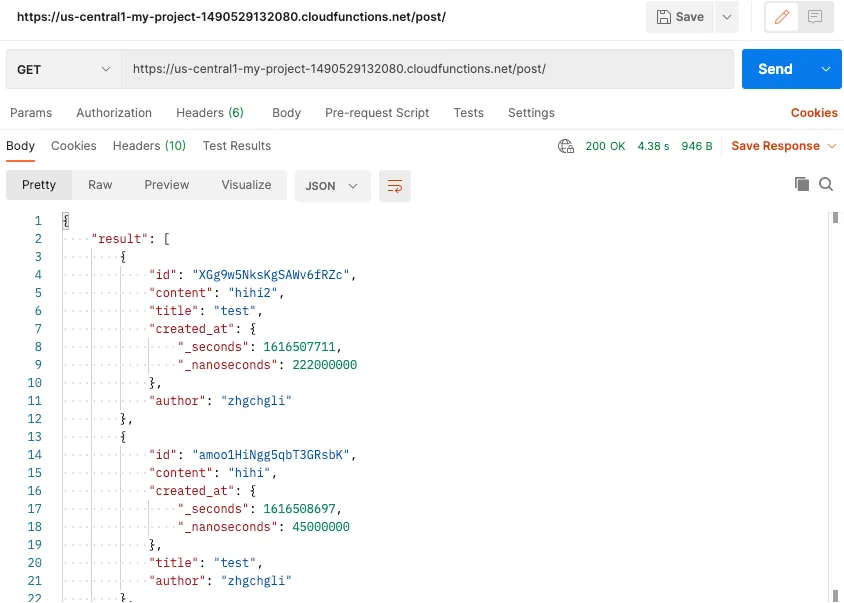
部署&測試方式如新增,Post Man Http Method 記得改成 GET 還有將 Body 切回 none 。
InsertOrUpdate?
有時候我們需要當值存在時做更新,當值不存在時新增,這時候可以用 set 搭配 merge: true :
index.js:
1
2
3
4
5
6
7
8
9
10
11
12
13
14
15
16
17
18
19
20
21
22
23
const functions = require('firebase-functions');
const admin = require('firebase-admin');
const express = require('express');
const cors = require('cors');
const app = express();

admin.initializeApp();
app.use(cors({ origin: true }));

// InsertOrUpdate
app.post("/tag", async (req, res) => {
    const name = req.body.name;

    if (name == null) {
        return res.status(400).send({"message":"參數錯誤!"});
    }

    var tag = {"name":name};
    await admin.firestore().collection('tags').doc(name).set({created_at: new Date()}, {merge: true});
    res.status(201).send({"message":"新增成功!"});
});

exports.post= functions.https.onRequest(app);
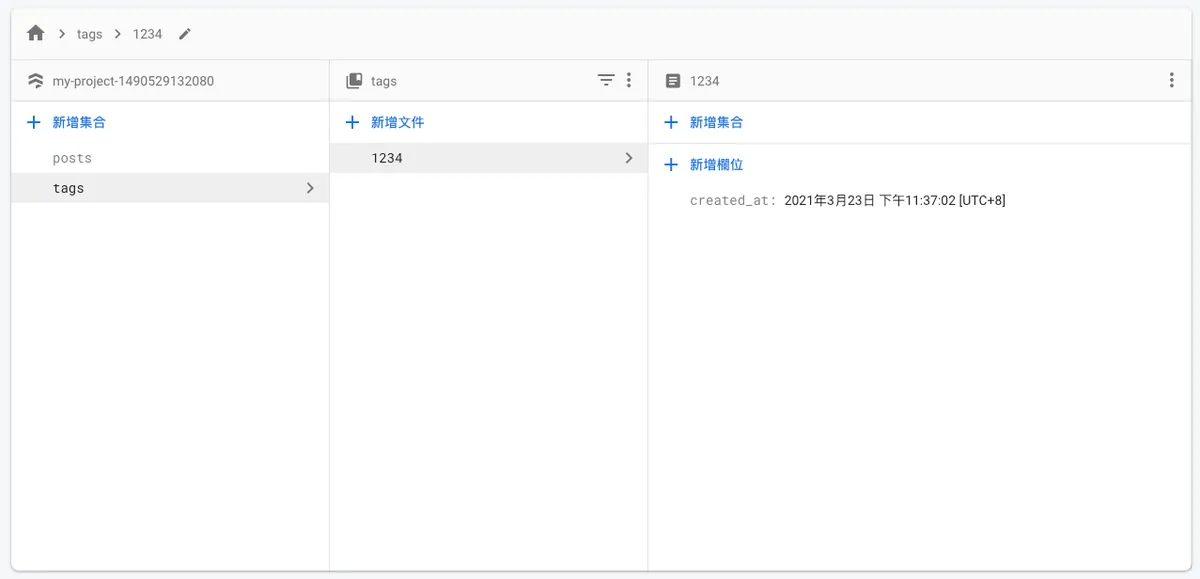
這邊以新增 tag 為例,部署&測試方式如新增,可以看到 Firestore 不會一直重複新增新資料。
文章按讚計數器
假設我們的文章資料現在多一個 likeCount 欄位紀錄按讚數量,那我們該怎麼做呢?
index.js:
1
2
3
4
5
6
7
8
9
10
11
12
13
14
15
16
17
18
19
20
21
22
23
const functions = require('firebase-functions');
const admin = require('firebase-admin');
const express = require('express');
const cors = require('cors');
const app = express();

admin.initializeApp();
app.use(cors({ origin: true }));

// Like Post
app.post("/like/:id", async (req, res) => {
    const doc = await admin.firestore().collection('posts').doc(req.params.id).get();
    const increment = admin.firestore.FieldValue.increment(1)

    if (!doc.exists) {
        return res.status(404).send({"message":"找不到文章!"});
    }

    await admin.firestore().collection('posts').doc(req.params.id).set({likeCount: increment}, {merge: true});
    res.status(201).send({"message":"按讚成功!"});
});

exports.post= functions.https.onRequest(app);
運用 increment 這個變數就能直接做到取出值 +1 的動作。
大流量文章按讚計數器
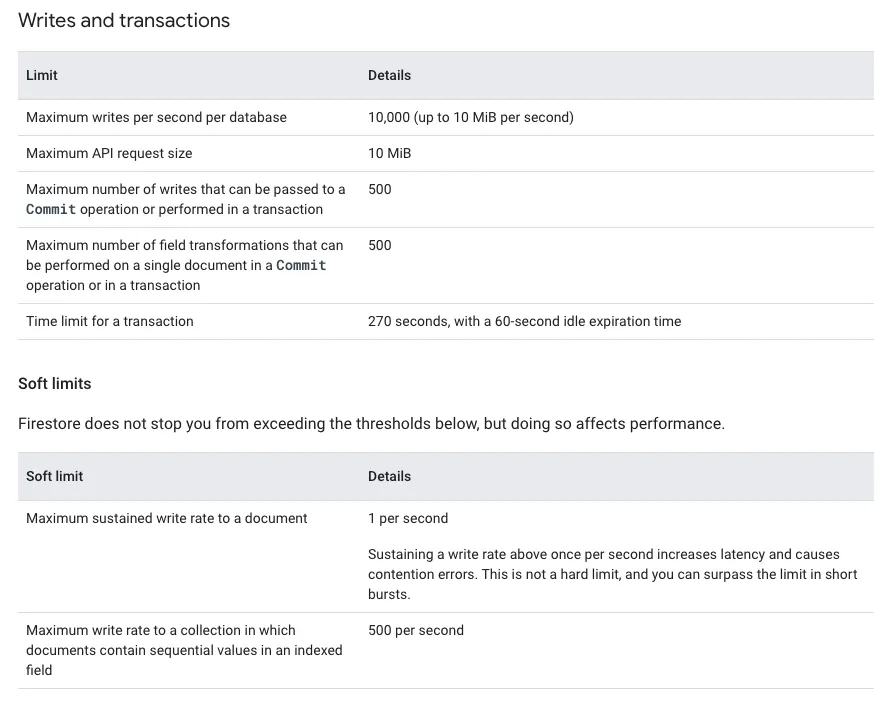
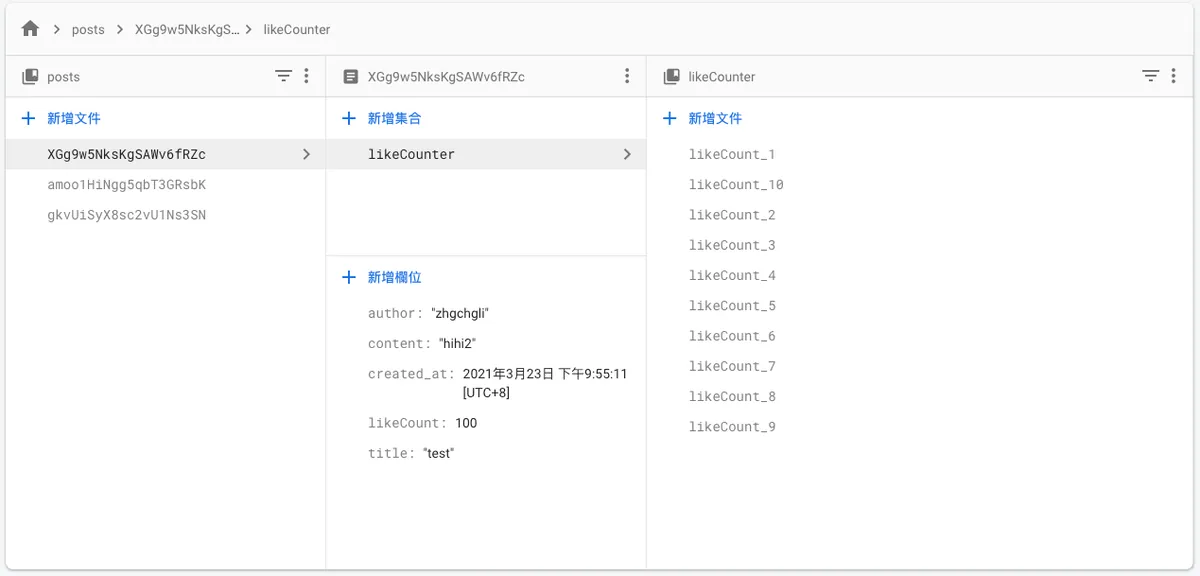
因為 Firestore 有 寫入速度限制 的:
一個文檔一秒只能寫入一次 ,所以當按讚的人一多;同時請求下可能會變得很慢。
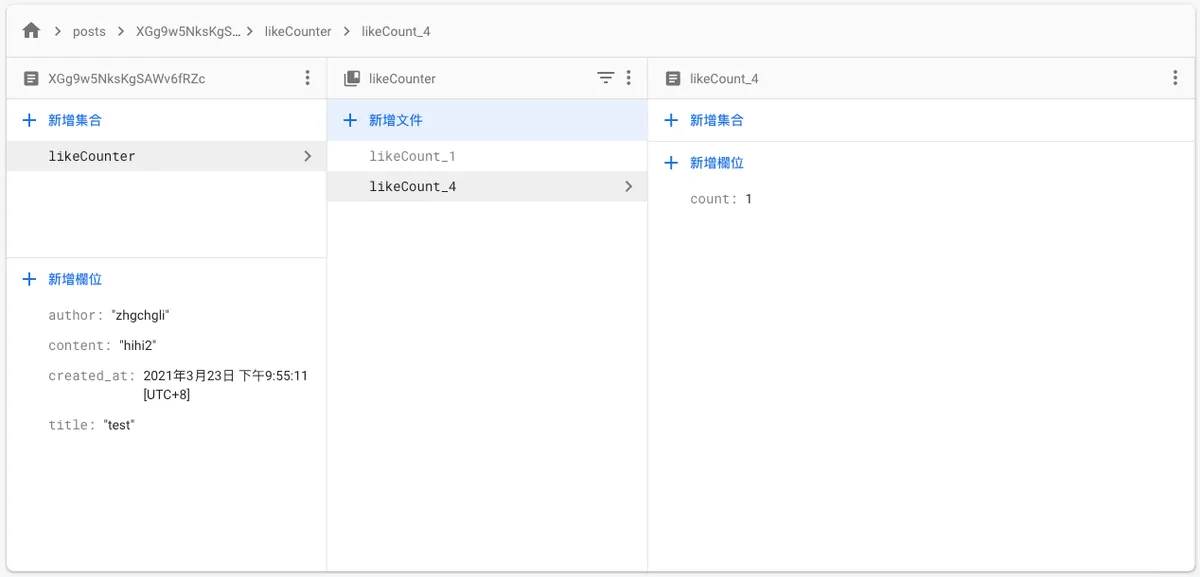
官方給的解決方法「 Distributed counters 」其實也沒什麼高深的技術,就是多用幾個分散的 likeCount 欄位來統計,然後讀取的時候再加總起來。
index.js:
1
2
3
4
5
6
7
8
9
10
11
12
13
14
15
16
17
18
19
20
21
22
23
24
25
26
const functions = require('firebase-functions');
const admin = require('firebase-admin');
const express = require('express');
const cors = require('cors');
const app = express();

admin.initializeApp();
app.use(cors({ origin: true }));

// Distributed counters Like Post
app.post("/like2/:id", async (req, res) => {
    const doc = await admin.firestore().collection('posts').doc(req.params.id).get();
    const increment = admin.firestore.FieldValue.increment(1)

    if (!doc.exists) {
        return res.status(404).send({"message":"找不到文章!"});
    }

    //1~10
    await admin.firestore().collection('posts').doc(req.params.id).collection("likeCounter").doc("likeCount_"+(Math.floor(Math.random()*10)+1).toString())
    .set({count: increment}, {merge: true});
    res.status(201).send({"message":"按讚成功!"});
});


exports.post= functions.https.onRequest(app);
以上就是分散出欄位來紀錄 Count 避免寫入太慢;但如果分散的欄位太多會增加讀取成本($$),但應該還是比每次按讚都 add 一筆新紀錄還便宜。
使用 Siege 工具進行壓力測試
使用 brew 安裝 siege
1
brew install siege
p.s 如果你出現 brew: command not found 請先安裝 brew 套件管理工具 :
1
/usr/bin/ruby -e "$(curl -fsSL https://raw.githubusercontent.com/Homebrew/install/master/install)"
安裝完成後可下:
1
siege -c 100 -r 1 -H 'Content-Type: application/json' 'https://us-central1-project.cloudfunctions.net/post/like/id POST {}'
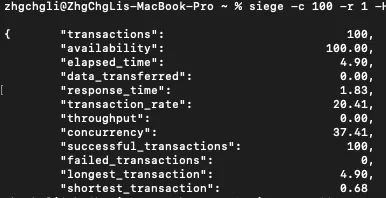
進行壓力測試:
-c 100:100 個任務同步執行-r 1:每個任務執行 1 次請求-H ‘Content-Type: application/json’:如果是 POST 時需加上‘https://us-central1-project.cloudfunctions.net/post/like/id POST {}’:POST 網址、Post Body (ex:{“name”:”1234”})
執行完成後可看到執行結果:
successful_transactions: 100 表示 100 次都執行成功。
可以回 Firebase -> Firestore 查看結果是否有 Loss Data:
成功!
完整 Example Code
index.js:
1
2
3
4
5
6
7
8
9
10
11
12
13
14
15
16
17
18
19
20
21
22
23
24
25
26
27
28
29
30
31
32
33
34
35
36
37
38
39
40
41
42
43
44
45
46
47
48
49
50
51
52
53
54
55
56
57
58
59
60
61
62
63
64
65
66
67
68
69
70
71
72
73
74
75
76
77
78
79
80
81
82
83
84
85
86
87
88
89
90
91
92
93
94
95
96
97
98
99
100
101
102
103
104
105
106
107
108
109
110
111
112
113
114
115
116
117
118
119
120
const functions = require('firebase-functions');
const admin = require('firebase-admin');
const express = require('express');
const cors = require('cors');
const app = express();

admin.initializeApp();
app.use(cors({ origin: true }));

// Insert
app.post('/', async (req, res) => {
    const title = req.body.title;
    const content = req.body.content;
    const author = req.body.author;

    if (title == null || content == null || author == null) {
        return res.status(400).send({"message":"參數錯誤!"});
    }

    var post = {"title":title, "content":content, "author": author, "created_at": new Date()};
    await admin.firestore().collection('posts').add(post);
    res.status(201).send({"message":"新增成功!"});
});

// Update
app.put("/:id", async (req, res) => {
    const title = req.body.title;
    const content = req.body.content;
    const author = req.body.author;
    const doc = await admin.firestore().collection('posts').doc(req.params.id).get();

    if (!doc.exists) {
        return res.status(404).send({"message":"找不到文章!"});
    } else if (title == null || content == null || author == null) {
        return res.status(400).send({"message":"參數錯誤!"});
    }

    var post = {"title":title, "content":content, "author": author};
    await admin.firestore().collection('posts').doc(req.params.id).update(post);
    res.status(200).send({"message":"修改成功!"});
});

// Delete
app.delete("/:id", async (req, res) => {
    const doc = await admin.firestore().collection('posts').doc(req.params.id).get();

    if (!doc.exists) {
        return res.status(404).send({"message":"找不到文章!"});
    }

    await admin.firestore().collection("posts").doc(req.params.id).delete();
    res.status(200).send({"message":"文章成功!"});
});

// Select List
app.get('/', async (req, res) => {
    const posts = await admin.firestore().collection('posts').get();
    var result = [];
    posts.forEach(doc => {
      let id = doc.id;
      let data = doc.data();
      result.push({"id":id, ...data})
    });
    res.status(200).send({"result":result});
});

// Select One
app.get("/:id", async (req, res) => {
    const doc = await admin.firestore().collection('posts').doc(req.params.id).get();

    if (!doc.exists) {
        return res.status(404).send({"message":"找不到文章!"});
    }

    res.status(200).send({"result":{"id":doc.id, ...doc.data()}});
});

// InsertOrUpdate
app.post("/tag", async (req, res) => {
    const name = req.body.name;

    if (name == null) {
        return res.status(400).send({"message":"參數錯誤!"});
    }

    var tag = {"name":name};
    await admin.firestore().collection('tags').doc(name).set({created_at: new Date()}, {merge: true});
    res.status(201).send({"message":"新增成功!"});
});

// Like Post
app.post("/like/:id", async (req, res) => {
    const doc = await admin.firestore().collection('posts').doc(req.params.id).get();
    const increment = admin.firestore.FieldValue.increment(1)

    if (!doc.exists) {
        return res.status(404).send({"message":"找不到文章!"});
    }

    await admin.firestore().collection('posts').doc(req.params.id).set({likeCount: increment}, {merge: true});
    res.status(201).send({"message":"按讚成功!"});
});

// Distributed counters Like Post
app.post("/like2/:id", async (req, res) => {
    const doc = await admin.firestore().collection('posts').doc(req.params.id).get();
    const increment = admin.firestore.FieldValue.increment(1)

    if (!doc.exists) {
        return res.status(404).send({"message":"找不到文章!"});
    }

    //1~10
    await admin.firestore().collection('posts').doc(req.params.id).collection("likeCounter").doc("likeCount_"+(Math.floor(Math.random()*10)+1).toString())
    .set({count: increment}, {merge: true});
    res.status(201).send({"message":"按讚成功!"});
});


exports.post= functions.https.onRequest(app);
回歸主題,推播統計
回到一開始我們想做的,推播統計功能。
index.js:
1
2
3
4
5
6
7
8
9
10
11
12
13
14
15
16
17
18
19
20
21
22
23
24
25
26
27
28
29
30
31
32
33
34
35
36
37
38
39
40
41
42
43
44
45
46
47
48
const functions = require('firebase-functions');
const admin = require('firebase-admin');
const express = require('express');
const cors = require('cors');
const app = express();

admin.initializeApp();
app.use(cors({ origin: true }));

const vaildPlatformTypes = ["iOS","Android"]
const vaildActionTypes = ["clicked","received"]

// Insert Log
app.post('/', async (req, res) => {
    const increment = admin.firestore.FieldValue.increment(1);
    const platformType = req.body.platformType;
    const pushID = req.body.pushID;
    const actionType =  req.body.actionType;

    if (!vaildPlatformTypes.includes(platformType) || pushID == undefined || !vaildActionTypes.includes(actionType)) {
        return res.status(400).send({"message":"參數錯誤!"});
    } else {
        await admin.firestore().collection(platformType).doc(actionType+"_"+pushID).collection("shards").doc((Math.floor(Math.random()*10)+1).toString())
        .set({count: increment}, {merge: true})
        res.status(201).send({"message":"紀錄成功!"});
    }
});

// View Log
app.get('/:type/:id', async (req, res) => {
    // received
    const receivedDocs = await admin.firestore().collection(req.params.type).doc("received_"+req.params.id).collection("shards").get();
    var received = 0;
    receivedDocs.forEach(doc => {
      received += doc.data().count;
    });

    // clicked
    const clickedDocs = await admin.firestore().collection(req.params.type).doc("clicked_"+req.params.id).collection("shards").get();
    var clicked = 0;
    clickedDocs.forEach(doc => {
        clicked += doc.data().count;
    });

    res.status(200).send({"received":received,"clicked":clicked});
});

exports.notification = functions.https.onRequest(app);
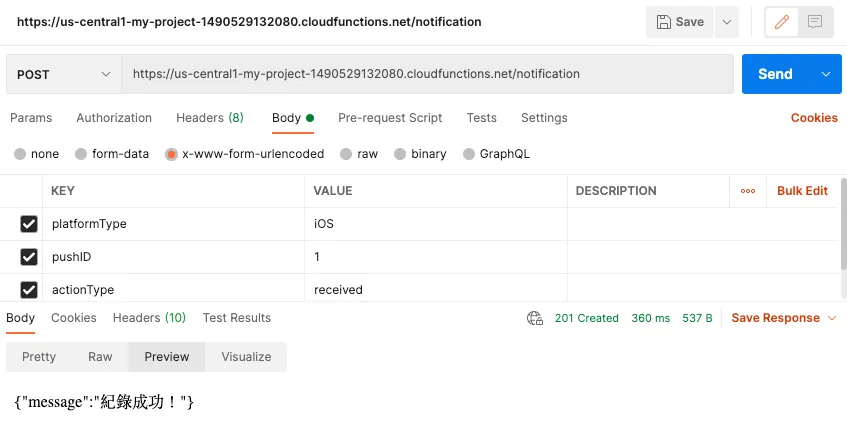
新增推播紀錄
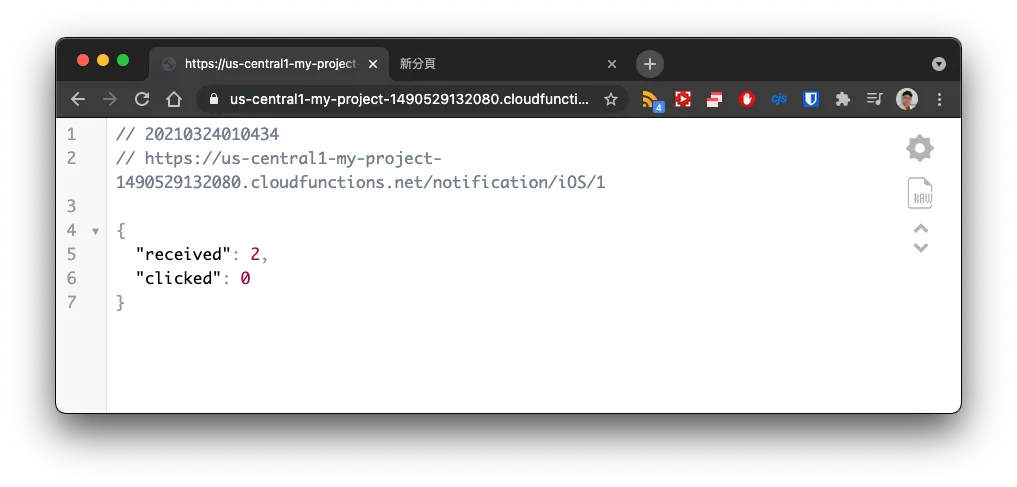
檢視推播統計數字
1
https://us-centra1-xxx.cloudfunctions.net/notification/iOS/1
另外也做了個介面統計推播數字。
踩坑
因為對 node.js 用法不太熟悉,一開始摸索的時候在 add 資料時沒加上
await再加上寫入速度限制,導致在大流量情況下會 Data Loss…
Pricing
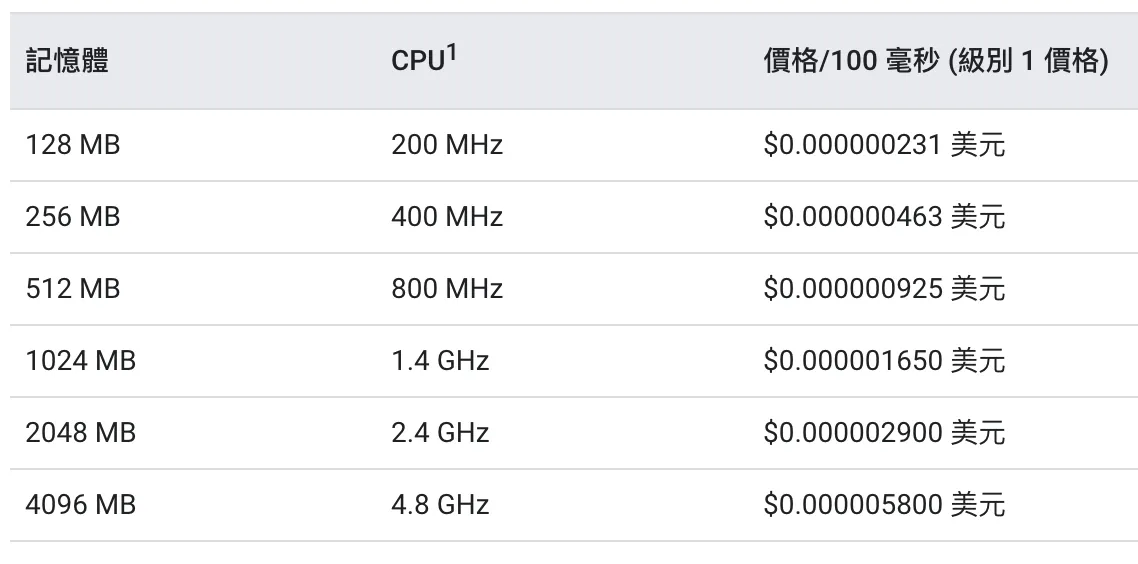
別忘了參考 Firebase Functions & Firestore 的定價策略。
Functions
運算時間
網路
Cloud Functions 針對運算時間資源提供永久免費方案,當中包含 GB/秒和 GHz/秒的運算時間。除了 200 萬次叫用以外,免費方案也提供 400,000 GB/秒和 200,000 GHz/秒的運算時間,以及每月 5 GB 的網際網路輸出流量。
Firestore
價格可能隨時更改,請以官網最新資訊為準。
結論
如同標題所寫「可供測試」、「可供測試」、「可供測試」不太建議將以上服務用於正式環境,甚至當作產品的核心上線。
收費貴、難遷移
之前曾聽說某個蠻大的服務就是使用 Firebase 服務搭建起家,結果後期資料、流量大,收費爆貴;要轉移也很困難,程式還好但資料非常難搬;只能說是初期省了小錢卻造成後期巨大的虧損,不值得。
僅供測試
因為以上原因,使用 Firebase Functions + Firestore 搭建的 API 服務個人建議僅供測試或是 Prototype 產品展示。
更多功能
Functions 還可以串 Authentication(身份驗證)、Storage(檔案上傳),但這部分我就沒研究了。
參考資料
- https://firebase.google.com/docs/firestore/query-data/queries
- https://coder.tw/?p=7198
- https://firebase.google.com/docs/firestore/solutions/counters#node.js_1
- https://javascript.plainenglish.io/firebase-cloud-functions-tutorial-creating-a-rest-api-8cbc51479f80
延伸閱讀
- 使用 Python+Google Cloud Platform+Line Bot 自動執行例行瑣事
- i OS ≥ 10 Notification Service Extension 應用 (Swift)
- 運用 Google Apps Script 轉發 Gmail 信件到 Slack
有任何問題及指教歡迎 與我聯絡 。
本文首次發表於 Medium (點此查看原始版本),由 ZMediumToMarkdown 提供自動轉換與同步技術。

