GitHub Actions iOS CI/CD|完整實作自動化建置、測試與部署流程教學
針對iOS開發者打造的GitHub Actions CI/CD流程,解決手動建置與測試繁瑣問題,結合Fastlane與Firebase實現自動化打包與部署,提升團隊開發效率與產品品質。
基於 SEO 考量,本文標題與描述經 AI 調整,原始版本請參考內文。
文章目錄
CI/CD 實戰指南(三):使用 GitHub Actions 實作 App iOS CI 與 CD 工作流程
iOS App 自動化建置、測試、部署的 GitHub Actions 實作步驟完整教學
{:target="_blank"}](/assets/4b001d2e8440/1*0LK6m6CTImL6rcsrliiOQA.webp)
Photo by Robs
前言
前篇「 CI/CD 實戰指南(二):GitHub Actions 與 Self-hosted Runner 使用與建置大全 」我們介紹了 GitHub Actions 的基礎知識與運作流程還有如何使用自己的機器當成 Runner、帶大家實現了三個簡單的自動化 Actions; 本篇將深入著重在現實使用 GitHub Actions 建置 App (iOS) CI/CD 工作流程上 ,一樣手把手帶大家一步一步完成並一邊補足 GitHub Actions 相關知識。
App CI/CD 流程關係圖
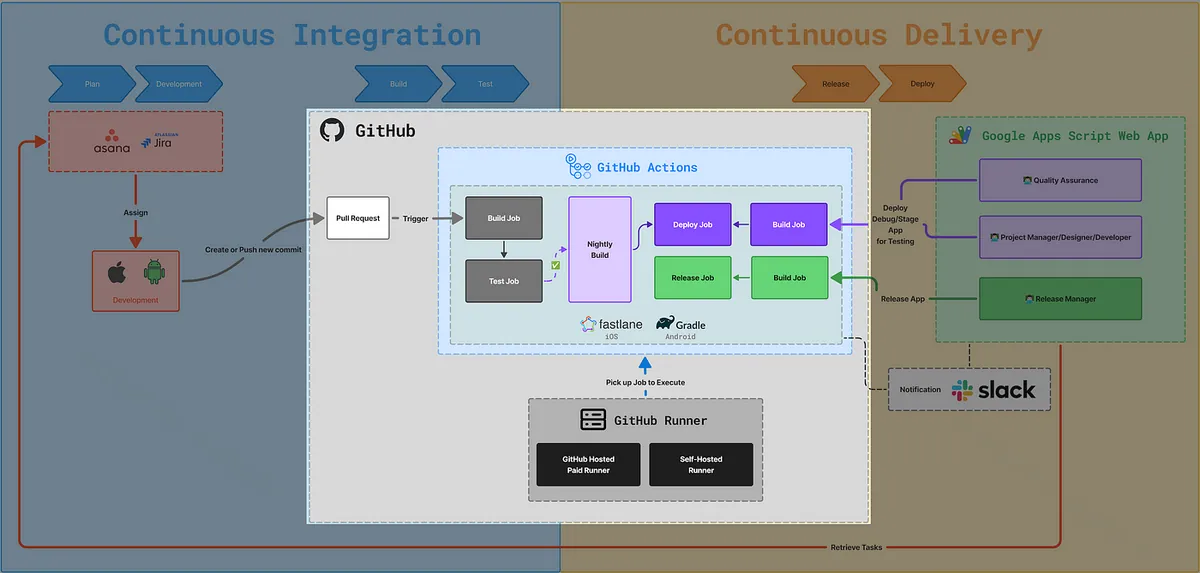
本篇將關注在 GitHub Actions 建置 CI/CD 的區塊,下一篇「 CI/CD 實戰指南(四):使用 Google Apps Script Web App 串接 GitHub Actions 建置免費易用的打包工具平台 」才會介紹右半部分的使用 Google Apps Script Web App 建置跨團隊協作打包平台。
運作流程:
- GitHub Actions 開 Pull Request 觸發 or 表單觸發 or 定時觸發
- 執行對應 Workflow Jobs/Steps
- Step 執行對應 Fastlane (iOS) or (Android Gradle) 腳本
- Fastlane 執行對應 xcodebuild (iOS) 指令
- 取得執行結果
- 後續 Workflow Jobs/Steps 處理結果
- 完成
GitHub Actions 成果圖
先上最終成果給大家一點實作動力!
{:target="_blank"}](/assets/4b001d2e8440/1*5gnQYdVAOtGR-bMK4ZrOhA.webp)
{:target="_blank"}](/assets/4b001d2e8440/1*t9PrQfcTANyvG7gfXXC-bw.webp)
GitHub Actions x Self-hosted Runner 基礎知識
如果你對 GitHub Actions 與架設 Self-hosted Runner 還不熟悉強烈建議先看過上篇「 CI/CD 實戰指南(二):GitHub Actions 與 Self-hosted Runner 使用與建置大全 」或是搭配上篇知識一起實作。
實作開始!
iOS Demo 專案的 Infra 架構
本文用到的 iOS 專案內容包含測試項目都是用 AI 產生的 ,不需在意 iOS 的程式細節,只針對 Infra & CI/CD 部分做討論。
Mint
Mint 工具可以幫我們統一管理依賴工具的版本(Gemfile 只能管理 Ruby Gems),例如 XCodeGen、XCodeGen、SwiftFormat、SwiftLint、Periphery
…etc
Mintfile:
1
2
3
yonaskolb/[email protected]
yonaskolb/[email protected]
nicklockwood/[email protected]
這邊我們只用到三個。
覺得太複雜不使用也可以,直接在 Action Workflow Step 中用 brew install 安裝需要的工具即可。
Bundle
Gemfile:
1
2
3
4
5
6
source 'https://rubygems.org'
gem 'cocoapods', '~>1.16.0'
gem 'fastlane', '~>2.228.0'

plugins_path = File.join(File.dirname(__FILE__), 'Product', 'fastlane', 'Pluginfile')
eval_gemfile(plugins_path) if File.exist?(plugins_path)
管理 Ruby (Gems) 相關依賴,一般 iOS 專案最常用的就是這兩個 cocoapods 跟 fastlane 。
Cocoapods
Product/podfile:
1
2
3
4
5
6
platform :ios, '13.0'
use_frameworks!

target 'app-ci-cd-github-actions-demo' do
  pod 'SnapKit'
end
雖然已宣告 即將停止維護 ,但 Cocoapods 在有年代的 iOS 專案中仍很常見,這邊簡單加一個 Snapkit 當 Demo。
XCodeGen
避免多人開發中 .xcodeproj / .xcworkspace 異動造成的衝突,統一使用 Project.yaml 定義 XCode Project 內容,然後在本地自己 Gen Project 檔案(不上 Git)。
Product/project.yaml:
1
2
3
4
5
6
7
8
9
10
11
12
13
14
15
16
17
18
19
20
21
22
23
24
25
26
27
28
29
30
31
32
33
34
35
36
37
38
39
40
41
42
43
44
45
46
47
48
49
50
51
52
53
54
55
56
57
58
59
60
61
62
63
64
65
66
67
68
69
70
71
72
73
74
75
76
77
78
name: app-ci-cd-github-actions-demo
options:
  bundleIdPrefix: com.example
  deploymentTarget:
    iOS: '13.0'
  usesTabs: false
  indentWidth: 2
  tabWidth: 2

configs:
  Debug: debug
  Release: release

targets:
  app-ci-cd-github-actions-demo:
    type: application
    platform: iOS
    sources:
      - app-ci-cd-github-actions-demo
    resources:
      - app-ci-cd-github-actions-demo/Assets.xcassets
      - app-ci-cd-github-actions-demo/Base.lproj
    info:
      path: app-ci-cd-github-actions-demo/Info.plist
      properties:
        CFBundleIdentifier: $(PRODUCT_BUNDLE_IDENTIFIER)
    settings:
      base:
        PRODUCT_BUNDLE_IDENTIFIER: com.test.appcicdgithubactionsdemo
    cocoapods: true

  app-ci-cd-github-actions-demoTests:
    type: bundle.unit-test
    platform: iOS
    sources:
      - app-ci-cd-github-actions-demoTests
    dependencies:
      - target: app-ci-cd-github-actions-demo
    info:
      path: app-ci-cd-github-actions-demoTests/Info.plist
    settings:
      base:
        PRODUCT_BUNDLE_IDENTIFIER: com.test.appcicdgithubactionsdemo.tests

  app-ci-cd-github-actions-demoUITests:
    type: bundle.ui-testing
    platform: iOS
    sources:
      - app-ci-cd-github-actions-demoUITests
    dependencies:
      - target: app-ci-cd-github-actions-demo
    info:
      path: app-ci-cd-github-actions-demoUITests/Info.plist
    settings:
      base:
        PRODUCT_BUNDLE_IDENTIFIER: com.test.appcicdgithubactionsdemo.uitests

  app-ci-cd-github-actions-demoSnapshotTests:
    type: bundle.unit-test
    platform: iOS
    sources:
      - path: app-ci-cd-github-actions-demoSnapshotTests
        excludes:
          - "**/__Snapshots__/**"
    dependencies:
      - target: app-ci-cd-github-actions-demo
      - product: SnapshotTesting
        package: SnapshotTesting
    info:
      path: app-ci-cd-github-actions-demoSnapshotTests/Info.plist
      settings:
        base:
          PRODUCT_BUNDLE_IDENTIFIER: com.test.appcicdgithubactionsdemo.snapshottests

packages:
  SnapshotTesting:
    url: https://github.com/pointfreeco/swift-snapshot-testing
    from: 1.18.4
SnapshotTesting: 使用 Swift Package Manager 管理。
Fastlane
封裝 xcodebuild 指令、封裝串接 App Store Connect API、Firebase API. .等服務的複雜步驟。
Product/fastlane/Fastfile:
1
2
3
4
5
6
7
8
9
10
11
12
13
14
15
16
17
18
19
20
21
22
23
24
25
26
27
28
29
30
31
32
33
34
35
36
37
38
39
40
41
42
43
44
45
46
47
48
49
50
51
52
53
54
55
56
57
58
59
60
61
62
63
64
65
66
67
68
69
70
71
default_platform(:ios)
platform :ios do
desc "Run all tests (Unit Tests + UI Tests)"
lane :run_all_tests do |options|
device = options[:device]
scan(
scheme: "app-ci-cd-github-actions-demo",
device: device,
clean: true,
output_directory: "fastlane/test_output",
output_types: "junit"
)
end
desc "Run only Unit Tests"
lane :run_unit_tests do |options|
device = options[:device]
scan(
scheme: "app-ci-cd-github-actions-demo",
device: device,
clean: true,
only_testing: [
"app-ci-cd-github-actions-demoTests"
],
output_directory: "fastlane/test_output",
output_types: "junit"
)
end
desc "Build and upload to Firebase App Distribution"
lane :beta do |options|
if options[:version_number] && options[:version_number].to_s.strip != ""
increment_version_number(version_number: options[:version_number])
end
if options[:build_number] && options[:build_number].to_s.strip != ""
increment_build_number(build_number: options[:build_number])
end
update_code_signing_settings(
use_automatic_signing: false,
path: "app-ci-cd-github-actions-demo.xcodeproj",
team_id: ENV['TEAM_ID'],
code_sign_identity: "iPhone Developer",
sdk: "iphoneos*",
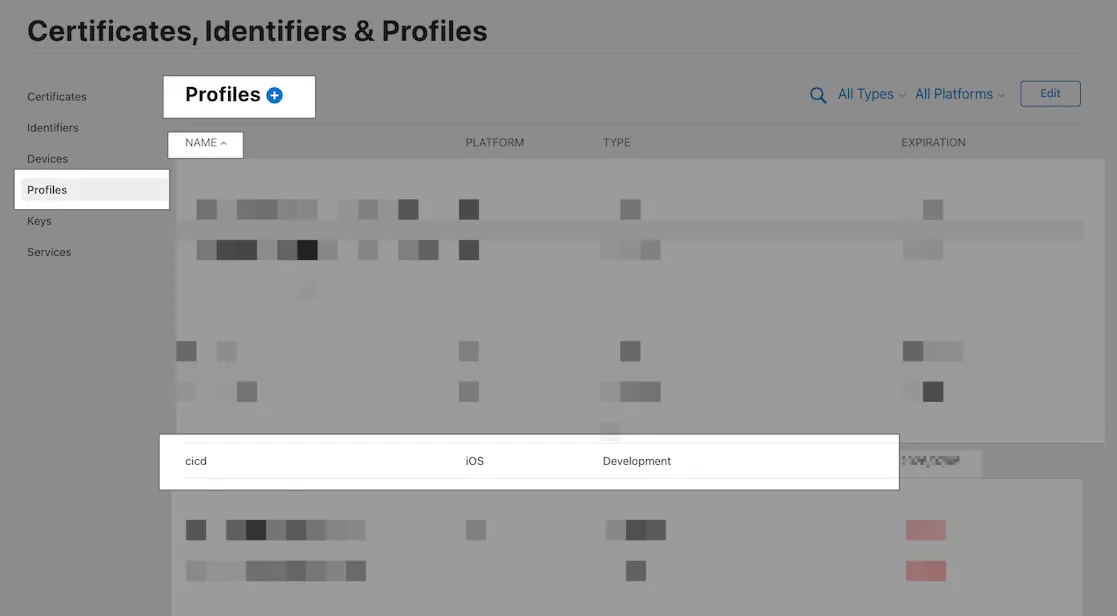
profile_name: "cicd"
)
gym(
scheme: "app-ci-cd-github-actions-demo",
clean: true,
export_method: "development",
output_directory: "fastlane/build",
output_name: "app-ci-cd-github-actions-demo.ipa",
export_options: {
provisioningProfiles: {
"com.test.appcicdgithubactionsdemo" => "cicd",
},
}
)
firebase_app_distribution(
app: "1:127683058219:ios:98896929fa131c7a80686e",
firebase_cli_token: ENV["FIREBASE_CLI_TOKEN"],
release_notes: options[:release_notes] || "New beta build"
)
end
end
註: provisioningProfiles、profile_name 對應的是 App Developer 中的 Profiles 憑證名稱 。(如果有用 match 則也不需要這些指定。)
Fastlane 是 iOS CI/CD 當中不可或缺的一部分 ,直接使用它封裝好的方法就能快速開發 CI/CD 實際執行的步驟;我們只需關注在整體的腳本設計,而不需去處理複雜的 API 串接或指令撰寫。
例如:Fastlane 只需要寫「scan(xxx)」就能執行測試,如果要寫成 xcodebuild 則需要「 xcodebuild -workspace ./xxx.xcworkspace -scheme xxx -derivedDataPath xxx ‘platform=iOS Simulator,id=xxx’ clean build test 」,打包部署要自己做更是麻煩,要自行串接 App Store Connect/Firebase API,光金鑰驗證都要寫超過 10 行程式了。
Demo 專案我們只有三個 Lane:
- run_all_tests: 跑所有類型的測試 (Snapshot+Unit)
- run_unit_tests: 只跑單元測試 (Unit)
- beta: 打包部署到 Firebase App Distribution
Fastlane — Match
因 Demo 專案限制,這邊沒用到 Match 管理團隊開發、部署憑證,但這邊還是要提一下,建議使用 Match 去管理團隊的所有開發、部署憑證,方便控管跟統一更新。
有用 Match 就能在專案 Setup 步驟直接使用
match all之類的指令一鍵安裝好所有開發需要的憑證。
- Fastlane Match 會使用另一個 Private Repo 管理憑證金鑰,在 GitHub Actions 中需要設定好 SSH Agent 才能 Clone 另一個 Private Repo。 (請參考文末補充)
[2026/02 Update] 延伸閱讀 — 補充 iOS 憑證、Fastlane Match、CI/CD 使用細節:
— — —
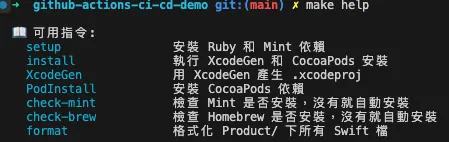
Makefile
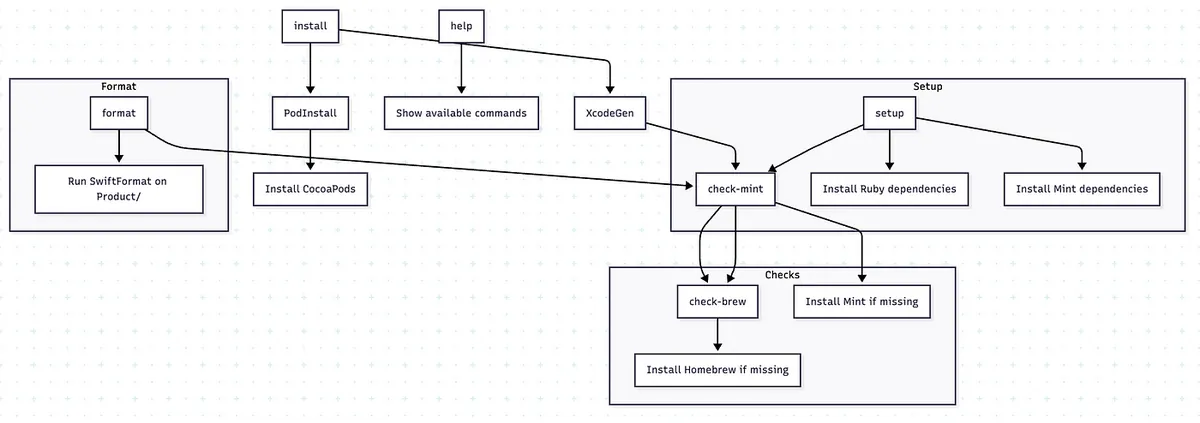
Makefile
讓開發端與 CI/CD 統一都使用 Makefile 執行指令,方便我們封裝同樣的環境、路徑與操作行爲。
經典的案例是有的人使用的是本機安裝的
pod install有的人則使用的是 Bundel 管理的bundle exec pod install如果版本不同就可能產生差異。
覺得太複雜不使用也可以,那就是在 Action Workflow Step 中直接寫要執行的指令即可。
Makefile:
1
2
3
4
5
6
7
8
9
10
11
12
13
14
15
16
17
18
19
20
21
22
23
24
25
26
27
28
29
30
31
32
33
34
35
36
37
38
39
40
41
42
43
44
45
46
47
48
49
50
51
52
53
54
55
56
57
58
59
60
#!make
PRODUCT_FOLDER = ./Product/
SHELL         := /bin/zsh
.DEFAULT_GOAL := install
MINT_DIRECTORY := ./mint/

export MINT_PATH=$(MINT_DIRECTORY)

## 👇 Help function
.PHONY: help
help:
 @echo ""
 @echo "📖 可用指令:"
 @grep -E '^[a-zA-Z_-]+:.*?## .*$$' $(MAKEFILE_LIST) | \
  awk 'BEGIN {FS = ":.*?## "}; {printf "  \033[36m%-20s\033[0m %s\n", $$1, $$2}'
 @echo ""

## Setup
.PHONY: setup
setup: check-mint ## 安裝 Ruby 和 Mint 依賴
 @echo "🔨 Installing Ruby dependencies..."
 bundle config set path 'vendor/bundle'
 bundle install
 @echo "🔨 Installing Mint dependencies..."
 mint bootstrap

## Install
.PHONY: install
install: XcodeGen PodInstall ## 執行 XcodeGen 和 CocoaPods 安裝

.PHONY: XcodeGen
XcodeGen: check-mint ## 用 XcodeGen 產生 .xcodeproj
 @echo "🔨 Execute XcodeGen"
 cd $(PRODUCT_FOLDER) && \
 mint run yonaskolb/XcodeGen --quiet

.PHONY: PodInstall
PodInstall: ## 安裝 CocoaPods 依賴
 @echo "📦 Installing CocoaPods dependencies..."
 cd $(PRODUCT_FOLDER) && \
 bundle exec pod install

### Mint
check-mint: check-brew ## 檢查 Mint 是否安裝,沒有就自動安裝
 @if ! command -v mint &> /dev/null; then \
  echo "🔨 Installing mint..."; \
  brew install mint; \
 fi

### Brew
check-brew: ## 檢查 Homebrew 是否安裝,沒有就自動安裝
 @if ! command -v brew &> /dev/null; then \
  echo "🔨 Installing Homebrew..."; \
  /bin/bash -c "$$(curl -fsSL https://raw.githubusercontent.com/Homebrew/install/HEAD/install.sh)"; \
 fi

## Format only git swift files
.PHONY: format
format: check-mint ## 格式化 Product/ 下所有 Swift 檔
 mint run swiftformat $(PRODUCT_FOLDER)
為了避免污染整個系統或其他專案,我們盡可能把 Dependency 套件(e.g. mint, bundle…etc)的路徑都改指定在專案目錄之下 (再搭配 .gitignore 排除)。
1
2
3
4
5
6
7
8
9
10
11
12
13
├── mint (Mint 依賴)
│   └── packages
├── Product
│   ├── app-ci-cd-github-actions-demo
│   ├── app-ci-cd-github-actions-demo.xcodeproj
│   ├── app-ci-cd-github-actions-demo.xcworkspace
│   ├── app-ci-cd-github-actions-demoSnapshotTests
│   ├── app-ci-cd-github-actions-demoTests
│   ├── app-ci-cd-github-actions-demoUITests
│   ├── fastlane
│   └── Pods (Cocoapods 依賴)
└── vendor (Bundle 依賴)
    └── bundle
make help
使用 Makefine 的統一專案 Setup 步驟:
git clone repocd ./repomake setup安裝必要的工具依賴 ( brew , mint , bundle , xcodegen, swiftformat,…)make install產生專案 (執行 pod install, xcodegen)- 完成
- 打開、執行專案
不管是 CI/CD 或新人 onboard 都是照以上步驟把專案建置起來。
本篇 GitHub Actions CI/CD 案例
本篇會介紹三個 GitHub Actions CI/CD 工作流程建置案例,大家也可以參考其中的步驟建置符合自己團隊工作流程的 CI/CD。
- CI — 發 Pull Request 執行單元測試
- CD — 打包+部署到 Firebase App Distribution
- CI +CD— Nightly Build 執行快照+單元測試+打包+部署到 Firebase App Distribution
因 Demo 限制,本文只會串接 打包部署到 Firebase App Distribution,打包到 Testflight 或是 App Store 也是同樣步驟只差別在 Fastlane 裡的腳本不同,大家可以自行發揮。
CI — 發 Pull Request 執行單元測試
流程
Develop 分支 無法直接推送 ,必須發 Pull Request 才能更新;所有 Pull Request 均需 Review 通過加上單元測試通過才能 Merge 、有新 Commit Push 會重新測試。
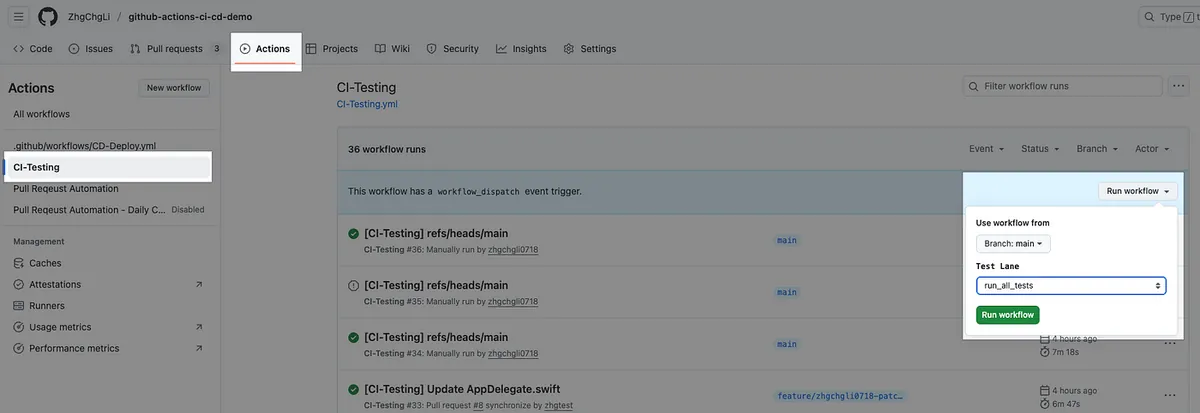
CI-Testing.yml
Repo → Actions → New workflow → set up a workflow yourself。
1
2
3
4
5
6
7
8
9
10
11
12
13
14
15
16
17
18
19
20
21
22
23
24
25
26
27
28
29
30
31
32
33
34
35
36
37
38
39
40
41
42
43
44
45
46
47
48
49
50
51
52
53
54
55
56
57
58
59
60
61
62
63
64
65
66
67
68
69
70
71
72
73
74
75
76
77
78
79
80
81
82
83
84
85
86
87
88
89
90
91
92
93
94
95
96
97
98
99
100
101
102
103
104
105
106
107
108
109
110
111
112
113
114
115
116
117
118
119
120
121
122
123
124
125
126
127
128
129
130
131
132
133
134
135
136
137
138
139
140
141
142
143
144
145
146
147
148
149
150
151
152
153
154
155
156
157
158
159
160
161
162
163
164
165
166
167
168
169
170
171
172
173
174
175
176
177
178
179
180
181
182
183
184
185
186
187
188
189
190
191
192
193
194
195
196
197
198
199
200
201
202
203
204
205
206
207
208
209
210
211
212
213
214
215
216
217
218
219
220
221
222
223
224
225
226
227
228
229
230
231
232
233
234
235
236
237
238
239
240
241
242
243
244
245
246
247
248
249
250
251
252
253
254
255
256
257
258
259
260
261
262
263
264
265
266
267
268
269
270
271
272
273
274
275
276
277
278
279
280
281
282
283
284
285
286
287
288
289
290
291
292
293
294
295
296
297
298
299
300
301
# Workflow(Action) 名稱
name: CI-Testing
# Actions Log 的標題名稱
run-name: "[CI-Testing] ${{ github.event.pull_request.title || github.ref }}"
# 同個 Concurrency Group 如果有新的 Job 會取消正在跑的
# 例如 Push Commit 觸發的任務還沒執行就又 Push Commit 時,會取消前一個任務
concurrency:
group: ${{ github.workflow }}-${{ github.event_name }}-${{ github.event.pull_request.number || github.ref }}
cancel-in-progress: true
# 觸發事件
on:
# PR 事件
pull_request:
# PR - 開啟、重開、有新 Push Commit 時
types: [opened, synchronize, reopened]
# 手動表單觸發
workflow_dispatch:
# 表單 Inputs 欄位
inputs:
# 執行的 Test Fastlane Lane
TEST_LANE:
description: 'Test Lane'
default: 'run_unit_tests'
type: choice
options:
- run_unit_tests
- run_all_tests
# 其他 Workflow 呼叫此 Workflow 觸發
# Nightly Build 會呼叫使用
workflow_call:
# 表單 Inputs 欄位
inputs:
# 執行的 Test Fastlane Lane
TEST_LANE:
description: 'Test Lane'
default: 'run_unit_tests'
# workflow_call inputs 不支援 choice
type: string
BRANCH:
description: 'Branch'
type: string
# Job 工作項目
# Job 會並發執行
jobs:
# Job ID
testing:
# Job 名稱 (可省略,有設定在 Log 顯示比較好讀)
name: Testing
# Runner Label - 使用 GitHub Hosted Runner macos-15 來執行工作
# 請注意:因為此專案是 Public Repo 可以無限免費使用
# 請注意:因為此專案是 Public Repo 可以無限免費使用
# 請注意:因為此專案是 Public Repo 可以無限免費使用
# 如果是 Private Repo 需要按計量收費,macOS 機器是最貴的(10倍),可能跑 10 次就達到 2,000 分鐘免費上限
# 建議使用 self-hosted Runner
runs-on: macos-15
# 設定最長 Timeout 時間,防止異常情況發生時無止盡的等待
timeout-minutes: 30
# use zsh
# 可省略,只是我習慣用 zsh,預設是 bash
defaults:
run:
shell: zsh {0}
# 工作步驟
# 工作步驟會照順序執行
steps:
# git clone 當前專案 & checkout 到執行的分支
- name: Checkout repository
uses: actions/checkout@v3
with:
# Git Large File Storage,我們的測試環境用不到
# default: false
lfs: false
# 如果有指定則 Checkout 指定分支,沒有則使用預設(當前分支)
# 因 on: schedule 事件只能在 main 主分支執行,因此想做 Nightly Build 之類的工作就需要指定分支
# e.g. on: schedule -> main 分支,Nightly Build master 分支
ref: ${{ github.event.inputs.BRANCH || '' }}
# ========== Env Setup Steps ==========
# 讀取專案指定的 XCode 版本
# 在後續之中,我們自己手動指定使用的 XCode_x.x.x.app
# 而不使用 xcversion,因為 xcversion 已經 sunset 不穩定。
- name: Read .xcode-version
id: read_xcode_version
run: |
XCODE_VERSION=$(cat .xcode-version)
echo "XCODE_VERSION: ${XCODE_VERSION}"
echo "xcode_version=${XCODE_VERSION}" >> $GITHUB_OUTPUT
# 也可以直接在這指定全域 XCode 版本,這樣就不用在後續步驟指定 DEVELOPER_DIR
# 但此指令需要 sudoer 權限,如果是 self-hosted runner 就要確定 runner 執行環境有 sudo 權限
# sudo xcode-select -s "/Applications/Xcode_${XCODE_VERSION}.app/Contents/Developer"
# 讀取專案指定的 Ruby 版本
- name: Read .ruby-version
id: read_ruby_version
run: |
RUBY_VERSION=$(cat .ruby-version)
echo "RUBY_VERSION: ${RUBY_VERSION}"
echo "ruby_version=${RUBY_VERSION}" >> $GITHUB_OUTPUT
# 安裝或設定 Runner Ruby 版本成專案指定版本
- name: Set up Ruby
uses: ruby/setup-ruby@v1
with:
ruby-version: "${{ steps.read_ruby_version.outputs.ruby_version }}"
# 可設可不設,原因是之前在 self-hosted 起多個 runner 跑 CI/CD 因為 cocoapods repos 是共用目錄
# 解決的問題是:有很小的機率會出現在同時 pod install 時拉 cocoapods repos 出現衝突(因為預設都是用) $HOME/.cocoapods/
# GitHub Hosted Runner 則不需此設定
# - name: Change Cocoapods Repos Folder
# if: contains(runner.labels, 'self-hosted')
# run: |
# # 每個 Runner 用自己的 .cocoapods 資料夾,防止資源衝突
# mkdir -p "$HOME/.cocoapods-${{ env.RUNNER_NAME }}/"
# export CP_HOME_DIR="$HOME/.cocoapods-${{ env.RUNNER_NAME }}"
# rm -f "$HOME/.cocoapods-${{ env.RUNNER_NAME }}/repos/cocoapods/.git/index.lock"
# ========== Cache Setting Steps ==========
# 請注意,就算是 self-hosted,Cache 目前也是 Cloud Cache 會計算用量
# 規則:7 天未 hit 自動刪除、單個 Cache 上限 10 GB、Action 成功才會 Cache
# Public Repo: 免費無限制
# Private Repo: 5 GB 起
# Self-hosted 可以自己用 shell script 撰寫 Cache & Restore 策略或使用其他工具協助
# Bundle Cache (Gemfile)
# 對應 Makefile 中我們指定了 Bundle 安裝路徑 ./vendor 下
- name: Cache Bundle
uses: actions/cache@v3
with:
path: |
./vendor
key: ${{ runner.os }}-bundle-${{ hashFiles('Gemfile.lock') }}
restore-keys: |
${{ runner.os }}-bundle-
# CocoaPods Cache (Podfile)
# 默認就是 專案/Pods 下
- name: Cache CocoaPods
uses: actions/cache@v3
with:
path: |
./Product/Pods
key: ${{ runner.os }}-cocoapods-${{ hashFiles('Product/Podfile.lock') }}
restore-keys: |
${{ runner.os }}-cocoapods-
# Mint cache
# 對應 Makefile 中我們指定的 Mint 安裝路徑 ./mint 下
- name: Cache Mint
uses: actions/cache@v3
with:
path: ./mint
key: ${{ runner.os }}-mint-${{ hashFiles('Mintfile') }}
restore-keys: |
${{ runner.os }}-mint-
# ====================
# 專案 Setup & 依賴安裝
- name: Setup & Install Dependency
run: |
# 執行 Makefile 中封裝的 Setup 指令,對應成指令大概是:
# brew install mint
# bundle config set path 'vendor/bundle'
# bundle install
# mint bootstrap
# ...
# 等等 setup 指令
make setup
# 執行 Makefile 中封裝的 Install 指令,對應成指令大概是:
# mint run yonaskolb/XcodeGen --quiet
# bundle exec pod install
# ...
# 等等 install 指令
make install
# 執行 Fastlane Unit 測試 Lane
- name: Run Tests
id: testing
# 指定工作目錄,這樣後續指令就不用在特別 cd ./Product/
working-directory: ./Product/
env:
# 測試計劃,全跑還是只跑單元測試
# 如為開 PR 觸發則使用 run_unit_tests,否則看 inputs.TEST_LANE 的值,預設值 run_all_tests
TEST_LANE: ${{ github.event_name == 'pull_request' && 'run_unit_tests' || github.event.inputs.TEST_LANE || 'run_all_tests' }}
# 指定這個 Job 要使用 XCode_x.x.x 指定的版本執行
DEVELOPER_DIR: "/Applications/Xcode_${{ steps.read_xcode_version.outputs.xcode_version }}.app/Contents/Developer"
# Repo -> Settings -> Actions secrets and variables -> variables
# 使用的模擬器名稱
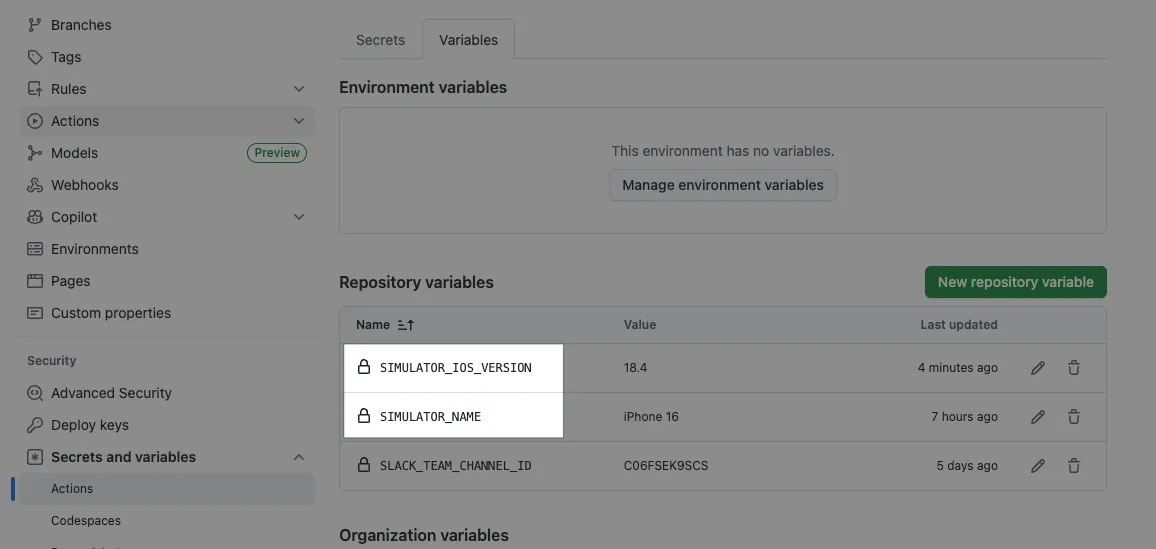
SIMULATOR_NAME: ${{ vars.SIMULATOR_NAME }}
# 模擬器的 iOS 版本
SIMULATOR_IOS_VERSION: ${{ vars.SIMULATOR_IOS_VERSION }}
# 當前 Runner 名稱
RUNNER_NAME: ${{ runner.name }}
# 提升 XCodebuild 指令 timeout 時間, retry 次數
# 因為機器 Loading 比較大的時候可能 3 次就失敗了
FASTLANE_XCODEBUILD_SETTINGS_TIMEOUT: 60
FASTLANE_XCODEBUILD_SETTINGS_RETRIES: 10
run: |
# 如果是 self-hosted 在同一台機器起多個 Runner 會出現搶模擬器的問題 (文章後會講)
# 要避免這問題建議將模擬名稱命名成 Runner 名稱,每個 Runner 都設一個模擬器,這樣就不會互搶導致測試失敗
# e.g. bundle exec fastlane run_unit_tests device:"${RUNNER_NAME} (${SIMULATOR_IOS_VERSION})"
# 這邊是用 GitHub Hosted Runner 沒這問題,所以直接用 device:"${SIMULATOR_NAME} (${SIMULATOR_IOS_VERSION})"
# 發生錯誤不直接退出並將所有輸出都寫入 temp/testing_output.txt 檔案
# 後續我們會分析檔案內容區分出是 Build Failed 還是 Test Failed,Comment 不同訊息到 PR
set +e
# EXIT_CODE 儲存執行結果的 exit code.
# 0 = OK
# 1 = exit
EXIT_CODE=0
# 所有輸出都寫入檔案
bundle exec fastlane ${TEST_LANE} device:"${SIMULATOR_NAME} (${SIMULATOR_IOS_VERSION})" | tee "$RUNNER_TEMP/testing_output.txt"
# 如果目前 EXIT_CODE 是 0,則將 ${PIPESTATUS[0]} = bundle exec fastlane ${TEST_LANE}.. 結果
[[ $EXIT_CODE -eq 0 ]] && EXIT_CODE=${PIPESTATUS[0]}
# 恢復出錯就退出
set -e
# 檢查 Testing Output
# 如果 Testing Output 包含 "Error building",則設 is_build_error=true 給 Actions 環境變數,為 Build 就失敗
# 如果 Testing Output 包含 "Tests have failed",則設 is_test_error=true 給 Actions 環境變數,為測試失敗
if grep -q "Error building" "$RUNNER_TEMP/testing_output.txt"; then
echo "is_build_error=true" >> $GITHUB_OUTPUT
echo "❌ Detected Build Error"
elif grep -q "Tests have failed" "$RUNNER_TEMP/testing_output.txt"; then
echo "is_test_error=true" >> $GITHUB_OUTPUT
echo "❌ Detected Test Error"
fi
# 恢復 Exit Code Output
exit $EXIT_CODE
# ========== Handle Result Steps ==========
# 解析 *.junit 測試報告,並標記結果、Comment(如果是 PR 的話)
- name: Publish Test Report
# 直接復用別人寫好的 .junit Paser Actions: https://github.com/mikepenz/action-junit-report
uses: mikepenz/action-junit-report@v5
# if:
# 上一步(Testing) success or
# 上一步(Testing) failed and is_test_error (build failed 不執行這個 step)
if: ${{ (failure() && steps.testing.outputs.is_test_error == 'true') || success() }}
with:
check_name: "Testing Report"
comment: true
updateComment: false
require_tests: true
detailed_summary: true
report_paths: "./Product/fastlane/test_output/*.junit"
# 測試建置失敗 Comment
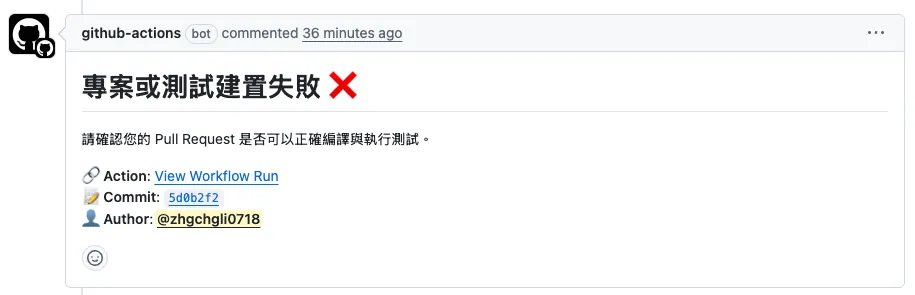
- name: Build Failure Comment
# if:
# 上一步(Testing) failed and is_build_error and 有 PR Number
#
if: ${{ failure() && steps.testing.outputs.is_build_error == 'true' && github.event.pull_request.number }}
uses: actions/github-script@v6
env:
action_url: "${{ github.server_url }}/${{ github.repository }}/actions/runs/${{ github.run_id }}/attempts/${{ github.run_attempt }}"
with:
script: |
const action_url = process.env.action_url
const pullRequest = context.payload.pull_request || {}
const commitSha = pullRequest.head?.sha || context.sha
const creator = pullRequest.user?.login || context.actor
const commentBody = [
`# 專案或測試建置失敗 ❌`,
`請確認您的 Pull Request 是否可以正確編譯與執行測試。`,
``,
`🔗 **Action**: [View Workflow Run](${action_url})`,
`📝 **Commit**: ${commitSha}`,
`👤 **Author**: @${creator}`
].join('\n')
await github.rest.issues.createComment({
owner: context.repo.owner,
repo: context.repo.repo,
issue_number: context.payload.pull_request.number,
body: commentBody
})
技術重點說明:
- runs-on: 建議改用 self-hosted Runner, GitHub Hosted Runner macOS 很貴的 。
- 手動讀取
.xcode-version檔案取得指定的 XCode 版本並在需要指定 XCode 的 Step 設定DEVELOPER_DIRenv 可以輕鬆免 Sudo 切換 XCode - Cache: 可以加速依賴安裝速度,但需注意就算是 self-hosted Runner 依然會使用 GitHub Cloud Cache,受到收費限制
- 使用
set +e使指令執行失敗不會馬上退出+將 output 都輸出到檔案+讀取檔案判斷是 Build Failed or Test Failed;如果不這樣做訊息統一都會是 Test Failed。 也可以延伸去判斷其他錯誤,例如:Underlying Error: Unable to boot the Simulator.模擬器啟動失敗,請重新嘗試。 - Checkout Code 可接受指定分支:因為
on: schedule事件只能在 main (Default Branch) 觸發,如果我們希望排程對某個其他分支操作,就需要指定分支。 - 指定 .cocoapods Repo 路徑可做可不做,之前是遇過 self-hosted 同一台機器兩個 Runner 同時卡在 pod install 就是因為剛好都在針對 .cocoapods Repo 操作造成 git lock。 (但機率很低就是了)
- 如果你有 Private Pods Repo 需要設定 SSH Agent 才有權限 Clone。 (請參考文末補充)
- 記得到 Repo -> Settings -> Actions secrets and variables -> variables 新增:
SIMULATOR_IOS_VERSION模擬器 iOS 版本SIMULATOR_NAME模擬器名稱
Commit 檔案到 Repo 主分支,手動觸發一次驗證正不正確:
正確後繼續設定。
GitHub 流程設定
Repo → Settins → Rules → Rulesets。
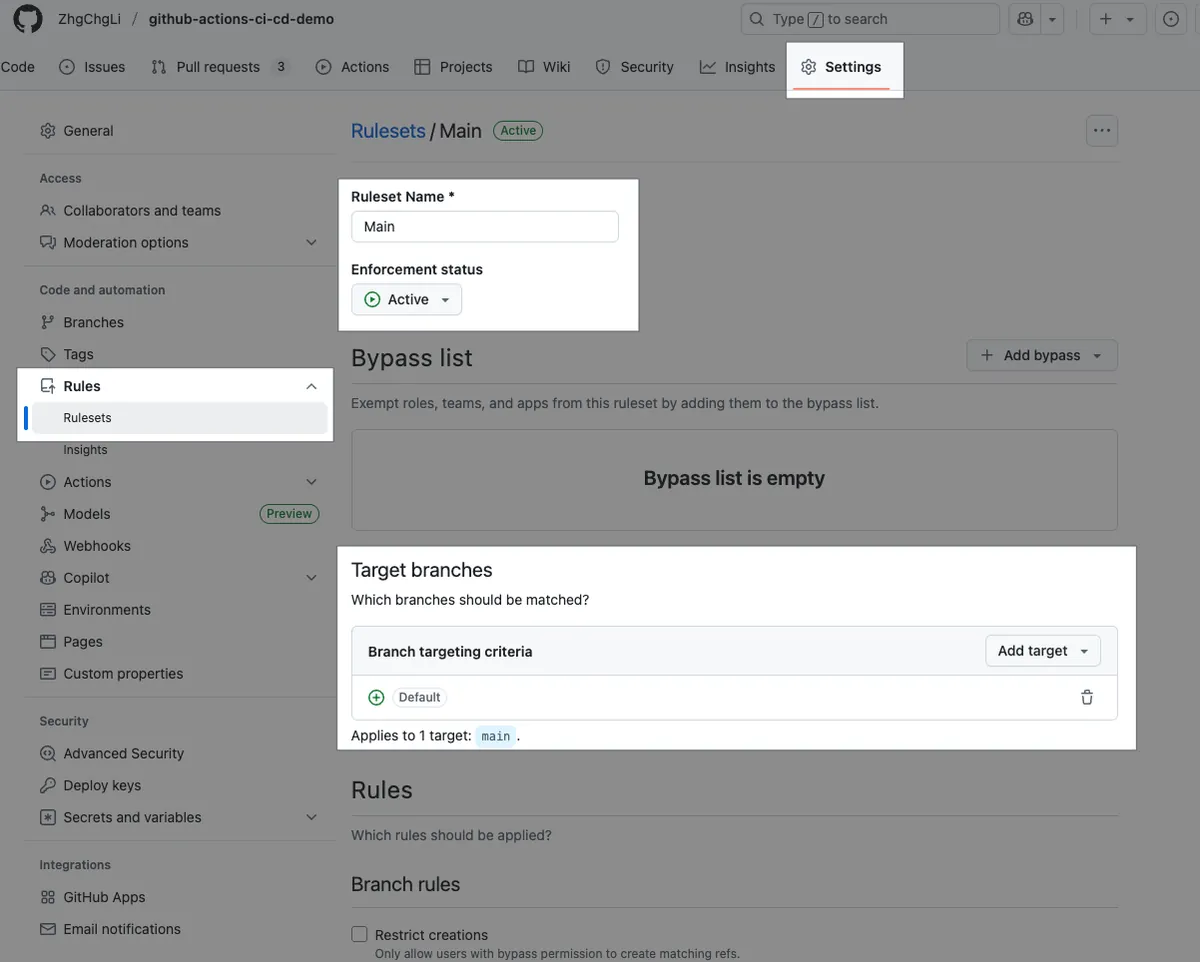
- Ruleset Name: 規則名稱
- Enforcement status: 啟用/停用 此規則限制
- Target branches: 目標的 Base 分支,設 Default Branch 就是所有想合進到 main or develop 的分支都受到此規則限制
- Bypass list: 可指定特殊身份、Team 可以不受此限
- Branch rules:
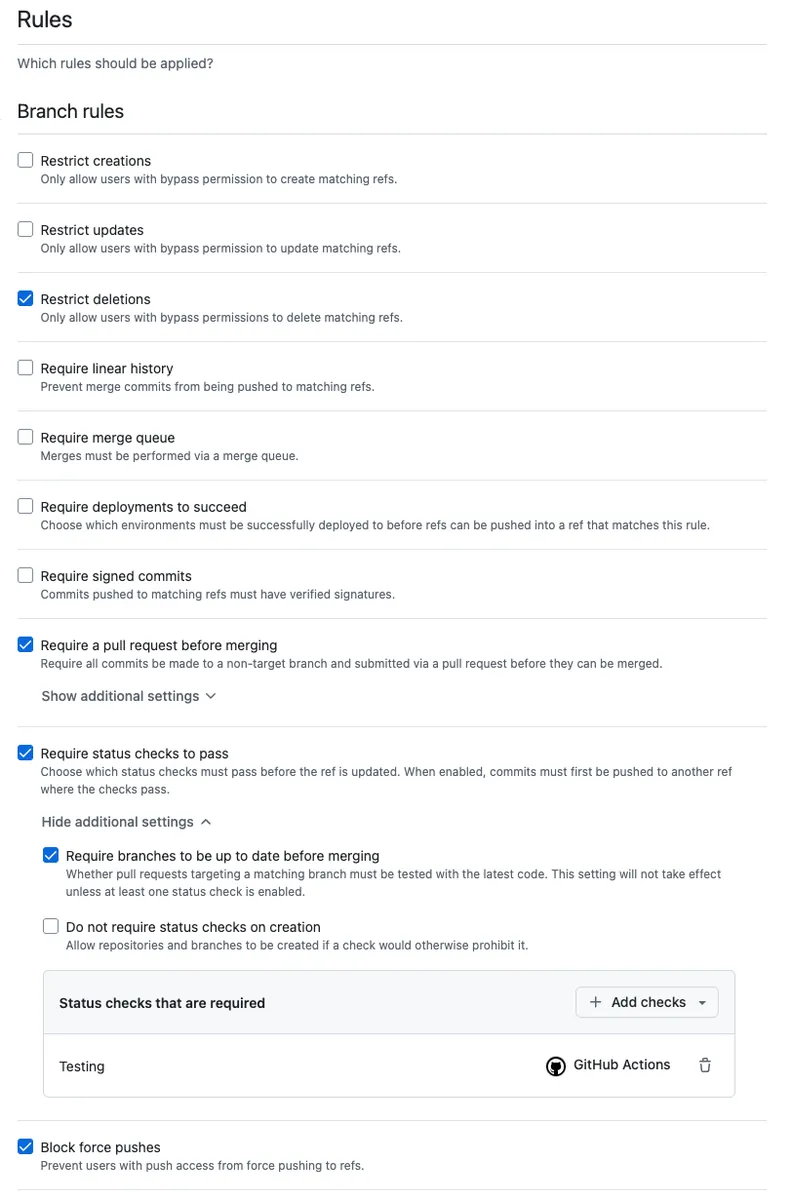
- Restrict deletions: 禁止刪除分支
- Require a pull request before mergin: 只能透過 PR Merge Required approvals: 限制需要幾人 Approve
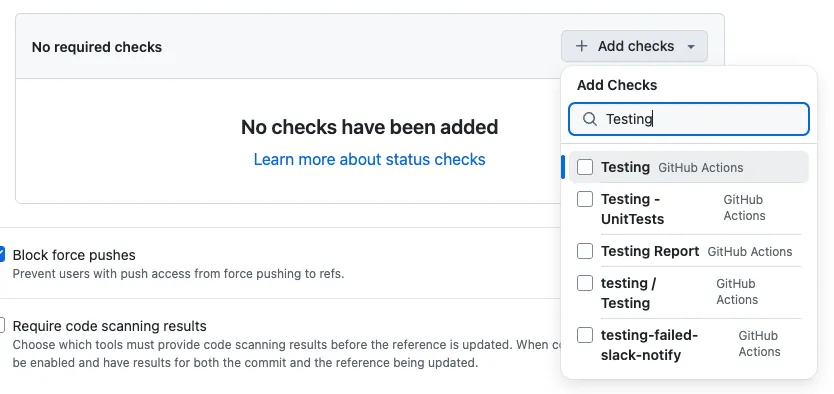
- Require status checks to pass: 限制哪些 Checks 要 Passed 才能 Merge 點 + Add checks 輸入
Testing選擇有 GitHub Actions 標誌的。 這邊有個小問題,如果 Suggestions 找不到Testing那需要先回到 Actions 觸發(開 PR 試試)成功一次,這裡才會出現。
- Block force pushes: 禁止 Force push
儲存、確定 Enforcement status 是 Active 後,規則就會生效了。
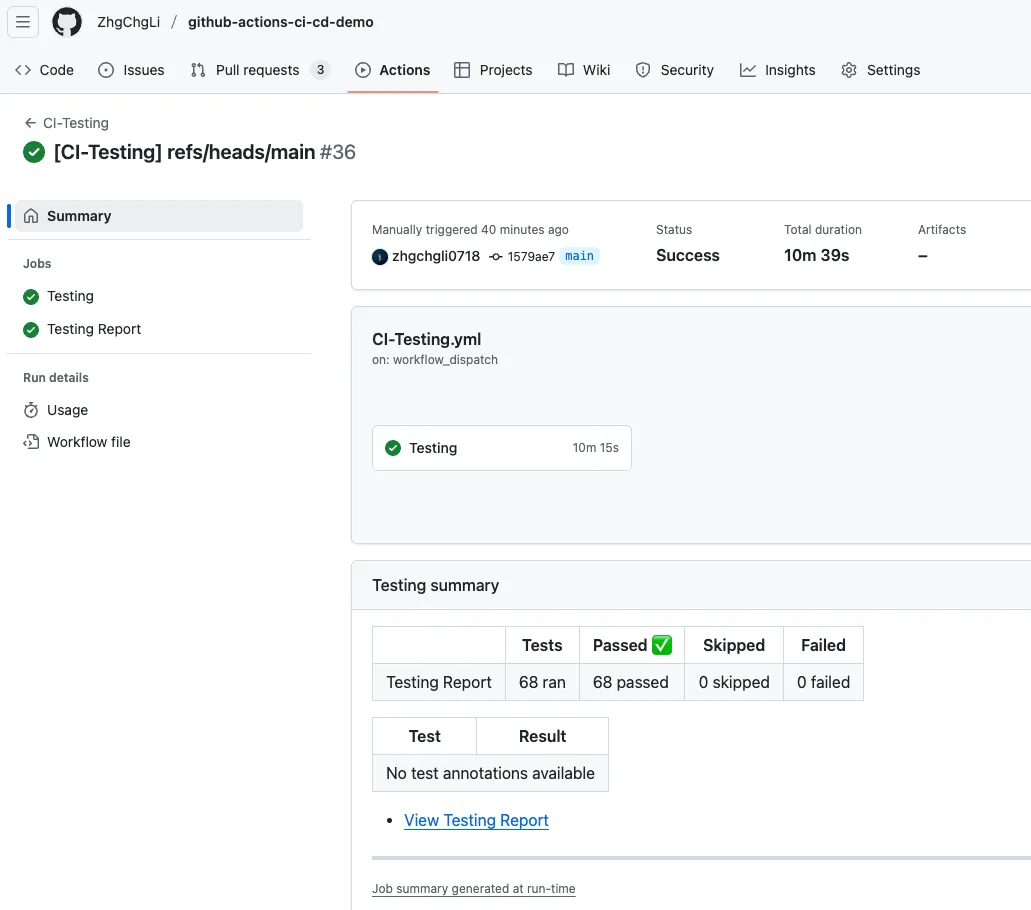
都設定好之後,開 PR 測試看看:
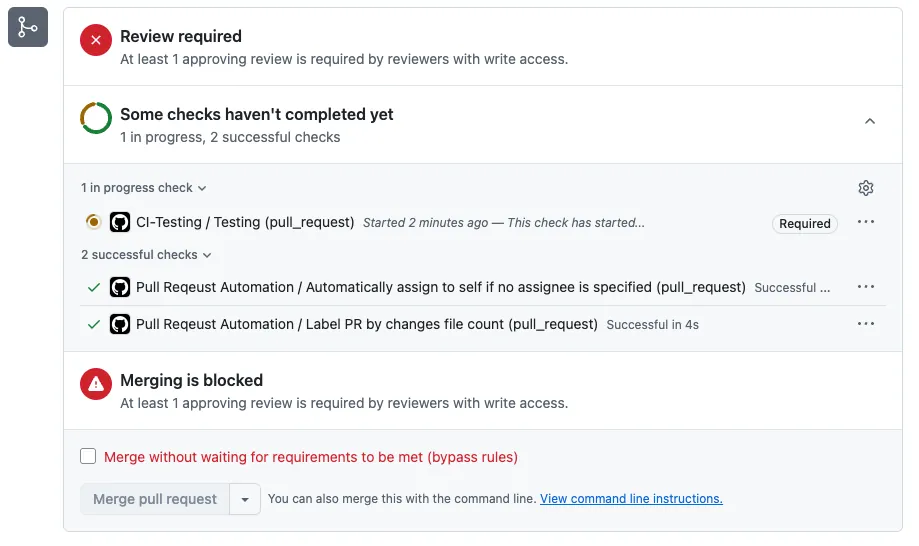
- Checks 有出現 CI-Testing ( Requried )、Merging is blocked、At least X approving review is required by reviewers with write access. 代表設置成功了。
如果專案建置失敗 (Build Failed) 會 Comment:
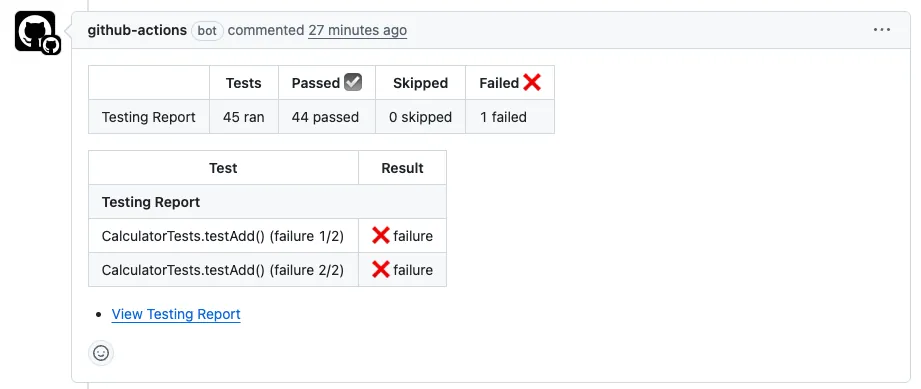
如果專案建置成功但測試案例失敗 (Test Failed) 會 Comment:
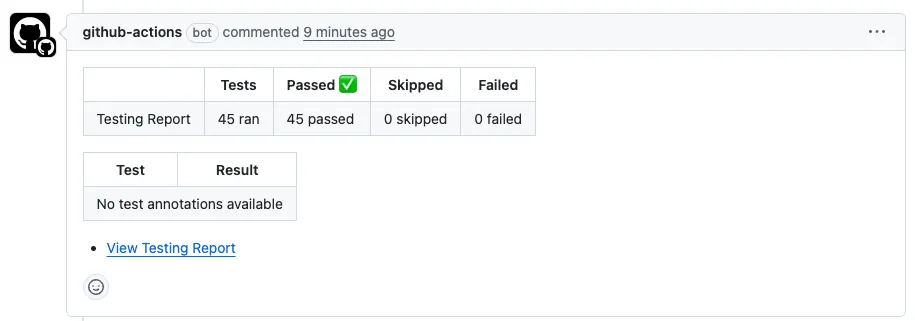
如果專案建置成功測試也成功(Test Success) 會 Comment:
完成 Review Approve + Check 測試通過後:
就能 Merge PR。
- 如果有 Push New Commit 會自動重跑 Checks 測試。
完整程式碼: CI-Testing.yml
Auto-merge:
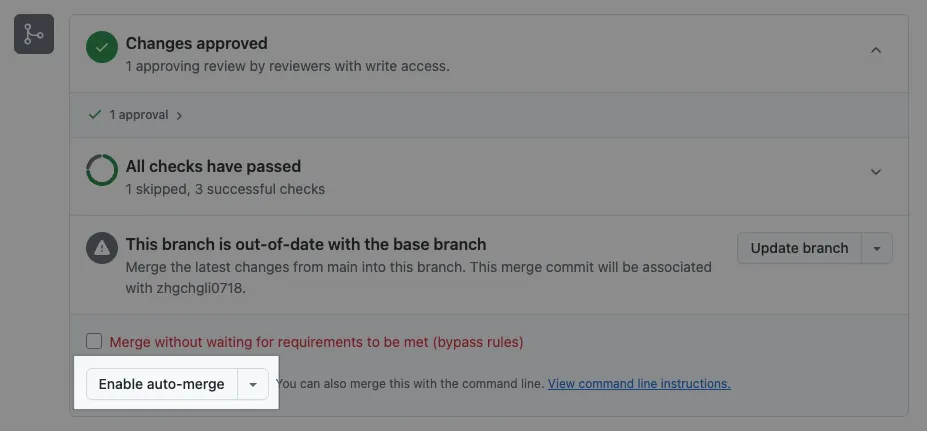
另外,也可以打開 Repo Settings → General → Pull Request 中的:
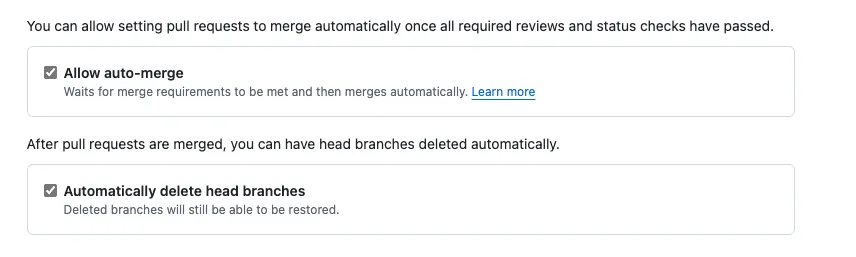
- Automatically delete head branches: Merge PR 後自動刪除分支
- Allow Auto-merge: 當 Checks 通過+符合條件的 Approvals 達成會自動 Merge PR 只有當有設條件+當前條件還不能 Merge 時才會出現 Enable auto-merge 按鈕。
CD — 打包+部署到 Firebase App Distribution
流程
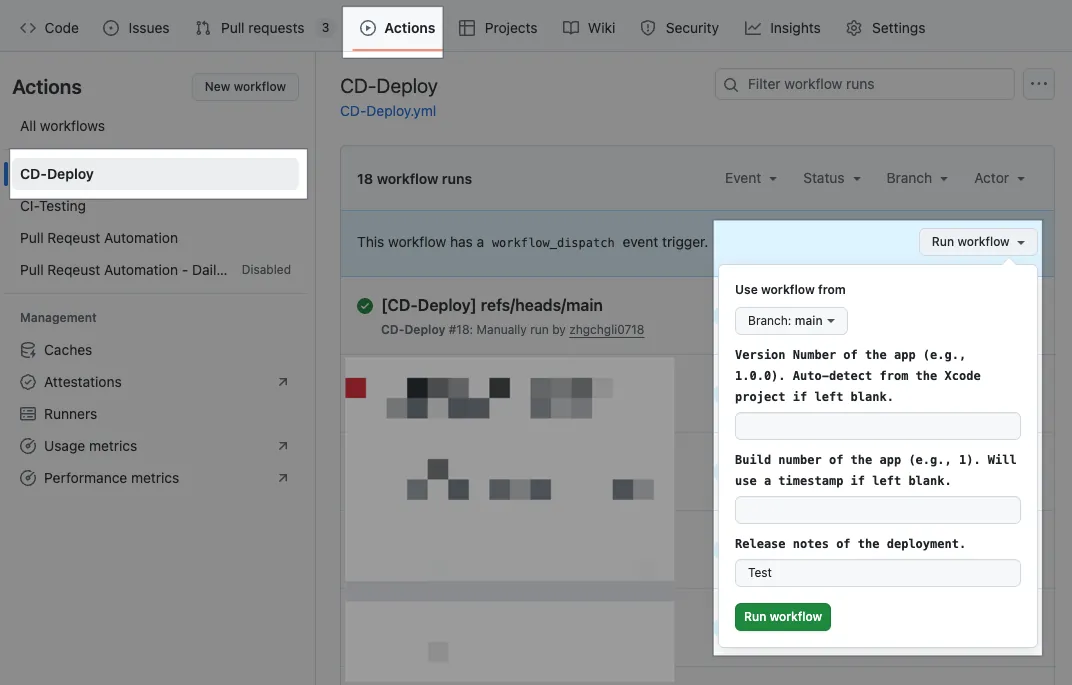
使用 GitHub Actions 表單觸發打包工作,可指定版本號、Release Notes,打包完會自動上傳到 Firebase App Distribution 供團隊下載測試使用。
CD-Deploy.yml
Repo → Actions → New workflow → set up a workflow yourself。
1
2
3
4
5
6
7
8
9
10
11
12
13
14
15
16
17
18
19
20
21
22
23
24
25
26
27
28
29
30
31
32
33
34
35
36
37
38
39
40
41
42
43
44
45
46
47
48
49
50
51
52
53
54
55
56
57
58
59
60
61
62
63
64
65
66
67
68
69
70
71
72
73
74
75
76
77
78
79
80
81
82
83
84
85
86
87
88
89
90
91
92
93
94
95
96
97
98
99
100
101
102
103
104
105
106
107
108
109
110
111
112
113
114
115
116
117
118
119
120
121
122
123
124
125
126
127
128
129
130
131
132
133
134
135
136
137
138
139
140
141
142
143
144
145
146
147
148
149
150
151
152
153
154
155
156
157
158
159
160
161
162
163
164
165
166
167
168
169
170
171
172
173
174
175
176
177
178
179
180
181
182
183
184
185
186
187
188
189
190
191
192
193
194
195
196
197
198
199
200
201
202
203
204
205
206
207
208
209
210
211
212
213
214
215
216
217
218
219
220
221
222
223
224
225
226
227
228
229
230
231
232
233
234
235
236
237
238
239
240
241
242
243
244
245
246
247
248
249
250
251
252
253
254
255
256
257
258
259
260
261
262
263
264
265
266
267
268
269
270
271
272
273
274
275
276
277
278
279
280
281
282
283
284
285
286
287
288
289
290
291
292
293
294
295
296
297
298
299
300
301
302
303
304
305
306
307
308
309
310
311
312
313
314
315
316
317
318
# Workflow(Action) 名稱
name: CD-Deploy

# Actions Log 的標題名稱
run-name: "[CD-Deploy] ${{ github.ref }}"

# 同個 Concurrency Group 如果有新的 Job 會取消正在跑的
# 例如 重複觸發相同分支的打包任務,會取消前一個任務
concurrency:
  group: ${{ github.workflow }}-${{ github.event_name }}-${{ github.ref }}
  cancel-in-progress: true

# 觸發事件
on:
  # 手動表單觸發
  workflow_dispatch:
    # 表單 Inputs 欄位
    inputs:
      # App 版本號
      VERSION_NUMBER:
        description: 'Version Number of the app (e.g., 1.0.0). Auto-detect from the Xcode project if left blank.'
        required: false
        type: string
      # App Build Number
      BUILD_NUMBER:
        description: 'Build number of the app (e.g., 1). Will use a timestamp if left blank.'
        required: false
        type: string
      # App Release Note
      RELEASE_NOTE:
        description: 'Release notes of the deployment.'
        required: false
        type: string
  # 其他 Workflow 呼叫此 Workflow 觸發
  # Nightly Build 會呼叫使用
  workflow_call:
    inputs:
      # App 版本號
      VERSION_NUMBER:
        description: 'Version Number of the app (e.g., 1.0.0). Auto-detect from the Xcode project if left blank.'
        required: false
        type: string
      # App Build Number
      BUILD_NUMBER:
        description: 'Build number of the app (e.g., 1). Will use a timestamp if left blank.'
        required: false
        type: string
      # App Release Note
      RELEASE_NOTE:
        description: 'Release notes of the deployment.'
        required: false
        type: string
      BRANCH:
        description: 'Branch'
        type: string


# 定義全域靜態變數
env:
  APP_STORE_CONNECT_API_KEY_FILE_NAME: "app_store_connect_api_key.json"

# Job 工作項目
# Job 會並發執行
jobs:
  # Job ID
  deploy:
    # Job 名稱 (可省略,有設定在 Log 顯示比較好讀)
    name: Deploy - Firebase App Distribution

    # Runner Label - 使用 GitHub Hosted Runner macos-15 來執行工作
    # 請注意:因為此專案是 Public Repo 可以無限免費使用
    # 請注意:因為此專案是 Public Repo 可以無限免費使用
    # 請注意:因為此專案是 Public Repo 可以無限免費使用
    # 如果是 Private Repo 需要按計量收費,macOS 機器是最貴的(10倍),可能跑 10 次就達到 2,000 分鐘免費上限
    # 建議使用 self-hosted Runner
    runs-on: macos-15

    # 設定最長 Timeout 時間,防止異常情況發生時無止盡的等待
    timeout-minutes: 30

    # use zsh
    # 可省略,只是我習慣用 zsh,預設是 bash
    defaults:
      run:
        shell: zsh {0}

    # 工作步驟
    # 工作步驟會照順序執行
    steps:
      # git clone 當前專案 & checkout 到執行的分支
      - name: Checkout repository
        uses: actions/checkout@v3
        with:
          # Git Large File Storage,我們的測試環境用不到
          # default: false
          lfs: false

          # 如果有指定則 Checkout 指定分支,沒有則使用預設(當前分支)
          # 因 on: schedule 事件只能在 main 主分支執行,因此想做 Nightly Build 之類的工作就需要指定分支
          # e.g. on: schedule -> main 分支,Nightly Build master 分支
          ref: ${{ github.event.inputs.BRANCH || '' }}

      # ========== Certificates Steps ==========

      # 建議是使用 Fastlnae - Match 管理開發憑證並在 Lane 中直接執行 match 安裝設定好
      # Match 會用另一個 Private Repo 管理憑證,但要設定好 SSH Agent 才有權限 git clone private repo
      # ref: https://stackoverflow.com/questions/57612428/cloning-private-github-repository-within-organisation-in-actions
      #
      #
      # --- 以下是沒有使用 Fastlane - Match 的情況下直接下載 & Import 憑證給 Runner 的做法 ---
      # ref: https://docs.github.com/en/actions/how-tos/use-cases-and-examples/deploying/installing-an-apple-certificate-on-macos-runners-for-xcode-development
      #
      # GitHub Actions Secret 無法儲存檔案,因此所有憑證檔案都要先轉成 Base64 Encoded 文字格式存在 Secret
      # 在 GitHub Actions Step 中再動態讀出來寫入 TEMP 檔案並移動到正確位置給系統讀取使用
      # 其他設定細節請參考文章
      #
      - name: Install the Apple certificate and provisioning profile
        env:
          BUILD_CERTIFICATE_BASE64: ${{ secrets.BUILD_CERTIFICATE_BASE64 }}
          P12_PASSWORD: ${{ secrets.BUILD_CERTIFICATE_P12_PASSWORD }}
          BUILD_PROVISION_PROFILE_BASE64: ${{ secrets.BUILD_PROVISION_PROFILE_BASE64 }}
          # GitHub Hosted Runner 為自定義字串
          # Self-hosted Runner 為機器登入密碼
          KEYCHAIN_PASSWORD: ${{ secrets.KEYCHAIN_PASSWORD }}
        run: |
          # create variables
          CERTIFICATE_PATH=$RUNNER_TEMP/build_certificate.p12
          PP_PATH=$RUNNER_TEMP/build_pp.mobileprovision
          KEYCHAIN_PATH=$RUNNER_TEMP/app-signing.keychain-db

          # import certificate and provisioning profile from secrets
          echo -n "$BUILD_CERTIFICATE_BASE64" | base64 --decode -o $CERTIFICATE_PATH
          echo -n "$BUILD_PROVISION_PROFILE_BASE64" | base64 --decode -o $PP_PATH

          # create temporary keychain
          security create-keychain -p "$KEYCHAIN_PASSWORD" $KEYCHAIN_PATH
          security set-keychain-settings -lut 21600 $KEYCHAIN_PATH
          security unlock-keychain -p "$KEYCHAIN_PASSWORD" $KEYCHAIN_PATH

          # import certificate to keychain
          security import $CERTIFICATE_PATH -P "$P12_PASSWORD" -A -t cert -f pkcs12 -k $KEYCHAIN_PATH
          security set-key-partition-list -S apple-tool:,apple: -k "$KEYCHAIN_PASSWORD" $KEYCHAIN_PATH
          security list-keychain -d user -s $KEYCHAIN_PATH

          # apply provisioning profile
          mkdir -p ~/Library/MobileDevice/Provisioning\ Profiles
          cp $PP_PATH ~/Library/MobileDevice/Provisioning\ Profiles

      # App Store Connect API Fastlane JSON Key
      # 另一個在打包環境幾乎是必須的 App Store Connect API Fastlane JSON Key (.json)
      # format: .json 內容格式:https://docs.fastlane.tools/app-store-connect-api/
      # 裡面包含 App Store Connect API .p8 Key
      # 會在後續帶給 Fastlane,用於上傳到 Testflight、App Store API 使用
      #
      # GitHub Actions Secret 無法儲存檔案,因此所有憑證檔案都要先轉成 Base64 Encoded 文字格式存在 Secret
      # 在 GitHub Actions Step 中再動態讀出來寫入 TEMP 檔案供其他步驟引用使用
      # 其他設定細節請參考文章
      - name: Read and Write Apple Store Connect API Key to Temp
        env:
          APP_STORE_CONNECT_API_KEY_BASE64: ${{ secrets.APP_STORE_CONNECT_API_KEY_BASE64 }}
          APP_STORE_CONNECT_API_KEY_PATH: "${{ runner.temp }}/${{ env.APP_STORE_CONNECT_API_KEY_FILE_NAME }}"
        run: |
          # import certificate and provisioning profile from secrets
          echo -n "$APP_STORE_CONNECT_API_KEY_BASE64" | base64 --decode -o $APP_STORE_CONNECT_API_KEY_PATH

      # ========== Env Setup Steps ==========

      # 讀取專案指定的 XCode 版本
      # 在後續之中,我們自己手動指定使用的 XCode_x.x.x.app
      # 而不使用 xcversion,因為 xcversion 已經 sunset 不穩定。
      - name: Read .xcode-version
        id: read_xcode_version
        run: |
          XCODE_VERSION=$(cat .xcode-version)
          echo "XCODE_VERSION: ${XCODE_VERSION}"
          echo "xcode_version=${XCODE_VERSION}" >> $GITHUB_OUTPUT

          # 也可以直接在這指定全域 XCode 版本,這樣就不用在後續步驟指定 DEVELOPER_DIR
          # 但此指令需要 sudoer 權限,如果是 self-hosted runner 就要確定 runner 執行環境有 sudo 權限
          # sudo xcode-select -s "/Applications/Xcode_${XCODE_VERSION}.app/Contents/Developer"

      # 讀取專案指定的 Ruby 版本
      - name: Read .ruby-version
        id: read_ruby_version
        run: |
          RUBY_VERSION=$(cat .ruby-version)
          echo "RUBY_VERSION: ${RUBY_VERSION}"
          echo "ruby_version=${RUBY_VERSION}" >> $GITHUB_OUTPUT

      # 安裝或設定 Runner Ruby 版本成專案指定版本
      - name: Set up Ruby
        uses: ruby/setup-ruby@v1
        with:
          ruby-version: "${{ steps.read_ruby_version.outputs.ruby_version }}"

      # 可設可不設,原因是之前在 self-hosted 起多個 runner 跑 CI/CD 因為 cocoapods repos 是共用目錄
      # 解決的問題是:有很小的機率會出現在同時 pod install 時拉 cocoapods repos 出現衝突(因為預設都是用) $HOME/.cocoapods/
      # GitHub Hosted Runner 則不需此設定
      # - name: Change Cocoapods Repos Folder
      #   if: contains(runner.labels, 'self-hosted')
      #   run: |
      #     # 每個 Runner 用自己的 .cocoapods 資料夾,防止資源衝突
      #     mkdir -p "$HOME/.cocoapods-${{ env.RUNNER_NAME }}/"
      #     export CP_HOME_DIR="$HOME/.cocoapods-${{ env.RUNNER_NAME }}"
      #     rm -f "$HOME/.cocoapods-${{ env.RUNNER_NAME }}/repos/cocoapods/.git/index.lock"

      # ========== Cache Setting Steps ==========
      # 請注意,就算是 self-hosted,Cache 目前也是 Cloud Cache 會計算用量
      # 規則:7 天未 hit 自動刪除、單個 Cache 上限 10 GB、Action 成功才會 Cache
      # Public Repo: 免費無限制
      # Private Repo: 5 GB 起
      # Self-hosted 可以自己用 shell script 撰寫 Cache & Restore 策略或使用其他工具協助

      # Bundle Cache (Gemfile)
      # 對應 Makefile 中我們指定了 Bundle  安裝路徑 ./vendor 下
      - name: Cache Bundle
        uses: actions/cache@v3
        with:
          path: |
            ./vendor
          key: ${{ runner.os }}-bundle-${{ hashFiles('Gemfile.lock') }}
          restore-keys: |
            ${{ runner.os }}-bundle-

      # CocoaPods Cache (Podfile)
      # 默認就是 專案/Pods 下
      - name: Cache CocoaPods
        uses: actions/cache@v3
        with:
          path: |
            ./Product/Pods
          key: ${{ runner.os }}-cocoapods-${{ hashFiles('Product/Podfile.lock') }}
          restore-keys: |
            ${{ runner.os }}-cocoapods-

      # Mint cache
      # 對應 Makefile 中我們指定的 Mint 安裝路徑 ./mint 下
      - name: Cache Mint
        uses: actions/cache@v3
        with:
          path: ./mint
          key: ${{ runner.os }}-mint-${{ hashFiles('Mintfile') }}
          restore-keys: |
            ${{ runner.os }}-mint-

      # ====================

      # 專案 Setup & 依賴安裝
      - name: Setup & Install Dependency
        run: |
          # 執行 Makefile 中封裝的 Setup 指令,對應成指令大概是:
          # brew install mint
          # bundle config set path 'vendor/bundle'
          # bundle install
          # mint bootstrap
          # ...
          # 等等 setup 指令
          make setup

          # 執行 Makefile 中封裝的 Install 指令,對應成指令大概是:
          # mint run yonaskolb/XcodeGen --quiet
          # bundle exec pod install
          # ...
          # 等等 install 指令
          make install

      - name: Deploy Beta
        id: deploy
        # 指定工作目錄,這樣後續指令就不用在特別 cd ./Product/
        working-directory: ./Product/
        env:
          # 打包 Input 參數
          VERSION_NUMBER: ${{ inputs.VERSION_NUMBER || '' }}
          BUILD_NUMBER: ${{ inputs.BUILD_NUMBER || '' }}
          RELEASE_NOTE: ${{ inputs.RELEASE_NOTE || '' }}
          AUTHOR: ${{ github.actor }}

          # Repo -> Settings -> Actions secrets and variables -> secrets
          # Firebase CLI Token 密鑰 (取得方式請參考文章)
          FIREBASE_CLI_TOKEN: ${{ secrets.FIREBASE_CLI_TOKEN }}
          # Apple Developer Program Team ID
          TEAM_ID: ${{ secrets.TEAM_ID }}

          # 指定這個 Job 要使用 XCode_x.x.x 指定的版本執行
          DEVELOPER_DIR: "/Applications/Xcode_${{ steps.read_xcode_version.outputs.xcode_version }}.app/Contents/Developer"
        run: |
          # 取得當前 Timestamp
          BUILD_TIMESTAMP=$(date +'%Y%m%d%H%M%S')

          # 如果 BUILD_NUMBER 沒有值,用 Timestamp 當 App Build Number
          BUILD_NUMBER="${BUILD_NUMBER:-$BUILD_TIMESTAMP}"

          ID="${{ github.run_id }}"
          COMMIT_SHA="${{ github.sha }}"
          BRANCH_NAME="${{ github.ref_name }}"
          AUTHOR="${{ env.AUTHOR }}"

          # 組合 Release Note
          RELEASE_NOTE="${{ env.RELEASE_NOTE }}
          ID: ${ID}
          Commit SHA: ${COMMIT_SHA}
          Branch: ${BRANCH_NAME}
          Author: ${AUTHOR}
          "

          # 執行 Fastlane 打包&部署 Lane
          bundle exec fastlane beta release_notes:"${RELEASE_NOTE}" version_number:"${VERSION_NUMBER}" build_number:"${BUILD_NUMBER}"

      # GitHub Actions 建議的 self-hosted 安全性設定:
      # ref: https://docs.github.com/en/actions/how-tos/use-cases-and-examples/deploying/installing-an-apple-certificate-on-macos-runners-for-xcode-development#required-clean-up-on-self-hosted-runners
      # 對應 Step: Install the Apple certificate and provisioning profile
      # 用途是刪除機器上下載下來的金鑰憑證
      # 如果你是用 Match 則需要改寫成 Match 的 Clean
      - name: Clean up keychain and provisioning profile
        if: ${{ always() && contains(runner.labels, 'self-hosted') }}
        run: |
          security delete-keychain $RUNNER_TEMP/app-signing.keychain-db
          rm ~/Library/MobileDevice/Provisioning\ Profiles/build_pp.mobileprovision
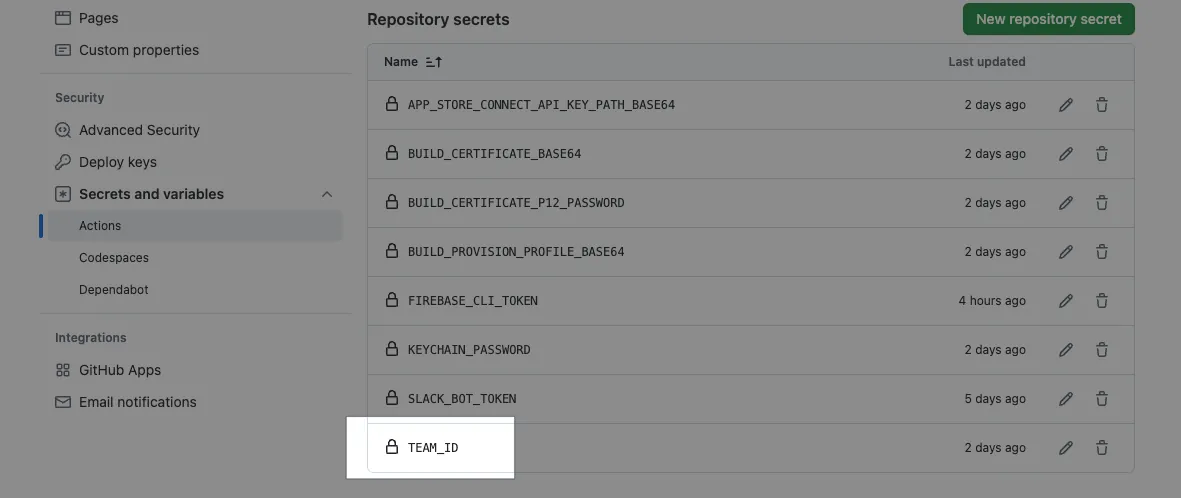
- 記得到 Repo -> Settings -> Actions secrets and variables -> secrets 新增一個
TEAM_ID變數,內容是 Apple Developer Team ID 字串。
Commit 檔案到 Repo 主分支,測試看看打包功能:
請注意若其他分支要使用此 Action 需要先 Merge 主分支的 CD-Deploy.yml 檔案。
等待任務跑完:

{:target="_blank"}](/assets/4b001d2e8440/1*W8PBkatfsITMDFSlp7xpjg.webp)
打包+部署成功 ✅
完整程式碼: CD-Deploy.yml
技術細節 — Firebase CLI Token 取得&設定
按照 Firebase 官方文件步驟 :
先安裝好 Firebase CLI 工具:
1
curl -sL https://firebase.tools | bash
執行:
1
firebase login:ci
完成登入、授權:
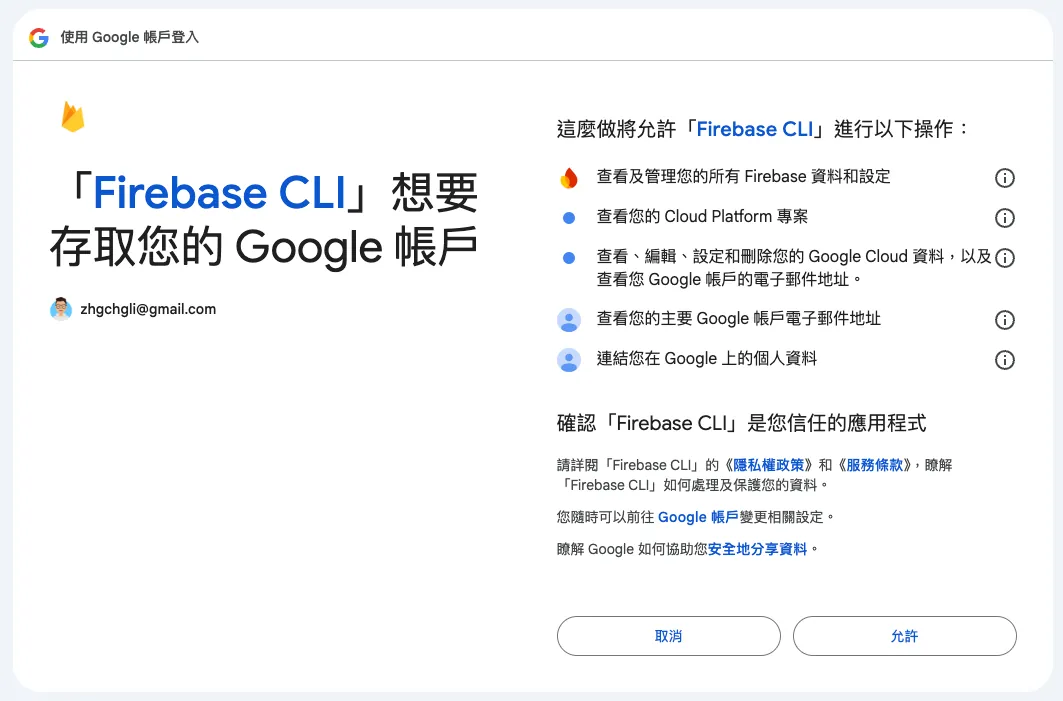

回到 Terminal 複製 Firebase CLI Token:
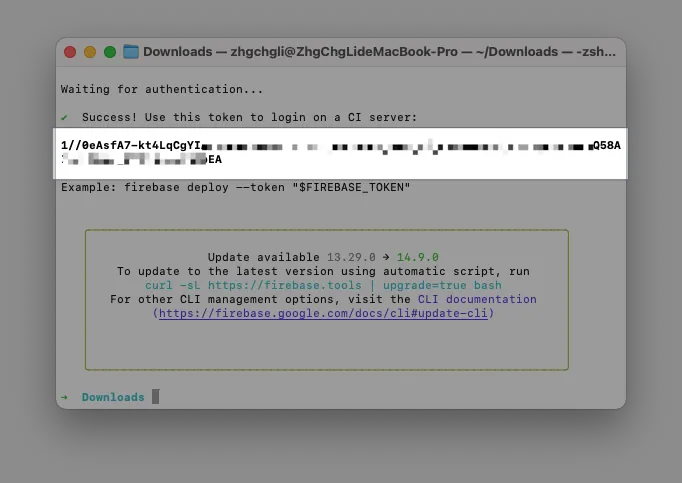
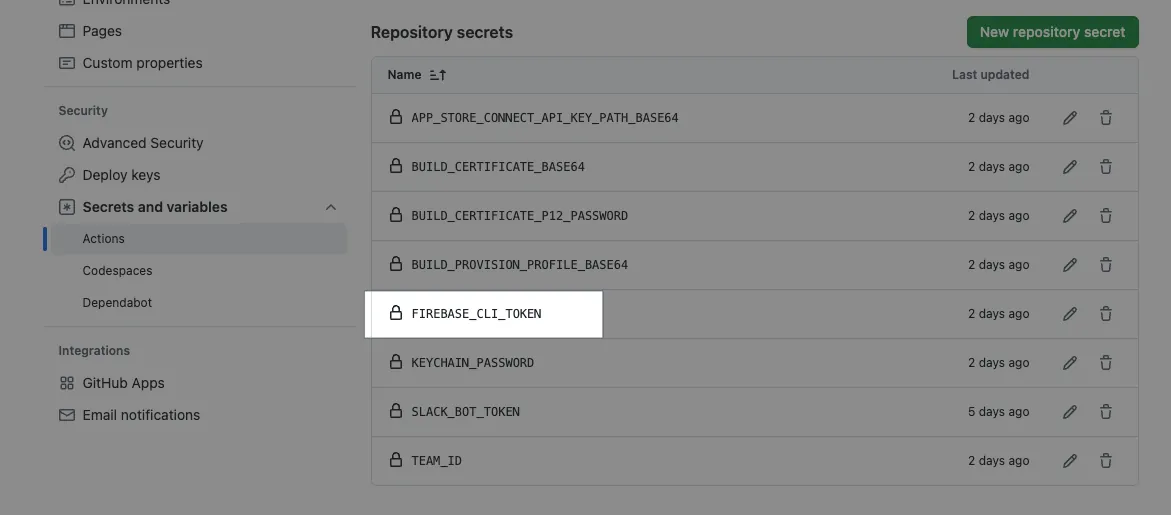
到 Repo → Settings → Secrets and variables → Actions → 新增一個 Secret: FIREBASE_CLI_TOKEN 並貼上 Firebase CLI Token。
這個 Token = 你的登入身份 ,請妥善保存,如果帳號離職也需要進行更換。
技術細節 — Install the Apple certificate and provisioning profile
補充開發憑證匯入 Runner 的步驟細節。
因 GitHub Actions Secret 無法儲存檔案,因此所有憑證檔案都要先轉成 Base64 Encoded 文字格式存在 Secrets,GitHub Actions Step 中再動態讀出來寫入 TEMP 檔案並移動到正確位置給系統讀取使用。
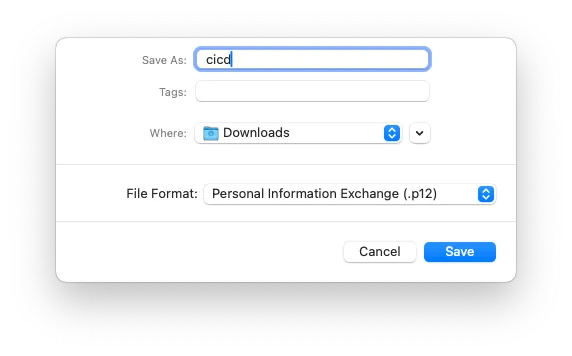
打包 Development 需要兩把金鑰憑證:
cicd.mobileprovision
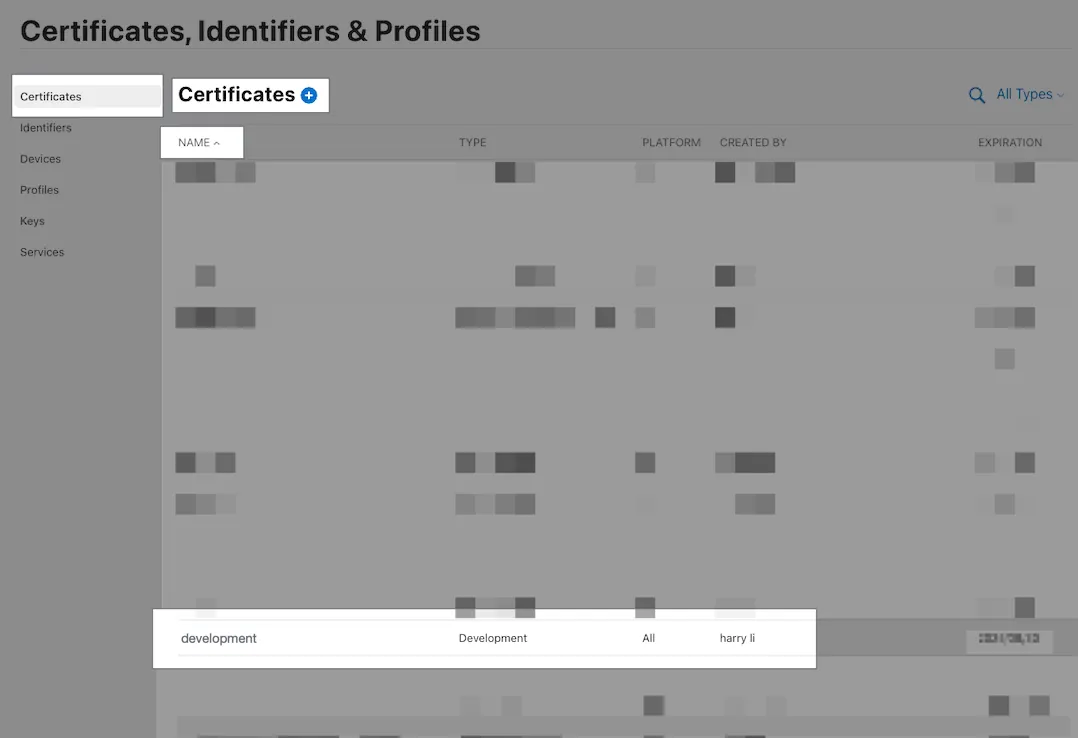
development.cer
從 Apple Developer 中下載的 Certificate 是 .cer 格式,而我們需要的是 .p12 格式,可以先把下載下來的 .cer 點兩下安裝到 Keychain,然後打開 Keychain 選擇該憑證右鍵 Export 匯出。
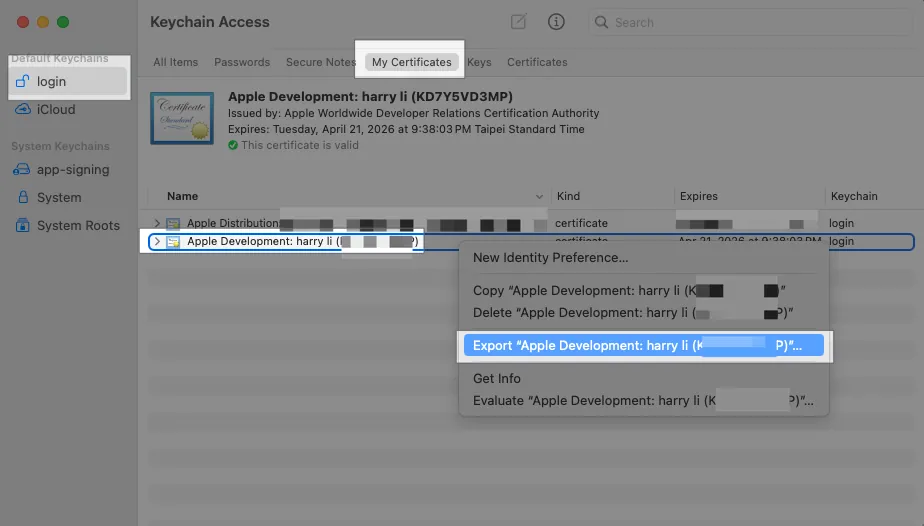
檔案名稱:cicd.p12、格式 .p12
P12 金鑰密碼:輸入一組安全的自訂義字串 (範例是不好的示範,用 123456 )

現在兩個檔案: cicd.p12、cicd.mobileprovision 都準備好了
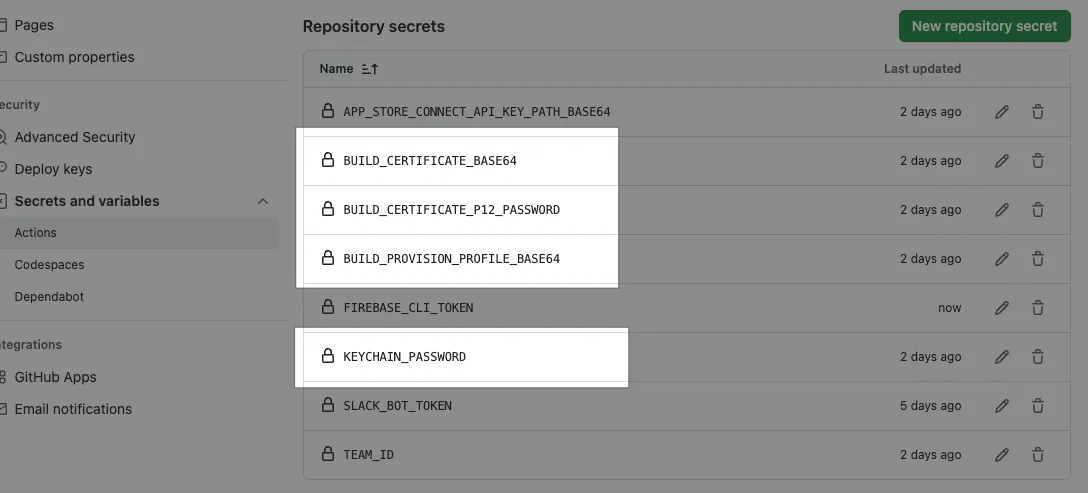
轉換成 BASE64 格式字串並存到 Repo Secrets:
1
base64 -i cicd.mobileprovision | pbcopy
到 Repo → Settings → Secrets and variables → Actions → 新增一個 Secret: BUILD_PROVISION_PROFILE_BASE64 並貼上以上內容。
-
1
base64 -i cicd.p12 | pbcopy
到 Repo → Settings → Secrets and variables → Actions → 新增一個 Secret: BUILD_CERTIFICATE_BASE64 並貼上以上內容。
-
到 Repo → Settings → Secrets and variables → Actions → 新增一個 Secret: P12_PASSWORD 內容是剛匯出 P12 金鑰設定的密碼。
- 到 Repo → Settings → Secrets and variables → Actions → 新增一個 Secret: KEYCHAIN_PASSWORD : 如果是 GitHub Hosted Runner 則隨便輸入一個任意字串, 如果是 Self-hosted Runner 則為 macOS Runner 使用者的登入密碼 。
技術細節 —App Store Connect API Key
Fastlane 打包部署到 App Store, Testflight 必須提供的 .json 金鑰 ,同樣受限 GitHub Actions Secrets 只能存字串不能存檔案,所以我們也要把金鑰內容轉成 Base64 字串,GitHub Actions Step 中再動態讀出來寫入 TEMP 檔案並把檔案路徑給 Fastlane 引用使用。
首先到 App Store Connect 建立&下載好 App Store Connect API Key ( .p8) :
-----BEGIN PRIVATE KEY-----
sss
axzzvcxz
zxzvzcxv
vzxcvzxvczxcvz
-----END PRIVATE KEY-----
新增一個 app_store_connect_api.json 檔案( 內容參考 ):
1
2
3
4
5
6
7
{
  "key_id": "App Store Connect 上寫的 Key ID",
  "issuer_id": "App Store Connect 上寫的 Issuer ID",
  "key": "-----BEGIN PRIVATE KEY-----記得把換行改成\n-----END PRIVATE KEY-----",
  "duration": 1200, # optional (maximum 1200)
  "in_house": false # optional but may be required if using match/sigh
}
儲存檔案後執行:
1
base64 -i app_store_connect_api.json | pbcopy
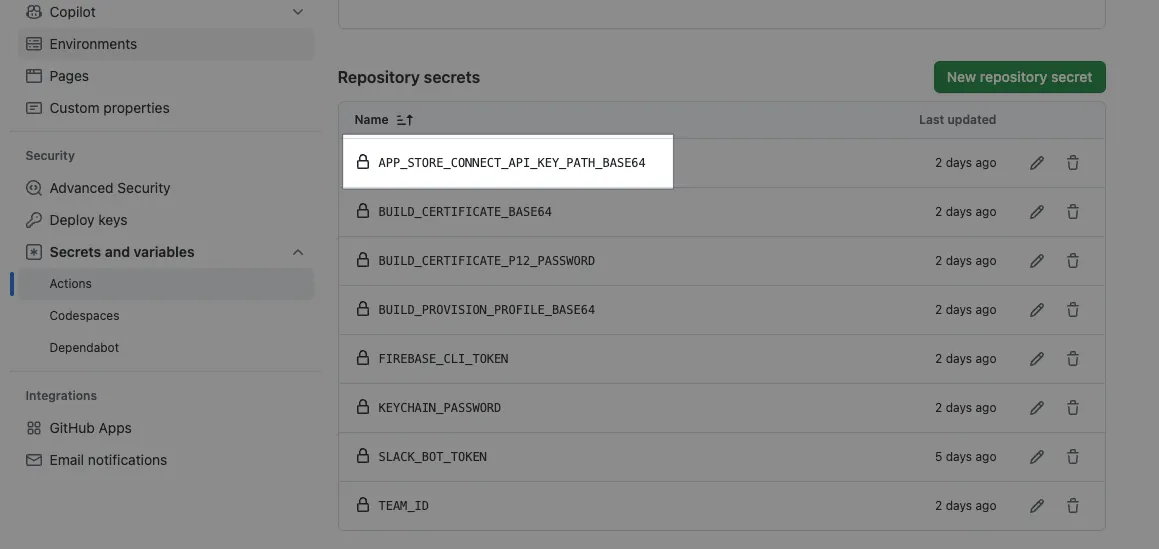
將字串內容貼到 Repo → Settings → Secrets and variables → Actions → 新增一個 Secret: APP_STORE_CONNECT_API_KEY_BASE64 並貼上以上內容。
Read and Write Apple Store Connect API Key to Temp Step 完成之後在後續的 Step 只要傳入 env APP_STORE_CONNECT_API_KEY_PATH :
1
2
3
4
5
- name: Deploy
  env:
    APP_STORE_CONNECT_API_KEY_PATH: "${{ runner.temp }}/${{ env.APP_STORE_CONNECT_API_KEY_FILE_NAME }}"
  run: |
    ....
Fastlane 就能自動取得使用。
技術延伸 — Reuse Action Workflow 拆分打包和部署動作
在這個案例中我們直接使用 Fastlane beta Lane 執行打包+部署兩個動作。
在實際案例中我們可能需要將同一包打包結果分別部署到不同平台上(Firebase, Testflight…etc) 因此比較好的做法是打包是一個 Action、部署是一個 Action,不然會重復跑兩次打包;而且也更符合 CI/CD 的權責劃分。
以下爲範例介紹:
CI-Build.yml:
1
2
3
4
5
6
7
8
9
10
11
12
13
14
15
16
17
18
19
20
21
22
23
24
25
26
27
28
29
30
31
32
33
34
name: Build

on:
  push:
    branches:
      - main
  workflow_call:
     inputs:
        RELEASE_NOTE:
          description: 'Release notes of the deployment.'
          required: false
          type: string

jobs:
  build:
    runs-on: macos-latest

    steps:
      - name: Checkout Code
        uses: actions/checkout@v4

      - name: Install Dependencies
        run: |
          make steup
          make instal

      - name: Build Project
        run: bundle exec fastlane build

      - name: Upload Build Artifact
        uses: actions/upload-artifact@v4
        with:
          name: build-artifact
          path: ./fastlane/build/
CD-Deploy-Firebase.yml:
1
2
3
4
5
6
7
8
9
10
11
12
13
14
15
16
17
18
19
20
21
22
23
24
25
26
27
28
29
30
31
32
name: Deploy Firebase

on:
  # 當 Build Action 完成時自動觸發執行
  workflow_run:
    workflows: ["Build"]
    types:
      - completed

jobs:
  deploy:
    runs-on: ubuntu-latest
    # 完成+執行成功才執行部署
    if: ${{ github.event.workflow_run.conclusion == 'success' }}

    steps:
      - name: Checkout Code
        uses: actions/checkout@v4

      - name: Install Dependencies
        run: |
          make steup

      - name: Download Build Artifact
        uses: actions/download-artifact@v4
        with:
          name: build-artifact
          path: ./fastlane/build/

      - name: Deploy to Production
        run: |
          bundle exec fastlane deploy-firebase
CD-Deploy-Testflight.yml:
1
2
3
4
5
6
7
8
9
10
11
12
13
14
15
16
17
18
19
20
21
22
23
24
25
26
27
28
29
30
31
32
name: Deploy Testflight

on:
  # 當 Build Action 完成時自動觸發執行
  workflow_run:
    workflows: ["Build"]
    types:
      - completed

jobs:
  deploy:
    runs-on: ubuntu-latest
    # 完成+執行成功才執行部署
    if: ${{ github.event.workflow_run.conclusion == 'success' }}

    steps:
      - name: Checkout Code
        uses: actions/checkout@v4

      - name: Install Dependencies
        run: |
          make steup

      - name: Download Build Artifact
        uses: actions/download-artifact@v4
        with:
          name: build-artifact
          path: ./fastlane/build/

      - name: Deploy to Production
        run: |
          bundle exec fastlane deploy-testflight
另外也可以用 Reusing Workflow :
CD-Deploy-Firebase.yml:
1
2
3
4
5
6
7
8
9
10
11
12
13
14
15
16
17
18
19
20
21
22
23
24
25
26
27
28
29
30
31
32
33
34
35
36
37
38
39
40
41
name: Deploy Firebase

on:
  # 任意的觸發條件,這裡以手動表單觸發為例
  workflow_dispatch:
    inputs:
      RELEASE_NOTE:
        description: 'Release notes of the deployment.'
        required: false
        type: string
jobs:
  build:
    needs: Build
    uses: ./.github/workflows/CD-Build.yml
    secrets: inherit
    with:
      RELEASE_NOTE: ${{ inputs.RELEASE_NOTE }}

  deploy:
    runs-on: ubuntu-latest
    # Job 預設是並發執行,用 needs 限制需等待 build 完成才執行
    needs: [build]
    # 執行成功,才部署
    if: ${{ always() && needs.deploy.result == 'success' }}
    steps:
      - name: Checkout Code
        uses: actions/checkout@v4

      - name: Install Dependencies
        run: |
          make steup

      - name: Download Build Artifact
        uses: actions/download-artifact@v4
        with:
          name: build-artifact
          path: ./fastlane/build/

      - name: Deploy to Production
        run: |
          bundle exec fastlane deploy-firebase
GitHub Actions — Artifact
同 Cache,目前 就算是 Self-hosted Runner Artifcact 功能依然會走 GitHub Cloud 受到使用量限制 ( 免費帳號 500MB 起 )。
Self-hosted Runner 要達到類似的效果可以自行建立共享主機目錄或找其他工具替代。
因此目前 Artifact 實際我只用來存放小資料,例如 Snapshot Tests 的錯誤結果、測試報告…等等
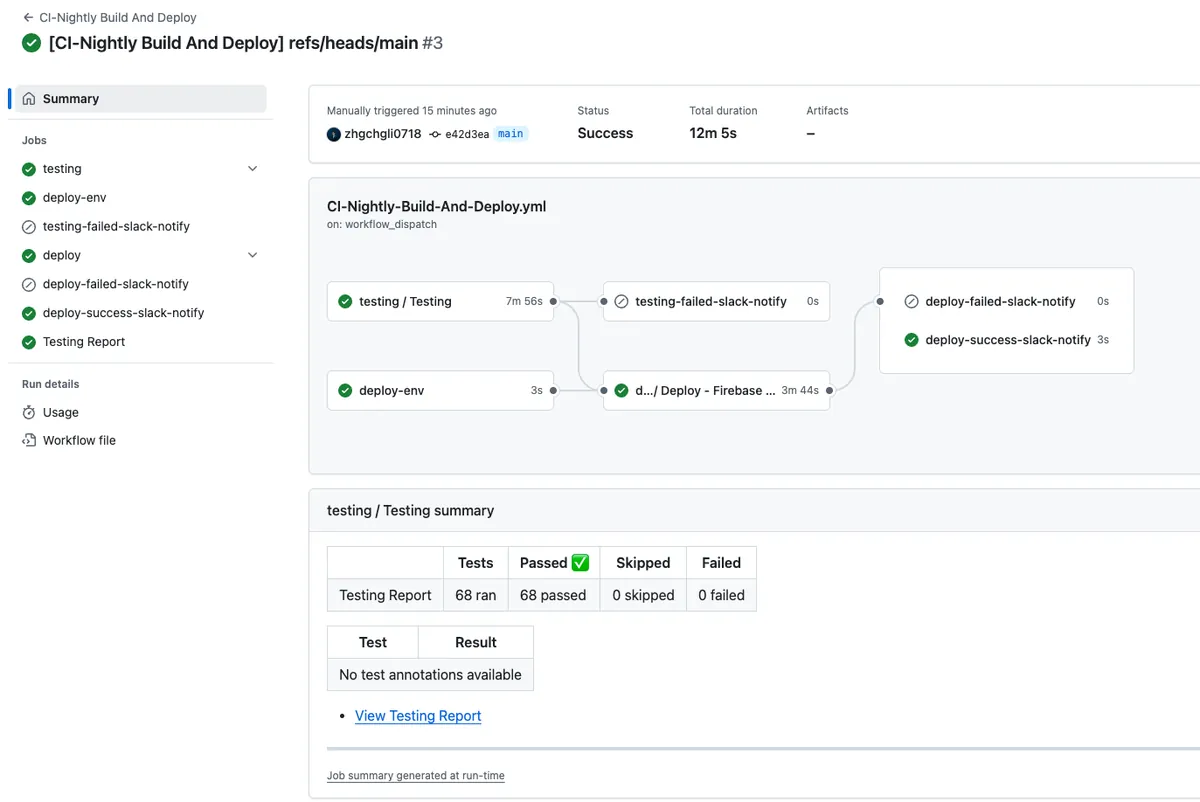
CI— Nightly Build 執行快照+單元測試+打包+CD 部署到 Firebase App Distribution
流程
每天凌晨 3 點自動針對 main(develop or master) 分支跑全部測試(unit+snapshot tests),如果失敗則傳送失敗通知到 Slack 工作群組;如果成功則打包+部署一個版本到 Firebase App Disturbution,打包成功/失敗都會傳送 Slack 通知。
CI-Nightly-Build-And-Deploy.yml
Repo → Actions → New workflow → set up a workflow yourself。
1
2
3
4
5
6
7
8
9
10
11
12
13
14
15
16
17
18
19
20
21
22
23
24
25
26
27
28
29
30
31
32
33
34
35
36
37
38
39
40
41
42
43
44
45
46
47
48
49
50
51
52
53
54
55
56
57
58
59
60
61
62
63
64
65
66
67
68
69
70
71
72
73
74
75
76
77
78
79
80
81
82
83
84
85
86
87
88
89
90
91
92
93
94
95
96
97
98
99
100
101
102
# Workflow(Action) 名稱
name: CI-Nightly Build And Deploy

# Actions Log 的標題名稱
run-name: "[CI-Nightly Build And Deploy] ${{ github.ref }}"

# 觸發事件
on:
  # 排程定時自動執行
  # https://crontab.guru/
  # UTC 時間
  schedule:
    # UTC 的 19:00 = 每天 UTC+8 的 03:00
    - cron: '0 19 * * *'
  # 手動觸發
  workflow_dispatch:

# Job 工作項目
# Job 會並發執行
jobs:
  # 測試工作
  testing:
    # Reuse Workflow (workflow_call)
    uses: ./.github/workflows/CI-Testing.yml
    # 傳遞所有 Secrets 給 CD-Testing.yml
    secrets: inherit
    with:
      # 執行全部測試
      TEST_LANE: "run_all_tests"
      # 目標分支:main, develop or master...etc
      BRANCH: "main"

  deploy-env:
    runs-on: ubuntu-latest
    outputs:
      DATE_STRING: ${{ steps.get_date.outputs.DATE_STRING }}
    steps:
      - name: Get Date String
        id: get_date
        run: |
          VERSION_DATE=$(date -u '+%Y%m%d')
          echo "${VERSION_DATE}"
          echo "DATE_STRING=${VERSION_DATE}" >> $GITHUB_ENV
          echo "DATE_STRING=${VERSION_DATE}" >> $GITHUB_OUTPUT

  deploy:
    # Job 預設是並發執行,用 needs 限制需等待 testing 和 deploy-env 完成才執行
    needs: [testing, deploy-env]
    # 如果測試成功才執行
    if: ${{ needs.testing.result == 'success' }}
    # Reuse Workflow (workflow_call)
    uses: ./.github/workflows/CD-Deploy.yml
    # 傳遞所有 Secrets 給 CD-Deploy.yml
    secrets: inherit
    with:
      VERSION_NUMBER: NightlyBuild-${{ needs.deploy-env.outputs.DATE_STRING }}
      RELEASE_NOTE: NightlyBuild-${{ needs.deploy-env.outputs.DATE_STRING }}
      # 目標分支:main, develop or master...etc
      BRANCH: "main"

# ----- Slack Notify -----
  testing-failed-slack-notify:
    needs: [testing]
    runs-on: ubuntu-latest
    if: ${{ needs.testing.result == 'failure' }}
    steps:
      - name: Post text to a Slack channel
        uses: slackapi/[email protected]
        with:
          method: chat.postMessage
          token: ${{ secrets.SLACK_BOT_TOKEN }}
          payload: |
            channel: ${{ vars.SLACK_TEAM_CHANNEL_ID }}
            text: ":x: Nightly Build - Testing 失敗\nWorkflow: <${{ github.server_url }}/${{ github.repository }}/actions/runs/${{ github.run_id }}|View Run>"

  deploy-failed-slack-notify:
    needs: [deploy]
    runs-on: ubuntu-latest
    if: ${{ needs.deploy.result == 'failure' }}
    steps:
      - name: Post text to a Slack channel
        uses: slackapi/[email protected]
        with:
          method: chat.postMessage
          token: ${{ secrets.SLACK_BOT_TOKEN }}
          payload: |
            channel: ${{ vars.SLACK_TEAM_CHANNEL_ID }}
            text: ":x: Nightly Build Deploy 失敗\nWorkflow: <${{ github.server_url }}/${{ github.repository }}/actions/runs/${{ github.run_id }}|View Run>"

  deploy-success-slack-notify:
    needs: [deploy]
    runs-on: ubuntu-latest
    if: ${{ needs.deploy.result == 'success' }}
    steps:
      - name: Post text to a Slack channel
        uses: slackapi/[email protected]
        with:
          method: chat.postMessage
          token: ${{ secrets.SLACK_BOT_TOKEN }}
          payload: |
            channel: ${{ vars.SLACK_TEAM_CHANNEL_ID }}
            text: ":white_check_mark: Nightly Build Deploy 成功\nWorkflow: <${{ github.server_url }}/${{ github.repository }}/actions/runs/${{ github.run_id }}|View Run>"
Commit 檔案到 Repo 主分支,手動觸發測試、打包功能看看結果:
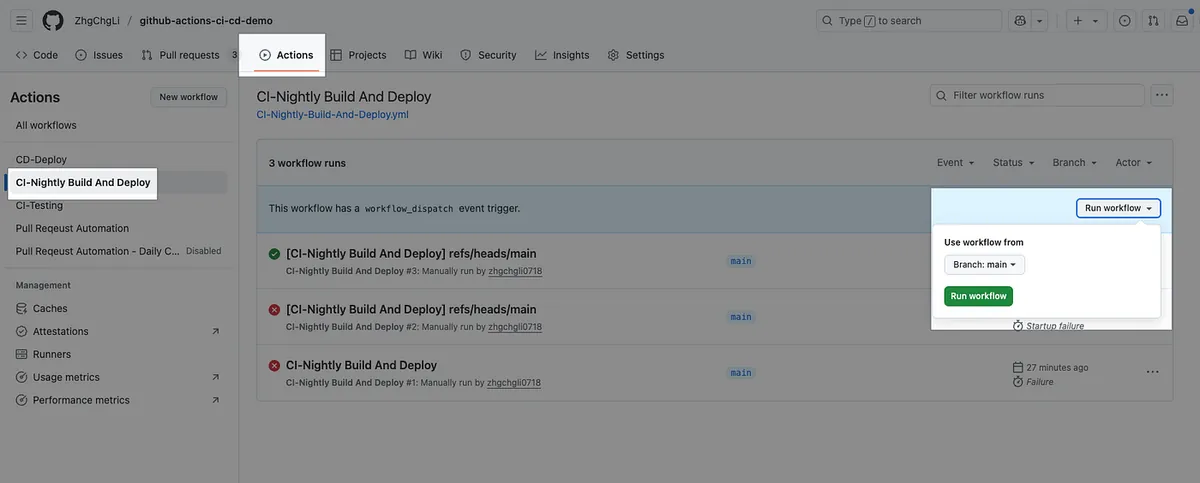
日後會每日自動觸發。

等待測試任務、打包部署任務、通知任務都完成後,查看結果。
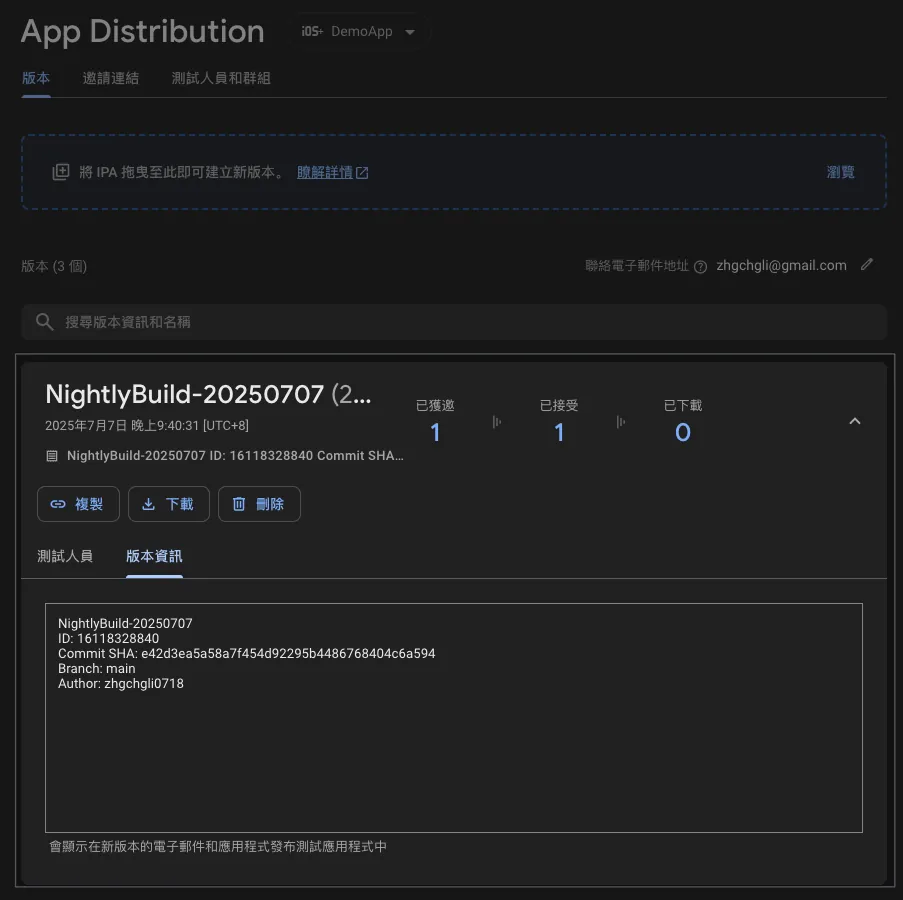
我們就能直接在手機上安裝 Nightly Build 版本來進行搶先體驗測試。
技術細節
這個 Action 我們直接復用前面設計的 CI-Testing 和 CD-Deploy,組合成我們的 Nightly Build,非常彈性好用!
完整程式碼: CI-Nightly-Build-And-Deploy.yml
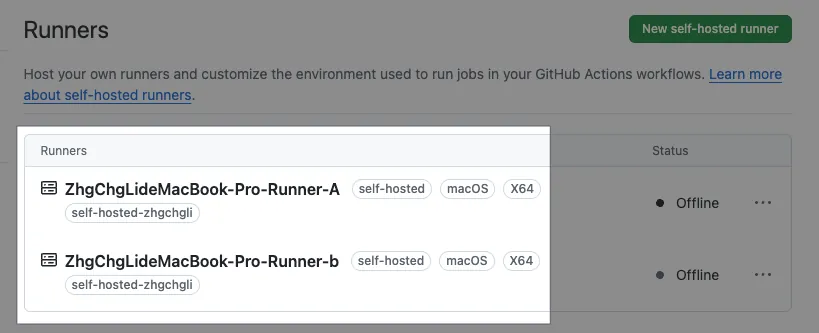
Self-hosted Runner 注意事項
本文是 Public Repo 因此直接使用 GitHub Hosted 的 macOS Runner,但在實際工作上我們的 Repo 一定是 Private,直接使用 GitHub Hosted Runner 超貴不划算(約一個月就能買一台 Mac Mini 放在公司吃到飽爽爽跑),每一台依照效能可以起多個 Runner 同時並發接任務來做。
細節可參考 上一篇 「 Self-hosted Runner 建置與改用 」部分 ,在本地電腦安裝好 XCode 跟基本環境後註冊、啟用 Runner、Action Worflow YAML 中把
runs-on改成[self-hosted]即可。
多個 Runner 在同一台電腦的問題,我們多半已在上面的 Actions 裡解決了,例如把所有依賴的共用目錄都改成本地目錄,還有一個測試會遇到的問題要解決,就是搶模擬器問題:「 當兩個測試 Job 被兩個 Runner 在同一台機器上同時檢來做,如果指定同個模擬器就會互相干擾導致測試失敗。」
解決方法也很容易,就是為個別 Runner 都設定一台模擬器。
多個 Runner 在同台機器的模擬器設定
假設我 同一台電腦上有兩個 Runner 在並行接收任務:
ZhgChgLideMacBook-Pro-Runner-AZhgChgLideMacBook-Pro-Runner-B
在 XCode 模擬器設定我們就需要新增兩個模擬器:
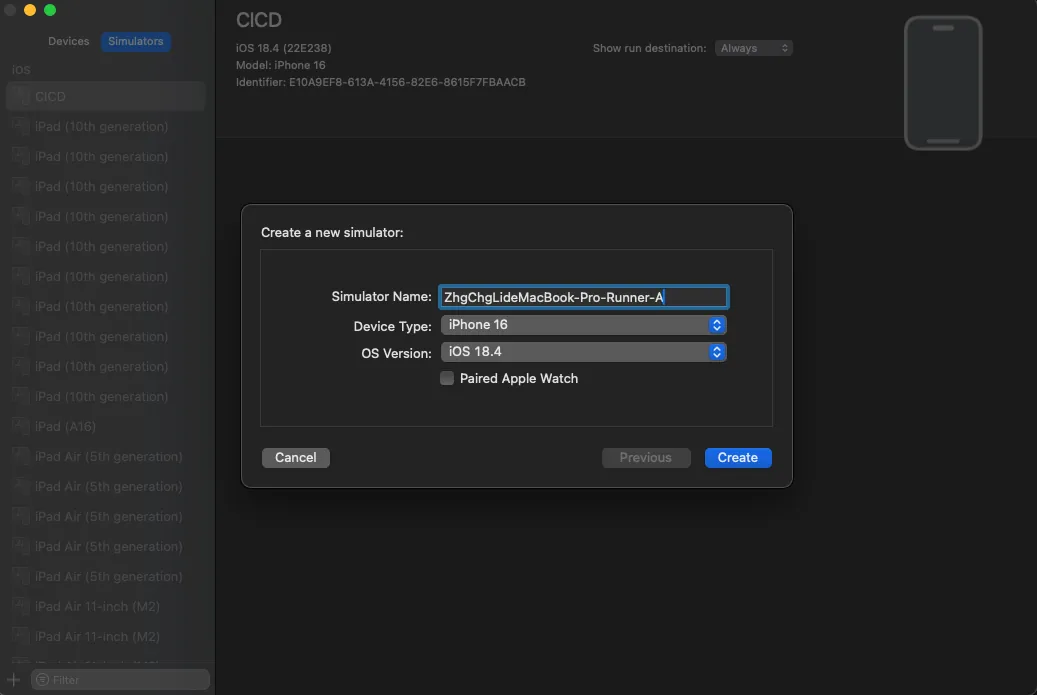
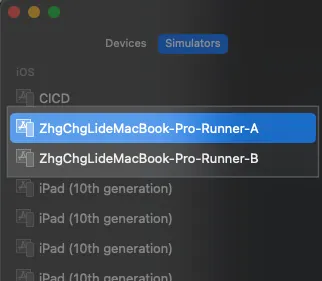
- 型號、iOS 版本同測試環境
CI-Testing.yml 中測試步驟改成:
1
2
3
4
5
6
7
8
9
10
11
12
13
14
15
16
17
18
19
20
# 執行 Fastlane Unit 測試 Lane
      - name: Run Tests
        id: testing
        # 指定工作目錄,這樣後續指令就不用在特別 cd ./Product/
        working-directory: ./Product/
        env:
          # ...
          # Repo -> Settings -> Actions secrets and variables -> variables
          # 模擬器的 iOS 版本
          SIMULATOR_IOS_VERSION: ${{ vars.SIMULATOR_IOS_VERSION }}

          # 當前 Runner 名稱
          RUNNER_NAME: ${{ runner.name }}

          # ...
        run: |

          # ...
          bundle exec fastlane ${TEST_LANE} device:"${RUNNER_NAME} (${SIMULATOR_IOS_VERSION})" | tee "$RUNNER_TEMP/testing_output.txt"
          # ...
device改成${RUNNER_NAME} (${SIMULATOR_IOS_VERSION})SIMULATOR_IOS_VERSION還是統一看 Repo variables 變數
組合結果就會是(以 18.4 為例):
- Runner:
ZhgChgLideMacBook-Pro-Runner-A模擬器: ZhgChgLideMacBook-Pro-Runner-A(18.4) - Runner:
ZhgChgLideMacBook-Pro-Runner-B模擬器: ZhgChgLideMacBook-Pro-Runner-B(18.4)
這樣兩個 Runner 同時在執行測試時就會起兩個模擬器自己跑自己的了。
完整專案 Repo
補充 SSH Agent 設定 — For Fastlane Match or Private CocoaPods Repo
在使用 Fastlane Match 或 Private CocoaPods Repo,因為是在另一個 Private Repo 當中,當前 Repo/Action 環境無法直接 git clone,需要使用 ssh agent 設定好環境,在 Action 執行時才有權限操作。
Step 1. 產生 SSH Key
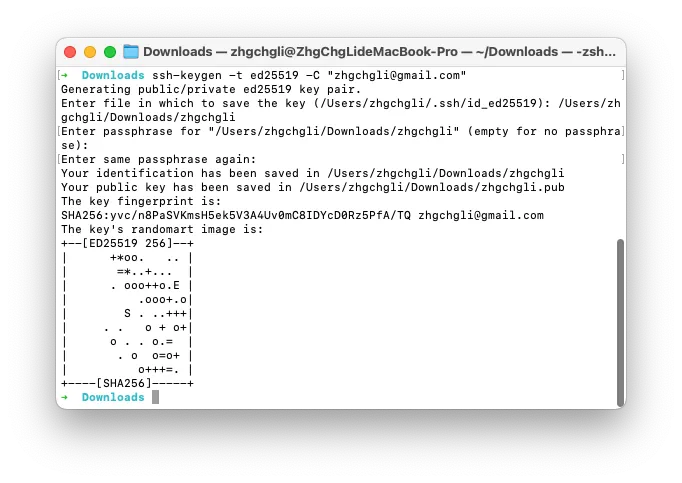
1
ssh-keygen -t ed25519 -C "[email protected]"
Enter file in which to save the key (/Users/zhgchgli/.ssh/id_ed25519): /Users/zhgchgli/Downloads/zhgchgli
- 輸入到下載路徑方便我們拷貝內容
Enter passphrase for “/Users/zhgchgli/Downloads/zhgchgli” (empty for no passphrase):
- 留空: CI/CD 使用,無法在 CLI 交互下輸入 Passphrase, 因此請留空
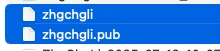
- 產生完畢 ( .pub/private_key)
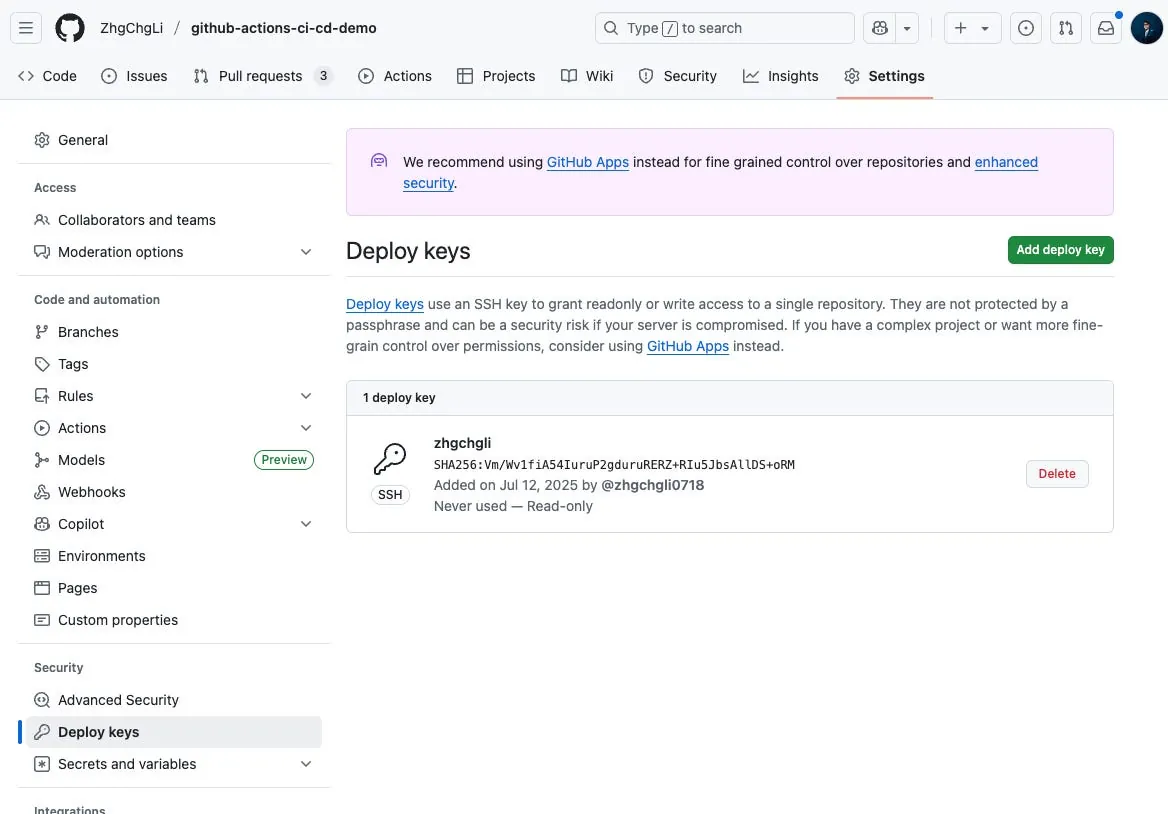
Step 2. 到 Private Repo 設定 Deploy Key
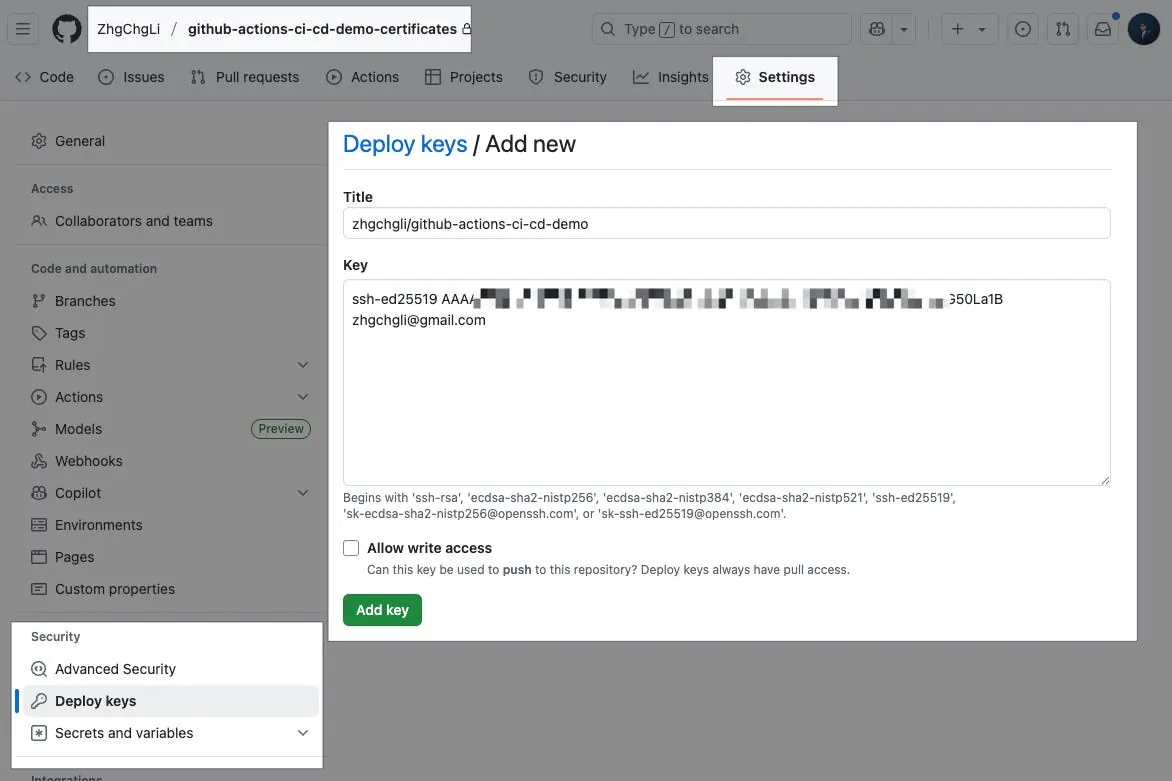
github-actions-ci-cd-demo-certificates Repo
Settings → Security → Deploy keys → Add deploy key。
- Title: 輸入 Key 名稱
- Key:
貼上 .pub Key 內容
完成。
Step 3. 回 Action 的 Repo 設定 SSH Private Key to Secrets

github-actions-ci-cd-demo Repo
Settings → Secrets and variables → Actions → New repository secret。
- Name: 輸入密鑰變數名稱
SSH_PRIVATE_KEY - Secret:
貼上 private_key 內容
完成。
Step 4. SSH Agent 設定完成,來驗證一下 Git Clone Private Repo 的權限
Demo-Git-Clone-Private-Repo.yml :
1
2
3
4
5
6
7
8
9
10
11
12
13
14
15
16
17
18
19
20
21
22
23
24
25
26
27
28
29
30
31
32
33
34
35
name: Demo Git Clone Private Repo

on:
  workflow_dispatch:

jobs:
  clone-private-repo:
    name: Git Clone Private Repo
    runs-on: ubuntu-latest
    timeout-minutes: 30

    steps:
      # 🔐 啟用 SSH Agent 並加入私鑰
      - name: Setup SSH Agent
        uses: webfactory/[email protected]
        with:
          ssh-private-key: ${{ secrets.SSH_PRIVATE_KEY }}

      # 🛡️ 將 github.com 加入 known_hosts 以避免 host verification 錯誤
      - name: Add GitHub to known_hosts
        run: |
          mkdir -p ~/.ssh
          ssh-keyscan github.com >> ~/.ssh/known_hosts
      # 📦 使用 SSH clone private repo 並驗證
      - name: Clone and Verify Private Repo
        run: |
          git clone [email protected]:ZhgChgLi/github-actions-ci-cd-demo-certificates.git ./fakeMatch/
          if [ -d "./fakeMatch/.git" ]; then
            echo "✅ Repo cloned successfully into ./fakeMatch/"
            cd ./fakeMatch
            echo "📌 Current commit: $(git rev-parse --short HEAD)"
          else
            echo "❌ Clone failed. SSH Agent may not be configured properly."
            exit 1
          fi
可以用以上 Action 驗證一下是否設定成功。
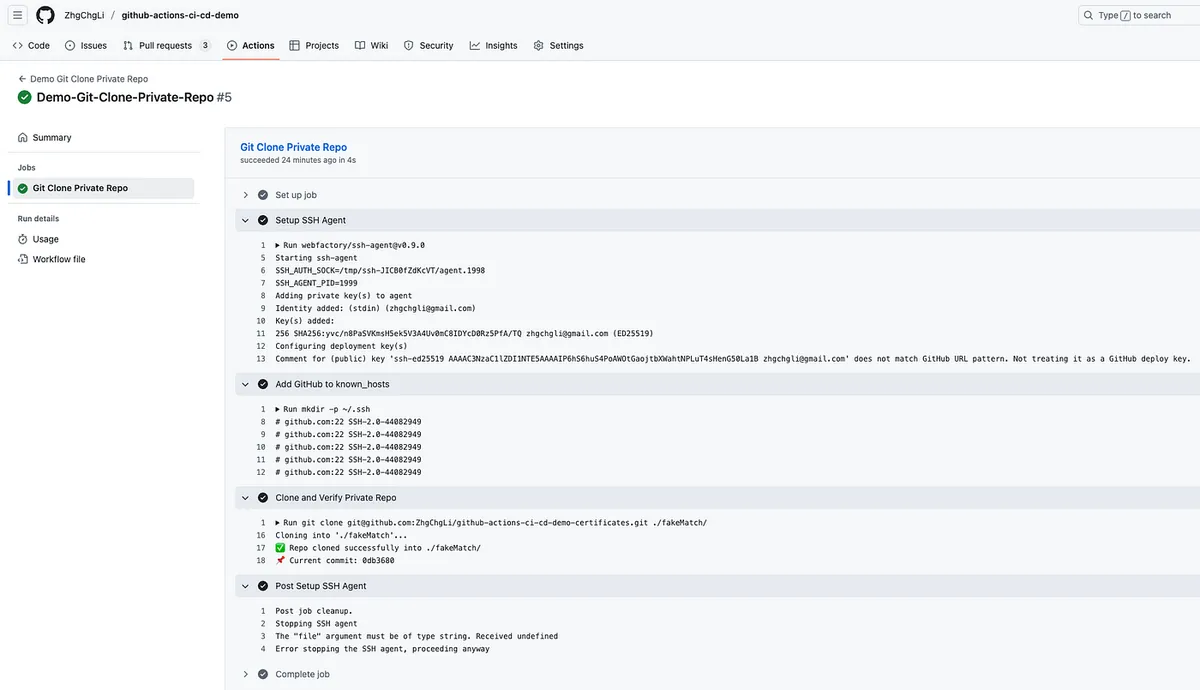
成功,後續 fastlane match or pod install private pods 應該就能正確執行。
總結
這篇文章詳細紀錄了使用 GitHub Actions 開發完整的 iOS CI/CD 流程,下一篇將優化使用者端(工程師/PM/設計師)體驗, 完善 Slack 通知及使用 Google Apps Script Web App 串接 GitHub Actions 打造免費易用的跨團隊打包平台工具。
系列文章:
- CI/CD 實戰指南(一):CI/CD 是什麼?如何透過 CI/CD 打造穩定高效的開發團隊?工具選擇?
- CI/CD 實戰指南(二):GitHub Actions 與 self-hosted Runner 使用與建置大全
- CI/CD 實戰指南(三):使用 GitHub Actions 實作 App 專案的 CI 與 CD 工作流程
- CI/CD 實戰指南(四):使用 Google Apps Script Web App 串接 GitHub Actions 建置免費易用的打包工具平台
🍺 Buy me a beer on PayPal
本系列文章花費了大量的時間精力撰寫,如果內容對您有幫助、對您的團隊有實質提升工作效率與產品品質;歡迎請我喝杯咖啡,感謝支持!
有任何問題及指教歡迎 與我聯絡 。
本文首次發表於 Medium (點此查看原始版本),由 ZMediumToMarkdown 提供自動轉換與同步技術。