
iOS UITextView 文繞圖編輯器 (Swift)
實戰路線
目標功能:
APP上有一個讓使用者能發表文章的討論區功能,發表文章功能介面需要能輸入文字、插入多張圖片、支援文繞圖穿插.
功能需求:
- 能輸入多行文字
- 能在行中穿插圖片
- 能上傳多張圖片
- 能隨意移除插入的圖片
- 圖片上傳效果/失敗處理
- 能將輸入內容轉譯成可傳遞文本 EX: BBCODE
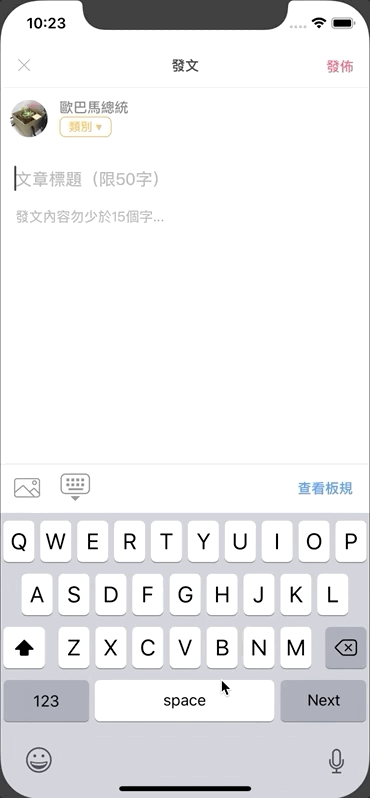
先上個成品效果圖:
開始:
第一章
什麼?你說第一章?不就用UITextView就能做到編輯器功能,哪來還需要分到「章節」;是的,我一開始的反應也是如此,直到我開始做才發現事情沒有那麼簡單,其中苦惱了我兩個星期、翻片國內外各種資料最後才找到解法,實作的心路歷程就讓我娓娓道來….
如果想直接知道最終解法,請直接跳到最後一章(往下滾滾滾滾滾).
一開始
文字編輯器理所當然是使用UITextView元件,看了一下文件UITextView attributedText 自帶 NSTextAttachment物件 可以附加圖片實做出文繞圖效果,程式碼也很簡單:
let imageAttachment = NSTextAttachment()
imageAttachment.image = UIImage(named: "example")
self.contentTextView.attributedText = NSAttributedString(attachment: imageAttachment)
當初天真的我還很開心想說蠻簡單的啊、好方便;問題現在才正要開始:
- 圖片要能是從本地選擇&上傳:這好解決,圖片選擇器我使用 TLPhotoPicker 這個套件(支援多圖選擇/客製化設定/切換相機拍照/Live Photos),具體作法就是 TLPhotoPicker選完圖片Callback後將PHAsset轉成UIImage塞進去imageAttachment.image並預先在背景上傳圖片至Server。
- 圖片上傳要有效果並能添加互動操作(點擊查看原圖/點擊X能刪除):沒做出來,找不到NSTextAttachment有什麼辦法能做到這項需求,不過這功能沒有還行反正還是能刪除(在圖片後按鍵盤上的「Back」鍵能刪除圖片),我們繼續…
- 原始圖檔案過大,上傳慢、插入慢、吃效能:插入及上傳前先Resize過,用 Kingfisher 的resizeTo
- 圖片插入在游標停留的位置:這裡就要將原本的Code改成如下
let range = self.contentTextView.selectedRange.location ?? NSRange(location: 0, length: 0)
let combination = NSMutableAttributedString(attributedString: self.contentTextView.attributedText) //取得當前內容
combination.insert(NSAttributedString(attachment: imageAttachment), at: range)
self.contentTextView.attributedText = combination //回寫回去
- 圖片上傳失敗處理:這裡要說一下,我實際另外寫了一個Class 擴充原始的 NSTextAttachment 目的就是要多塞個屬性存識別用的值
class UploadImageNSTextAttachment:NSTextAttachment {
   var uuid:String?
}
上傳圖片時改成:
let id = UUID().uuidString
let attachment = UploadImageNSTextAttachment()
attachment.uuid = id
有辦法辨識NSTextAttachment的對應之後,我們就能針對上傳失敗的圖片,去attributedTextd裡做NSTextAttachment搜索,找到他並取代成錯誤提示圖或直接移除
if let content = self.contentTextView.attributedText {
    content.enumerateAttributes(in: NSMakeRange(0, content.length),  options: NSAttributedString.EnumerationOptions(rawValue: 0)) { (object, range, stop) in
        if object.keys.contains(NSAttributedStringKey.attachment) {
            if let attachment = object[NSAttributedStringKey.attachment] as? UploadImageNSTextAttachment,attachment.uuid == "目標ID" {
                attachment.bounds = CGRect(x: 0, y: 0, width: 30, height: 30)
                attachment.image =  UIImage(named: "IconError")
                let combination = NSMutableAttributedString(attributedString: content)
                combination.replaceCharacters(in: range, with: NSAttributedString(attachment: attachment))
                //如要直接移除可用deleteCharacters(in: range)
                self.contentTextView.attributedText = combination
            }
        }
    }
}
克服上述問題後,程式碼大約會長成這樣:
class UploadImageNSTextAttachment:NSTextAttachment {
    var uuid:String?
}
func dismissPhotoPicker(withTLPHAssets: [TLPHAsset]) {
    //TLPhotoPicker 圖片選擇器的Callback

    let range = self.contentTextView.selectedRange.location ?? NSRange(location: 0, length: 0)
    //取得游標停留位置,無則從頭

    guard withTLPHAssets.count > 0 else {
        return
    }

    DispatchQueue.global().async { in
        //在背景處理
        let orderWithTLPHAssets = withTLPHAssets.sorted(by: { $0.selectedOrder > $1.selectedOrder })
        orderWithTLPHAssets.forEach { (obj) in
            if var image = obj.fullResolutionImage {

                let id = UUID().uuidString

                var maxWidth:CGFloat = 1500
                var size = image.size
                if size.width > maxWidth {
                    size.width = maxWidth
                    size.height = (maxWidth/image.size.width) * size.height
                }
                image = image.resizeTo(scaledToSize: size)
                //縮圖

                let attachment = UploadImageNSTextAttachment()
                attachment.bounds = CGRect(x: 0, y: 0, width: size.width, height: size.height)
                attachment.uuid = id

                DispatchQueue.main.async {
                    //切回主執行緒更新UI插入圖片
                    let combination = NSMutableAttributedString(attributedString: self.contentTextView.attributedText)
                    attachments.forEach({ (attachment) in
                        combination.insert(NSAttributedString(string: "\n"), at: range)
                        combination.insert(NSAttributedString(attachment: attachment), at: range)
                        combination.insert(NSAttributedString(string: "\n"), at: range)
                    })
                    self.contentTextView.attributedText = combination

                }

                //上傳圖片至Server
                //Alamofire post or....
                //POST image
                //if failed {
                    if let content = self.contentTextView.attributedText {
                        content.enumerateAttributes(in: NSMakeRange(0, content.length),  options: NSAttributedString.EnumerationOptions(rawValue: 0)) { (object, range, stop) in

                            if object.keys.contains(NSAttributedStringKey.attachment) {
                                if let attachment = object[NSAttributedStringKey.attachment] as? UploadImageNSTextAttachment,attachment.uuid == obj.key {

                                    //REPLACE:
                                    attachment.bounds = CGRect(x: 0, y: 0, width: 30, height: 30)
                                    attachment.image = //ERROR Image
                                    let combination = NSMutableAttributedString(attributedString: content)
                                    combination.replaceCharacters(in: range, with: NSAttributedString(attachment: attachment))
                                    //OR DELETE:
                                    //combination.deleteCharacters(in: range)

                                    self.contentTextView.attributedText = combination
                                }
                            }
                        }
                    }
                //}
                //

            }
        }
    }
}
到此差不多問題都解決了,那是什麼苦惱了我兩週呢?
答:「記憶體」問題
iPhone 6頂不住啊!
以上做法插入超過5張圖片,UITextView就會開始卡頓;到一個程度就會因為記憶體負荷不了APP直接閃退
p.s 試過各種壓縮/其他儲存方式,結果依然
推測原因是,UITextView沒有針對圖片的NSTextAttachment做Reuse,你所插入的所有圖片都Load在記憶體之中不會釋放;所以除非是拿來穿插表情符號那種小圖😅,不然根本不能拿來做文繞圖
第二章
發現記憶體這個「硬傷」後,繼續在網路上搜索解決方案,得到以下其他做法:
- 用WebView嵌套HTML檔案( <div contentEditable=”true”></div>)並用JS跟WebView做交互處理
- 用UITableView结合UITextView,能Reuse
- 基於TextKit自行擴充UITextView🏆
第一項用WebView嵌套HTML檔案的做法;考量到效能跟使用者體驗,所以不考慮,有興趣的朋友可以在Github搜尋相關的解決方案(EX: RichTextDemo )
第二項用UITableView结合UITextView
我實作了大約7成出來,具體大約是每一行都是一個Cell,Cell有兩種,一種是UITextView另一種是UIImageView,圖片一行文字一行;內容必須用陣列去儲存,避免Reuse過程消失
能優秀的Reuse解決記憶體問題,但做到後面還是放棄了,在 控制行尾按Return要能新建一行並跳到該行 和 控制行頭按Back鍵要能跳到上一行(若當前為空行要能刪除該行) 這兩個部分上吃足苦頭,非常難控制
有興趣的朋友可參考: MMRichTextEdit 」
最終章
走到這裡已經耗費了許多時間,開發時程嚴重拖延;目前最終解法就是用TextKit
這裡附上兩篇找到的文章給有興趣研究的朋友:
但有一定的學習門檻,對我這個菜鳥來說太難了,再說時間也已不夠,只能漫無目的在Github尋找他山之石借借用用
最終找到 XLYTextKitExtension 這個項目,可以直接引入Code使用
✔ 讓 NSTextAttachment 支援自訂義UIView 要加什麼交互操作都可以
✔ NSTextAttachment 可以Reuse 不會撐爆記憶體
具體實作方式跟 第一章 差不多,就只差在原本是用NSTextAttachment而現在改用XLYTextAttachment
針對要使用的UITextView:
contentTextView.setUseXLYLayoutManager()
Tip 1:插入NSTextAttachment的地方改為
let combine = NSMutableAttributedString(attributedString: NSAttributedString(string: ""))
let imageView = UIView() // your custom view
let imageAttachment = XLYTextAttachment { () -> UIView in
    return imageView
}
imageAttachment.id = id
imageAttachment.bounds = CGRect(x: 0, y: 0, width: size.width, height: size.height)
combine.append(NSAttributedString(attachment: imageAttachment))
self.contentTextView.textStorage.insert(combine, at: range)
Tip 2:NSTextAttachment搜索改為
self.contentTextView.textStorage.enumerateAttribute(NSAttributedStringKey.attachment, in: NSRange(location: 0, length: self.contentTextView.textStorage.length), options: []) { (value, range, stop) in
    if let attachment = value as? XLYTextAttachment {
        //attachment.id
    }
}
Tip 3:刪除NSTextAttachment項目改為
self.contentTextView.textStorage.deleteCharacters(in: range)
Tip 4:取得當前內容長度
self.contentTextView.textStorage.length
Tip 5:刷新Attachment的Bounds大小
主因是為了使用者體驗;插入圖片時我會先塞一張loading圖,插入的圖片在背景壓縮後才會替換上去,要去更新TextAttachment的Bounds成Resize後大小
self.contentTextView.textStorage.addAttributes([:], range: range)
(新增空屬性,觸發刷新)
Tip 6: 將輸入內容轉譯成可傳遞文本
運用Tip 2搜索全部輸入內容並將找到的Attachment取出ID組合成類似[[ID]]格式傳遞
Tip 7: 內容取代
self.contentTextView.textStorage.replaceCharacters(in: range,with: NSAttributedString(attachment: newImageAttachment))
Tip 8: 正規表示法匹配內容所在Range
let pattern = "(\\[\\[image_id=){1}([0-9]+){1}(\\]\\]){1}"
let textStorage = self.contentTextView.textStorage

if let regex = try? NSRegularExpression(pattern: pattern, options: .caseInsensitive) {
    while true {
        let range = NSRange(location: 0, length: textStorage.length)
        if let match = regex.matches(in: textStorage.string, options: .withTransparentBounds, range: range).first {
            let matchString = textStorage.attributedSubstring(from: match.range)
            //FINDED!
        } else {
            break
        }
    }
}
注意:如果你要搜尋&取代項目,需要使用While迴圈,不然當有多個搜尋結果時,找到第一個並取代後,後面的搜尋結果的Range就會錯誤導致閃退.
結語
目前使用此方法完成成品並上線了,還沒遇到有什麼問題;有時間我再來好好探究一下其中的原理吧!
這篇比較不是教學文章,而是個人解題心得分享;如果您也在實作類似功能,希望有幫助到你,有任何問題及指教歡迎與我聯絡.
Medium的正式第一篇


留言 · Comments