
CI/CD Practical Guide (Part 4): Using Google Apps Script Web App to Connect GitHub Actions and Build a Free, Easy-to-Use Packaging Tool Platform
GAS Web App Integrates GitHub, Slack, Firebase, or Asana/Jira APIs to Build a Relay Station, Providing a Cross-Team Shared Packaging Tool Platform

Photo by Lee Campbell
Preface
In the previous article “CI/CD Practical Guide (Part 3): Implementing iOS App CI and CD Workflows with GitHub Actions,” we completed the foundational CI/CD setup for the iOS app project. Now, CI can automatically run tests and CD can handle packaging and deployment. However, in real product development workflows, packaging and deployment are mostly done to deliver builds to other functional teams for QA (Quality Assurance) testing. At this point, the CD process is no longer limited to the engineering side; it may involve QA, PM, design (Design QA), or even the boss wanting to try it out first.
GitHub Actions workflow_dispatch manual trigger events provide a simple form for users to start builds. However, this is unfriendly for non-engineers who may not understand: what is a branch? Should fields be filled? How to know when the build is done? How to download it once ready? …etc.
There is also a permission control issue. To let other team members use GitHub Actions for builds, you have to add their accounts to the repo. This is insecure and unreasonable from a security perspective, as they get access to the entire source code just to operate the build form.
Unlike Jenkins, which has an independent web tool platform, GitHub Actions only provides this functionality.
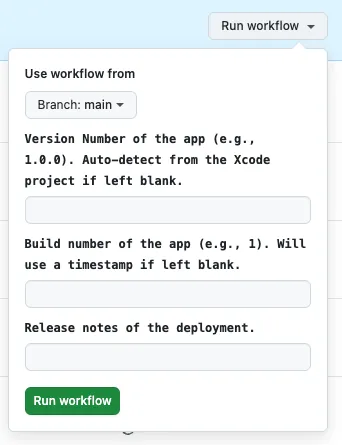
workflow_dispatch form style
Therefore, we need an intermediary packaging platform to serve other functional users, integrating Asana/Jira task tickets so that users can directly package the app using the task ticket and view the progress and download the packaging results on it.
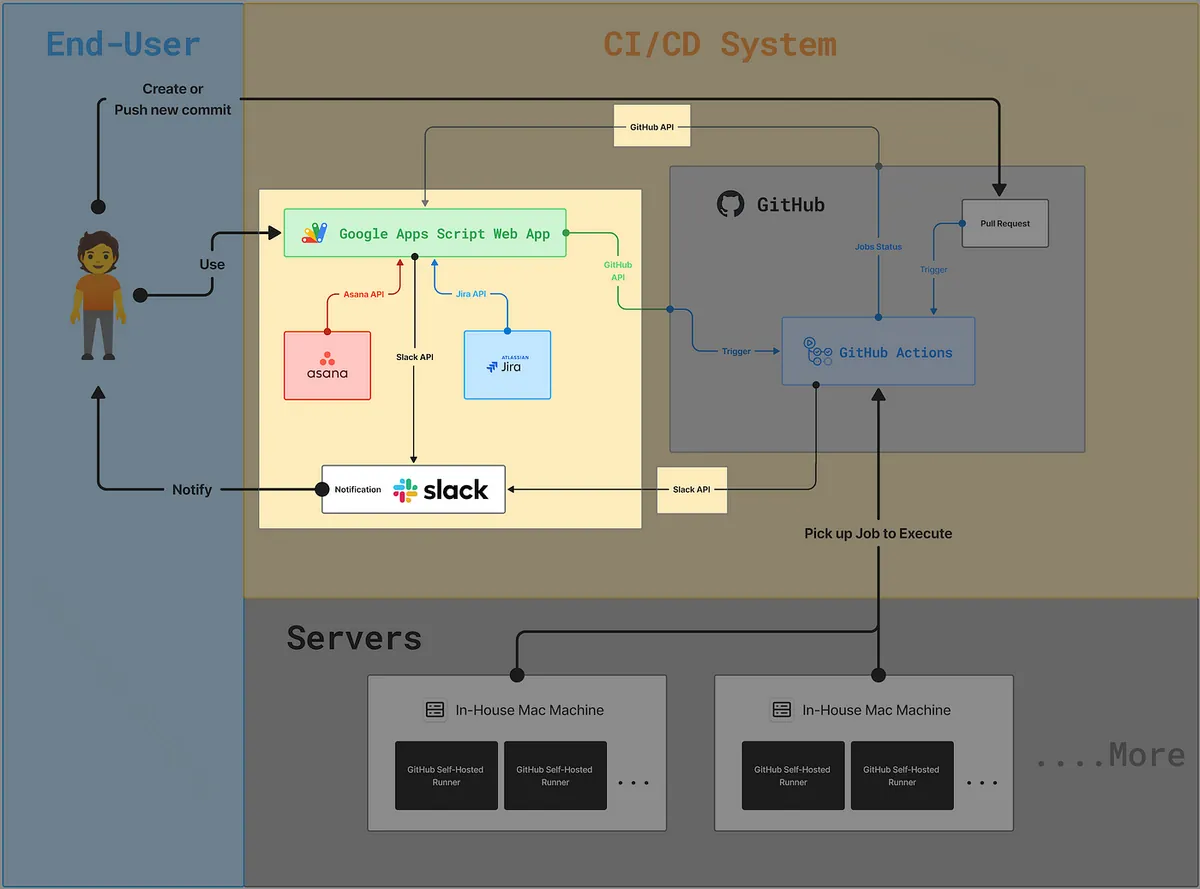
GAS Web App Relay Station
Previous article focused on the core GitHub Actions CI/CD workflow development on the right side; this article focuses on the left side—the end-user packaging tool platform and enhancing user experience.
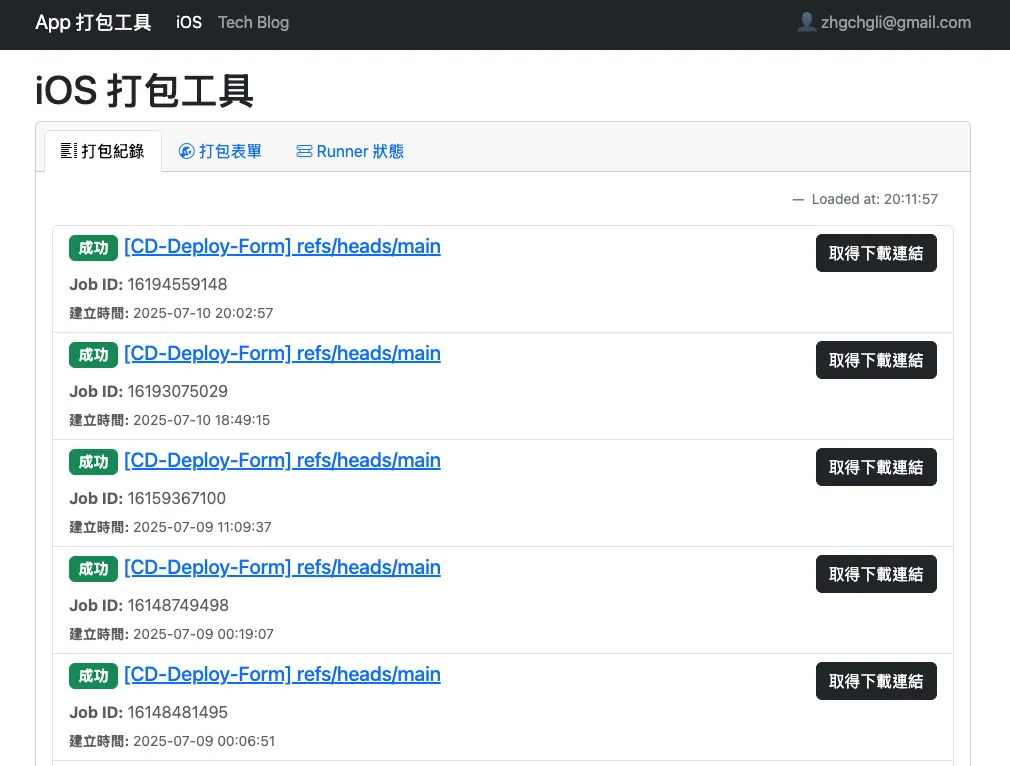
Google Apps Script — Web App Packaging Tool Platform Result Image
-
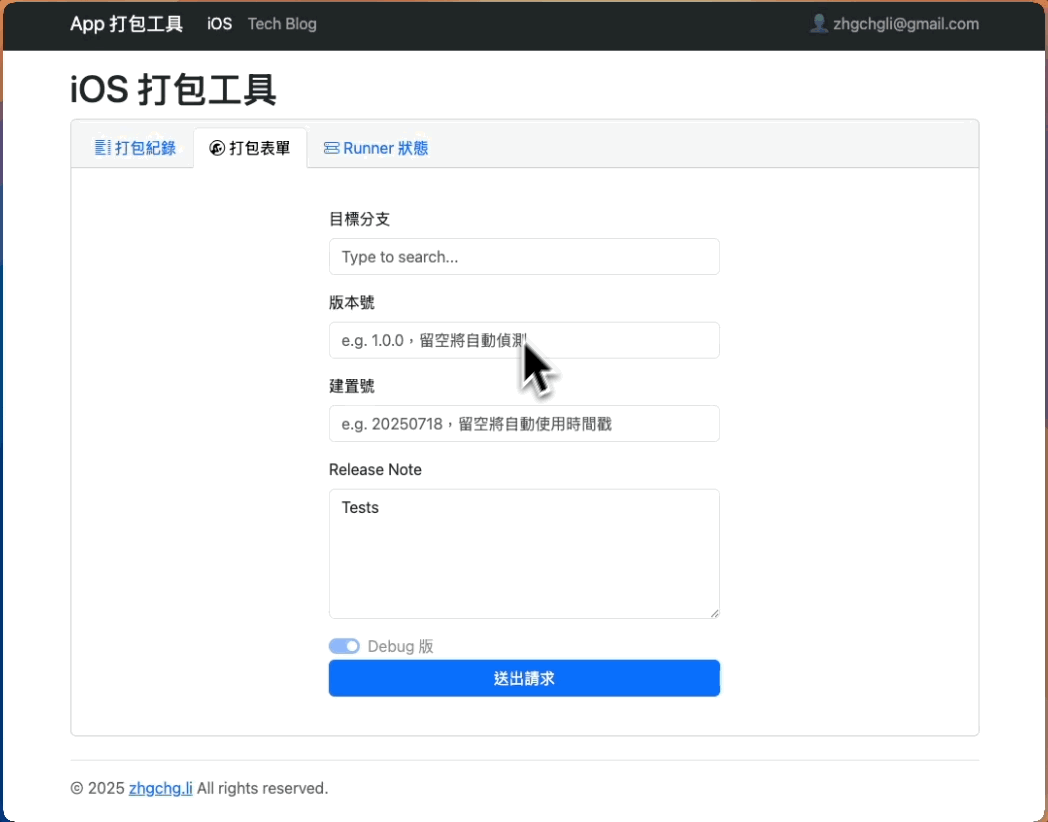
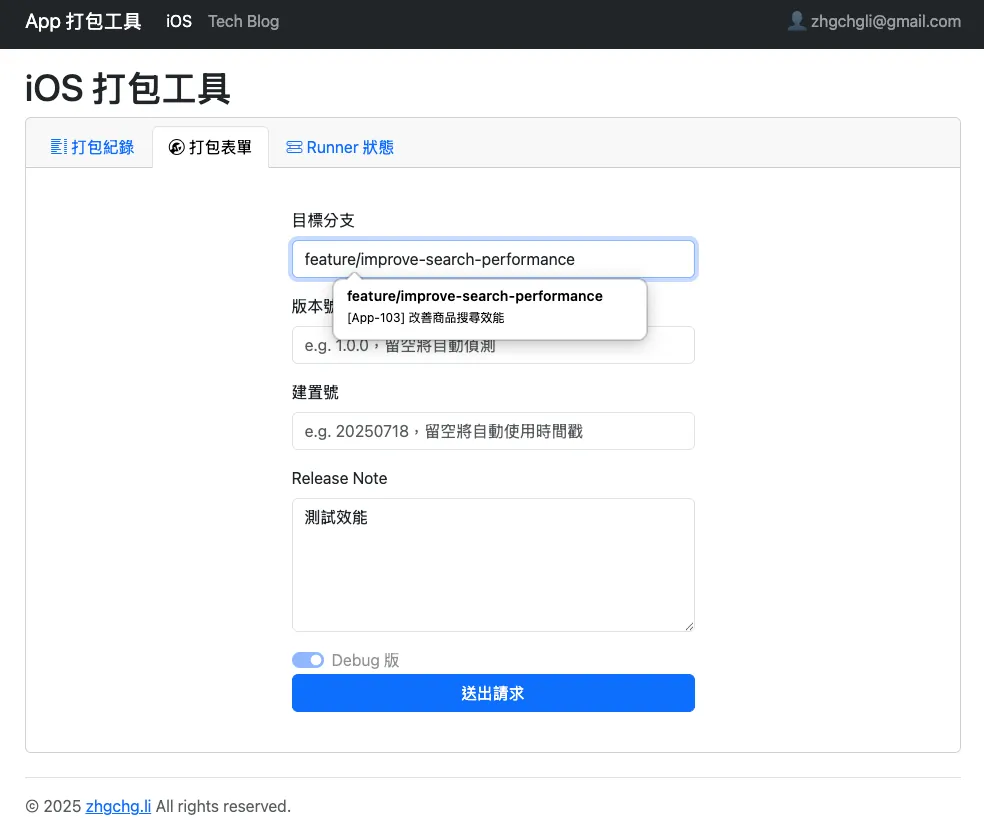
Packaging Form: Integrate project management tools to fetch ticket numbers and GitHub to retrieve open Pull Requests.
-
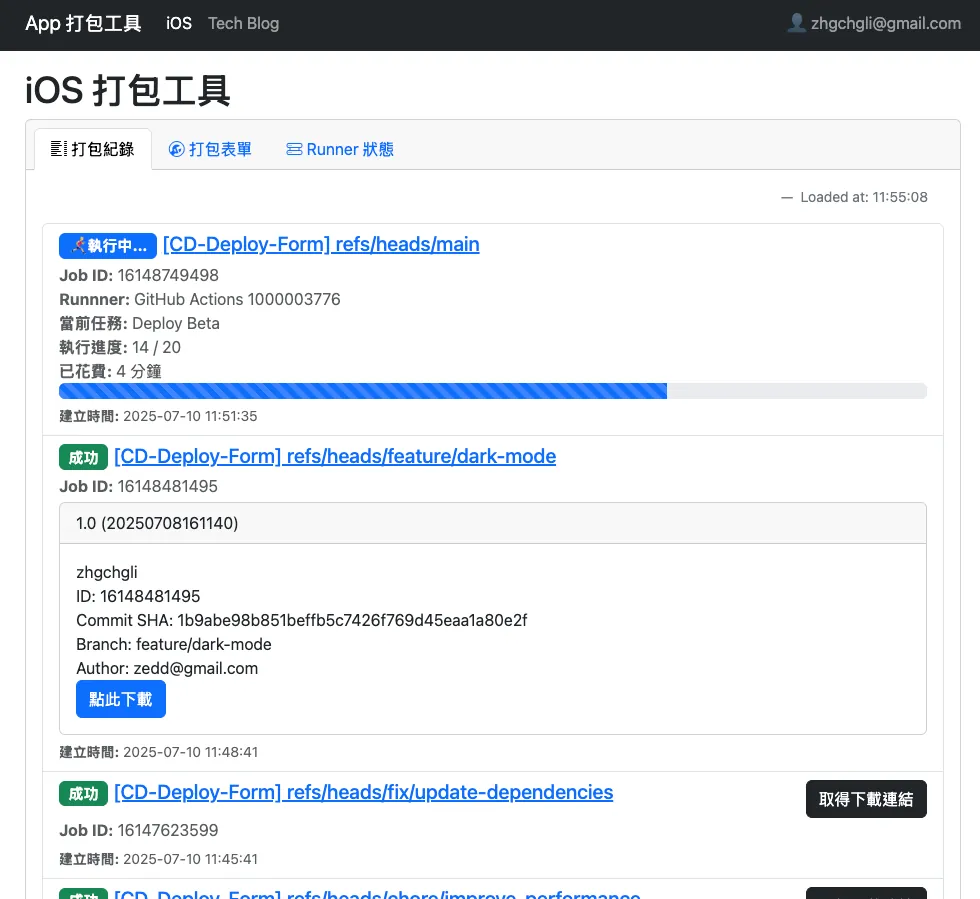
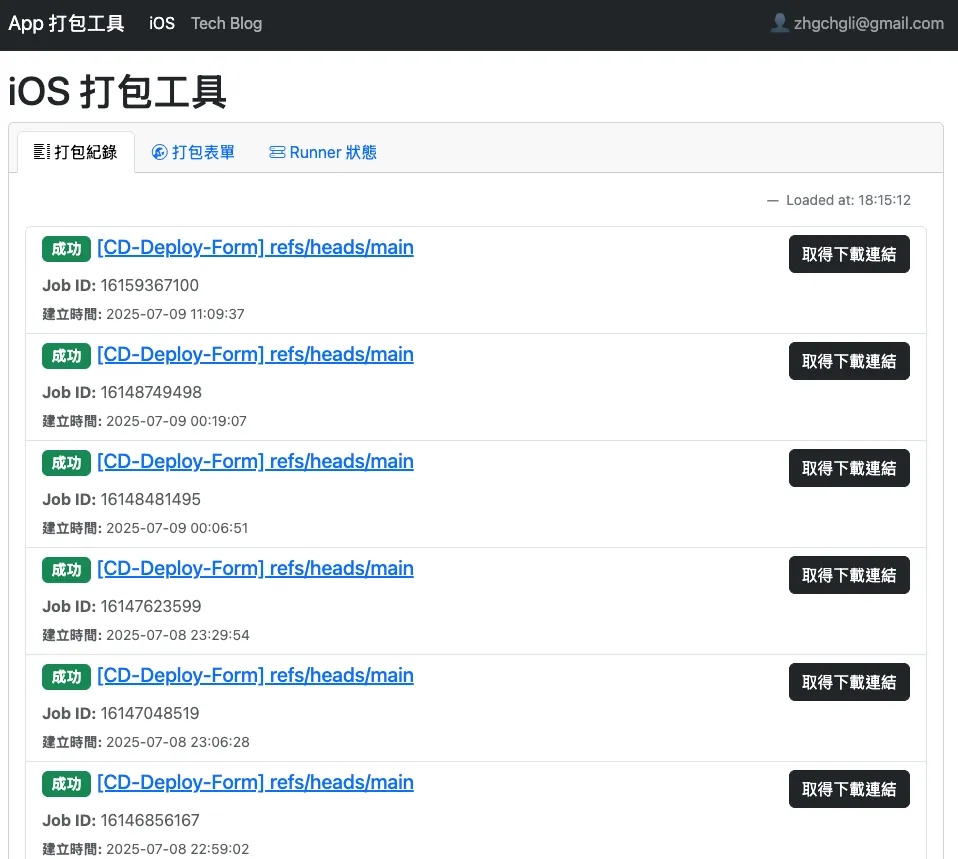
Package Records: Show packaging history, current task progress, and allow clicking to get download links by fetching Firebase App Distribution links and related information.
-
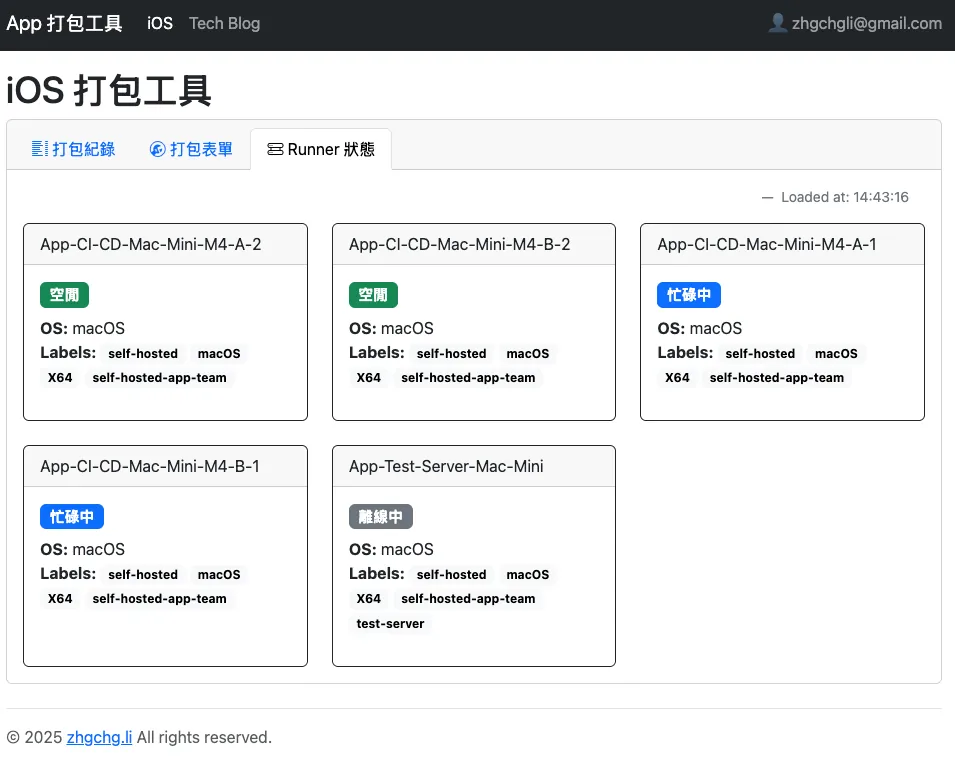
Runner Status: Display the status of the Self-hosted Runner.
-
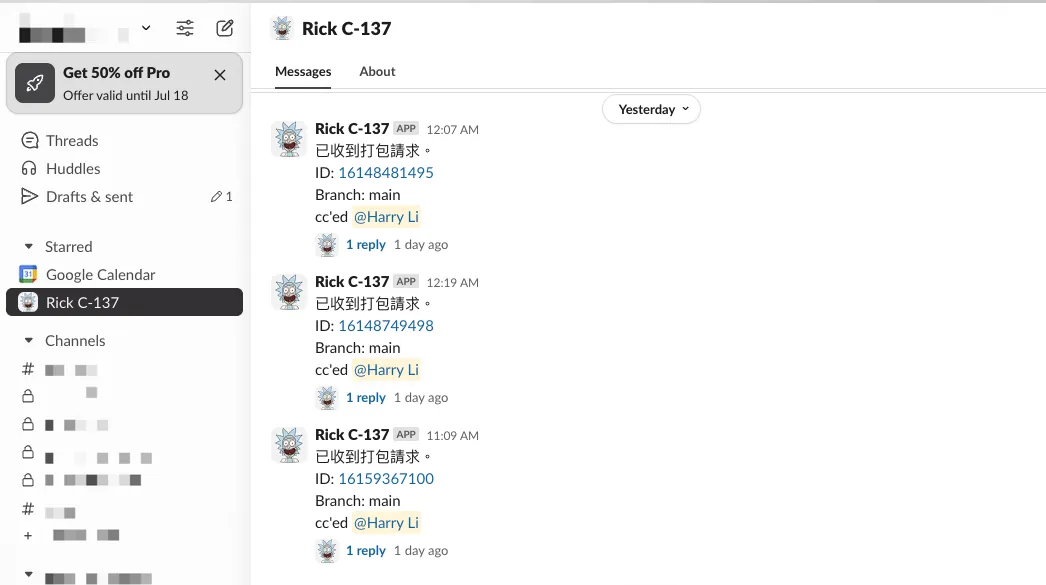
Slack build progress notifications.
-
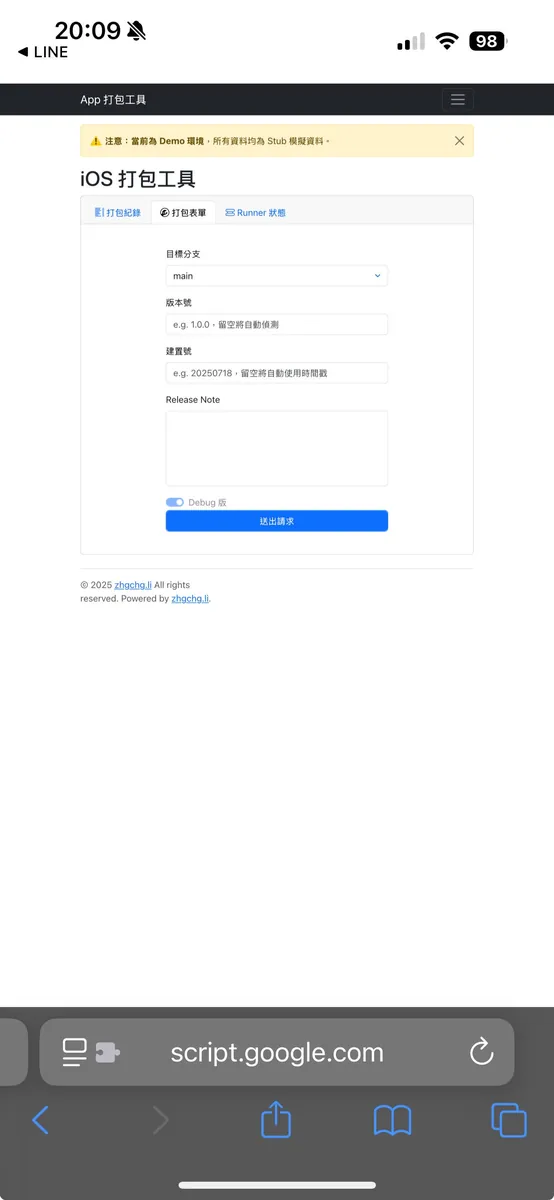
Support Mobile Version.
-
Support restricting usage to accounts within the organization team.
Main Responsibilities
0 state, 0 database, purely a relay exchange station, integrating and displaying data from various APIs (e.g. Asana/Jira/GitHub) and forwarding form requests to GitHub Actions.
Operation Requirements: Support both mobile and desktop devices.
Permission Requirements: Access should be restricted to team organization members only.
Online Demo Web App
- For first-time use, please refer to the authorization in the image below (Only For Demo App):
Project source code: https://script.google.com/home/projects/1CBB39OMedqP9Ro1WSlvgDnMBin4-ksyhgly2h_KrbOuFiPHTalNgwHOp/edit
Technology Choices
The first article mentioned this, here is a detailed summary again.
Integrate with Slack
We tried using Slack as the packaging platform by developing our own backend service hosted on GCP. It integrated with Slack API and Asana API, then forwarded forms submitted via Slack to GitHub API to trigger subsequent GitHub Actions. The experience was very smooth and unified within the team’s collaboration tools, making it easy to use. However, the downside was the high development and maintenance costs. Since the backend was built with Ktor, app engineers had to handle both backend development and Google service OAuth integration. Some features, like submission for review, had to be implemented here, making it complex. If new team members didn’t properly take over this part, it became nearly impossible to maintain. Additionally, there was a monthly $15 USD GCP server fee.
Initially, we also tried using FaaS services to connect with the Slack API, such as Cloud Functions. However, Slack API requires the connected service to respond within 3 seconds; otherwise, it is considered a failure. FaaS suffers from the cold start issue, where the service goes to sleep after a period of inactivity and takes longer to respond (≥ 5 seconds) when called again. This causes the Slack packaging form to be unstable and often results in Timeout Errors.
Integration into Internal Systems
This is obviously the optimal solution. If the team has web or backend developers, directly integrating with existing systems is the best and safest approach.
The premise of this article is: None, the app is self-reliant.
Google Apps Script — Web App
Google Apps Script has been our longtime partner. We have used it in many RPA projects to schedule and trigger tasks, such as: “Crashlytics + Google Analytics Auto Query for App Crash-Free Users Rate” and “Using Google Apps Script to Automate Daily Data Report RPA”. This time, I recalled it again; GAS has a feature to deploy as a Web (App) to serve directly as a web service.
Advantages of Google Apps Script:
-
✅ Functions as a Service means no need to set up or maintain your own server
-
✅ Permission control integrates with Google Workspace, allowing access only to Google accounts within the organization
-
✅ Seamless integration with Google ecosystem services (e.g. Firebase, GA, etc.) and data (no need to handle OAuth yourself)
-
✅ Programming language uses JavaScript, easy to learn (V8 Runtime supports ES6+)
-
✅ Fast writing, fast deployment, fast usage
-
✅ Stable and long-lasting service (launched over 16 years ago)
-
✅ AI Can Help! Tested Using ChatGPT for Development Assistance, Achieving Up to 95% Accuracy
Disadvantages of Google Apps Script:
-
❌ Built-in version control is problematic
-
❌ No built-in support for file storage, data storage, or key/certificate management
-
❌ Web App cannot achieve a 100% responsive web design (RWD) experience
-
❌ The project can only be linked to a personal account, not an organization
-
❌ Although Google continues development and maintenance, overall feature updates are slow
-
❌ Network request
UrlFetchAppdoes not support setting User-Agent -
❌ Web App
doGet/doPostdoes not support retrieving Headers information -
❌ FaaS Cold Start Issue
-
❌ Does not support simultaneous multi-developer collaboration
However, this has little impact on the Web App, at most causing a few extra seconds delay when loading the page.
The above are the pros and cons of the GAS service itself, which have little impact on building a packaging tool web app. Compared to a Slack-based solution, this approach is faster, lighter, and easier to hand over and learn. The downside is that the team needs to know the tool’s URL and how to use it, and due to GAS’s limited library functions (e.g., no built-in encryption algorithms), it can basically only serve as a pure relay platform. For example, for submission requests, it can only forward the approval request to GitHub Actions.
Also only suitable for teams using Google Workspace environment; after weighing resources and needs, Google Apps Script — Web App was chosen to implement the packaging tool platform.
UI Framework

We directly use the Bootstrap CDN, otherwise managing CSS styles ourselves would be too troublesome. Asking AI how to combine and use Bootstrap is also more accurate and convenient.
Hands-on Practice
The entire platform architecture has been open-sourced here. Everyone can customize this version according to their team’s needs.
Open Source Example Project
View the project directly on GAS:

GitHub Repo Backup:
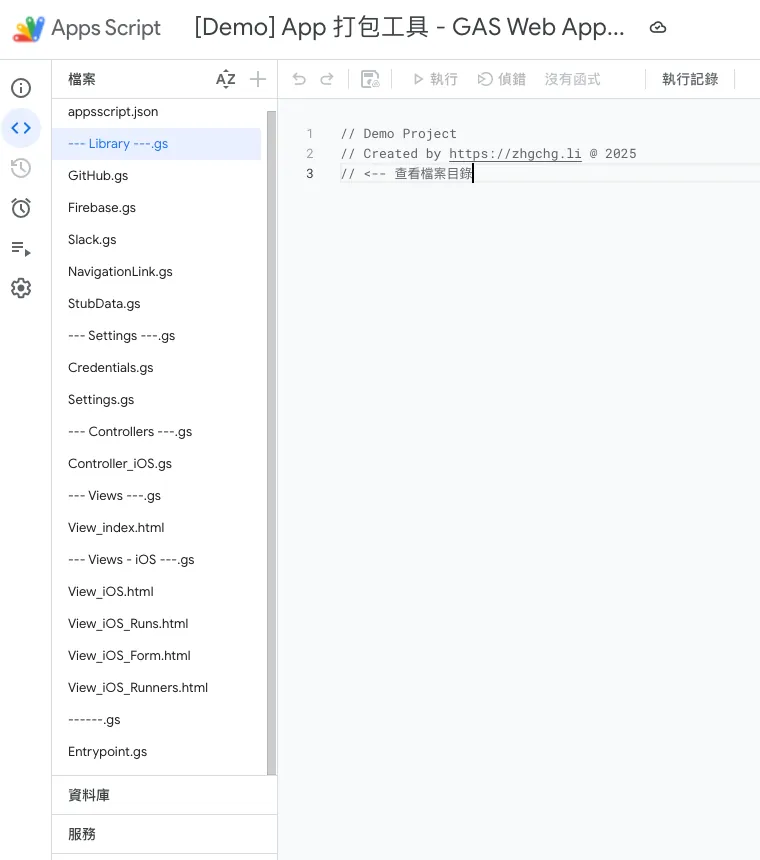
File Structure
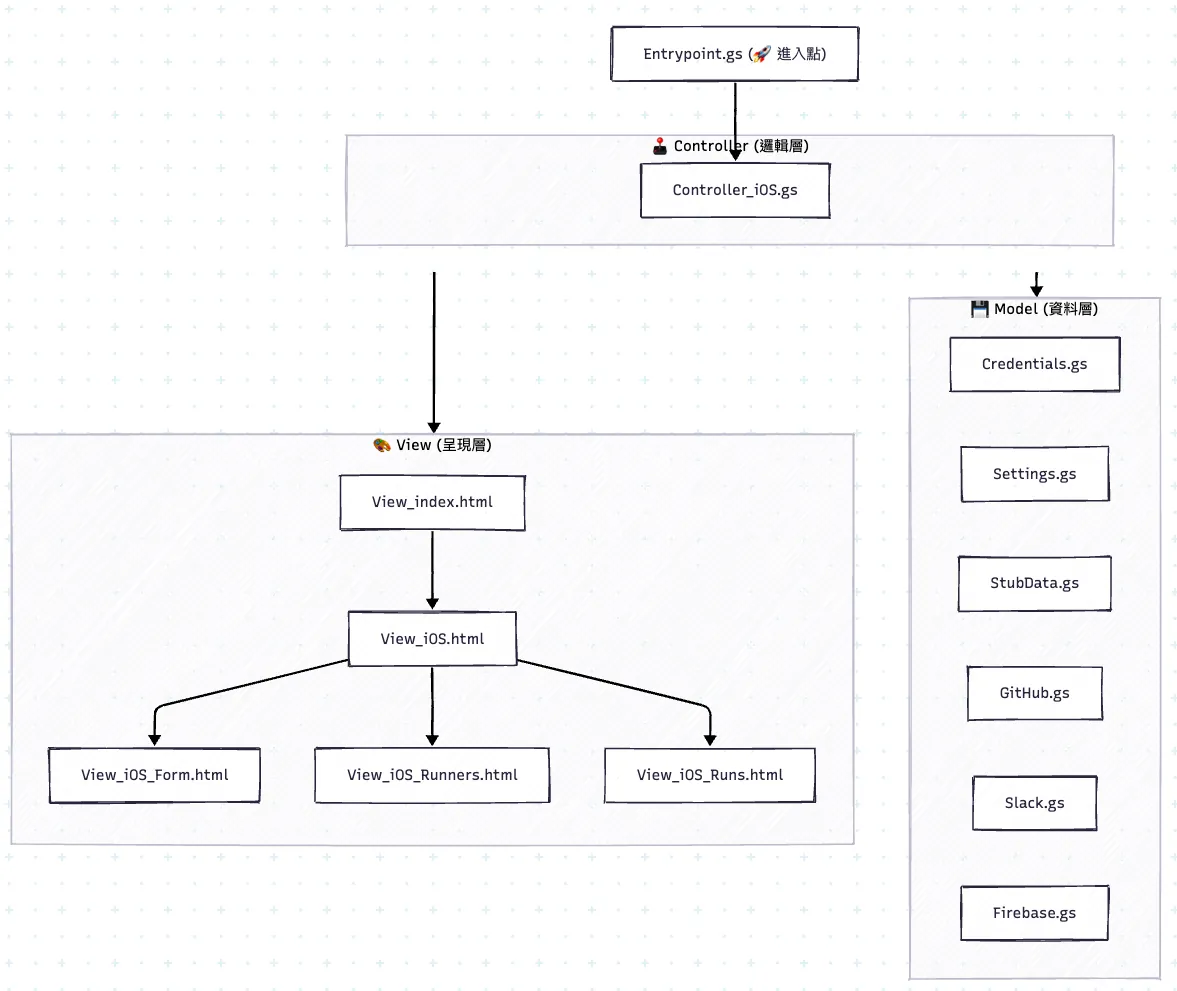
I wrote a very simple class-based MVC architecture. If you need adjustments or don’t understand a feature, you can ask AI for accurate answers.
System
-
appsscript.json: Metadata configuration file for the GAS system
The key point is the “oauthScopes” variable, which declares the external permissions this Script will use. -
Entrypoint.gs: Define the doGet() entry point
Controller
- Controller_iOS.gs: iOS packaging tool page Controller, responsible for fetching data for the View display
View
-
View_index.html: The entire packaging tool framework and homepage
-
View_iOS.html: iOS Packaging Tool Page Skeleton
-
View_iOS_Runs.html: iOS Packaging Tool — Packaging Record Details Page
-
View_iOS_Form.html: iOS Packaging Tool — Packaging Form Page
-
View_iOS_Runners.html: iOS Packaging Tool — Self-hosted Runner Status Page
Model(Lib)
-
Credentials.gs: Define key content
(⚠️ Please note, using GCP IAM with GAS can be quite complex, so we directly define the keys here. Therefore, this GAS project contains sensitive information; do not share project view or edit permissions casually.) -
StubData.gs: Stub methods and data for the Online Demo.
-
Settings.gs: Some common settings and lib initialization.
-
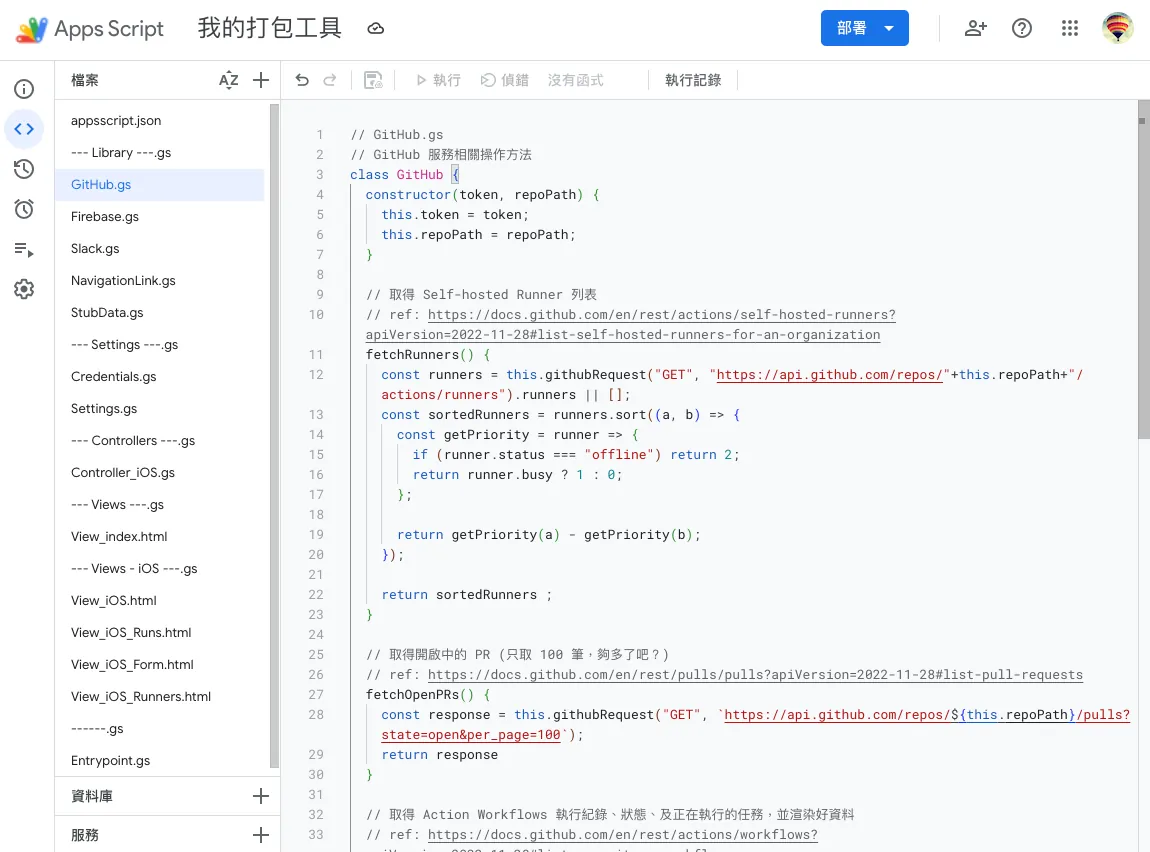
GitHub.gs: Wrapper for GitHub API operations.
-
Slack.gs: Wrapper for Slack API operations.
-
Firebase.gs: Firebase — Wrapper for App Distribution API operations.
Build Your Own Packaging Platform
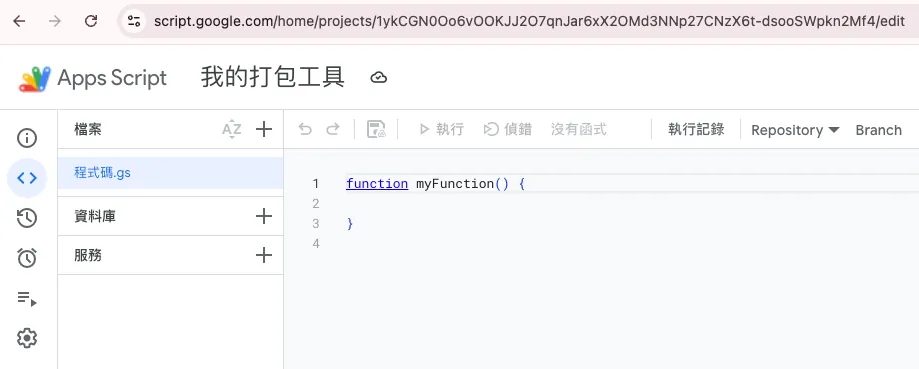
- Create a Google Apps Script project and name it
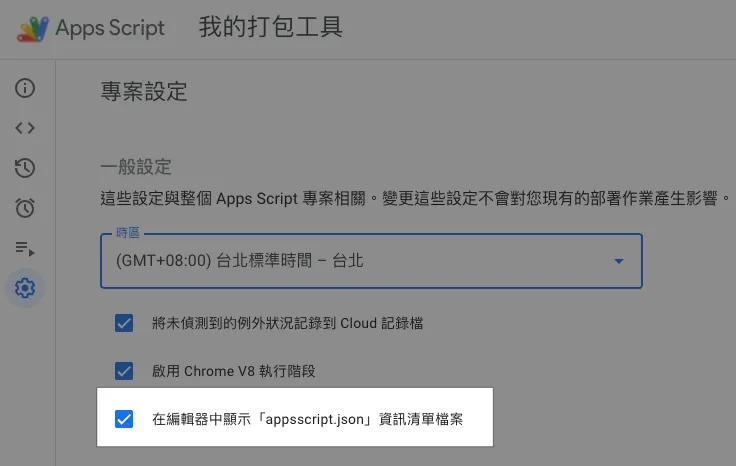
Go to Project Settings → Check “Show ‘appsscript.json’ manifest file in editor” to display the “appsscript.json” metadata file.
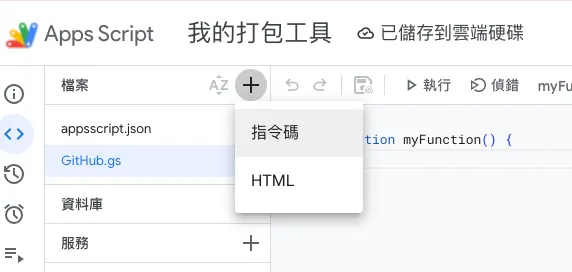
- Refer to my open source project files and create all files exactly as in the example, then copy the content directly.
Very silly, but no choice.
Copy StubData.gs first; it can be used for the initial deployment test.
Another method is to use clasp (Google Apps Script CLI) to git clone the demo project and then push the code.
After copying, it will look exactly the same as the sample project.
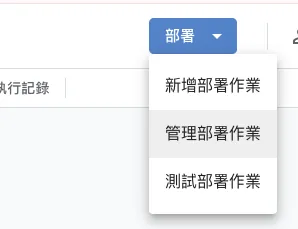
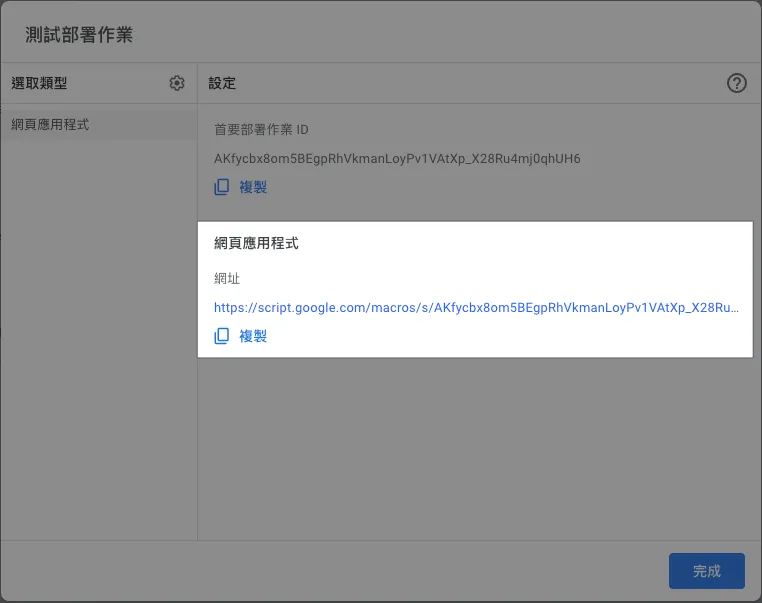
- First Deployment of the “Web App” and Checking the Result
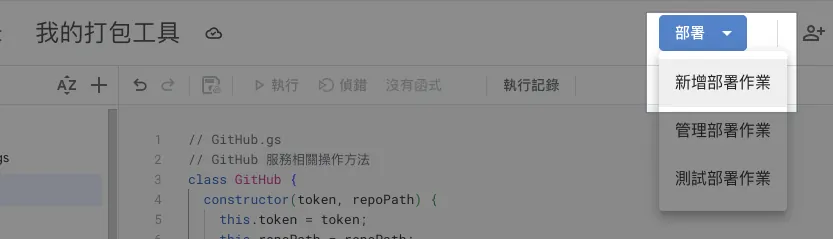
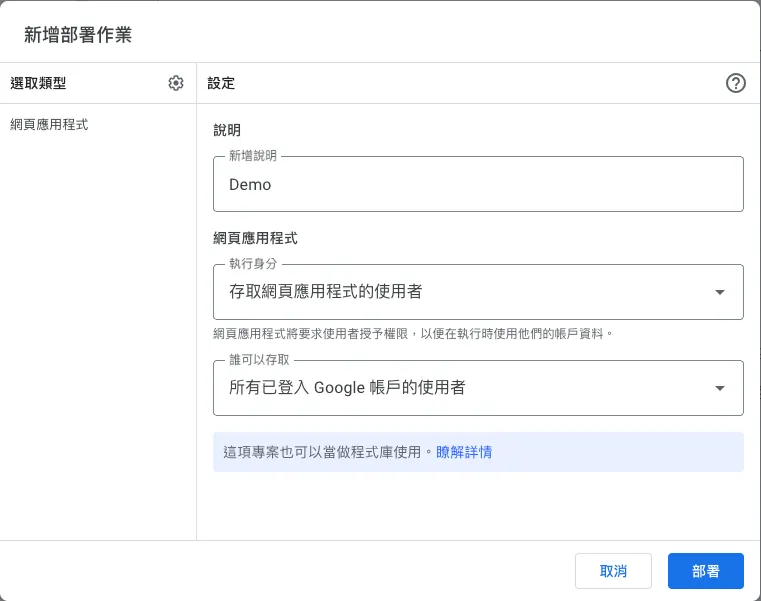
In the top right corner of the project, click “Deploy” → “New deployment” → select type “Web app”:
Execution Identity:
-
I
always run the script using your account identity. -
The user accessing the web app
will run the script under their currently logged-in Google account.
Who can access:
-
Only me
-
All users in the same XXX organization
Only users with the same organization and logged-in Google accounts can access. -
All signed-in Google account users
All signed-in Google account users can access. -
Everyone
does not need to sign in with a Google account, and everyone can access it publicly.
If it is an internal tool: you can choose “Who has access: All users in the XXX organization” + “Execute as: User accessing the web app” for secure control.
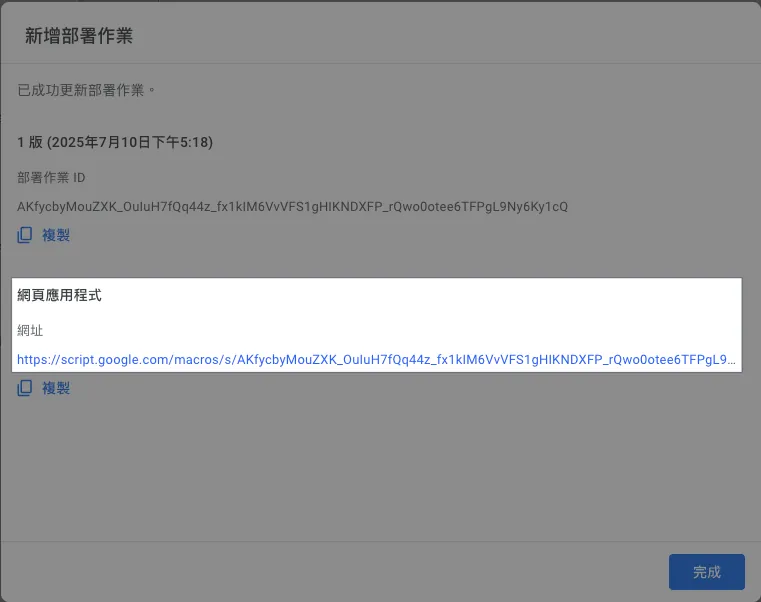
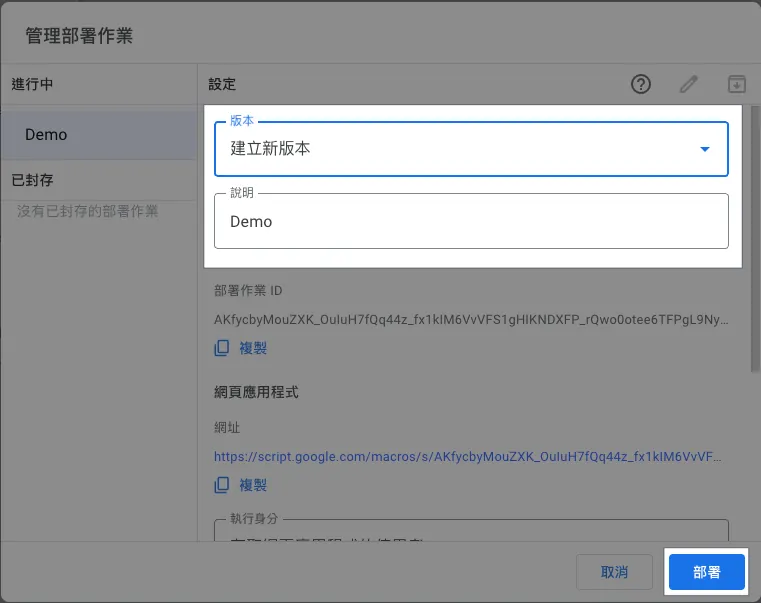
The URL of the “Web App” after deployment is your Web App packaging tool URL, which you can share with your team members. (The URL might look ugly, so you can use a URL shortening service to tidy it up. Updating the deployment content will not change the URL.)
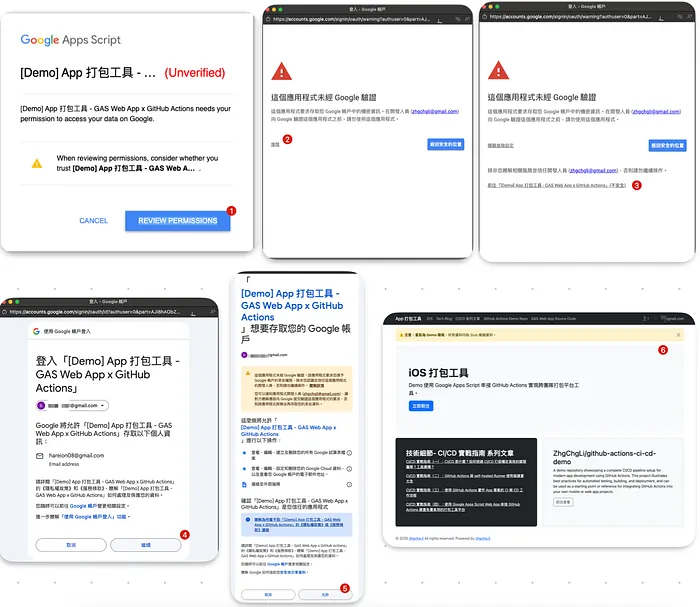
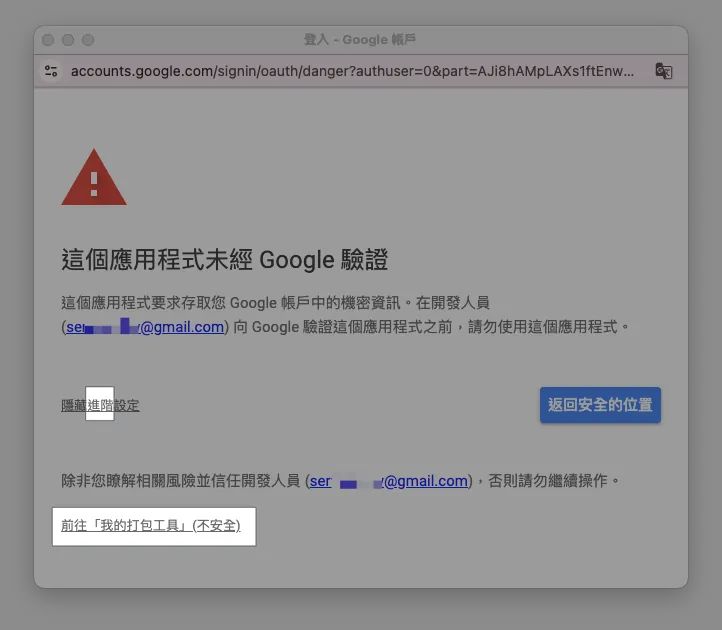
User Consent Required on First Use
The first time you click the Web App URL, you need to grant authorization.
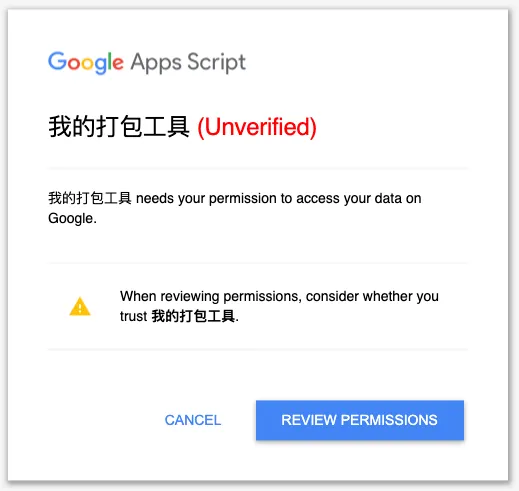
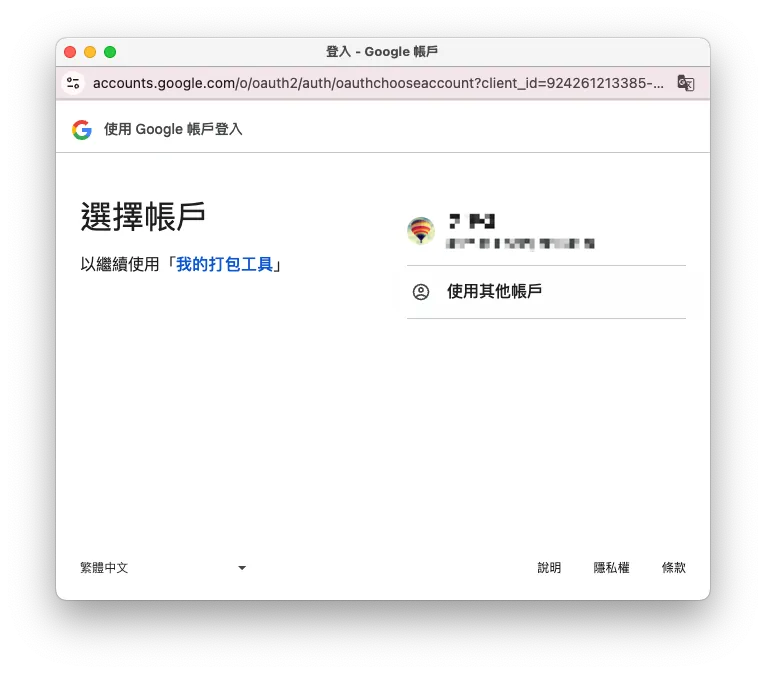
-
Review Permission → Select the account identity to use this Web App
-
Unverified warning window, click “Advanced” to expand → click Proceed to “XXX” (unsafe)
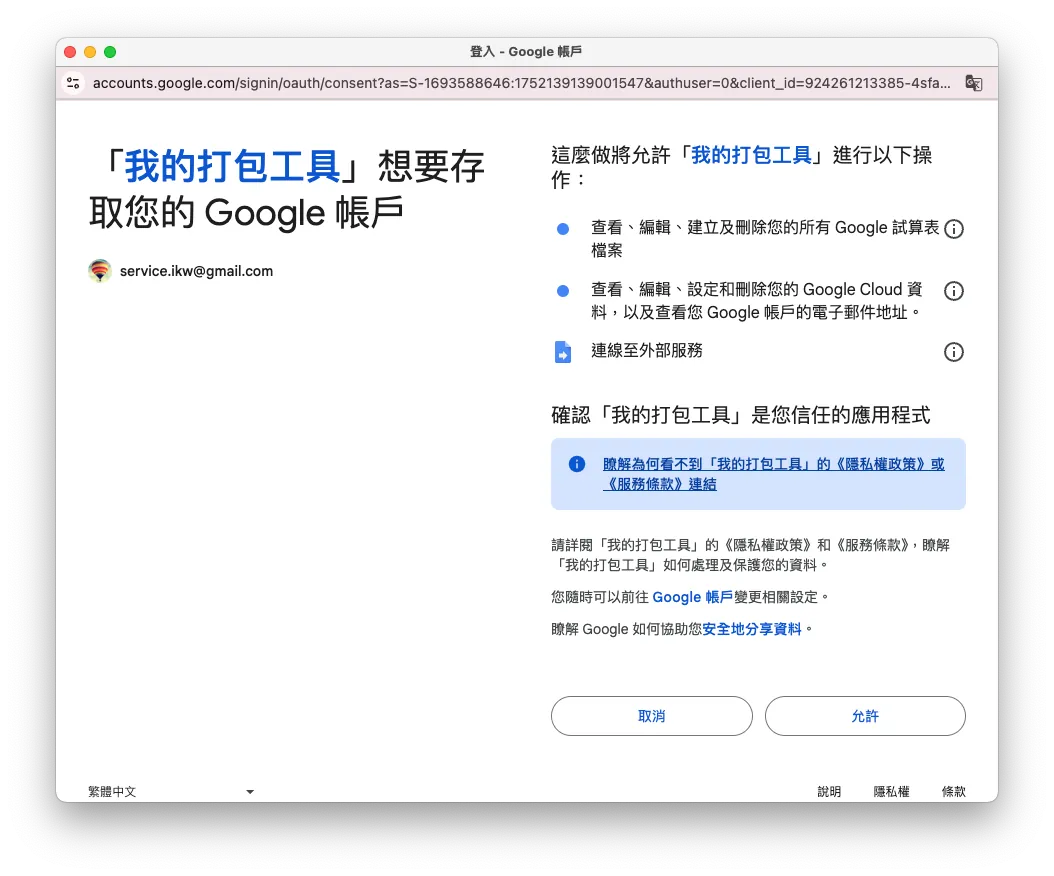
- Click “Allow”
No need to reauthorize if the script permissions remain unchanged.
After completing the authorization consent, you will enter the packaging tool homepage:

Demo packaging tool deployed successfully 🎉🎉🎉
Note: The “This app was created by a Google Apps Script user” message cannot be hidden automatically.
Update Deployment
⚠️ All code changes require redeployment to take effect.
️️⚠️All code changes require redeployment to take effect.
⚠️ All code changes require redeployment to take effect.
Note that saving code changes does not immediately update the Web App, so if refreshing has no effect, this is the reason; you need to go to “Deploy” → “Manage Deployments” → “Edit” → create a new version → click “Deploy” → “Done”.
After updating and deploying, refresh the webpage to see the changes take effect.
Add Test Deployment for Easier Development
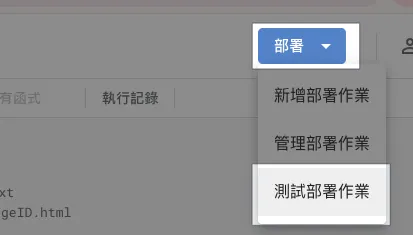
As mentioned earlier, all changes require redeployment to take effect; this is inconvenient during development. Therefore, we can use a “test deployment” during development to quickly verify if the changes are correct.
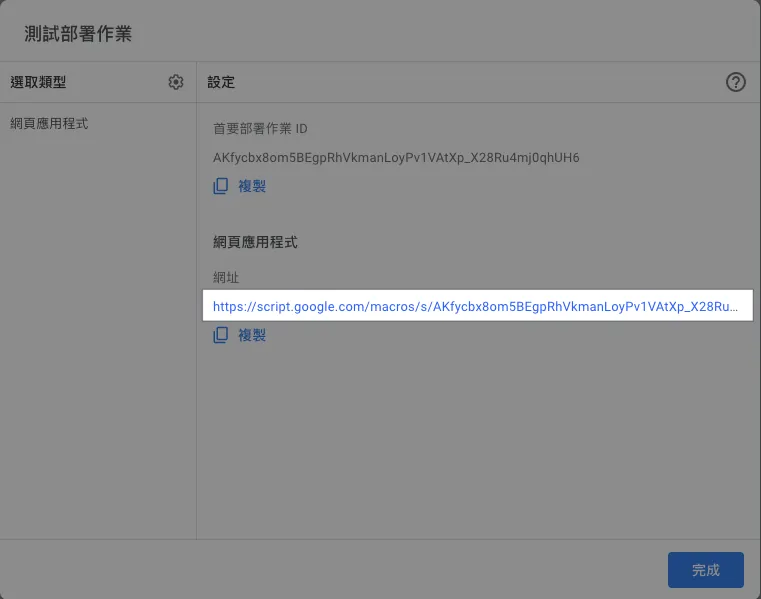
Go to “Deploy” → “Test Deployments” → get the test “Web App” URL.
During development, we can directly use this URL to save. After saving file changes, refresh the page at this development URL to see the results!
After all development is complete, update and deploy as described earlier, then release it for users to use.
Modify the Demo Example Project to Connect Real Data
Next is the key part: connecting real data. The GitHub Actions Workflow refers to the CI/CD process established in the previous article. You can also adjust the parameters according to your actual Actions Workflow.
⚠️ Please Note Before Making Changes
The Google Apps Script platform does not support multiple users or multiple editing windows well. A pitfall I encountered was accidentally opening two editor windows; after editing in window A, I later edited in window B, causing all changes to be overwritten by B’s older version. Therefore, it is recommended that only one person edits the Script in one window at a time.
GitHub Integration
Inject GitHub API Token:
GitHub -> Account -> Settings -> Developer Settings -> Fine-grained personal access tokens or Personal access tokens (classic).
It is recommended to use Fine-grained personal access tokens for better security (but they have an expiration).
The required permissions for Fine-grained personal access tokens are as follows:
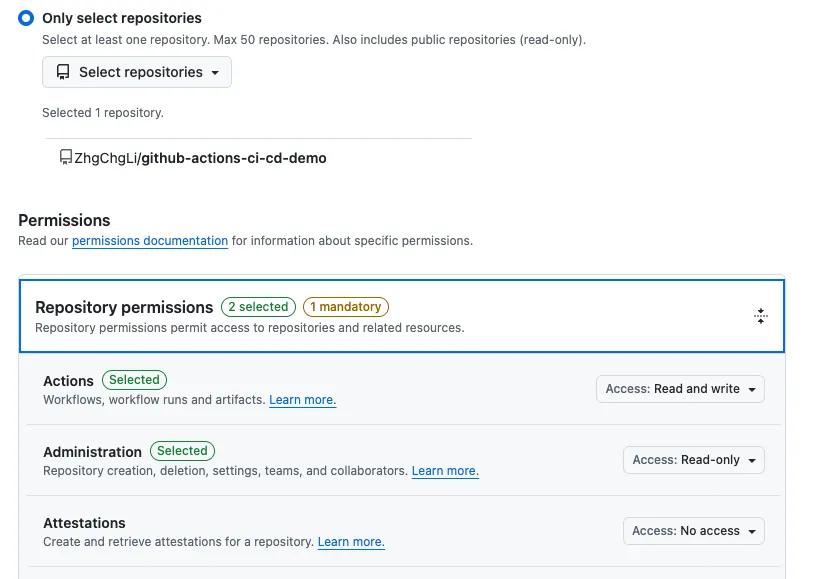
-
Repo: Remember to select the Repo you want to operate on
-
Permissions:
Actions (read/write)andAdministration (read only)
If you don’t want to rely on someone’s personal account, it is recommended to create a dedicated team GitHub account and use its Token.
Go to the GAS project → Credentials.gs → Insert the token into the githubToken variable.
Replace GithubStub with GitHub:
Go to the GAS project → Settings.gs → change:
const iOSGitHub = new GitHubStub(githubToken, iOSRepoPath);
Change to
const iOSGitHub = new GitHub(githubToken, iOSRepoPath);
Save the file.
Refresh the test “Web App” URL to check if the changes are correct:
Correct data display means: GitHub is successfully connected to real data 🎉🎉🎉
You can also easily switch to the “Runner Status” tab to check if the Self-hosted Runner status is being fetched correctly:
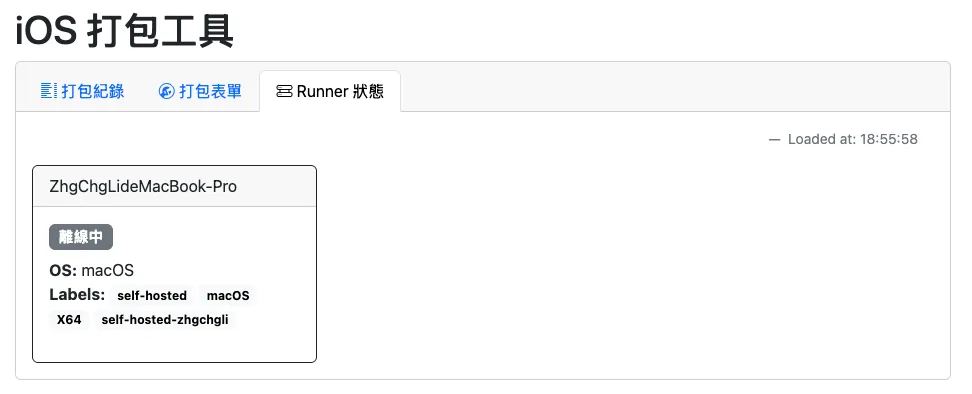
Note: My Runner is off… so it is offline.
Slack Integration
To integrate Slack notifications, we first need to go back to the Repo → GitHub Actions and add a notification container Action that wraps the package build Action Workflow.
CD-Deploy-Form.yml:
# Workflow(Action) name
name: CD-Deploy-Form
# Actions Log title
run-name: "[CD-Deploy-Form] ${{ github.ref }}"
# Cancel any running job in the same concurrency group if a new one starts
# For example, if the same branch's build job is triggered repeatedly, cancel the previous one
concurrency:
group: ${{ github.workflow }}-${{ github.ref }}
cancel-in-progress: true
# Trigger events
on:
# Manual form trigger
workflow_dispatch:
# Form input fields
inputs:
# App version number
VERSION_NUMBER:
description: 'Version Number of the app (e.g., 1.0.0). Auto-detect from the Xcode project if left blank.'
required: false
type: string
# App build number
BUILD_NUMBER:
description: 'Build number of the app (e.g., 1). Will use a timestamp if left blank.'
required: false
type: string
# App release note
RELEASE_NOTE:
description: 'Release notes of the deployment.'
required: false
type: string
# Slack User ID of the triggerer
SLACK_USER_ID:
description: 'Slack user id.'
required: true
type: string
# Email of the triggerer
AUTHOR:
description: 'Trigger author email.'
required: true
type: string
# Job tasks
jobs:
# Send Slack message when starting build
# Job ID
start-message:
# Run this small job on GitHub Hosted Runner, low usage
runs-on: ubuntu-latest
# Set max timeout to avoid endless waiting in abnormal cases
# Normally should not exceed 5 minutes
timeout-minutes: 5
# Job steps
steps:
- name: Post a Start Slack Message
id: slack
uses: slackapi/[email protected]
with:
method: chat.postMessage
token: ${{ secrets.SLACK_BOT_TOKEN }}
payload: \\|
channel: ${{ inputs.SLACK_USER_ID }}
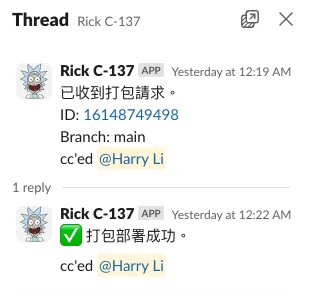
text: "Build request received.\nID: <${{ github.server_url }}/${{ github.repository }}/actions/runs/${{ github.run_id }}\\|${{ github.run_id }}>\nBranch: ${{ github.ref_name }}\ncc'ed <@${{ inputs.SLACK_USER_ID }}>"
# Job output for following jobs
# ts = Slack message ID, so later notifications can reply in the same thread
outputs:
ts: ${{ steps.slack.outputs.ts }}
deploy:
# Jobs run concurrently by default, use needs to wait for start-message to finish before running
# Execute build and deploy task
needs: start-message
uses: ./.github/workflows/CD-Deploy.yml
secrets: inherit
with:
VERSION_NUMBER: ${{ inputs.VERSION_NUMBER }}
BUILD_NUMBER: ${{ inputs.BUILD_NUMBER }}
RELEASE_NOTE: ${{ inputs.RELEASE_NOTE }}
AUTHOR: ${{ inputs.AUTHOR }}
# Success message for build and deploy task
end-message-success:
needs: [start-message, deploy]
if: ${{ needs.deploy.result == 'success' }}
runs-on: ubuntu-latest
timeout-minutes: 5
steps:
- name: Post a Success Slack Message
uses: slackapi/[email protected]
with:
method: chat.postMessage
token: ${{ secrets.SLACK_BOT_TOKEN }}
payload: \\|
channel: ${{ inputs.SLACK_USER_ID }}
thread_ts: "${{ needs.start-message.outputs.ts }}"
text: "✅ Build and deploy succeeded.\n\ncc'ed <@${{ inputs.SLACK_USER_ID }}>"
# Failure message for build and deploy task
end-message-failure:
needs: [deploy, start-message]
if: ${{ needs.deploy.result == 'failure' }}
runs-on: ubuntu-latest
timeout-minutes: 5
steps:
- name: Post a Failure Slack Message
uses: slackapi/[email protected]
with:
method: chat.postMessage
token: ${{ secrets.SLACK_BOT_TOKEN }}
payload: \\|
channel: ${{ inputs.SLACK_USER_ID }}
thread_ts: "${{ needs.start-message.outputs.ts }}"
text: "❌ Build and deploy failed, please check the execution status or try again later.\n\ncc'ed <@${{ inputs.SLACK_USER_ID }}>"
# Cancelled message for build and deploy task
end-message-cancelled:
needs: [deploy, start-message]
if: ${{ needs.deploy.result == 'cancelled' }}
runs-on: ubuntu-latest
timeout-minutes: 5
steps:
- name: Post a Cancelled Slack Message
uses: slackapi/[email protected]
with:
method: chat.postMessage
token: ${{ secrets.SLACK_BOT_TOKEN }}
payload: \\|
channel: ${{ inputs.SLACK_USER_ID }}
thread_ts: "${{ needs.start-message.outputs.ts }}"
text: ":black_square_for_stop: Build and deploy cancelled.\n\ncc'ed <@${{ inputs.SLACK_USER_ID }}>"
Full Code: CD-Deploy-Form.yml
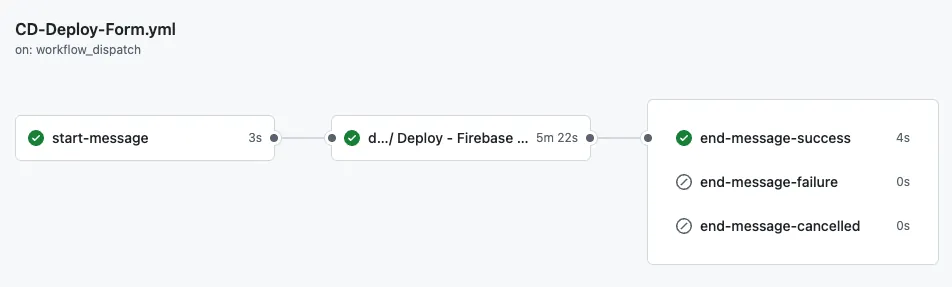
This Action is just a container that connects Slack notifications, actually reusing the CD-Deploy.yml Action written in the previous article.
-
For creating the Slack Bot App and setting message permissions, please refer to my previous article.
-
Remember to add the corresponding
SLACK_BOT_TOKENin Repo → Secrets and enter the Slack Bot App Token value.
Back to the GAS project → Credentials.gs → Insert the Token into the slackBotToken variable.
Go to the GAS project → Settings.gs → change:
const slack = new SlackStub(slackBotToken);
Change to
const slack = new Slack(slackBotToken);
Save the file.
If you don’t have a ready Slack Bot App for notifications and don’t want to create one, you can skip all the steps here and remove any Slack-related usage from the GAS project.
GitHub Integration — Build Form
Go to the GAS project → Controller_iOS.gs → modify the View_iOS_Form.html content:
Remove the fake Asana Tasks integration method:
      <? tasks.forEach(function(task) { ?>
      <option value="<?=task.githubBranch?>">[<?=task.id?>] <?=task.title?></option>
      <? }) ?>
You can also adjust the default branch here (it’s main in this case).
—
Go to the GAS project → Controller_iOS.gs → modify the content of iOSLoadForm():
-
Remove the line
template.tasks = Stubable.fetchStubAsanaTasks();which mocks the Asana connection.
If you want to connect to Asana/Jira, you can directly ask ChatGPT to help generate the integration method. -
template.prs = iOSGitHub.fetchOpenPRs();actually calls the GitHub API to fetch the list of opened PRs and can be kept as needed.
Post-Submission Handling Inside iOSSubmitForm():
You can adjust according to the actual GitHub Actions Workflow file name and the workflow_dispatch inputs parameters:
  iOSGitHub.dispatchWorkflow("CD-Deploy-Form.yml", branch, {
    "BUILD_NUMBER": buildNumber,
    "VERSION_NUMBER": versionNumber,
    "VERSION_NUMBER": versionNumber,
    "RELEASE_NOTE": releaseNote,
    "AUTHOR": email,
    "SLACK_USER_ID": slack.fetchUserID(email)
  });
You can also add your own required field validations. Here, it only checks that the branch must be filled in; otherwise, an error message will appear.
If you think this is not secure enough, you can add password verification or restrict access to specific accounts.
The last line Slack notification requires proper Slack setup. If you don’t have a Slack Bot App or don’t want to integrate Slack, you can directly use
iOSGitHub.dispatchWorkflow("CD-Deploy.yml")in the Demo Actions Repo and remove theSLACK_USER_IDparameter.
Refresh the test “Web App” URL to check if the changes are correct:
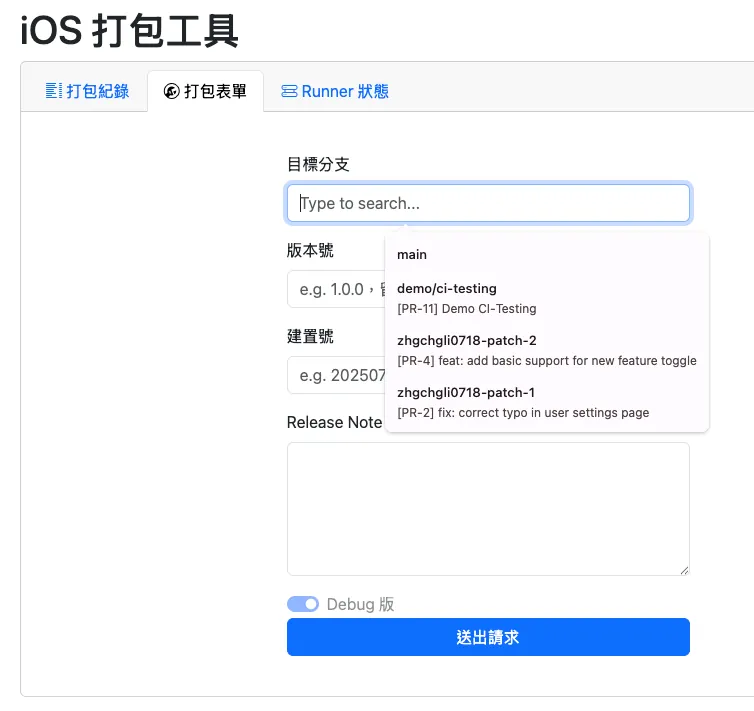
You can see that the packaging form now only has the Opened PR List left.
Fill in the information and click “Submit Request” to test the packaging form:
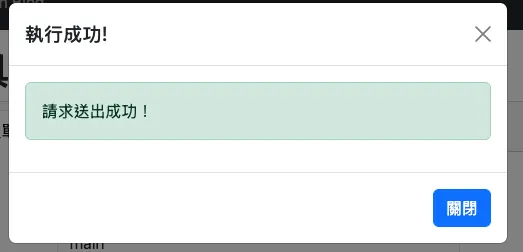
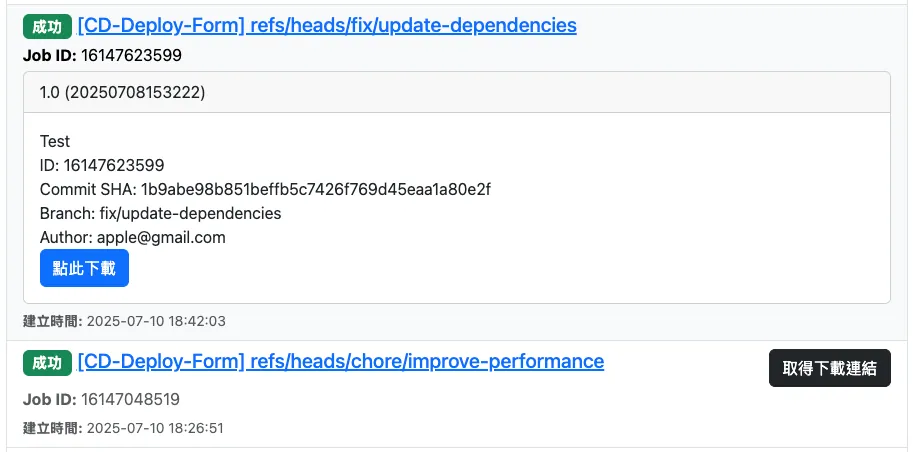
A successful submission means everything is fine, and you can see the task started running in the build records 🎉:
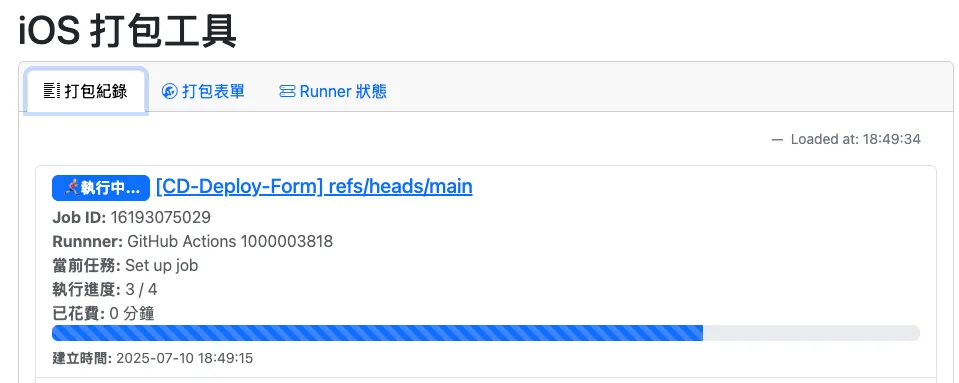
Repeated packaging records can update progress.
Common Submission Errors:
Required input ‘SLACK_USER_ID’ not provided: The SLACK_USER_ID field is required in GitHub Actions but was not provided. This may be due to Slack configuration failure or the current User Email not matching any Slack UID.
Workflow does not have ‘workflow_dispatch’ triggerandBranch is outdated, please update the xxx branch: The selected branch cannot find the corresponding Action Workflow file (the file specified by iOSGitHub.dispatchWorkflow).
No ref found for,Branch not found: The branch could not be found.
Firebase App Distribution — Get Download Link Integration
The last small feature is integrating Firebase App Distribution to directly get download info and links, making it easy to open the packaging platform tool on a mobile device and click to download and install.
Previously introduced “Google Apps Script x Google APIs Quick Integration Method“—GAS can quickly and easily integrate with Firebase.
Integration Principle
Before integration, let’s first explain the “Tricky” integration principle.
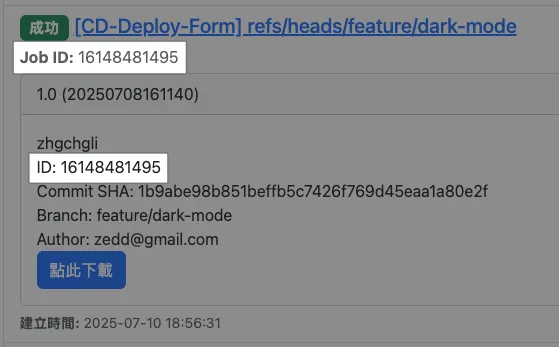
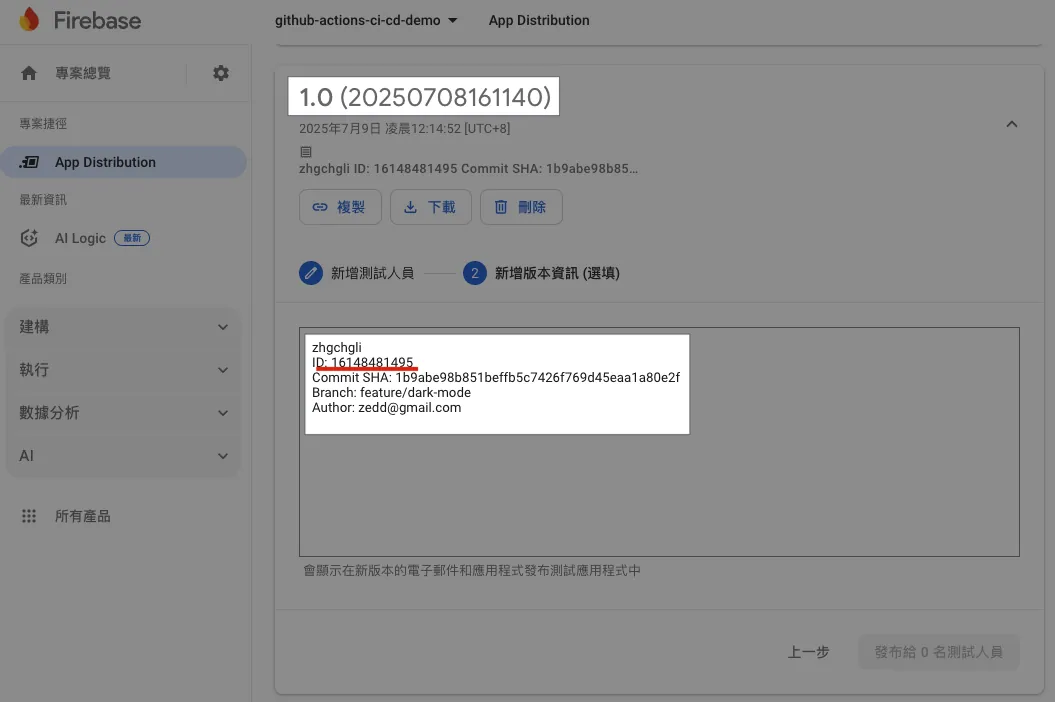
Our packaging platform has no database and serves purely as an API relay station; so in practice, when we run the packaging job in GitHub Actions CD-Deploy.yml, we include the Job Run ID in the Release Note (of course, it can also be included in the Build Number):
ID="${{ github.run_id }}" // Job Run ID
COMMIT_SHA="${{ github.sha }}"
BRANCH_NAME="${{ github.ref_name }}"
AUTHOR="${{ env.AUTHOR }}"

# Compose Release Note
RELEASE_NOTE="${{ env.RELEASE_NOTE }}
ID: ${ID}
Commit SHA: ${COMMIT_SHA}
Branch: ${BRANCH_NAME}
Author: ${AUTHOR}
"

# Run Fastlane build & deploy lane
bundle exec fastlane beta release_notes:"${RELEASE_NOTE}" version_number:"${VERSION_NUMBER}" build_number:"${BUILD_NUMBER}"
This way, the Firebase App Distribution Release Notes will include the Job Run ID.
The GAS Web App packaging tool platform connects to the GitHub API to get GitHub Actions run records. We directly use the Job Run ID provided by the API to query the Firebase App Distribution API. If the Release Notes contain a version with *ID: XXX*, the corresponding packaging record can be found.
Map two tool platforms without using any database.
Project Integration Settings
Go to GAS → Project Settings → Google Cloud Platform (GCP) Project → Change Project:
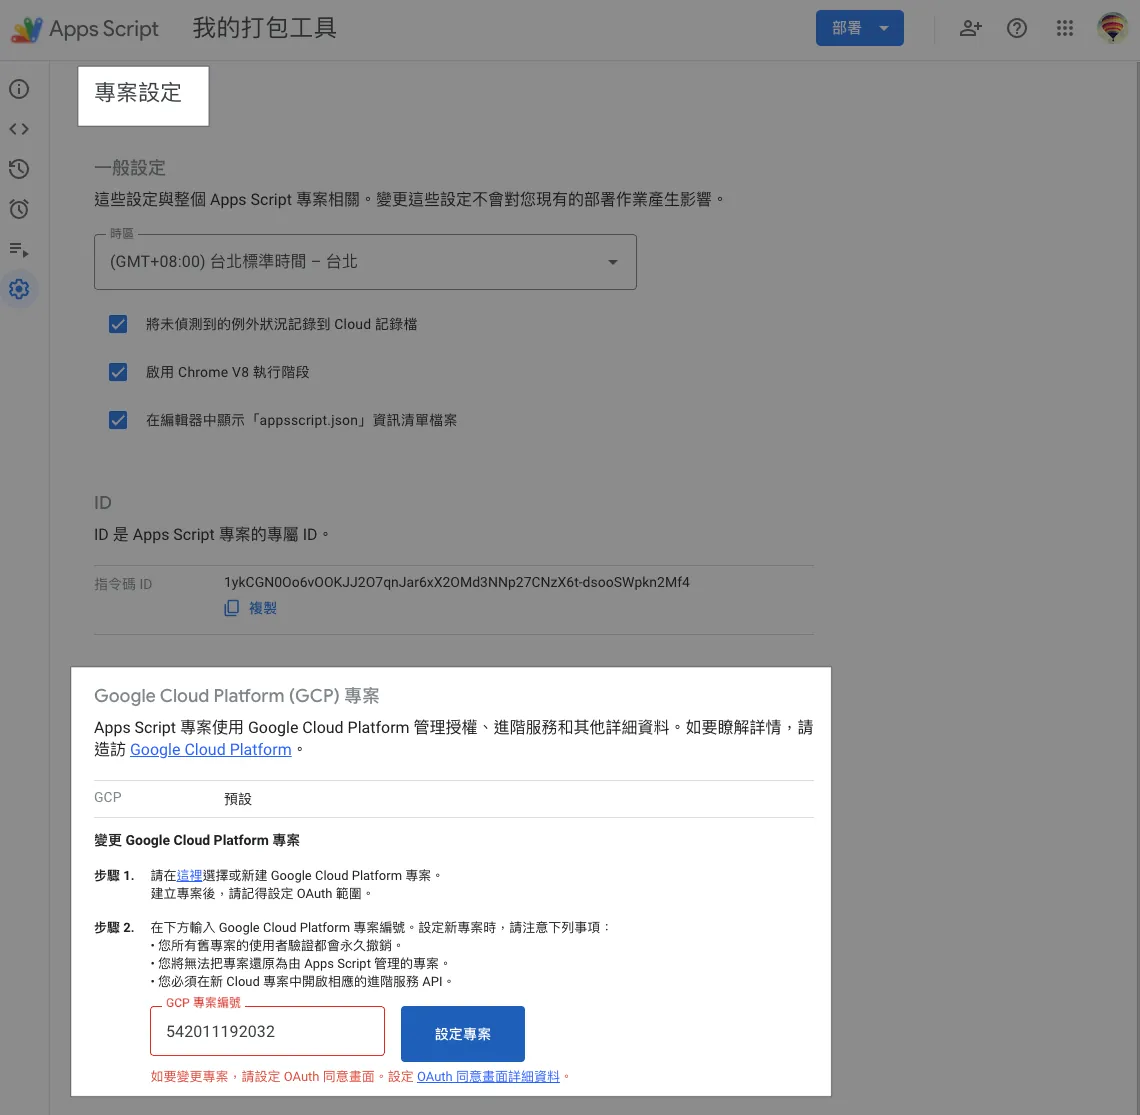
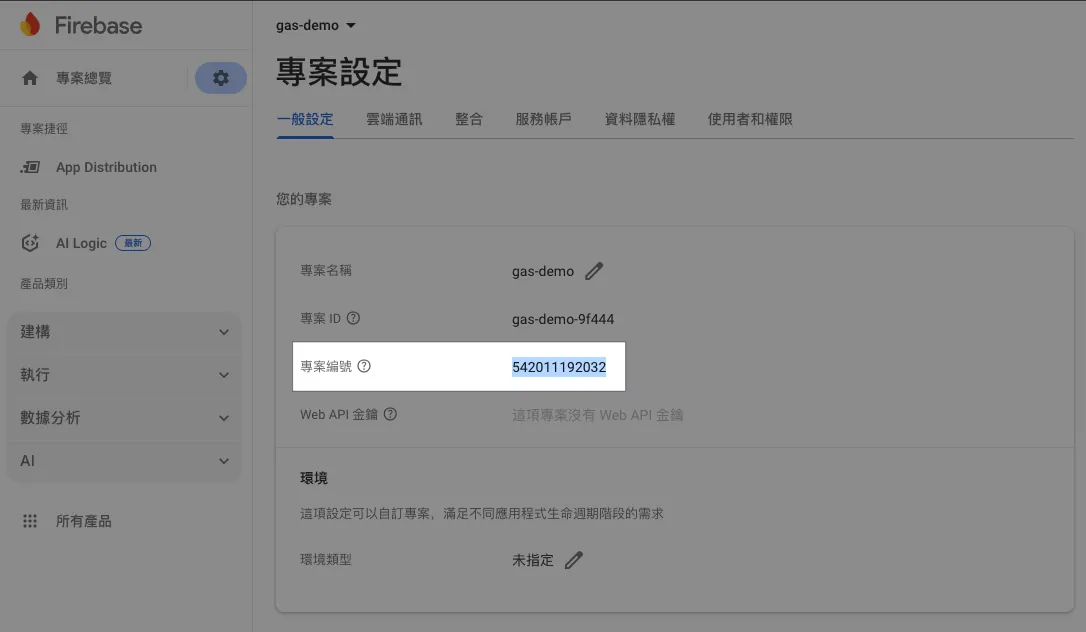
Enter the Firebase project ID you want to connect.
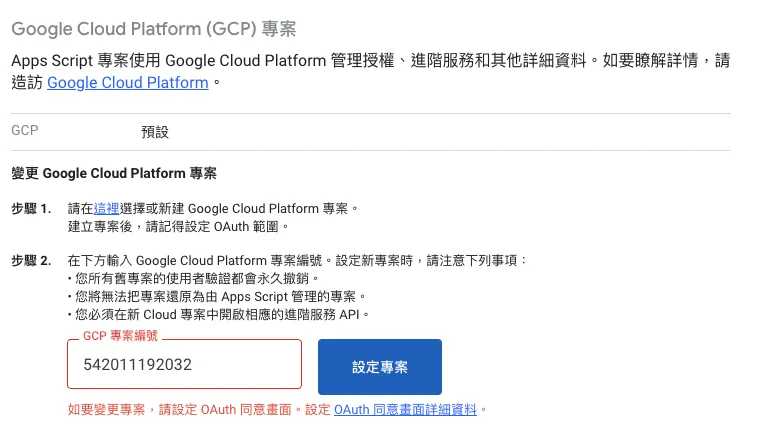
Initial setup may show errors “To change the project, please configure the OAuth consent screen. Set up the OAuth consent screen details.” If it does not appear, you can skip the following steps.
Click the “OAuth consent screen details” link → Click “Configure consent screen”:
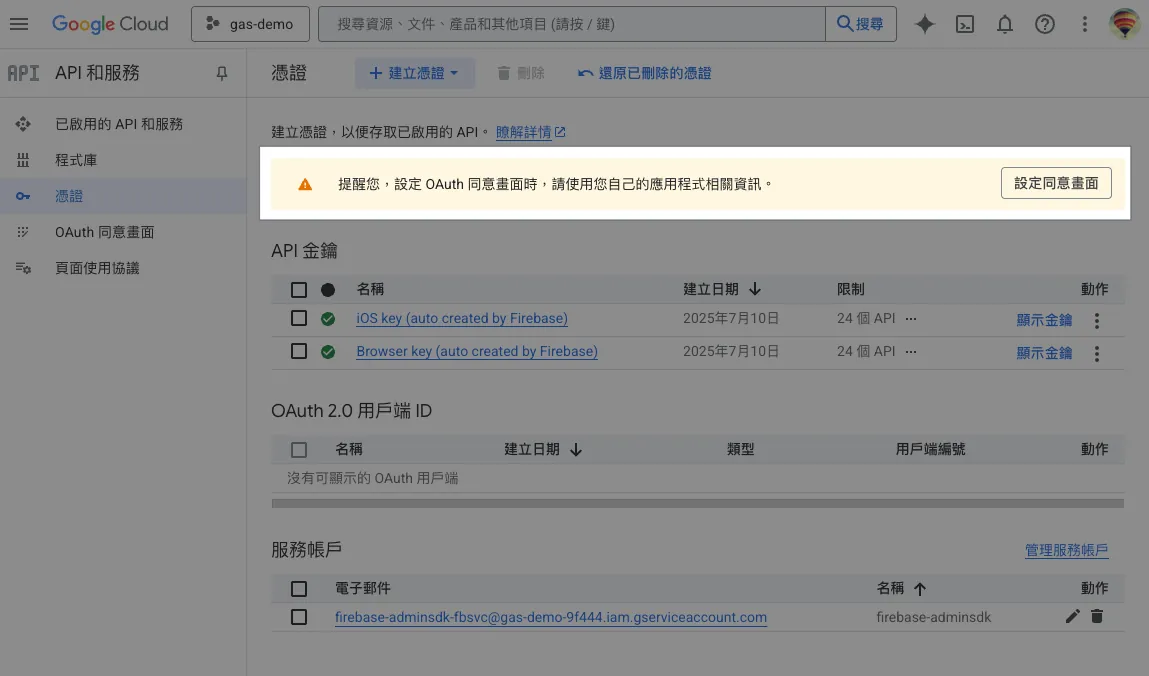
Click “Start”:

Application Information:
-
Application Name:
Enter Your Tool Name -
User Support Email:
Select Email
Target Audience:
-
Internal: For use by organization members only
-
External: Available to all Google account users after consent to authorization
Contact Information:
- Enter the email address to receive notifications
Check to agree to the 《 Google API Services: User Data Policy 》。
Finally, click “Create”.
—
Back to GAS → Project Settings → Google Cloud Platform (GCP) Project → Change Project:
Re-enter the Firebase project ID and click “Change Project”.
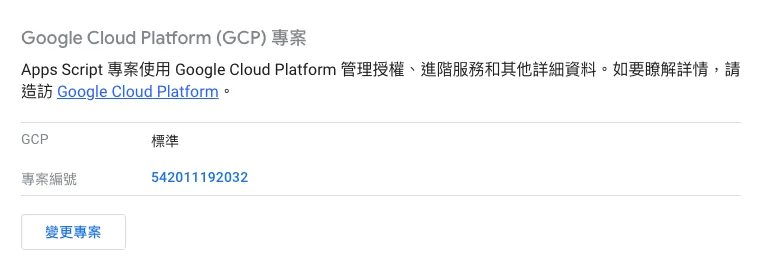
If no errors appear, the binding is complete.
—
If you choose “External,” you may also need to complete the following settings:
Click “Project Number” → expand the left sidebar → “APIs & Services” → “OAuth consent screen”
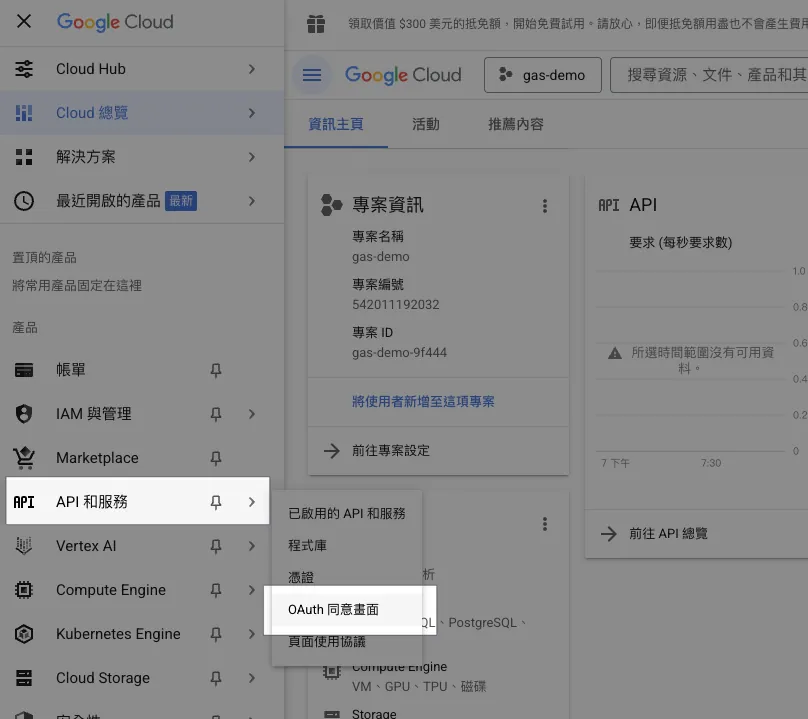
Select “Target Audience” → Test, click “Deploy as web app” → Done.
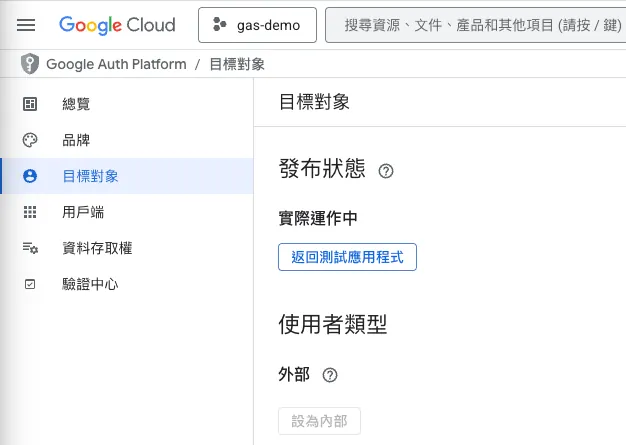
Users can follow the previous step “User must authorize on first use” to complete authorization and start using it!
If the above steps are not configured, users will encounter the following error:
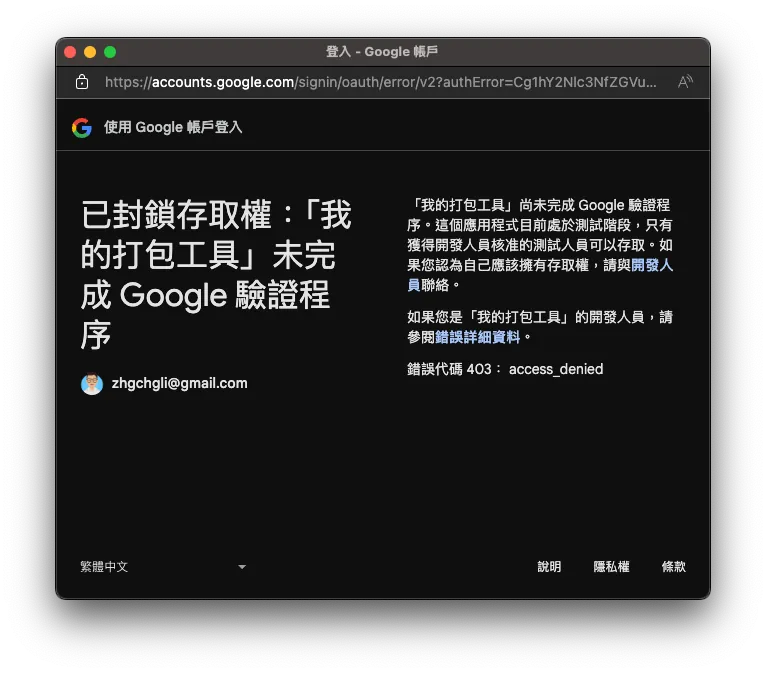
Access to “XXX” blocked due to incomplete Google verification process
Integrate Project
Back to the integration, Firebase directly uses ScriptApp.getOAuthToken() to dynamically obtain the token based on the execution identity, so no token setup is needed.
Only up to the GAS project → Settings.gs → change:
const iOSFirebase = new FirebaseStub(iOSFirebaseProject);
Change to
const iOSFirebase = new Firebase(iOSFirebaseProject);
Done.
Refresh the test “Web App” URL to the build records → Find a record and click “Get Download Link”:
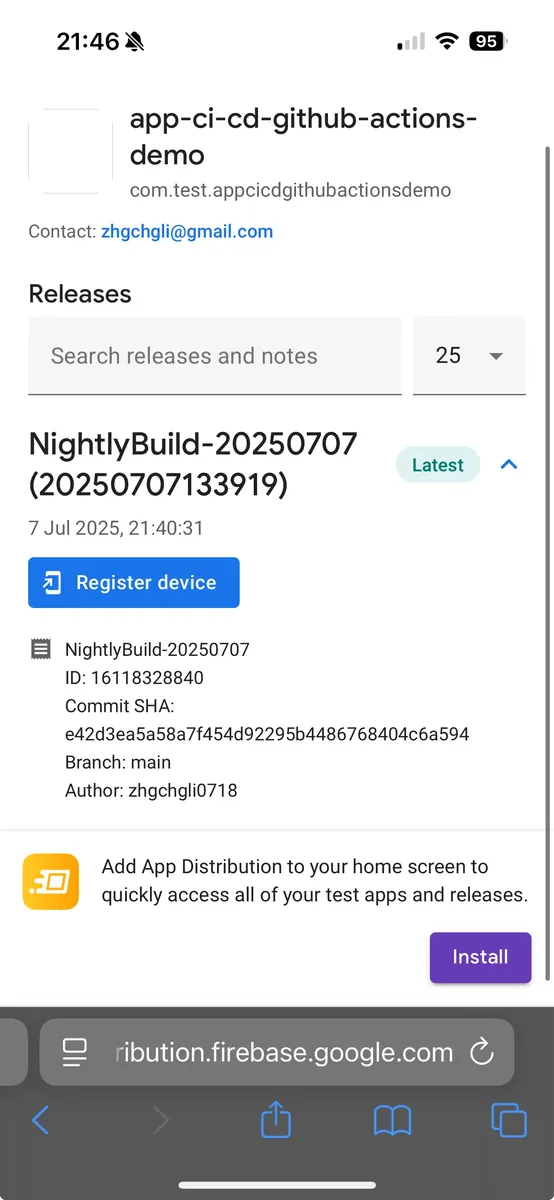
If the corresponding Job Run Id is found in the Firebase App Distribution Release Notes, the download information will be displayed directly, and clicking the download button will take you straight to the download page.
Done! 🎉🎉🎉
Results
By now, you have adapted the examples into your actual usable packaging tool. Remaining custom features, additional third-party API integrations, and more forms can be extended on your own (discuss with ChatGPT).
Finally, don’t forget that after development and testing are complete, you need to follow the previous steps — updating the deployment is required for changes to take effect!
Integration Extensions
Continuing the spirit of our “relay station” role, here are some quick integration CheatSheets:
function asanaAPI(endPoint, method = "GET", data = null) {
    var options = {
      "method" : method,
      "headers": {
          "Authorization":  "Bearer "+asanaToken
      },
      "payload" : data
    };

    var url = "https://app.asana.com/api/1.0"+endPoint;
    var res = UrlFetchApp.fetch(url, options);
    var data = JSON.parse(res.getContentText());
    return data;
}

asanaAPI("/projects/{project_gid}/tasks")
// jql = filter criteria
function jiraTickets(jql) {
  const url = `https://xxx.atlassian.net/rest/api/3/search`;
  const maxResults = 100;

  let allIssues = [];
  let startAt = 0;
  let total = 0;

  do {
    const queryParams = {
      jql: jql,
      startAt: startAt,
      maxResults: maxResults,
      fields: "assignee,summary,status"
    };

    const queryString = Object.keys(queryParams)
      .map(key => `${encodeURIComponent(key)}=${encodeURIComponent(queryParams[key])}`)
      .join("&");

    const options = {
      method: "get",
      headers: {
        Authorization: "Basic " + jiraToken,
        "Content-Type": "application/json",
      },
      muteHttpExceptions: true,
    };

    const response = UrlFetchApp.fetch(`${url}?${queryString}`, options);
    const json = JSON.parse(response.getContentText());
    if (response.getResponseCode() != 200) {
      throw new Error("Failed to fetch Jira issues.");
    }

    if (json.issues && json.issues.length > 0) {
      allIssues = allIssues.concat(json.issues);
      total = json.total;
      startAt += json.issues.length;
    } else {
      break;
    }
  } while (startAt < total);

  var groupIssues = {};
  for(var i = 0; i < allIssues.length; i++) {
    const issue = allIssues[i];
    if (groupIssues[issue.fields.status.name] == null) {
      groupIssues[issue.fields.status.name] = [];
    }
    groupIssues[issue.fields.status.name].push(issue);
  }

  return groupIssues;
}

jiraTickets(`project IN(App)`);
If a database is really needed, Google Sheets can be used as a substitute:
class Saveable {
  constructor(type) {
    // https://docs.google.com/spreadsheets/d/Sheet-ID/edit
    const spreadsheet = SpreadsheetApp.openById("Sheet-ID");
    this.sheet = spreadsheet.getSheetByName("Data"); // Sheet Name
    this.type = type;
  }

  write(key, value) {
    this.sheet.appendRow([
      this.type,
      key,
      JSON.stringify(value)
    ]);
  }

  read(key) {
    const data = this.sheet.getDataRange().getValues();
    const row = data.find(r => r[0] === this.type && r[1] === key);
    if (row) {
      return JSON.parse(row[2]);
    }
    return null;
  }
}

let saveable = Saveable("user");
// Write
saveable.write("birthday_zhgchgli", "0718");
// Read
saveable.read("birthday_zhgchgli"); // -> 0718
function slackSendMessage(channel, text = "", blocks = null) {
  const content = {
    channel: channel,
    unfurl_links: false,
    unfurl_media: false,
    text: text,
    blocks: blocks
  };

  try {
    const response = slackRequest("chat.postMessage", content);
    return response;
  } catch (error) {
    throw new Error(`Failed to send Slack message: ${error}`);
  }
}

function slackRequest(path, content) {
  const options = {
    method: "post",
    contentType: "application/json",
    headers: {
      Authorization: `Bearer ${slackBotToken}`,
      'X-Slack-No-Retry': 1
    },
    payload: JSON.stringify(content)
  };

  try {
    const response = UrlFetchApp.fetch("https://slack.com/api/"+path, options);
    const responseData = JSON.parse(response.getContentText());
    if (responseData.ok) {
      return responseData
    } else {
      throw new Error(`Slack: ${responseData.error}`);
    }
  } catch (error) {
    throw error;
  }
}
More Google Apps Script Examples:
-
Quick Integration Method for Google Apps Script x Google APIs
-
Simple 3 Steps — Build a Free GA4 Automated Data Notification Bot
-
Create a Free Github Repo Star Notifier in Three Steps Using Google Apps Script
-
Crashlytics + Google Analytics Automated Query for App Crash-Free Users Rate
-
Crashlytics + Big Query: Building a More Real-Time and Convenient Crash Tracking Tool
Summary
Thank you for your patience and participation. The CI/CD from 0 to 1 series ends here; I hope it helps you and your team build a solid CI/CD workflow to improve efficiency and product stability. If you have any implementation questions, feel free to leave a comment. These four articles took about 14+ days to write. If you found them helpful, please follow me on Medium and share with your friends and colleagues.
Thank you.
🍺 Buy me a beer on PayPal


Comments