Apple Watch App 開發教學|從 UI 排版到 WatchConnectivity 資料同步完整攻略
針對有 iOS UIKit 基礎的開發者,掌握 Apple Watch App 簡化 UI 排版、WatchConnectivity 雙向資料傳遞與推播實作,解決第三方 App 功能不足痛點,快速打造輔助型手錶應用,提升使用體驗與即時互動效率。
基於 SEO 考量,本文標題與描述經 AI 調整,原始版本請參考內文。
文章目錄
動手做一支 Apple Watch App 吧!(Swift)
watchOS 5 手把手開發Apple Watch App 從無到有
[最新] Apple Watch Series 6 開箱&使用兩年體驗心得 >>>點我前往
前言:
暨上一篇 Apple Watch 入手開箱文 後已經過了快三個月,最近終於找到機會研究開發Apple Watch App啦。
{:target="_blank"}](/assets/e85d77b05061/1*aNqsa7aR3Vi3NIIvaUFZLA.webp)
補一下使用三個月後的心得: 1. e-sim(LTE)依然還想不到什麼時候會用到,所以也還沒申請沒用過 2.常用功能:靠近解鎖Mac電腦、舉手查看通知、Apple Pay 3.健康提醒:過了三個月已開始懶了,通知提醒都看看,沒達成圓圈也無感 4.第三方App支援度依然很差 5.錶面可依照心情任意更換增加新鮮感 6.更詳細的運動紀錄:例如走遠一點路去買晚餐,手錶會自動偵測詢問是否要記錄運動
使用三個月後整體來說,還是如原開箱文所寫就像是多個生活小助手,幫你解決瑣碎的事.
第三方App支援度依然很差
在我實際開發過Apple Watch App之前還很納悶,為何Apple Watch上的App都很陽春甚至就只是「堪用」罷了,包括LINE(訊息不同步而且從未更新)、Messenger(就是堪用);直到我實際開發過Apple Watch App之後才知道這些開發者的苦衷….
首先,了解Apple Watch App的定位,化繁為簡
Apple Watch的定位 「不是取代iPhone,而是輔助」 不論是官方介紹、官方App、watchOS API都是這個走向;所以才會覺得第三方APP很陽春、功能很少(抱歉,我太貪心了Orz)
以 我們的A pp為例,有搜尋商家、查看專欄、討論區、線上詢問…等等功能;線上詢問就是有價值搬上Apple Watch的項目,因為他需要即時性而且更快速的回覆代表更有機會獲得訂單;搜尋商家、查看專欄、討論區這些功能相對複雜,在手錶上就算做的到也意義不大(螢幕能呈現的資訊太少、也不需要即時性)
核心概念還是「以輔助為主」,所以並不是什麼功能都需要搬上Apple Watch;畢竟使用者很少很少時間會是只有戴手錶沒帶手機,而遇到這種情況時,使用者的需求也只有重要的功能(像查看專欄文章這種沒有重要到一定要立刻馬上用手錶看)
讓我們開始吧!
這也是我第一次開發Apple Watch App,文章內容可能不夠深入,敬請大家指教!!
本篇只適合有開發過iOS App/UIKit基礎的讀者閱讀
本篇使用:iOS ≥ 9、watchOS ≥ 5
為iOS專案新建 watchOS Target:
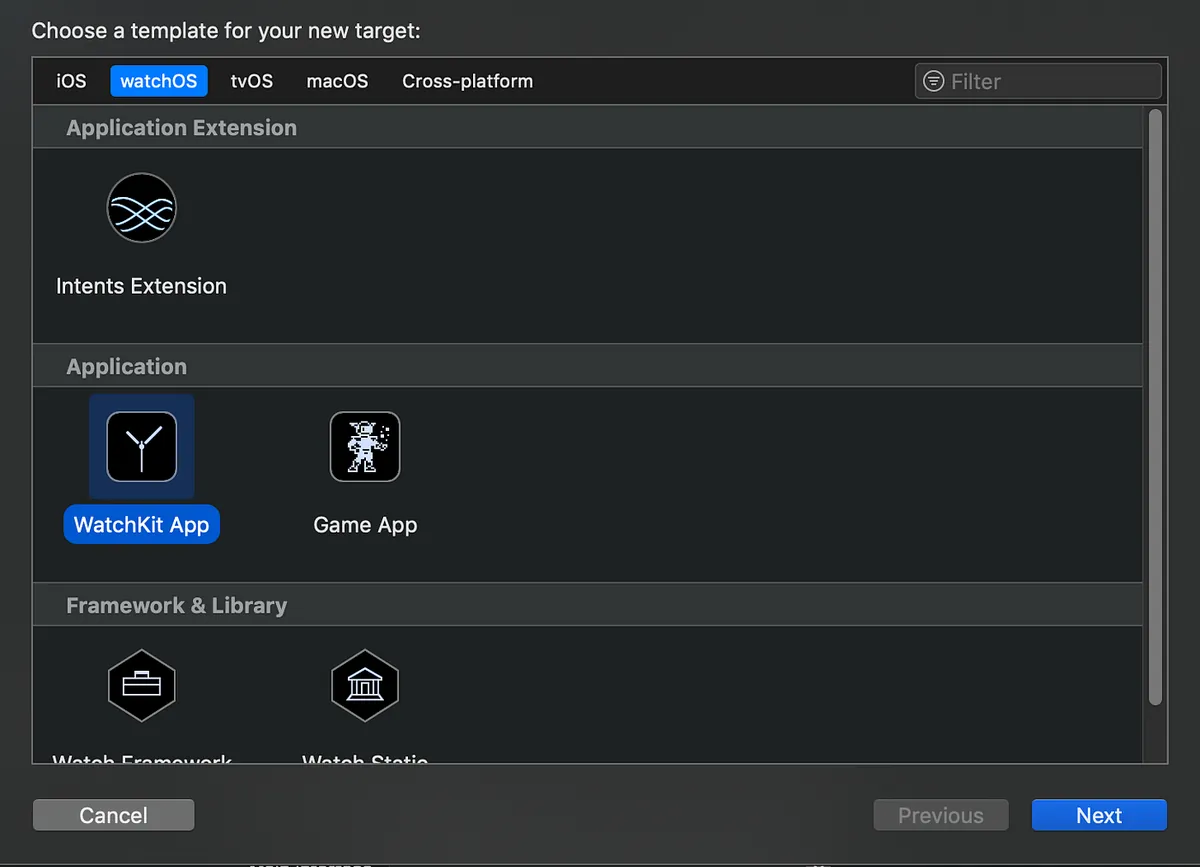
File -> New -> Target -> watchOS -> WatchKit App
*Apple Watch App無法獨立安裝,一定要依附在 iOS App 之下
新建好之後目錄會長這樣:
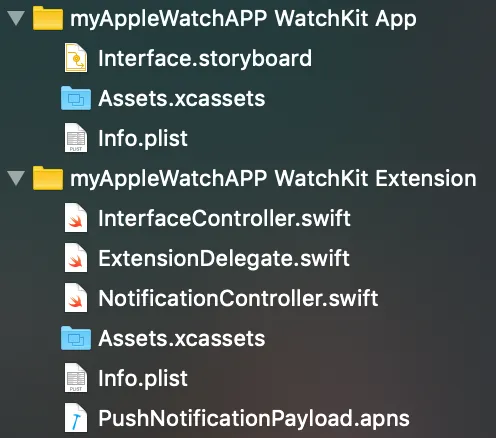
你會發現有兩個Target項目,缺一不可:
- WatchKit App: 負責存放資源、UI顯示 /Interface.storyboard:同 iOS,裡面有系統預設建立的視圖控制器 /Assets.xcassets:同 iOS,存放用到的資源項目 /info.plist:同 iOS,WatchKit App 相關設定
- WatchKit Extension: 負責程式呼叫、邏輯處理( * .swift) /InterfaceController.swift:預設的視圖控制器程式 /ExtensionDelegate.swift:類似Swift的AppDelegate,Apple Watch App 啟動入口 /NotificationController.swift:用於處理Apple Watch App上的推播顯示 /Assets.xcassets:這裡不使用,我統一放在WatchKit App的Assets.xcassets下 /info.plist:同 iOS,WatchKit Extension 相關設定 /PushNotificationPayload.apns:推播資料,可用在模擬器上測試推播功能
細節會在後面做介紹,先大概了解一下目錄及文件內容功能即可。
視圖控制器:
在AppleWatch中視圖控制器不叫ViewController而是InterfaceController ,你可以在WatchKit App/Interface.storyboard中找到Interface Controller Scence,控制它的程式就放在WatchKit Extension/InterfaceController.swift中(同iOS概念)
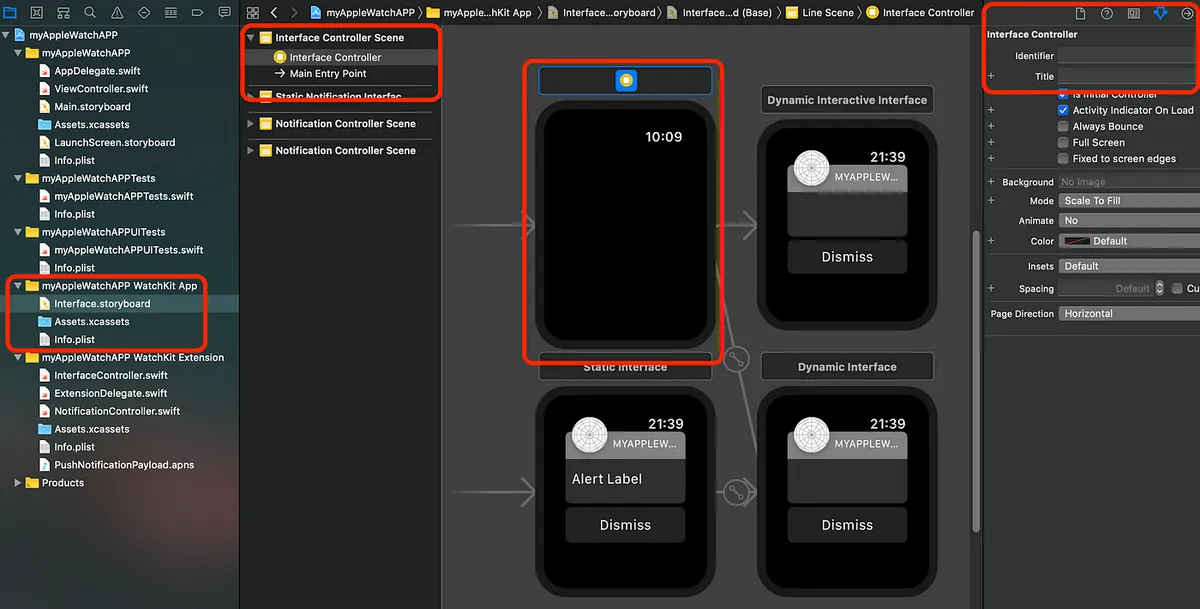
Scene預設會和Notification Controller Scene擠在一起 (我會把它拉上面一點分開)
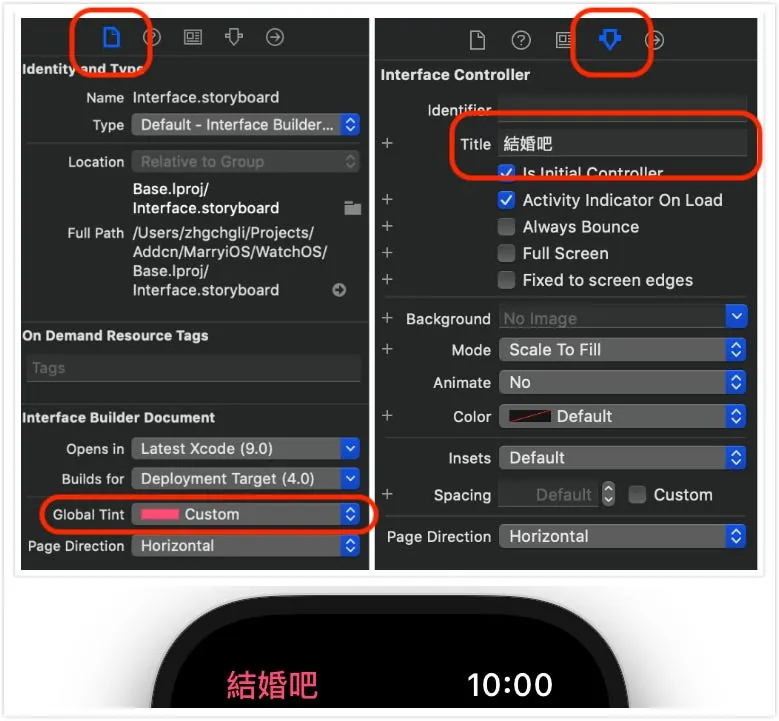
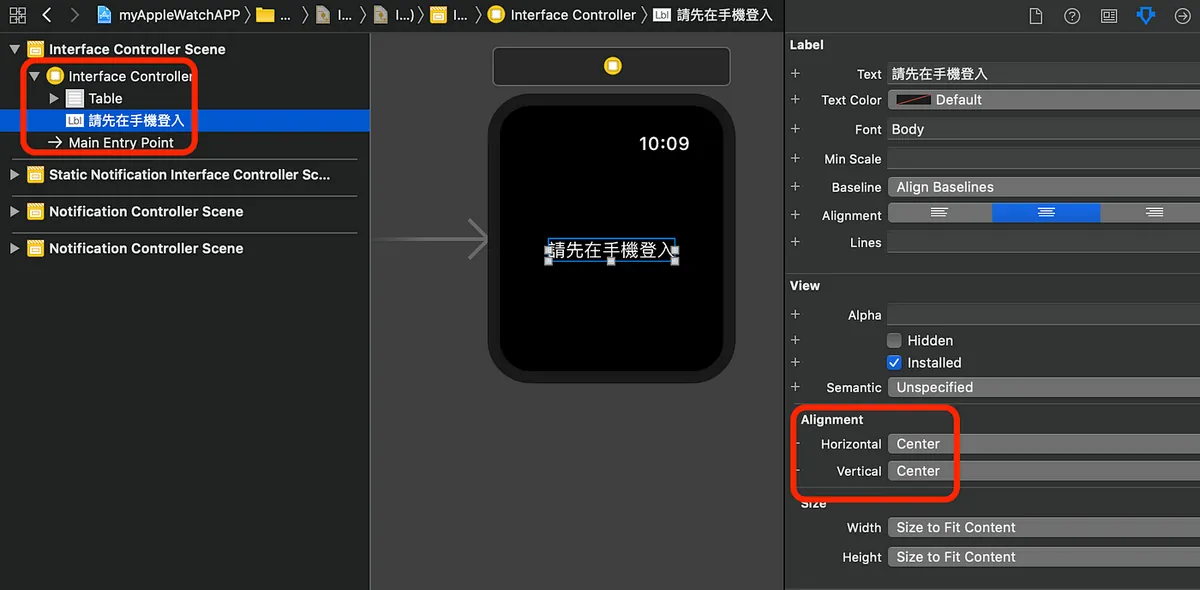
可在右方設定InterfaceController的標題顯示文字.
標題顏色部分吃的是Interface Builder Document/Global hint設定,整個App的風格顏色會是統一的.
元件庫:
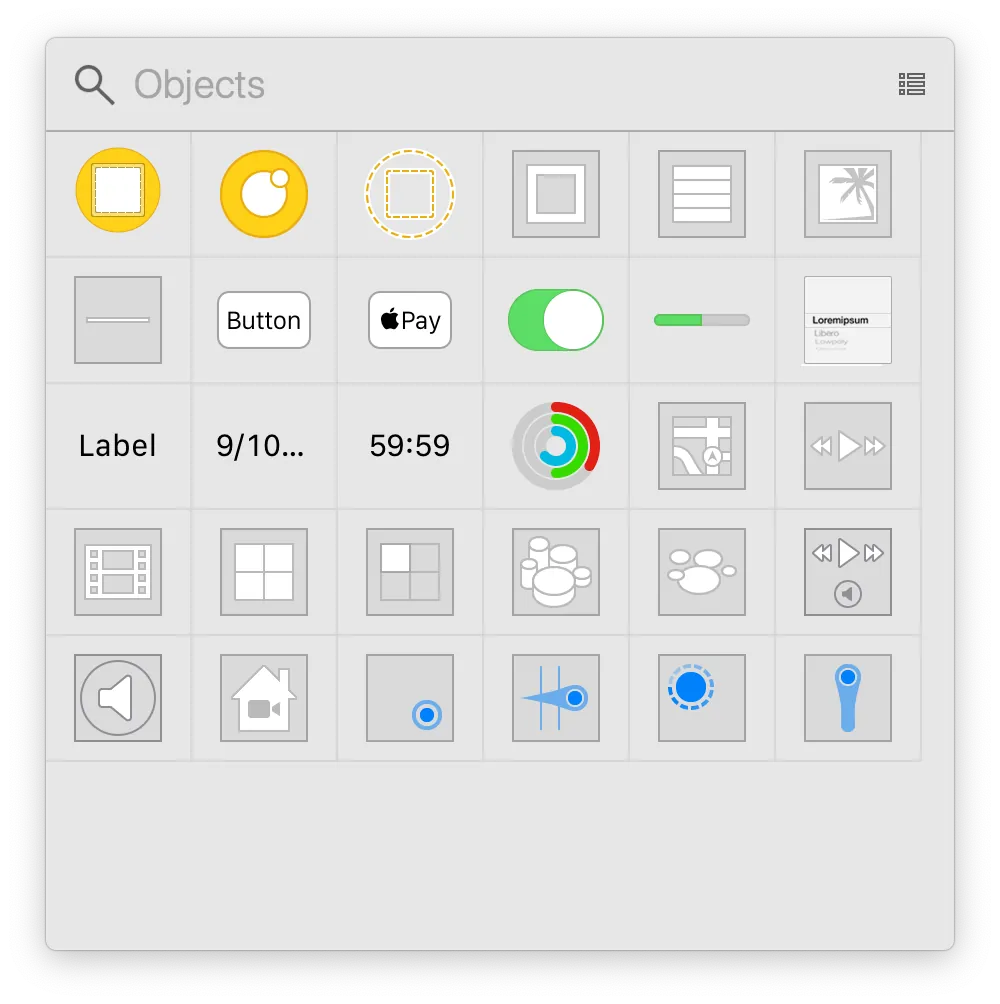
沒有太多複雜的元件,元件功能也都簡單明瞭
UI 排版:
萬丈高樓從View起,排版的部分沒有 UIKit(iOS) 中的Auto Layout、約束、圖層,全都使用參數進行排版設置,更簡單有力(排起來有點像 UIKit 中的 UIStackView)
一切排版由Group組成,類似UIKit中的 UIStackView 但能設置更多排版參數
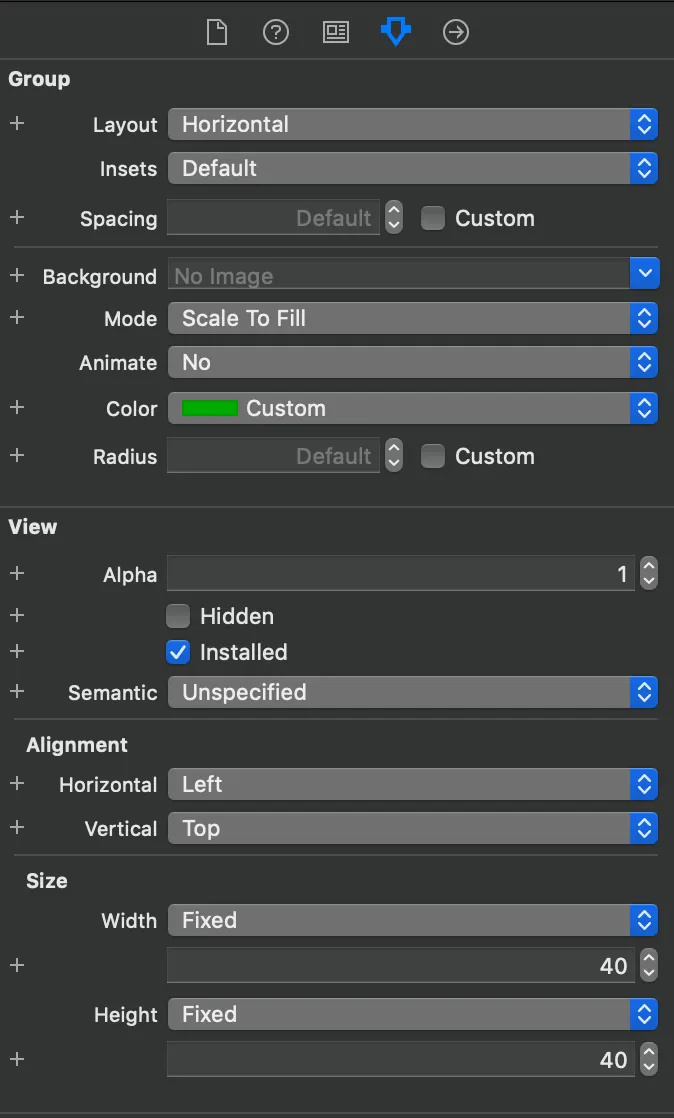
Group的參數設置
- Layout:設置被包在裡面的子View排版方式(水平、垂直、圖層堆疊)
- Insets:設置Group的上下左右間距
- Spacing:設置被包在裡面的子View之間的間距
- Radius:設置Group的圓角,沒錯!WatchKit自帶圓角設置參數
- Alignment/Horizontal:設置水平對齊方式(左、中、右)與鄰居、外層包覆的View設置會有所連動
- Alignment/Vertical:設置垂直對齊方式(上、中、下)與鄰居、外層包覆的View設置會有所連動
- Size/Width:設置Group的大小,有三種模式可選「Fixed:指定寬度」、「Size To Fit Content:依照內容子View大小決定寬度」、「Relative to Container:參照外層包覆的View大小為寬度(可設%/+ -修正值)」
- Size/Height:同Size/Width,此項是設置高度
字型/字體大小設置:

可直接套用系統的Text Styles,或使用Custom(但這邊我測試使用Custom無法設定字體大小);所以 我是使用System 自訂各顯示Label的字體大小
做中學:以Line排版為例
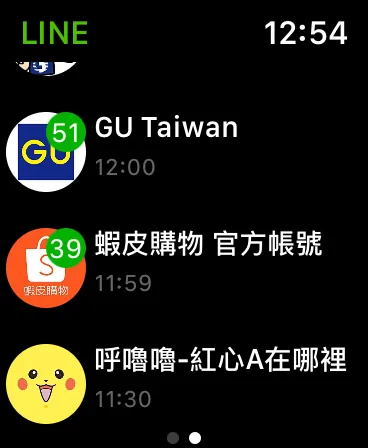
排版部分不像 iOS 那麼複雜,所以我直接透過範例示範給大家看,就能直接上手;以 Line 的主頁排版為例子:
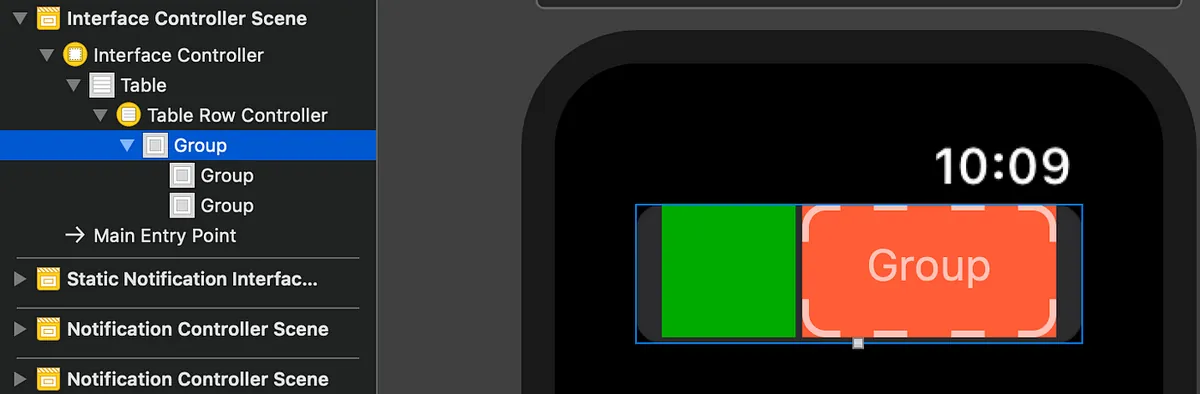
在WatchKit App/Interface.storyboard中找到Interface Controller Scence:
1.整個頁面,相當於 iOS App 開發中會使用到的 UITableView,在Apple Watch App 中簡化了操作,名字也改叫做「WKInterfaceTable」 首先就先拉一個Table到Interface Controller Scence中
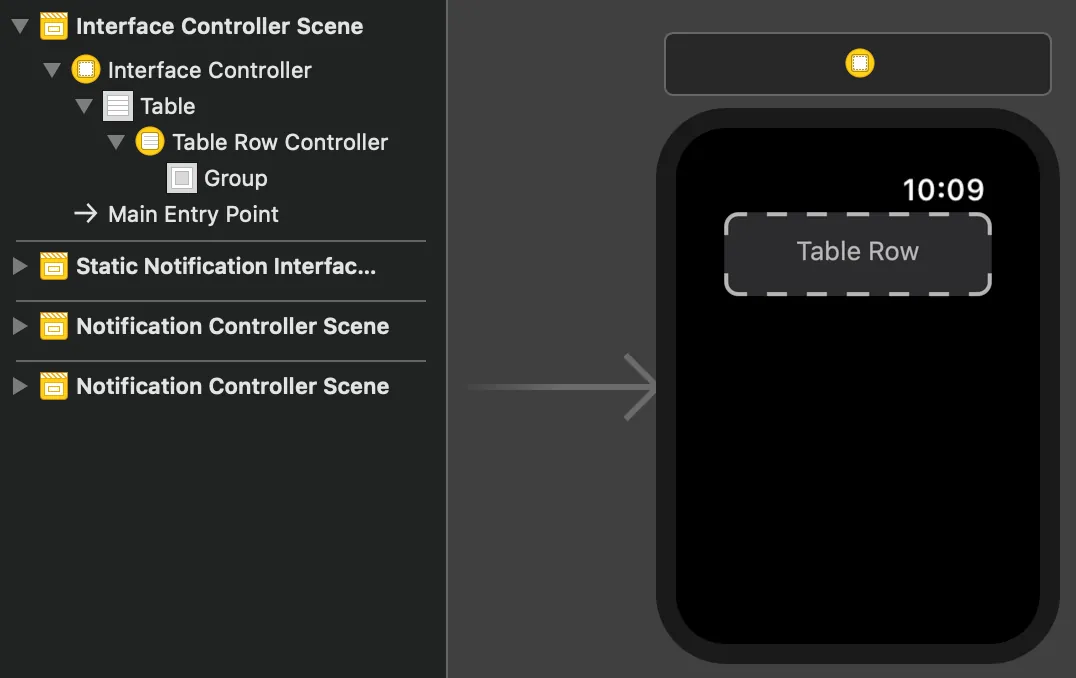
同UIKit UITableView,有Table本體、有Cell(Apple Watch中叫做Row);使用起來簡化許多, 你可以直接在此介面上進行Cell的設計排版!
2. 分析排版架構,設計Row顯示樣式:

要排出一個左邊有圓角滿版的Image且堆疊一個Label,右邊平均分配上下兩個區塊,上方放Label,下方也放Label的區塊
2–1: 拉出左右兩區塊的架構
拉兩個Group到Group中,並對Size參數分別設定:
左邊綠色部分:

Layout設定Overlap,裡面子View要做未讀訊息Label的圖層堆疊顯示
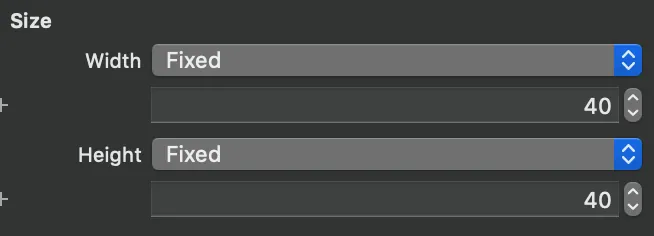
設固定長寬40的正方形
右邊紅色部分:

Layout設定Vertical,裡面子View要做上下兩個顯示
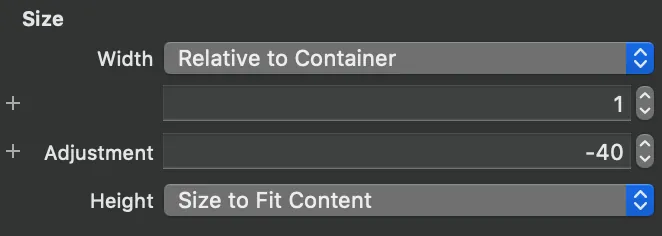
寬度設定參照外層,比例100%,扣掉左邊綠色部分40
左右容器內排版:
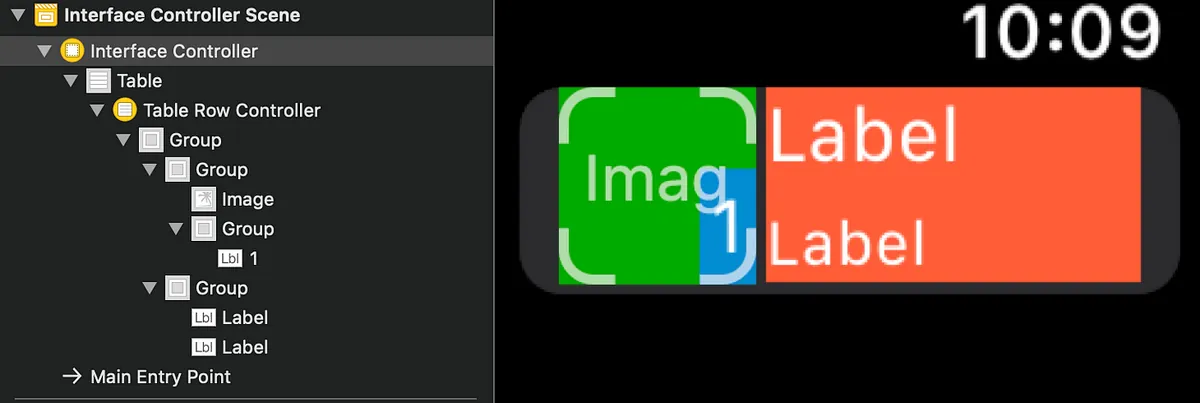
左邊部分:拉入一個Image,再拉入一個包覆Lable的Group對齊設右下(Group設底色再設間距及圓角)
右邊部分:拉入兩個Label,一個對齊設左上,一個對齊設左下即可
為Row命名(同UIKit UITableView為Cell設定identifier):
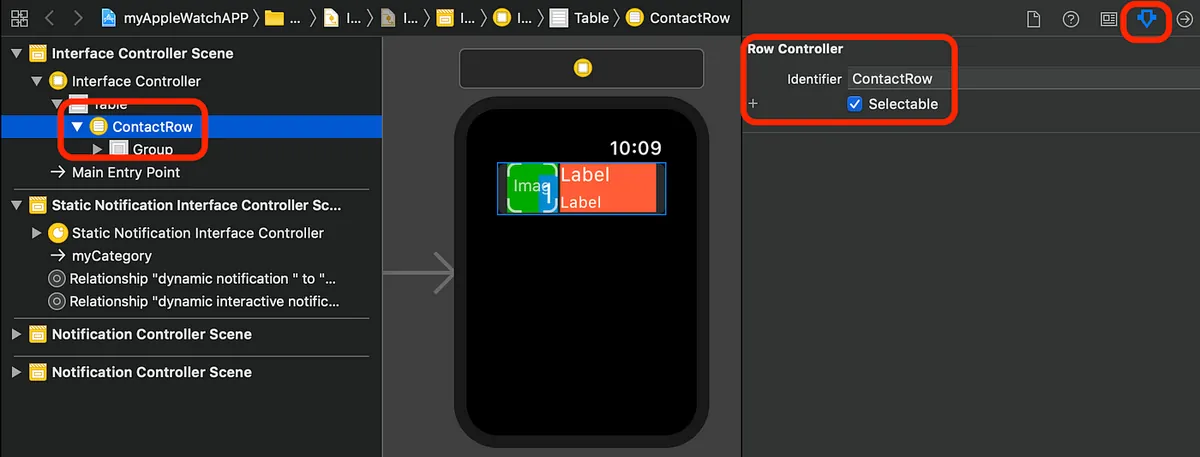
選定Row->Identifier->輸入自訂名稱
Row的呈現樣式不只一種呢?
非常簡單,只要在拉一個Row放在Table裡(實際要顯示哪個樣式的ROW由程式控制)並輸入Identifier命名即可
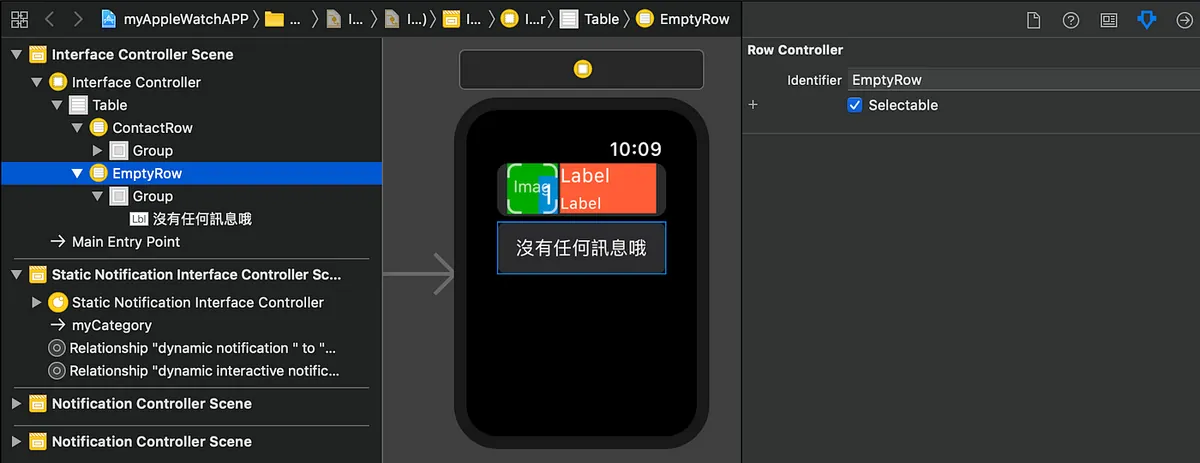
這邊我再拉一個Row用於呈現無資料時的提示
排版相關資訊
watchKit的hidden不會佔位,可拿來做交互應用(有登入才顯示Table;沒登入顯示提示Label)
排版到此告一段落,可依照個人設計做修改;上手容易,多排個幾次、玩玩對齊參數,就能熟悉!
程式控制部分:
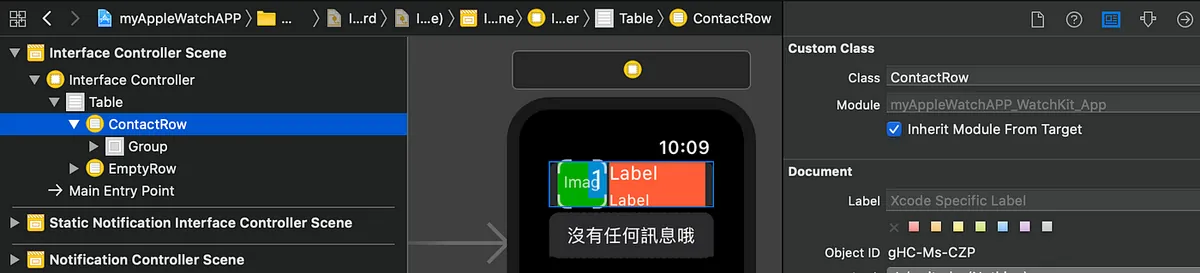
接續Row,我們需要建立一個Class對Row進行參照操作:
1
2
class ContactRow:NSObject {
}
1
2
3
4
5
6
7
8
class ContactRow:NSObject {
    var id:String?
    @IBOutlet var unReadGroup: WKInterfaceGroup!
    @IBOutlet var unReadLabel: WKInterfaceLabel!
    @IBOutlet weak var imageView: WKInterfaceImage!
    @IBOutlet weak var nameLabel: WKInterfaceLabel!
    @IBOutlet weak var timeLabel: WKInterfaceLabel!
}
拉outlet、儲存變數
Table部分ㄧ樣拉Outlet到Controller中:
1
2
3
4
5
6
7
8
9
10
11
12
13
14
15
16
17
18
19
20
21
22
23
24
25
26
27
28
29
30
31
32
33
34
35
36
37
38
39
40
41
42
43
44
45
46
47
48
49
50
51
52
53
class InterfaceController: WKInterfaceController {

    @IBOutlet weak var Table: WKInterfaceTable!
    override func awake(withContext context: Any?) {
        super.awake(withContext: context)

        // Configure interface objects here.
    }

    override func willActivate() {
        // This method is called when watch view controller is about to be visible to user
        super.willActivate()
    }

    struct ContactStruct {
        var name:String
        var image:String
        var time:String
    }

    func loadData() {
        //Get API Call Back...
        //postData {
        let data:[ContactStruct] = [] //api returned data...

        self.Table.setNumberOfRows(data.count, withRowType: "ContactRow")
        //如果你有多種ROW需要呈現則用:
            //self.Table.setRowTypes(["ContactRow","ContactRow2","ContactRow3"])
        //
        for item in data.enumerated() {
            if let row = self.Table.rowController(at: item.offset) as? ContactRow {
                row.nameLabel.setText(item.element.name)
                //assign value to lable/image......
            }
        }

        //}
    }

    override func didDeactivate() {
        // This method is called when watch view controller is no longer visible
        super.didDeactivate()
        loadData()
    }

    //處理Row點選時:
    override func table(_ table: WKInterfaceTable, didSelectRowAt rowIndex: Int) {
        guard let row = table.rowController(at: rowIndex) as? ContactRow,let id = row.id else {
            return
        }
        self.pushController(withName: "showDetail", context: id)
    }
}
Table的操作簡化許多沒有delegate/datasource,設定資料方式只要呼叫setNumberOfRows/setRowTypes指定Row數量和形態,再使用rowController(at:) 設定每列的資料內容即可!
Table的Row選擇事件也只需 override func table( _ table: WKInterfaceTable, didSelectRowAt rowIndex: Int) 即可操作!(Table也只有這個事件)
如何跳頁?
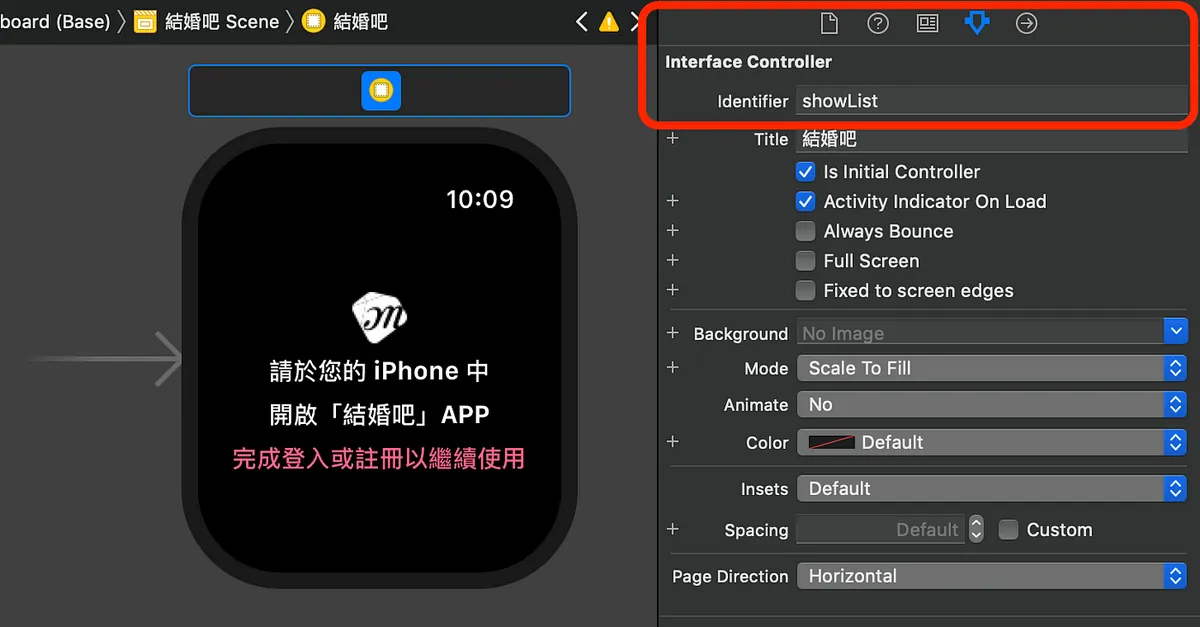
首先為Interface Controller設定Identifier
watchKit有兩種跳頁模式:
1.類似iOS UIKit push self.pushController(withName: Interface Controller Identifier , context: Any? )
push方式可左上返回
返回上一頁同iOS UIKit:self.pop( )
返回根頁面:self.popToRootController( )
開新頁面:self.presentController( )
2. 頁籤顯示方式 WKInterfaceController.reloadRootControllers(withNames: [ Interface Controller Identifier ], contexts: [ Any? ] )
亦或是在Storyboard上,在第一頁的Interface Controller上按Control+Click拖曳到第二頁選擇「next page」也可
頁籤顯示方式可以左右切換頁面
兩種跳頁方式不能混用.
跳頁參數?
不像iOS需要使用自訂delegate或segue方式傳遞參數,watchKit跳頁帶參數方式就是將參數放入上方方法中的 contexts 中即可.
接收參數在 InterfaceController 的 awake(withContext context: Any?)
例如我在A頁面要跳到B頁面並帶入id:Int時:
A 頁面:
1
self.pushController(withName: "showDetail", context: 100)
B 頁面:
1
2
3
4
5
6
7
8
9
override func awake(withContext context: Any?) {
        super.awake(withContext: context)
        guard let id = context as? Int else {
           print("參數錯誤!")
           self.popToRootController()
           return
        }
        // Configure interface objects here.
}
程式控制元件部分
相比iOS UIKit一樣簡化許多,有開發過iOS的應該上手很快! 例如label變成setText( ) p.s. 而且居然沒有getText的方法,只能extension變數或放在外部變數儲存
與iPhone之間同步/資料傳遞
如果有開發過iOS 相關 Extension 的話;下意識一定是用App Groups共享UserDefaults的方式,當初我也興沖沖的這樣做,然後卡了好久發現資料一直過不去,直到上網一查才發現,watchOS>2之後就不再支援此方法了….
要使用新的WatchConnectivity方式讓手機跟手錶之間進行通訊(類似socket概念),iOS手機及手錶watchOS兩端都需要實做,我們寫成singleton模式如下:
手機端:
1
2
3
4
5
6
7
8
9
10
11
12
13
14
15
16
17
18
19
20
21
22
23
24
25
26
27
28
29
30
31
32
33
34
35
36
37
38
39
40
41
42
43
44
45
46
47
48
49
50
51
52
53
54
55
56
57
58
59
60
61
62
63
64
65
66
67
68
69
70
71
import WatchConnectivity

class WatchSessionManager: NSObject, WCSessionDelegate {
    @available(iOS 9.3, *)
    func session(_ session: WCSession, activationDidCompleteWith activationState: WCSessionActivationState, error: Error?) {
        //手機端session啟用完成
    }

    func session(_ session: WCSession, didReceiveUserInfo userInfo: [String : Any] = [:]) {
        //手機端接受到手錶傳回的UserInfo
    }

    func session(_ session: WCSession, didReceiveMessage message: [String : Any], replyHandler: @escaping ([String : Any]) -> Void) {
        //手機端接受到手錶回傳的Message
    }

    //另外還有didReceiveMessageData,didReceiveFile同樣都是處理收到手錶回傳的資料
    //看你的資料傳遞接收需求決定要用哪個

    func sendUserInfo() {
        guard let validSession = self.validSession,validSession.isReachable else {
            return
        }

        if userDefaultsTransfer?.isTransferring == true {
            userDefaultsTransfer?.cancel()
        }

        var list:[String:Any] = [:]
        //將UserDefaults放入list....

        self.userDefaultsTransfer = validSession.transferUserInfo(list)
    }

    func sessionReachabilityDidChange(_ session: WCSession) {
        //與手錶APP連接狀態改變時(手錶開啟APP時/手錶關閉APP時)
        sendUserInfo()
        //我是當狀態改變,如為手錶開啟APP時就同步一次UserDefaults
    }

    func session(_ session: WCSession, didFinish userInfoTransfer: WCSessionUserInfoTransfer, error: Error?) {
        //完成同步UserDefaults(transferUserInfo)
    }

    func sessionDidBecomeInactive(_ session: WCSession) {

    }

    func sessionDidDeactivate(_ session: WCSession) {

    }

    static let sharedManager = WatchSessionManager()
    private override init() {
        super.init()
    }

    private let session: WCSession? = WCSession.isSupported() ? WCSession.default : nil
    private var validSession: WCSession? {
        if let session = session, session.isPaired && session.isWatchAppInstalled {
            return session
        }
        //回傳有效且連接中且手錶APP開啟中的session
        return nil
    }

    func startSession() {
        session?.delegate = self
        session?.activate()
    }
}
WatchConnectivity 手機端的 Code
並在iOS/AppDelegate.swift的application( _ application: UIApplication, didFinishLaunchingWithOptions launchOptions: [UIApplicationLaunchOptionsKey: Any]?)中加入WatchSessionManager.sharedManager.startSession( ) 以在啟動手機APP後連接上session
手錶端:
1
2
3
4
5
6
7
8
9
10
11
12
13
14
15
16
17
18
19
20
21
22
23
24
25
26
27
28
29
30
31
32
33
34
35
36
37
import WatchConnectivity

class WatchSessionManager: NSObject, WCSessionDelegate {
    func session(_ session: WCSession, activationDidCompleteWith activationState: WCSessionActivationState, error: Error?) {
    }

    func sessionReachabilityDidChange(_ session: WCSession) {
        guard session.isReachable else {
            return
        }

    }

    func session(_ session: WCSession, didFinish userInfoTransfer: WCSessionUserInfoTransfer, error: Error?) {

    }

    func session(_ session: WCSession, didReceiveUserInfo userInfo: [String : Any] = [:]) {
        DispatchQueue.main.async {
            //UserDefaults:
            //print(userInfo)
        }
    }

    static let sharedManager = WatchSessionManager()
    private override init() {
        super.init()
    }

    private let session: WCSession? = WCSession.isSupported() ? WCSession.default : nil

    func startSession() {
        session?.delegate = self
        session?.activate()
    }
}
WatchConnectivity 手錶端的 Code
並在WatchOS Extension/ExtensionDelegate.swift中的applicationDidFinishLaunching( ) 加入 WatchSessionManager.sharedManager.startSession( ) 以在啟動手錶APP後連接上session
WatchConnectivity 資料傳遞方式
傳資料用:sendMessage,sendMessageData,transferUserInfo,transferFile 收資料用:didReceiveMessageData,didReceive,didReceiveMessage 兩端傳接收方法都ㄧ樣

可以看到手錶傳資料到手機都通,但手機傳資料到手錶僅限手錶APP開啟中
watchOS推播處理
專案目錄底下的PushNotificationPayload.apns這時就派上用場了,這是用來在模擬器上測試推播之用,在模擬器上部署Watch App target,安裝完啟動App就會收到一則以這個檔案內容的推播,讓開發者更容易測試推播功能.
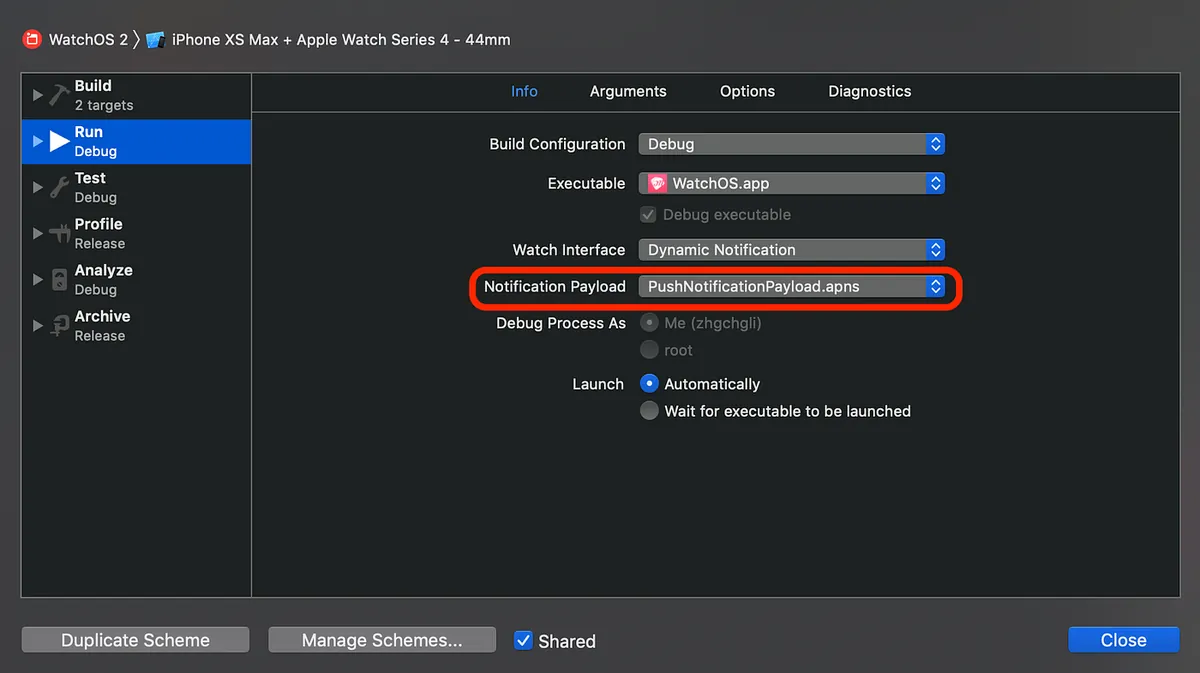
如要修改/啟用/停用 PushNotificationPayload.apns,請選擇Target後Edit Scheme
watchOS 推播處理:
同iOS我們實做UNUserNotificationCenterDelegate,在watchOS中我們也實作一樣的方法,在watchOS Extension/ExtensionDelegate.swift中
1
2
3
4
5
6
7
8
9
10
11
12
13
14
15
16
17
18
19
20
21
22
23
24
25
26
27
28
29
30
31
32
33
34
35
36
37
38
39
40
41
import WatchKit
import UserNotifications
import WatchConnectivity

class ExtensionDelegate: NSObject, WKExtensionDelegate, UNUserNotificationCenterDelegate {

    func applicationDidFinishLaunching() {

        WatchSessionManager.sharedManager.startSession() //前面提到的WatchConnectivity連線

        UNUserNotificationCenter.current().delegate = self //設定UNUserNotificationCenter delegate
        // Perform any final initialization of your application.
    }

    func userNotificationCenter(_ center: UNUserNotificationCenter, willPresent notification: UNNotification, withCompletionHandler completionHandler: @escaping (UNNotificationPresentationOptions) -> Void) {
        completionHandler([.sound, .alert])
        //同iOS,此做法可讓推播在APP前景時依然會顯示
    }

    func userNotificationCenter(_ center: UNUserNotificationCenter, didReceive response: UNNotificationResponse, withCompletionHandler completionHandler: @escaping () -> Void) {
        //點擊推播時
        guard let info = response.notification.request.content.userInfo["aps"] as? NSDictionary,let alert = info["alert"] as? Dictionary<String,String>,let data = info["data"] as? Dictionary<String,String> else {
            completionHandler()
            return
        }

        //response.actionIdentifier可得點擊事件Identifier
        //預設點擊事件:UNNotificationDefaultActionIdentifier

        if alert["type"] == "new_ask") {
            WKExtension.shared().rootInterfaceController?.pushController(withName: "showDetail", context: 100)
            //取得目前root interface controller 並 push
        } else {
           //其他處理....
           //WKExtension.shared().rootInterfaceController?.presentController(withName: "", context: nil)

        }

        completionHandler()
    }
}
ExtensionDelegate.swift
watchOS 推播顯示,分成三種:
- static: 預設推播顯示方式
會同手機推播,這邊手機端iOS有實做UNUserNotificationCenter.setNotificationCategories在通知下方增加按鈕;Apple Watch預設亦然會出現
- dynamic:動態處理推播顯示樣式(重組內容、顯示圖片)
- interactive:watchOS ≥ 5 後支援,在dynamic的基礎下再增加支援按鈕
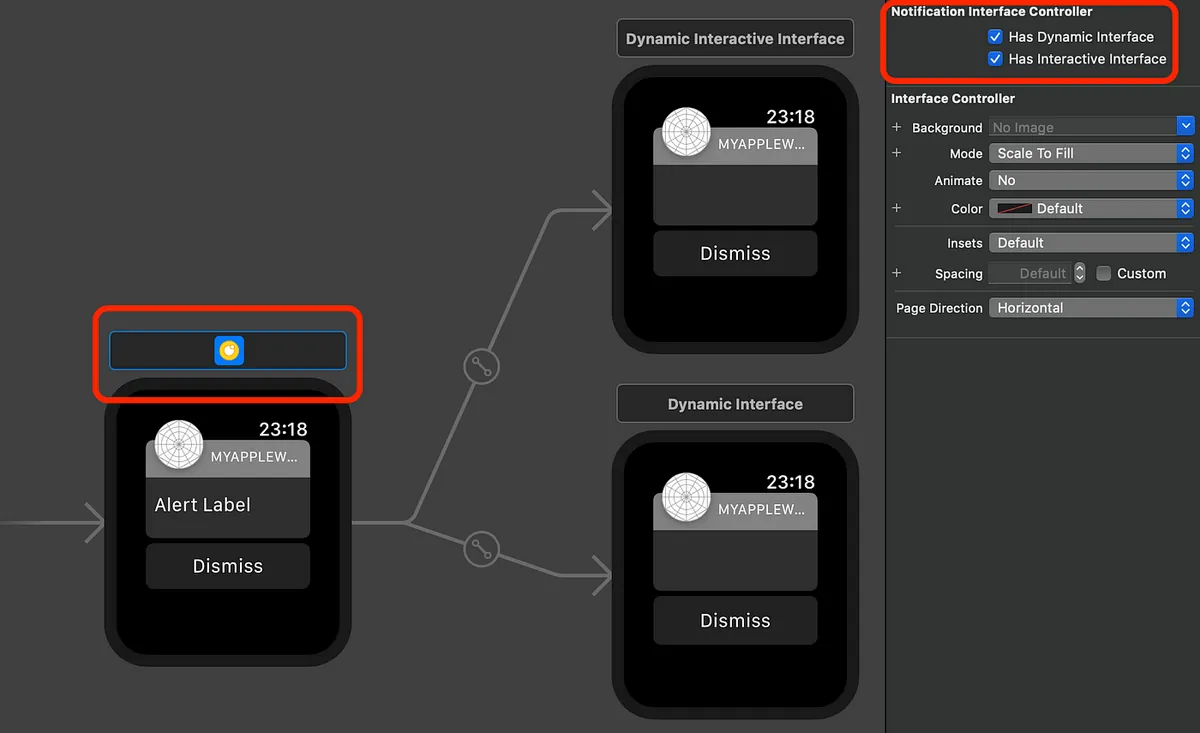
可在Interface.storyboard中的Static Notification Interface Controller Scene設定推播處理方式
static沒什麼好說的,就是走預設的顯示方式,這邊先介紹dynamic,勾選「Has Dynamic Interface」後會出現「Dynamic Interface」可在此視圖設計你自訂的推播呈現方式(不能使用Button):
我的自訂推播呈現設計
1
2
3
4
5
6
7
8
9
10
11
12
13
14
15
16
17
18
19
20
21
22
23
24
25
26
27
28
29
30
31
32
33
34
35
36
37
38
39
40
41
42
43
44
45
46
47
48
49
50
51
52
53
54
55
56
57
58
59
import WatchKit
import Foundation
import UserNotifications
class NotificationController: WKUserNotificationInterfaceController {
@IBOutlet var imageView: WKInterfaceImage!
@IBOutlet var titleLabel: WKInterfaceLabel!
@IBOutlet var contentLabel: WKInterfaceLabel!
override init() {
// Initialize variables here.
super.init()
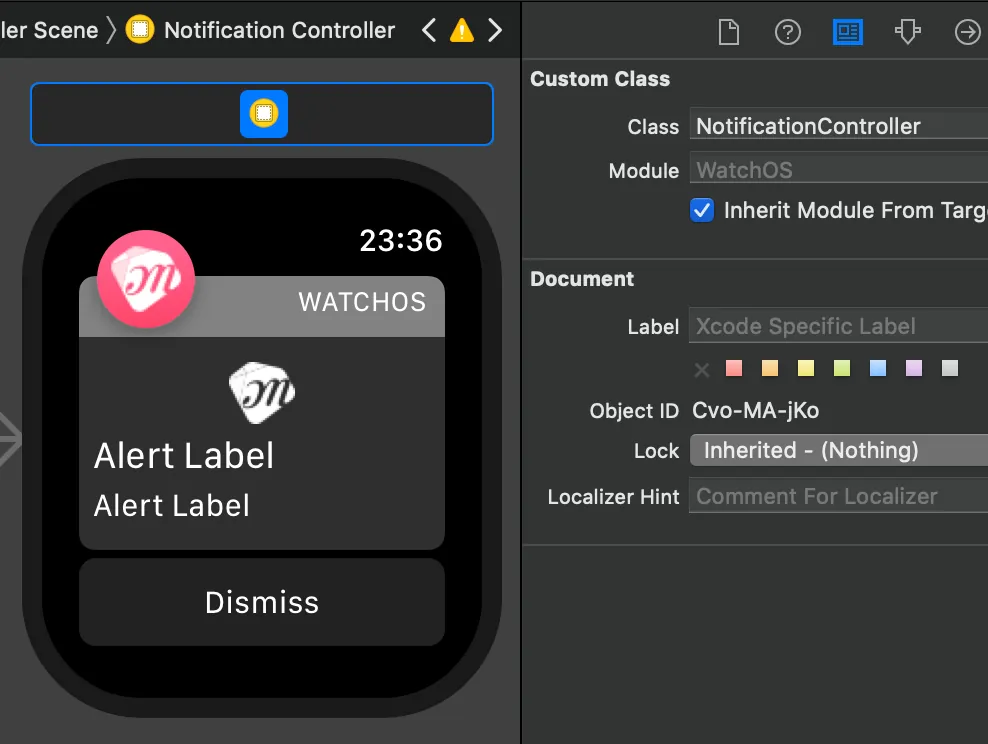
self.setTitle("結婚吧") //設定右上方標題
// Configure interface objects here.
}
override func willActivate() {
// This method is called when watch view controller is about to be visible to user
super.willActivate()
}
override func didDeactivate() {
// This method is called when watch view controller is no longer visible
super.didDeactivate()
}
override func didReceive(_ notification: UNNotification) {
if #available(watchOSApplicationExtension 5.0, *) {
self.notificationActions = []
//清除iOS實做的UNUserNotificationCenter.setNotificationCategories在通知下方增加的按鈕
}
guard let info = notification.request.content.userInfo["aps"] as? NSDictionary,let alert = info["alert"] as? Dictionary<String,String> else {
return
}
//推播資訊
self.titleLabel.setText(alert["title"])
self.contentLabel.setText(alert["body"])
if #available(watchOSApplicationExtension 5.0, *) {
if alert["type"] == "new_msg" {
//如果是新訊息推播則在通知下方增加回覆按鈕
self.notificationActions = [UNNotificationAction(identifier: "replyAction",title: "回覆", options: [.foreground])]
} else {
//其他則增加查看按鈕
self.notificationActions = [UNNotificationAction(identifier: "openAction",title: "查看", options: [.foreground])]
}
}
// This method is called when a notification needs to be presented.
// Implement it if you use a dynamic notification interface.
// Populate your dynamic notification interface as quickly as possible.
}
}
程式部分,ㄧ樣拉outlet到controller並實做功能
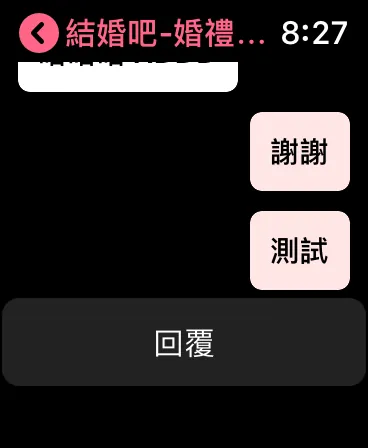
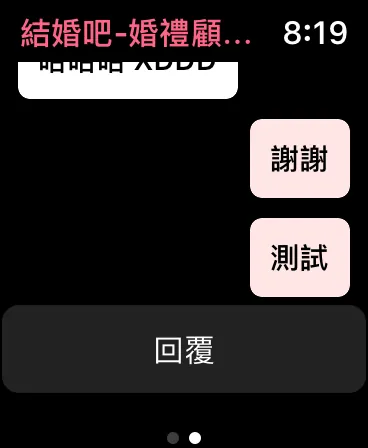
再來講到interactive,同dynamic,只是能多加Button,能跟dynamic設同個Class控制程式;interactive我沒有使用,因為我的按鈕是用程式self.notificationActions加上去的,差異如下:
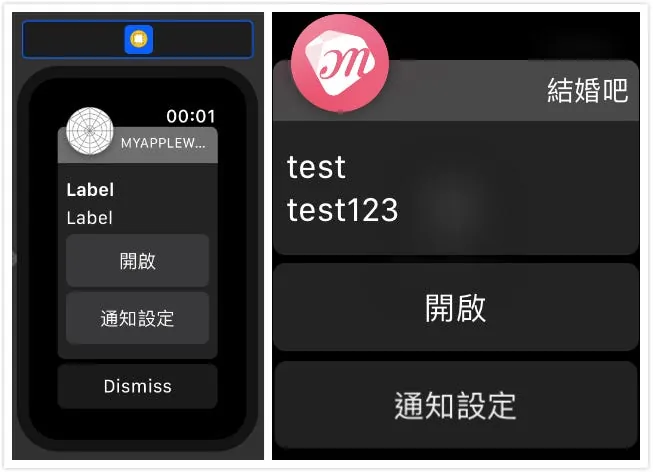
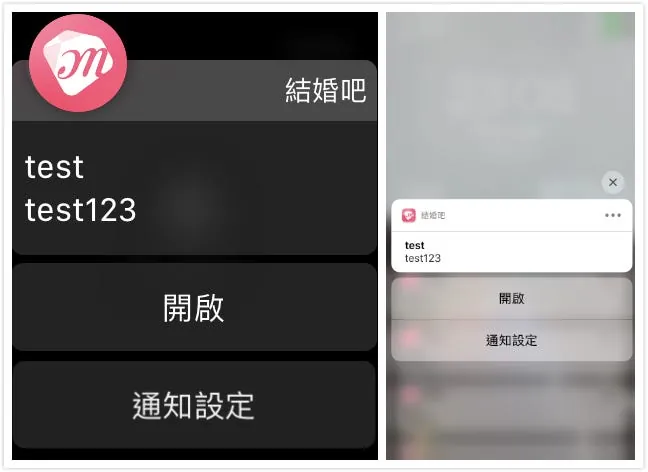
左使用interactive,右使用self.notificationActions
兩個做法都需watchOS ≥ 5 支援.
使用self.notificationActions增加按鈕則按鈕事件處理由ExtensionDelegate中的 userNotificationCenter(_ center: UNUserNotificationCenter, didReceive response: UNNotificationResponse, withCompletionHandler completionHandler: @escaping () -> Void) 處理,並以identifier識別動作
選單功能?
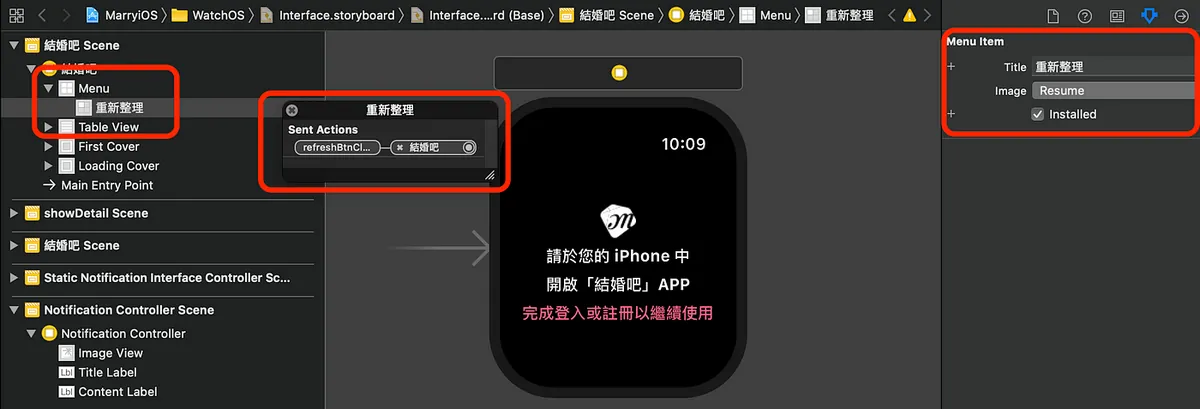
在元件庫中拉入Menu,再拉入選單項目Menu Item,再拉IBAction到程式控制
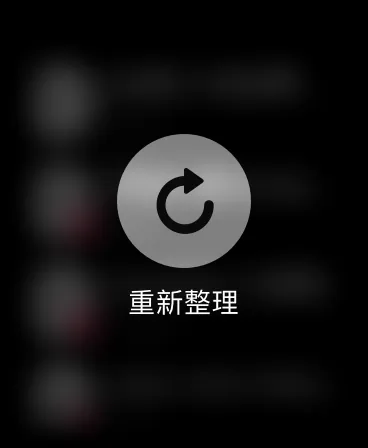
在頁面重壓就會出現:
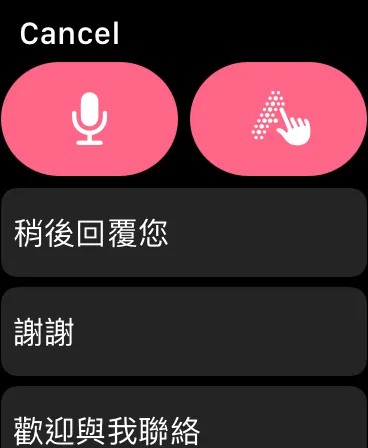
內容輸入?
使用內建的presentTextInputController方法即可!
1
2
3
4
5
6
7
8
9
10
11
12
13
14
15
16
17
18
19
20
21
22
23
24
25
26
27
28
29
@IBAction func replyBtnClick() {
    guard let target = target else {
        return
    }

    self.presentTextInputController(withSuggestions: ["稍後回覆您","謝謝","歡迎與我聯絡","好的","OK!"], allowedInputMode: WKTextInputMode.plain) { (results) in

        guard let results = results else {
            return
        }
        //有輸入值時

        let txts = results.filter({ (txt) -> Bool in
            if let txt = txt as? String,txt != "" {
                return true
            } else {
                return false
            }
        }).map({ (txt) -> String in
            return txt as? String ?? ""
        })
        //預處理輸入


        txts.forEach({ (txt) in
            print(txt)
        })
    }
}
總結
謝謝你看到這!辛苦了!
到這裡文章已告一段落,大略提了一下UI排版、程式、推播、介面應用部分,有開發過iOS的上手真的很快,幾乎差不多而且許多方法都做了簡化使用起來更簡潔,但能做的事確實也變少了(像是目前還不知道怎麼針對Table做載入更多);目前能做的事確實很少,希望官方在未來能開放更多API給開發者使用❤️❤️❤️
MurMur:
{:target="_blank"}](/assets/e85d77b05061/1*-J9qZ846ZysJEhMTSZeE3w.webp)
Apple Watch App Target 部署到手錶真的有夠慢 — Narcos
有任何問題及指教歡迎 與我聯絡 。
本文首次發表於 Medium (點此查看原始版本),由 ZMediumToMarkdown 提供自動轉換與同步技術。