Apple Watch App Development|Step-by-Step watchOS 5 Guide for Beginners
Discover how to build an Apple Watch app from scratch with this hands-on watchOS 5 tutorial, designed for developers seeking clear, practical steps to launch functional apps efficiently.
点击这里查看本文章简体中文版本。
點擊這裡查看本文章正體中文版本。
This post was translated with AI assistance — let me know if anything sounds off!
Table of Contents
Let’s Build an Apple Watch App! (Swift)
watchOS 5 Step-by-Step Development of Apple Watch App from Scratch
[Latest] Apple Watch Series 6 Unboxing & Two-Year Experience »> Click Here
Introduction:
After the previous Apple Watch Unboxing Article, almost three months have passed, and I finally found the opportunity to start developing an Apple Watch App.
{:target="_blank"}](/assets/e85d77b05061/1*aNqsa7aR3Vi3NIIvaUFZLA.webp)
Wedding Planner — The Largest Wedding Planning App
Here is the feedback after using it for three months:
- e-SIM (LTE) still hasn’t found a use case, so I haven’t applied for or used it.
- Frequently used features: unlocking Mac by proximity, raise to check notifications, Apple Pay.
- Health reminders: after three months, I’ve started to slack off; I glance at notifications, but feel indifferent if I don’t close the activity rings.
- Third-party app support is still very poor.
- Watch faces can be changed freely according to mood, adding freshness.
- More detailed workout tracking: for example, if I walk a bit farther to buy dinner, the watch automatically detects it and asks if I want to record the workout.
After using it for three months, overall, it is still like multiple little life assistants as described in the original unboxing article, helping you handle trivial matters.
Third-Party App Support Is Still Poor
Before I actually developed an Apple Watch App, I wondered why apps on Apple Watch were so basic or just “barely usable,” including LINE (messages not synced and never updated) and Messenger (just barely usable); it wasn’t until I developed an Apple Watch App myself that I understood the developers’ difficulties…
First, Understand the Positioning of the Apple Watch App, Simplify Complexity
The positioning of Apple Watch is “not to replace the iPhone, but to assist”. This direction is reflected in official introductions, official apps, and watchOS APIs; that’s why third-party apps often feel basic and limited in functionality (sorry, I was too greedy Orz).
Using Our A app as an example, it includes features like searching for businesses, viewing columns, discussion forums, and online inquiries. Online inquiries are valuable to bring to the Apple Watch because they require immediacy and faster replies, which increase the chance of securing orders. Features like searching for businesses, viewing columns, and discussion forums are more complex and less meaningful on the watch due to limited screen space and lack of urgency.
The core concept is still “assistive first,” so not every feature needs to be on the Apple Watch. After all, users rarely wear only the watch without their phone, and in such cases, their needs are limited to essential functions (for example, reading column articles is not urgent enough to require immediate access on the watch).
Let’s get started!
This is also my first time developing an Apple Watch App, so the article may not be very detailed. I welcome your feedback!!
This article is only suitable for readers with basic experience in iOS App/UIKit development
This article uses: iOS ≥ 9, watchOS ≥ 5
Creating a watchOS Target for an iOS Project:
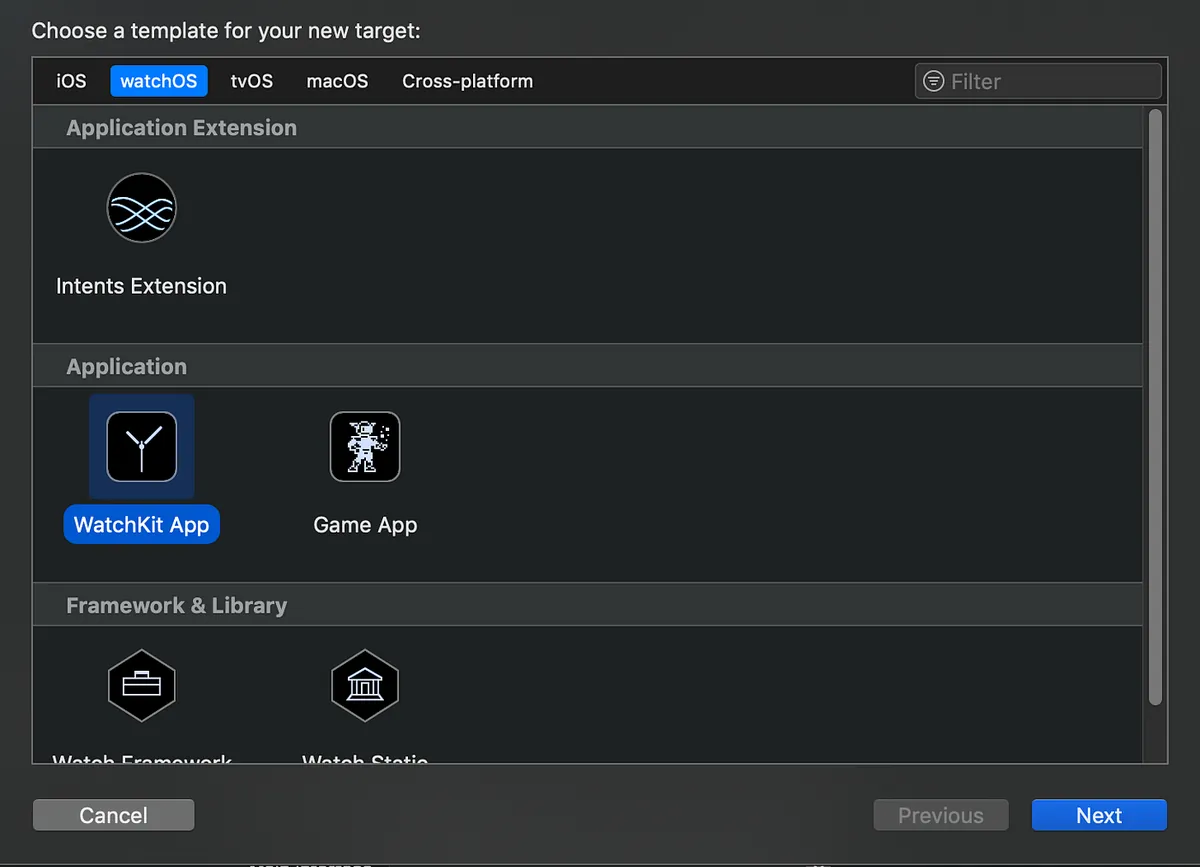
File -> New -> Target -> watchOS -> WatchKit App
Apple Watch App cannot be installed independently; it must be bundled with an iOS App
After creating it, the directory will look like this:
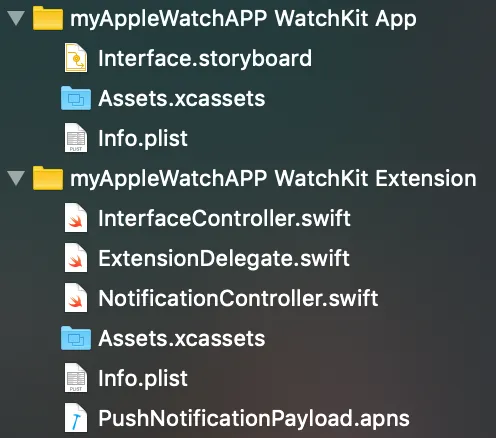
You will find two Target items, both essential:
WatchKit App: Responsible for storing resources and UI display
/Interface.storyboard: Same as iOS, contains system-created view controllers
/Assets.xcassets: Same as iOS, stores used resource items
/info.plist: Same as iOS, WatchKit App related settingsWatchKit Extension: Responsible for program calls and logic processing (*.swift)
/InterfaceController.swift: Default view controller program
/ExtensionDelegate.swift: Similar to Swift’s AppDelegate, the entry point for the Apple Watch App
/NotificationController.swift: Handles push notification display on the Apple Watch App
/Assets.xcassets: Not used here; all assets are stored under WatchKit App’s Assets.xcassets
/info.plist: Similar to iOS, WatchKit Extension related settings
/PushNotificationPayload.apns: Push notification data, used for testing push notifications on the simulator
Details will be introduced later; for now, just get a general understanding of the table of contents and the document’s features.
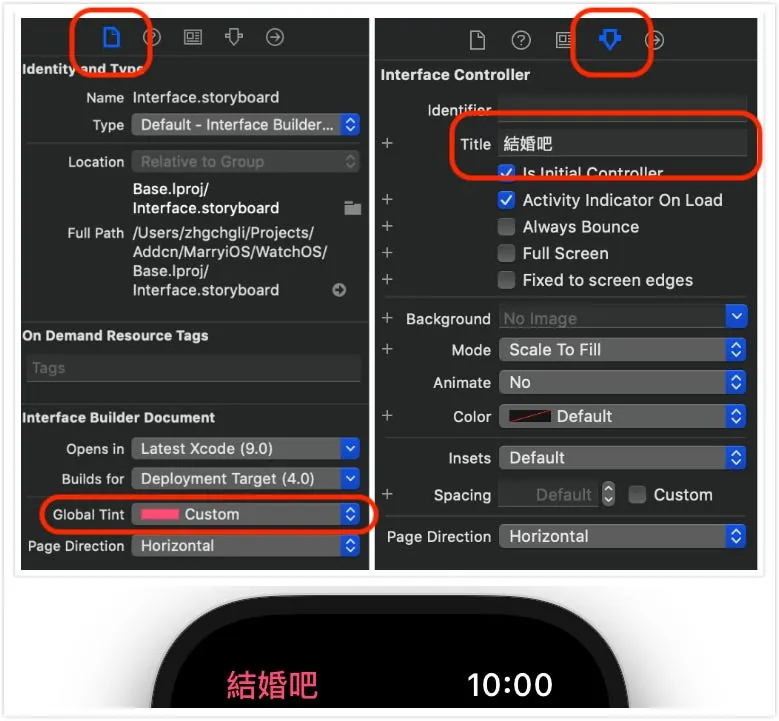
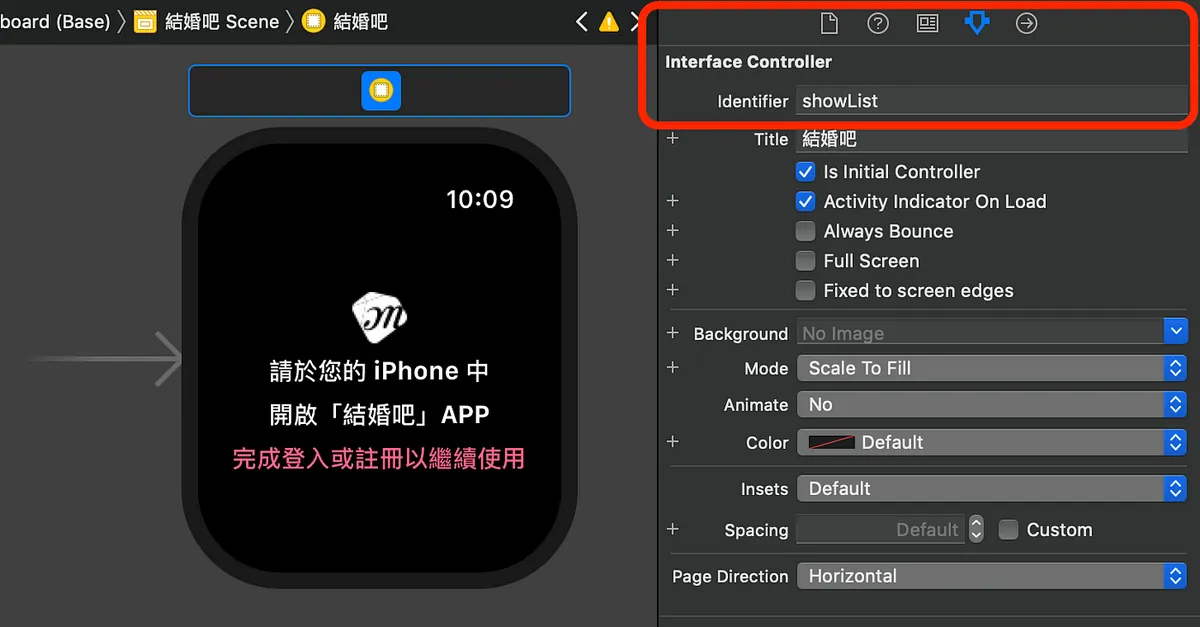
View Controller:
In Apple Watch, the view controller is called InterfaceController instead of ViewController. You can find the Interface Controller Scene in WatchKit App/Interface.storyboard. The code controlling it is located in WatchKit Extension/InterfaceController.swift (similar to the iOS concept).
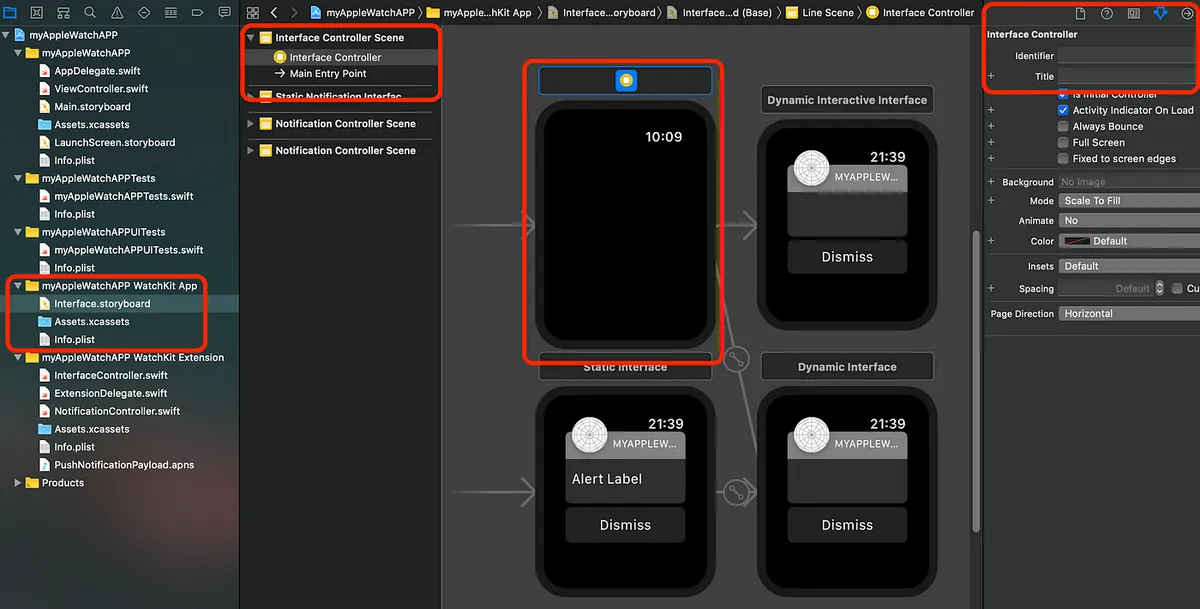
The Scene is set to be grouped with the Notification Controller Scene by default (I will move it up a bit to separate them).
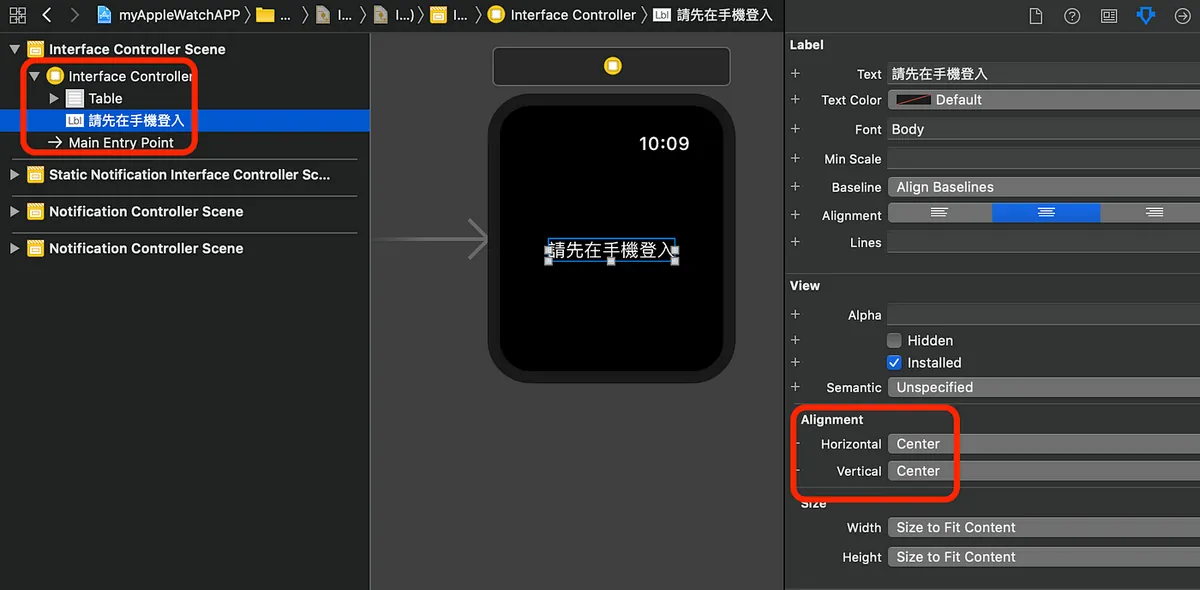
You can set the title text of the InterfaceController on the right side.
The title color is determined by the Interface Builder Document/Global tint setting, ensuring a consistent color scheme throughout the entire app.
Component Library:
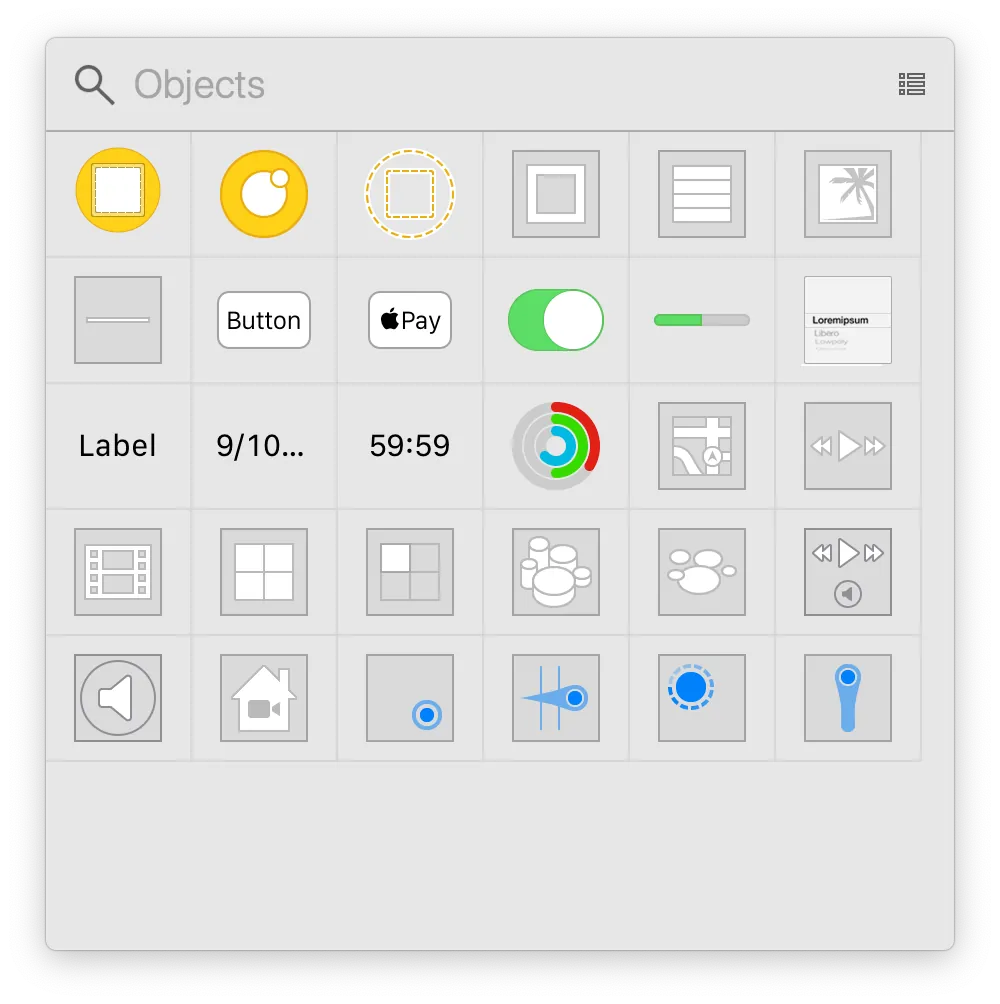
There are not many complex components, and the functions of the components are simple and clear.
UI Layout:
A towering building starts from the View. For layout, there is no Auto Layout, constraints, or layers like in UIKit (iOS). All layout settings are done using parameters, making it simpler and more powerful (somewhat like UIStackView in UIKit).
All layouts are composed of Groups, similar to UIStackView in UIKit but with more layout parameters available
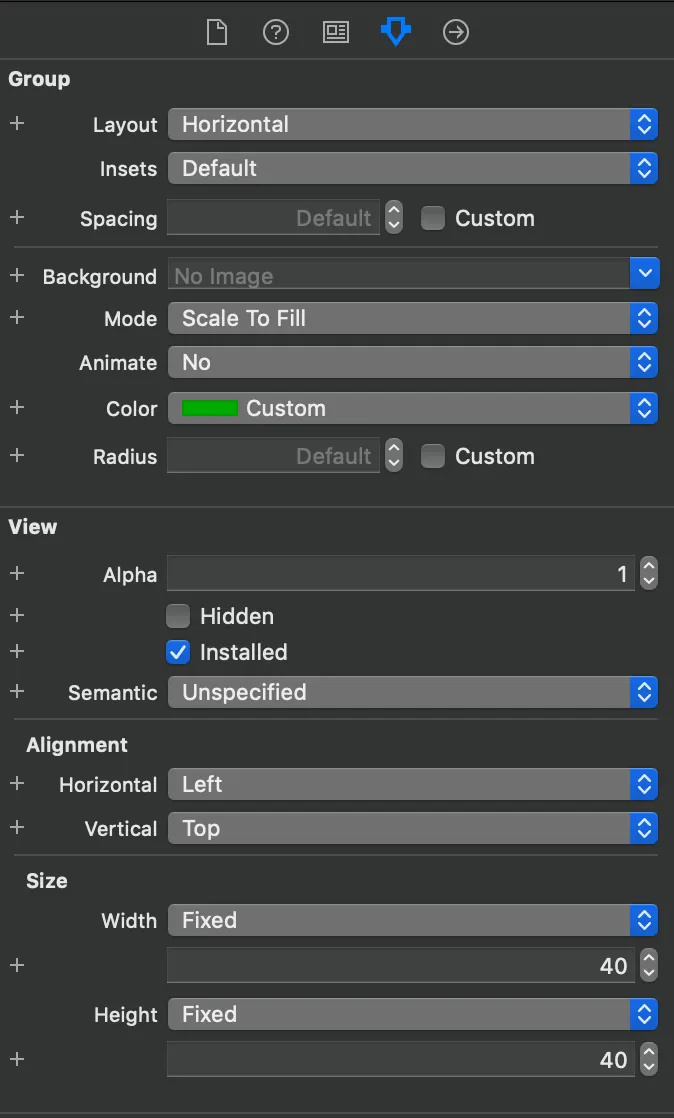
Group Parameter Settings
Layout: Set the arrangement of enclosed subviews (horizontal, vertical, layer stacking)
Insets: Set the top, bottom, left, and right margins of the Group
Spacing: Set the spacing between the enclosed child Views
Radius: Set the corner radius of the Group. That’s right! WatchKit comes with built-in corner radius parameters.
Alignment/Horizontal: Sets the horizontal alignment (left, center, right) and is linked to the settings of neighboring and outer wrapping Views.
Alignment/Vertical: Sets the vertical alignment (top, center, bottom) and interacts with neighboring and outer wrapper views.
Size/Width: Set the size of the Group with three modes available: “Fixed: specify width,” “Size To Fit Content: width based on the size of child views,” and “Relative to Container: width relative to the outer container view (can set % or +/- adjustments).”
Size/Height: Same as Size/Width, this sets the height.
Font/Font Size Settings:

You can directly apply the system’s Text Styles or use Custom (but I tested Custom and couldn’t set the font size); so I use System to customize the font size of each display Label.
Learning by Doing: Using Line Formatting as an Example
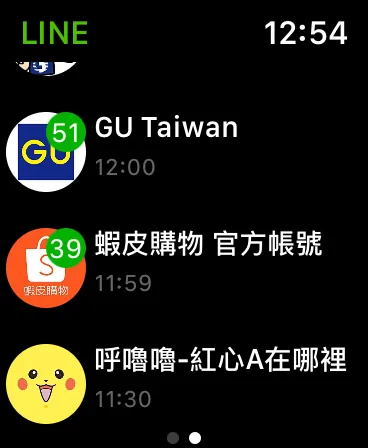
Layout is not as complex as on iOS, so I’ll demonstrate with an example to help you get started quickly; using Line’s main page layout as an example:
Find the Interface Controller Scene in WatchKit App/Interface.storyboard:
- The entire page is equivalent to the UITableView used in iOS App development. In Apple Watch Apps, it simplifies the operation and is renamed “WKInterfaceTable.”
First, drag a Table into the Interface Controller Scene.
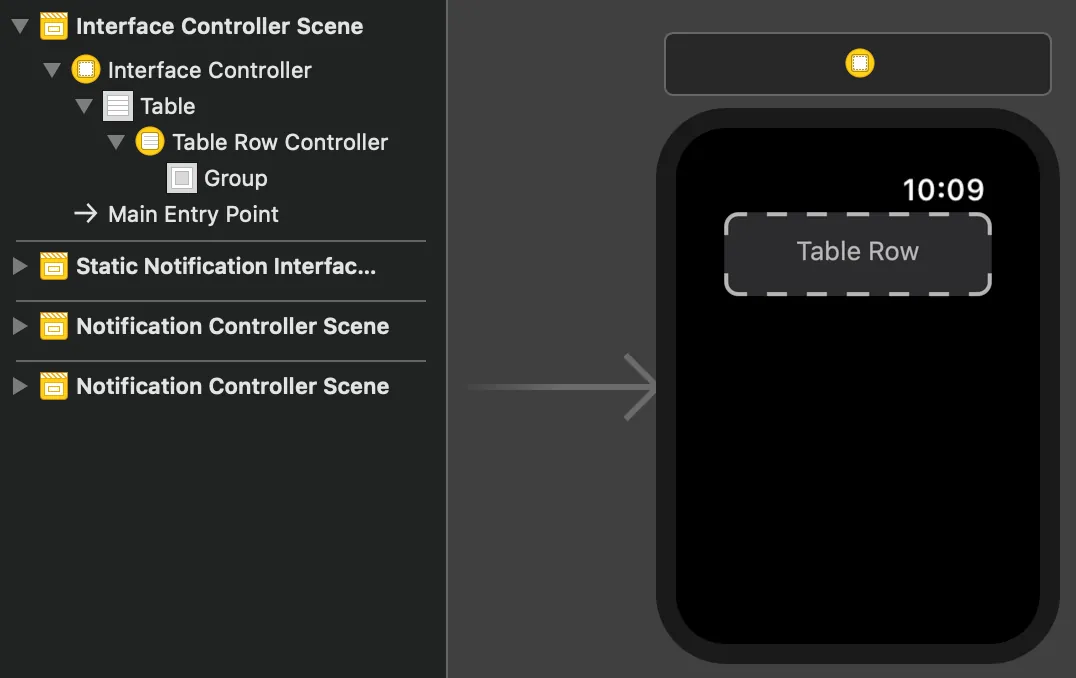
Like UIKit’s UITableView, there is the main Table and Cells (called Rows on Apple Watch); using it simplifies many tasks. You can directly design and layout Cells on this interface!
- Analyze the layout structure and design the Row display style:

To layout a full-height image with rounded corners on the left stacked with a label, and on the right evenly divide two sections with a label on top and another label below:
2–1: Layout of Left and Right Sections
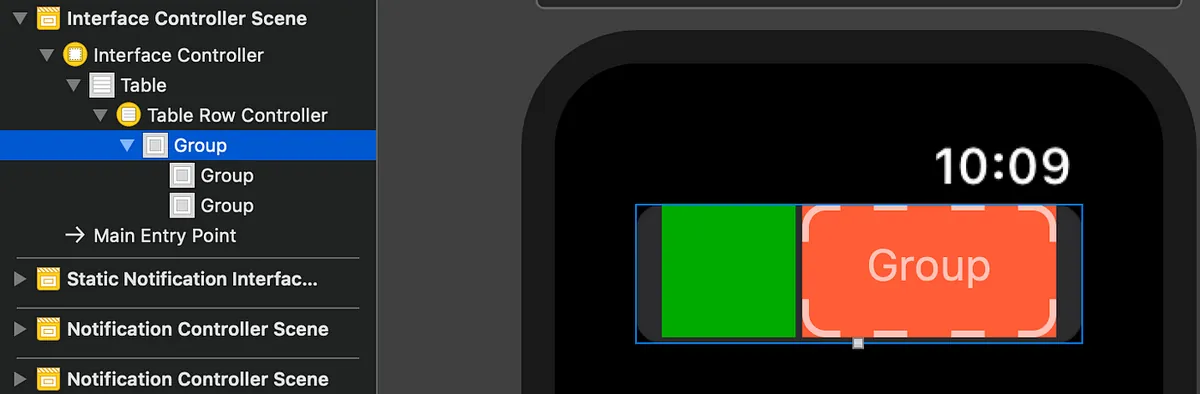
Drag two Groups into a Group, and set the Size parameter for each:
Left green section:

Layout setting Overlap, where the child View displays unread message Labels in layered stacking.
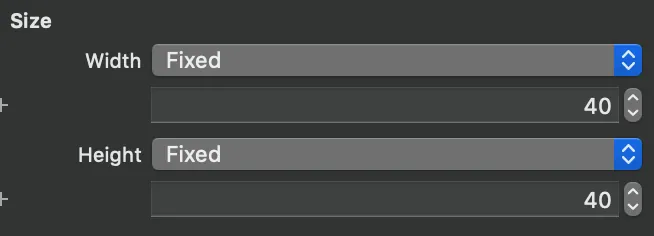
Set a square with fixed width and height of 40.
Right side red part:

Layout set to Vertical, with child Views arranged in two vertical sections.
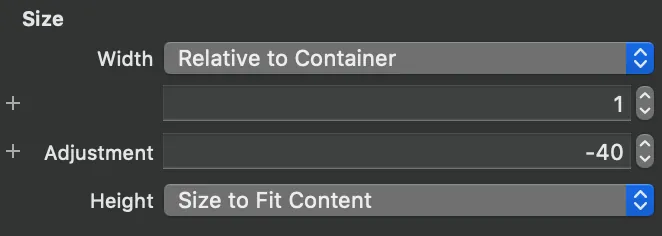
Width set relative to the outer layer, 100% minus 40 for the left green part
Layout inside left and right containers:
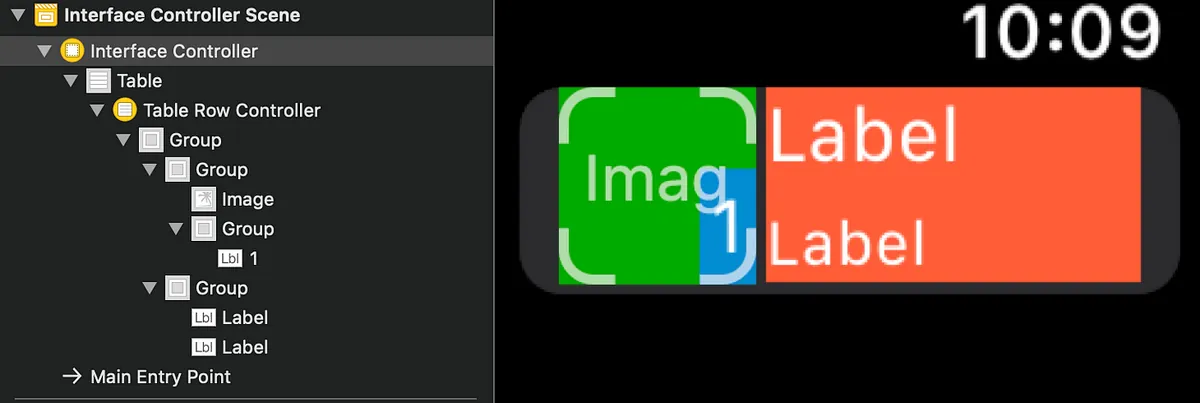
Left side: Drag in an Image, then drag in a Group containing a Label aligned to the bottom right (set the Group background color, spacing, and corner radius).
Right side: Add two Labels, one aligned to the top left and the other aligned to the bottom left.
Naming a Row (Similar to setting an identifier for a Cell in UIKit UITableView):
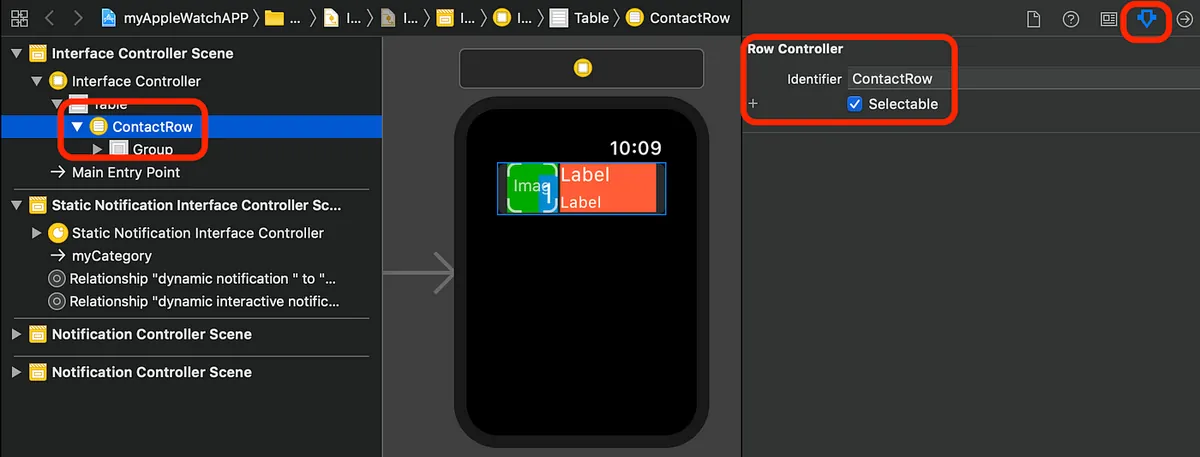
Select Row -> Identifier -> Enter a custom name
There is more than one way to display a Row.
Very simple, just add a Row inside the Table (the style of the Row to display is controlled by the program) and enter an Identifier to name it.
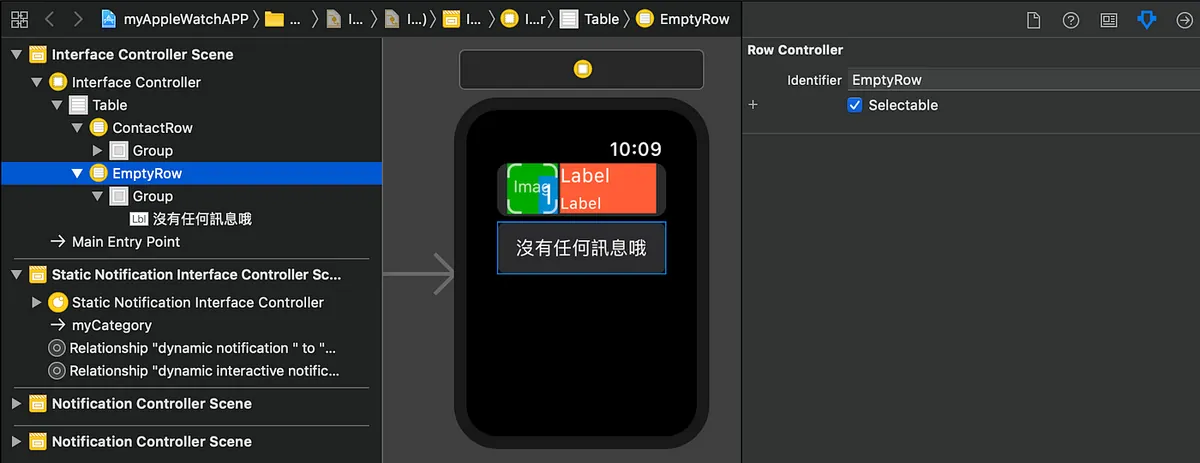
Here, I add another Row to display a message when there is no data.
Layout Related Information
The hidden property in watchKit does not occupy space, which can be used for interactive applications (e.g., show a Table only when logged in; show a prompt Label when not logged in).
The layout is complete for now and can be adjusted according to your personal design; it’s easy to get started—just try aligning a few more times and experimenting with the parameters to get familiar!
Program Control Section:
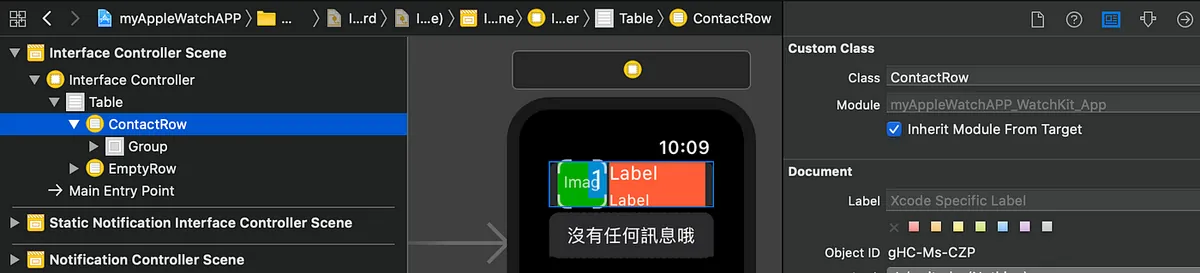
Continuing with Row, we need to create a Class to reference and operate on Row:
1
2
class ContactRow:NSObject {
}
1
2
3
4
5
6
7
8
class ContactRow:NSObject {
    var id:String?
    @IBOutlet var unReadGroup: WKInterfaceGroup!
    @IBOutlet var unReadLabel: WKInterfaceLabel!
    @IBOutlet weak var imageView: WKInterfaceImage!
    @IBOutlet weak var nameLabel: WKInterfaceLabel!
    @IBOutlet weak var timeLabel: WKInterfaceLabel!
}
Pull outlet, store variable
For the Table section, similarly drag the Outlet to the Controller:
1
2
3
4
5
6
7
8
9
10
11
12
13
14
15
16
17
18
19
20
21
22
23
24
25
26
27
28
29
30
31
32
33
34
35
36
37
38
39
40
41
42
43
44
45
46
47
48
49
50
51
52
53
class InterfaceController: WKInterfaceController {

    @IBOutlet weak var Table: WKInterfaceTable!
    override func awake(withContext context: Any?) {
        super.awake(withContext: context)

        // Configure interface objects here.
    }

    override func willActivate() {
        // This method is called when watch view controller is about to be visible to user
        super.willActivate()
    }

    struct ContactStruct {
        var name:String
        var image:String
        var time:String
    }

    func loadData() {
        //Get API Call Back...
        //postData {
        let data:[ContactStruct] = [] //api returned data...

        self.Table.setNumberOfRows(data.count, withRowType: "ContactRow")
        //If you have multiple row types to display, use:
            //self.Table.setRowTypes(["ContactRow","ContactRow2","ContactRow3"])
        //
        for item in data.enumerated() {
            if let row = self.Table.rowController(at: item.offset) as? ContactRow {
                row.nameLabel.setText(item.element.name)
                //assign value to label/image......
            }
        }

        //}
    }

    override func didDeactivate() {
        // This method is called when watch view controller is no longer visible
        super.didDeactivate()
        loadData()
    }

    //Handle row selection:
    override func table(_ table: WKInterfaceTable, didSelectRowAt rowIndex: Int) {
        guard let row = table.rowController(at: rowIndex) as? ContactRow,let id = row.id else {
            return
        }
        self.pushController(withName: "showDetail", context: id)
    }
}
Table operations are much simpler without delegate/datasource. To set data, just call setNumberOfRows/setRowTypes to specify the number and type of rows, then use rowController(at:) to set the content for each row!
The Table row selection event can be handled simply by overriding the function
override func table(_ table: WKInterfaceTable, didSelectRowAt rowIndex: Int). (This is the only event for Table)
How to skip pages?
First, set the Identifier for the Interface Controller
watchKit has two page navigation modes:
- Similar to iOS UIKit push
self.pushController(withName: Interface Controller Identifier, context: Any?)
Push method allows returning from the top left corner
Go Back to Previous Page with iOS UIKit: self.pop()
Return to root page: self.popToRootController()
Open a new page: self.presentController( )
- Tab Display Style WKInterfaceController.reloadRootControllers(withNames: [ Interface Controller Identifier ], contexts: [ Any? ] )
Or in the Storyboard, press Control+Click on the first page’s Interface Controller and drag to the second page, then select “next page”.
The tab display allows switching pages left and right
Do not mix the two page-skipping methods.
Pagination Parameters?
Unlike iOS, which requires custom delegates or segues to pass parameters, watchKit passes parameters by placing them in the contexts of the method above.
Receiving parameters in InterfaceController’s awake(withContext context: Any?)
For example, when I want to navigate from Page A to Page B and pass an id:Int:
Page A:
1
self.pushController(withName: "showDetail", context: 100)
Page B:
1
2
3
4
5
6
7
8
9
override func awake(withContext context: Any?) {
        super.awake(withContext: context)
        guard let id = context as? Int else {
           print("Parameter error!")
           self.popToRootController()
           return
        }
        // Configure interface objects here.
}
Program Control Components
Compared to iOS UIKit, it is much simpler. Those who have developed for iOS should pick it up quickly!
For example, label becomes setText()
p.s. Also, there is no getText method; you can only use an extension variable or store it in an external variable.
Syncing/Data Transfer with iPhone
If you have developed iOS-related Extensions, you would instinctively use App Groups to share UserDefaults. I enthusiastically did the same but got stuck for a long time because the data wouldn’t transfer. Only after searching online did I find out that watchOS > 2 no longer supports this method…
To use the new WatchConnectivity method for communication between the phone and the watch (similar to the socket concept), both iOS phone and watchOS need to implement it. We write it as a singleton pattern as follows:
Mobile:
1
2
3
4
5
6
7
8
9
10
11
12
13
14
15
16
17
18
19
20
21
22
23
24
25
26
27
28
29
30
31
32
33
34
35
36
37
38
39
40
41
42
43
44
45
46
47
48
49
50
51
52
53
54
55
56
57
58
59
60
61
62
63
64
65
66
67
68
69
70
71
import WatchConnectivity

class WatchSessionManager: NSObject, WCSessionDelegate {
    @available(iOS 9.3, *)
    func session(_ session: WCSession, activationDidCompleteWith activationState: WCSessionActivationState, error: Error?) {
        // Session activation completed on the iPhone side
    }

    func session(_ session: WCSession, didReceiveUserInfo userInfo: [String : Any] = [:]) {
        // iPhone received UserInfo sent from the watch
    }

    func session(_ session: WCSession, didReceiveMessage message: [String : Any], replyHandler: @escaping ([String : Any]) -> Void) {
        // iPhone received a Message sent from the watch
    }

    // There are also didReceiveMessageData and didReceiveFile methods to handle data received from the watch
    // Choose which one to use based on your data transfer and reception needs

    func sendUserInfo() {
        guard let validSession = self.validSession, validSession.isReachable else {
            return
        }

        if userDefaultsTransfer?.isTransferring == true {
            userDefaultsTransfer?.cancel()
        }

        var list:[String:Any] = [:]
        // Put UserDefaults data into list....

        self.userDefaultsTransfer = validSession.transferUserInfo(list)
    }

    func sessionReachabilityDidChange(_ session: WCSession) {
        // When connection status with the watch app changes (watch app opened/closed)
        sendUserInfo()
        // Sync UserDefaults once when the watch app opens on status change
    }

    func session(_ session: WCSession, didFinish userInfoTransfer: WCSessionUserInfoTransfer, error: Error?) {
        // Completed syncing UserDefaults (transferUserInfo)
    }

    func sessionDidBecomeInactive(_ session: WCSession) {

    }

    func sessionDidDeactivate(_ session: WCSession) {

    }

    static let sharedManager = WatchSessionManager()
    private override init() {
        super.init()
    }

    private let session: WCSession? = WCSession.isSupported() ? WCSession.default : nil
    private var validSession: WCSession? {
        if let session = session, session.isPaired && session.isWatchAppInstalled {
            return session
        }
        // Return a valid session that is connected and has the watch app installed and running
        return nil
    }

    func startSession() {
        session?.delegate = self
        session?.activate()
    }
}
WatchConnectivity Code on the iPhone Side
Add WatchSessionManager.sharedManager.startSession() in iOS/AppDelegate.swift’s application(_ application: UIApplication, didFinishLaunchingWithOptions launchOptions: [UIApplicationLaunchOptionsKey: Any]?) to connect the session after launching the mobile app.
Watch Side:
1
2
3
4
5
6
7
8
9
10
11
12
13
14
15
16
17
18
19
20
21
22
23
24
25
26
27
28
29
30
31
32
33
34
35
36
37
import WatchConnectivity

class WatchSessionManager: NSObject, WCSessionDelegate {
    func session(_ session: WCSession, activationDidCompleteWith activationState: WCSessionActivationState, error: Error?) {
    }

    func sessionReachabilityDidChange(_ session: WCSession) {
        guard session.isReachable else {
            return
        }

    }

    func session(_ session: WCSession, didFinish userInfoTransfer: WCSessionUserInfoTransfer, error: Error?) {

    }

    func session(_ session: WCSession, didReceiveUserInfo userInfo: [String : Any] = [:]) {
        DispatchQueue.main.async {
            // UserDefaults:
            // print(userInfo)
        }
    }

    static let sharedManager = WatchSessionManager()
    private override init() {
        super.init()
    }

    private let session: WCSession? = WCSession.isSupported() ? WCSession.default : nil

    func startSession() {
        session?.delegate = self
        session?.activate()
    }
}
WatchConnectivity Watch App Code
Add the following line in WatchOS Extension/ExtensionDelegate.swift inside applicationDidFinishLaunching():
WatchSessionManager.sharedManager.startSession()
to connect the session after launching the watch app.
WatchConnectivity Data Transfer Methods
To send data: sendMessage, sendMessageData, transferUserInfo, transferFile
To receive data: didReceiveMessageData, didReceive, didReceiveMessage
Both sides use the same methods for sending and receiving.

You can see that data transfer from the watch to the phone works fine, but data transfer from the phone to the watch only works when the watch app is open.
watchOS Push Notification Handling
The PushNotificationPayload.apns file under the project directory comes in handy here. It is used to test push notifications on the simulator. When you deploy the Watch App target on the simulator and launch the app after installation, you will receive a push notification with the content from this file, making it easier for developers to test push notification functionality.
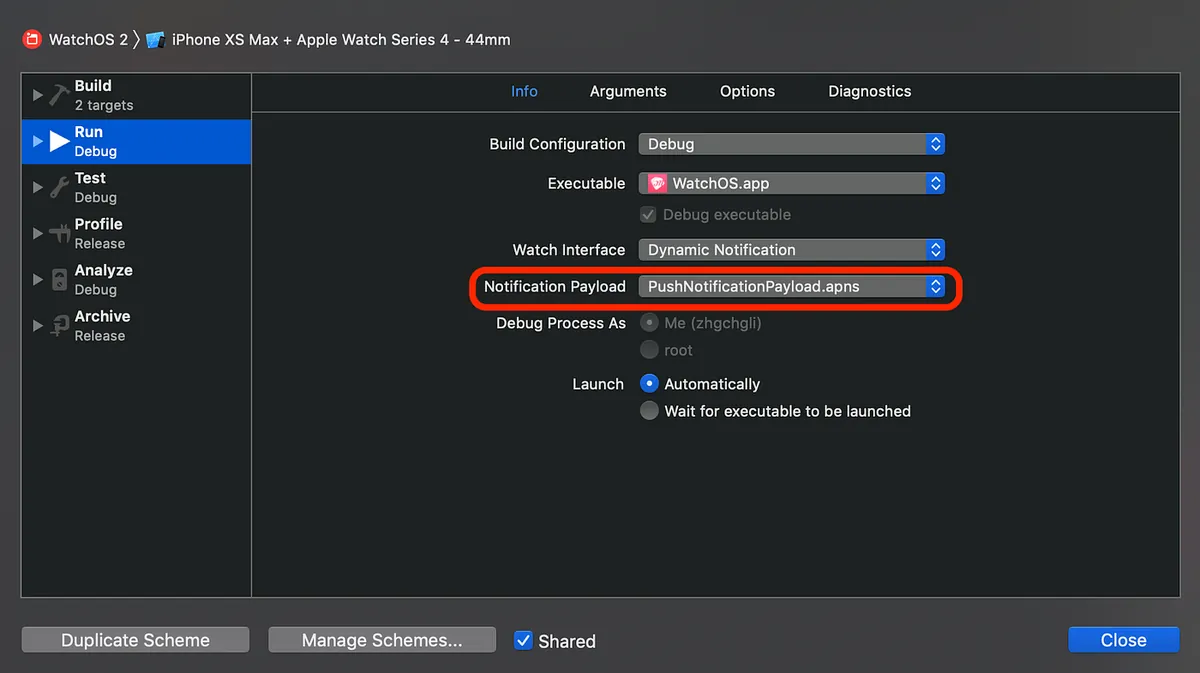
To modify/enable/disable PushNotificationPayload.apns, please select the Target and then Edit Scheme.
watchOS Push Notification Handling:
Like in iOS, we implement UNUserNotificationCenterDelegate. In watchOS, we also implement the same method in watchOS Extension/ExtensionDelegate.swift.
1
2
3
4
5
6
7
8
9
10
11
12
13
14
15
16
17
18
19
20
21
22
23
24
25
26
27
28
29
30
31
32
33
34
35
36
37
38
39
40
41
import WatchKit
import UserNotifications
import WatchConnectivity

class ExtensionDelegate: NSObject, WKExtensionDelegate, UNUserNotificationCenterDelegate {

    func applicationDidFinishLaunching() {

        WatchSessionManager.sharedManager.startSession() // The previously mentioned WatchConnectivity connection

        UNUserNotificationCenter.current().delegate = self // Set UNUserNotificationCenter delegate
        // Perform any final initialization of your application.
    }

    func userNotificationCenter(_ center: UNUserNotificationCenter, willPresent notification: UNNotification, withCompletionHandler completionHandler: @escaping (UNNotificationPresentationOptions) -> Void) {
        completionHandler([.sound, .alert])
        // Same as iOS, this allows notifications to show when the app is in the foreground
    }

    func userNotificationCenter(_ center: UNUserNotificationCenter, didReceive response: UNNotificationResponse, withCompletionHandler completionHandler: @escaping () -> Void) {
        // When the notification is tapped
        guard let info = response.notification.request.content.userInfo["aps"] as? NSDictionary, let alert = info["alert"] as? Dictionary<String,String>, let data = info["data"] as? Dictionary<String,String> else {
            completionHandler()
            return
        }

        // response.actionIdentifier gives the tapped action identifier
        // Default tap action: UNNotificationDefaultActionIdentifier

        if alert["type"] == "new_ask" {
            WKExtension.shared().rootInterfaceController?.pushController(withName: "showDetail", context: 100)
            // Get the current root interface controller and push
        } else {
           // Other handling...
           // WKExtension.shared().rootInterfaceController?.presentController(withName: "", context: nil)

        }

        completionHandler()
    }
}
ExtensionDelegate.swift
watchOS push notifications display in three types:
- static: Default push notification display mode
Together with mobile push notifications, the iOS app implements UNUserNotificationCenter.setNotificationCategories to add buttons below the notification; Apple Watch will also display them by default.
dynamic: Dynamically handle push notification display styles (rearrange content, display images)
interactive: Supported on watchOS ≥ 5, adding button support on top of dynamic features
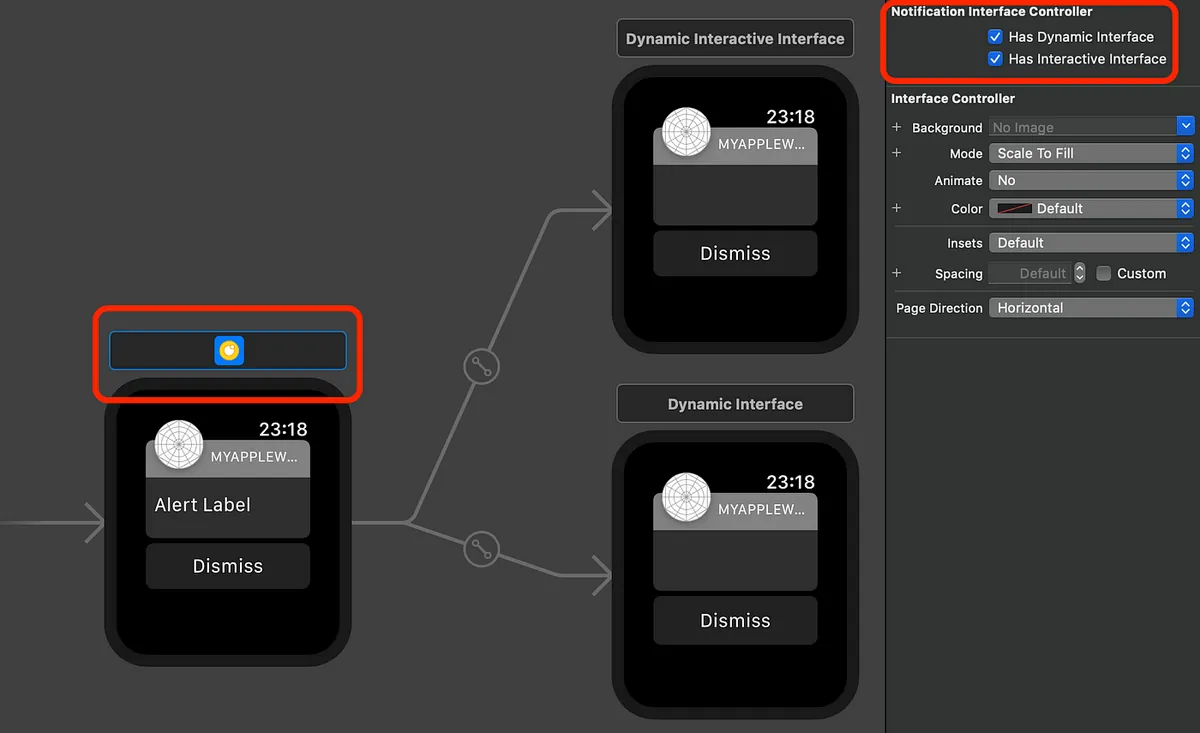
You can set the notification handling method in the Static Notification Interface Controller Scene within Interface.storyboard.
There’s not much to say about static; it just uses the default display method. Here, we’ll introduce dynamic. After checking “Has Dynamic Interface,” the “Dynamic Interface” option appears, where you can design your custom push notification layout (Buttons cannot be used here):
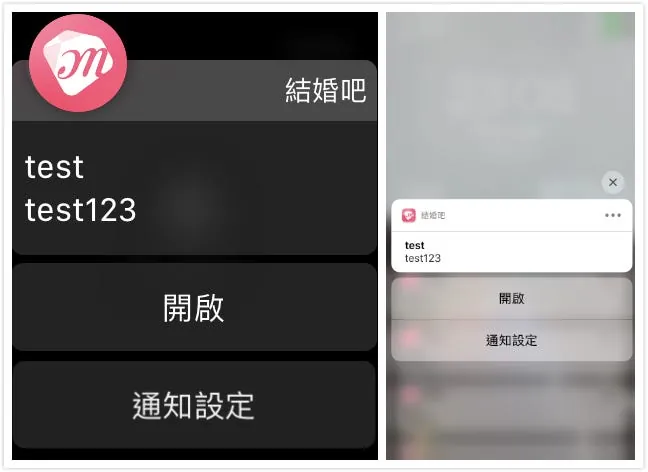
My Custom Push Notification Design
1
2
3
4
5
6
7
8
9
10
11
12
13
14
15
16
17
18
19
20
21
22
23
24
25
26
27
28
29
30
31
32
33
34
35
36
37
38
39
40
41
42
43
44
45
46
47
48
49
50
51
52
53
54
55
56
57
58
59
import WatchKit
import Foundation
import UserNotifications

class NotificationController: WKUserNotificationInterfaceController {

    @IBOutlet var imageView: WKInterfaceImage!
    @IBOutlet var titleLabel: WKInterfaceLabel!
    @IBOutlet var contentLabel: WKInterfaceLabel!

    override init() {
        // Initialize variables here.
        super.init()
        self.setTitle("Marry Me") // Set the top-right title
        // Configure interface objects here.
    }

    override func willActivate() {
        // This method is called when watch view controller is about to be visible to user
        super.willActivate()
    }

    override func didDeactivate() {
        // This method is called when watch view controller is no longer visible
        super.didDeactivate()
    }

    override func didReceive(_ notification: UNNotification) {

        if #available(watchOSApplicationExtension 5.0, *) {
            self.notificationActions = []
            // Clear buttons added below the notification by iOS implementation of UNUserNotificationCenter.setNotificationCategories
        }

        guard let info = notification.request.content.userInfo["aps"] as? NSDictionary,let alert = info["alert"] as? Dictionary<String,String> else {
            return
        }
        // Notification info

        self.titleLabel.setText(alert["title"])
        self.contentLabel.setText(alert["body"])

        if #available(watchOSApplicationExtension 5.0, *) {
            if alert["type"] == "new_msg" {
              // If it's a new message notification, add a reply button below the notification
              self.notificationActions = [UNNotificationAction(identifier: "replyAction",title: "Reply", options: [.foreground])]
            } else {
              // Otherwise, add a view button
              self.notificationActions = [UNNotificationAction(identifier: "openAction",title: "View", options: [.foreground])]
            }
        }


        // This method is called when a notification needs to be presented.
        // Implement it if you use a dynamic notification interface.
        // Populate your dynamic notification interface as quickly as possible.

    }
}
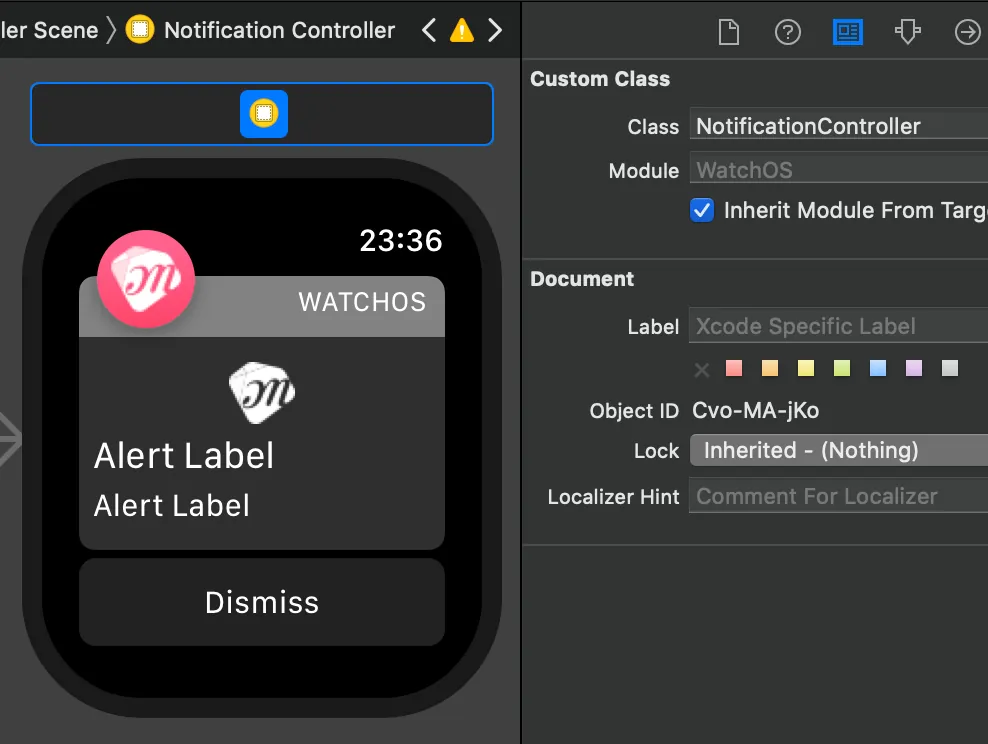
For the code part, similarly connect the outlet to the controller and implement the functionality.
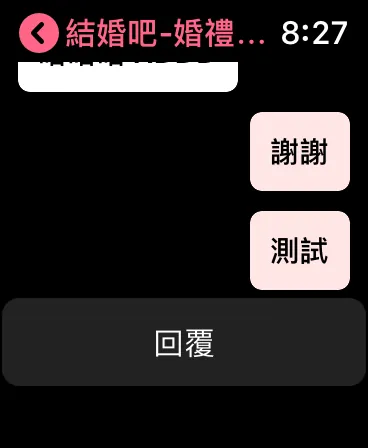
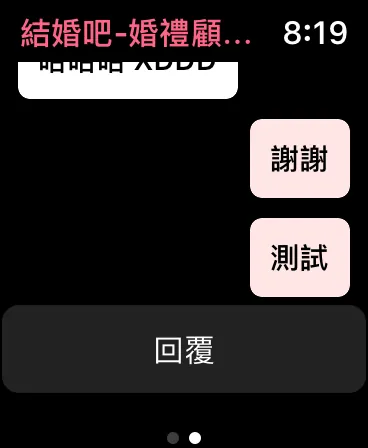
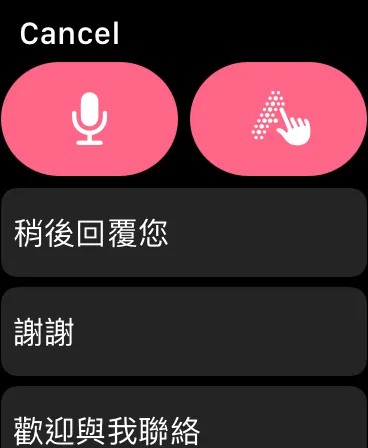
Next, regarding interactive, like dynamic, it can add Buttons and share the same Class for program control; I didn’t use interactive because my buttons are added programmatically via self.notificationActions. The differences are as follows:
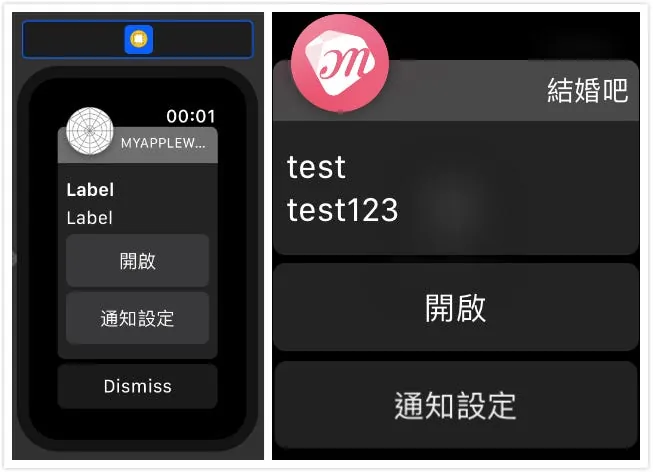
Left uses interactive, right uses self.notificationActions
Both methods require watchOS ≥ 5 support.
Using self.notificationActions to add buttons means the button events are handled by ExtensionDelegate’s userNotificationCenter(_ center: UNUserNotificationCenter, didReceive response: UNNotificationResponse, withCompletionHandler completionHandler: @escaping () -> Void), and actions are identified by their identifier.
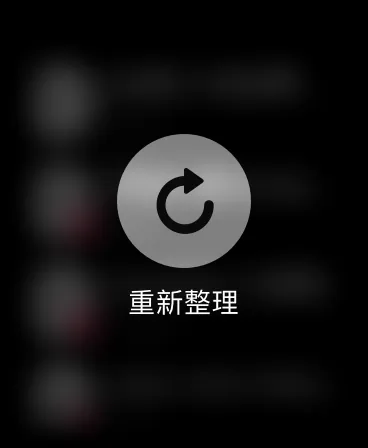
Menu Functions?
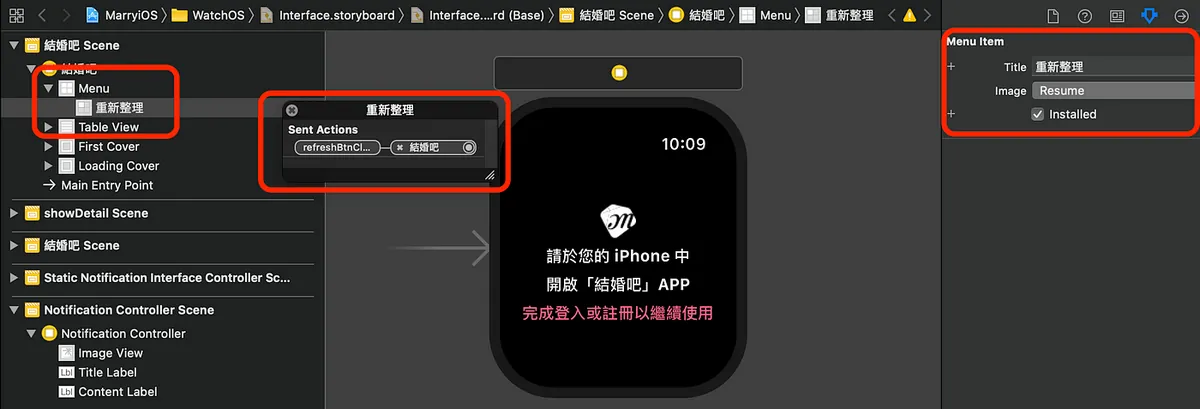
Drag a Menu from the component library, then drag a Menu Item into it, and finally drag an IBAction to the code controller.
Pressing repeatedly on the page will display:
Content Input?
You can simply use the built-in presentTextInputController method!
1
2
3
4
5
6
7
8
9
10
11
12
13
14
15
16
17
18
19
20
21
22
23
24
25
26
27
28
29
@IBAction func replyBtnClick() {
    guard let target = target else {
        return
    }

    self.presentTextInputController(withSuggestions: ["Reply later","Thank you","Feel free to contact me","Okay","OK!"], allowedInputMode: WKTextInputMode.plain) { (results) in

        guard let results = results else {
            return
        }
        // When there is input

        let txts = results.filter({ (txt) -> Bool in
            if let txt = txt as? String, txt != "" {
                return true
            } else {
                return false
            }
        }).map({ (txt) -> String in
            return txt as? String ?? ""
        })
        // Preprocess input


        txts.forEach({ (txt) in
            print(txt)
        })
    }
}
Summary
Thank you for reading this! Much appreciated!
The article concludes here, briefly covering UI layout, programming, push notifications, and interface applications. For those who have developed iOS apps, the learning curve is very quick since it’s quite similar, and many methods have been simplified for easier use. However, the available features are indeed fewer (for example, it’s currently unclear how to implement “load more” for Tables). The current capabilities are quite limited, so I hope the official team will open up more APIs for developers in the future ❤️❤️❤️
MurMur:
{:target="_blank"}](/assets/e85d77b05061/1*-J9qZ846ZysJEhMTSZeE3w.webp)
Apple Watch App Target deployment to the watch is really slow — Narcos
If you have any questions or feedback, feel free to contact me.

This post was originally published on Medium (View original post), and automatically converted and synced by ZMediumToMarkdown.