iOS ≥ 12|Enable Quick Access to App Notification Settings in User Settings with Swift
Help iOS users easily manage app notifications by adding a direct shortcut to the notification settings page within the app using Swift, offering alternatives beyond system-wide notification toggles for better control and user experience.
点击这里查看本文章简体中文版本。
點擊這裡查看本文章正體中文版本。
This post was translated with AI assistance — let me know if anything sounds off!
Table of Contents
Adding an “APP Notification Settings Page” Shortcut in User “Settings” for iOS ≥ 12 (Swift)
Besides turning off notifications from the system, users have other options.
Following the previous three articles:
What? iOS 12 Can Send Push Notifications Without User Permission (Swift)
iOS 9 to iOS 12 Push Notification Permission Status Handling (Swift)
Let’s continue improving push notifications by experimenting with both existing technologies and newly available features!
What is this time?
iOS ≥ 12 allows you to add a shortcut to your app’s notification settings page within the user’s “Settings,” giving users another option when they want to adjust notifications; they can jump to “within the app” instead of turning them off directly from the “system side.” Here’s a quick example:
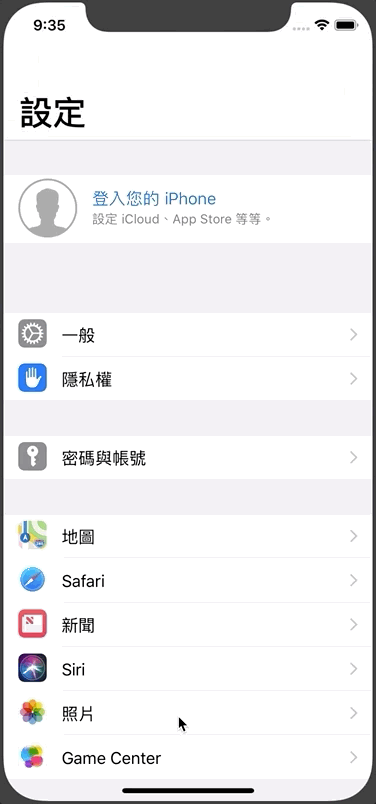
“Settings” -> “Apps” -> “Notifications” -> “Set within the app”
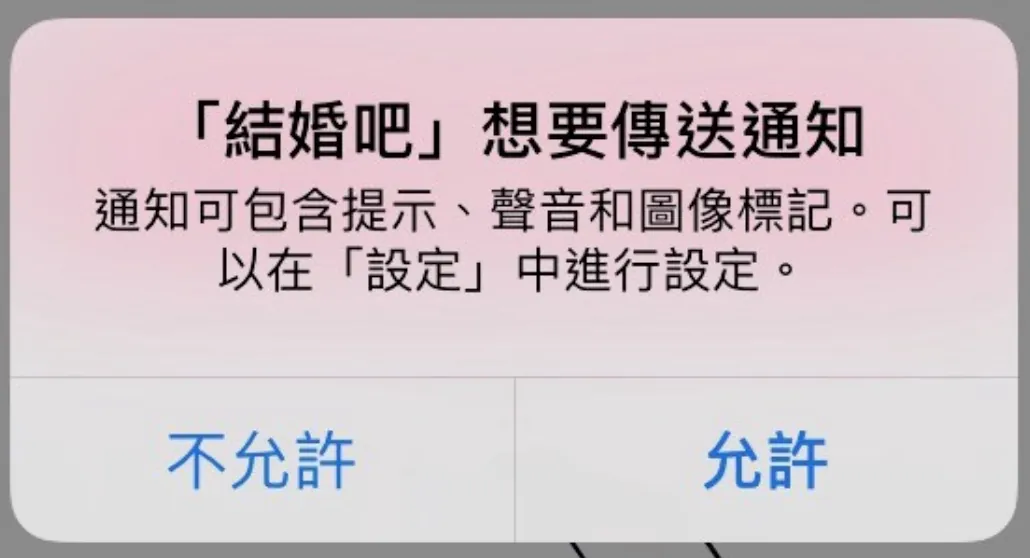
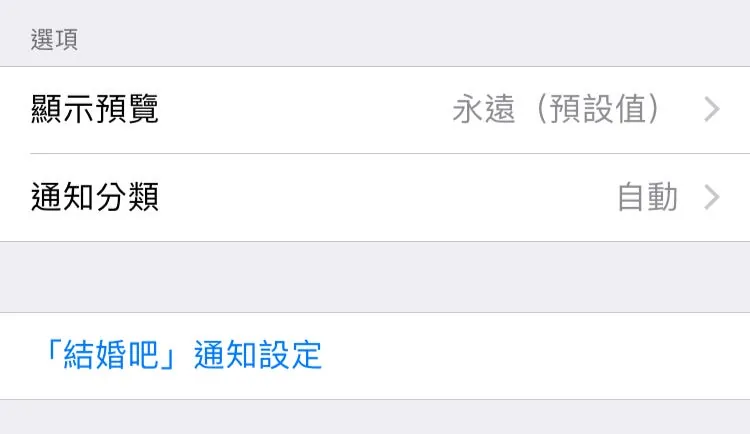
Additionally, when users receive a notification, if they want to use 3D Touch to adjust the setting to “Turn Off” notifications, there will be an extra option called “Settings in App” for users to choose.

“Notifications” -> “3D Touch” -> “…” -> “Turn Off…” -> “Set in App”
How to Implement?
This part of the implementation is very simple. The first step is to request an additional .providesAppNotificationSettings permission when asking for push notification authorization.
1
2
3
4
5
6
7
8
//appDelegate.swift didFinishLaunchingWithOptions or....
if #available(iOS 12.0, *) {
    let center = UNUserNotificationCenter.current()
    let permissiones:UNAuthorizationOptions = [.badge, .alert, .sound, .provisional,.providesAppNotificationSettings]
    center.requestAuthorization(options: permissiones) { (granted, error) in

    }
}
After asking the user whether to allow notifications, if notifications are enabled, options will appear below (regardless of whether the user previously allowed or denied).
Step 2:
The second and final step; we need to make appDelegate conform to the UNUserNotificationCenterDelegate protocol and implement the userNotificationCenter(_ center: UNUserNotificationCenter, openSettingsFor notification: UNNotification?) method!
1
2
3
4
5
6
7
8
9
10
11
12
13
14
15
16
17
18
19
20
21
22
23
//appDelegate.swift
import UserNotifications
@UIApplicationMain
class AppDelegate: UIResponder, UIApplicationDelegate {
    var window: UIWindow?
    func application(_ application: UIApplication, didFinishLaunchingWithOptions launchOptions: [UIApplicationLaunchOptionsKey: Any]?) -> Bool {
        if #available(iOS 10.0, *) {
            UNUserNotificationCenter.current().delegate = self
        }

        return true
    }
    //Other parts omitted...
}
extension AppDelegate: UNUserNotificationCenterDelegate {
    @available(iOS 10.0, *)
    func userNotificationCenter(_ center: UNUserNotificationCenter, openSettingsFor notification: UNNotification?) {
        //Navigate to your settings page location..
        //EX:
        //let VC = SettingViewController();
        //self.window?.rootViewController.present(alertController, animated: true)
    }
}
Implement delegate in AppDelegate’s didFinishLaunchingWithOptions
AppDelegate conforms to the delegate and implements the methods
Done! Compared to the previous articles, implementing this feature is much simpler 🏆
Summary
This feature is somewhat similar to the one mentioned in the previous article where silent push notifications with lower interference are sent to users without requiring their authorization to test the waters!
They all build new bridges between developers and users. In the past, when apps were too noisy, we would go straight to the settings page and mercilessly turn off all notifications. However, this means that for developers, whether the notifications are good, bad, or useful, none can be sent to users anymore. Users might also miss important messages or limited-time offers because of this.
This feature allows users to choose to open the app to adjust notifications when they want to disable them. Developers can categorize push notification items, letting users decide which types of notifications they want to receive.
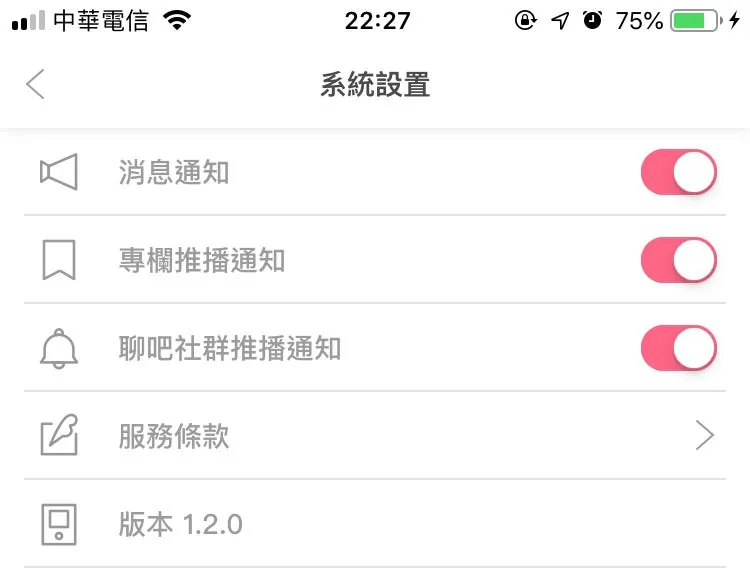
For the 結婚吧APP, users who find column notifications too intrusive can turn them off individually; however, they will still receive important system notifications.
p.s The ability to individually disable notifications is a feature already available in our app, but combining it with iOS ≥12’s new notification features can provide better effects and an improved user experience
If you have any questions or feedback, feel free to contact me.

This post was originally published on Medium (View original post), and automatically converted and synced by ZMediumToMarkdown.