iOS 12 Provisional Authorization|Receive Silent Push Notifications Without User Permission
Discover how iOS 12's UserNotifications Provisional Authorization enables apps to deliver silent push notifications without explicit user consent, enhancing engagement while respecting privacy.
点击这里查看本文章简体中文版本。
點擊這裡查看本文章正體中文版本。
This post was translated with AI assistance — let me know if anything sounds off!
Table of Contents
What? iOS 12 Can Send Push Notifications Without User Permission (Swift) — (Updated 2019–02–06)
UserNotifications Provisional Authorization Temporary Permission and iOS 12 Silent Notifications Introduction
MurMur……
Some time ago, I worked on improving the app’s push notification permission and click-through rates by making some optimizations. The initial version had a very poor experience: right after installing and launching the app, a prompt would immediately appear asking, “App wants to send notifications.” Naturally, the denial rate was very high. Based on the previous article using Notification Service Extension to count actual notification displays, it is estimated that only about 10% of users allowed push notifications.
Currently adjusting the new installation guide process and optimizing the interface by changing the timing of the notification pop-up as follows:
{:target="_blank"}](/assets/ade9e745a4bf/1*Yehjud9-RMPTENiVQz4Ryg.gif)
If users are still hesitant or want to try before deciding whether to receive notifications, they can tap “Skip” in the top right corner. This avoids pressing “Don’t Allow” initially due to unfamiliarity with the app, which would prevent future prompts permanently.
Getting to the Point
When working on the above optimization, I found that UserNotifications in iOS 12 added a .provisional permission. Simply put, it is a temporary notification permission that allows sending push notifications to users (silent notifications) without showing the permission prompt. Let’s look at its actual effects and limitations.
How to Request Temporary Notification Permission?
1
2
3
4
5
6
7
8
9
10
if #available(iOS 12.0, *) {
    let center = UNUserNotificationCenter.current()
    let permissions: UNAuthorizationOptions = [.badge, .alert, .sound, .provisional]
    // You can request only temporary permission .provisional, or request all needed permissions at once XD
    // Neither will trigger the notification permission prompt

    center.requestAuthorization(options: permissions) { (granted, error) in
        print(granted)
    }
}
We add the above code to AppDelegate’s didFinishLaunchingWithOptions, then launch the app, and notice that the notification permission prompt does not appear; at this point, we go to Settings to check App Notification Settings.
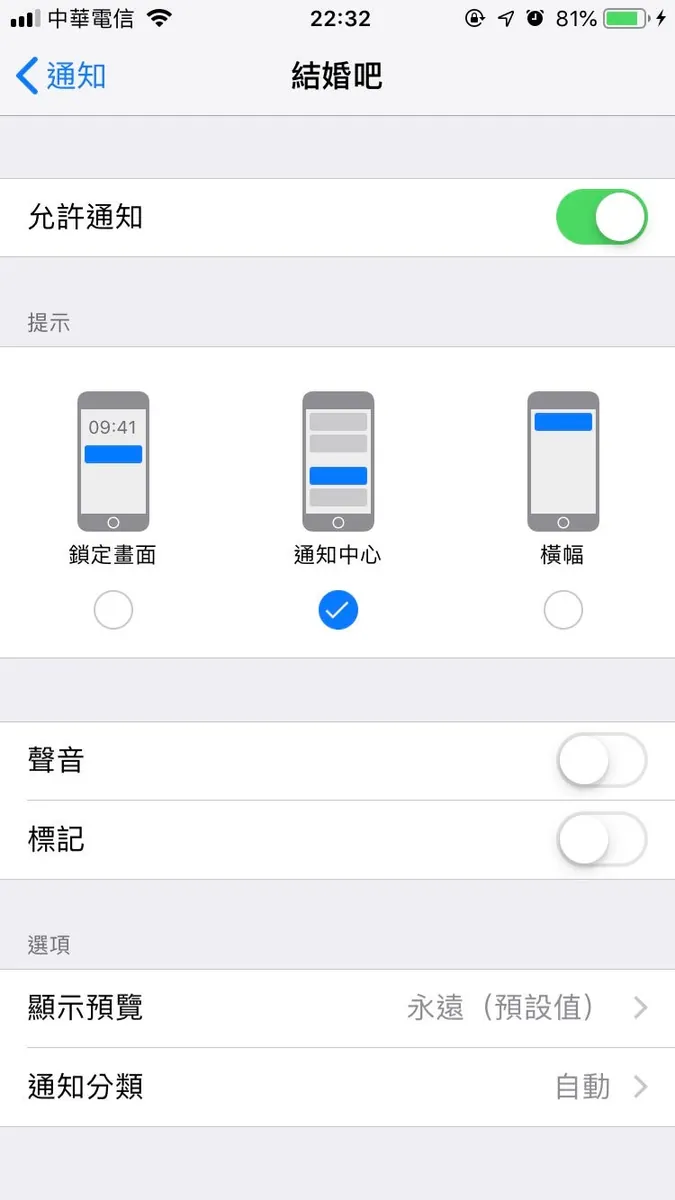
(Figure 1) Obtain silent notification permission
We quietly obtained the silent notification permission 🏆
Add the authorizationStatus .provisional item (iOS 12 and later only) in the code that checks the current push notification permission:
1
2
3
4
5
6
7
8
9
10
11
12
13
14
15
if #available(iOS 10.0, *) {
    UNUserNotificationCenter.current().getNotificationSettings { (settings) in
        if settings.authorizationStatus == .authorized {
            // Allowed
        } else if settings.authorizationStatus == .denied {
            // Denied
        } else if settings.authorizationStatus == .notDetermined {
            // Not asked yet
        } else if #available(iOS 12.0, *) {
            if settings.authorizationStatus == .provisional {
                // Currently provisional permission
            }
        }
    }
}
Please note! If you are checking the current notification permission status,
settings.authorizationStatus == .notDeterminedandsettings.authorizationStatus == .provisional
They can all trigger a notification prompt asking the user whether they allow receiving notifications.
What can silent notifications do? How do push notifications display?
First, here is an image summarizing when silent notifications will appear:
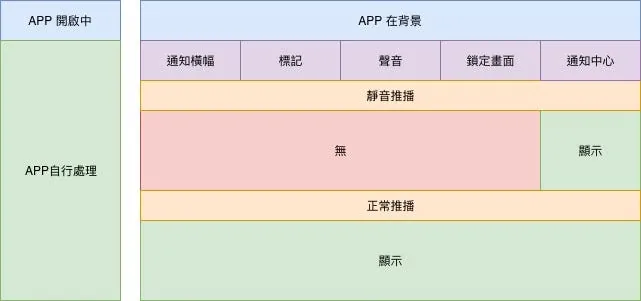
You can see that if it is a silent push notification, when the app receives the notification in the background state, no banner will appear, no sound alert will play, it cannot be marked, and it will not show on the lock screen; it will only appear in the Notification Center when the phone is unlocked and pulled down:

You can see the push notifications you sent, which will automatically be grouped into a category.
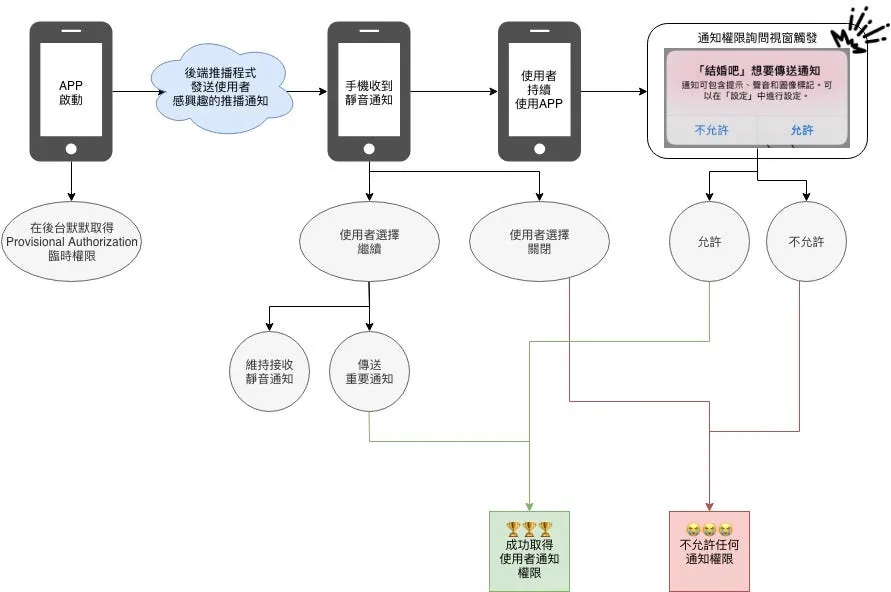
After clicking to expand, users can choose:

This expanded inquiry window only appears under “temporary permission” when silent push notifications are enabled.
To “continue” receiving push notifications — “Send important notifications”: Notification permissions are fully enabled! Notification permissions are fully enabled! Notification permissions are fully enabled! This is really important, so it’s repeated three times. At this point, the earlier code requesting all permissions together becomes very effective.
Or continue receiving silent notifications.“Off” — Clicking “Turn off all notifications” completely disables push notifications (including silent notifications).
Note: How to manually set an existing app to silent notifications?
Silent notifications are a new setting introduced in iOS 12 to optimize notifications and are unrelated to temporary permissions. However, apps that have temporary permissions can send silent notifications. Setting an app’s notifications to silent is simple. One way is to go to “Settings” - “Notifications” - find the app, then turn off all permissions except “Notification Center” (as shown in Figure 1) to enable silent notifications.
Alternatively, when receiving a notification from the app, press firmly/long press to expand it, then tap the “…” in the top right corner and select “Send Silent Notification”:

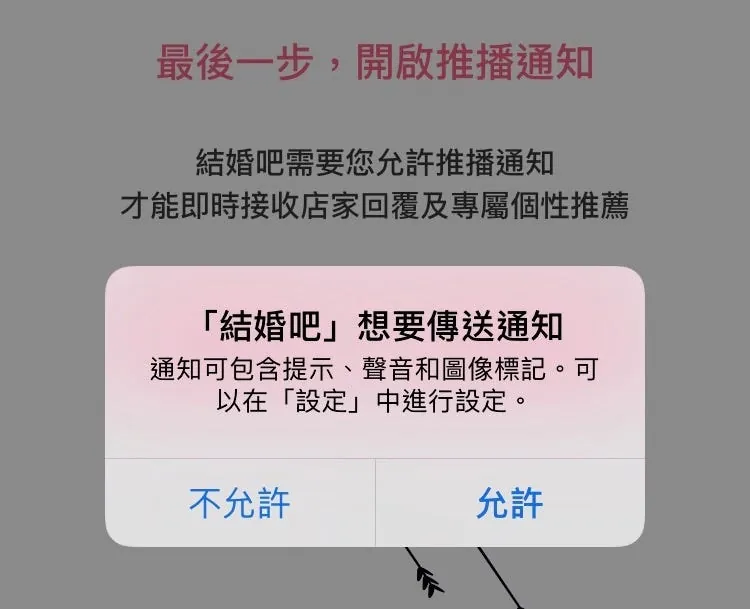
With temporary permissions when a prompt notification window is triggered later:
Removing the notification permission request and just using .provisional will still prompt the user to allow notifications:
1
2
3
4
5
6
7
if #available(iOS 10.0, *) {
    let center = UNUserNotificationCenter.current()
    let permissions: UNAuthorizationOptions = [.badge, .alert, .sound]
    center.requestAuthorization(options: permissions) { (granted, error) in
        print(granted)
    }
}
Tap “Allow” to grant all notification permissions, or tap “Don’t Allow” to disable all notification permissions (including previously granted silent notification permissions).
The overall process is as follows:
Summary:
This thoughtful notification improvement in iOS 12 makes it easier for users and developers to build interactive bridges through notifications, helping to avoid situations where notifications are permanently turned off.
For users, when the notification permission prompt appears, they often don’t know whether to allow or deny it because they don’t know what kind of notifications the developer will send. It could be ads or important messages. The unknown is scary, so most people tend to play it safe and press deny first.
For developers, we carefully prepare many items, including important messages to push to users, but due to the issues mentioned above, users block them, wasting the effort we put into designing the content!
This feature allows developers to seize the opportunity when users first install the app, design the push notification process and content, prioritize sending notifications about items users are interested in, increase users’ awareness of the app’s notifications, track push notification click rates, and trigger prompts asking users if they want to receive notifications at the right time.
Although the only place for exposure is the Notification Center, having exposure is still an opportunity; from another perspective, if we were users and didn’t allow notifications, an app sending many notifications with banners, sounds, and appearing on the lock screen would be very annoying (the competing side does this XD). Apple’s approach strikes a balance between users and developers.
The current problem is that there are still too few iOS 12 users 🤐
Further Reading
If you have any questions or feedback, feel free to contact me.

This post was originally published on Medium (View original post), and automatically converted and synced by ZMediumToMarkdown.