iOS Button Tap Area Expansion|Enhance User Interaction with Custom pointInside Override
Improve iOS app usability by expanding button tap areas using a custom pointInside method. Solve missed taps and boost user experience with precise touch target enlargement techniques.
点击这里查看本文章简体中文版本。
點擊這裡查看本文章正體中文版本。
This post was translated with AI assistance — let me know if anything sounds off!
Table of Contents
iOS Expand Button Tap Area
Rewrite pointInside to expand the touch area
In daily development, it’s common to follow the design UI layout perfectly, making the interface look beautiful, but the actual button touch area is too small, making it hard to tap accurately; this is especially unfriendly for people with thick fingers.
Completed sample image
Before…
Regarding this issue, I didn’t research it deeply at first. I simply overlaid a larger transparent UIButton on the original button and used this transparent button to handle events. This approach is very troublesome and hard to manage when there are many components.
Later, the issue was solved using layout. The button was set with top, bottom, left, and right constraints all at 0 (or less) during layout, then the imageEdgeInsets, titleEdgeInsets, and contentEdgeInsets were adjusted to position the icon/button title correctly according to the UI design. However, this approach is more suitable for projects using Storyboard/xib because you can directly adjust the layout in Interface Builder. Another point is that the designed icon should ideally have no extra spacing; otherwise, it becomes difficult to align properly. Sometimes it gets stuck at a 0.5 distance that can’t be adjusted correctly.
After…
As the saying goes, the more you see, the more you know. Recently, after working on a new project, I learned a neat trick: you can enlarge the touch area in UIButton’s pointInside method. By default, it uses the UIButton’s bounds, but you can extend the bounds inside to make the button’s clickable area bigger!
After the above approach… we can:
1
2
3
4
5
6
7
8
9
10
11
12
class MyButton: UIButton {
    var touchEdgeInsets:UIEdgeInsets?
    override open func point(inside point: CGPoint, with event: UIEvent?) -> Bool {
        var frame = self.bounds

        if let touchEdgeInsets = self.touchEdgeInsets {
            frame = frame.inset(by: touchEdgeInsets)
        }

        return frame.contains(point);
    }
}
Customize a UIButton by adding a public property touchEdgeInsets to store the expanded touch area for convenience; then override the pointInside method to implement this idea.
Usage:
1
2
3
4
5
6
7
8
9
10
11
12
13
import UIKit

class MusicViewController: UIViewController {

    @IBOutlet weak var playerButton: MyButton!

    override func viewDidLoad() {
        super.viewDidLoad()

        playerButton.touchEdgeInsets = UIEdgeInsets(top: -10, left: -10, bottom: -10, right: -10)
    }

}

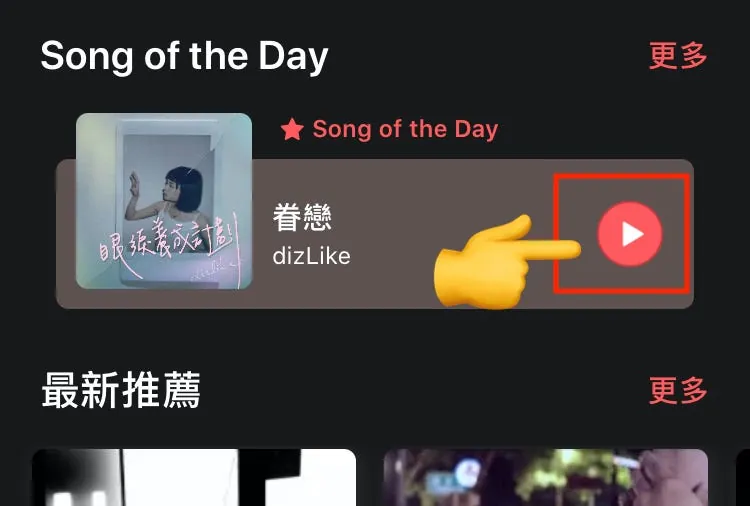
Play button / Blue is the original click area / Red is the expanded click range
When using, just remember to set the Button’s Class to our custom MyButton, then you can expand the clickable area for each Button by setting touchEdgeInsets!
️⚠️⚠️⚠️⚠️️️️⚠️️️️
When using Storyboard/xib, remember to set the
Custom Classto MyButton
⚠️⚠️⚠️⚠️⚠️
touchEdgeInsetsextends outward from (0,0) at the center, so the distances for top, bottom, left, and right should use negative values to expand.
Looks good… but:
Replacing every UIButton with a custom MyButton is quite tedious and increases code complexity. It may even cause conflicts in large projects.
For this feature that we believe every UIButton should inherently have, if possible, we hope to directly extend the original UIButton through an Extension:
1
2
3
4
5
6
7
8
9
10
11
12
13
14
15
16
17
18
19
20
21
22
23
24
25
private var buttonTouchEdgeInsets: UIEdgeInsets?

extension UIButton {
    var touchEdgeInsets:UIEdgeInsets? {
        get {
            return objc_getAssociatedObject(self, &buttonTouchEdgeInsets) as? UIEdgeInsets
        }

        set {
            objc_setAssociatedObject(self,
                &buttonTouchEdgeInsets, newValue,
                .OBJC_ASSOCIATION_RETAIN_NONATOMIC)
        }
    }

    override open func point(inside point: CGPoint, with event: UIEvent?) -> Bool {
        var frame = self.bounds

        if let touchEdgeInsets = self.touchEdgeInsets {
            frame = frame.inset(by: touchEdgeInsets)
        }

        return frame.contains(point);
    }
}
Usage as shown in the example above.
Because Extensions cannot contain Properties, otherwise it will cause a compile error “Extensions must not contain stored properties,” here we refer to Using Property with Associated Object to associate the external variable buttonTouchEdgeInsets with our Extension, allowing it to be used like a regular Property. (For detailed principles, please refer to Mao Da’s article)
UIImageView (UITapGestureRecognizer)?
For image taps, the tap gesture we added on the View;
we can achieve the same effect by overriding UIImageView’s pointInside.
Done! After continuous improvements, solving this issue has become much simpler and more convenient!
References:
UIView Change Touch Area (Objective-C)
Postscript
Last year around the same time, I wanted to create a subcategory called “Small Things Lead to Big Things” to record daily trivial development tasks. These small tasks quietly accumulate and can significantly improve the app’s experience and code quality. However, after a year, I finally added another article <( _ _ )>. Small things are really easy to forget to record!
If you have any questions or feedback, feel free to contact me.

This post was originally published on Medium (View original post), and automatically converted and synced by ZMediumToMarkdown.