Apple Watch App 开发教学|从 UI 排版到 WatchConnectivity 资料同步完整攻略
针对有 iOS UIKit 基础的开发者,掌握 Apple Watch App 简化 UI 排版、WatchConnectivity 双向资料传递与推播实作,解决第三方 App 功能不足痛点,快速打造辅助型手表应用,提升使用体验与即时互动效率。
Click here to view the English version of this article.
點擊這裡查看本文章正體中文版本。
基于 SEO 考量,本文标题与描述经 AI 调整,原始版本请参考内文。
文章目录
动手做一支 Apple Watch App 吧!(Swift)
watchOS 5 手把手开发Apple Watch App 从无到有
[最新] Apple Watch Series 6 开箱&使用两年体验心得 >>>点我前往
前言:
暨上一篇 Apple Watch 入手开箱文 后已经过了快三个月,最近终于找到机会研究开发Apple Watch App啦。
{:target="_blank"}](/assets/e85d77b05061/1*aNqsa7aR3Vi3NIIvaUFZLA.webp)
补一下使用三个月后的心得:
- e-sim(LTE)依然还想不到什么时候会用到,所以也还没申请没用过 2.常用功能:靠近解锁Mac电脑、举手查看通知、Apple Pay 3.健康提醒:过了三个月已开始懒了,通知提醒都看看,没达成圆圈也无感 4.第三方App支援度依然很差 5.表面可依照心情任意更换增加新鲜感 6.更详细的运动纪录:例如走远一点路去买晚餐,手表会自动侦测询问是否要记录运动
使用三个月后整体来说,还是如原开箱文所写就像是多个生活小助手,帮你解决琐碎的事.
第三方App支援度依然很差
在我实际开发过Apple Watch App之前还很纳闷,为何Apple Watch上的App都很阳春甚至就只是「堪用」罢了,包括LINE(讯息不同步而且从未更新)、Messenger(就是堪用);直到我实际开发过Apple Watch App之后才知道这些开发者的苦衷….
首先,了解Apple Watch App的定位,化繁为简
Apple Watch的定位 「不是取代iPhone,而是辅助」 不论是官方介绍、官方App、watchOS API都是这个走向;所以才会觉得第三方APP很阳春、功能很少(抱歉,我太贪心了Orz)
以 我们的A pp为例,有搜寻商家、查看专栏、讨论区、线上询问…等等功能;线上询问就是有价值搬上Apple Watch的项目,因为他需要即时性而且更快速的回复代表更有机会获得订单;搜寻商家、查看专栏、讨论区这些功能相对复杂,在手表上就算做的到也意义不大(萤幕能呈现的资讯太少、也不需要即时性)
核心概念还是「以辅助为主」,所以并不是什么功能都需要搬上Apple Watch;毕竟使用者很少很少时间会是只有戴手表没带手机,而遇到这种情况时,使用者的需求也只有重要的功能(像查看专栏文章这种没有重要到一定要立刻马上用手表看)
让我们开始吧!
这也是我第一次开发Apple Watch App,文章内容可能不够深入,敬请大家指教!!
本篇只适合有开发过iOS App/UIKit基础的读者阅读
本篇使用:iOS ≥ 9、watchOS ≥ 5
为iOS专案新建 watchOS Target:
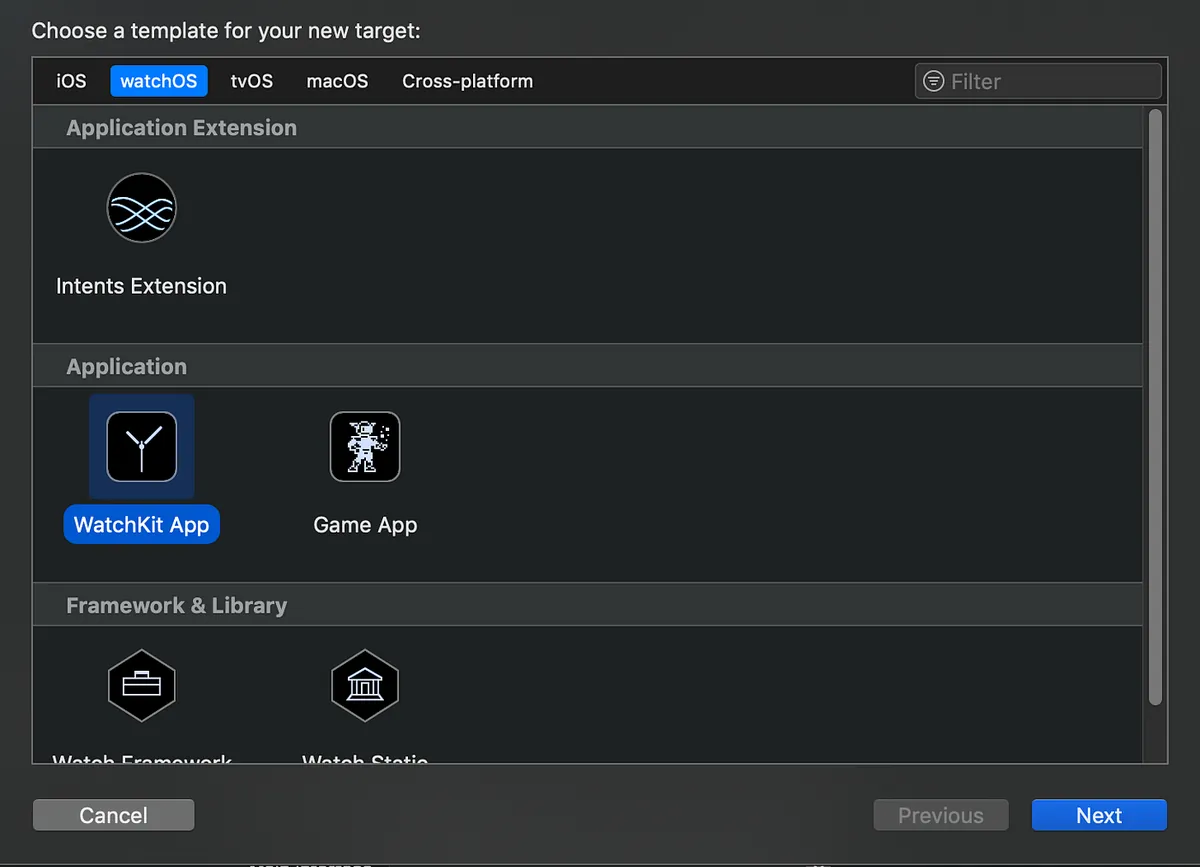
File -> New -> Target -> watchOS -> WatchKit App
*Apple Watch App无法独立安装,一定要依附在 iOS App 之下
新建好之后目录会长这样:
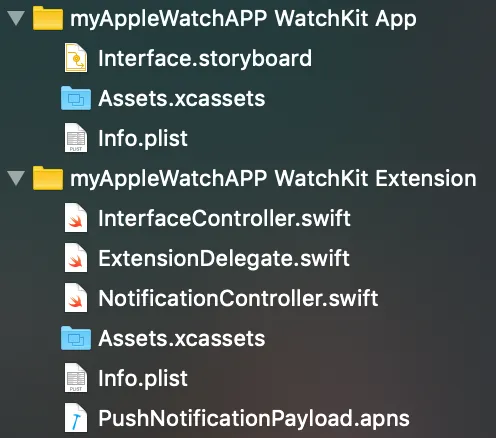
你会发现有两个Target项目,缺一不可:
WatchKit App: 负责存放资源、UI显示 /Interface.storyboard:同 iOS,里面有系统预设建立的视图控制器 /Assets.xcassets:同 iOS,存放用到的资源项目 /info.plist:同 iOS,WatchKit App 相关设定
WatchKit Extension: 负责程式呼叫、逻辑处理( * .swift) /InterfaceController.swift:预设的视图控制器程式 /ExtensionDelegate.swift:类似Swift的AppDelegate,Apple Watch App 启动入口 /NotificationController.swift:用于处理Apple Watch App上的推播显示 /Assets.xcassets:这里不使用,我统一放在WatchKit App的Assets.xcassets下 /info.plist:同 iOS,WatchKit Extension 相关设定 /PushNotificationPayload.apns:推播资料,可用在模拟器上测试推播功能
细节会在后面做介绍,先大概了解一下目录及文件内容功能即可。
视图控制器:
在AppleWatch中视图控制器不叫ViewController而是InterfaceController ,你可以在WatchKit App/Interface.storyboard中找到Interface Controller Scence,控制它的程式就放在WatchKit Extension/InterfaceController.swift中(同iOS概念)
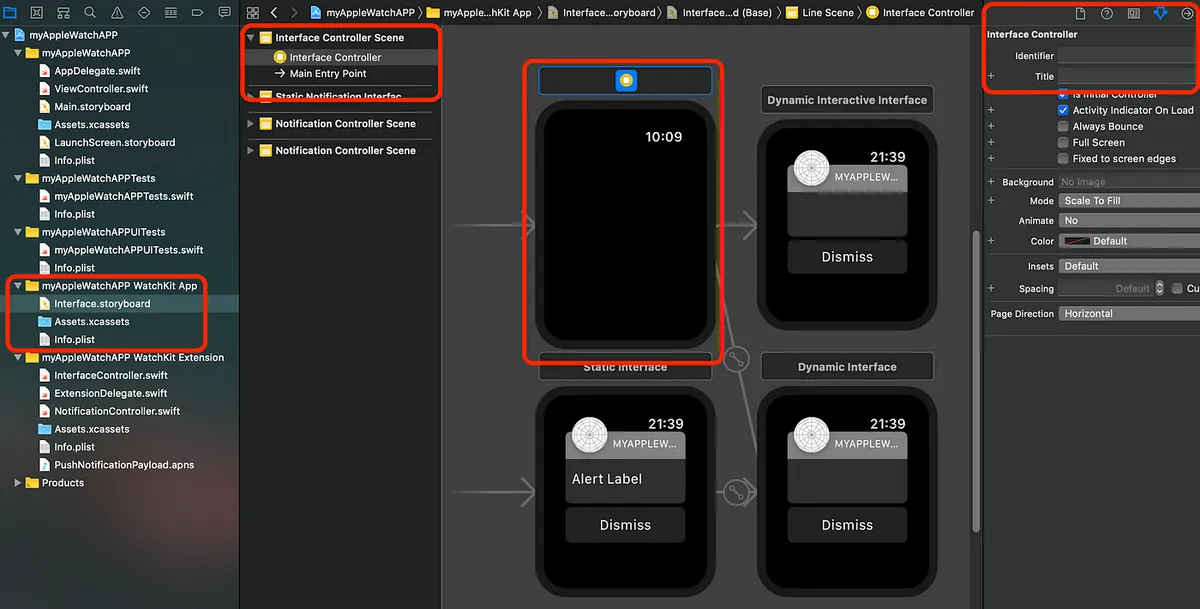
Scene预设会和Notification Controller Scene挤在一起 (我会把它拉上面一点分开)
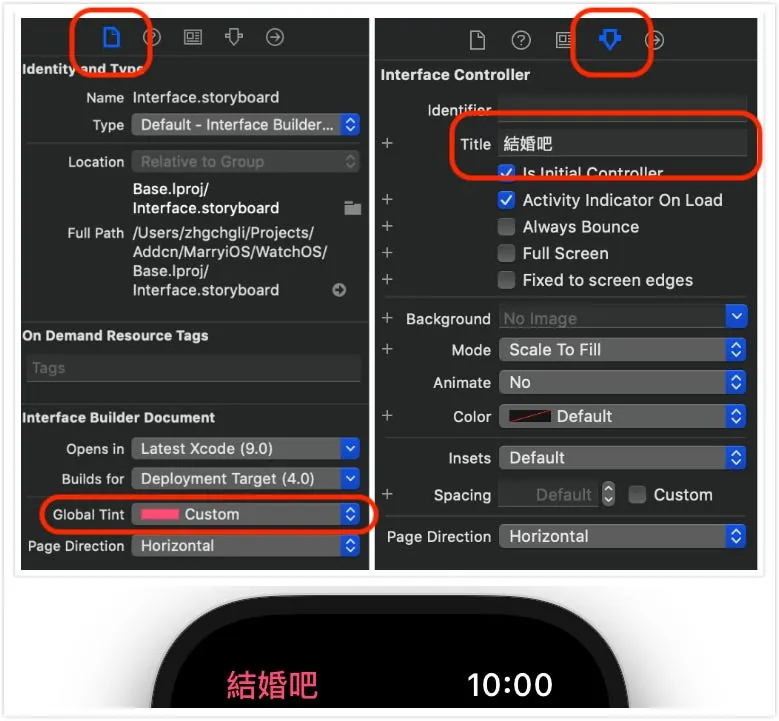
可在右方设定InterfaceController的标题显示文字.
标题颜色部分吃的是Interface Builder Document/Global hint设定,整个App的风格颜色会是统一的.
元件库:
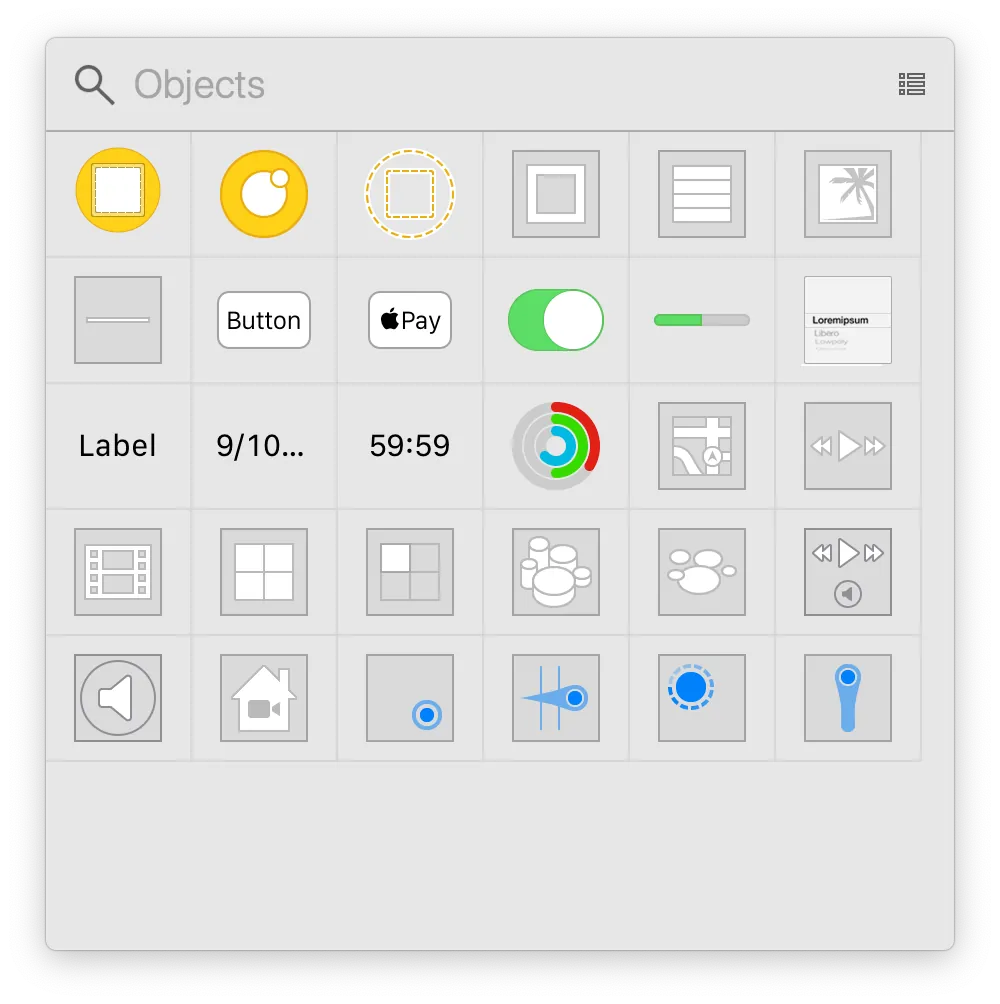
没有太多复杂的元件,元件功能也都简单明了
UI 排版:
万丈高楼从View起,排版的部分没有 UIKit(iOS) 中的Auto Layout、约束、图层,全都使用参数进行排版设置,更简单有力(排起来有点像 UIKit 中的 UIStackView)
一切排版由Group组成,类似UIKit中的 UIStackView 但能设置更多排版参数
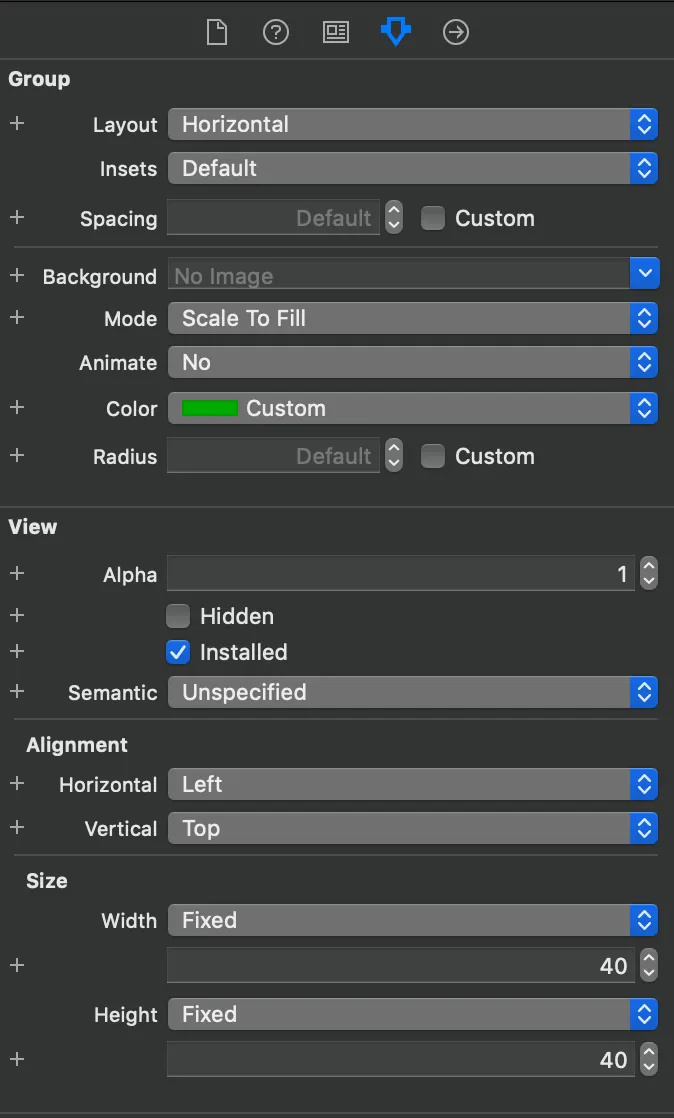
Group的参数设置
Layout:设置被包在里面的子View排版方式(水平、垂直、图层堆叠)
Insets:设置Group的上下左右间距
Spacing:设置被包在里面的子View之间的间距
Radius:设置Group的圆角,没错!WatchKit自带圆角设置参数
Alignment/Horizontal:设置水平对齐方式(左、中、右)与邻居、外层包覆的View设置会有所连动
Alignment/Vertical:设置垂直对齐方式(上、中、下)与邻居、外层包覆的View设置会有所连动
Size/Width:设置Group的大小,有三种模式可选「Fixed:指定宽度」、「Size To Fit Content:依照内容子View大小决定宽度」、「Relative to Container:参照外层包覆的View大小为宽度(可设%/+ -修正值)」
Size/Height:同Size/Width,此项是设置高度
字型/字体大小设置:

可直接套用系统的Text Styles,或使用Custom(但这边我测试使用Custom无法设定字体大小);所以 我是使用System 自订各显示Label的字体大小
做中学:以Line排版为例
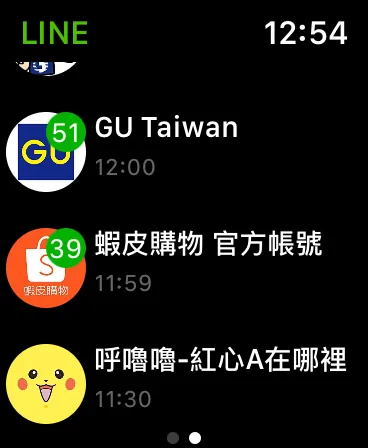
排版部分不像 iOS 那么复杂,所以我直接透过范例示范给大家看,就能直接上手;以 Line 的主页排版为例子:
在WatchKit App/Interface.storyboard中找到Interface Controller Scence:
1.整个页面,相当于 iOS App 开发中会使用到的 UITableView,在Apple Watch App 中简化了操作,名字也改叫做「WKInterfaceTable」 首先就先拉一个Table到Interface Controller Scence中
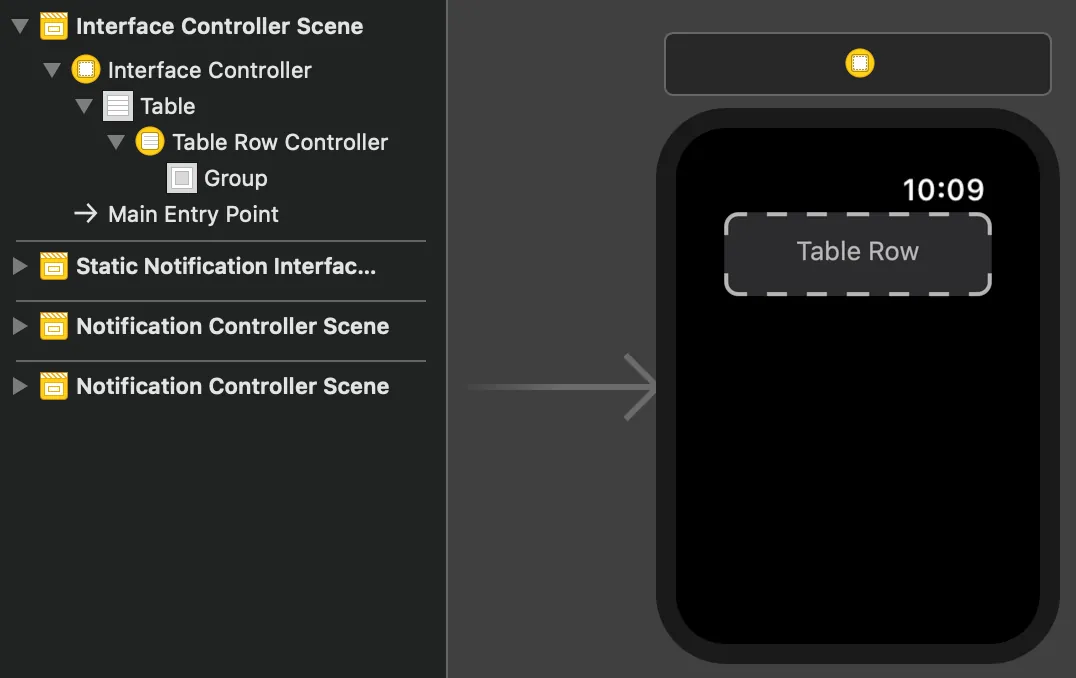
同UIKit UITableView,有Table本体、有Cell(Apple Watch中叫做Row);使用起来简化许多, 你可以直接在此介面上进行Cell的设计排版!
- 分析排版架构,设计Row显示样式:

要排出一个左边有圆角满版的Image且堆叠一个Label,右边平均分配上下两个区块,上方放Label,下方也放Label的区块
2–1: 拉出左右两区块的架构
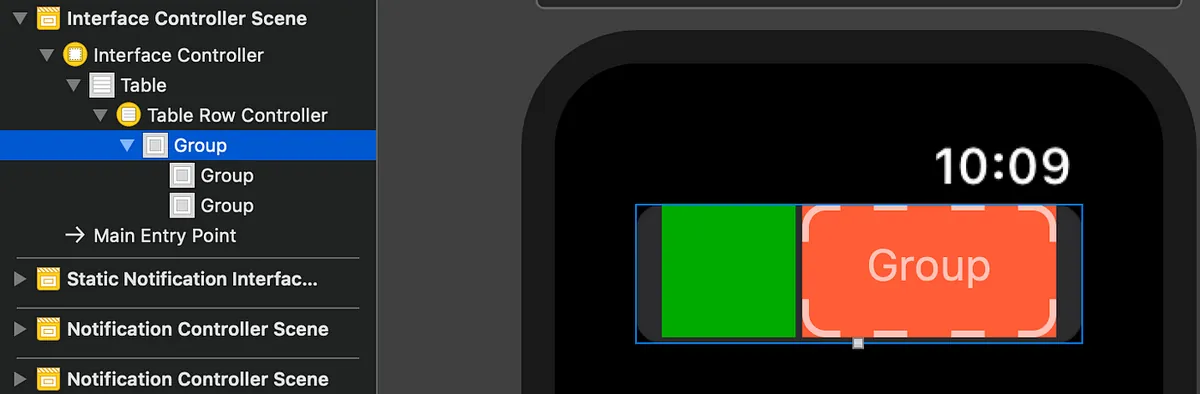
拉两个Group到Group中,并对Size参数分别设定:
左边绿色部分:

Layout设定Overlap,里面子View要做未读讯息Label的图层堆叠显示
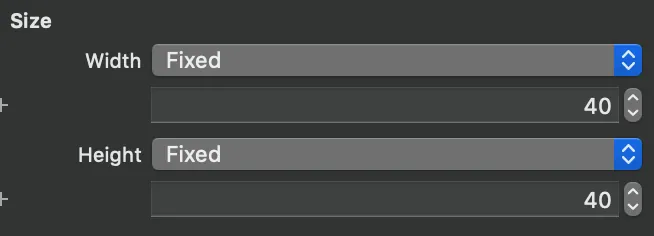
设固定长宽40的正方形
右边红色部分:

Layout设定Vertical,里面子View要做上下两个显示
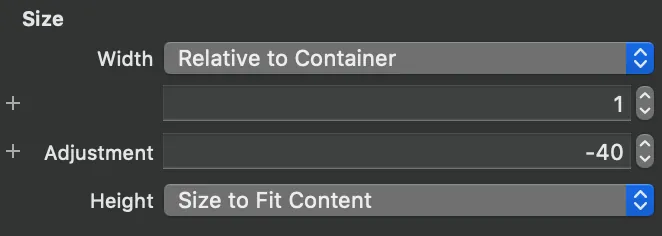
宽度设定参照外层,比例100%,扣掉左边绿色部分40
左右容器内排版:
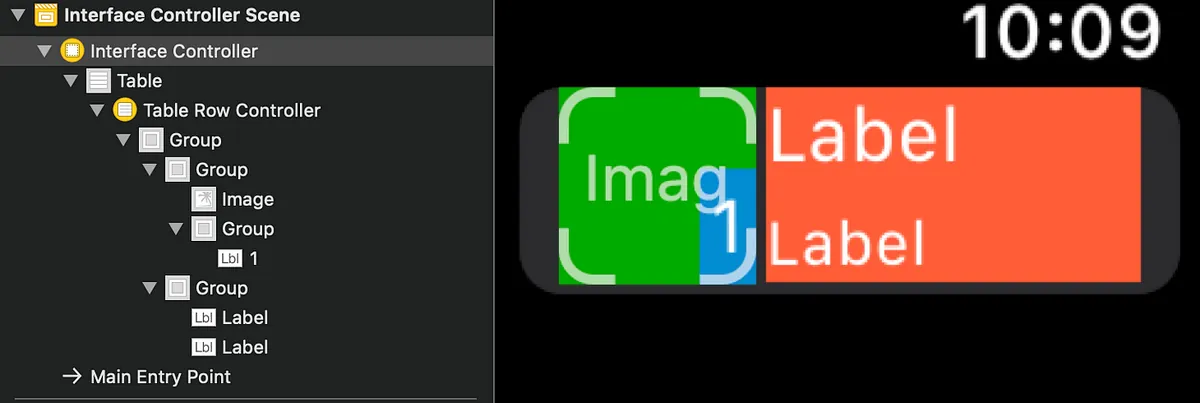
左边部分:拉入一个Image,再拉入一个包覆Lable的Group对齐设右下(Group设底色再设间距及圆角)
右边部分:拉入两个Label,一个对齐设左上,一个对齐设左下即可
为Row命名(同UIKit UITableView为Cell设定identifier):
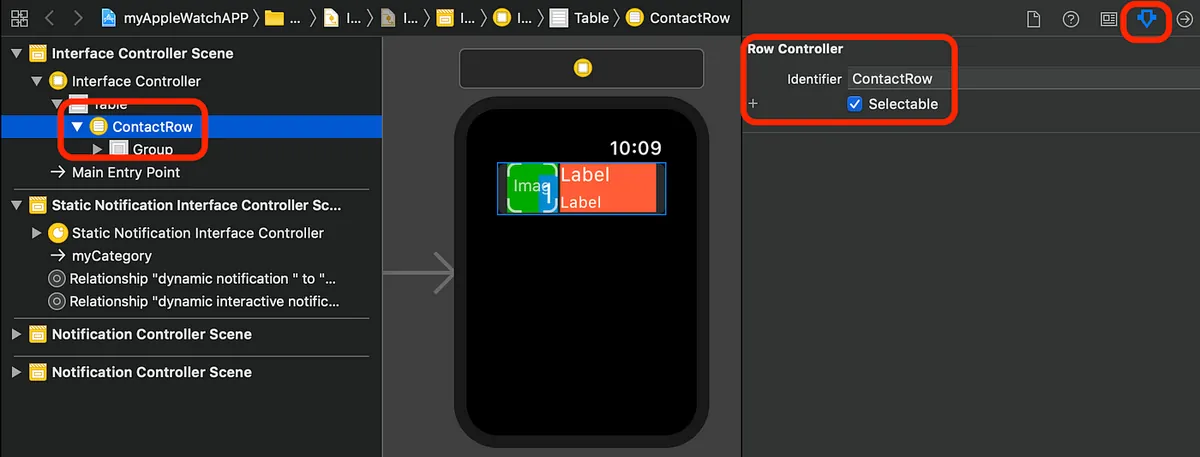
选定Row->Identifier->输入自订名称
Row的呈现样式不只一种呢?
非常简单,只要在拉一个Row放在Table里(实际要显示哪个样式的ROW由程式控制)并输入Identifier命名即可
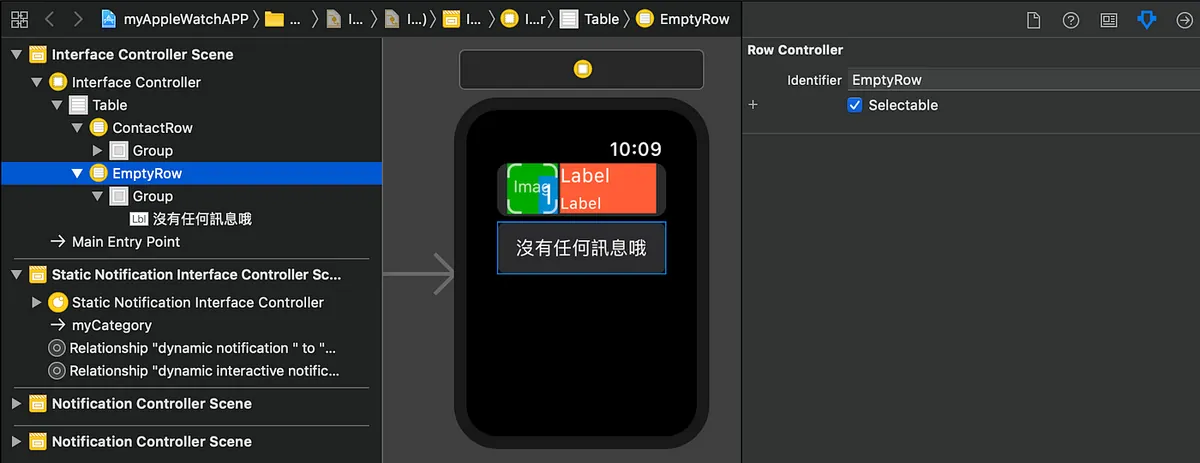
这边我再拉一个Row用于呈现无资料时的提示
排版相关资讯
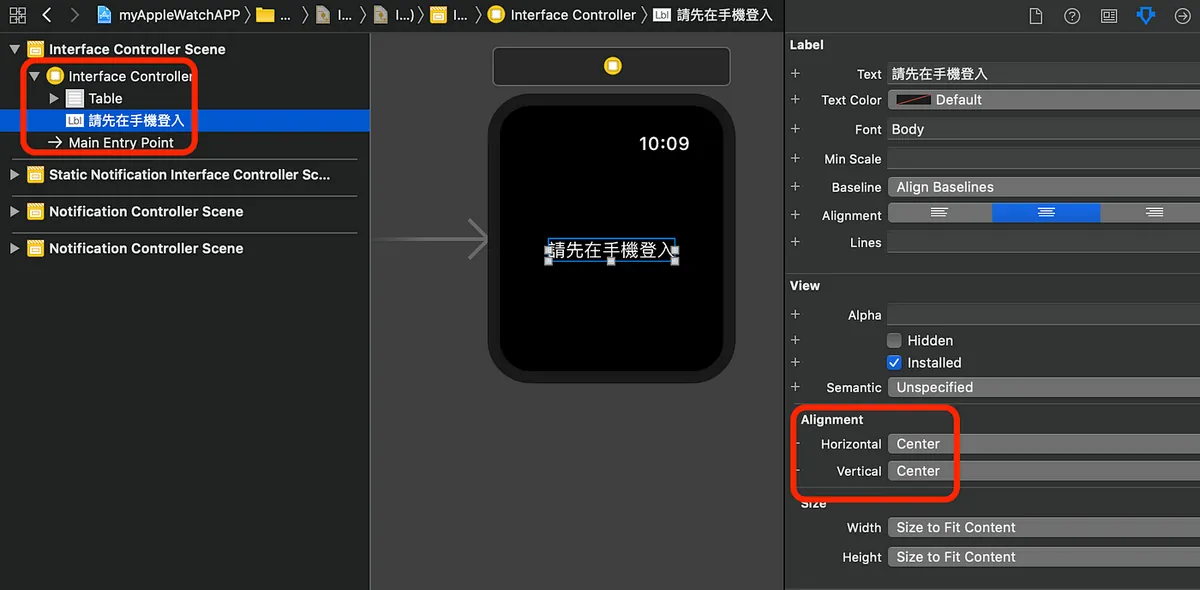
watchKit的hidden不会占位,可拿来做交互应用(有登入才显示Table;没登入显示提示Label)
排版到此告一段落,可依照个人设计做修改;上手容易,多排个几次、玩玩对齐参数,就能熟悉!
程式控制部分:
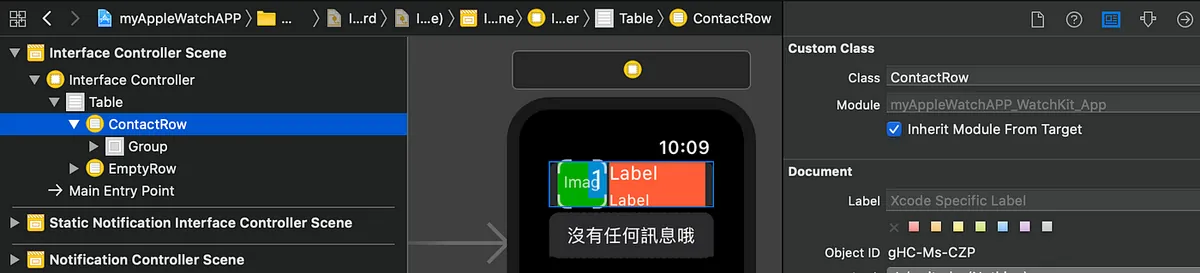
接续Row,我们需要建立一个Class对Row进行参照操作:
1
2
class ContactRow:NSObject {
}
1
2
3
4
5
6
7
8
class ContactRow:NSObject {
    var id:String?
    @IBOutlet var unReadGroup: WKInterfaceGroup!
    @IBOutlet var unReadLabel: WKInterfaceLabel!
    @IBOutlet weak var imageView: WKInterfaceImage!
    @IBOutlet weak var nameLabel: WKInterfaceLabel!
    @IBOutlet weak var timeLabel: WKInterfaceLabel!
}
拉outlet、储存变数
Table部分ㄧ样拉Outlet到Controller中:
1
2
3
4
5
6
7
8
9
10
11
12
13
14
15
16
17
18
19
20
21
22
23
24
25
26
27
28
29
30
31
32
33
34
35
36
37
38
39
40
41
42
43
44
45
46
47
48
49
50
51
52
53
class InterfaceController: WKInterfaceController {

    @IBOutlet weak var Table: WKInterfaceTable!
    override func awake(withContext context: Any?) {
        super.awake(withContext: context)

        // Configure interface objects here.
    }

    override func willActivate() {
        // This method is called when watch view controller is about to be visible to user
        super.willActivate()
    }

    struct ContactStruct {
        var name:String
        var image:String
        var time:String
    }

    func loadData() {
        //Get API Call Back...
        //postData {
        let data:[ContactStruct] = [] //api returned data...

        self.Table.setNumberOfRows(data.count, withRowType: "ContactRow")
        //如果你有多种ROW需要呈现则用:
            //self.Table.setRowTypes(["ContactRow","ContactRow2","ContactRow3"])
        //
        for item in data.enumerated() {
            if let row = self.Table.rowController(at: item.offset) as? ContactRow {
                row.nameLabel.setText(item.element.name)
                //assign value to lable/image......
            }
        }

        //}
    }

    override func didDeactivate() {
        // This method is called when watch view controller is no longer visible
        super.didDeactivate()
        loadData()
    }

    //处理Row点选时:
    override func table(_ table: WKInterfaceTable, didSelectRowAt rowIndex: Int) {
        guard let row = table.rowController(at: rowIndex) as? ContactRow,let id = row.id else {
            return
        }
        self.pushController(withName: "showDetail", context: id)
    }
}
Table的操作简化许多没有delegate/datasource,设定资料方式只要呼叫setNumberOfRows/setRowTypes指定Row数量和形态,再使用rowController(at:) 设定每列的资料内容即可!
Table的Row选择事件也只需 override func table( _ table: WKInterfaceTable, didSelectRowAt rowIndex: Int) 即可操作!(Table也只有这个事件)
如何跳页?
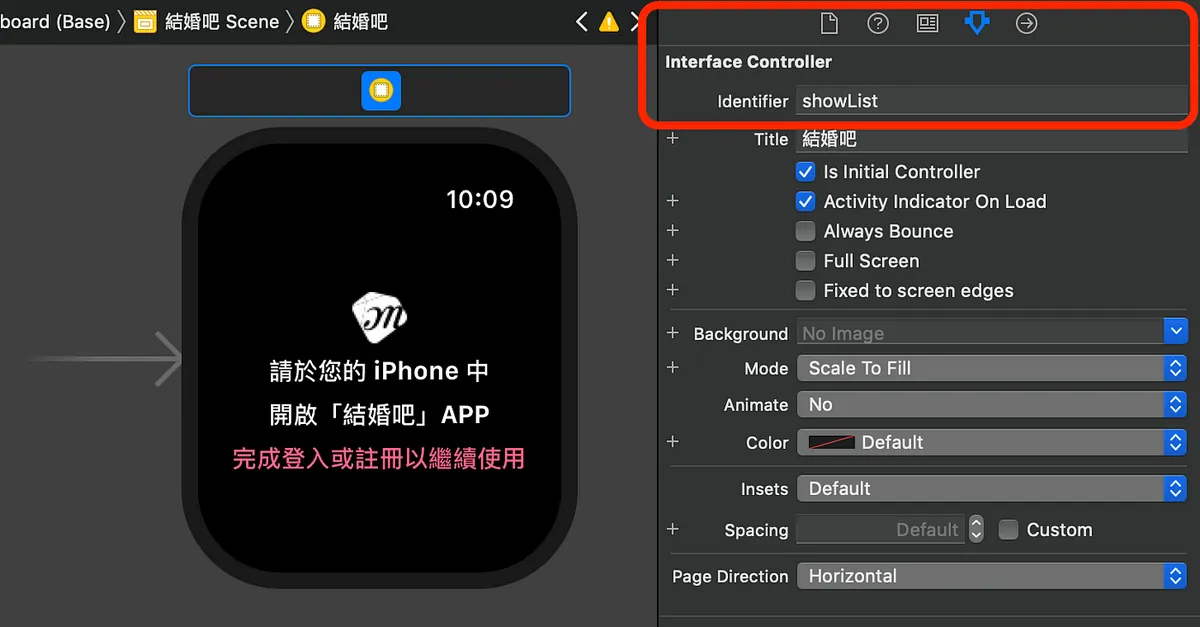
首先为Interface Controller设定Identifier
watchKit有两种跳页模式:
1.类似iOS UIKit push self.pushController(withName: Interface Controller Identifier , context: Any? )
push方式可左上返回
返回上一页同iOS UIKit:self.pop( )
返回根页面:self.popToRootController( )
开新页面:self.presentController( )
- 页签显示方式 WKInterfaceController.reloadRootControllers(withNames: [ Interface Controller Identifier ], contexts: [ Any? ] )
亦或是在Storyboard上,在第一页的Interface Controller上按Control+Click拖曳到第二页选择「next page」也可
页签显示方式可以左右切换页面
两种跳页方式不能混用.
跳页参数?
不像iOS需要使用自订delegate或segue方式传递参数,watchKit跳页带参数方式就是将参数放入上方方法中的 contexts 中即可.
接收参数在 InterfaceController 的 awake(withContext context: Any?)
例如我在A页面要跳到B页面并带入id:Int时:
A 页面:
1
self.pushController(withName: "showDetail", context: 100)
B 页面:
1
2
3
4
5
6
7
8
9
override func awake(withContext context: Any?) {
        super.awake(withContext: context)
        guard let id = context as? Int else {
           print("参数错误!")
           self.popToRootController()
           return
        }
        // Configure interface objects here.
}
程式控制元件部分
相比iOS UIKit一样简化许多,有开发过iOS的应该上手很快! 例如label变成setText( ) p.s. 而且居然没有getText的方法,只能extension变数或放在外部变数储存
与iPhone之间同步/资料传递
如果有开发过iOS 相关 Extension 的话;下意识一定是用App Groups共享UserDefaults的方式,当初我也兴冲冲的这样做,然后卡了好久发现资料一直过不去,直到上网一查才发现,watchOS>2之后就不再支援此方法了….
要使用新的WatchConnectivity方式让手机跟手表之间进行通讯(类似socket概念),iOS手机及手表watchOS两端都需要实做,我们写成singleton模式如下:
手机端:
1
2
3
4
5
6
7
8
9
10
11
12
13
14
15
16
17
18
19
20
21
22
23
24
25
26
27
28
29
30
31
32
33
34
35
36
37
38
39
40
41
42
43
44
45
46
47
48
49
50
51
52
53
54
55
56
57
58
59
60
61
62
63
64
65
66
67
68
69
70
71
import WatchConnectivity

class WatchSessionManager: NSObject, WCSessionDelegate {
    @available(iOS 9.3, *)
    func session(_ session: WCSession, activationDidCompleteWith activationState: WCSessionActivationState, error: Error?) {
        //手机端session启用完成
    }

    func session(_ session: WCSession, didReceiveUserInfo userInfo: [String : Any] = [:]) {
        //手机端接受到手表传回的UserInfo
    }

    func session(_ session: WCSession, didReceiveMessage message: [String : Any], replyHandler: @escaping ([String : Any]) -> Void) {
        //手机端接受到手表回传的Message
    }

    //另外还有didReceiveMessageData,didReceiveFile同样都是处理收到手表回传的资料
    //看你的资料传递接收需求决定要用哪个

    func sendUserInfo() {
        guard let validSession = self.validSession,validSession.isReachable else {
            return
        }

        if userDefaultsTransfer?.isTransferring == true {
            userDefaultsTransfer?.cancel()
        }

        var list:[String:Any] = [:]
        //将UserDefaults放入list....

        self.userDefaultsTransfer = validSession.transferUserInfo(list)
    }

    func sessionReachabilityDidChange(_ session: WCSession) {
        //与手表APP连接状态改变时(手表开启APP时/手表关闭APP时)
        sendUserInfo()
        //我是当状态改变,如为手表开启APP时就同步一次UserDefaults
    }

    func session(_ session: WCSession, didFinish userInfoTransfer: WCSessionUserInfoTransfer, error: Error?) {
        //完成同步UserDefaults(transferUserInfo)
    }

    func sessionDidBecomeInactive(_ session: WCSession) {

    }

    func sessionDidDeactivate(_ session: WCSession) {

    }

    static let sharedManager = WatchSessionManager()
    private override init() {
        super.init()
    }

    private let session: WCSession? = WCSession.isSupported() ? WCSession.default : nil
    private var validSession: WCSession? {
        if let session = session, session.isPaired && session.isWatchAppInstalled {
            return session
        }
        //回传有效且连接中且手表APP开启中的session
        return nil
    }

    func startSession() {
        session?.delegate = self
        session?.activate()
    }
}
WatchConnectivity 手机端的 Code
并在iOS/AppDelegate.swift的application( _ application: UIApplication, didFinishLaunchingWithOptions launchOptions: [UIApplicationLaunchOptionsKey: Any]?)中加入WatchSessionManager.sharedManager.startSession( ) 以在启动手机APP后连接上session
手表端:
1
2
3
4
5
6
7
8
9
10
11
12
13
14
15
16
17
18
19
20
21
22
23
24
25
26
27
28
29
30
31
32
33
34
35
36
37
import WatchConnectivity

class WatchSessionManager: NSObject, WCSessionDelegate {
    func session(_ session: WCSession, activationDidCompleteWith activationState: WCSessionActivationState, error: Error?) {
    }

    func sessionReachabilityDidChange(_ session: WCSession) {
        guard session.isReachable else {
            return
        }

    }

    func session(_ session: WCSession, didFinish userInfoTransfer: WCSessionUserInfoTransfer, error: Error?) {

    }

    func session(_ session: WCSession, didReceiveUserInfo userInfo: [String : Any] = [:]) {
        DispatchQueue.main.async {
            //UserDefaults:
            //print(userInfo)
        }
    }

    static let sharedManager = WatchSessionManager()
    private override init() {
        super.init()
    }

    private let session: WCSession? = WCSession.isSupported() ? WCSession.default : nil

    func startSession() {
        session?.delegate = self
        session?.activate()
    }
}
WatchConnectivity 手表端的 Code
并在WatchOS Extension/ExtensionDelegate.swift中的applicationDidFinishLaunching( ) 加入 WatchSessionManager.sharedManager.startSession( ) 以在启动手表APP后连接上session
WatchConnectivity 资料传递方式
传资料用:sendMessage,sendMessageData,transferUserInfo,transferFile 收资料用:didReceiveMessageData,didReceive,didReceiveMessage 两端传接收方法都ㄧ样

可以看到手表传资料到手机都通,但手机传资料到手表仅限手表APP开启中
watchOS推播处理
专案目录底下的PushNotificationPayload.apns这时就派上用场了,这是用来在模拟器上测试推播之用,在模拟器上部署Watch App target,安装完启动App就会收到一则以这个档案内容的推播,让开发者更容易测试推播功能.
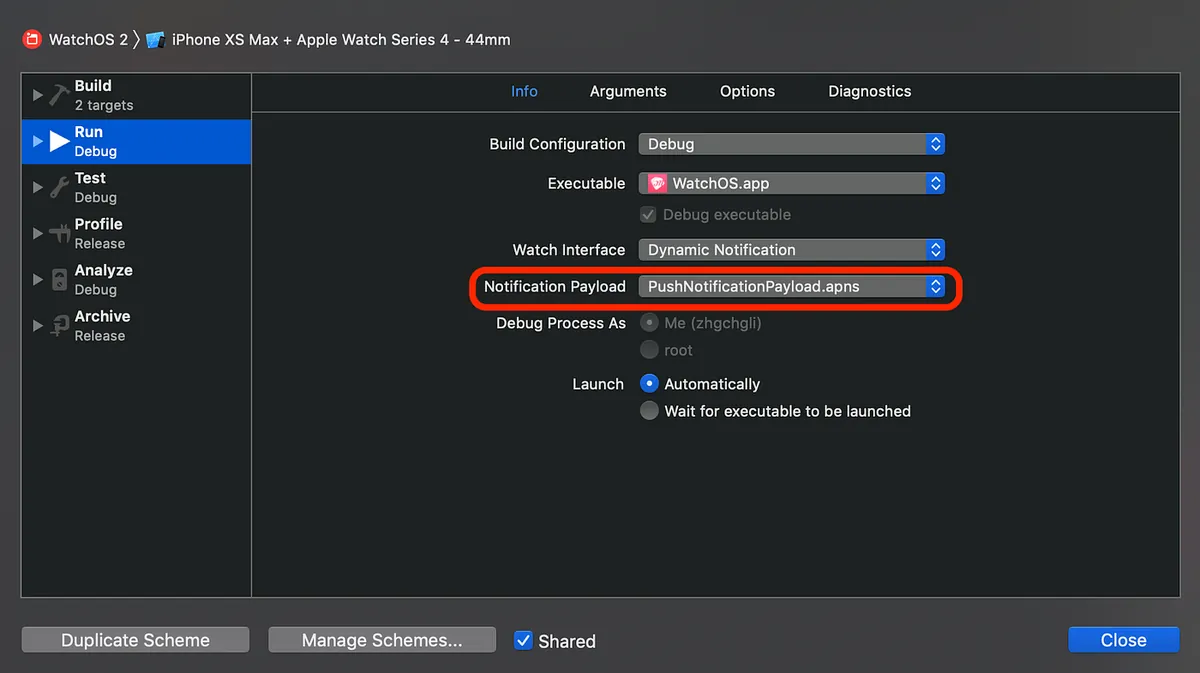
如要修改/启用/停用 PushNotificationPayload.apns,请选择Target后Edit Scheme
watchOS 推播处理:
同iOS我们实做UNUserNotificationCenterDelegate,在watchOS中我们也实作一样的方法,在watchOS Extension/ExtensionDelegate.swift中
1
2
3
4
5
6
7
8
9
10
11
12
13
14
15
16
17
18
19
20
21
22
23
24
25
26
27
28
29
30
31
32
33
34
35
36
37
38
39
40
41
import WatchKit
import UserNotifications
import WatchConnectivity

class ExtensionDelegate: NSObject, WKExtensionDelegate, UNUserNotificationCenterDelegate {

    func applicationDidFinishLaunching() {

        WatchSessionManager.sharedManager.startSession() //前面提到的WatchConnectivity连线

        UNUserNotificationCenter.current().delegate = self //设定UNUserNotificationCenter delegate
        // Perform any final initialization of your application.
    }

    func userNotificationCenter(_ center: UNUserNotificationCenter, willPresent notification: UNNotification, withCompletionHandler completionHandler: @escaping (UNNotificationPresentationOptions) -> Void) {
        completionHandler([.sound, .alert])
        //同iOS,此做法可让推播在APP前景时依然会显示
    }

    func userNotificationCenter(_ center: UNUserNotificationCenter, didReceive response: UNNotificationResponse, withCompletionHandler completionHandler: @escaping () -> Void) {
        //点击推播时
        guard let info = response.notification.request.content.userInfo["aps"] as? NSDictionary,let alert = info["alert"] as? Dictionary<String,String>,let data = info["data"] as? Dictionary<String,String> else {
            completionHandler()
            return
        }

        //response.actionIdentifier可得点击事件Identifier
        //预设点击事件:UNNotificationDefaultActionIdentifier

        if alert["type"] == "new_ask") {
            WKExtension.shared().rootInterfaceController?.pushController(withName: "showDetail", context: 100)
            //取得目前root interface controller 并 push
        } else {
           //其他处理....
           //WKExtension.shared().rootInterfaceController?.presentController(withName: "", context: nil)

        }

        completionHandler()
    }
}
ExtensionDelegate.swift
watchOS 推播显示,分成三种:
- static: 预设推播显示方式
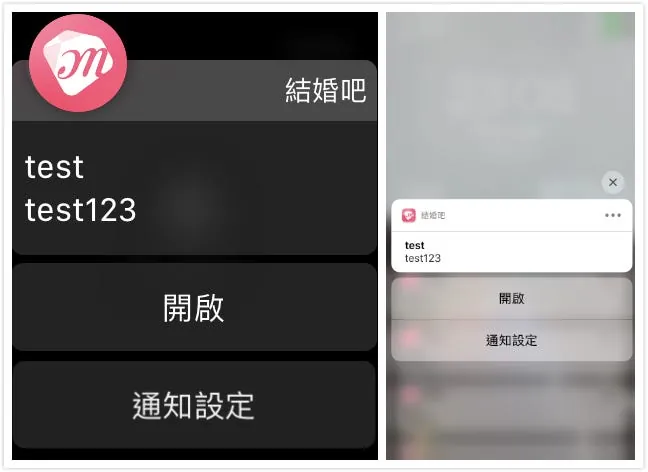
会同手机推播,这边手机端iOS有实做UNUserNotificationCenter.setNotificationCategories在通知下方增加按钮;Apple Watch预设亦然会出现
dynamic:动态处理推播显示样式(重组内容、显示图片)
interactive:watchOS ≥ 5 后支援,在dynamic的基础下再增加支援按钮
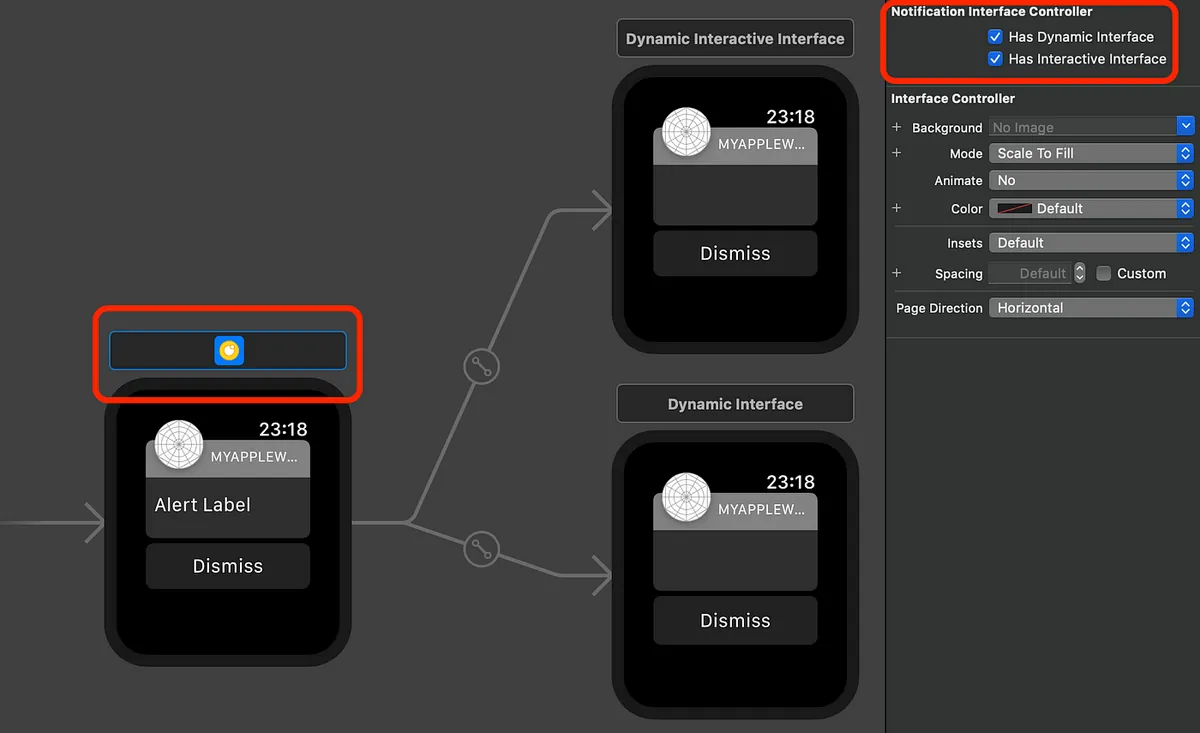
可在Interface.storyboard中的Static Notification Interface Controller Scene设定推播处理方式
static没什么好说的,就是走预设的显示方式,这边先介绍dynamic,勾选「Has Dynamic Interface」后会出现「Dynamic Interface」可在此视图设计你自订的推播呈现方式(不能使用Button):
我的自订推播呈现设计
1
2
3
4
5
6
7
8
9
10
11
12
13
14
15
16
17
18
19
20
21
22
23
24
25
26
27
28
29
30
31
32
33
34
35
36
37
38
39
40
41
42
43
44
45
46
47
48
49
50
51
52
53
54
55
56
57
58
59
import WatchKit
import Foundation
import UserNotifications
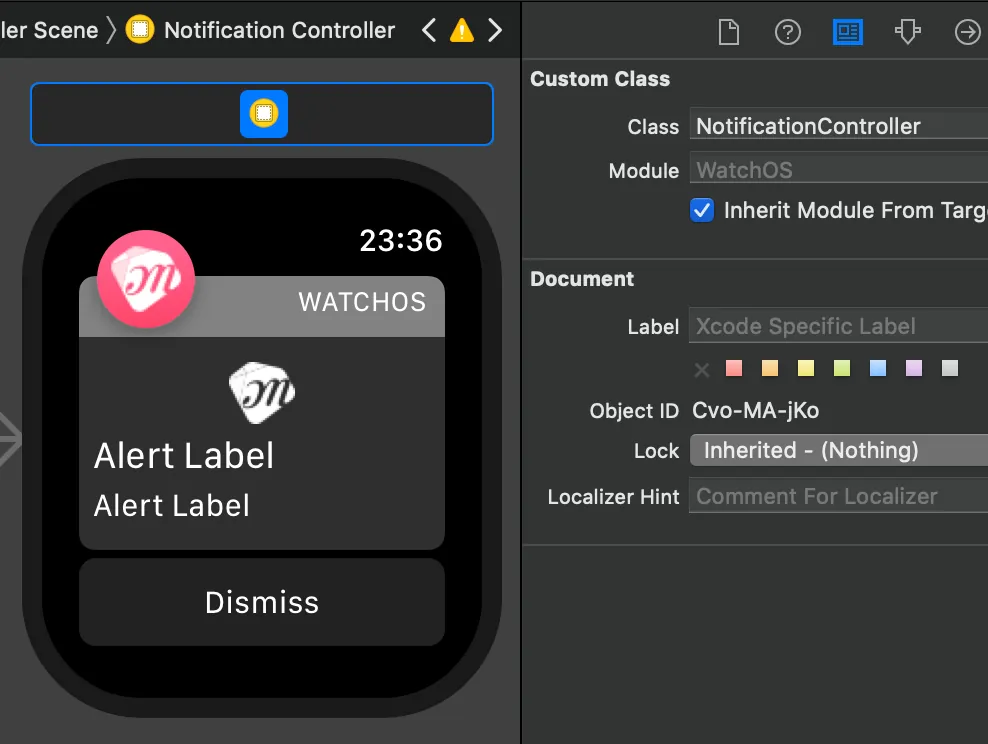
class NotificationController: WKUserNotificationInterfaceController {
@IBOutlet var imageView: WKInterfaceImage!
@IBOutlet var titleLabel: WKInterfaceLabel!
@IBOutlet var contentLabel: WKInterfaceLabel!
override init() {
// Initialize variables here.
super.init()
self.setTitle("结婚吧") //设定右上方标题
// Configure interface objects here.
}
override func willActivate() {
// This method is called when watch view controller is about to be visible to user
super.willActivate()
}
override func didDeactivate() {
// This method is called when watch view controller is no longer visible
super.didDeactivate()
}
override func didReceive(_ notification: UNNotification) {
if #available(watchOSApplicationExtension 5.0, *) {
self.notificationActions = []
//清除iOS实做的UNUserNotificationCenter.setNotificationCategories在通知下方增加的按钮
}
guard let info = notification.request.content.userInfo["aps"] as? NSDictionary,let alert = info["alert"] as? Dictionary<String,String> else {
return
}
//推播资讯
self.titleLabel.setText(alert["title"])
self.contentLabel.setText(alert["body"])
if #available(watchOSApplicationExtension 5.0, *) {
if alert["type"] == "new_msg" {
//如果是新讯息推播则在通知下方增加回复按钮
self.notificationActions = [UNNotificationAction(identifier: "replyAction",title: "回复", options: [.foreground])]
} else {
//其他则增加查看按钮
self.notificationActions = [UNNotificationAction(identifier: "openAction",title: "查看", options: [.foreground])]
}
}
// This method is called when a notification needs to be presented.
// Implement it if you use a dynamic notification interface.
// Populate your dynamic notification interface as quickly as possible.
}
}
程式部分,ㄧ样拉outlet到controller并实做功能
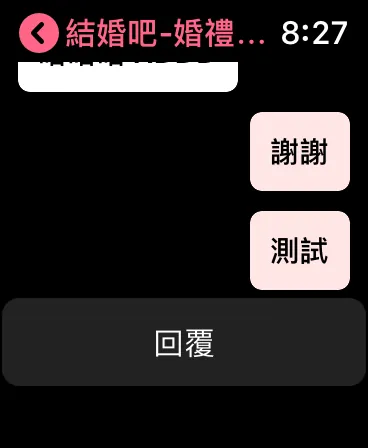
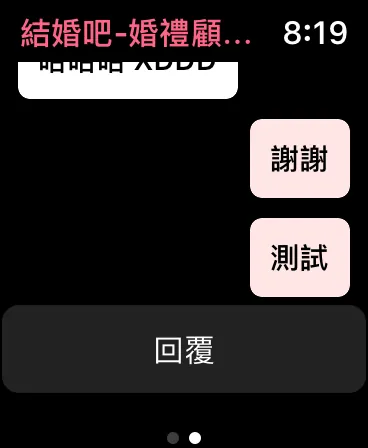
再来讲到interactive,同dynamic,只是能多加Button,能跟dynamic设同个Class控制程式;interactive我没有使用,因为我的按钮是用程式self.notificationActions加上去的,差异如下:
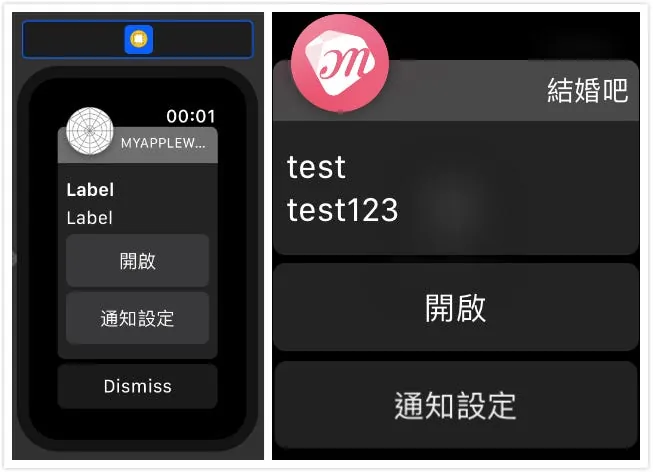
左使用interactive,右使用self.notificationActions
两个做法都需watchOS ≥ 5 支援.
使用self.notificationActions增加按钮则按钮事件处理由ExtensionDelegate中的 userNotificationCenter(_ center: UNUserNotificationCenter, didReceive response: UNNotificationResponse, withCompletionHandler completionHandler: @escaping () -> Void) 处理,并以identifier识别动作
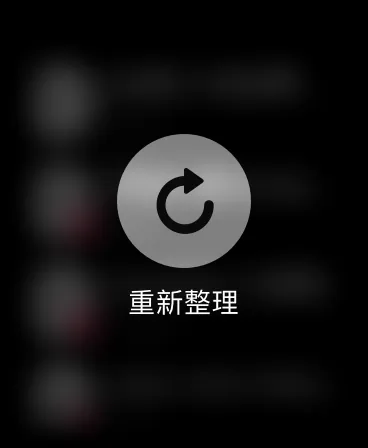
选单功能?
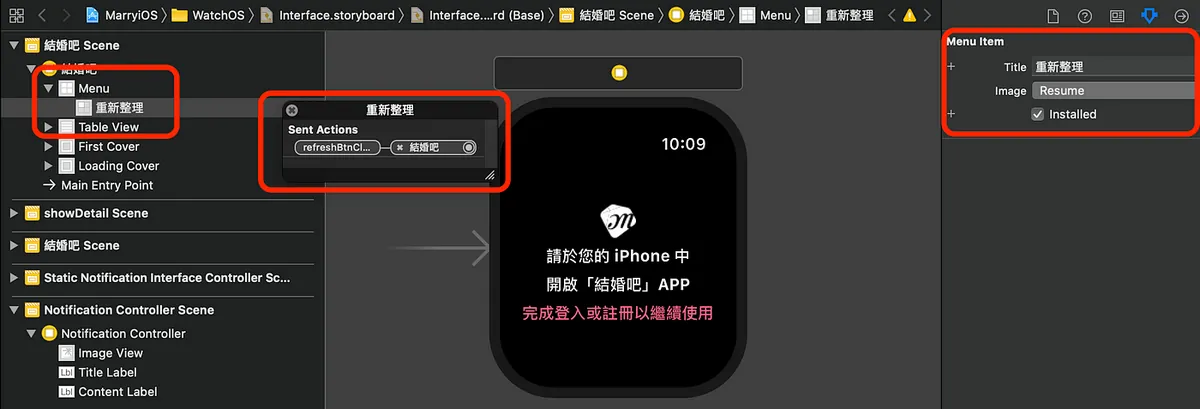
在元件库中拉入Menu,再拉入选单项目Menu Item,再拉IBAction到程式控制
在页面重压就会出现:
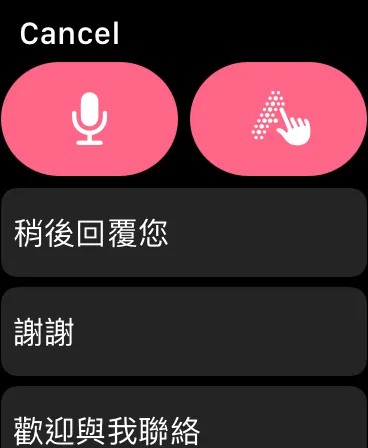
内容输入?
使用内建的presentTextInputController方法即可!
1
2
3
4
5
6
7
8
9
10
11
12
13
14
15
16
17
18
19
20
21
22
23
24
25
26
27
28
29
@IBAction func replyBtnClick() {
    guard let target = target else {
        return
    }

    self.presentTextInputController(withSuggestions: ["稍后回复您","谢谢","欢迎与我联络","好的","OK!"], allowedInputMode: WKTextInputMode.plain) { (results) in

        guard let results = results else {
            return
        }
        //有输入值时

        let txts = results.filter({ (txt) -> Bool in
            if let txt = txt as? String,txt != "" {
                return true
            } else {
                return false
            }
        }).map({ (txt) -> String in
            return txt as? String ?? ""
        })
        //预处理输入


        txts.forEach({ (txt) in
            print(txt)
        })
    }
}
总结
谢谢你看到这!辛苦了!
到这里文章已告一段落,大略提了一下UI排版、程式、推播、介面应用部分,有开发过iOS的上手真的很快,几乎差不多而且许多方法都做了简化使用起来更简洁,但能做的事确实也变少了(像是目前还不知道怎么针对Table做载入更多);目前能做的事确实很少,希望官方在未来能开放更多API给开发者使用❤️❤️❤️
MurMur:
{:target="_blank"}](/assets/e85d77b05061/1*-J9qZ846ZysJEhMTSZeE3w.webp)
Apple Watch App Target 部署到手表真的有够慢 — Narcos
有任何问题及指教欢迎 与我联络 。

本文首次发表于 Medium (点击查看原始版本),由 ZMediumToMarkdown 提供自动转换与同步技术。