Swift iOS电话辨识实作|Call Directory Extension离线号码标记完整攻略
针对iOS开发者,解决无法即时辨识来电的痛点,透过Swift与Call Directory Extension离线资料库技术,打造本地电话号码标记功能,提升用户接听体验并避免漏接重要来电。
Click here to view the English version of this article.
點擊這裡查看本文章正體中文版本。
基于 SEO 考量,本文标题与描述经 AI 调整,原始版本请参考内文。
文章目录
自己的电话自己辨识(Swift)
iOS自干 Whoscall 来电辨识、电话号码标记 功能
起源
一直以来都是Whoscall的忠实用户,从原本用Android手机时就有使用,能够非常即时的显示陌生来电资讯,当下就能直接决定接通与否;后来转跳苹果阵营,第一只苹果手机是iPhone 6 (iOS 9),那时在使用Whoscall上非常别扭,无法即时辨识电话,要复制电话号码去APP查询,后期Whoscall提供将陌生电话资料库安装在本地手机的服务,虽然能解决即时辨识的问题,但很容易就弄乱你的手机通讯录!
直到 iOS 10+ 之后苹果开放电话辨识功能(Call Directory Extension)权限给开发者,才使whoscall目前至少就体验来说已和Android版无太大缺别,甚至超越Android版(Android版广告超多,但以开发者的立场是可以理解的)
用途?
Call Directory Extension 能做到什么呢?
电话 拨打 辨识标记
电话 来电 辨识标记
通话纪录 辨识标记
电话 拒接 黑名单设置
限制?
使用者需手动进入「设定」「电话」「通话封锁与识别」打开您的APP才能使用
仅能以离线资料库方式辨识电话(无法即时取得来电资讯然后Call API查询,仅能预先写入号码<->名称对应在手机资料库中) *也因此Whoscall会定期推播请使用者开APP更新来电辨识资料库
数量上限?目前没查到资料,应该是依照使用者手机容量无特别上限;但是数量多得辨识清单、封锁清单要分批处理写入!
软体限制:iOS 版本需 ≥ 10
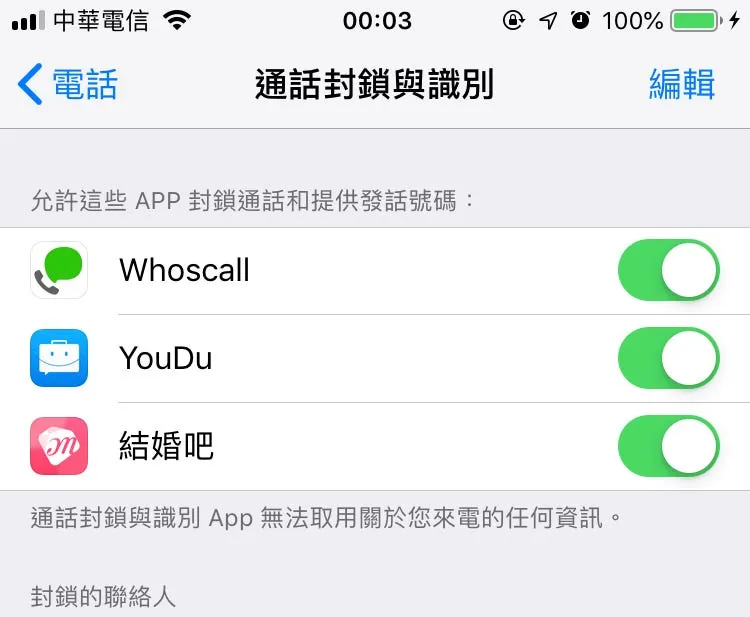
「设定」->「电话」->「通话封锁与识别」
应用场景?
通讯软体、办公室通讯软体;在APP内你可能有对方的联络人,但实际并未将手机号码加入手机通讯录中,这个功能就能避免同事甚至老板来电时,被当陌生电话,结果漏接.
敝站( 结婚吧 )或敝私的( 591房屋交易 ),使用者与店家或房东联系时所拨打的电话都是我们的转接号码,经由转接中心在转拨到目标电话,大致流程如下:
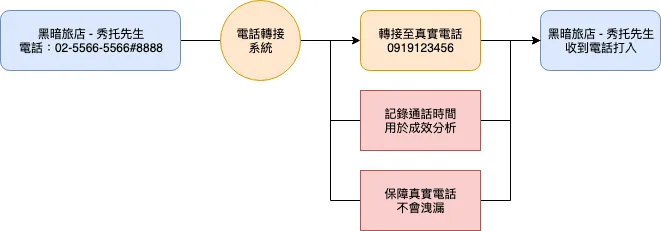
使用者所拨打的电话都是转接中心代表号( #分机),不会知道真实的电话号码;一方面是保护个资隐私、另一方面也能知道有多少人联络商家(评估成效)甚至能知道是在哪看到然后拨打的(EX:网页显示#1234,APP显示#5678)、还有也能推免费服务,由我方吸收电话通信费用.
但此做法会带来ㄧ项不可避免的问题,就是电话号码凌乱;无法辨识出是打给谁或是店家回拨时,使用者不知道来电者是谁,透过使用电话辨识功能就能大大解决这个问题,提升使用者体验!
直接上一张成品图:
{:target="_blank"}](/assets/ac557047d206/1*WEUjz38cymEtywWDvm86vg.webp)
可以看到在输入电话、电话来电时能直接显示辨识结果、通话记录列表也不在乱糟糟ㄧ样能在下方显示辨识结果.
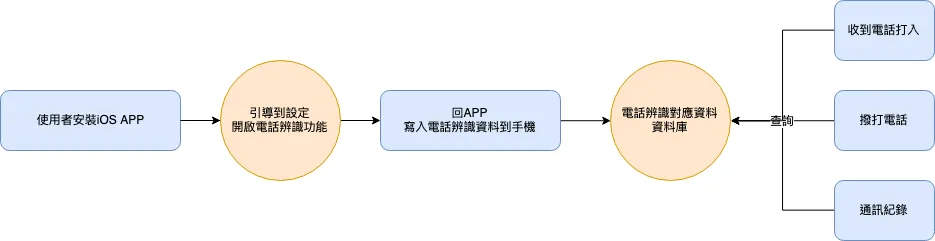
Call Directory Extension 电话辨识功能运作流程:
开工:
让我们开始动手做吧!
1.为 iOS 专案加入 Call Directory Extension

Xcode -> File -> New -> Target
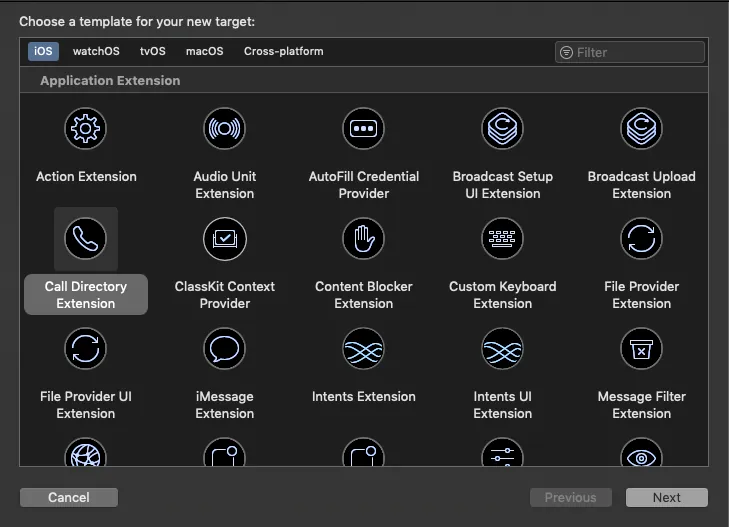
选择 Call Directory Extension
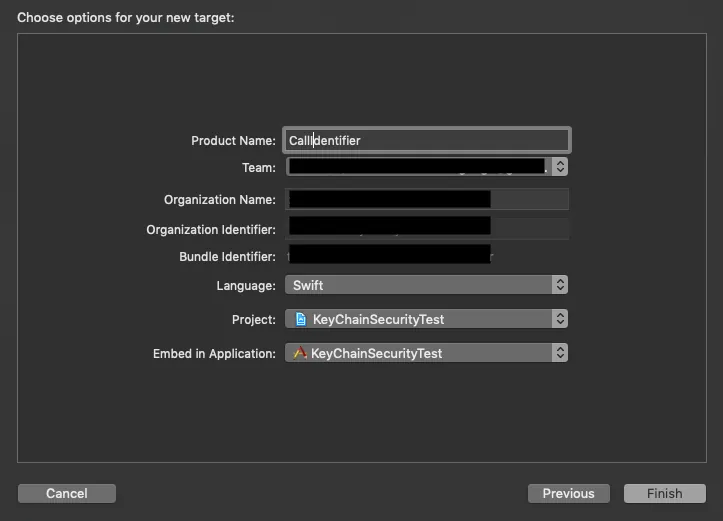
输入Extension名称

可顺带加入 Scheme 方便 Debug

目录底下就会出现Call Directory Extension的资料夹及程式
2.开始编写 Call Directory Extension 相关程式
首先回到主 iOS 专案上
第一个问题是我们该如何判断使用者的装置支不支援Call Directory Extension或是设定中的「通话封锁与识别」是否已经打开:
1
2
3
4
5
6
7
8
9
10
11
12
13
14
15
import CallKit
//
//......
//
if #available(iOS 10.0, *) {
    CXCallDirectoryManager.sharedInstance.getEnabledStatusForExtension(withIdentifier: "这里输入call directory extension的bundle identifier", completionHandler: { (status, error) in
        if status == .enabled {
          //启用中
        } else if status == .disabled {
          //未启用
        } else {
          //未知,不支援
        }
    })
}
前面有提到,来电辨识的运作方式是要在本地维护一个辨识资料库;再来就是重头戏该如何达成这个功能?
很遗憾,您无法直接对Call Directory Extension进行呼叫写入资料,所以你需要多维护一层对应结构,然后Call Directory Extension再去读取你的结构再写入辨识资料库中,流程如下:

意旨我们需要多维护一个自己的资料库文件,再让Extenstion去读取写入到手机中
那所谓的辨识资料、档案该长怎样?
其实就是个Dictionary结构,如:[“电话”:”王大明”]
存在本地的档案可用一些Local DB(但Extension那边也要能装能用),这边是直接存一个.json档在手机里; 不建议直接存在UserDefaults,如果是测试或资料很少可以,实际应用强烈不建议!
好的,开始:
1
2
3
4
5
6
7
8
9
10
11
12
13
14
15
16
if #available(iOS 10.0, *) {
    if let dir = FileManager.default.containerURL(forSecurityApplicationGroupIdentifier: "你的跨Extesion,Group Identifier名称") {
        let fileURL = dir.appendingPathComponent("phoneIdentity.json")
        var datas:[String:String] = ["8869190001234":"李先生","886912002456":"大帅"]
        if let content = try? String(contentsOf: fileURL, encoding: .utf8),let text = content.data(using: .utf8),let json2 = try? JSONSerialization.jsonObject(with: text, options: .mutableContainers) as? Dictionary<String,String>,let json = json2 {
            datas = json
        }
        if let data = jsonToData(jsonDic: datas) {
            DispatchQueue(label: "phoneIdentity").async {
                if let _ = try? data.write(to: fileURL) {
                    //写入json档完成
                }
            }
        }
    }
}
就只是一般的本地档案维护,要注意的就是目录需要在Extesion也能读取的地方。
补充 — 电话号码格式:
台湾地区市话、手机都需去掉0以886代替:如 0255667788 -> 886255667788
电话格式是纯数字组合的字串,勿夹杂「-」、「,」、「#」…等符号
市话电话如有包含要辨识到 分机 ,直接接在后面即可不需带任何符号:如 0255667788,0718 -> 8862556677880718
将一般iOS电话格式转换成辨识资料库可接受格式可参考以下两个取代方法:
1
2
3
4
5
6
7
var newNumber = "0255667788,0718"
if let regex = try? NSRegularExpression(pattern: "^0{1}") {
    newNumber = regex.stringByReplacingMatches(in: newNumber, options: [], range: NSRange(location: 0, length: newNumber.count), withTemplate: "886")
}
if let regex = try? NSRegularExpression(pattern: ",") {
    newNumber = regex.stringByReplacingMatches(in: newNumber, options: [], range: NSRange(location: 0, length: newNumber.count), withTemplate: "")
}
再来就是如流程,辨识资料已维护好;需要通知Call Directory Extension去刷新手机那边的资料:
1
2
3
4
5
6
7
8
9
10
11
12
13
14
15
16
17
18
19
20
21
22
23
24
25
26
27
28
29
30
31
32
if #available(iOS 10.0, *) {
    CXCallDirectoryManager.sharedInstance.reloadExtension(withIdentifier: "tw.com.marry.MarryiOS.CallDirectory") { errorOrNil in
        if let error = errorOrNil as? CXErrorCodeCallDirectoryManagerError {
            print("reload failed")

            switch error.code {
            case .unknown:
                print("error is unknown")
            case .noExtensionFound:
                print("error is noExtensionFound")
            case .loadingInterrupted:
                print("error is loadingInterrupted")
            case .entriesOutOfOrder:
                print("error is entriesOutOfOrder")
            case .duplicateEntries:
                print("error is duplicateEntries")
            case .maximumEntriesExceeded:
                print("maximumEntriesExceeded")
            case .extensionDisabled:
                print("extensionDisabled")
            case .currentlyLoading:
                print("currentlyLoading")
            case .unexpectedIncrementalRemoval:
                print("unexpectedIncrementalRemoval")
            }
        } else if let error = errorOrNil {
            print("reload error: \(error)")
        } else {
            print("reload succeeded")
        }
    }
}
使用以上方法通知Extension刷新,并取得执行结果。(这时候会呼叫执行Call Directory Extension里的beginRequest,请继续往下看)
主 iOS 专案的程式就到这了!
3.开始修改 Call Directory Extension 的程式
打开Call Directory Extension 目录,找到底下已经帮你建立好的档案 CallDirectoryHandler.swift
能实作的方法只有 beginRequest 当要处理手机电话资料时的动作,预设范例都把我们建好了,不太需要去动:
addAllBlockingPhoneNumbers :处理加入黑名单号码(全新增)
addOrRemoveIncrementalBlockingPhoneNumbers :处理加入黑名单号码(递增方式)
addAllIdentificationPhoneNumbers :处理加入来电辨识号码(全新增)
addOrRemoveIncrementalIdentificationPhoneNumbers :处理加入来电辨识号码(递增方式)
我们只要完成以上的Function实作即可,黑名单功能跟来电辨识方式原理都ㄧ样这边就不多作介绍.
1
2
3
4
5
6
7
8
9
10
11
12
13
14
15
16
17
18
19
20
21
22
23
24
25
26
27
28
29
30
31
32
33
34
35
36
37
38
39
40
41
42
43
44
45
46
47
48
49
50
51
52
53
54
private func fetchAll(context: CXCallDirectoryExtensionContext) {
    if let dir = FileManager.default.containerURL(forSecurityApplicationGroupIdentifier: "你的跨Extesion,Group Identifier名称") {
        let fileURL = dir.appendingPathComponent("phoneIdentity.json")
        if let content = try? String(contentsOf: fileURL, encoding: .utf8),let text = content.data(using: .utf8),let numbers = try? JSONSerialization.jsonObject(with: text, options: .mutableContainers) as? Dictionary<String,String> {
            numbers?.sorted(by: { (Int($0.key) ?? 0) < Int($1.key) ?? 0 }).forEach({ (obj) in
                if let number = CXCallDirectoryPhoneNumber(obj.key) {
                    autoreleasepool{
                        if context.isIncremental {
                            context.removeIdentificationEntry(withPhoneNumber: number)
                        }
                        context.addIdentificationEntry(withNextSequentialPhoneNumber: number, label: obj.value)
                    }
                }
            })
        }
    }
}

private func addAllIdentificationPhoneNumbers(to context: CXCallDirectoryExtensionContext) {
    // Retrieve phone numbers to identify and their identification labels from data store. For optimal performance and memory usage when there are many phone numbers,
    // consider only loading a subset of numbers at a given time and using autorelease pool(s) to release objects allocated during each batch of numbers which are loaded.
    //
    // Numbers must be provided in numerically ascending order.
    //        let allPhoneNumbers: [CXCallDirectoryPhoneNumber] = [ 1_877_555_5555, 1_888_555_5555 ]
    //        let labels = [ "Telemarketer", "Local business" ]
    //
    //        for (phoneNumber, label) in zip(allPhoneNumbers, labels) {
    //            context.addIdentificationEntry(withNextSequentialPhoneNumber: phoneNumber, label: label)
    //        }
    fetchAll(context: context)
}

private func addOrRemoveIncrementalIdentificationPhoneNumbers(to context: CXCallDirectoryExtensionContext) {
    // Retrieve any changes to the set of phone numbers to identify (and their identification labels) from data store. For optimal performance and memory usage when there are many phone numbers,
    // consider only loading a subset of numbers at a given time and using autorelease pool(s) to release objects allocated during each batch of numbers which are loaded.
    //        let phoneNumbersToAdd: [CXCallDirectoryPhoneNumber] = [ 1_408_555_5678 ]
    //        let labelsToAdd = [ "New local business" ]
    //
    //        for (phoneNumber, label) in zip(phoneNumbersToAdd, labelsToAdd) {
    //            context.addIdentificationEntry(withNextSequentialPhoneNumber: phoneNumber, label: label)
    //        }
    //
    //        let phoneNumbersToRemove: [CXCallDirectoryPhoneNumber] = [ 1_888_555_5555 ]
    //
    //        for phoneNumber in phoneNumbersToRemove {
    //            context.removeIdentificationEntry(withPhoneNumber: phoneNumber)
    //        }

    //context.removeIdentificationEntry(withPhoneNumber: CXCallDirectoryPhoneNumber("886277283610")!)
    //context.addIdentificationEntry(withNextSequentialPhoneNumber: CXCallDirectoryPhoneNumber("886277283610")!, label: "TEST")

    fetchAll(context: context)
    // Record the most-recently loaded set of identification entries in data store for the next incremental load...
}
因为敝站的资料不会到太多而且我的本地资料结构相当简易,无法做到递增;所以这边 统一都用全新增的方式,如是递增方式则要先删除旧的(这步很重要不然会reload extensiton失败!)
完工!
到此为止就完成啰!实作方面非常简单!
Tips:
如果在「设定」「电话」「通话封锁与识别」打开APP时一直转或是打开后无法辨识号码,可先确认号码是否正确、本地维护的.json资料是否正确、reload extensiton是否成功;或重开机试试,都找不出来可以选call directory extension的Scheme Build 看看错误讯息.
这个功能 最困难的点不是程式方面而是要引导使用者手动去设定打开 ,具体方式及引导可参考whoscall:
{:target="_blank"}](/assets/ac557047d206/1*L0EKptoSnE88lB8uEN7H3A.webp)
有任何问题及指教欢迎 与我联络 。

本文首次发表于 Medium (点击查看原始版本),由 ZMediumToMarkdown 提供自动转换与同步技术。