

Start!
1. Go to the Template Repo -> medium-to-jekyll-starter.github.io
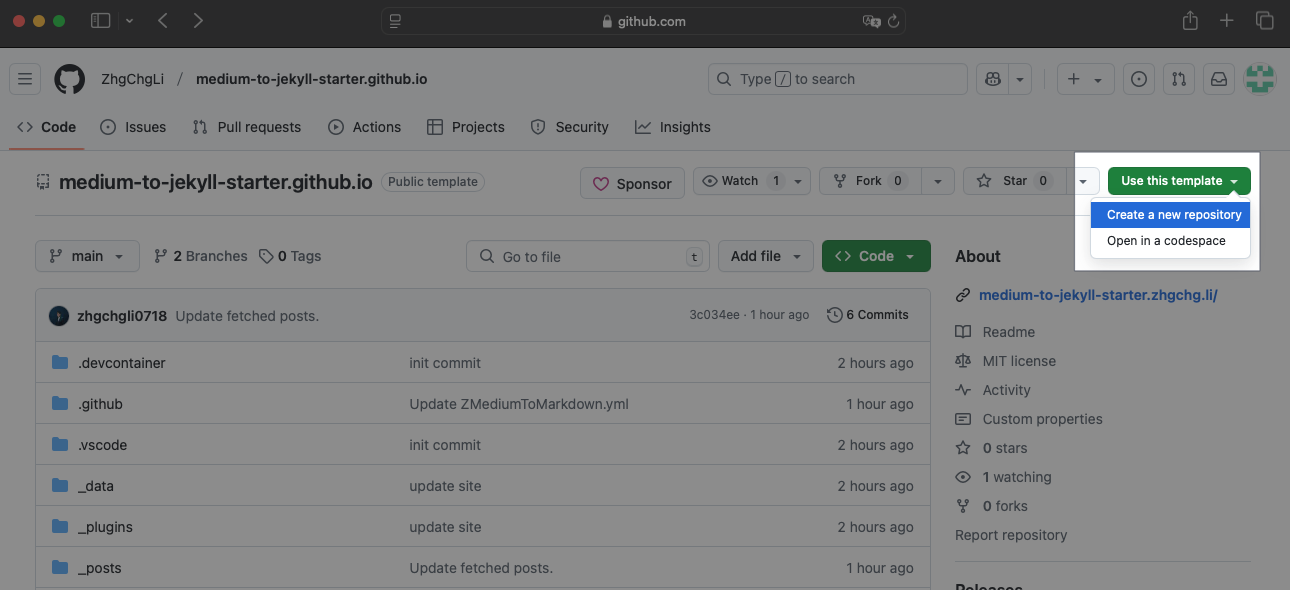
Click the top right corner “Use this template” -> “Create a new repository”
2. Create a new repository

-
Repository name: Usually
username or organization.github.io, must end with*.github.io. -
The repository must be
Publicto use GitHub Pages.
Adjust GitHub Actions Execution Permissions

- After creation, due to GitHub’s security settings, you need to enable GitHub Actions execution permissions in the repository settings.
3. Create gh-pages branch if needed

-
On the Repo homepage, click the “
main” branch dropdown, type “gh-pages”, and if it doesn’t exist, select “Create branchgh-pagesfrommain”. -
If the
gh-pagesbranch already exists, or you see the message “Sorry, that branch already exists.” when creating it, you can skip this step.
4. Enable Github Pages, go to Settings -> Pages -> Build and deployment
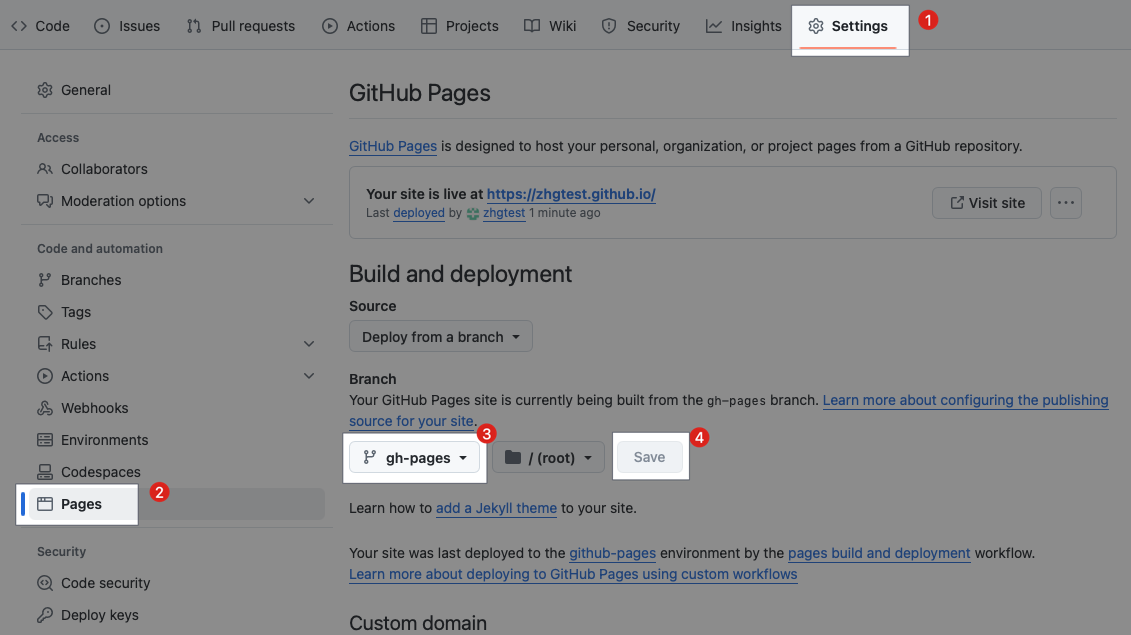
- Select the
gh-pagesbranch and clickSaveto save the settings
Run the First Deployment
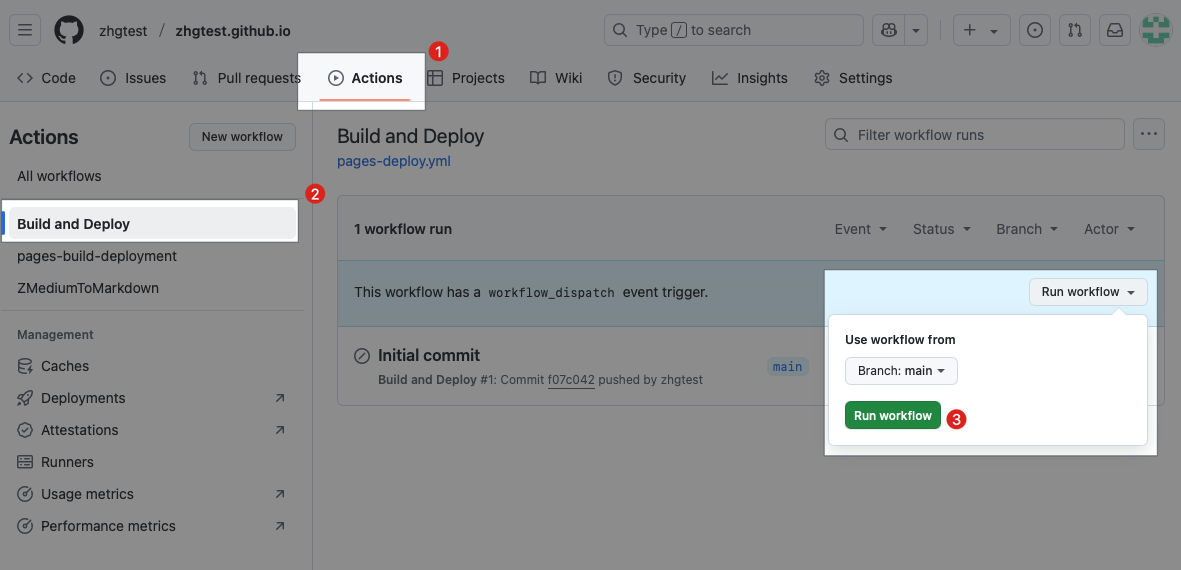
- Repo -> “Actions” -> “Build and Deploy” -> “Run workflow” -> “Branch: main, Run workflow”
5. Wait for All Deployment Jobs to Complete
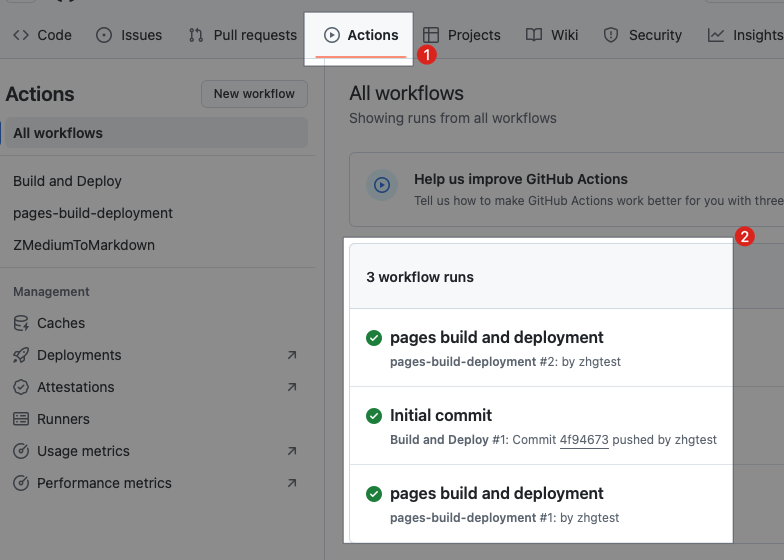
- 🟢 pages build and deployment
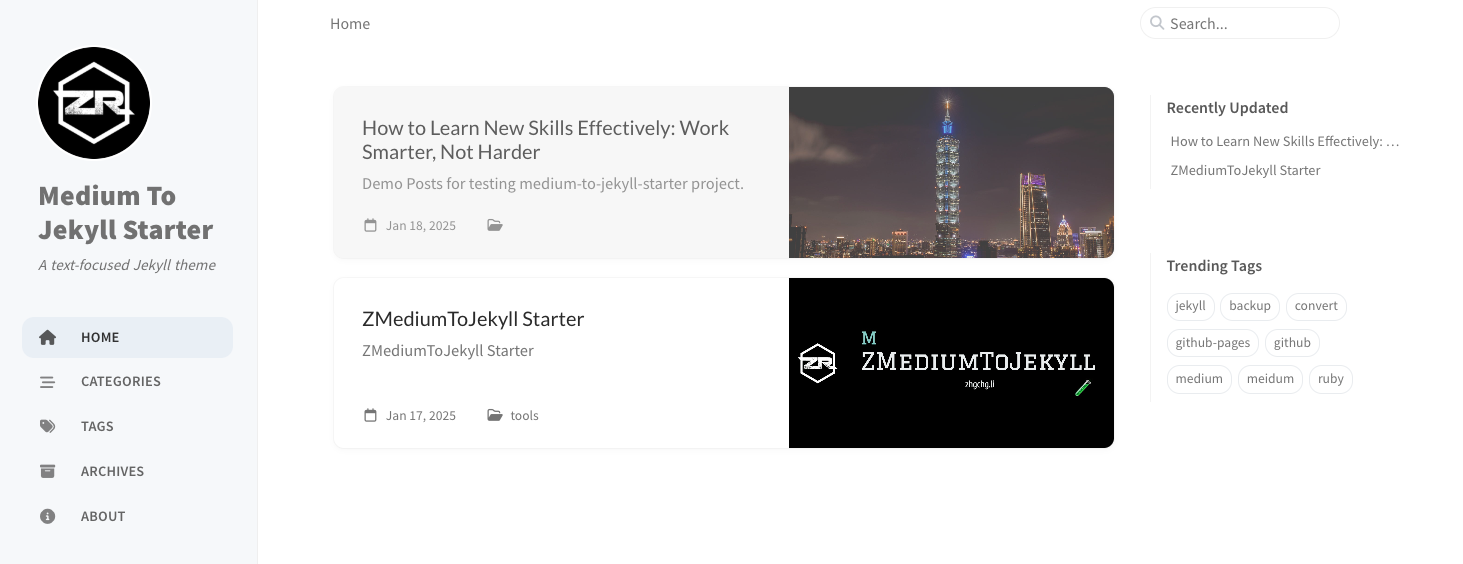
6. Visit the Website to See the Results
https://
username-or-organization.github.io
Troubleshooting
If the page only displays:
--- layout: home # Index page ---
This indicates a GitHub Pages configuration error, ongoing deployment, or cached previous page. Please use a hard refresh or open the webpage in an incognito browser window.
First deployment successful! 🎉🎉🎉 Please continue setting up synchronization with your Medium account.
Github Repo (Github Actions) Setup
1. Go to your Github Repo’s Github Actions page -> Click “ZMediumToMarkdown” -> Click “ZMediumToMarkdown.yml”
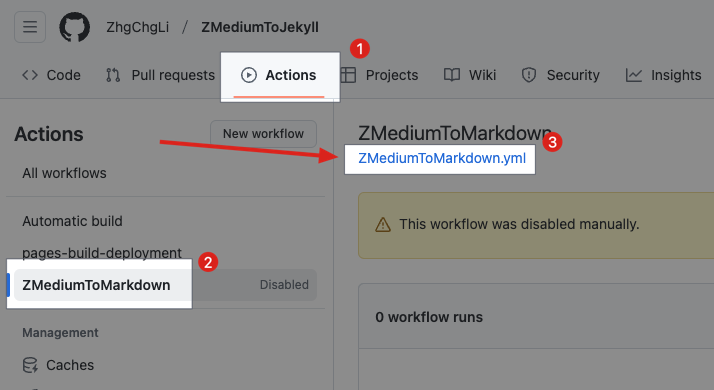
https://github.com/{ORG}/{REPO_NAME}/blob/main/.github/workflows/ZMediumToMarkdown.yml
2. Click the Edit Button on the Right

3. Set Parameters for Automatic Medium Article Sync
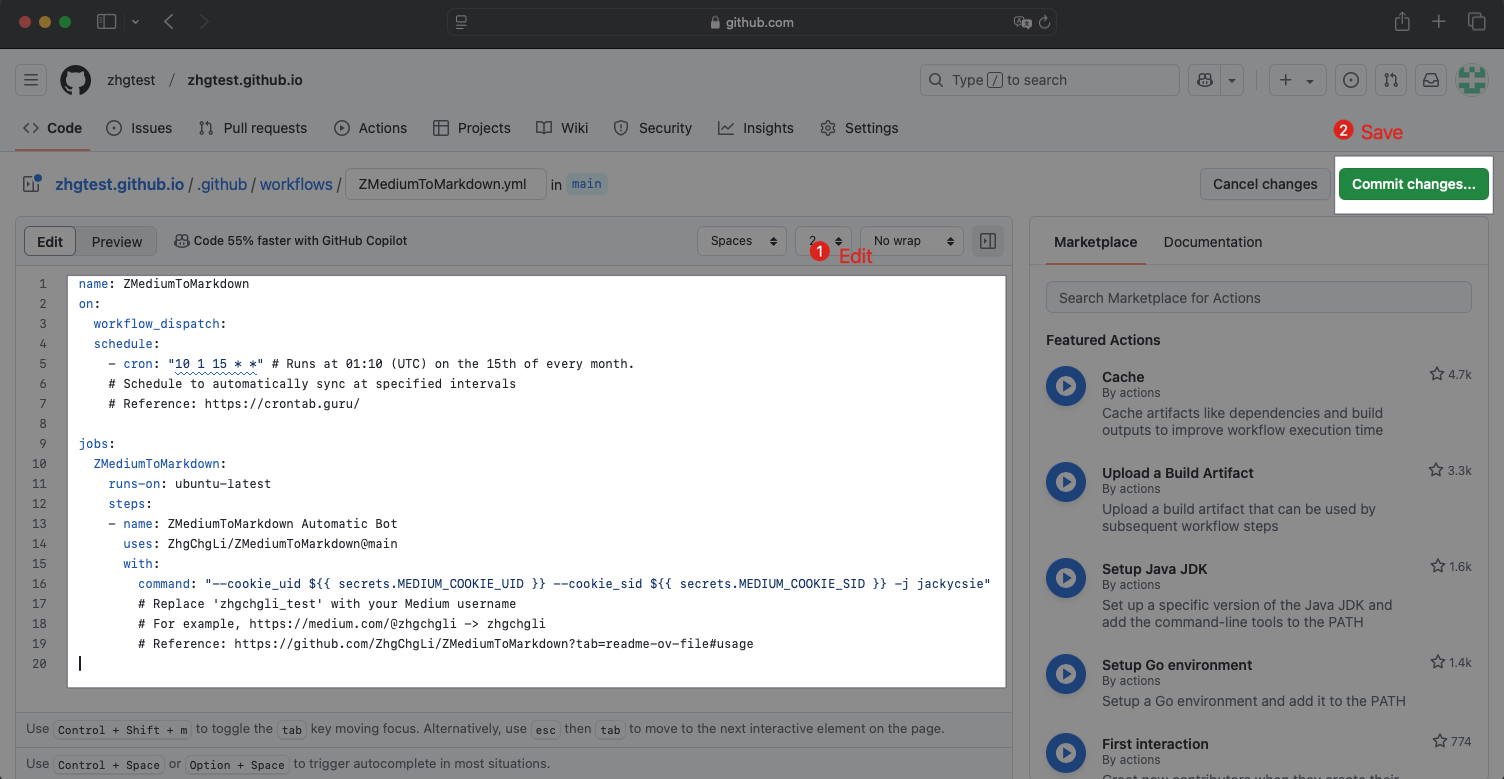
name: ZMediumToMarkdown
on:
  workflow_dispatch:
  schedule:
    - cron: "10 1 15 * *" # Runs at 01:10(UTC), every day.
    # Set how often to auto-sync
    # ref: https://crontab.guru/

jobs:
  ZMediumToMarkdown:
    runs-on: ubuntu-latest
    steps:
    - name: ZMediumToMarkdown Automatic Bot
      uses: ZhgChgLi/ZMediumToMarkdown@main
      with:
        command: "--cookie_uid ${{ secrets.MEDIUM_COOKIE_UID }} --cookie_sid ${{ secrets.MEDIUM_COOKIE_SID }} -j zhgchgli_test"
        # Replace zhgchgli_test with your Medium username
        # For example https://medium.com/@zhgchgli -> zhgchgli
        # ref: https://github.com/ZhgChgLi/ZMediumToMarkdown?tab=readme-ov-file#usage
Provide Medium account cookies with access permissions.
-
If you have articles behind a paywall, you must provide
-
If you find that Medium article synchronization is incomplete (missing articles), it means the synchronization was blocked by Medium’s firewall and you must also provide
Steps to Obtain Medium Account Cookies MEDIUM_COOKIE_UID & MEDIUM_COOKIE_SID:

-
Log in to a Medium account with access rights and go to the Medium dashboard
-
Right-click on the blank area
-
Select “Inspect”
-
After the Developer Console appears, select “Application”
-
Select “Cookies” -> “https://medium.com”
-
Scroll down to find “
sid” and “uid” -
Double-click to copy the values of these two fields
Securely Store Medium Account Cookies in GitHub Repo Secrets
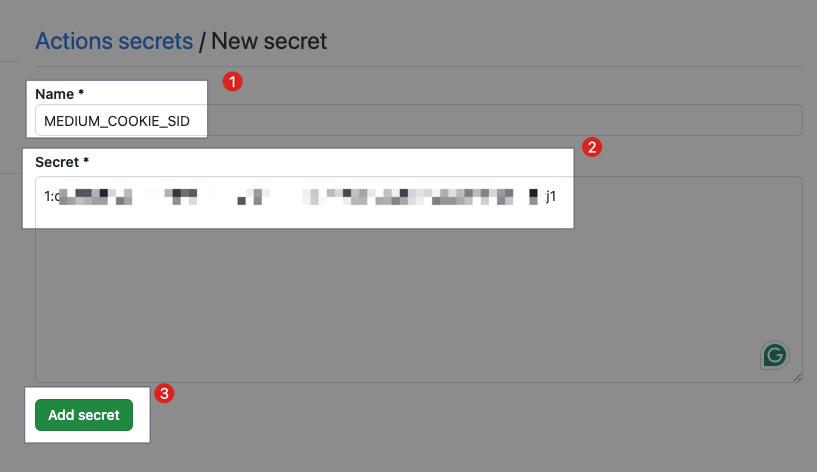
1. Go to Github Repo Settings -> Secrets and variables -> Actions -> New repository secret
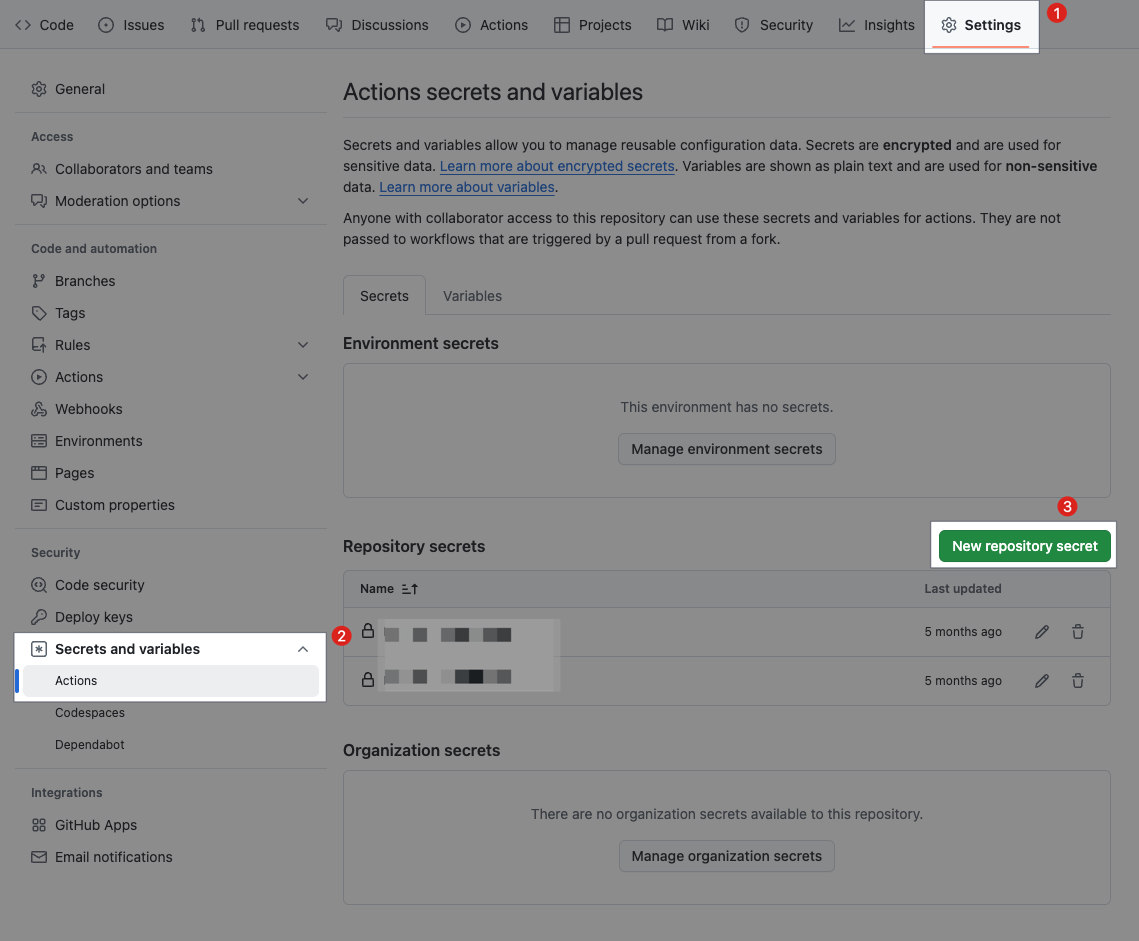
-
Name:
MEDIUM_COOKIE_SID -
Secret: Paste the
sidvalue of the Medium account copied in the previous step
https://github.com/{ORG}/{REPO_NAME}/settings/secrets/actions/new
2. New secret - MEDIUM_COOKIE_SID
3. New secret - MEDIUM_COOKIE_UID
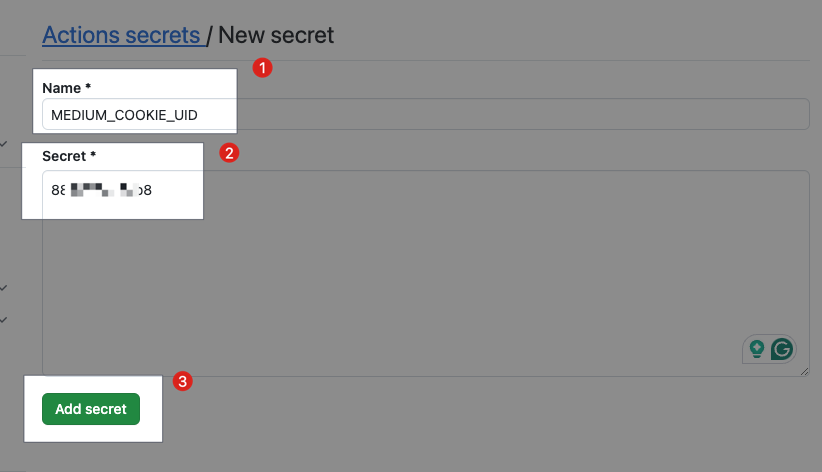
-
Name:
MEDIUM_COOKIE_UID -
Secret: Paste the
uidvalue copied from the previous step of the Medium account
Done
If the account is not explicitly logged out or encounters issues, the cookies will not expire.
If the following message appears during synchronization and the synced articles are incomplete:
This post is behind Medium's paywall. You must provide valid Medium Member login cookies to download the full post.
Indicates that the cookies have expired. Please follow the above steps to set them again.
4. First Manual Sync, Repo -> GitHub Actions -> Click “ZMediumToMarkdown” -> Click “Enable workflow”
For the first run, we can manually sync once to check if the settings are correct.

5. Wait for the Article Synchronization and Website Deployment to Complete
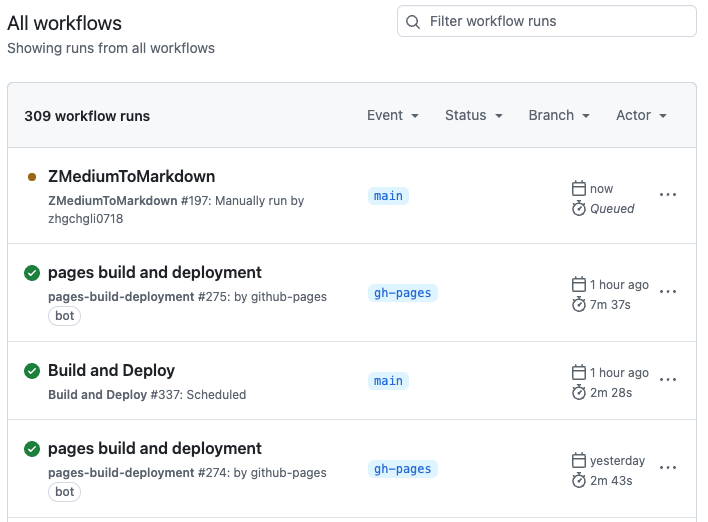
Wait for the following three Actions jobs to complete without errors:
-
🟢 ZMediumToMarkdown
-
🟢 pages build and deployment
-
🟢 Build and Deploy
6. Refresh the page to see the results, Enjoy!
⚠️ Attention! All file changes will trigger:
- 🟢 pages build and deployment
You need to wait for both deployment jobs above to complete before the website changes take effect.
Jekyll Website Configuration
Basic Website Setup
-
./_config.ymlBe sure to adjust the
url:to your GitHub Pages URL and other site settings. -
Share Feature Settings:
./_data/share.yml -
Define article author information:
./_data/authors.yml
Left Sidebar Settings
-
./tabs -
Footer link buttons:
./_data/contact.yml
Footer and Other Text Content Settings
./locales/{Lang}.ymldefault is/locales/en.yml
Local Testing
-
Make sure your environment has Ruby version 3.1 or higher installed and in use
-
cd ./ -
bundle install -
bundle exec jekyll s -
Go to http://127.0.0.1:4000/ to see the result
-
Press
Ctrl-cto stop.
*The basic site configuration files need to be re-run to take effect after adjustments.


Comments