App Reviews Monitoring Robot|ZReviewTender—Free Open Source Tool for Real-Time Feedback
Monitor app reviews instantly with ZReviewTender to boost team collaboration and enhance customer satisfaction through timely feedback on the latest user comments.
点击这里查看本文章简体中文版本。
點擊這裡查看本文章正體中文版本。
This post was translated with AI assistance — let me know if anything sounds off!
Table of Contents
ZReviewTender — Free Open-Source App Reviews Monitoring Bot
Real-time monitoring of the app’s latest review content and providing instant feedback to improve collaboration efficiency and customer satisfaction
{:target="_blank"} [ZReviewTender](https://github.com/ZhgChgLi/ZReviewTender){:target="_blank"}](/assets/e36e48bb9265/1*DjHhZ7Yq-rE3LkFDiYW9lg.webp)
ZhgChgLi / ZReviewTender
App Reviews to Slack Channel
ZReviewTender — Automatically monitors the latest user reviews for App Store iOS/macOS apps and Google Play Android apps, and provides continuous integration tools to connect with team workflows, improving collaboration efficiency and customer satisfaction.
Features
Obtain the review list of iOS/macOS apps from the App Store and Android apps from Google Play, then filter out the latest reviews that have not been crawled yet.
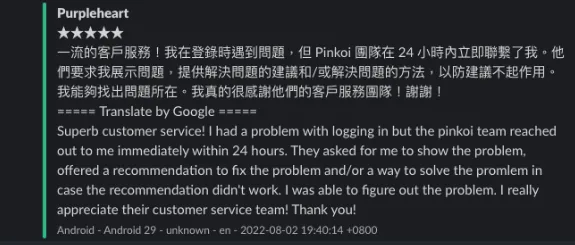
[Default Feature] Forward the latest crawled reviews to Slack. Clicking the message Timestamp link allows quick access to the backend to reply to reviews.
[Default Feature] Supports using Google Translate API to automatically translate reviews in languages or regions other than the specified one into your language
[Default Feature] Supports automatic logging of reviews to Google Sheet
Supports flexible expansion. Besides the included default features, you can develop and integrate additional functionalities according to your team’s workflow.
e.g. Forward reviews to Discord, Line, Telegram…Use timestamps to record crawl locations and prevent duplicate review scraping
Supports filtering features, allowing you to specify crawling only reviews with certain ratings, containing specific keywords, or from particular regions/languages.
Apple, based on the new App Store Connect API, provides a stable and reliable source for App Store app review data, unlike before when using XML data was unreliable or Fastlane Spaceship sessions expired and required regular manual maintenance.
Android also uses the official AndroidpublisherV3 API to fetch review data
Support deploying with Github Repo w/ Github Action, allowing you to quickly and freely create the ZReviewTender App Reviews bot
100% Ruby @ RubyGem
TL;DR [2024/09/27] Update
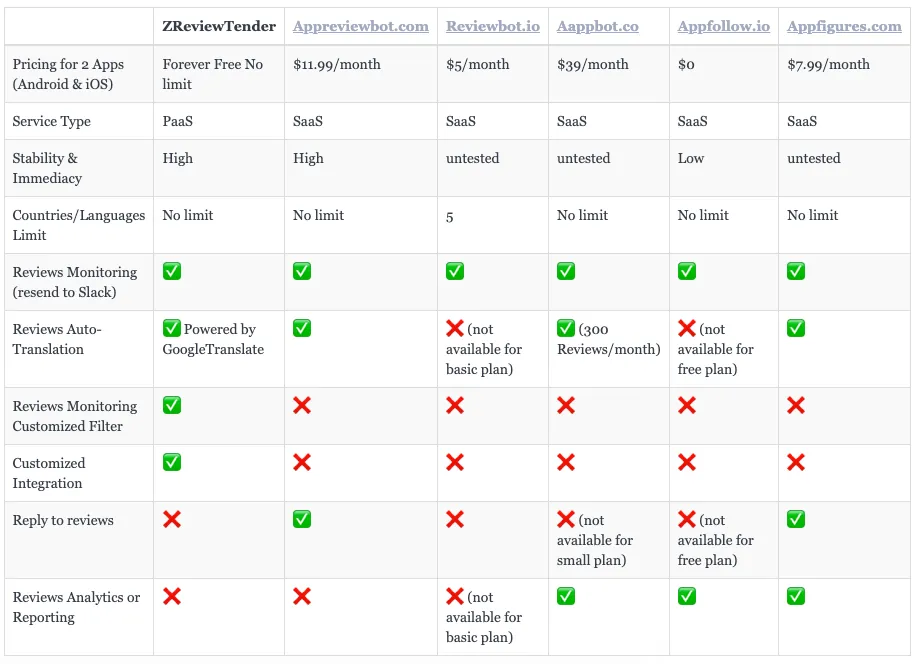
Comparison with Similar Services
App Reviews Workflow Integration Example (in Pinkoi)
Question:
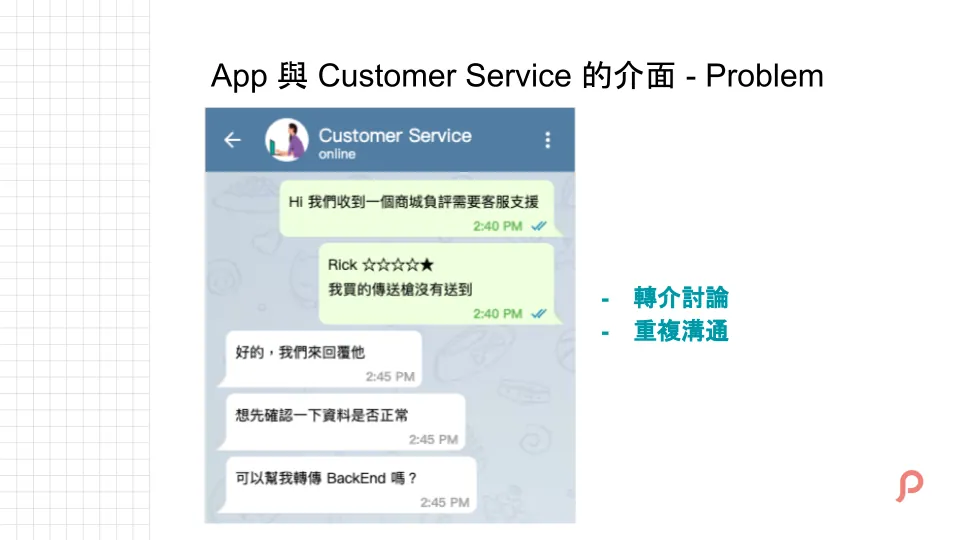
Product reviews in online stores are very important, but they involve a lot of manual and repetitive referral communication.
Because I need to manually check for new reviews from time to time, and if there are customer service issues, forward them to the support team for assistance, it becomes repetitive and manual.
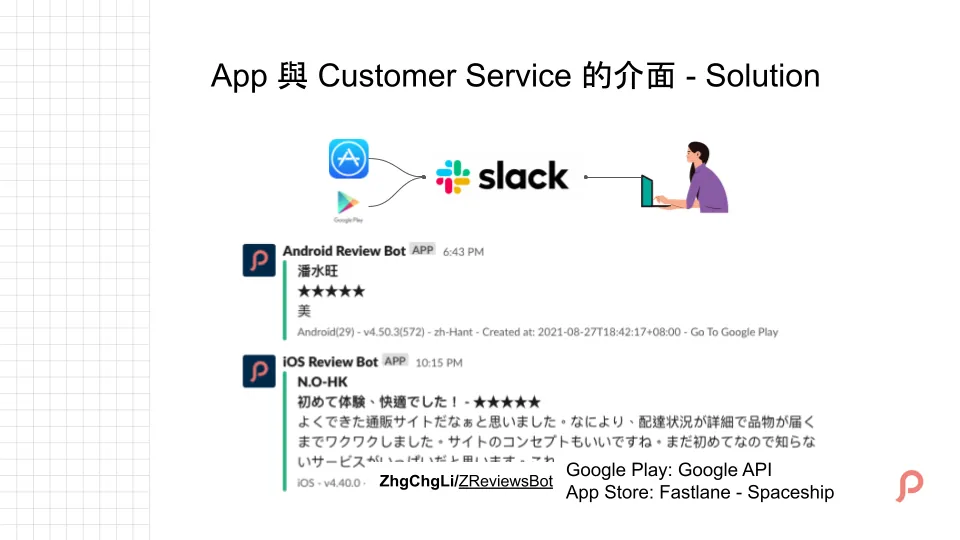
Using the ZReviewTender review bot, reviews are automatically forwarded to the Slack Channel, allowing everyone to quickly receive the latest review information and track and discuss it in real time. It also helps the entire team understand current user feedback and suggestions for the product.
For more information, please refer to: 2021 Pinkoi Tech Career Talk — Secrets of a High-Efficiency Engineering Team .
Deployment — Using Only Default Features
If you only need the default features of ZReviewTender (to Slack/Google Translate/Filter), you can use the following quick deployment method.
ZReviewTender has been packaged and released on RubyGems, allowing you to quickly and easily install and use ZReviewTender via RubyGems.
[Recommendation] Deploy Directly Using Github Repo Template
No hosting space required ✅
No environment requirements needed ✅
No need to understand engineering principles ✅
Complete the Config file setup to finish the deployment ✅
Complete deployment in 8 steps ✅
Completely Free ✅
GitHub Actions provides over 2,000 minutes of runtime per account each month. Running the ZReviewTender evaluation retrieval takes about 15 to 30 seconds each time.
By default, it runs every 6 hours, four times a day, using only about 60 minutes of your quota per month.
GitHub Private Repositories can be created for free without any limits.
- Go to the ZReviewTender Template Repo: ZReviewTender-deploy-with-github-action
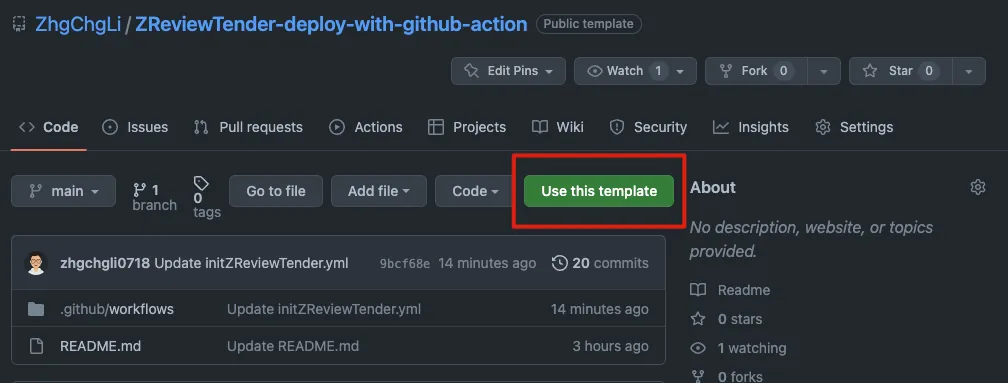
Click the “Use this template” button at the top right.
- Create Repo
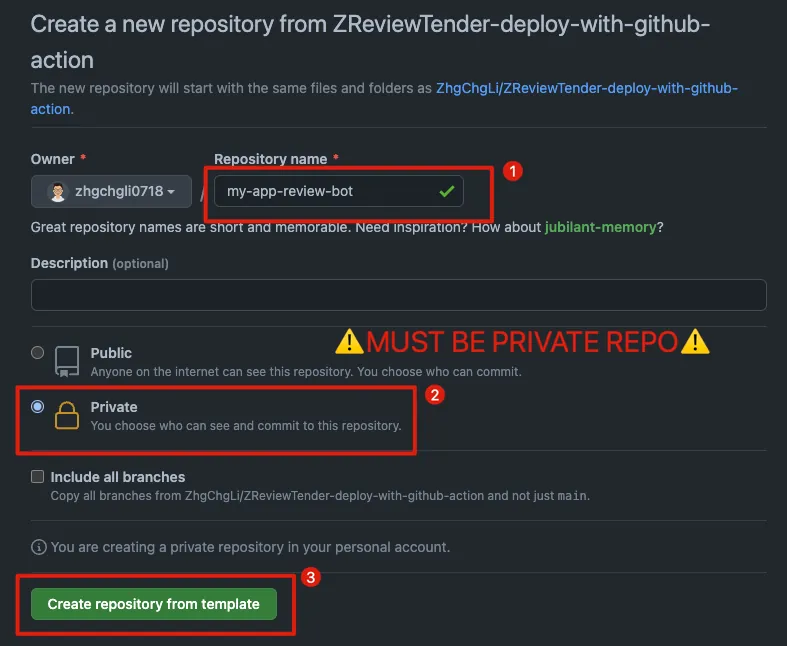
Repository name: Enter the desired Repo project name
Access: Private
⚠️⚠️ Please make sure to create a Private Repo ⚠️⚠️
Because you will upload the configuration and private key to the project
Finally, click the “Create repository from template” button below.
- Confirm that the Repo you created is a Private Repo
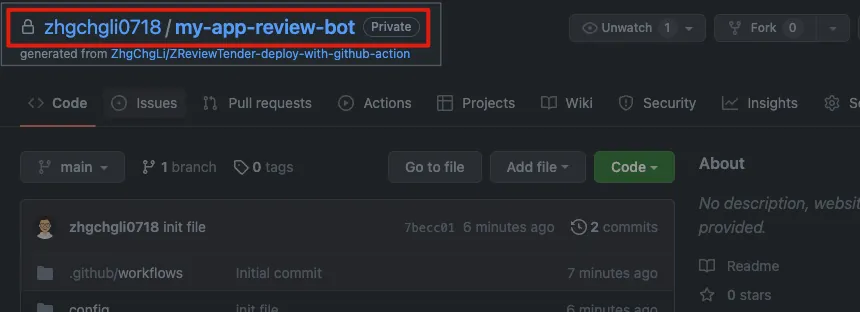
Confirm that the repo name in the top right shows the “🔒” icon and the Private label.
If not, it means the repository you created is a Public Repo and very risky. Please go to the top tab “Settings” -> “General” -> bottom “Danger Zone” -> “Change repository visibility” -> “Make private” to change it back to a Private Repo.
- Wait for the Project init to succeed
Can be found in the Repo homepage Readme under
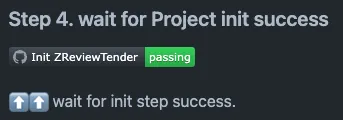
Check the block for the Badge; if it shows passing, it means the init was successful.
Or click the top tab “Actions” -> wait for the “Init ZReviewTender” Workflow to complete:
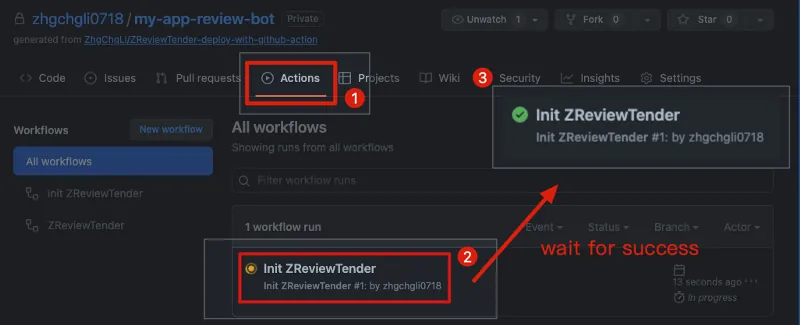
Execution status will change to 3 “✅ Init ZReviewTender” -> Project init successful.
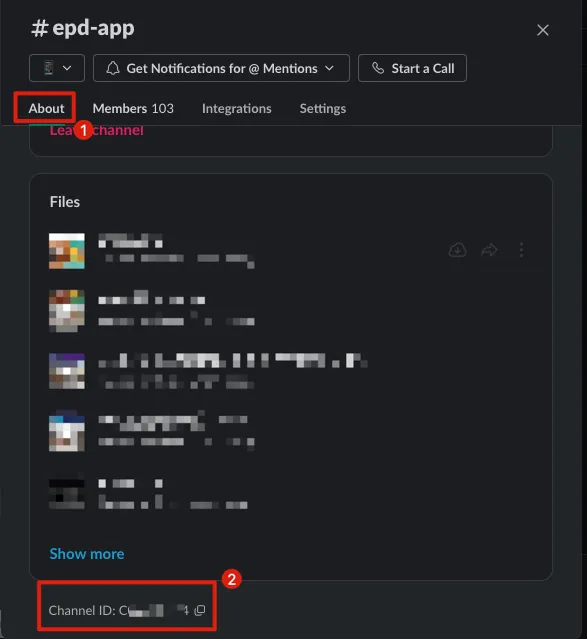
- Verify that the init files and directories are correctly created
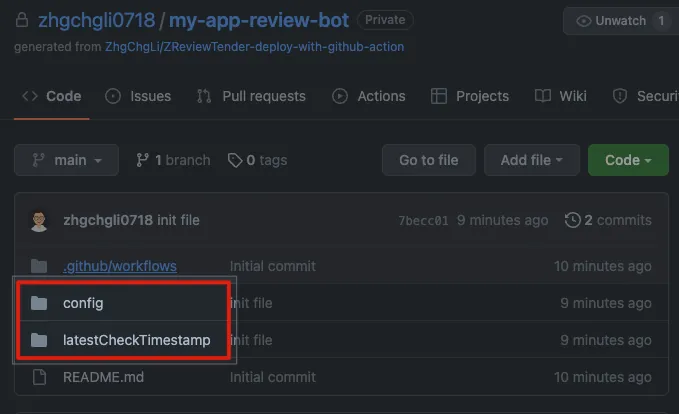
Click the “Code” tab above to return to the project directory. If the project initialization is successful, you will see:
Table of Contents:
config/File:
config/android.ymlFile:
config/apple.ymlTable of Contents:
latestCheckTimestamp/File:
latestCheckTimestamp/.keep
- Complete Configuration by setting up
android.yml&apple.yml
Enter the config/ directory to complete the configuration of the android.yml and apple.yml files.
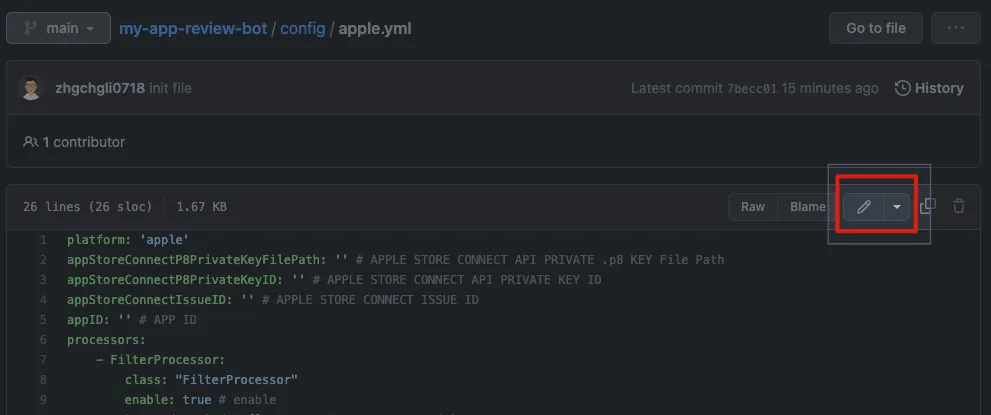
Click to open the confi YML file you want to edit, then click the “✏️” icon at the top right to edit the file.
Refer to the “Settings” section below to complete the configuration of android.yml & apple.yml.
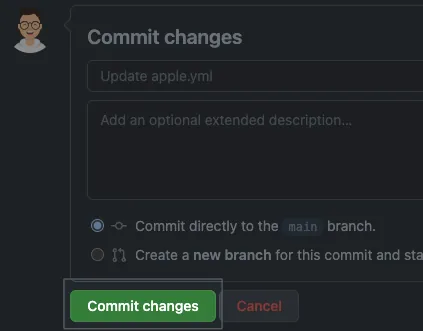
After editing, you can directly save the settings by clicking “Commit changes” below.
Upload the corresponding Key file to the config/ directory:
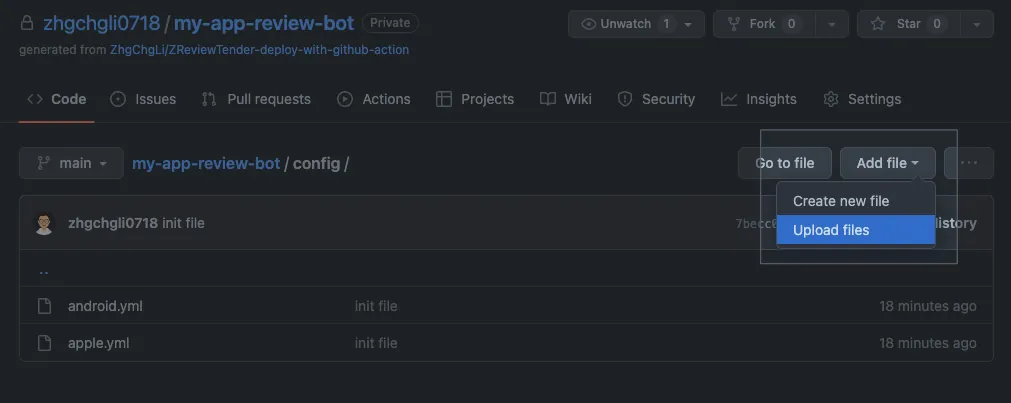
In the config/ directory, click “Add file” in the top right corner -> “Upload files”
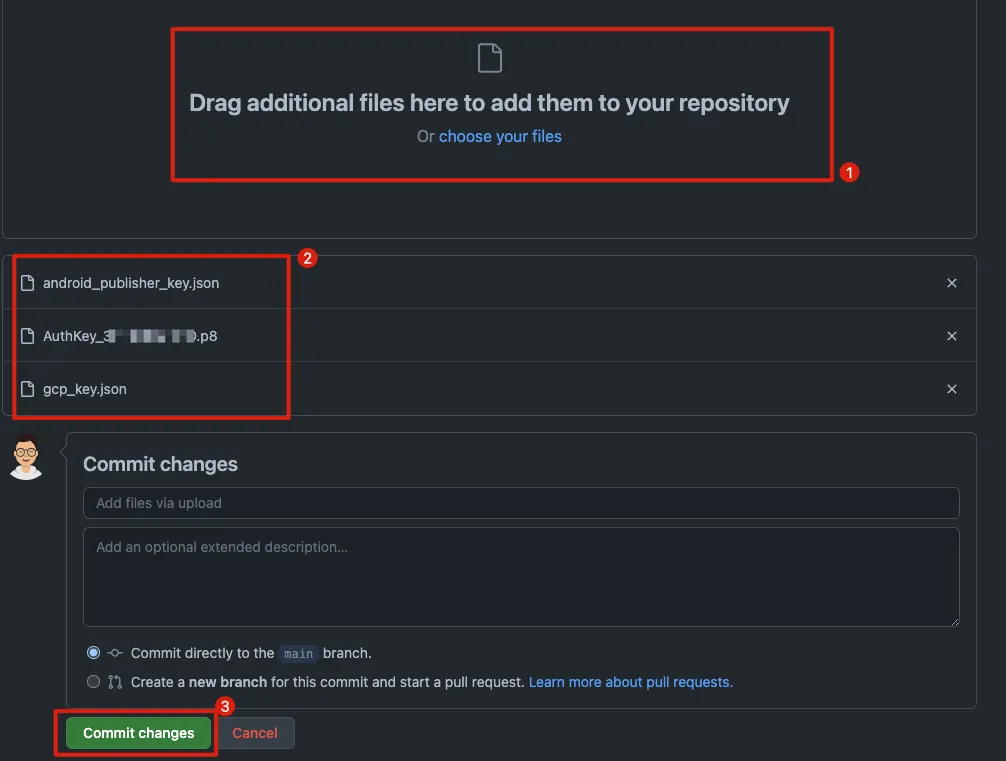
Upload the corresponding keys configured in the config yml and the external file paths together to the config/ directory. Drag the files to the “upper section” -> wait for the files to finish uploading -> then directly “Commit changes” below to save.
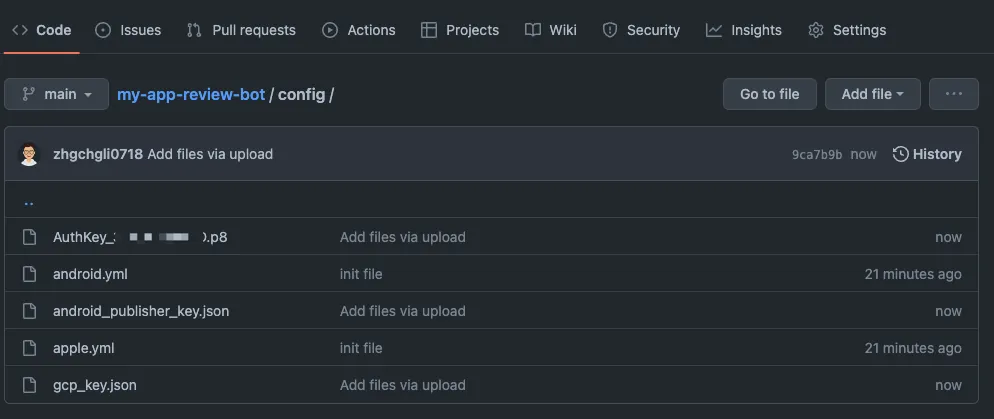
After uploading, go back to the /config directory to check if the files are correctly saved and uploaded.
- Initialize ZReviewTender (manually trigger once)
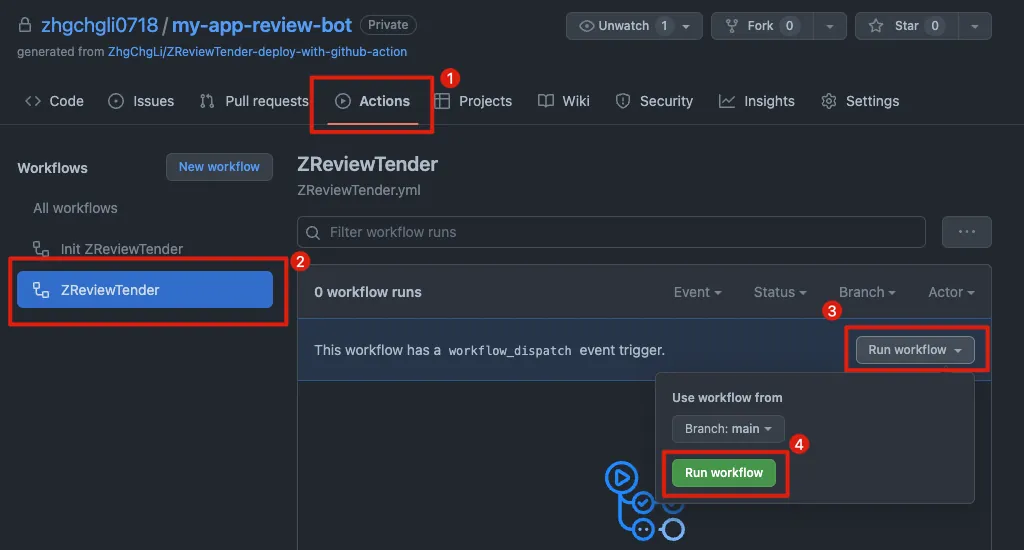
Click the top tab “Actions” -> select “ZReviewTender” on the left -> click the “Run workflow” button on the right -> click the “Run workflow” button to execute ZReviewTender once.
After clicking, refreshing the webpage will display:
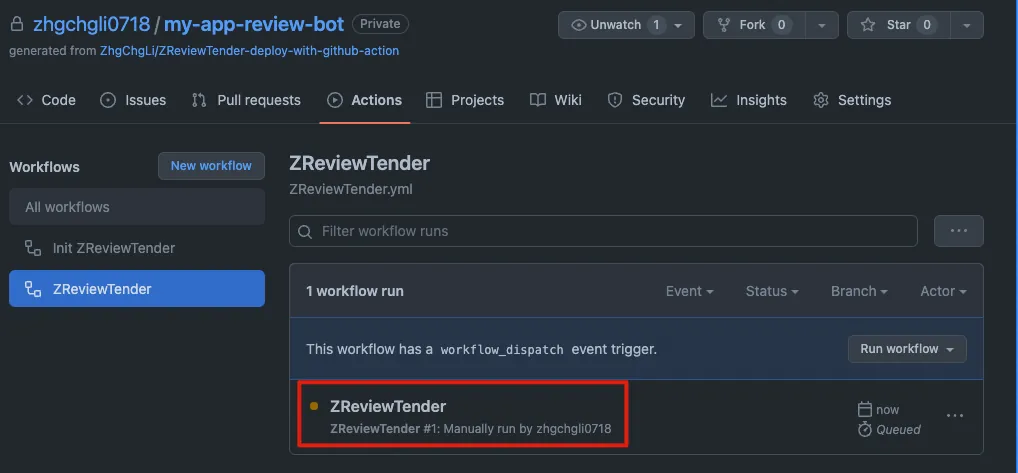
Click “ZReviewTender” to view the execution status.
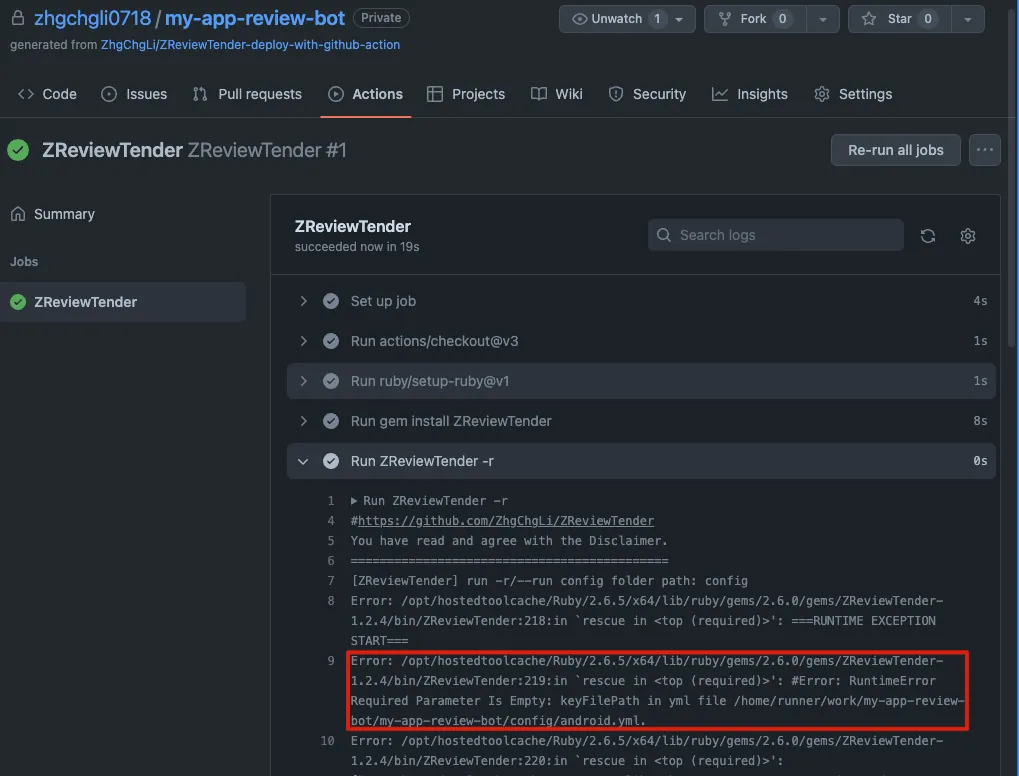
Expand the Run ZreviewTender -r block to view the execution log.
Here you can see an Error because I haven’t set up my config yml file yet.
After adjusting the android/apple config yml, go back to step 6 and trigger the execution again from the beginning.

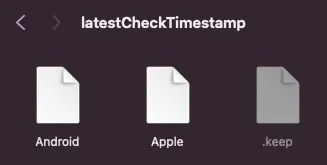
Check the log in the 「 ZReviewTender -r 」 section to confirm successful execution!
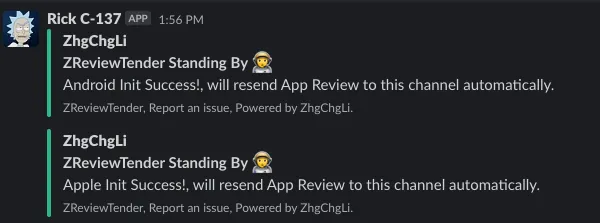
The Slack channel designated to receive the latest review messages will also display the “init Success” success message 🎉
- Done! 🎉 🎉 🎉
Setup complete! Every 6 hours, the latest reviews from the period will be automatically fetched and forwarded to your Slack Channel!
You can check the latest execution status at the top of the Readme on the Repo homepage:

If an Error occurs, it means the execution failed. Please go to Actions -> ZReviewTender to check the logs; if there is an unexpected error, please create an Issue and attach the log information. It will be fixed as soon as possible!
❌❌❌ Errors during execution will also trigger email notifications from Github, so you don’t have to worry about the bot crashing without anyone noticing!
Github Action Adjustments
You can also configure the Github Action execution rules according to your needs.
Click the top tab “Actions” -> left side “ZReviewTender” -> top right “ZReviewTender.yml”
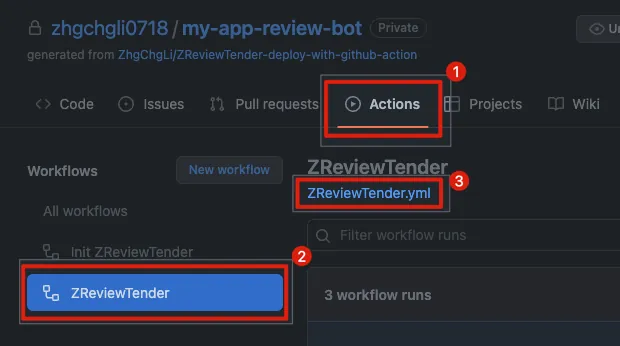
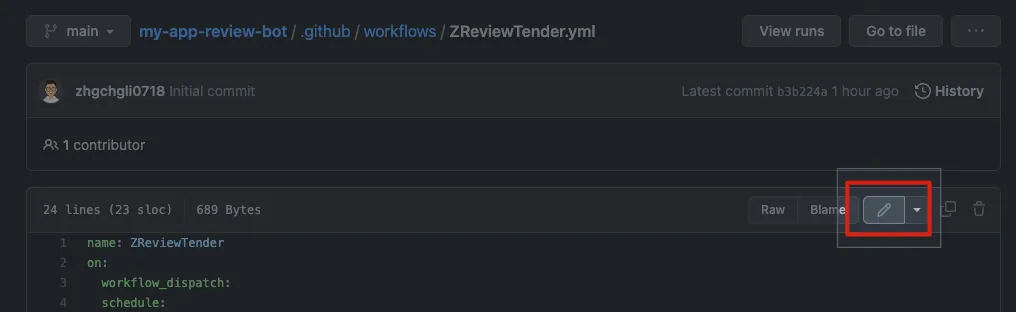
Click the “✏️” icon at the top right to edit the file.
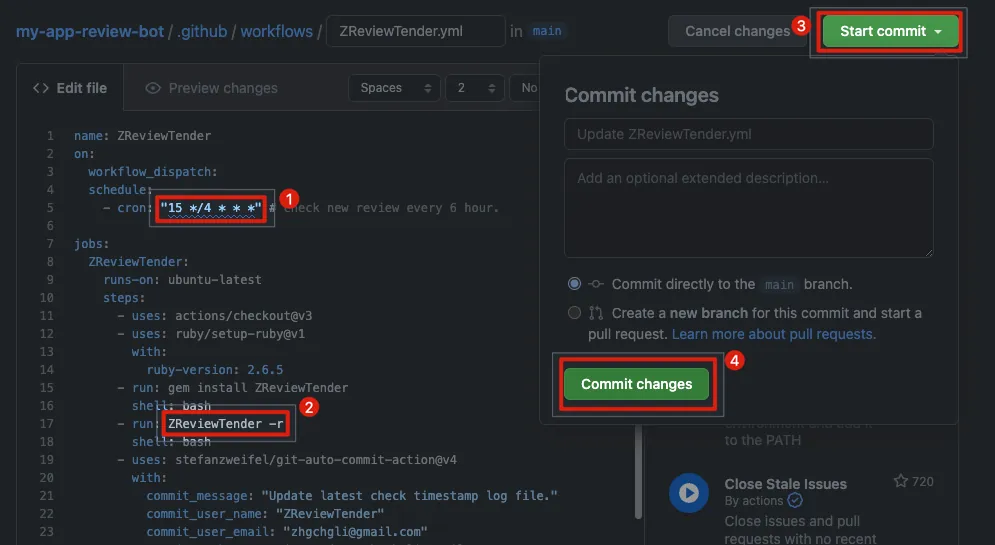
There are two parameters available for adjustment:
cron: Set how often to check for new reviews. The default is 15 */6 * * *, which means it runs every 6 hours at 15 minutes past the hour.
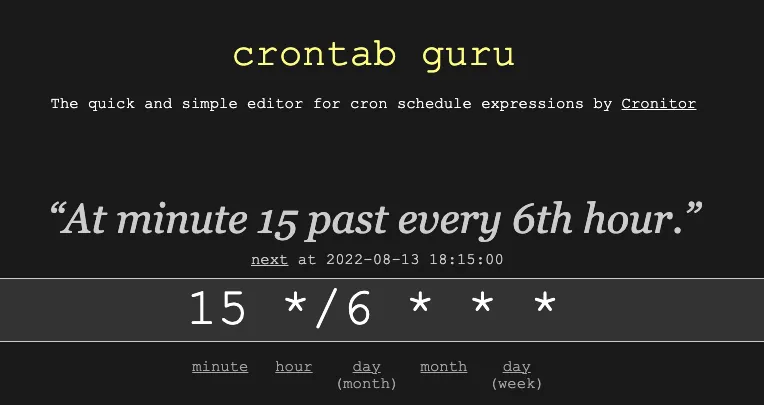
You can refer to crontab.guru to configure according to your needs.
Please Note:
- Github Actions uses the UTC time zone
- Higher execution frequency consumes more GitHub Action minutes.
run : Set the command to execute. Refer to the “Execution” section below. The default is ZReviewTender -r
Default execution for Android App & Apple (iOS/macOS App):
ZReviewTender -rOnly run Android App:
ZReviewTender -gOnly run Apple (iOS/macOS App) App:
ZReviewTender -a
After editing, click “Start commit” at the top right and select “Commit changes” to save the settings.
Manually Trigger ZReviewTender Execution
Refer to the previous section “6. Initialize ZReviewTender (manually trigger once)”
Installing with Gem
If you are familiar with Gems, you can install ZReviewTender directly using the following command:
1
gem install ZReviewTender
Installing with Gem (For those unfamiliar with Ruby/Gems)
If you are not familiar with Ruby or Gems, you can follow the steps below to install ZReviewTender step by step.
Although macOS comes with Ruby pre-installed, it is recommended to use rbenv or rvm to install and manage Ruby versions (I use
2.6.5).Use rbenv or rvm to install Ruby 2.6.5, and switch to Ruby managed by rbenv/rvm.
Use
which rubyto confirm the current Ruby in use is not the system Ruby at/usr/bin/ruby.After setting up the Ruby environment, use the following command to install
ZReviewTender.
1
gem install ZReviewTender
Deployment — Want to Expand Features Yourself
Manual
git clone ZReviewTender Source Code
Confirm & Improve Ruby Environment
Go to the directory and run
bundle installto install dependencies for ZReviewTender.
The processor setup method can be referred to in the following article content.
Settings
ZReviewTender — Use a YAML file to configure Apple/Google review bots.
[Recommendation] Use the execution command below the article directly — “Generate Configuration File”:
1
ZReviewTender -i
Directly generate blank apple.yml & android.yml configuration files.
Apple (iOS/macOS App)
Reference the apple.example.yml file:
⚠️ After downloading
apple.example.yml, remember to rename the file toapple.yml
apple.yml:
1
2
3
4
5
6
platform: 'apple'
appStoreConnectP8PrivateKeyFilePath: '' # APPLE STORE CONNECT API PRIVATE .p8 KEY File Path
appStoreConnectP8PrivateKeyID: '' # APPLE STORE CONNECT API PRIVATE KEY ID
appStoreConnectIssueID: '' # APPLE STORE CONNECT ISSUE ID
appID: '' # APP ID
...
appStoreConnectIssueID:
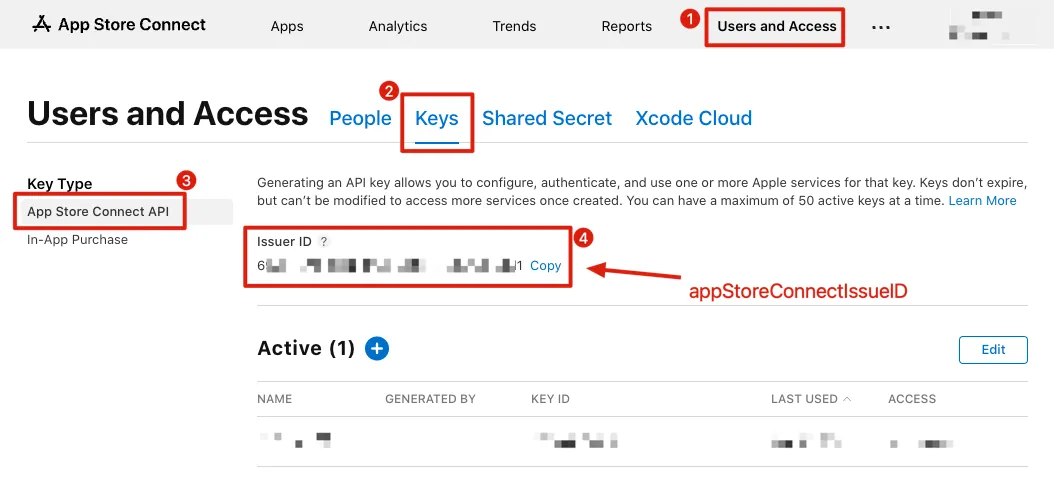
App Store Connect -> Keys -> App Store Connect API
Issuer ID:
appStoreConnectIssueID
appStoreConnectP8PrivateKeyID & appStoreConnectP8PrivateKeyFilePath:
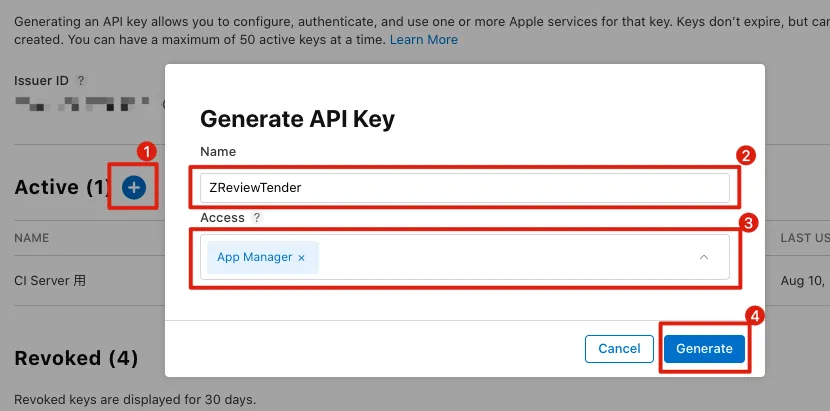
Name:
ZReviewTenderAccess:
App Manager
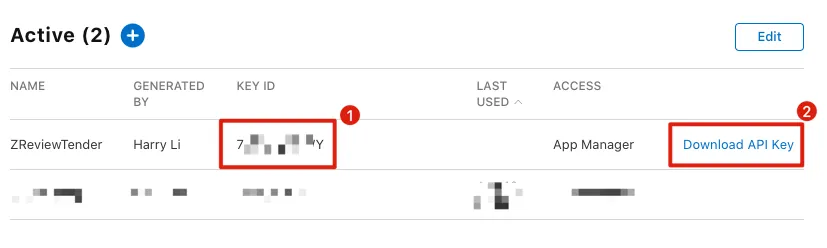
appStoreConnectP8PrivateKeyID:
Key IDappStoreConnectP8PrivateKeyFilePath:
/AuthKey_XXXXXXXXXX.p8, download the API Key and place the file in the same directory as the config yml.
appID:
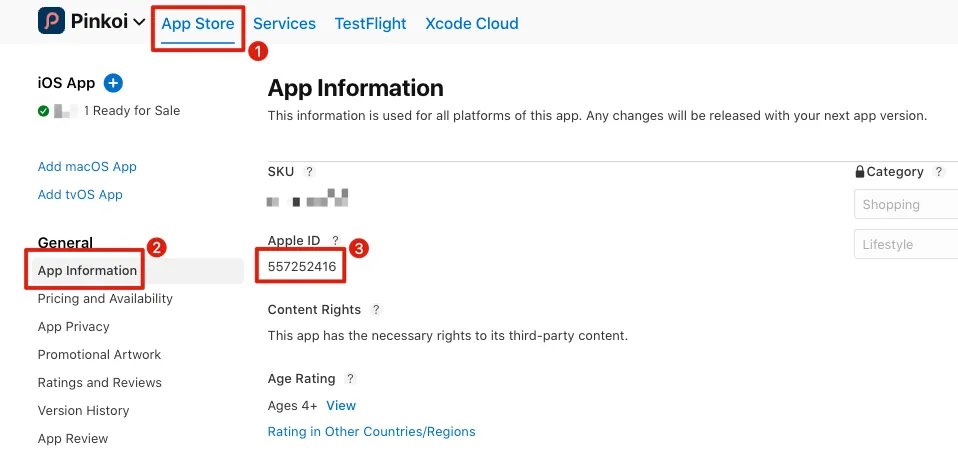
appID: App Store Connect -> App Store -> General -> App Information -> Apple ID
GCP Service Account
ZReviewTender uses Google API services (fetching store reviews, Google Translate, Google Sheets) with Service Account authentication.
You can first follow the official steps to create GCP & Service Account to download and save the GCP Service Account credentials key (*.json).
To use the automatic translation feature, please ensure that GCP has enabled the
Cloud Translation APIand that the Service Account in use has the necessary permissions.To use the feature that records data to Google Sheets, please ensure that the GCP has enabled the
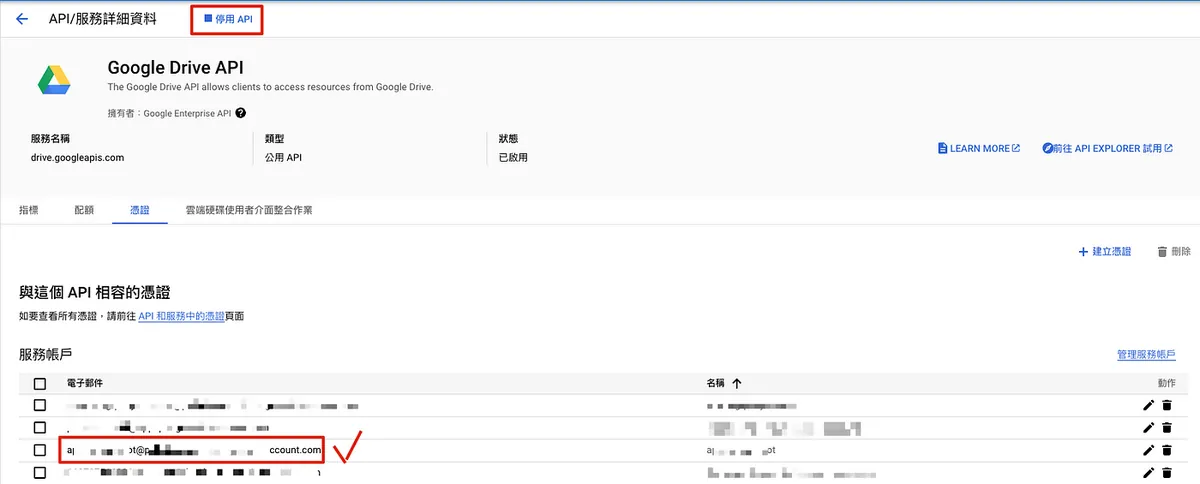
Google Sheets APIandGoogle Drive API, and that the Service Account used has been added as well.
Google Play Console (Android App)
Reference the android.example.yml file:
⚠️ After downloading
android.example.yml, remember to rename the file toandroid.yml
android.yml:
1
2
3
4
5
6
platform: 'android'
packageName: '' # Android App Package Name
keyFilePath: '' # Google Android Publisher API Credential .json File Path
playConsoleDeveloperAccountID: '' # Google Console Developer Account ID
playConsoleAppID: '' # Google Console App ID
......
packageName:
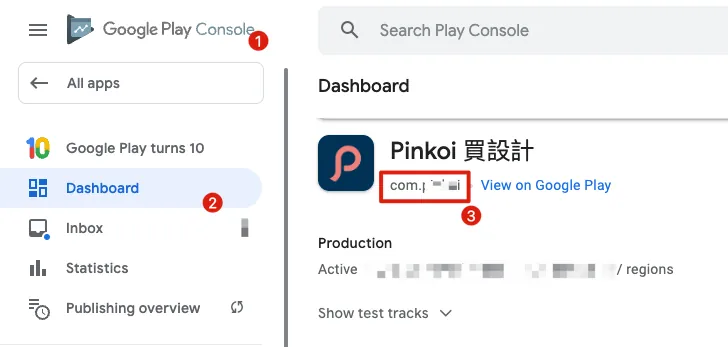
packageName: com.XXXXX can be found in Google Play Console -> Dashboard -> App
playConsoleDeveloperAccountID & playConsoleAppID:
Can be obtained from the Google Play Console -> Dashboard -> App page URL:
Used to generate a combined review message link, allowing the team to quickly access the backend review reply page by clicking the link.
keyFilePath:
The most important information, GCP Service Account identity permission key (*.json)
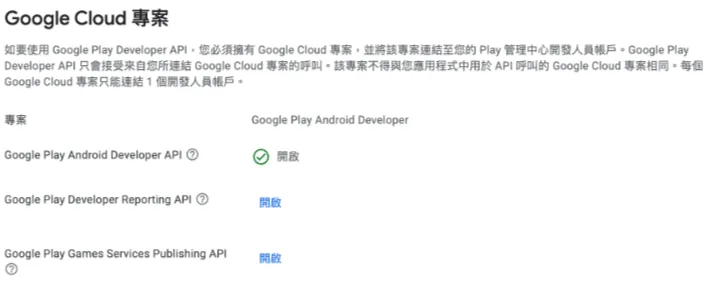
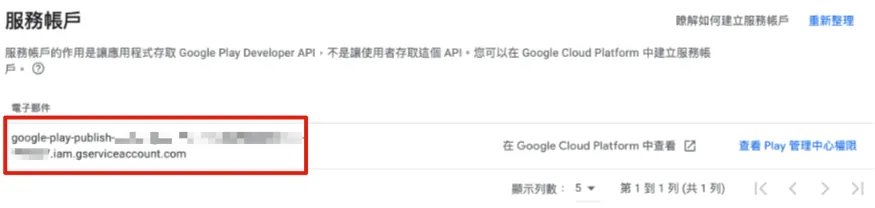
Follow the steps in the official documentation to create a Google Cloud Project & Service Account. Then, go to Google Play Console -> Setup -> API Access to enable the Google Play Android Developer API and link the project. Finally, download the service account JSON key from GCP.
Example JSON Key Content:
gcp_key.json:
1
2
3
4
5
6
7
8
9
10
11
12
{
    "type": "service_account",
    "project_id": "XXXX",
    "private_key_id": "XXXX",
    "private_key": "-----BEGIN PRIVATE KEY-----\nXXXX\n-----END PRIVATE KEY-----\n",
    "client_email": "XXXX@XXXX.iam.gserviceaccount.com",
    "client_id": "XXXX",
    "auth_uri": "https://accounts.google.com/o/oauth2/auth",
    "token_uri": "https://oauth2.googleapis.com/token",
    "auth_provider_x509_cert_url": "https://www.googleapis.com/oauth2/v1/certs",
    "client_x509_cert_url": "https://www.googleapis.com/robot/v1/metadata/x509/XXXX.iam.gserviceaccount.com"
}
- keyFilePath:
/gcp_key.jsonKey file path, place the file in the same directory as the config yml.
Processors
1
2
3
4
5
6
7
8
9
10
11
12
13
14
15
16
17
18
19
20
21
22
processors:
    - FilterProcessor:
        class: "FilterProcessor"
        enable: true # enable
        keywordsInclude: [] # keywords you want to filter out
        ratingsInclude: [] # ratings you want to filter out
        territoriesInclude: [] # territories you want to filter out
    - GoogleTranslateProcessor: # Google Translate Processor, will translate review text to your language, you can remove whole block if you don't need it.
        class: "GoogleTranslateProcessor"
        enable: false # enable
        googleTranslateAPIKeyFilePath: '' # Google Translate API Credential .json File Path
        googleTranslateTargetLang: 'zh-TW' # Translate to what Language
        googleTranslateTerritoriesExclude: ["TWN","CHN"] # Review origin Territory (language) that you don't want to translate.
    - SlackProcessor: # Slack Processor, resend App Review to Slack.
        class: "SlackProcessor"
        enable: true # enable
        slackTimeZoneOffset: "+08:00" # Review Created Date TimeZone
        slackAttachmentGroupByNumber: "1" # 1~100, how many review messages in 1 slack message.
        slackBotToken: "" # Slack Bot Token, send slack message through Slack Bot.
        slackBotTargetChannel: "" # Slack Bot Token, send slack message through Slack Bot. (recommended, first priority)
        slackInCommingWebHookURL: "" # Slack Incoming WebHook URL, send slack message through Incoming WebHook, not recommended, deprecated.
    ...More Processors...
ZReviewTender comes with four Processors. Their order affects the data processing flow: FilterProcessor -> GoogleTranslateProcessor -> SlackProcessor -> GoogleSheetProcessor.
FilterProcessor:
Filter and retrieve reviews based on specified conditions, processing only the reviews that meet the criteria.
class:
FilterProcessorrequires no changes, points to lib/Processors/FilterProcessor.rbenable:
true/falseEnable this Processor or notkeywordsInclude: [“
keyword1”,“keyword2”…] Filter reviews containing these keywordsratingsInclude: [
1,2…] Filter reviews that include these rating scores from 1 to 5territoriesInclude: [“
zh-hant”,”TWN”…] Filter reviews that include these regions (Apple) or languages (Android)
GoogleTranslateProcessor:
Translate the reviews into the specified language.
class:
GoogleTranslateProcessordoes not require changes, it refers to lib/Processors/GoogleTranslateProcessor.rbenable:
true/falseEnable or disable this ProcessorgoogleTranslateAPIKeyFilePath:
/gcp_key.jsonThe GCP Service Account credential key file path*.json. Place the file in the same folder as the config yml. For an example, see the Google Play Console JSON key above.
(Ensure the service account in the JSON key hasCloud Translation APIaccess permission)googleTranslateTargetLang:
zh-TW,en… Target translation languagesgoogleTranslateTerritoriesExclude: [“
zh-hant”,”TWN”…] Regions (Apple) or languages (Android) that do not require translation
SlackProcessor:
Forward reviews to Slack.
class:
SlackProcessordoes not need adjustment, it points to lib/Processors/SlackProcessor.rbenable:
true/falseEnable this Processor or notslackTimeZoneOffset:
+08:00Time zone for displaying review timeslackAttachmentGroupByNumber:
1sets how many Reviews are combined into one message to speed up sending; default is 1 Review per Slack message.slackBotToken:
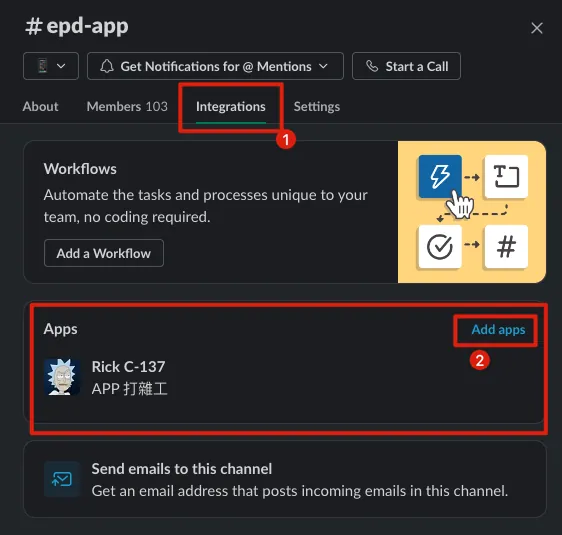
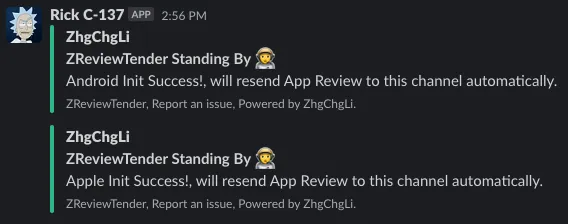
xoxb-xxxx-xxxx-xxxxSlack Bot Token, Slack recommends creating a Slack Bot with thepostMessagesscope and using it to send Slack messagesslackBotTargetChannel:
CXXXXXXgroup ID ( not the group name ), the Slack Bot will send messages to this Channel group; and you need to add your Slack Bot to this groupslackInCommingWebHookURL:
https://hooks.slack.com/services/XXXXXUse the old Incoming WebHookURL to send messages to Slack. Note! Slack no longer recommends using this method to send messages.
Please note, this is a legacy custom integration — an outdated method for teams to integrate with Slack. These integrations lack newer features and will be deprecated and possibly removed in the future. We do not recommend using them. Instead, we suggest you check out their replacement: Slack apps.
- slackBotToken and slackInCommingWebHookURL, SlackProcessor will prioritize using slackBotToken
GoogleSheetProcessor
Record reviews to Google Sheet.
class:
GoogleSheetProcessordoes not need adjustment, points to lib/Processors/SlackProcessor.rbenable:
true/falseEnable this Processor or notgoogleSheetAPIKeyFilePath:
/gcp_key.jsonGCP Service Account credential key file path*.json. Place the file in the same directory as the config yml. For the content example, refer to the Google Play Console JSON key example above.
(Please ensure the service account in the JSON key has permissions forGoogle Sheets APIandGoogle Drive API)googleSheetTimeZoneOffset:
+08:00Review time display timezonegoogleSheetID:
Google Sheet ID
Can be obtained from the Google Sheet URL: https://docs.google.com/spreadsheets/d/googleSheetID/googleSheetName: Sheet name, e.g.
Sheet1keywordsInclude: [“
keyword1”,“keyword2”…] Filter reviews containing these keywordsratingsInclude: [
1,2…] Filter reviews that include these rating scores from 1 to 5territoriesInclude: [“
zh-hant”,”TWN”…] Filter reviews that include these regions (Apple) or languages (Android)values: [ ] Combination of fields for review information
1
2
3
4
5
6
7
8
9
10
%TITLE% Review Title
%BODY% Review Content
%RATING% Rating Score 1~5
%PLATFORM% Review Source Platform Apple or Android
%ID% Review ID
%USERNAME% Reviewer
%URL% Review Link
%TERRITORY% Review Region (Apple) or Review Language (Android)
%APPVERSION% Rated App Version
%CREATEDDATE% Review Creation Date
For example, my Google Sheet columns are as follows:
1
Rating Score,Review Title,Review Content,Review Information
The values can be set to:
1
values: ["%TITLE%","%BODY%","%RATING%","%PLATFORM% - %APPVERSION%"]
Custom Processor Integration with Your Own Workflow
If you need to customize the Processor, please use manual deployment, as the ZReviewTender on the gem is packaged and cannot be adjusted dynamically.
You can refer to lib/Processors/ProcessorTemplate.rb to create your extension:
1
2
3
4
5
6
7
8
9
10
11
12
13
14
15
16
17
18
19
20
21
22
23
24
25
26
27
28
29
30
31
32
33
34
35
36
37
38
$lib = File.expand_path('../lib', File.dirname(__FILE__))

require "Models/Review"
require "Models/Processor"
require "Helper"
require "ZLogger"

# Add to config.yml:
#
# processors:
#   - ProcessorTemplate:
#       class: "ProcessorTemplate"
#       parameter1: "value"
#       parameter2: "value"
#       parameter3: "value"
#       ...
#

class ProcessorTemplate < Processor

    def initialize(config, configFilePath, baseExecutePath)
        # init Processor
        # get parameter from config e.g. config["parameter1"]
        # configFilePath: file path of config file (apple.yml/android.yml)
        # baseExecutePath: user execute path
    end

    def processReviews(reviews, platform)
        if reviews.length < 1
            return reviews
        end

        ## do what you want to do with reviews...

        ## return result reviews
        return reviews
    end
end
initialize will provide:
config Object: Corresponds to the settings in the config yml file
configFilePath: Path to the config yml file used
baseExecutePath: The path where the user runs ZReviewTender
processReviews(reviews, platform):
After scraping new reviews, this function is called to give the Processor a chance to handle them. Please return the processed Reviews after completion.
Review data structure is defined in lib/Models/ Review.rb
Note
XXXterritorXXX Parameters:
Apple Usage Regions: TWM/JPN…
Android Language Settings: zh-hant/en/…
If a Processor is not needed:
You can set enable: false or simply remove the Processor Config Block.
Processors execution order can be adjusted according to your needs:
e.g. Run Filter first, then Translation, followed by Slack, and finally Log to Google Sheet…
Execution
⚠️ Using the Gem, you can run
ZReviewTenderdirectly. For manually deployed projects, please usebundle exec ruby bin/ZReviewTenderto execute.
Generate Configuration File:
1
ZReviewTender -i
Generate apple.yml and android.yml from apple.example.yml and android.example.yml into the config/ directory in the current working directory.
Execute Apple & Android Review Scraping:
1
ZReviewTender -r
- Default reads the
apple.yml&android.ymlsettings under/config/
Execute Apple & Android Review Scraping & Specify Profile Directory:
1
ZReviewTender --run=config directory
- Default reads
apple.yml&android.ymlsettings under/config/
Only execute Apple review scraping:
1
ZReviewTender -a
- Default reads the
apple.ymlconfiguration under/config/
Only Execute Apple Review Crawling & Specify Profile Location:
1
ZReviewTender --apple=apple.yml configuration file location
Run Android Review Scraping Only:
1
ZReviewTender -g
- Default reads the
android.ymlconfiguration under/config/
Only Execute Android Review Scraping & Specify Profile Location:
1
ZReviewTender --googleAndroid=path_to_android.yml_configuration_file
Clear Execution Records and Reset to Default Settings
1
ZReviewTender -d
It will delete the Timestamp record file in /latestCheckTimestamp, returning to the initial state. Running the crawl again will receive the init success message:
![]()
Current ZReviewTender Version
1
ZReviewTender -v
Display the current latest version number of ZReviewTender on RubyGem.
Update ZReviewTender to the Latest Version (rubygem only)
1
ZReviewTender -n
First Execution
The first successful run will send an initialization success message to the specified Slack Channel and create latestCheckTimestamp/Apple and latestCheckTimestamp/Android files in the execution directory to record the last fetched review timestamps.
An execute.log file will also be generated to record execution errors.
Set Schedule for Continuous Execution
Set a scheduled task ( crontab ) to continuously crawl new reviews. ZReviewTender will crawl new reviews from the last crawl timestamp latestCheckTimestamp up to the current crawl time and update the timestamp record file.
e.g. crontab: 15 */6 * * * ZReviewTender -r
Also, note that the Android API only allows querying reviews added or edited within the last 7 days, so schedule cycles should not exceed 7 days to avoid missing any reviews.

https://developers.google.com/android-publisher/reply-to-reviews#retrieving_a_set_of_reviews
Github Action Deployment
{:target="_blank"}](/assets/e36e48bb9265/1*uDsJPUqtiltvCsNBFDTz-w.webp)
ZReviewTender App Reviews Automatic Bot
1
2
3
4
5
6
7
8
9
10
11
12
13
14
name: ZReviewTender
on:
  workflow_dispatch:
  schedule:
    - cron: "15 */6 * * *" # Runs every six hours, you can refer to the crontab above to adjust the schedule

jobs:
  ZReviewTender:
    runs-on: ubuntu-latest
    steps:
    - name: ZReviewTender Automatic Bot
      uses: ZhgChgLi/ZReviewTender@main
      with:
        command: '-r' # Execute Apple & iOS App review check, you can change to other commands as shown above
⚠️️️️️ Warning Again!
Be sure to keep your configuration files and keys private, as sensitive information may lead to App/Slack permission misuse; the author is not responsible for any misuse.
If an unexpected error occurs, please create an Issue and include the log information. It will be fixed as soon as possible!
Done
The tutorial ends here. Next is a behind-the-scenes development secret sharing.
=========================
The War with App Reviews
I thought last year’s summary of AppStore APP’s Reviews Slack Bot Stories and the related technology implementation of ZReviewsBot — Slack App Review Notification Bot, along with integrating the latest app reviews into the company workflow, had come to an end; unexpectedly, Apple updated the App Store Connect API this year (../f1365e51902c/), allowing this process to continue evolving.
The solution for extracting reviews from Apple iOS/macOS Apps summarized last year:
Public URL API (RSS) ⚠️: Limited filtering options, provides minimal information, has quantity limits, and we occasionally encounter data inconsistencies, making it unstable; the official service may be discontinued in the future.
Using Fastlane — SpaceShip, we encapsulate complex web operations and session management to fetch review data from the App Store Connect backend (essentially running a web emulator crawler to scrape data from the backend).
According to last year’s method, only Method Two can be used to achieve this, but the results are not ideal; the session expires and requires manual periodic renewal, and it cannot be placed on a CI/CD server because the session expires immediately if the IP changes.
{:target="_blank"} by Fastlane](/assets/e36e48bb9265/1*N6B1H_PdtB4bNDrX4BIYRA.webp)
important-note-about-session-duration by Fastlane
After receiving the news that Apple updated the App Store Connect API this year, I immediately started redesigning the new review bot. Besides switching to the official API, I also optimized the previous architecture and became more familiar with Ruby usage.
Issues Encountered in Developing with App Store Connect API
- List All Customer Reviews for an App This endpoint does not provide app version information
It’s strange that the only workaround is to first call this endpoint to filter the latest reviews, then call List All App Store Versions for an App & List All Customer Reviews for an App Store Version to combine the app version information.
Issues Encountered in AndroidpublisherV3 Development
The API does not provide a method to retrieve all review lists; it can only fetch reviews added or edited within the last 7 days.
Using JWT to Connect to Google API (Without Relying on Related Libraries e.g. google-apis-androidpublisher_v3)
Here is an example of generating and using a Google API JWT:
1
2
3
4
5
6
7
8
9
10
11
12
13
14
15
16
17
18
19
20
21
22
23
24
25
26
27
28
29
30
31
32
33
34
35
36
37
38
39
require "jwt"
require "time"

payload = {
  iss: "client_email field in GCP API service account key (*.json) file",
  sub: "client_email field in GCP API service account key (*.json) file",
  scope: ["https://www.googleapis.com/auth/androidpublisher"].join(' '),
  aud: "token_uri field in GCP API service account key (*.json) file",
  iat: Time.now.to_i,
  exp: Time.now.to_i + 60*20
}

rsa_private = OpenSSL::PKey::RSA.new("private_key field in GCP API service account key (*.json) file")
token = JWT.encode payload, rsa_private, 'RS256', header_fields = {kid:"private_key_id field in GCP API service account key (*.json) file", typ:"JWT"}

uri = URI("token_uri field in GCP API service account key (*.json) file")
https = Net::HTTP.new(uri.host, uri.port)
https.use_ssl = true
request = Net::HTTP::Post.new(uri)
request.body = "grant_type=urn%3Aietf%3Aparams%3Aoauth%3Agrant-type%3Ajwt-bearer&assertion=#{token}"

response = https.request(request).read_body

bearer = result["access_token"]

### use bearer token

uri = URI("https://androidpublisher.googleapis.com/androidpublisher/v3/applications/APP_PACKAGE_NAME/reviews")
https = Net::HTTP.new(uri.host, uri.port)
https.use_ssl = true

request = Net::HTTP::Get.new(uri)
request['Authorization'] = "Bearer #{bearer}";

response = https.request(request).read_body

result = JSON.parse(response)

# success!
If you have any questions or feedback, feel free to contact me.

This post was originally published on Medium (View original post), and automatically converted and synced by ZMediumToMarkdown.