Boost iOS App UX|Implement 3D Touch with Swift for Instant Interaction
iOS developers facing engagement challenges can integrate 3D Touch using Swift to enable quick actions and previews, enhancing user experience and app responsiveness effectively.
点击这里查看本文章简体中文版本。
點擊這裡查看本文章正體中文版本。
This post was translated with AI assistance — let me know if anything sounds off!
Table of Contents
[Deprecated] Enhance User Experience by Adding 3D TOUCH to Your iOS APP Now (Swift)
iOS 3D TOUCH Applications
[Deprecated] 2020/06/14
iPhone 11 and later models have removed the 3D Touch feature; it has been replaced by Haptic Touch, which works differently.
Recently, during some downtime in project development, I explored many interesting iOS features: CoreML, Vision, Notification Service Extension, Notification Content Extension, Today Extension, Core Spotlight, Share Extension, SiriKit (some have been organized into articles, more to come 🤣)
Among them is today’s highlight: 3D Touch feature
This feature, supported since iOS 9/iPhone 7, only became truly useful to me after I upgraded from an iPhone 6 to an iPhone 8!
3D Touch can implement two features in the APP, as follows:
{:target="_blank"}](/assets/1ca246e27273/1*Nl6uz_dA2h13g7PtqSi6aw.gif)
- Preview ViewController Preview Feature — 結婚吧APP
- 3D Touch Shortcut APP Launch Feature
The first item is the most widely used and effective (Facebook: News Feed content preview, Line: message sneak peek). The second item, app shortcut launch, currently shows low usage based on data, so it is discussed last.
1. Preview ViewController Preview Feature:
The feature demonstration is shown in Figure 1 above. The ViewController preview function is supported.
3D Touch Press: Background Blur Effect
3D Touch Press and Hold to Pop Up ViewController Preview Window
3D Touch press triggers a ViewController preview window, swiping up reveals an options menu below.
3D Touch Press and Release to Return to Window
3D Touch: Press Harder to Enter the Target ViewController
Here, the code to be implemented is listed separately for A: List Window and B: Target Window:
Since there is no way to determine whether the current state is preview or actual entry into this window in B, we first create a Protocol to pass values for judgment.
1
2
3
protocol UIViewControllerPreviewable {
    var is3DTouchPreview: Bool { get set }
}
This way, we can make the following judgment in B:
1
2
3
4
5
6
7
8
9
10
class BViewController:UIViewController, UIViewControllerPreviewable {
     var is3DTouchPreview:Bool = false
     override func viewDidLoad() {
     super.viewDidLoad()
     if is3DTouchPreview {
       // If this is a preview window... for example: go full screen, hide toolbar
     } else {
       // Display normally in full mode
   }
}
A: List view, which can be a UITableView or UICollectionView:
1
2
3
4
5
6
7
8
9
10
11
12
13
14
15
16
17
18
19
20
21
22
23
24
25
26
27
28
29
30
31
32
33
34
35
36
37
38
39
40
41
42
43
44
45
46
47
48
49
50
class AViewController:UIViewController {
    // Register views that support 3D Touch
    override func traitCollectionDidChange(_ previousTraitCollection: UITraitCollection?) {
        super.traitCollectionDidChange(previousTraitCollection)
        if traitCollection.forceTouchCapability == .available {
            //TableView:
            registerForPreviewing(with: self, sourceView: self.TableView)
            //CollectionView:
            registerForPreviewing(with: self, sourceView: self.CollectionView)
        }
    }
}
extension AViewController: UIViewControllerPreviewingDelegate {
    // Action after 3D Touch is released
    func previewingContext(_ previewingContext: UIViewControllerPreviewing, commit viewControllerToCommit: UIViewController) {

        // Now directly push the page, so disable preview mode on the ViewController:
        if var viewControllerToCommit = viewControllerToCommit as? UIViewControllerPreviewable {
            viewControllerToCommit.is3DTouchPreview = false
        }
        self.navigationController?.pushViewController(viewControllerToCommit, animated: true)
    }

    // Control the 3D Touch cell location and the ViewController to show
    func previewingContext(_ previewingContext: UIViewControllerPreviewing, viewControllerForLocation location: CGPoint) -> UIViewController? {

        // Get current indexPath/cell at the touch point
        //TableView:
        guard let indexPath = TableView.indexPathForRow(at: location),let cell = TableView.cellForRow(at: indexPath) else { return nil }
        //CollectionView:
        guard let indexPath = CollectionView.indexPathForItem(at: location),let cell = CollectionView.cellForItem(at: indexPath) else { return nil }

        // ViewController to display
        let targetViewController = UIStoryboard(name: "StoryboardName", bundle: nil).instantiateViewController(withIdentifier: "ViewControllerIdentifier")

        // Area to keep clear during background blur (usually the touch area), see image 1
        previewingContext.sourceRect = cell.frame

        // 3D Touch window size, default is adaptive and usually no change needed
        // To modify, use: targetViewController.preferredContentSize = CGSize(width: 0.0, height: 0.0)

        // Inform the preview ViewController that it is in preview mode:
        if var targetViewController = targetViewController as? UIViewControllerPreviewable {
            targetViewController.is3DTouchPreview = true
        }

        // Return nil to disable any action
        return nil
    }
}
Note! The registration for the 3D Touch enabled View must be placed inside traitCollectionDidChange, not in “viewDidLoad” ( please refer to this article )
Regarding where to add it, I encountered many pitfalls. Some online sources suggest placing it in viewDidLoad, while others recommend cellForItem, but both locations sometimes cause occasional failures or partial cell failures.

Figure 1 Background Blur Retention Area Diagram
If you need to add an options menu at the bottom after scrolling up, please add it inside B. It’s B, it’s B, it’s B!

1
2
3
4
5
6
override var previewActionItems: [UIPreviewActionItem] {
  let profileAction = UIPreviewAction(title: "View Business Info", style: .default) { (action, viewController) -> Void in
    // Action after tapping
  }
  return [profileAction]
}
Return an empty array to indicate that this feature is not used.
Done!
2. APP Shortcut Launch
Step One
Add the UIApplicationShortcutItems key in info.plist, type Array
Add a menu item (Dictionary), with the Key-Value pairs set as follows:
[Required] UIApplicationShortcutItemType: Identifier string used for decision-making in AppDelegate
[Required] UIApplicationShortcutItemTitle: Option Title
UIApplicationShortcutItemSubtitle: Option subtitle
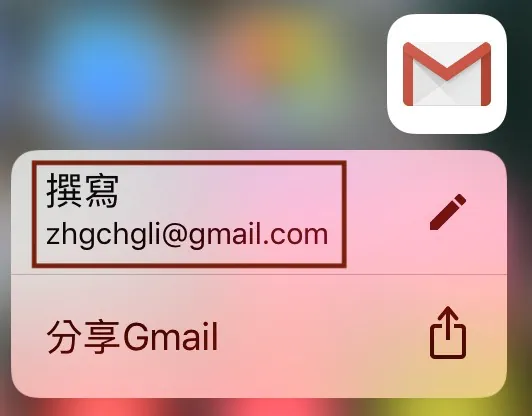
- UIApplicationShortcutItemIconType : Use system icons
{:target="_blank"}](/assets/1ca246e27273/1*S3dbMWNnTvhdt-NlxAQ2Tw.webp)
Reference from this article
UIApplicationShortcutItemIconFile: Use a custom icon (size: 35x35, monochrome), choose either this or UIApplicationShortcutItemIconType
UIApplicationShortcutItemUserInfo: Additional information EX: [id:1]
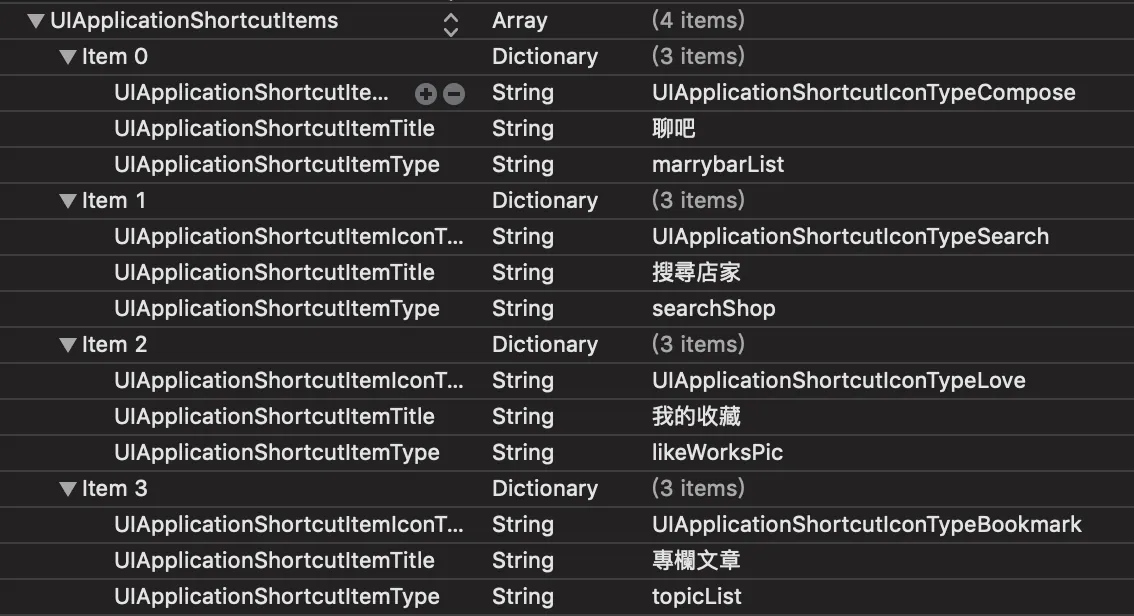
My settings are as shown in the above image.
Step Two
Add a handling function in AppDelegate
1
2
3
4
5
6
7
8
9
10
11
12
13
14
15
16
17
func application(_ application: UIApplication, performActionFor shortcutItem: UIApplicationShortcutItem, completionHandler: @escaping (Bool) -> Void) {
    var info = shortcutItem.userInfo

    switch shortcutItem.type {
    case "searchShop":
      // Handle search shop action
    case "topicList":
      // Handle topic list action
    case "likeWorksPic":
      // Handle like works picture action
    case "marrybarList":
      // Handle marry bar list action
    default:
        break
    }
    completionHandler(true)
}
Done!
Conclusion
Adding 3D Touch functionality in an app is not difficult and users will find it thoughtful ❤; it can be combined with design operations to enhance user experience. However, currently only the two functions mentioned above can be implemented, and since iPhone 6s and below, iPad, and iPhone XR do not support 3D Touch, the actual usable features are even fewer, mainly serving as an aid to enhance experience.
p.s.

If you test carefully, you’ll notice the above effect occurs when some images in the CollectionView have already scrolled out of view and you press on them. 😅
If you have any questions or feedback, feel free to contact me.

This post was originally published on Medium (View original post), and automatically converted and synced by ZMediumToMarkdown.