GitHub Actions|Self-hosted Runner 详解与实战案例|CI/CD 自动化工作流程建置
针对开发团队自动化需求,解析 GitHub Actions 与 Self-hosted Runner 架构与设定,并透过三大实战案例教你快速建立自动标记 PR、指派负责人及每日 PR 统计通知,提升 CI/CD 执行效率与成本优化。
Click here to view the English version of this article.
點擊這裡查看本文章正體中文版本。
基于 SEO 考量,本文标题与描述经 AI 调整,原始版本请参考内文。
文章目录
CI/CD 实战指南(二):GitHub Actions 与 Self-hosted Runner 使用与建置大全
带您从头了解 GitHub Actions/Self-hosted Runner 运作方式与手把手使用教学。
{:target="_blank"}](/assets/404bd5c70040/1*_vGYh_XSI3ZDbdeT8xCihA.webp)
Photo by Dan Taylor
前言
前篇「 CI/CD 实战指南(一):CI/CD 是什么?如何透过 CI/CD 打造稳定高效的开发团队?工具选择? 」我们介绍了 CI/CD 是什么?能带来哪些效益与工具的选择, 这篇将著重在 GitHub Actions, Self-hosted Runner 的架构与使用介绍 ,并手把手一起建立几个有趣的自动化工作流程,带您慢慢上手。
GitHub Actions 架构流程图
在开始之前我们先来确定一下 GitHub Actions 的运作架构流程关系与职责。
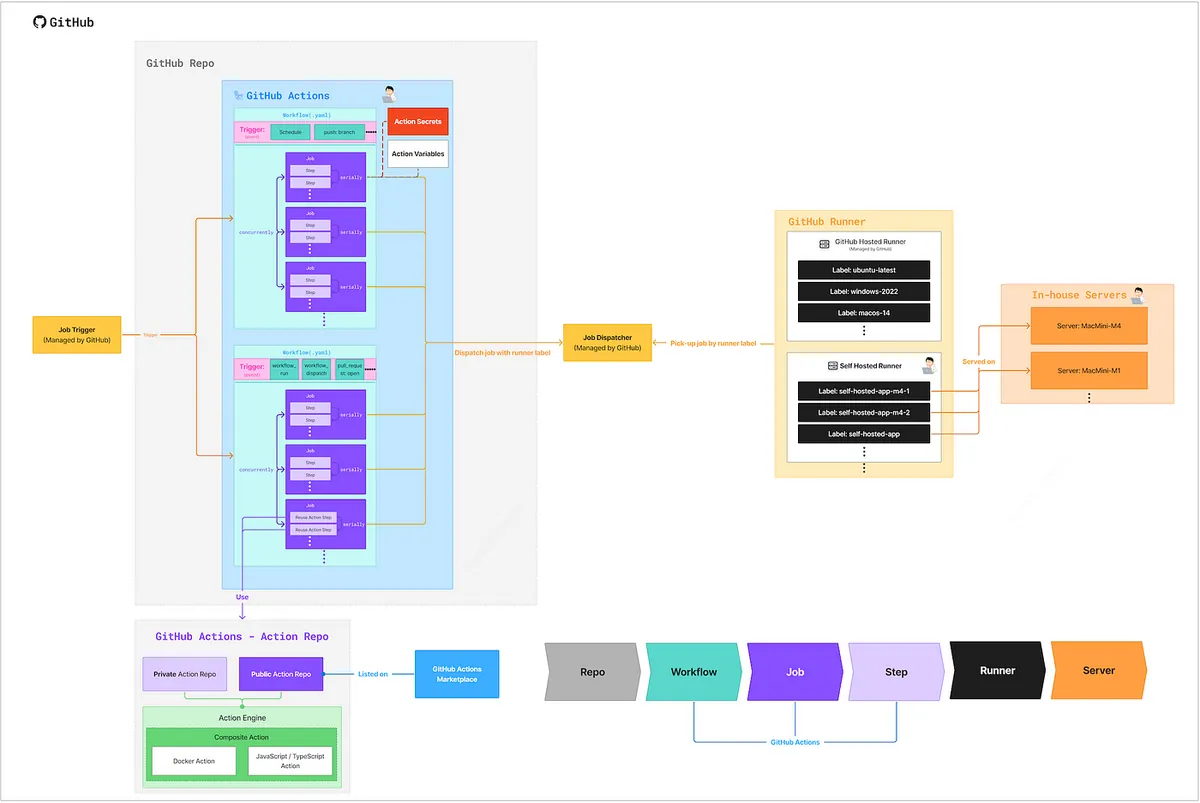
GitHub Repo
- 在 GitHub Actions 的世界里,所有 Actions (Workflow YAML 档案) 都要存放在某个 Git Repo 之中 (
REPO/.github/workflows/)
GitHub Repo —Actions Secrets
Repo → Settings → Secrets and variables → Actions → Secrets。
存放 Actions 步骤中会用到的 Secret Key, Token e.g. Slack Bot Token、Apple Store Connect API .p8 Key
Secrets 内容无法在 Action Log 中查看,会自动用 * * * * 隐蔽
Secrets 内容无法查看、编辑,只能覆盖
- Secrets 目前只支援纯文字内容,无法上传档案 - 如果是二进制的金要请参考 官方步骤使用 Base64 编码转换后储存 。
- iOS 开发凭证储存方式可参考官方教学: Installing an Apple certificate on macOS runners for Xcode development
- 可以储存组织层级的 Secrets,跨 Repo 共享
GitHub Repo — Actions Variables
Repo → Settings → Secrets and variables → Actions → Variables。
存放 Actions 步骤中常用到的变数 e.g. 模拟器 iOS 版本、工作目录
Variables 内容可以查看、编辑
Variables 内容可以输出在 Action Log 中
Variables 只支援纯文字,也可存放 json 字串然后自己解析使用
可以储存组织层级的 Variables,跨 Repo 共享
GitHub Actions — Trigger
Github Action 中最重要的起始点 — 触发事件(条件)
符合触发事件的 GitHub Actions 才会触发执行
完整事件列表可 参考官方文件
基本上涵盖了所有 CI/CD、自动化会遇到的事件场景。 但 如果有特殊场景没有事件,那就只能用其他事件+在 Job 中判断组合或是用 Schedule 排程手动检查了 。 e.g. 例如没有 PR Merged 事件,就只能用
pull_request: closed+ Jobif: github.event.pull_request.merged == true达成
常用事件:
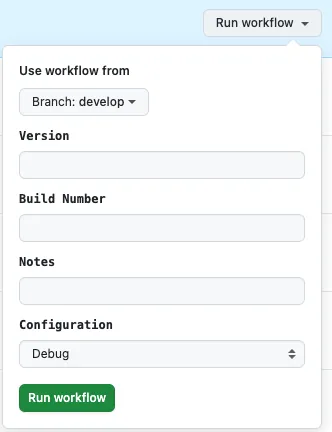
schedule(cron):排程定时执行(同 crontab) 可以用来做自动化:定时检查 PR、定时打包、定时执行自动化脚本 统一都在 main / develop (Default Branch) 执行。pull_request::PR 相关事件 当 PR 开启时、PR Assign 时、加 Label 时、有新 Push Commit 时…等等issues、issue_comment:Issue 相关事件 当 Issue 开启时、有新留言时…等等workflow_dispatch:手动触发;可以设定需要提供的栏位,GitHub Actions 提供简易的表单让使用者可以填写资讯。 e.g.:
workflow_call:触发另一个 Action(Workflow) 执行任务。workflow_run:当别的 Action(Workflow) 执行任务,触发执行此任务。
更多事件类型、设定细节请 参考官方文件 。
GitHub Actions — Workflow
a.k.a Action
使用 YAML 撰写 .yaml 档案,档案统一放置在
REPO/.github/workflows/之下以主分支内的 Workflow YAML 档案为主 如果在其他分支看不到正在开发的 Action 或执行上有误,可以先 Merge 回主分支看看。
GitHub Actions 中的最基础单位,每个 Workflow 就代表一项 CI/CD 或自动化操作
Workflow 可以呼叫别的 Workflow 执行任务 (可以利用这个特性拆出核心 Workflow 和呼叫的 Workflow)
当中会定义任务名称、执行策略、触发事件、任务工作…等等所有 Action 相关设定
目前档案结构不支援子目录
Action 完全免费 (Public and Private Repo)
GitHub Actions — Workflow — Job
GitHub Actions 中的执行单位
定义 Workflow 中的任务工作有哪些
每个 Workflow 可以有多个 Jobs
每个 Job 需要指定使用哪个 Runner Label,执行的时候会使用对应的 Runner 机器来执行任务
多个 Jobs 是并发执行 (如有顺序可以用
needs约束)每个 Job 应该视为独立执行个体(每个都要当成是 Sandbox) ,Job 结束后如果有产出资源档案要给后续其他 Job/Workflow 使用,需要 Upload Artifacts 或在 self-hosted 移动到共用产出目录。
Job 做完可以 Output 字串给其他 Job 参考使用。 (例如执行结果 true or false)
没特别设流程条件的话,多个 Job 如果其中有 Job 发生错误, 其他 Job 依然会继续执行
GitHub Actions — Reuse Workflow/Job
Workflow 定义
on: workflow_call就能封装给其他 Workflow 当成 Job 复用同个组织下可以跨 Repo 分享使用
因此可以把跨 Repo 共用的 CI/CD 工作放到共享的 Repo 一起使用
GitHub Actions — Workflow — Job — Step
GitHub Actions 中的最小执行项目
Job 中实际执行任务的程式
每个 Job 可以有多个 Steps
多个 Steps 是照顺序执行
Step 做完可以 Output 字串给后续 Steps 参考使用。
Step 可以直接撰写 shell script 程式 可以引用 gh cli 、当前环境变数(例如取得 PR 编号),直接做想做的事
没特别设流程条件的话,Step 如果发生错误, 会直接中断 ,后续的 Steps 不会执行
GitHub Actions — Workflow — Job — Reuse Action Step
可以直接复用 Marketplace 上各路大神包好的现有工作步骤。 例如: Comment 内容到 PR 。
也可以将自己一系列的工作任务 Step 打包成一个 Action GitHub Repo 让其他工作直接复用
Public Repo 的 Action 可以上架到 Marketplace
打包 Action 支援使用:
Docker Action — 代表 GitHub Actions 会把环境变数传到 Docker 容器中,再看你要怎么处理,可以是 shell script、Java、PHP…etc.
JavaScript/TypeScript Action — 直接使用 node.js 撰写 GitHub Actions 处理逻辑,同样的会把环境变数都传给你参考使用。 e.g. pozil/auto-assign-issue
Composite (YAML) — 纯 YAML 描述任务步骤 (同 GitHub Actions — Workflow — Job — Step) 可以宣告有哪写步骤要做或直接在上面写 shell script。 e.g. ZhgChgLi/ZReviewTender
碍于篇幅,本篇文章不会介绍如何打包 Github Actions Action,有兴趣可以参考官方文件: tutorials/creating-a-composite-action 。
GitHub Runner
GitHub 会根据 Runner Label 派发对应的 Job 给 Runner 执行
Runner 只做为监听者,轮询监听 GitHub 派发任务
只关心 Job 不关心是哪个 Action(Workflow) 因此会出现 Action A 的 Job-1 执行完,下一个换 Action B 的 Job-1,而不是 Action A 的 Jobs 都执行完才换 Action B。
Runner 可以使用 GitHub Hosted Runner 或 Self-hosted Runner。
GitHub Hosted Runner
- GitHub 提供的 Runner,可参考官方 Repo 列表:
{:target="_blank"}](/assets/404bd5c70040/1*KtQV4kDCWscEeaZ8jQI8Dg.webp)
- Runner 预先安装了什么可以点进去查看: e.g. macos-14-arm64
{:target="_blank"}](/assets/404bd5c70040/1*svXtXH78-TvK1C_XXCyYLA.webp)
iOS 开发优先使用 -arm64 (M系列) 处理器的 Runner,跑起来比较快
只要在 Job
run-on贴上表格上的 YAML Label,就能使用该 Runner 执行任务Public Repo 收费方式: 完全免费无限使用
️ Private Repo 免费额度: 免费额度(依照帐号不同额度不同,以 GitHub Free 为例): 用量:每月免费 2,000 分钟 储存:500 MB
⚠️️Private Repo 计费方式: 超过免费额度之后开始用用量计费(可设上限跟通知),依照 Runner 所属的机器作业系统、核心不同,价格也不同:
{:target="_blank"}](/assets/404bd5c70040/1*rkhRJN4ZRas_lDOJh-pjkQ.webp)
about-billing-for-github-actions
可以看到 macOS 的价格因为设备成本很高所以贵。
- 最多并发任务数限制:
{:target="_blank"}](/assets/404bd5c70040/1*LU3zGSBe57NBVMfDwl0wdQ.webp)
usage-limits-billing-and-administration
这边扯太多了,我们的重点是 Self-hosted Runner。
Self-hosted Runner on In-house Server
将自己的机器作为 Runner
一台实体机器可以起多个 Runner 并发接任务来做
免费无限量无限制使用 只有机器购买成本,花一次使用到饱! 以 32G RAM M4 Mini (=NT$40,900) 计算,如果用 GitHub Hosted Runner 一个月要花 500 USD; 买一台架设好用超过三个月就回本 了!
支援 Windows, macOS, Linux (x64/ARM/ARM64)
同个组织可以跨 Repo 共享 Runner
⚠️目前:actions/cache, actions/upload-artifact, actions/download-artifact 都只支援 GitHub 云端服务,代表这些内容还是会上传到 GitHub 伺服器并计算储存量收费。 可以在自己的机器上开共用目录取代。
Self-hosted Runner 也支援 Docker, k8s 只是我没研究。
架设 Self-hosted Runner 只需几步 (10 分钟内设定好) 就能上线开始接任务执行(本文稍后会介绍)。
GitHub Workflow x Job x Step x Runner 流程关系图
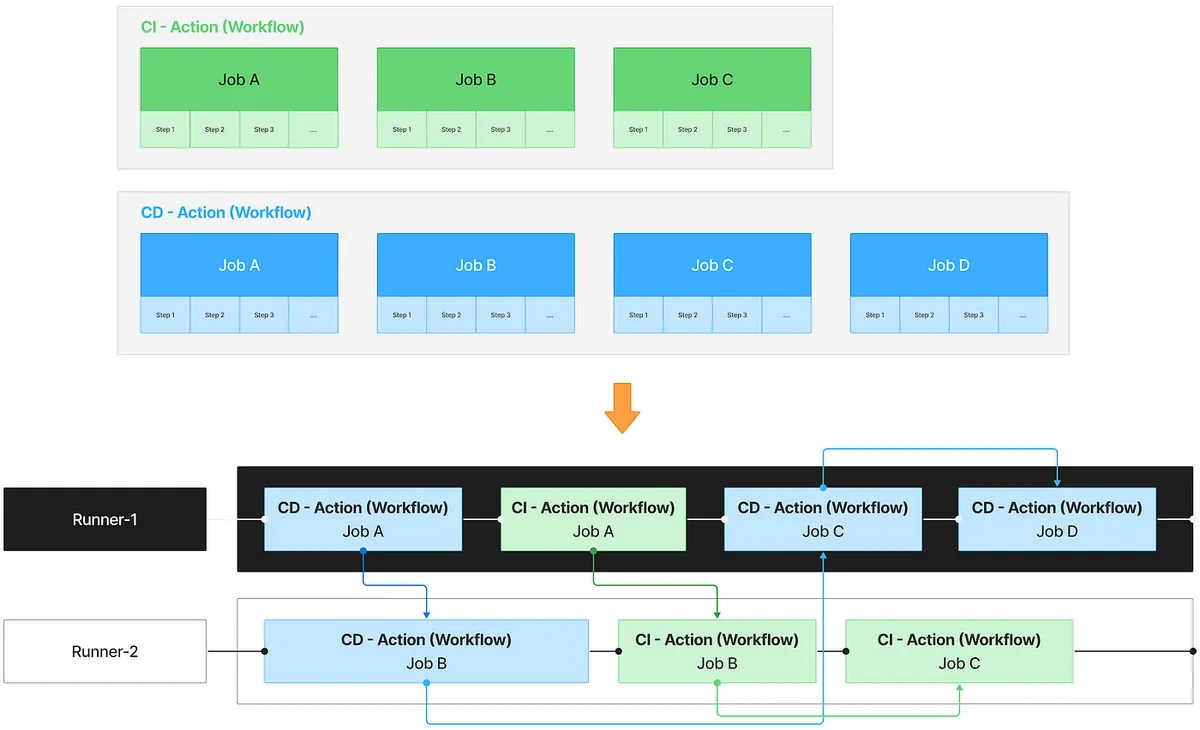
这边用一张图总结工作流程与关系,假设我们有两个 Workflow、两个 Runner:
CI —假设 R有 3 个 Jobs,每个 Job 各有几个 Steps,Runner Label(run-on) —
self-hosted-appCD — 有 4 个 Jobs,每个 Job 各有几个 Steps,Runner Label(run-on) —
self-hosted-appRunner — 有 2 个,Runner Label 也都是—
self-hosted-app
同前述,Runner 跟 Workflow 是依照 Runnler Label 来派发、接收任务来做,这个案例都是用同个 self-hosted-app Runner Label,Workflow 的 Jobs 预设是并发执行、Steps 是每个 Job 的实际执行内容,串行照顺序执行,Steps 都执行完等于 Job 执行完毕。
因此 Workflow 实际执行的时间轴会是在两个 Runner 之间穿梭执行 Job,也会并发执行、当前 Job 执行完下一个也不一定是接著同个 Worflow 的下一个 Job。
⚠️ 所以才说确保每个 Job 是独立的很重要 (尤其在 Self-hosted Runner 环境之下,Job 结束之后可能不会清除的太干净,我们可能会下意识觉得这个 Job 的产出,下一个 Job 可以接著做事),不应该这样用。
如果 Job 有产出要给后续的 Job 使用:
Job Output String : 输出纯文字到变数给其他 Job 引用
Artifact-upload/download: Job 的 Step 最后一步将执行结果上传到 GitHub Artifact,另一个 Job 的第一个 Step 下载回来继续处理使用。 e.g. 例如 Job — 打包 → 将打包结果 .ipa 传到 Artifact → Job — 部署 → 下载回来 .ipa → 上传 App Store 部署 要注意: 目前就算是 Self-hosted 也是会上 GitHub Artifact 云储存。
AWS/GCP…云端储存 : 同上,只是是用自己的云端储存服务。
[Self-hosted Only] 共用硬碟、目录: Self-hosted Runner 如果都有挂载一个共用目录,则可用这个目录依照 UUID 建立资料夹存放产出结果,然后后续 Job 去读取前一个 Job Output UUID 去找到对应的储存再拿回来用。 要注意,不同主机的 Runner 也都要挂载同个共用目录。
在同个 Job 的 Steps 把所有事情做完。
做中学 GitHub Actions — 案例实作
「坐而言,不如起而行」以上名词解释跟流程架构介绍相信大家也是看得懵懵懂懂,接下来会直接举三个功能例子,带大家实际动手做,并一边解释碰到的东西,从做当中学习,以了解 GitHub Actions 到底是什么。
案例 — 1
建立 Pull Request 后自动标记 File Changes Size Label 让 Reviewer 方便安排 Review 工作。
成果图
{:target="_blank"}](/assets/404bd5c70040/1*vjSWeu2zB-hmVpfziMDR5Q.webp)
运作流程
使用者开 PR、重开 PR、Push 新 Commit 到 PR
触发 GitHub Actions Workflow
shell script 取的 file changes 数量
判断数量对 PR 标记上 Label
完成
动手做
Repo → Actions → New workflow → set up a workflow yourself。
档案名称: Automation-PullRequest.yml
Action Workflow 可以每个任务独立一个档案,也可以依照触发事件、目的,同个目的聚合在同个档案,反正多个 Job 是并发执行的,另外 因为 GitHub Actions 暂时不支援目录结构,所以档案少一点、使用阶层命名档案会比较好管理 。
这边把 PR 相关事件的 Actions 都放在同个 Workflow。
Automation-PullRequest.yml
1
2
3
4
5
6
7
8
9
10
11
12
13
14
15
16
17
18
19
20
21
22
23
24
25
26
27
28
29
30
31
32
33
34
35
36
37
38
39
40
41
42
43
44
45
46
47
48
49
50
51
52
53
54
55
56
57
58
59
60
61
62
63
64
65
66
67
68
69
70
71
72
73
74
75
76
77
78
79
80
81
82
83
84
85
86
87
88
89
90
91
92
93
94
95
96
97
98
99
100
101
102
103
104
105
106
# Workflow(Action) 名称
name: Pull Reqeust Automation

# Actions Log 的标题名称
run-name: "[Pull Reqeust Automation] ${{ github.event.pull_request.title \\|\\| github.ref }}"

# 触发事件
on:
  # PR 事件
  pull_request:
    # PR - 开启、重开、有新 Push Commit 时
    types: [opened, synchronize, reopened]


# 同个 Concurrency Group 如果有新的 Job 会取消正在跑的
# 例如 Push Commit 触发的任务还没执行就又 Push Commit 时,会取消前一个任务
concurrency:
  group: ${{ github.workflow }}-${{ github.ref_name }}
  cancel-in-progress: true

# Job 工作项目
# Job 会并发执行
jobs:
  # Job ID
  label-pr-by-file-count:
    # Job 名称 (可省略,有设定在 Log 显示比较好读)
    name: Label PR by changes file count

    # 如果这个 Job 失败,不影响整个 Workflow,继续其他 Job
    continue-on-error: true

    # 设定最长 Timeout 时间,防止异常情况发生时无止尽的等待
    timeout-minutes: 10

    # Runner Label - 使用 GitHub Hosted Runner ubuntu-latest 来执行工作
    # 如果是 Private Repo 会计算用量,超过可能会产生费用
    runs-on: ubuntu-latest

    # 工作步骤
    # 工作步骤会照顺序执行
    steps:
      # 步骤名称
      - name: Get changed file count and apply label
        # 步骤 ID (可省略,后续若没有 Step 要引用 Output 输出则不需设定)
        id: get-changed-files-count-by-gh
        # 注入外部环境参数到执行阶段
        env:
          # secrets.GITHUB_TOKEN 是 GitHub Actions 执行时自动产生的 Token,不需自行在 Secrets 设定,拥有一些 GitHub Repo API Scopes 权限
          # https://docs.github.com/en/actions/how-tos/security-for-github-actions/security-guides/use-github_token-in-workflows
          # gh(GitHub) cli 需要注入 GH_TOKEN 到 ENV,gh 才有权限操作
          GH_TOKEN: ${{ secrets.GITHUB_TOKEN }}
        # Shell script
        # GitHub Hosted Runner 内建都有安装好 gh cli,不需要安装 Job 就能直接使用
        run: \\|
          #   ${{ github.xxx }} 是 GitHub Actions Context 表达式
          #   不是 Shell 变数,而是 YAML 解析阶段由 GitHub Actions 替换成对应值
          #   其他参数:https://docs.github.com/en/actions/learn-github-actions/contexts#github-context

          # 取得 PR 编号:
          PR_NUMBER=${{ github.event.pull_request.number }}

          # 取得 Repo:
          REPO=${{ github.repository }}

          # 使用 GitHub API (gh cli) 取得 File changed 数量
          FILE_COUNT=$(gh pr view $PR_NUMBER --repo $REPO --json files --jq '.files \\| length')

          # Print Log
          echo "Changed file count: $FILE_COUNT"

          # Label 逻辑
          if [ "$FILE_COUNT" -lt 5 ]; then
            LABEL="XS"
          elif [ "$FILE_COUNT" -lt 10 ]; then
            LABEL="S"
          elif [ "$FILE_COUNT" -lt 30 ]; then
            LABEL="M"
          elif [ "$FILE_COUNT" -lt 80 ]; then
            LABEL="L"
          elif [ "$FILE_COUNT" -lt 200 ]; then
            LABEL="XL"
          else
            LABEL="XXL"
          fi

          # 使用 GitHub API (gh cli) 移除目前的 Size Label
          EXISTING_LABELS=$(gh pr view "$PR_NUMBER" --repo "$REPO" --json labels --jq '.labels[].name')
          for EXISTING in $EXISTING_LABELS; do
            case "$EXISTING" in
              XS\\|S\\|M\\|L\\|XL\\|XXL)
                echo "🧹 Removing existing label: $EXISTING"
                gh pr edit "$PR_NUMBER" --repo "$REPO" --remove-label "$EXISTING"
                ;;
            esac
          done

          # (可选)如果 Label 不存在则建立
          if ! gh label list --repo "$REPO" \\| grep -q "^$LABEL"; then
            echo "🆕 Creating missing label: $LABEL"
            gh label create "$LABEL" --repo "$REPO" --description "Size label: $LABEL" --color "ededed"
          else
            echo "✅ Label '$LABEL' already exists"
          fi

          # 使用 GitHub API (gh cli) 标记上 Label
          gh pr edit $PR_NUMBER --repo $REPO --add-label "$LABEL"
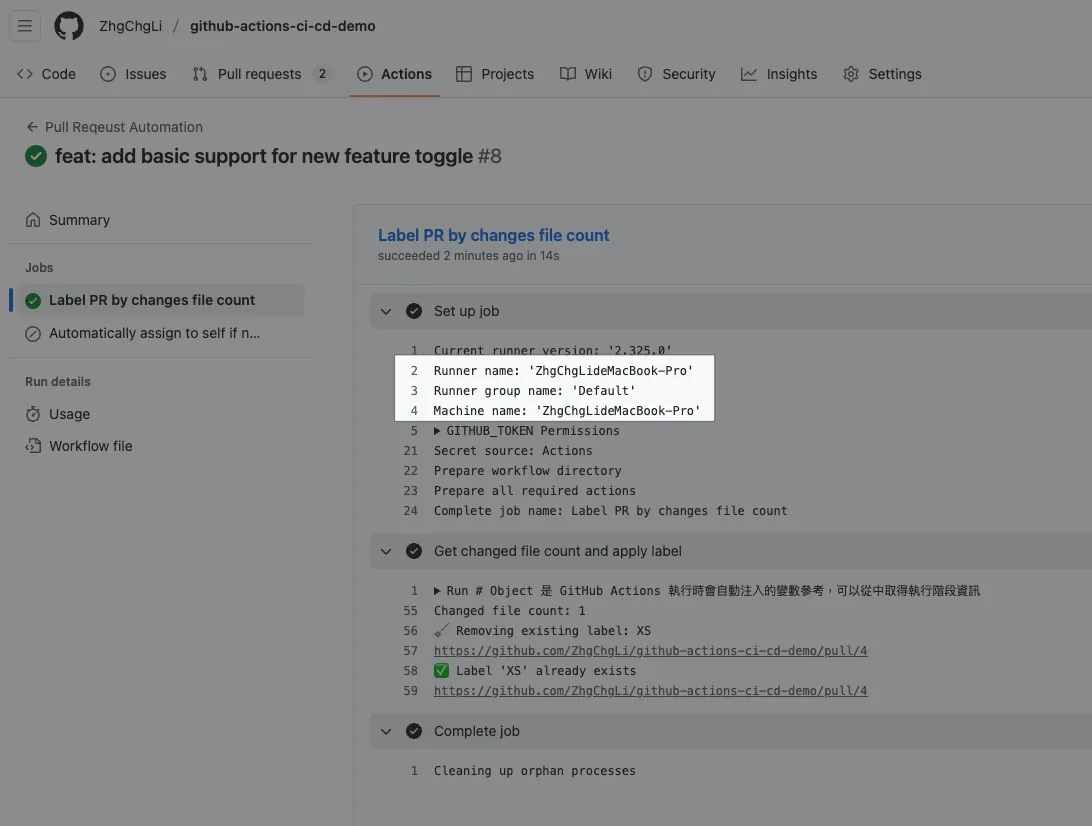
Commit 档案到 Repo 主分支之后,我们再开新 PR 就会自动触发 GitHub Actions:
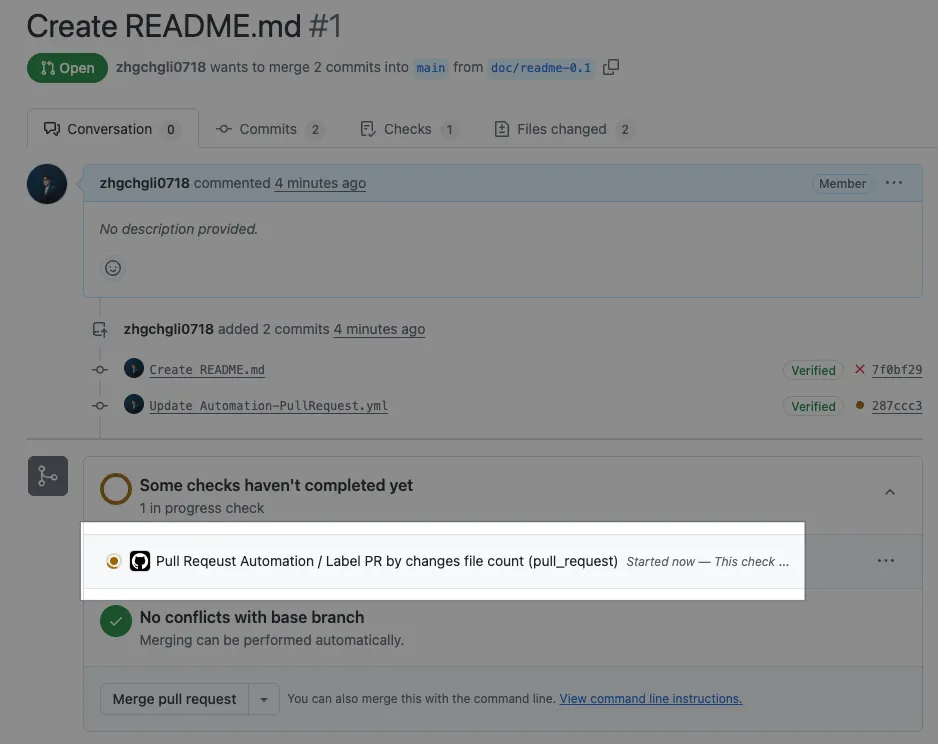
Action 执行状态显示 Queued 代表任务正在等待 Runner 接任务回去做。
执行结果
{:target="_blank"}](/assets/404bd5c70040/1*-JoD8IQYHVrDqHmLmrXyaQ.webp)
执行完毕并且成功后 PR 上就会自动标记好对应的 Label 了!纪录会显示由 github-actions 标记。
完整程式码: Automation-PullRequest.yml
直接使用别人包好的 Action 步骤: pascalgn/size-label-action
前面有说到可以直接使用别人封装好的 Action,标记 PR Size Label 这任务已经有现成的轮子可以使用,上述只是为了教学目的,实际上不需要自己重造轮子。
只需要在 Action Workflow Job Step 中直接使用就能完成任务:
1
2
3
4
5
6
7
8
9
10
11
12
13
14
15
16
17
18
19
20
21
22
23
24
25
26
27
28
29
30
31
32
33
34
35
36
37
38
39
40
41
42
43
44
45
46
47
48
49
50
# Workflow(Action) 名称
name: Pull Reqeust Automation

# 触发事件
on:
  # PR 事件
  pull_request:
    # PR - 开启、重开、有新 Push Commit 时
    types: [opened, synchronize, reopened]


# 同个 Concurrency Group 如果有新的 Job 会取消正在跑的
# 例如 Push Commit 触发的任务还没执行就又 Push Commit 时,会取消前一个任务
concurrency:
  group: ${{ github.workflow }}-${{ github.ref_name }}
  cancel-in-progress: true

# Job 工作项目
# Job 会并发执行
jobs:
  # Job ID
  label-pr-by-file-count:
    # Job 名称 (可省略,有设定在 Log 显示比较好读)
    name: Label PR by changes file count

    # 如果这个 Job 失败,不影响整个 Workflow,继续其他 Job
    continue-on-error: true

    # 设定最长 Timeout 时间,防止异常情况发生时无止尽的等待
    timeout-minutes: 10

    # Runner Label - 使用 GitHub Hosted Runner ubuntu-latest 来执行工作
    # 如果是 Private Repo 会计算用量,超过可能会产生费用
    runs-on: ubuntu-latest

    # 工作步骤
    # 工作步骤会照顺序执行
    steps:
      # 步骤名称
      - name: Get changed file count and apply label
        # 步骤 ID (可省略,后续若没有 Step 要引用 Output 输出则不需设定)
        id: get-changed-files-count-by-gh
        # 直接使用别人封装好的程式
        uses: "pascalgn/size-label-action@v0.5.5"
        # 注入外部环境参数到执行阶段
        # 参数命名、可用参数要参考说明:https://github.com/pascalgn/size-label-action/tree/main
        env:
          # secrets.GITHUB_TOKEN 是 GitHub Actions 执行时自动产生的 Token (github-actions 身份),不需自行在 Secrets 设定,拥有一些 GitHub Repo API Scopes 权限
          # https://docs.github.com/en/actions/how-tos/security-for-github-actions/security-guides/use-github_token-in-workflows
          GITHUB_TOKEN: "${{ secrets.GITHUB_TOKEN }}"
这个包好的 Action 是 JavaScript Action,实际执行程式码可以参考以下档案: dist/index.js 。
name, run-name 的补充:
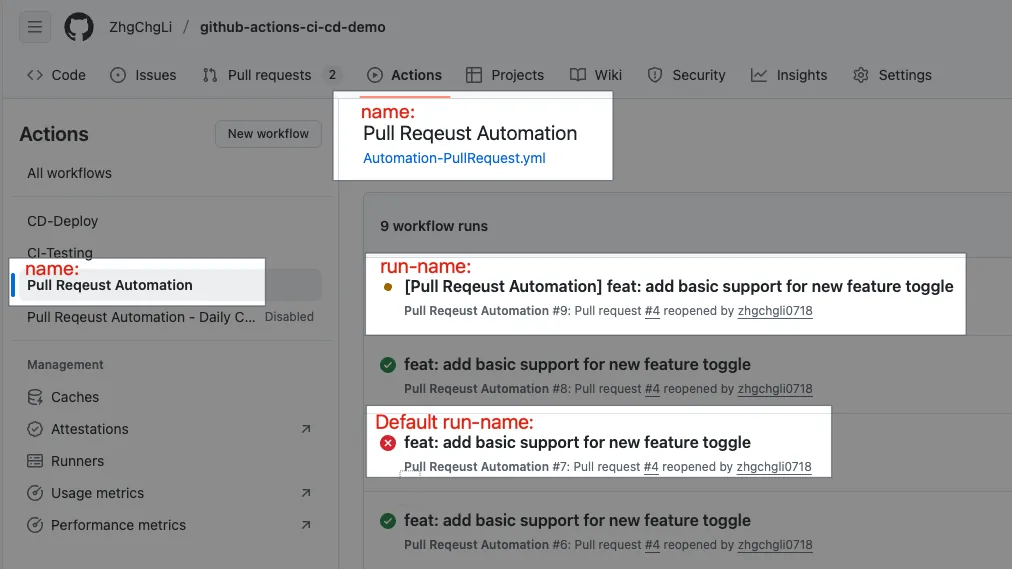
name: Action Workflow 的名称
run-name: 执行纪录的标题名称 (可带入 PR Title or Branch or Author…etc) 如果是 on:pull_request 事件预设是 PR Title。
案例 — 2
建立 Pull Request 后如果没有 Assignee 则自动 Assign 作者自己并且 Comment 提示。(只有在初次建立时才会执行)
成果图
{:target="_blank"}](/assets/404bd5c70040/1*EL-0nQF7jhP34d6ZoSkJAg.webp)
运作流程
使用者开 PR
触发 GitHub Actions Workflow
github script 取得 assignee
如果没有 asignee 则 assign 开 PR 的作者 & Comment 讯息
完成
动手做
Repo → Actions → New workflow → set up a workflow yourself。
档案名称: Automation-PullRequest.yml (同上)
Automation-PullRequest.yml
1
2
3
4
5
6
7
8
9
10
11
12
13
14
15
16
17
18
19
20
21
22
23
24
25
26
27
28
29
30
31
32
33
34
35
36
37
38
39
40
41
42
43
44
45
46
47
48
49
50
51
52
53
54
55
56
57
58
59
60
61
62
63
64
65
66
67
68
69
70
71
72
73
74
# Workflow(Action) 名称
name: Pull Reqeust Automation

# Actions Log 的标题名称
run-name: "Pull Reqeust Automation - Daily Checker"

# 触发事件
on:
  # PR 事件
  pull_request:
    # PR - 开启、重开、有新 Push Commit 时
    types: [opened, synchronize, reopened]


# 同个 Concurrency Group 如果有新的 Job 会取消正在跑的
# 例如 Push Commit 触发的任务还没执行就又 Push Commit 时,会取消前一个任务
concurrency:
  group: ${{ github.workflow }}-${{ github.ref_name }}
  cancel-in-progress: true

# Job 工作项目
# Job 会并发执行
jobs:
  # Job ID
  label-pr-by-file-count:
    # 请参考前文,略....
  # ---------
  assign-self-if-no-assignee:
    name: Automatically assign to self if no assignee is specified
    # 因为是共用触发事件,所以在 Job 上自己判断,当是 Pull Request Opened(首次建立) 时才执行 Job 否则会 Skipped
    if: github.event_name == 'pull_request' && github.event.action == 'opened'

    # 如果这个 Job 失败,不影响整个 Workflow,继续其他 Job
    continue-on-error: true

    # 设定最长 Timeout 时间,防止异常情况发生时无止尽的等待
    timeout-minutes: 10

    # Runner Label - 使用 GitHub Hosted Runner ubuntu-latest 来执行工作
    # 如果是 Private Repo 会计算用量,超过可能会产生费用
    runs-on: ubuntu-latest

    steps:
      - name: Assign self if No Assignee
        # 使用 GitHub Script (JavaScript) 撰写脚本 (Node.js 环境)
        # 相较上面直接用 Shell Script 写起来更方便漂亮
        # 也不需要自行注入环境变数、GITHUB_TOKEN
        uses: actions/github-script@v7
        with:
          script: \\|
            // github-script 中会自动注入到 context 变数供 javascript 直接引用
            // https://docs.github.com/en/actions/learn-github-actions/contexts#github-context

            const issue = context.payload.pull_request; // 如果要连 Issue 一起支援可写成 context.payload.issue \\|\\| context.payload.pull_request
            const assignees = issue.assignees \\|\\| [];
            const me = context.actor;

            if (assignees.length === 0) {
              // Assignee 设成自己
              await github.rest.issues.addAssignees({
                owner: context.repo.owner,
                repo: context.repo.repo,
                issue_number: issue.number,
                assignees: [me]
              });

              // 留言通知
              await github.rest.issues.createComment({
                owner: context.repo.owner,
                repo: context.repo.repo,
                issue_number: issue.number,
                body: `🔧 No assignee was set, so I have assigned this to myself (@${me}).`
              });
            }
这次我们示范改用 GitHub Script (JavaScript) 撰写脚本,程式码语法上更弹性更好撰写。
当然如果你想照我之前说的每个任务一个档案,就可以拔掉 Job If. . 直接在 Action Workflow 触发条件设定:
Automation-PullRequest-Auto-Assign.yml :
1
2
3
4
5
6
7
8
9
10
11
12
13
14
15
16
# Workflow(Action) 名称
name: Pull Reqeust Automation - Auto Assignee Self

# 触发事件
on:
  # PR 事件
  pull_request:
    # PR - 开启时
    types: [opened]

jobs:
  assign-self-if-no-assignee:
    name: Automatically assign to self if no assignee is specified
    runs-on: ubuntu-latest
    steps:
      # 请参考前文,略....
Commit 档案到 Repo 主分支之后,我们再开新 PR 就会自动触发 GitHub Actions:
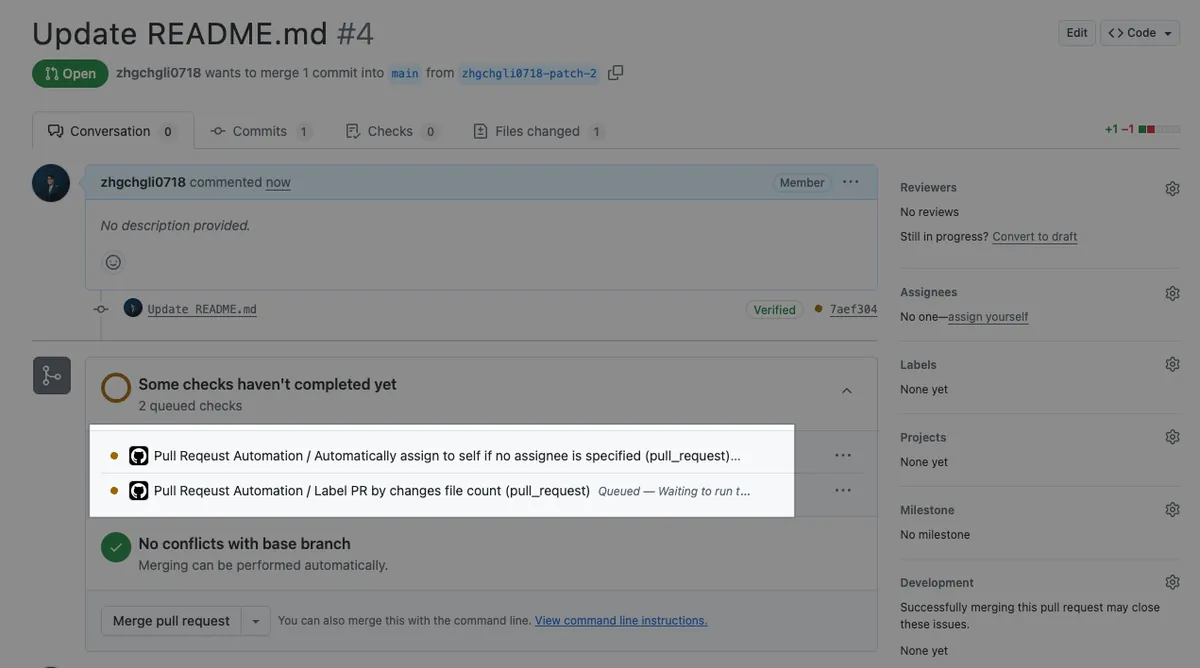
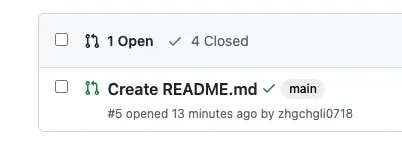
现在有两个 Job 要执行了!
执行结果
{:target="_blank"}](/assets/404bd5c70040/1*23muCVgUJKmZt746khBMFQ.webp)
执行完毕并且成功后 PR 如果没有 Asignees 会自动 Assign PR 作者并且 Comment 讯息。(都是用 github-actions 身份操作)
完整程式码: Automation-PullRequest.yml
测试重开(Reopened) PR
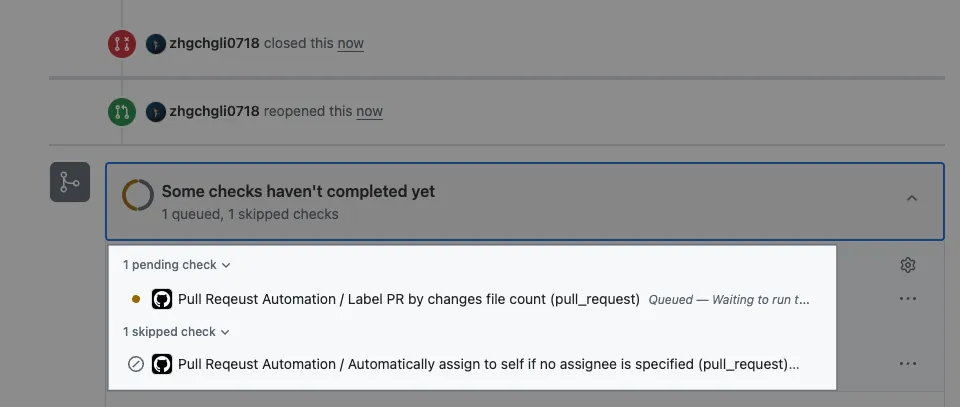
可看到只会执行 Size Label Job,Auto Assignee Job 被 Skipped 了。
这个任务也有人包好 Action 可以直接复用,可参考: pozil/auto-assign-issue 。
案例 — 3
每日早上 9 点自动统计当前 PR 数量及已开启多久时间发送通知讯息到 Slack 工作寻组、自动关闭已开启超过 3 个月的 PR。
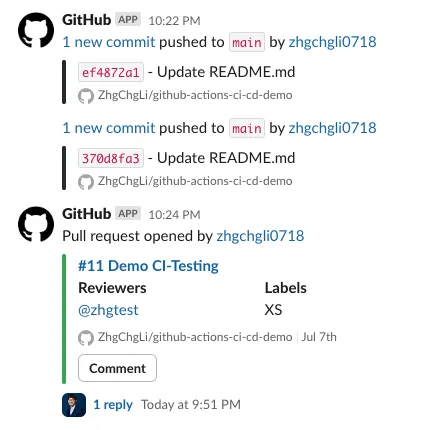
成果图
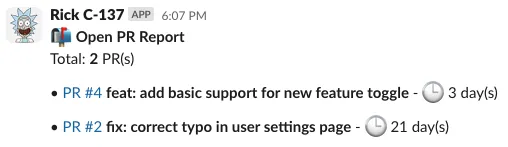
Slack 工作群组每天早上自动收到报告
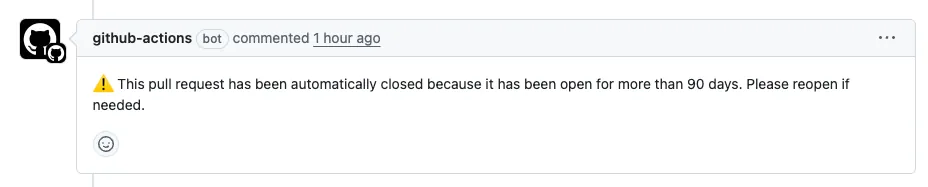
自动关闭超过 90 天的 PR
运作流程
GitHub Actions 每天早上 9 点自动触发
触发 GitHub Actions Workflow
github script 取得 开启中的 PR 列表、统计开启了几天
传送统计报告讯息到 Slack
关闭超过 90 天的 PR
完成
动手做
Repo → Actions → New workflow → set up a workflow yourself。
档案名称: Automation-PullRequest-Daily.yml
Automation-PullRequest-Daily.yml
1
2
3
4
5
6
7
8
9
10
11
12
13
14
15
16
17
18
19
20
21
22
23
24
25
26
27
28
29
30
31
32
33
34
35
36
37
38
39
40
41
42
43
44
45
46
47
48
49
50
51
52
53
54
55
56
57
58
59
60
61
62
63
64
65
66
67
68
69
70
71
72
73
74
75
76
77
78
79
80
81
82
83
84
85
86
87
88
89
90
91
92
93
94
95
96
97
98
99
100
101
102
103
104
105
106
107
108
109
110
111
112
113
114
115
116
117
118
119
120
121
122
123
124
125
126
127
128
129
130
131
132
133
134
135
136
137
138
139
140
141
142
143
144
145
146
147
148
149
150
151
152
# Workflow(Action) 名称
name: Pull Reqeust Automation - Daily Checker

# 触发事件
on:
  # 排程定时自动执行
  # https://crontab.guru/
  # UTC 时间
  schedule:
    # UTC 的 01:00 = 每天 UTC+8 的 09:00
    - cron: '0 1 * * *'
  # 手动触发
  workflow_dispatch:

# Job 工作项目
# Job 会并发执行
jobs:
  # Job ID
  caculate-pr-status:
    # Job 名称 (可省略,有设定在 Log 显示比较好读)
    name: Caculate PR Status
    # Runner Label - 使用 GitHub Hosted Runner ubuntu-latest 来执行工作
    # 如果是 Private Repo 会计算用量,超过可能会产生费用
    runs-on: ubuntu-latest

    # Job Output
    outputs:
      pr_list: ${{ steps.pr-info.outputs.pr_list }}

    # 工作步骤
    # 工作步骤会照顺序执行
    steps:
      # 步骤名称
      - name: Fetch open PRs and caculate
        # Step 外部要引用 Output 输出,需设定
        id: pr-info
        uses: actions/github-script@v7
        with:
          script: \\|
            const now = new Date();
            const per_page = 100;
            let page = 1;
            let allPRs = [];

            while (true) {
              const { data: prs } = await github.rest.pulls.list({
                owner: context.repo.owner,
                repo: context.repo.repo,
                state: 'open',
                per_page,
                page,
              });
              if (prs.length === 0) break;
              allPRs = allPRs.concat(prs);
              if (prs.length < per_page) break;
              page++;
            }

            const result = allPRs.map(pr => {
              const created = new Date(pr.created_at);
              const daysOpen = Math.floor((now - created) / (1000 * 60 * 60 * 24));
              return {
                pr: pr.number.toString(),
                title: pr.title,
                idle: daysOpen
              };
            });

            // 设定回 Output,只接受 String
            core.setOutput('pr_list', JSON.stringify(result));
  # ----
  send-pr-summary-message-to-slack:
    name: Send PR Summary Messag to Slack
    # Job 预设是并发,使用 needs 可以迫使当前 Job 等到 need Job 完成时才会执行
    needs: [caculate-pr-status]
    runs-on: ubuntu-latest

    steps:
      - name: Generate Message
        # Step 外部要引用 Output 输出,需设定
        id: gen-msg
        uses: actions/github-script@v7
        with:
          script: \\|
            const prList = JSON.parse(`${{ needs.caculate-pr-status.outputs.pr_list }}`);
            const blocks = [];

            // 标题
            blocks.push({
              type: "section",
              text: {
                type: "mrkdwn",
                text: `📬 *Open PR Report*\nTotal: *${prList.length}* PR(s)`
              }
            });

            // 每个 PR 一行
            for (const pr of prList) {
              blocks.push({
                type: "section",
                text: {
                  type: "mrkdwn",
                  text: `• <https://github.com/${context.repo.owner}/${context.repo.repo}/pull/${pr.pr}\\|PR #${pr.pr}> *${pr.title}* - 🕒 ${pr.idle} day(s)`
                }
              });
            }

            // 设定回 Output,只接受 String
            core.setOutput('blocks', JSON.stringify(blocks));


      # 使用 Slack 官方封装好的 Slack API Github Actions
      # https://tools.slack.dev/slack-github-action/sending-techniques/sending-data-slack-api-method/
      # 发送讯息
      - name: Post text to a Slack channel
        uses: slackapi/slack-github-action@v2.1.0
        with:
          method: chat.postMessage
          token: ${{ secrets.SLACK_BOT_TOKEN }}
          payload: \\|
            channel: ${{ vars.SLACK_TEAM_CHANNEL_ID }}
            blocks: ${{ steps.gen-msg.outputs.blocks }}
  # ----
  auto-close-old-prs:
    name: Auto Close Old PRs
    needs: [caculate-pr-status]
    runs-on: ubuntu-latest

    steps:
      - name: Auto close PRs opened more than 90 days
        uses: actions/github-script@v7
        with:
          script: \\|
            const prList = JSON.parse(`${{ needs.caculate-pr-status.outputs.pr_list }}`);
            const oldPRs = prList.filter(pr => pr.idle > 90);

            for (const pr of oldPRs) {
              await github.rest.pulls.update({
                owner: context.repo.owner,
                repo: context.repo.repo,
                pull_number: parseInt(pr.pr),
                state: 'closed'
              });

              await github.rest.issues.createComment({
                owner: context.repo.owner,
                repo: context.repo.repo,
                issue_number: parseInt(pr.pr),
                body: `⚠️ This pull request has been automatically closed because it has been open for more than 90 days. Please reopen if needed.`
              });
            }
            console.log(`Closed ${oldPRs.length} PR(s)`);
在这个范例中我们使用:
on: schedule Crontab 排程自动触发跟 workflow_dispatch 支援手动触发
Job output/Step output (都只能是字串)
多个 Jobs 预设是并发但可以用
needs时间依赖等待关系从 Repo Secrets/Variables 取得设定
串接 Slack API
Repo Secrets — 新增 SLACK_BOT_TOKEN
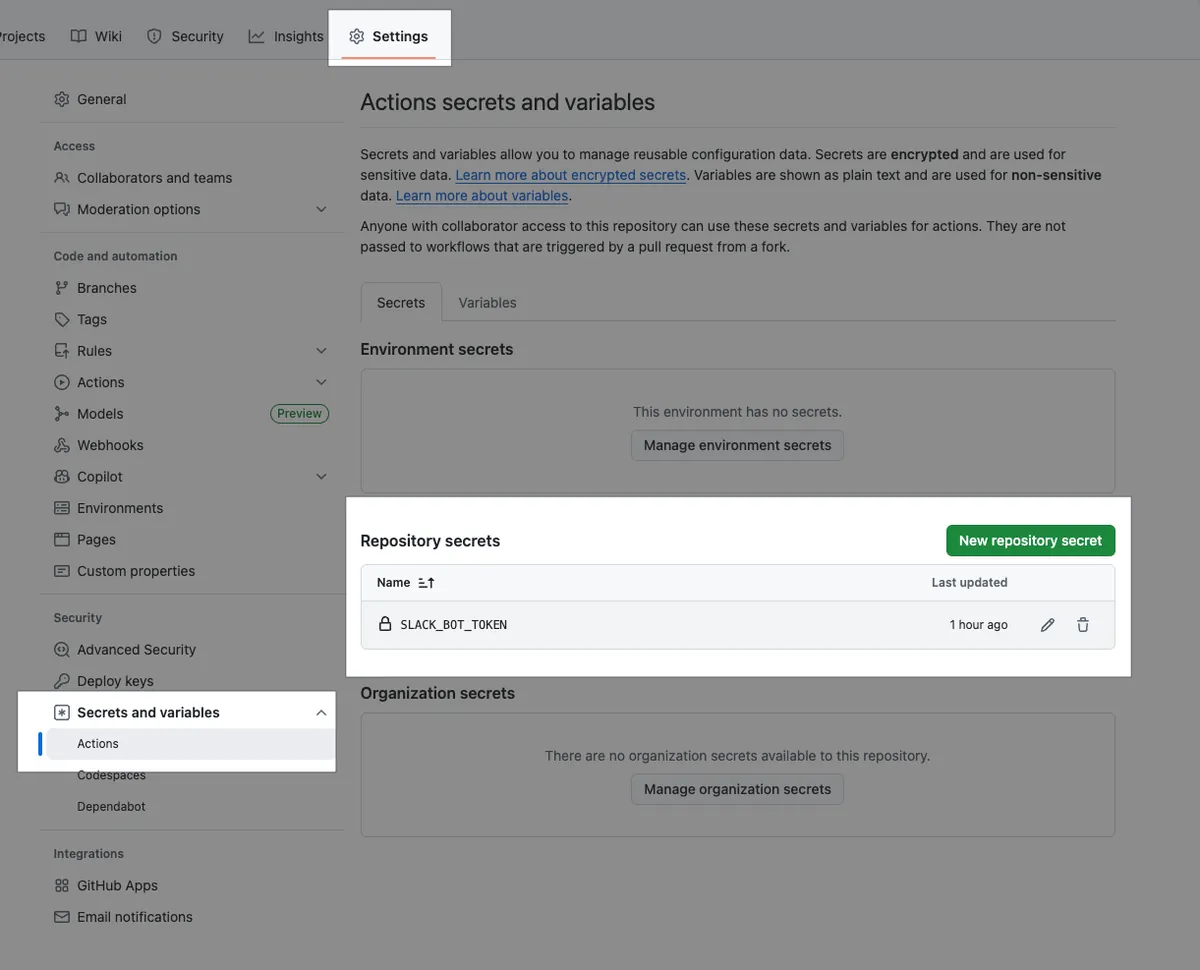
- Slack App 建立、发讯息权限设定可参考我 之前的文章
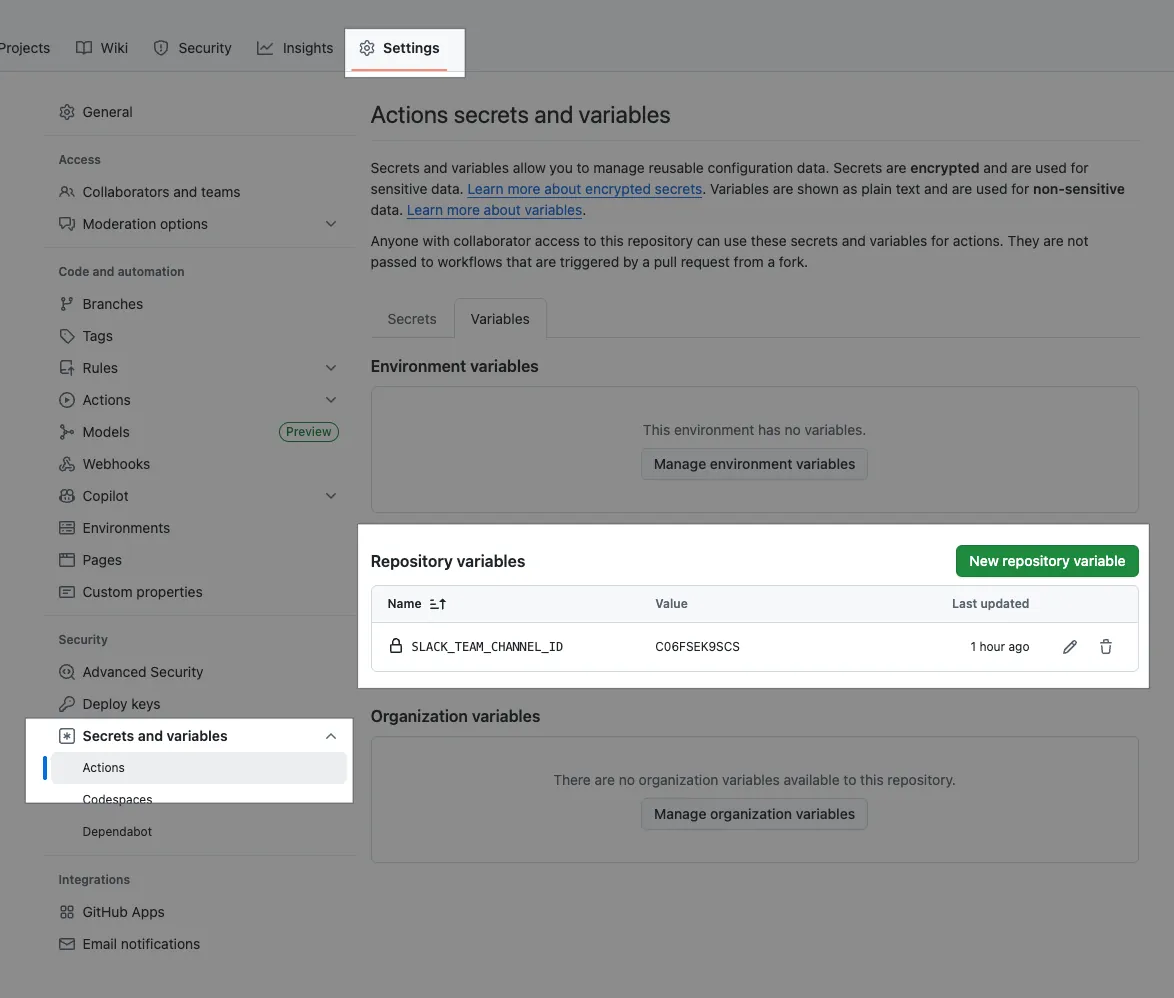
Repo Variables — 新增 SLACK_TEAM_CHANNEL_ID
Commit 档案到 Repo 主分支之后,回到 Actions 手动触发看看:
日后会每日自动触发。
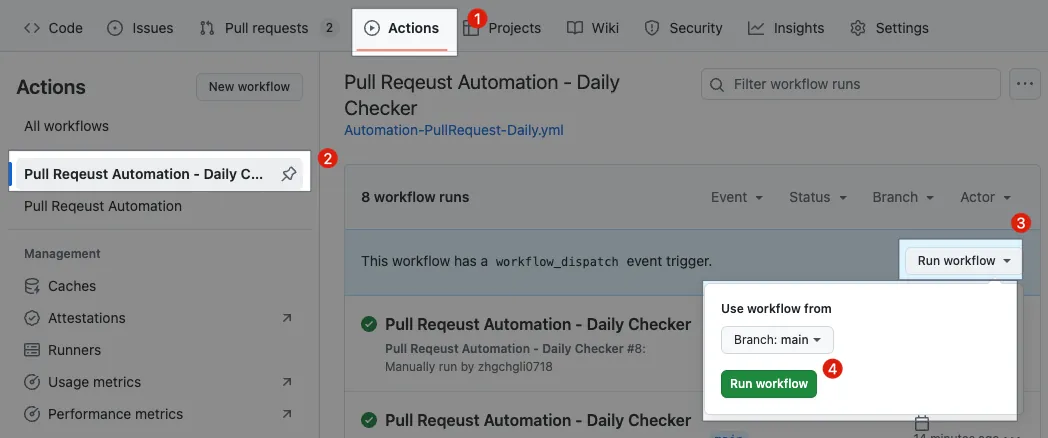
Actions → Pull Request Automation — Daily Checker → Run workflow → Branch: main → Run workflow。
执行后可以点击进入查看执行状况:
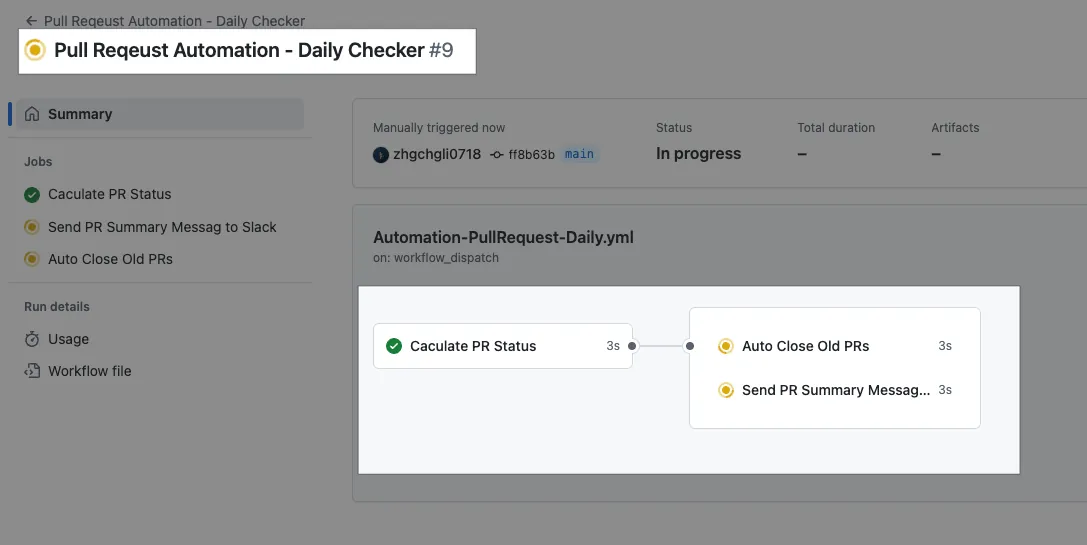
因为有 needs 的限制,Jobs 流程就会是 Cacluate PR Status 先完成后才会并发执行 Auto Close Old PRs 和 Send PR Summary Message to Slack 。
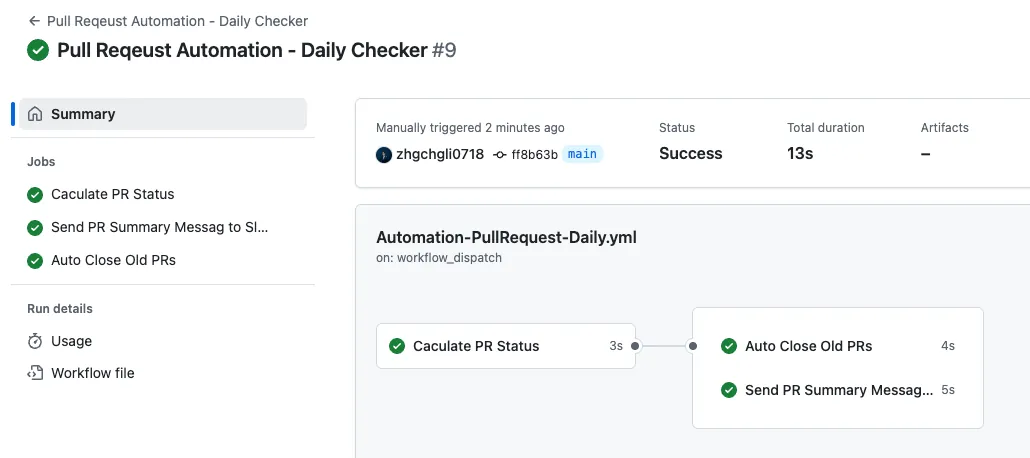
执行结果
任务都成功执行后可以查看 Slack 讯息:
成功 🚀🚀🚀
完整程式码: Automation-PullRequest-Daily.yml
小结
希望上面三个案例能让您对 GitHub Actions 有个初步的了解也希望有激起你的自动化工作创意,可以自己发想工作流程(请务必先参考 触发事件 ),然后撰写脚本执行;也记得先去 Marketplace 找找现有的步骤可以站在巨人的肩膀直接使用。
本篇只是入门基础(甚至没 Checkout Code),下一篇「 CI/CD 实战指南(三):使用 GitHub Actions 实作 App 专案的 CI 与 CD 工作流程 」会在介绍更复杂深入的 GitHub Actions Workflow。
GitHub 自动化延伸议题
GitHub 可以与 Slack 整合,订阅 Repo 的 PR 更新通知、Push Default Branch 通知…等等。
问题 1. GitHub 讯息无法标记到人,只标记了 GitHub 帐号,Slack 帐号收不到通知:
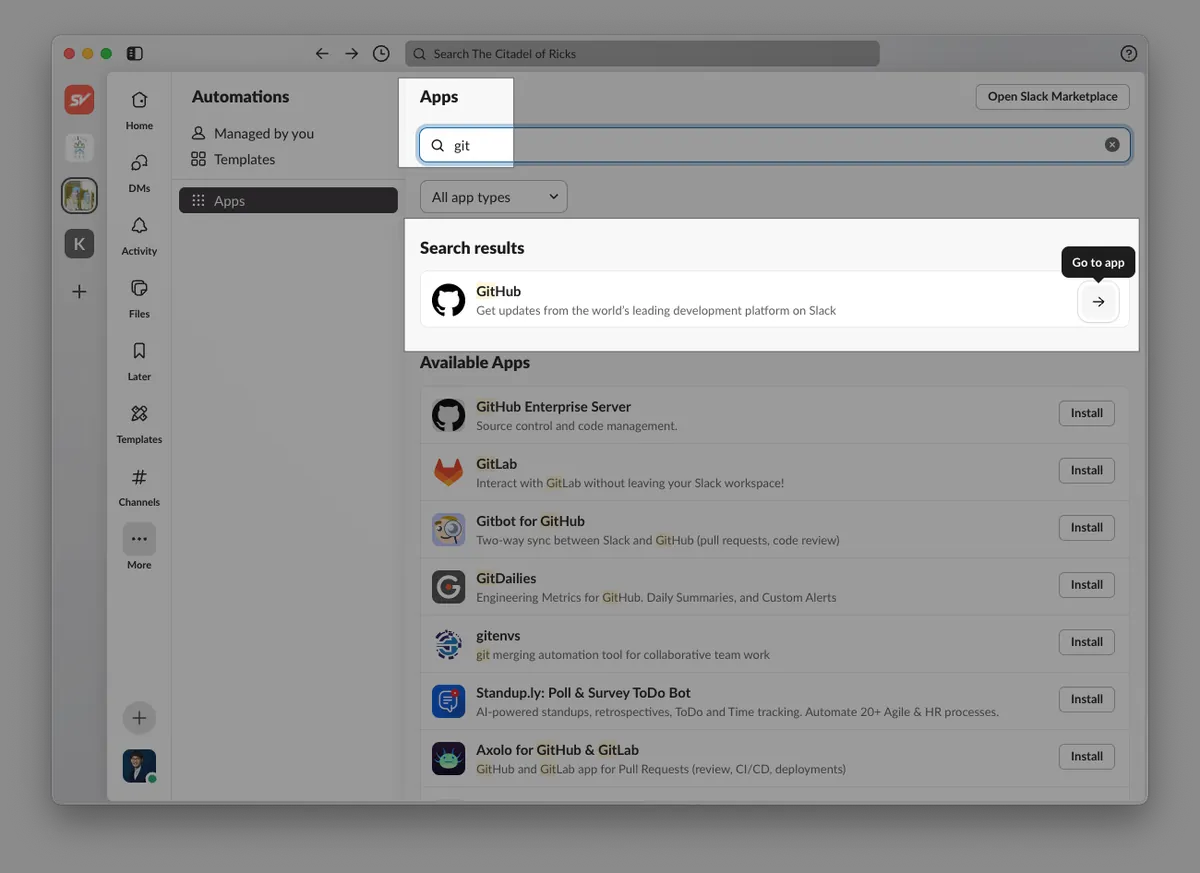

Slack App or Apps 搜寻 GitHub → 打开讯息视窗 →完成 Connect GitHub Account 步骤,这样 GitHub 才知道你对应的 Slack UID 是什么,才能标记你。
问题 2. Pull Request Reminder
我记得这本来是第三方开发的功能,后来直接整合在 GitHub 里面了,不要傻傻的自己用 GitHub Actions 写脚本做!
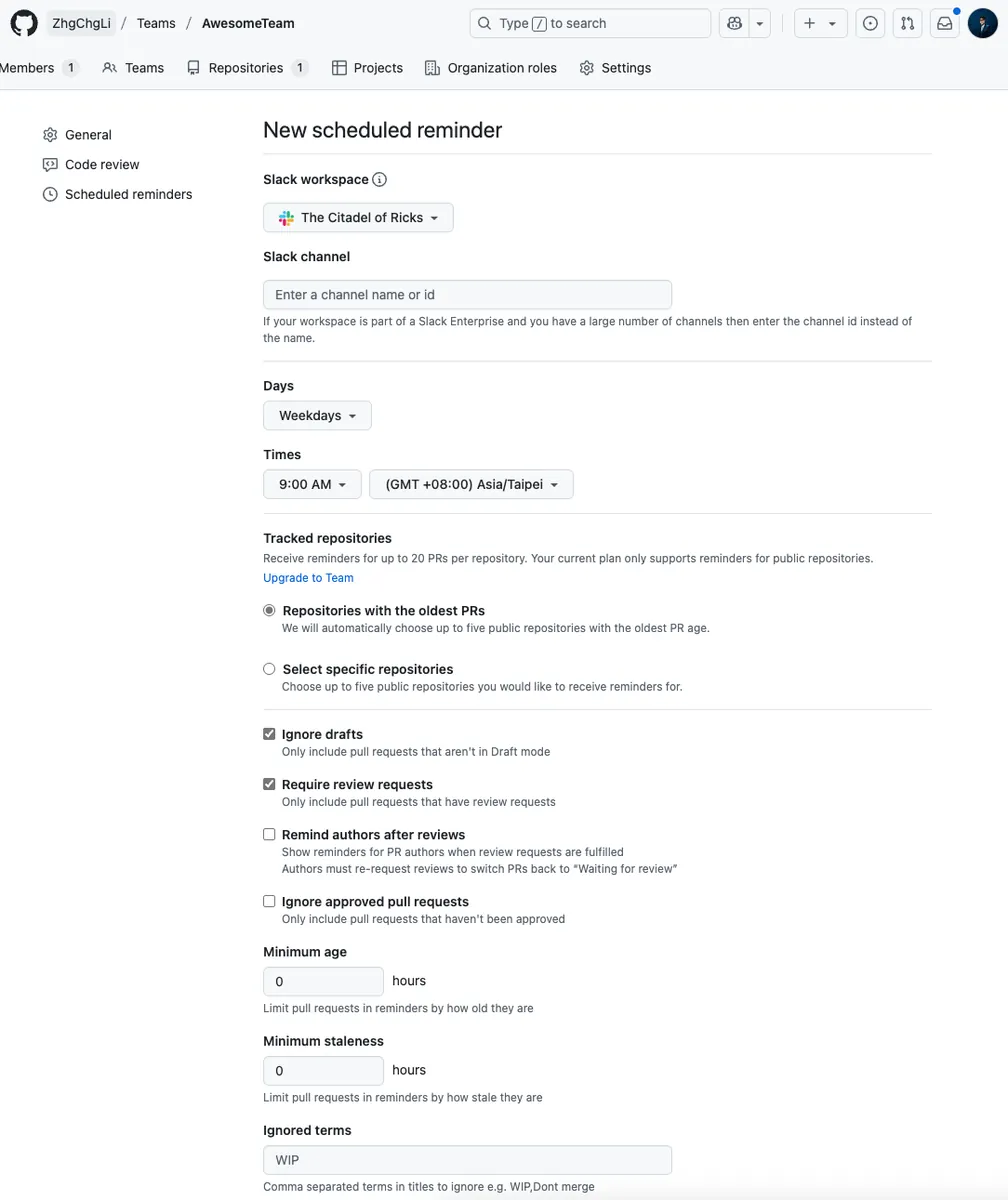
GitHub 内建的是 by Team 设置,你需要先为组织增加 Team、Repo 加入 Team 然后才能设置 Pull Request Reminder。
- 输入完 Slack Channel 跟规则储存之后每天就会自动传送提示讯息跟标记 Reviewer 了,设置可 参考 ,结果如下图:

https://michaelheap.com/github-scheduled-reminders/
问题 4. GitHub PR 讯息,作者收不到通知:
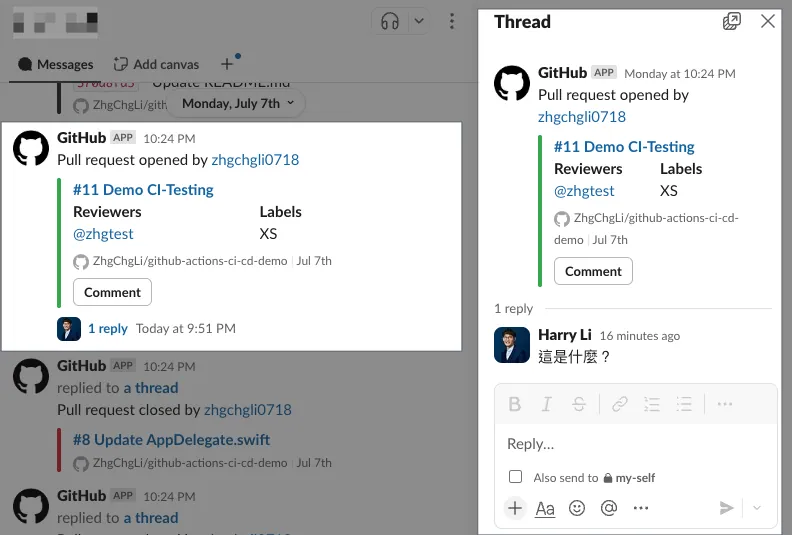
这是一个万年的问题,就是 PR 的 Slack 讯息 其实作者并不知道有人 Reply Threads 讨论 ,GitHub 发的这则 Slack 讯息只会标记 Reviewers,不会标记 Assignee or PR 作者。
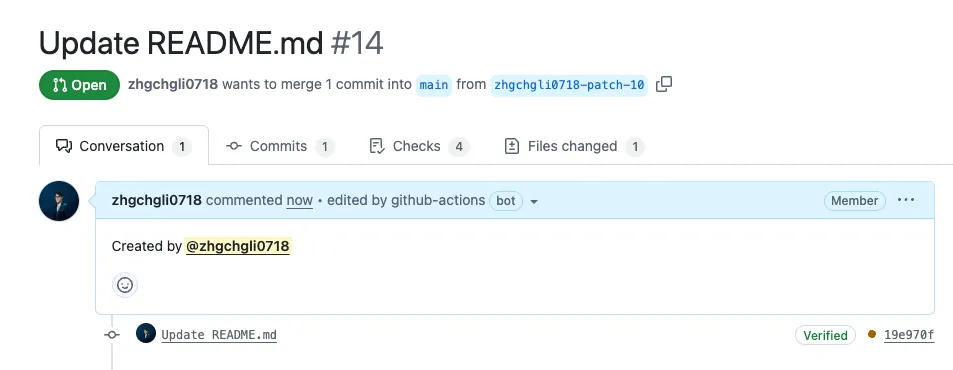
这时候 GitHub Actions 做自动化小工具就派上用场了,我们可以加一个 Job 在 PR Description 最后 Append 标记作者,这样讯息传到 Slack 也会一并标记到作者的 Slack:
1
2
3
4
5
6
7
8
9
10
11
12
13
14
15
16
17
18
19
20
21
22
23
24
25
26
27
28
29
30
31
32
33
34
35
36
37
# Workflow(Action) 名称
name: Pull Reqeust Automation
# 请参考前文,略....

  # ---------
  append-author-to-pr-description:
    name: Append author to PR description
    # 因为是共用触发事件,所以在 Job 上自己判断,当是 Pull Request Opened(首次建立) 时才执行 Job 否则会 Skipped
    if: github.event_name == 'pull_request' && github.event.action == 'opened'

    # 如果这个 Job 失败,不影响整个 Workflow,继续其他 Job
    continue-on-error: true

    # 设定最长 Timeout 时间,防止异常情况发生时无止尽的等待
    timeout-minutes: 10

    # Runner Label - 使用 GitHub Hosted Runner ubuntu-latest 来执行工作
    # 如果是 Private Repo 会计算用量,超过可能会产生费用
    # 但这种自动化小工作不太容易用过量
    runs-on: ubuntu-latest
    steps:
      - name: Append author to PR description
        env:
          # secrets.GITHUB_TOKEN 是 GitHub Actions 执行时自动产生的 Token,不需自行在 Secrets 设定,拥有一些 GitHub Repo API Scopes 权限
          # gh(GitHub) cli 需要注入 GH_TOKEN 到 ENV,gh 才有权限操作
          # https://docs.github.com/en/actions/how-tos/security-for-github-actions/security-guides/use-github_token-in-workflows
          GH_TOKEN: ${{ secrets.GITHUB_TOKEN }}

          #   ${{ github.xxx }} 是 GitHub Actions Context 表达式
          #   不是 Shell 变数,而是 YAML 解析阶段由 GitHub Actions 替换成对应值
          #   其他参数:https://docs.github.com/en/actions/learn-github-actions/contexts#github-context
          PR_NUMBER: ${{ github.event.pull_request.number }}
          AUTHOR_TAG: '@${{ github.event.pull_request.user.login }}'
        run: \\|
          PR_BODY=$(gh pr view $PR_NUMBER --repo ${{ github.repository }} --json body -q ".body")
          NEW_BODY=$(printf "%s\n\nCreated by %s" "$PR_BODY" "$AUTHOR_TAG")
          gh pr edit $PR_NUMBER --repo ${{ github.repository }} --body "$NEW_BODY"
完整程式码: Automation-PullRequest.yml
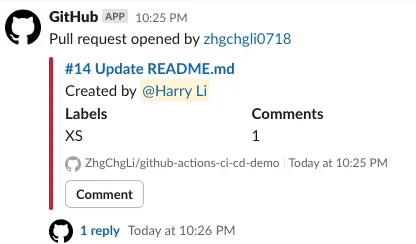
开 PR 时会自动在描述后加上作者资讯、Slack 讯息也会正确的标记作者:
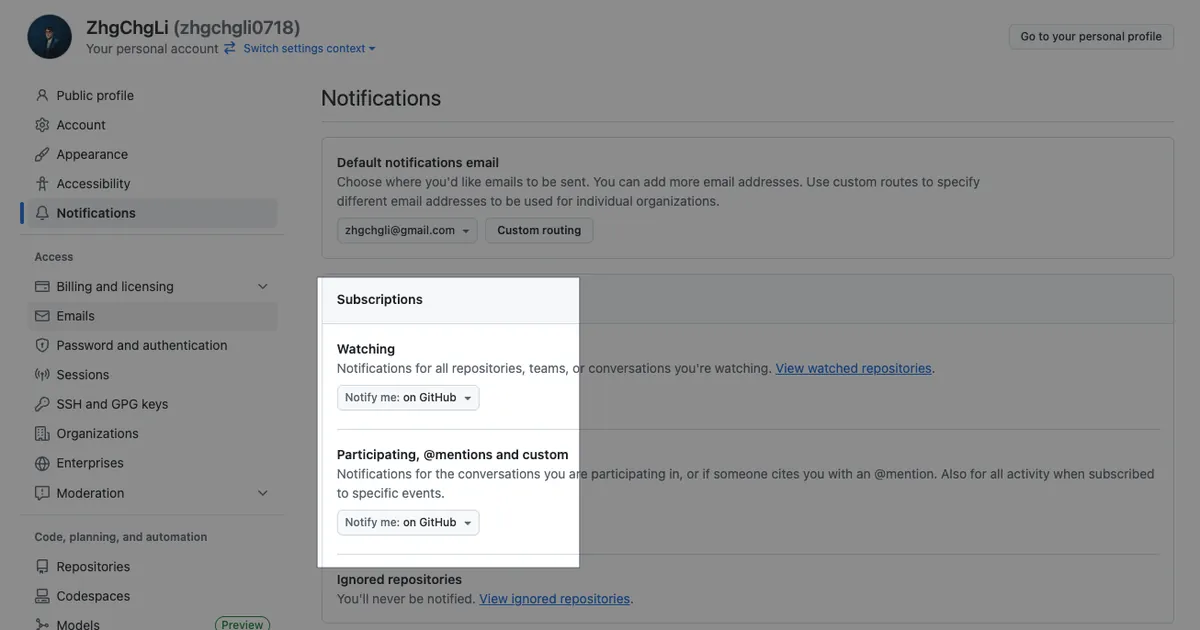
问题 5. GitHub 疯狂寄通知信到信箱很干扰:
GitHub Repo 通知跟 Slack 都有设定好之后,统一都在 Slack 收通知了,可以去 GitHub 个人设定把 Email 通知关掉:
其他
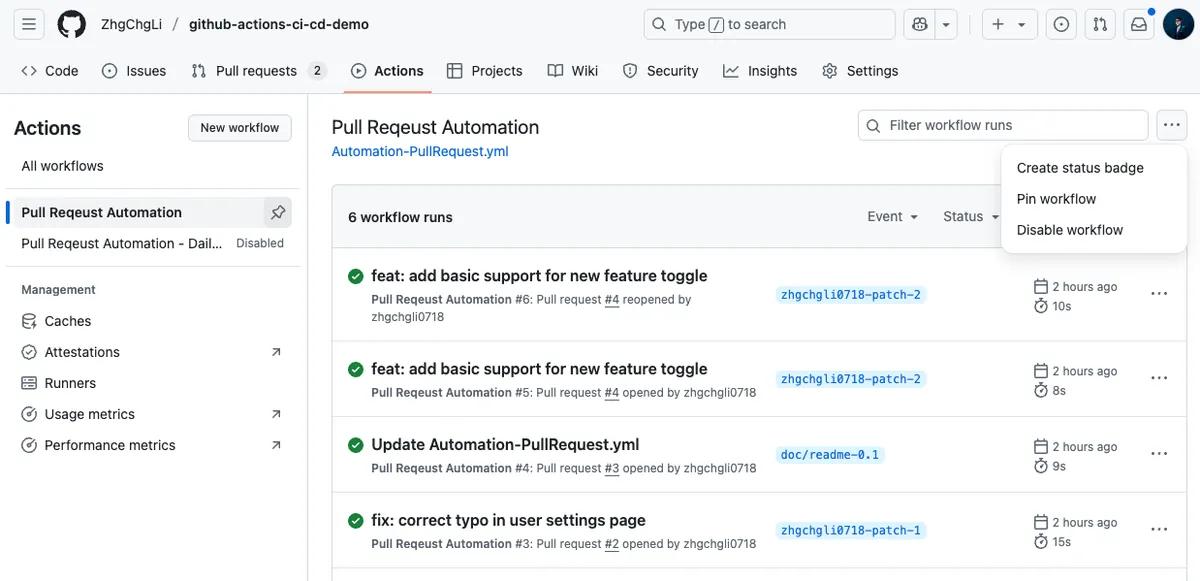
Actions 目前没有目录结构,但可以在 Actions 页,置顶(Pin) 五个 Actions;也可以使用 Disable 暂停某个 Action。
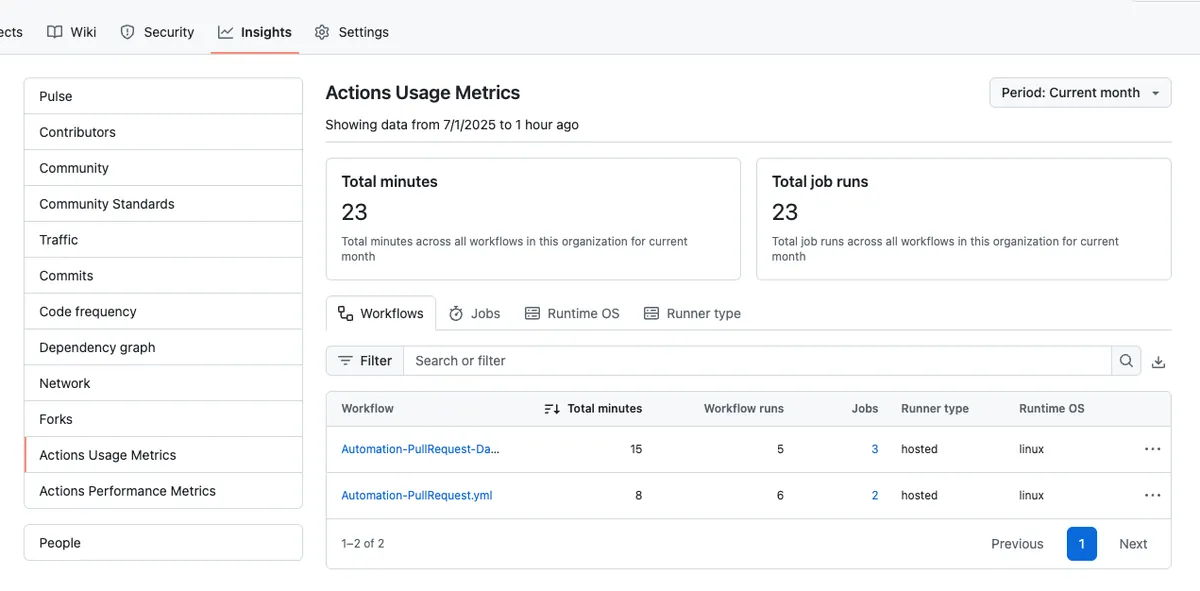
可以在 Insights 查看 GitHub Actions 用量跟执行成效:
Reuse Workflow 补充
下一篇文章 有用到同个 Repo 拆 Reuse Workflow,这边补充一下不同 Repo 拆 Reuse Workflow 的范例。
先定义一个 Reuse Workflow: Automation-label-pr-base-branch.yml: 在 ZhgChgLi/github-actions-ci-cd-demo-share-actions Repo 。
1
2
3
4
5
6
7
8
9
10
11
12
13
14
15
16
17
18
19
20
21
22
23
24
25
26
27
28
29
30
31
32
33
34
35
36
37
38
39
40
41
42
43
44
45
46
47
48
49
50
51
52
53
54
55
56
57
58
59
60
61
62
63
64
65
66
67
68
69
70
71
72
73
74
75
name: Automation-label-pr-base-branch
run-name: "[Automation-label-pr-base-branch] ${{ github.event.inputs.PR_NUMBER \\|\\| github.ref }}"

concurrency:
  group: ${{ github.workflow }}-${{ github.event.inputs.PR_NUMBER \\|\\| github.ref }}
  cancel-in-progress: true

# 触发事件
on:
  # 其他 Workflow 呼叫此 Workflow 触发
  workflow_call:
    # 资料输入
    inputs:
      # PR Number
      PR_NUMBER:
        required: true
        type: string
    # 密钥输入
    secrets:
      GH_TOKEN:
        description: "GitHub token for API access"
        required: true
jobs:
  label-pr-base-branch:
    name: Label PR Base Branch
    continue-on-error: true
    timeout-minutes: 10
    runs-on: ubuntu-latest

    steps:
      - name: Label PR by Base Branch
        id: label-pr-base-branch
        env:
          GH_TOKEN: ${{ secrets.GITHUB_TOKEN }}
        run: \\|
          PR_NUMBER="${{ inputs.PR_NUMBER }}"
          REPO="${{ github.repository }}"

          echo "📦 Processing PR #$PR_NUMBER in repo $REPO"

          # 取得 PR 的 base branch
          BASE_BRANCH=$(gh pr view "$PR_NUMBER" --repo "$REPO" --json baseRefName --jq '.baseRefName')
          echo "🔖 PR Base Branch: $BASE_BRANCH"

          # 允许的 base branch labels
          BRANCH_LABELS=("develop" "main" "master")

          # Label 是否在允许列表
          if [[ " ${BRANCH_LABELS[@]} " =~ " ${BASE_BRANCH} " ]]; then
            LABEL="$BASE_BRANCH"
          else
            echo "⚠️ Base branch '$BASE_BRANCH' not in allowed list, skipping label."
            exit 0
          fi

          # 移除现有的 base branch labels
          EXISTING_LABELS=$(gh pr view "$PR_NUMBER" --repo "$REPO" --json labels --jq '.labels[].name')
          for EXISTING in $EXISTING_LABELS; do
            if [[ " ${BRANCH_LABELS[@]} " =~ " ${EXISTING} " ]]; then
              echo "🧹 Removing existing base branch label: $EXISTING"
              gh pr edit "$PR_NUMBER" --repo "$REPO" --remove-label "$EXISTING"
            fi
          done

          # 如果 Label 不存在则建立
          if ! gh label list --repo "$REPO" \\| grep -q "^$LABEL$"; then
            echo "🆕 Creating missing label: $LABEL"
            gh label create "$LABEL" --repo "$REPO" --description "PR targeting $LABEL branch" --color "ededed"
          else
            echo "✅ Label '$LABEL' already exists"
          fi

          # 加上 base branch label
          echo "🏷️ Adding label '$LABEL' to PR #$PR_NUMBER"
          gh pr edit "$PR_NUMBER" --repo "$REPO" --add-label "$LABEL"
回到我们的 主 ZhgChgLi/github-actions-ci-cd-demo Repo, 新增一个主 Workflow Demo-Reuse-Action-From-Another-Repo.yml :
1
2
3
4
5
6
7
8
9
10
11
12
13
14
15
16
17
18
19
20
21
22
23
24
25
26
27
28
29
30
name: Automation-label-pr-base-branch

on:
  pull_request:
    types: [opened]

jobs:
  call-label-pr-workflow:
    name: Call Base Branch Label Workflow
    # ✅ 如果被呼叫的 workflow 在同一个 repo:
    #    uses: ./.github/workflows/Automation-label-pr-base-branch.yml
    #    注意:这种写法无法指定分支(固定使用 caller workflow 的 branch)
    #    参考范例:
    #    - CD-Deploy-Form.yml 呼叫本 repo workflow
    #    - CD-Deploy.yml 呼叫跨 repo workflow
    #
    # ✅ 如果被呼叫的 workflow 在其他 repo:
    #    uses: {owner}/{repo}/.github/workflows/{file}.yml@{branch_or_tag}
    #    可以指定 branch 或 tag
    #    ref: https://github.com/ZhgChgLi/github-actions-ci-cd-demo-share-actions/blob/main/.github/workflows/Automation-label-pr-base-branch.yml
    uses: ZhgChgLi/github-actions-ci-cd-demo-share-actions/.github/workflows/Automation-label-pr-base-branch.yml@main
    with:
      PR_NUMBER: ${{ github.event.number }}

    # 如果所有 secrets 都要继承 caller workflow,直接用 `inherit`
    # secrets: inherit
    #
    # 如果只要传特定 secrets,个别指定
    secrets:
      GH_TOKEN: ${{ secrets.GITHUB_TOKEN }}
Commit 档案后开 PR 试试看。
工作流程:主 Repo 的 Demo-Reuse-Action-From-Another-Repo.yml → 呼叫并把参数传到另一个 Repo 的 Automation-label-pr-base-branch.yml 执行任务 → 回到主 Repo 回报结果。
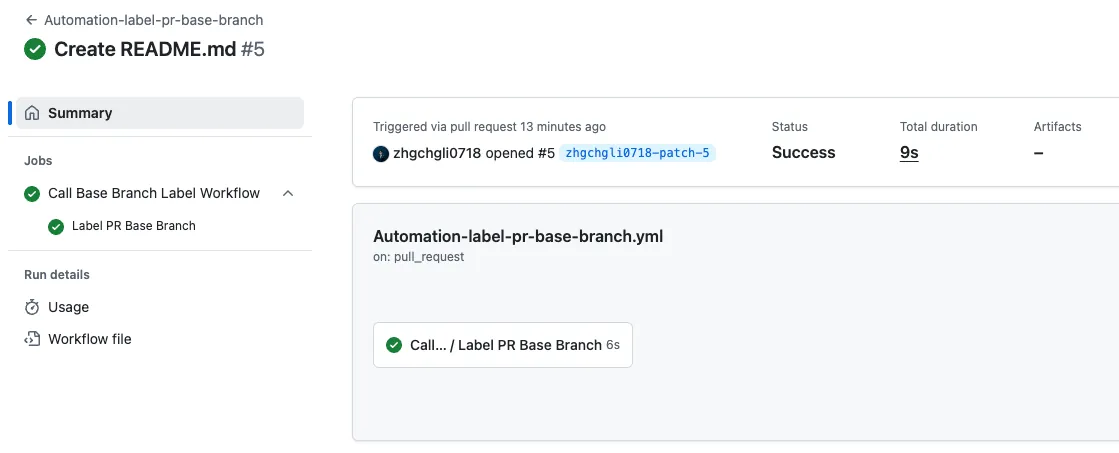
成功!
Private Repo 存取问题
这边要注意一个安全性问题,Public Repo 完全没问题,但如果 Reuse Workflow 在 Private Repo 当中,只有在 同个组织下的其他 Repo + Repo 同样也是 Private + 设定允许 =才能存取使用 Private Repo Reuse Workflow。
Public — ZhgChgLi/ReuseRepo+Private or Public-ZhgChgli or harry/myRepo= ✅Private — ZhgChgLi/ReuseRepo+Private or Public— harry/myRepo= ❌Private — ZhgChgLi/ReuseRepo+Public — ZhgChgLi/anotherRepo= ❌Private — ZhgChgLi/ReuseRepo+Private — ZhgChgLi/anotherRepo= ✅
设定允许的方式,要去 Reuse Workflow Repo → Settings → Actions → General → Acces:
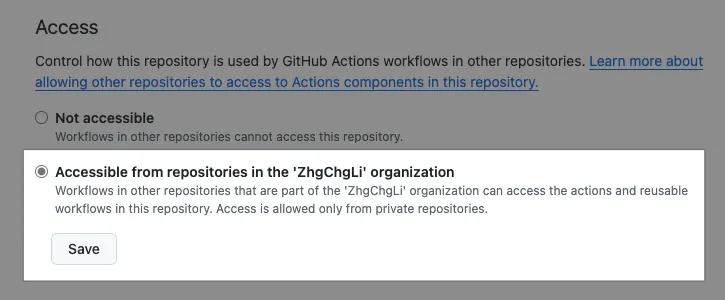
改勾选:
1
2
Accessible from repositories in the 'ZhgChgLi' organization
Workflows in other repositories that are part of the 'ZhgChgLi' organization can access the actions and reusable workflows in this repository. Access is allowed only from private repositories.
点击「Save」储存,完成。
如果没权限存取会出现以下错误讯息:
1
2
3
4
5
Invalid workflow file: .github/workflows/Demo-reuse-action-from-another-repo.yml#L21
error parsing called workflow
".github/workflows/Demo-reuse-action-from-another-repo.yml"
-> "ZhgChgLi/github-actions-ci-cd-demo-share-actions/.github/workflows/Automation-label-pr-base-branch.yml@main"
: workflow was not found.
GitHub Actions Script 语法补充
补充一下大家可能会感到疑惑的 ${{ XXX }} or ${XXX} or $XXX 变数语法。
Demo-Env-Vars- .yml:
1
2
3
4
5
6
7
8
9
10
11
12
13
14
15
16
17
18
19
20
21
22
23
24
25
26
27
28
29
30
31
32
33
34
35
36
37
38
39
40
41
42
43
44
45
46
47
48
49
50
51
52
53
54
55
56
57
58
59
60
61
62
63
64
65
66
67
68
69
70
71
72
73
74
75
76
77
78
79
80
81
82
83
84
85
86
87
88
89
90
91
92
93
94
95
96
97
name: Demo-Env-Vars
on:
workflow_dispatch:
jobs:
print-env-vars:
runs-on: ubuntu-latest
steps:
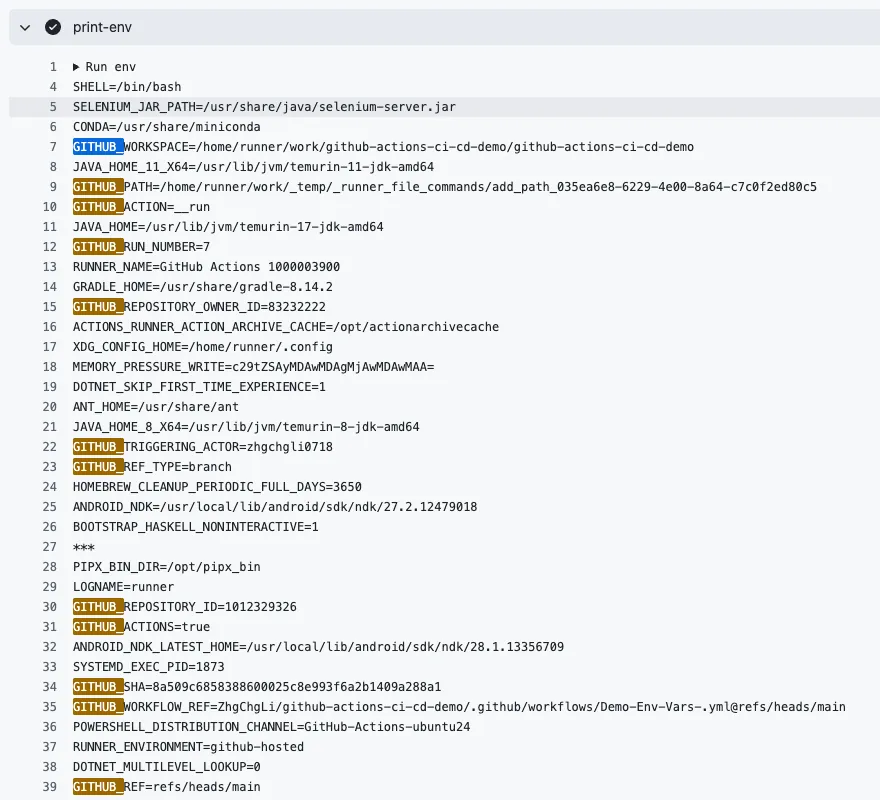
- name: print-env
run: env
- name: context-vars-vs-vars
env:
SAY_MY_NAME: "Heisenberg"
# GitHub Actions Context 表达式,同下方解释
FROM_REF: "${{ github.ref }}"
run: \\|
# Sehll Script:
# 引用自订注入的 ENV 变数内容
# ${SAY_MY_NAME} or $SAY_MY_NAME 都可以
# ${XX} 遇到字串拼接比较好用:
echo "HI: ${SAY_MY_NAME}"
# 💡 GitHub Actions Context 表达式
# 这不是 shell 变数,而是 YAML 解析阶段由 GitHub Actions 替换成对应值
# ⚠ 在本机或非 GitHub Actions 环境执行会失败
# 🔗 https://docs.github.com/en/actions/learn-github-actions/contexts#github-context
BRANCH_NAME_FROM_CONTEXT="${{ github.ref }}"
# 💡 GitHub Actions 执行阶段的环境变数
# 这些变数在 runner 执行 shell 时由 GitHub Actions 自动注入
# ✅ 在其他环境可用 export 或 ENV 预先定义相同变数
# 🔗 https://docs.github.com/en/actions/learn-github-actions/environment-variables
BRANCH_NAME_FROM_ENV_VARS="${GITHUB_REF}"
echo "FROM_REF: ${FROM_REF}"
echo "BRANCH_NAME_FROM_CONTEXT: ${BRANCH_NAME_FROM_CONTEXT}"
echo "BRANCH_NAME_FROM_ENV_VARS: ${BRANCH_NAME_FROM_ENV_VARS}"
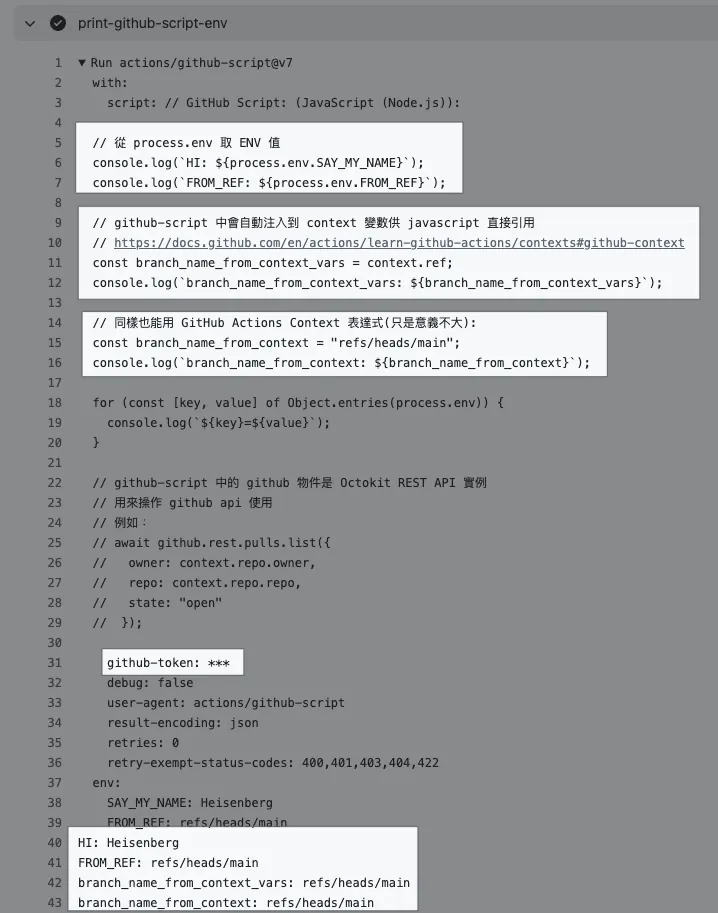
- name: print-github-script-env
uses: actions/github-script@v7
env:
SAY_MY_NAME: "Heisenberg"
# GitHub Actions Context 表达式,同上方解释
FROM_REF: "${{ github.ref }}"
with:
script: \\|
// GitHub Script: (JavaScript (Node.js)):
// 从 process.env 取 ENV 值
console.log(`HI: ${process.env.SAY_MY_NAME}`);
console.log(`FROM_REF: ${process.env.FROM_REF}`);
// github-script 中会自动注入到 context 变数供 javascript 直接引用
// https://docs.github.com/en/actions/learn-github-actions/contexts#github-context
const branch_name_from_context_vars = context.ref;
console.log(`branch_name_from_context_vars: ${branch_name_from_context_vars}`);
// 同样也能用 GitHub Actions Context 表达式(只是意义不大):
const branch_name_from_context = "${{ github.ref }}";
console.log(`branch_name_from_context: ${branch_name_from_context}`);
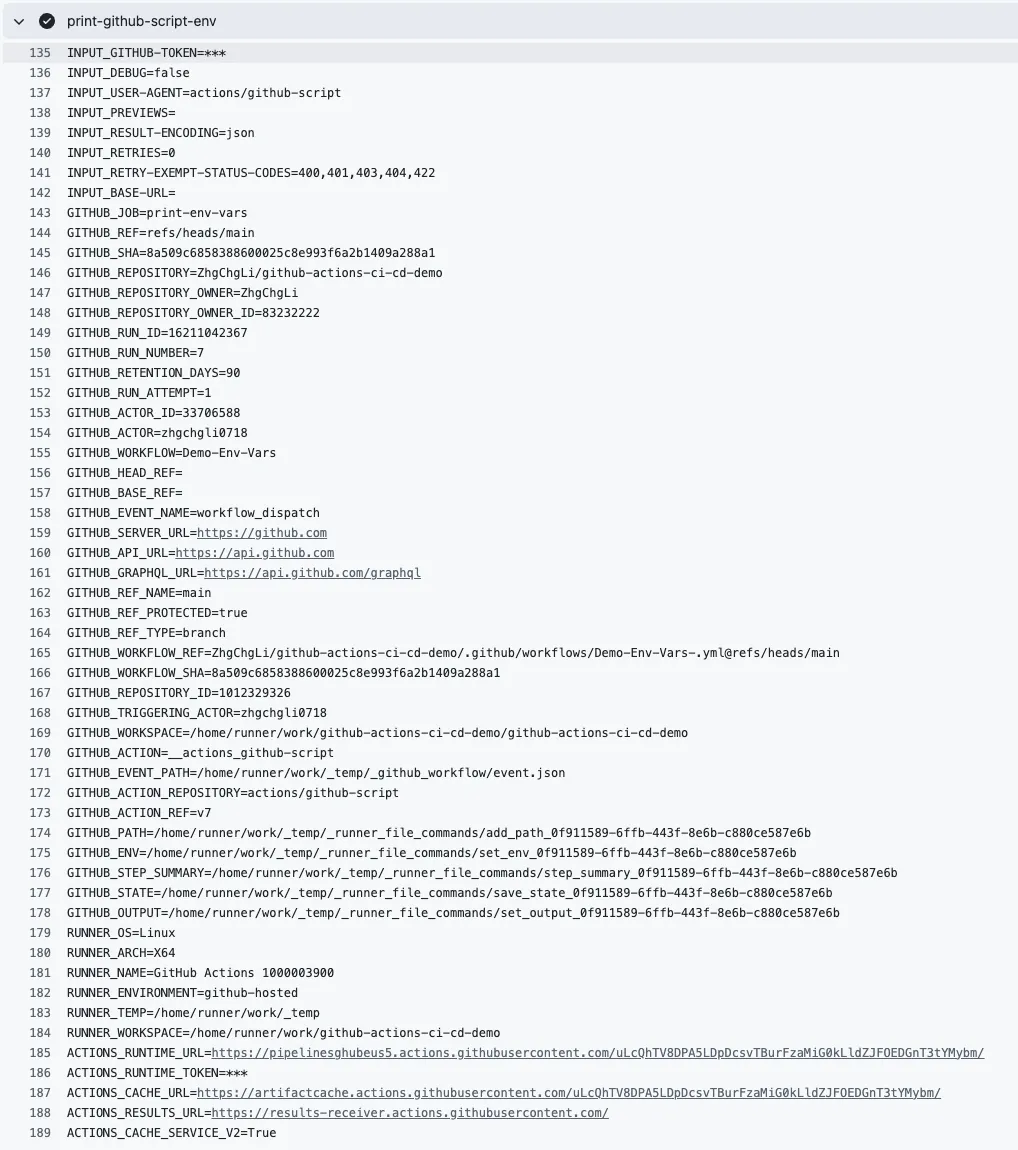
for (const [key, value] of Object.entries(process.env)) {
console.log(`${key}=${value}`);
}
// github-script 中的 github 物件是 Octokit REST API 实例
// 用来操作 github api 使用
// 例如:
// await github.rest.pulls.list({
// owner: context.repo.owner,
// repo: context.repo.repo,
// state: "open"
// });
# gh CLI does NOT use GITHUB_TOKEN by default; requires GH_TOKEN
- name: gh CLI without GH_TOKEN (expected to fail)
continue-on-error: true
run: \\|
PR_COUNT=$(gh pr list --repo $GITHUB_REPOSITORY --json number --jq 'length')
echo "Found $PR_COUNT open pull requests"
- name: gh CLI with GH_TOKEN (expected to succeed)
env:
# Assign GH_TOKEN so gh CLI can authenticate
# https://docs.github.com/en/actions/how-tos/security-for-github-actions/security-guides/use-github_token-in-workflows
GH_TOKEN: ${{ secrets.GITHUB_TOKEN }}
run: \\|
PR_COUNT=$(gh pr list --repo $GITHUB_REPOSITORY --json number --jq 'length')
echo "Found $PR_COUNT open pull requests"
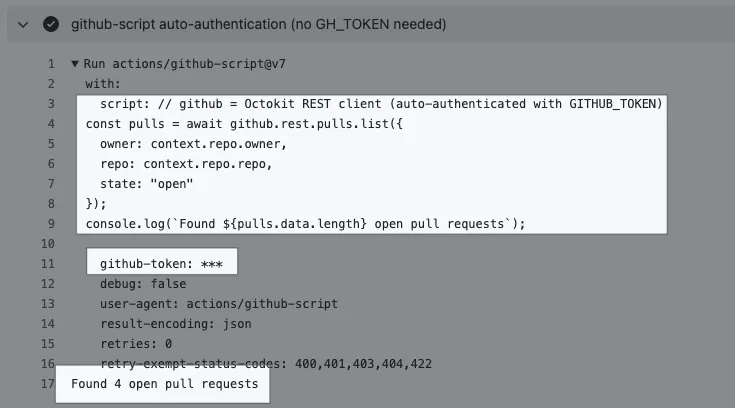
- name: github-script auto-authentication (no GH_TOKEN needed)
uses: actions/github-script@v7
with:
script: \\|
// github = Octokit REST client (auto-authenticated with GITHUB_TOKEN)
const pulls = await github.rest.pulls.list({
owner: context.repo.owner,
repo: context.repo.repo,
state: "open"
});
console.log(`Found ${pulls.data.length} open pull requests`);
${ { XXX } } GitHub Actions Context 表达式
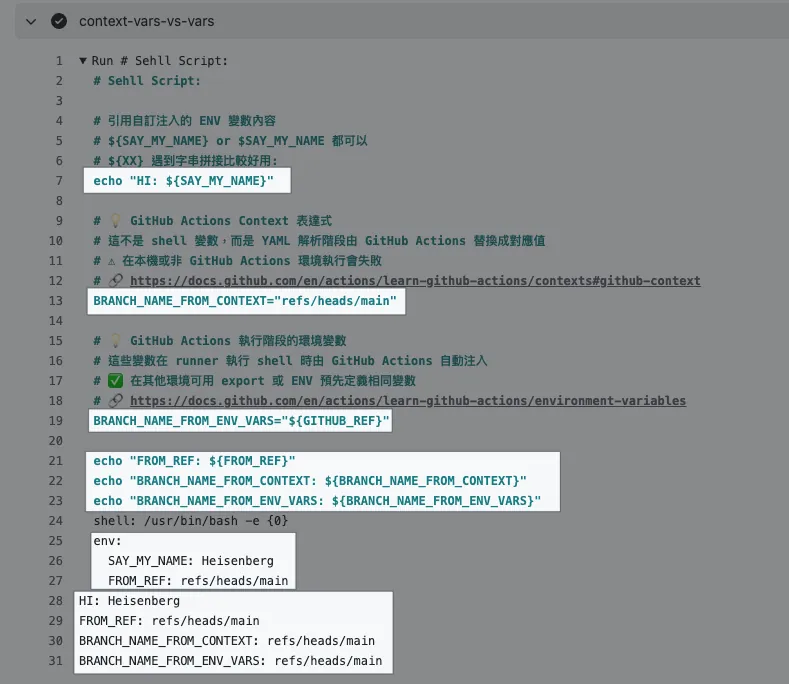
${{ XXX }}是 GitHub Actions Context 表达式, 在YAML 解析阶段由 GitHub Actions 替换成对应值 (如上图BRANCH_NAME_FROM_CONTEXT)完整可用表达式可 参考官方文件
${XXX}or$XXX是真实环境变数,${XXX}在字串拼接比较好用GitHub Actions 预设会注入一些环境变数,完整可 参考官方文件
actions/github-script@v7
在
github-script中同样可以用${{ XXX }}是 GitHub Actions Context 表达式,但是意义不大;因为 在 github-scirpt 环境中预设会注入 context 变数可以直接在 javascript 中引用在
github-script中github物件是 Octokit REST API 实例github-script也能从env:注入变数,但是要用${process.env.xxx}存取同样预设会注入一些环境变数,完整可 参考官方文件
${process.env.xxx}存取;但是已经有context变数了,从这存取意义也不大
github-script会自动带入github-token,无需指定
gh cli GH_TOKEN
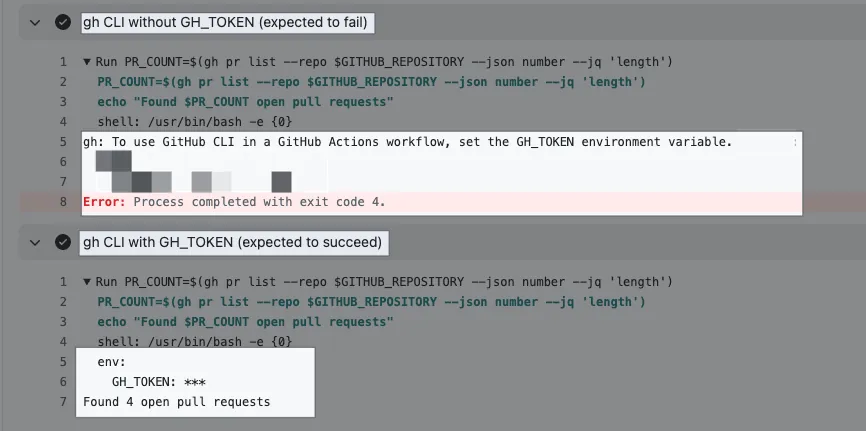
在 GitHub Actions Shell Script 使用
gh cli需指定GH_TOKEN参数可以直接带入预设 Token —
secrets.GITHUB_TOKEN(GitHub Actions 执行时自动产生)预设 Token 有一些基本权限,如果要操作的指令权限不够就要改用 Personal Access Token ,团队使用建议用共用帐号建立 PAT。
完整程式码: Demo-Env-Vars- .yml
GitHub Actions 已经开发好了,下一步我们可以抽换 GitHub Hosted Runner 成自己的 Self-hosted Runner。
GitHub Hosted Runner 有免费额度 2,000 分钟一个月(起),跑这种小的自动化任务花不了多少时间,而且是跑在 linux 机器花费很低,可能还用不到免费上限; 不一定要改成 Self-hosted Runner ,改 Runner 还要确保 Runner 环境正确(例如 GitHub Hosted Runner 自带 gh cli,self-hosted Runner 就记得要自己安装好), 本文纯粹是因为教学才会这样抽换 。
如果是用在执行 CI/CD 任务才必须要用 Self-hosted Runner。
新增 Self-hosted Runner
本文以 macOS M1 为例。
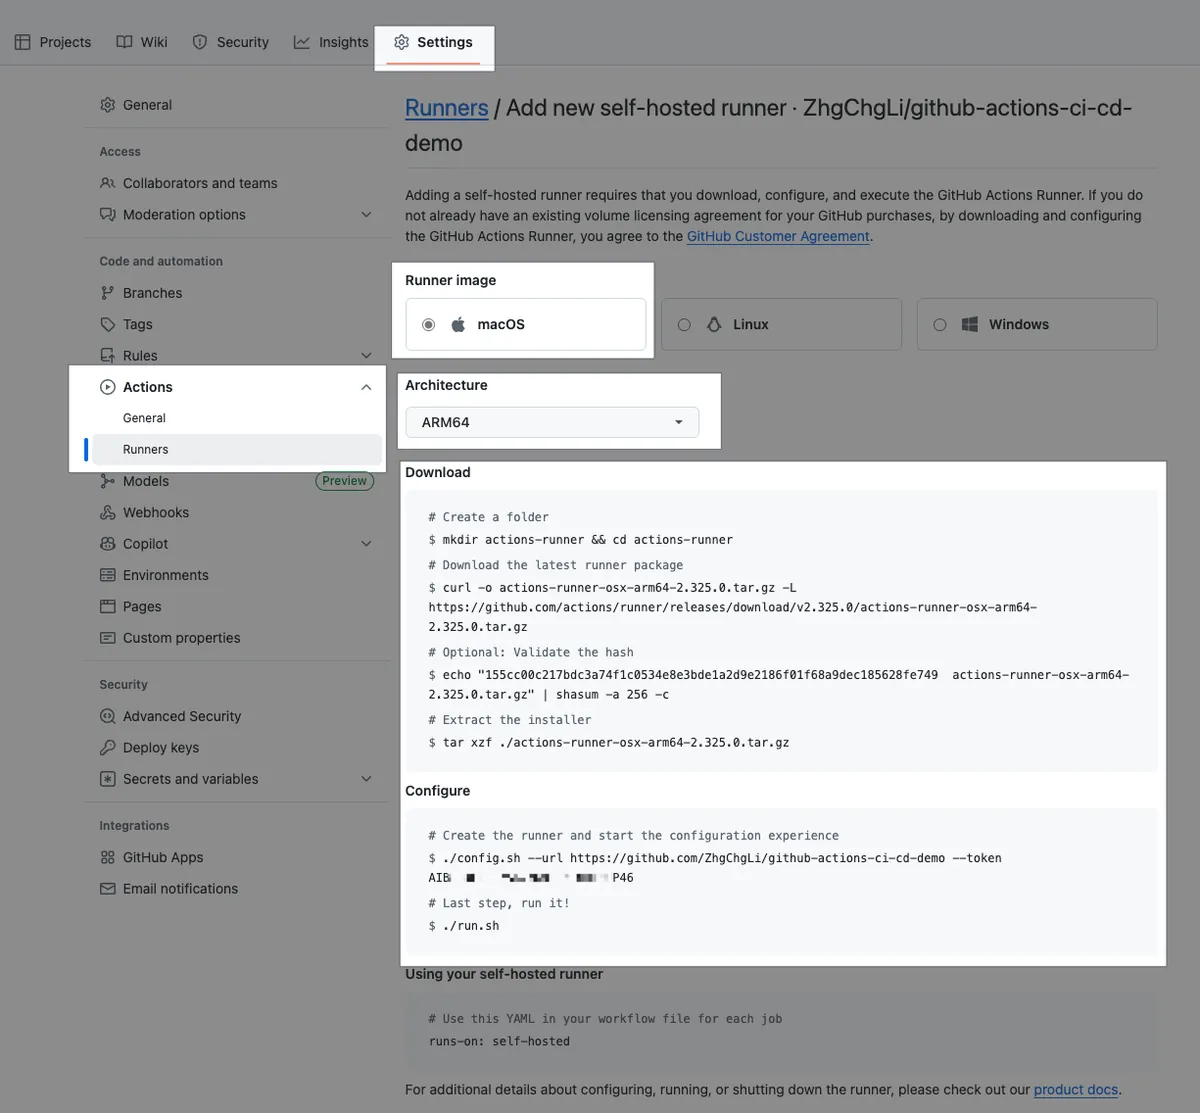
Settings → Actions → Runners → New self-hosted runner。
Runner image: macOS
Architecture : M1 记得选 ARM64 执行比较快
在实体电脑上开一个 Termnial。
按照 Download 步骤在本地电脑完成:
1
2
3
4
5
6
7
8
9
10
# 在你想要的路径,建立 Runner 目录
mkdir actions-runner && cd actions-runner
# 下载 Runner image
curl -o actions-runner-osx-x64-2.325.0.tar.gz -L https://github.com/actions/runner/releases/download/v2.325.0/actions-runner-osx-x64-2.325.0.tar.gz

# Optional: Validate the hash
echo "0562bd934b27ca0c6d8a357df00809fbc7b4d5524d4aeb6ec152e14fd520a4c3  actions-runner-osx-x64-2.325.0.tar.gz" \\| shasum -a 256 -c

# 解压缩
tar xzf ./actions-runner-osx-x64-2.325.0.tar.gz
以上只是参考;建议照你设定页里的步骤来做,才会是最新版本的 Runner image。

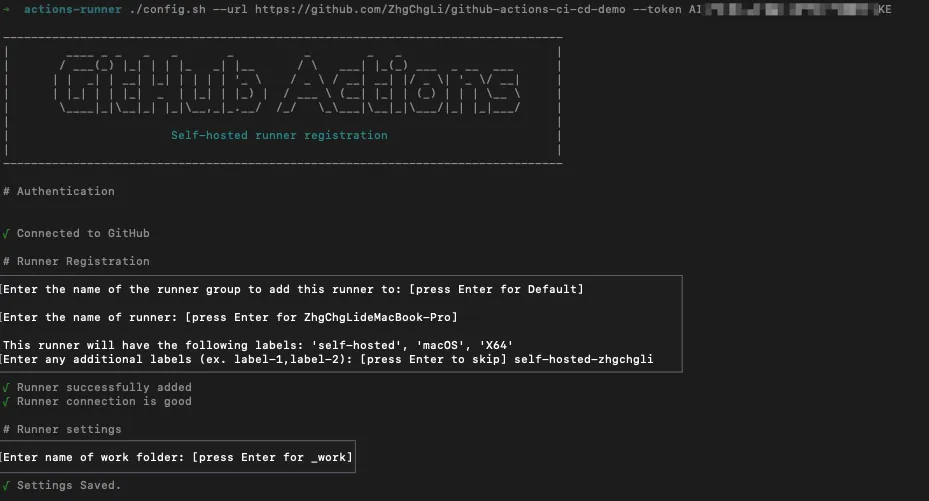
设定 Configure:
1
2
# 请参考设定页指令,Token 会随时间改变
./config.sh --url https://github.com/ORG/REPO --token XXX
会依序要你输入:
Enter the name of the runner group to add this runner to: [press Enter for Default] 直接 Enter *只有注册到 Organization 组织层级的 Runner 才有 Group 分组功能
Enter the name of runner: [press Enter for ZhgChgLideMacBook-Pro] 可以输入想设定的 Runner 名称 e.g.
app-runner-1或直接 EnterThis runner will have the following labels: ‘self-hosted’, ‘macOS’, ‘X64’ Enter any additional labels (ex. label-1,label-2): [press Enter to skip] 输入想要设定的 Runner label,可以多输入自订 Label 方便之后使用 同前述 GitHub Acitons/Runner 是依照对应 Label 找任务来做, 如果只用 default label,Runner 可能会捡到组织内的其他 Runner 来执行工作,自订一个最保险 。 这边我自己乱定了一个 label
self-hosted-zhgchgliEnter name of work folder: [press Enter for _work] 直接 Enter
出现 √ Settings Saved. 代表设定完成了。
启动 Runner:
1
./run.sh
出现 √ Connected to GitHub、Listening for Jobs 就代表已经在监听 Actions 任务了:
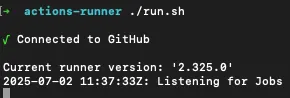
这个 Terminal 视窗不关闭就会持续接收任务来做。
🚀🚀🚀同一台电脑开多个 Terminal 在不同目录就能起多个 Runner。
回到 Repo 设定页也能看到 Runner 正在等待任务:
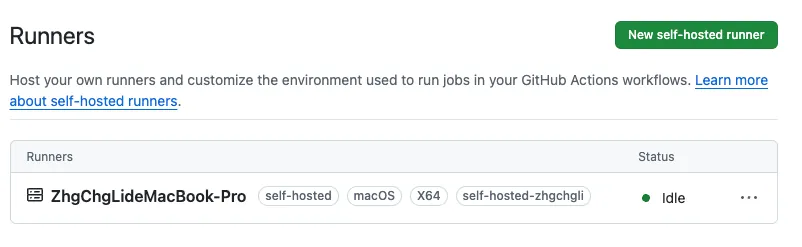
Status:
Idle: 闲置,在等待任务
Active: 有任务正在执行
Offline: Runner 不在线上
Workflow(GitHub Actions) Runner 改用 Self-hosted Runner
以 Automation-PullRequest.yml 为例:
1
2
3
4
5
6
7
8
9
10
11
12
13
# 请参考前文,略....
jobs:
  label-pr-by-file-count:
    # 请参考前文,略....
    runs-on: [self-hosted-zhgchgli]
    # 请参考前文,略....
  # ---------
  assign-self-if-no-assignee:
    # 请参考前文,略....
    runs-on: [self-hosted-zhgchgli]

    steps:
      # 请参考前文,略....
Commit 档案到 Repo 主分支之后,重新开 PR 触发验证一下 Actions。
回到 Runner Terminal 就能看到有新的任务进来了,正在执行跟执行结果:

失败了,因为我本机电脑没有安装 gh cli 环境:

使用 brew install gh 在实体电脑上安装完 gh 后再次触发执行:

成功!现在这个任务就完全是使用我们自己的电脑在执行,不使用 GitHub Hosted Runner、不计费使用。
我们可以点进去 Action Log 查看任务执行在的 Runner、机器是哪一个:
runs-on: [ Runner Label] 设定
这里是 AND 不是 OR,GitHub Runner 暂不支援 OR 挑选 Runner 执行。
例如: [self-hosted, macOS, app] → 代表 Runner 要 同时有 self-hosted, macOS, app 这 3 个 Labels 才会匹配接任务来执行。
如果一个 Job 想同时测试不同 Runner 环境下的结果可以使用 matrix 参数:
1
2
3
4
5
6
7
8
9
10
11
jobs:
  test:
    runs-on: ${{ matrix.runner }}
    strategy:
      matrix:
        runner:
          - [self-hosted, linux, high-memory]
          - [self-hosted, macos, xcode-15]

    steps:
      - run: echo "Running on ${{ matrix.runner }}"
这样这个 Job 会在下列两个 Runner Labels Runner 中并行各执行一次:
self-hosted, linux, high-memory
self-hosted, macos, xcode-15
Runner 暂不支援:
- OR 挑选 Runner
- Runner 权重设定
注册 Runner 成 Service
可以参考官方文件「 Configuring the self-hosted runner application as a service 」将 Runner 直接注册成系统 Service,这样就能在背景执行(不用开 Terminal 在前景)、开机后也会自动启动。
有多个 Runner 记得调整「 Customizing the self-hosted runner service 」设定注册不同名称。
iOS 这边我有一个待研究排除的问题, 就是我改用背景 Service 之后在 Archive 会遇到错误(疑似是跟 keychain 权限有关) ,当时没时间解决,就先用起前景 Terminal Runner 了。
如果是传统前景要做到开机自动启动就要去 ~/Library/LaunchAgents 新增一个自动启动设定档案:
actions.runner.REPO.RUNNER_NAME.plist :
1
2
3
4
5
6
7
8
9
10
11
12
13
14
15
16
17
18
19
20
<?xml version="1.0" encoding="UTF-8"?>
<!DOCTYPE plist PUBLIC "-//Apple//DTD PLIST 1.0//EN" "http://www.apple.com/DTDs/PropertyList-1.0.dtd">
<plist version="1.0">
 <dict>
  <key>Label</key>
  <string>actions.runner.REPO.RUNNER_NAME</string>
  <!-- 指定 Terminal.app 来启动 -->
  <key>ProgramArguments</key>
  <array>
   <string>/usr/bin/open</string>
   <string>-a</string>
   <string>Terminal</string>
   <string>/Users/zhgchgli/Documents/actions-runner/run.sh</string>
  </array>
  <key>RunAtLoad</key>
  <true/>
  <key>WorkingDirectory</key>
  <string>/Users/zhgchgli/Documents/actions-runner</string>
 </dict>
</plist>
有兴趣深入研究 DevOps 的朋友可参考官方 k8s Runner 文件。
完整专案 Repo
官方文件

更细节的设置方式请务必参考官方手册。
AI Can Help!
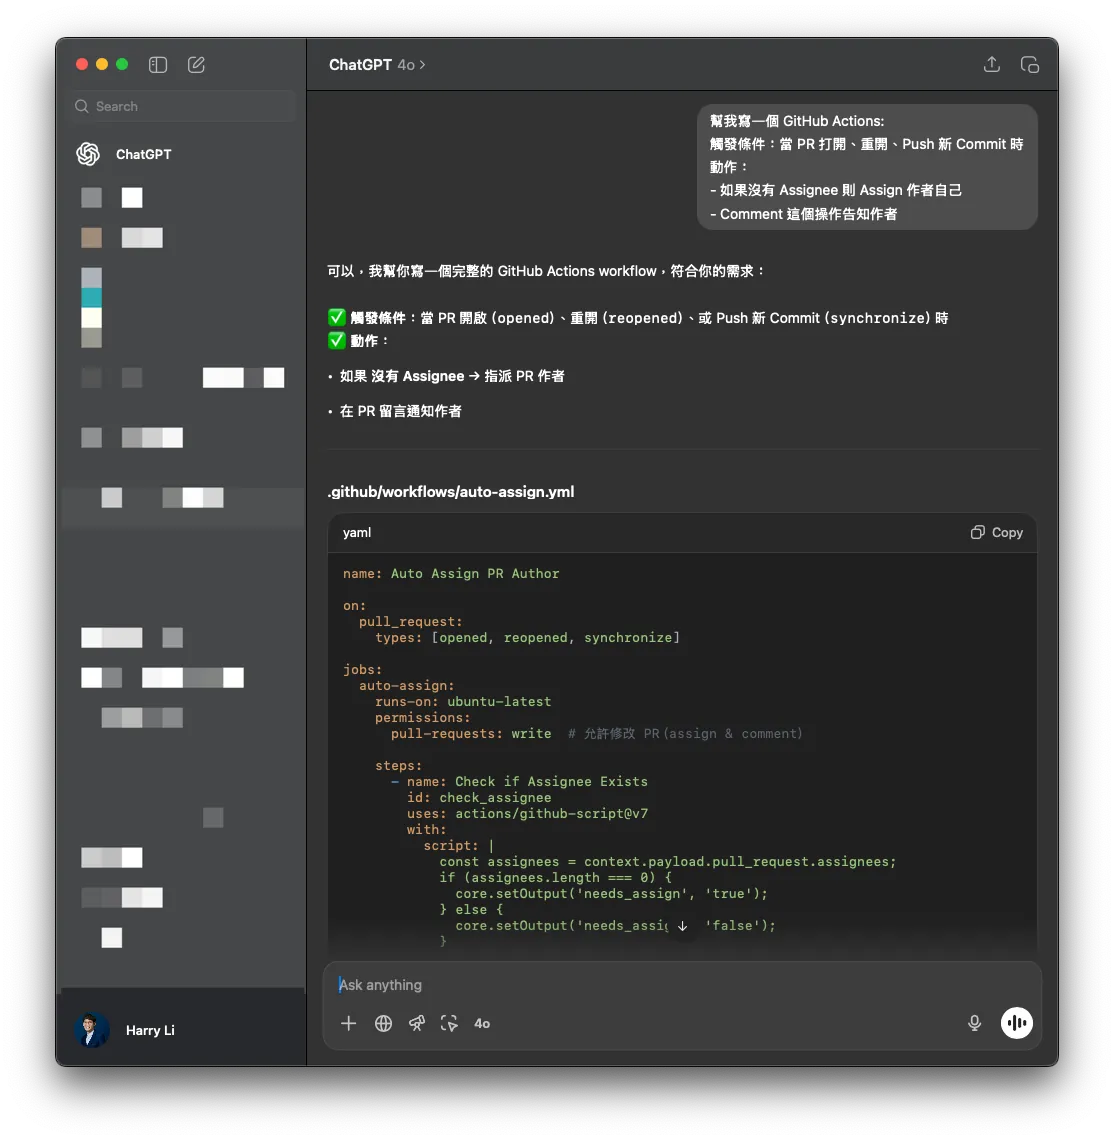
实测给 ChatGPT 完整的步骤跟时机点就能帮你写好 GitHub Actions 直接使用!
总结
现在你应该已经对 GitHub Actions + Self-hosted Runner 有了一定程度的了解,下一篇我将开始以 App (iOS) CI/CD 为案例,手把手建置整套流程。
系列文章:
Buy me a coffee
本系列文章花费了大量的时间精力撰写,如果内容对您有帮助、对您的团队有实质提升工作效率与产品品质;欢迎请我喝杯咖啡,感谢支持!
{:target="_blank"}](/assets/404bd5c70040/1*QJj54G9gOjtQS-rbHVT1SQ.webp)
有任何问题及指教欢迎 与我联络 。

本文首次发表于 Medium (点击查看原始版本),由 ZMediumToMarkdown 提供自动转换与同步技术。