Google Apps Script Web App|打造 Github Action CI/CD 自订表单提升开发效率
针对缺乏动态 GUI 表单的 Github Action CI/CD,使用 Google Apps Script Web App 建立组织内专属表单,串接 Github API 自动取得分支并触发工作流程,并整合 Slack 通知与 Jira、Asana 工单查询,实现免维护、低成本的自动化打包工具。
Click here to view the English version of this article.
點擊這裡查看本文章正體中文版本。
基于 SEO 考量,本文标题与描述经 AI 调整,原始版本请参考内文。
文章目录
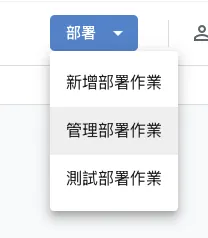
使用 Google Apps Script Web App 表单串接 Github Action CI/CD 工作
Github Action Workflow 表单优化与整合其他工作流程工具(Jira, Asana, Slack. . )提升开发效率。
{:target="_blank"}](/assets/4cb4437818f2/1*TiGXBQdPaCM6r2J1RHrgnA.webp)
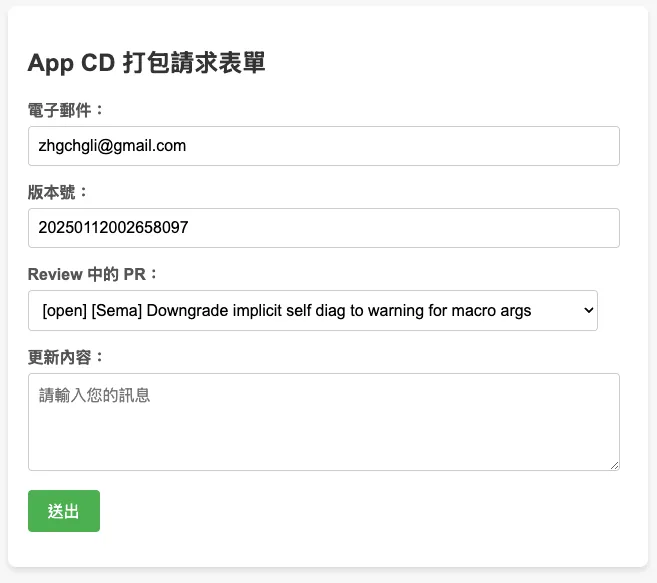
左:原始的 Github Action Workflow Form / 右: 最终成果 (GAS Web App Form)
2025/07 Update:
此功能已整合到实际打包工具使用,可参考最新文章案例:「 CI/CD 实战指南(四):使用 Google Apps Script Web App 串接 GitHub Actions 建置免费易用的打包工具平台 」
背景
之前的团队使用 Github Action & Self-hosted Github Runner + Slack 搭建整套 CI/CD 服务;整体效果不错,对于 App 开发者来说建置与维护相对容易,只需照著官方文件提供的 YAML 参数完成设定就会自动触发、机器方面也可以轻易的使用自己的机器当成 Runner 使用,服务本身都是由 Github 维护,我们不需在意版本升级等问题并且 Runner 是反向跟 Github 要任务下来做,不需要特别开对外网路开口;对团队更好的事是,使用自己的 Runner 跑 Github Action 是完全免费的。
等于同时享受到类似 Bitrise 的 GUI YAML 建置方式又有像 Jenkins 那样使用自架机器的弹性跟较低的建置成本,但不用像 Jenkins 那样需要花时间维护服务本身。
未来有时间再写一篇完整的 App CI/CD x Github Action 搭建过程。
问题:Github Action CI/CD GUI Form
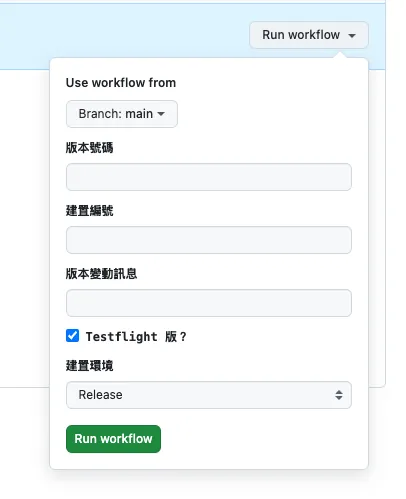
Github Action GUI Form
在 App 开发中,在 CD 触发打包测试版、正式版或送审时通常会需要提供一些外部参数或是依照需求选择环境、分支,才会开始执行工作。
不同于 Jenkins 是自建服务,有完整的 Web GUI;Github Action 没有,唯一的 Web GUI Form 是在 Actions 中点击 Run workflow 可以自订一个简易的表单供使用者输入外部参数,然后触发 CI/CD 工作流程。
通常会使用这个 CD 打包的使用者,不一定是 App 开发者本身、也不一定拥有这个专案的权限;例如 QA 需要打包指定版本、PM/Backend 需要打包某个开发中版本进行测试;Github Action Form 需要有该专案的权限才能使用,但使用者不要说能不能有专案权限、甚至是不一定有工程背景。
而且我们无法在这边做动态表单或资料验证。
因此我们需要另外拉一个 GUI 服务给其他使用者操作使用。
自建 Slack App 解决
之前团队是有热爱做自动化的同仁自己用 Kotlin+Ktor 搭建了一个完整的 Slack App 网路服务,串接 Slack 讯息、表单、指令…等功能,接收、转发 CD 打包请求,触发 Github Action 执行操作并将结果串回 Slack。
目前没有开发资源跟之前一样使用 Kotlin+Ktor 建置服务
自己写 Web/iOS/macOS App 工具
目前团队原本是使用 Jenkins 有基础的 Web 可以给其他使用者登入使用、另外还有自行开发了一个 App 串接 Jenkins 封装一些参数让非工程背景的使用者更方便使用。
不过迁移到 Github Action 之后这整套就废弃了。
❌ Private Github Pages
应该有机会直接建置 Github Pages 来当 CI/CD Web GUI,但是目前只有 Github Enterprise 可以设定 Github Pages 存取权限,其他方案就算是 Private Repo 也会是公开的;无安全性可言。
❌ Slack App,但使用 Google Apps Script 建置
一开始想说依照之前团队的经验使用 Slack App 做为 CI/CD GUI Form 服务,但是目前没有资源跟之前一样使用 Kotlin+Ktor 建置服务;所以想说先使用 Function as a Service 服务快速尝试建置。
Function as a Service 有很多种, Cloud Functions 的自由度比较高,但由于组织 IT 限制,无法随意新增 Public Cloud Functions 并且有收费问题;因此还是回到我们的老朋友 — Google Apps Script。
之前写过好几篇关于 Google Apps Script 做自动化的文章,有兴趣的朋友可以参考:
2. 「 简单 3 步骤 — 打造免费 GA4 自动数据通知机器人 」
3. 「 Crashlytics + Google Analytics 自动查询 App Crash-Free Users Rate 」
总而言之,Google Apps Script 是 Google 另一个 Function as a Service 服务,主要特色是免费跟与 Google 服务之间可以快速整合;但是限制也较多,例如只能用它的语言、执行时间不能超过 6 分钟、有执行次数上限、不支援多执行绪…等等,细节可以参考 我之前的文章 。
结论是不可行,原因是:
Function as a Service 冷启动问题 。 服务一段时间没呼叫会进入睡眠,再次呼叫要花较长时间启动(3~≥ 5 秒); Slack App 对于 API 响应时间非常严格,服务需要在 3 秒内回应否则视为失败 ,Slack 这边就会直接喷错误、事件监听也会被认为丢失,导致重复发送。
Google Apps Script doGet, doPost 方法无法取得 Headers。 这会导致无法走 官方的安全验证 、无法关闭 Slack Retry 。
Google Apps Script 单执行绪问题。 如果要串接其他服务响应时间都会超过 3 秒,直接被 Slack 判定为失败。
有勉强使用 Slack 讯息、Block Kit、Form 串接完整个流程,但是太容易触发上述问题,后来直接放弃。
如果要做这套还是要走自己起伺服器、服务,不要走 Function as a Service! !
❌ Slack Workflow Form
{:target="_blank"} (❌ 无法客制化)](/assets/4cb4437818f2/1*hnDPyOfGCTW_yJf71krMnA.webp)
Slack Workflow Form (❌ 无法客制化)
另外也尝试过 Slack 内建的自动化功能 Workflow Form,不过他无法做到动态表单内容 (e.g. 捞分支让使用者选),唯一能客制化的只有后续送资料的步骤。
✅ Google Apps Script Web App GUI Form 表单
山不转路转,转念一想好像也不用纠结在一定要用 Slack 整合上,用 Slack 整合是最好的方案,因为是直接整进既有的团队协作工具,不需要发散额外去学新工具;但是迫于资源限制,我们只能退而求其次找其他稳定又好用的方法。
回头想到 Google Apps Script 本身就能部署成 Web App,可以在 Web doGet 时回应 GUI Form 表单,送出表单后触发后续的 Github 串接处理。
最终成果 🎉
{:target="_blank"}](/assets/4cb4437818f2/1*pzW-Yki-4HbE2nYXC4q-Aw.webp)
工作流程
我们使用 Google Apps Script Web App 建置 CI/CD 表单,直接绑定 Google Workspace 帐号,设定只有组织内的使用者可以存取;自动获取当前登入的使用者信箱、使用 Github Repo 共用帐号(或借用某个有权限的帐号)的 Personal Access Token 打 Github API 获得分支列表,送出后同样打 API 触发 Github Action 开始执行 CI/CD 工作。
另外,我们可以用使用者的信箱透过 Slack App 去打 Slack API,取得该使用者的 Slack ID,再透过 Slack App 传送讯息,通知 CI/CD 任务执行情况。
也可以再与其他工具、开发流程进行整合,例如先从 Asana, Jira 取得工单,选择后再透过 Github API 查找分支、触发 Github Action,最后再透过 Slack 通知给使用者。
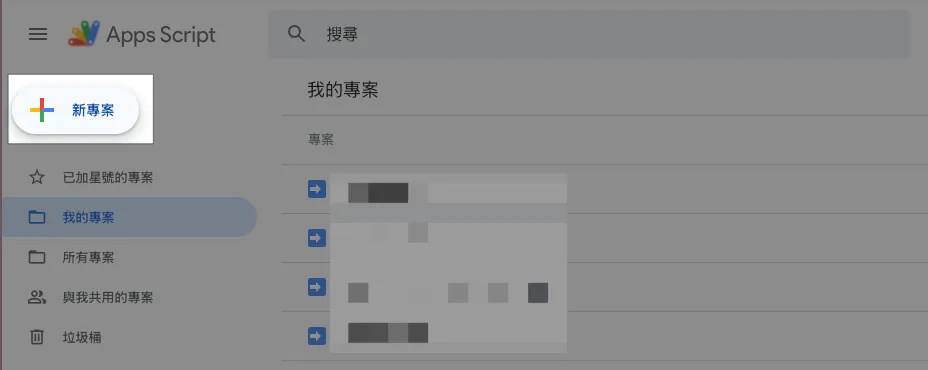
Step 1. 建立 Google Apps Script Web App Form
前往 > Google Apps Script ,新增专案。
Step 2. 建立表单内容、GAS 程式
太久没有写 HTML,CSS 也懒得自己设计样式,直接请 ChatGPT 产一个有一点设计的 HTML 表单范本。
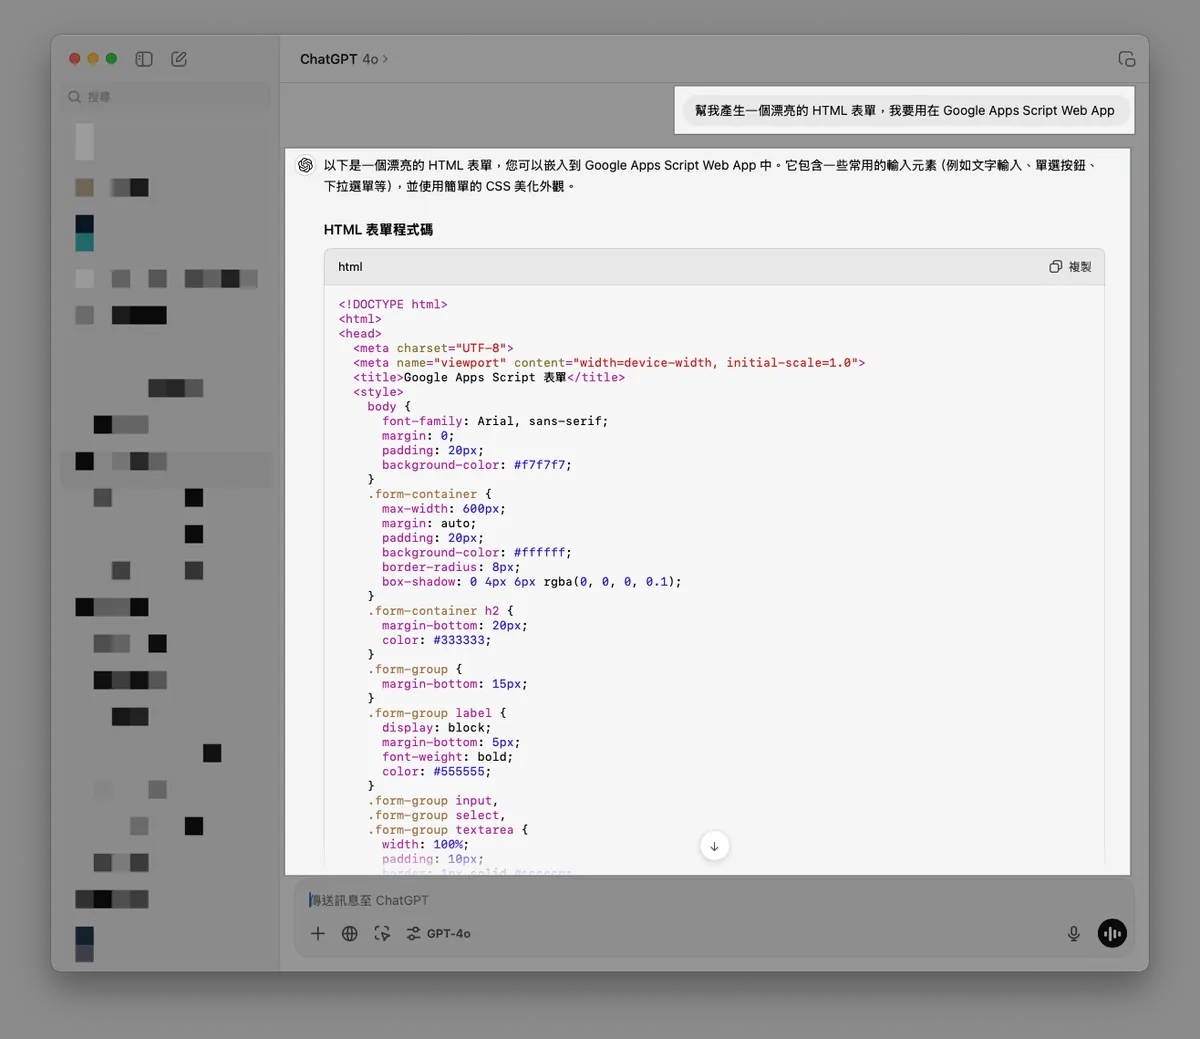
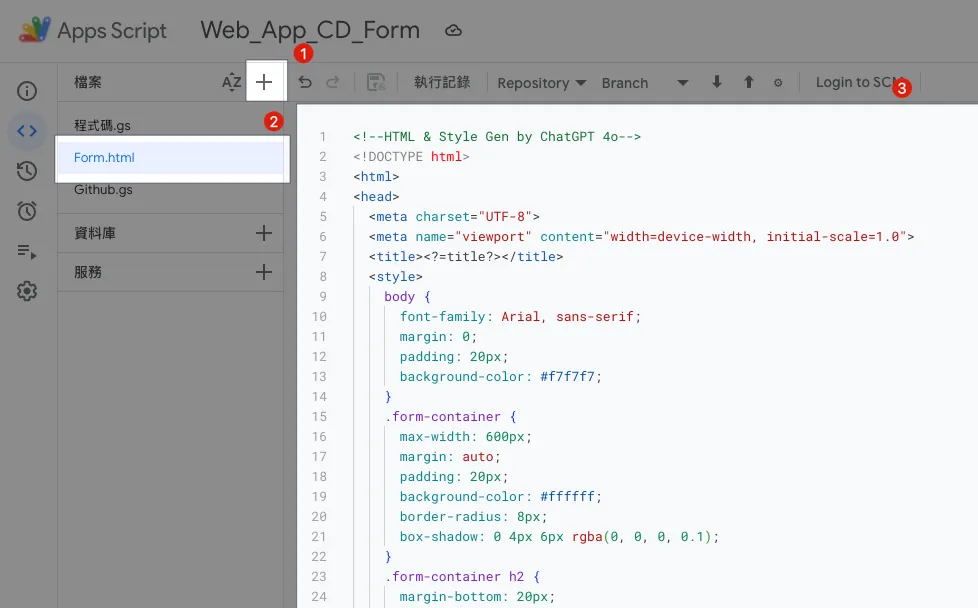
在 GAS 左方档案列表点「+」新增档案,输入档案名称「 Form.html 」并把 GPT 产的 HTML 表单范本内容贴上。
Form.html:
1
2
3
4
5
6
7
8
9
10
11
12
13
14
15
16
17
18
19
20
21
22
23
24
25
26
27
28
29
30
31
32
33
34
35
36
37
38
39
40
41
42
43
44
45
46
47
48
49
50
51
52
53
54
55
56
57
58
59
60
61
62
63
64
65
66
67
68
69
70
71
72
73
74
75
76
77
78
79
80
81
82
83
84
85
86
87
88
89
90
91
92
93
94
95
96
97
98
99
100
101
102
103
104
105
106
107
108
109
110
111
112
113
114
115
116
117
118
119
120
121
122
123
124
125
126
127
128
129
130
131
132
133
134
135
136
<!--HTML & Style Gen by ChatGPT 4o-->
<!DOCTYPE html>
<html>
<head>
  <meta charset="UTF-8">
  <meta name="viewport" content="width=device-width, initial-scale=1.0">
  <title><?=title?></title>
  <style>
    body {
      font-family: Arial, sans-serif;
      margin: 0;
      padding: 20px;
      background-color: #f7f7f7;
    }
    .form-container {
      max-width: 600px;
      margin: auto;
      padding: 20px;
      background-color: #ffffff;
      border-radius: 8px;
      box-shadow: 0 4px 6px rgba(0, 0, 0, 0.1);
    }
    .form-container h2 {
      margin-bottom: 20px;
      color: #333333;
    }
    .form-group {
      margin-bottom: 15px;
    }
    .form-group label {
      display: block;
      margin-bottom: 5px;
      font-weight: bold;
      color: #555555;
    }
    .form-group input,
    .form-group select,
    .form-group textarea {
      width: 95%;
      padding: 10px;
      border: 1px solid #cccccc;
      border-radius: 4px;
      font-size: 16px;
    }
    .form-group input[type="radio"] {
      width: auto;
      margin-right: 10px;
    }
    .form-group .radio-label {
      display: inline-block;
      margin-right: 20px;
    }
    .form-group button {
      background-color: #4CAF50;
      color: white;
      padding: 10px 20px;
      border: none;
      border-radius: 4px;
      cursor: pointer;
      font-size: 16px;
    }
    .form-group button:hover {
      background-color: #45a049;
    }
    .message {
      margin-top: 20px;
      padding: 15px;
      border-radius: 5px;
      font-size: 1em;
      text-align: center;
    }
    .message.success {
      background-color: #d4edda;
      color: #155724;
      border: 1px solid #c3e6cb;
    }
    .message.error {
      background-color: #f8d7da;
      color: #721c24;
      border: 1px solid #f5c6cb;
    }
    .hidden {
      display: none;
    }
  </style>
</head>
<body>
  <div class="form-container">
    <h2><?=title?></h2>
    <form id="myForm">
      <div id="message-block" class="hidden"></div>
      <div class="form-group">
        <label for="email">电子邮件:</label>
        <input type="email" value="<?=email?>" readonly/>
      </div>
      <div class="form-group">
        <label for="buildNumber">版本号:</label>
        <input type="number" value="<?=buildNumber?>"/>
      </div>
      <div class="form-group">
        <label for="branch">Review 中的 PR:</label>
        <select id="branch" name="branch">
          <option>请选择</option>
          <? pullRequests.forEach(pullRequest => { ?>
            <option value="<?=pullRequest.head.ref?>">[<?=pullRequest.state?>] <?=pullRequest.title?></option>
          <? }); ?>
        </select>
      </div>
      <div class="form-group">
        <label for="message">更新内容:</label>
        <textarea id="message" name="message" rows="4" placeholder="请输入您的讯息"></textarea>
      </div>
      <div class="form-group">
        <button type="submit">送出</button>
      </div>
    </form>
  </div>
  <script>
    function displayMessage(ok, message) {
      const messageBlock = document.getElementById('message-block');
      messageBlock.className = ok ? 'message success' : 'message error';
      messageBlock.innerHTML = message;
      messageBlock.classList.remove('hidden');
    }

    document.getElementById("myForm").addEventListener("submit", function(e) {
      e.preventDefault();
      const formData = new FormData(this);
      const formObject = Object.fromEntries(formData);
      google.script.run.withSuccessHandler((response) => {
        displayMessage(response.ok, response.message);
      }).processForm(formObject);
    });
  </script>
</body>
</html>
表单内容可依照需求自行调整。
程式码.gs:
1
2
3
4
5
6
7
8
9
10
11
12
13
14
15
16
17
18
19
20
21
22
23
24
25
26
27
28
29
30
31
32
33
function doGet(e) {
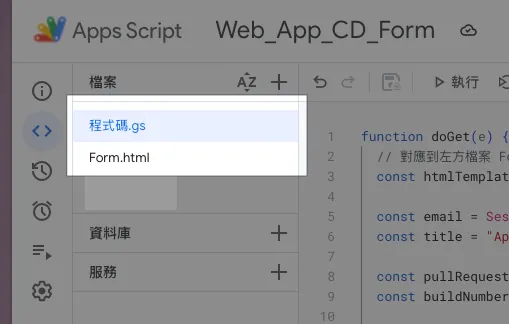
// 对应到左方档案 Form.html
const htmlTemplate = HtmlService.createTemplateFromFile('Form');
const email = Session.getActiveUser().getEmail();
// 取得使用者信箱,只限 执行身份:存取网页程式的使用者 设定有效
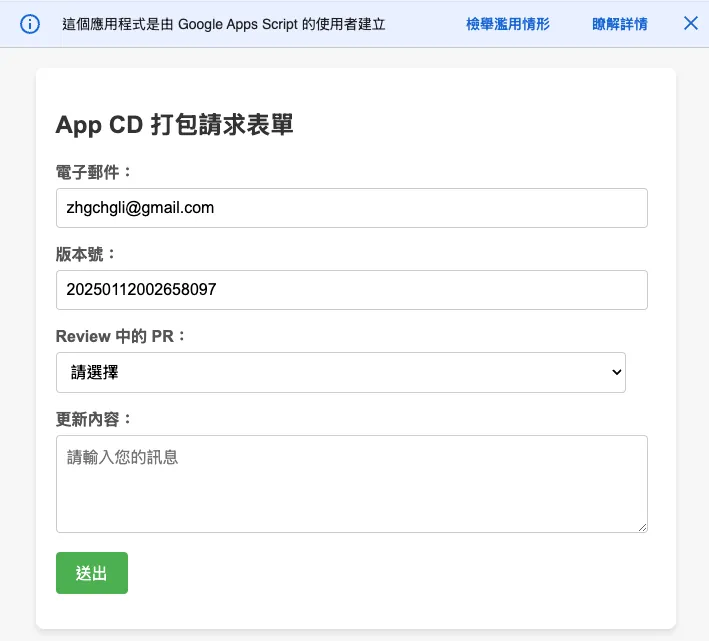
const title = "App CD 打包请求表单";
const buildNumber = genBuildNumber();
htmlTemplate.email = email;
htmlTemplate.title = title;
htmlTemplate.pullRequests = []; // 下一步在串接 Github...
htmlTemplate.buildNumber = buildNumber;
const html = htmlTemplate.evaluate();
html.setTitle(title);
//html.setWidth(600) // 设定页面宽度
return html
}
function processForm(object) {
return {"ok": true, "message": "请求送出成功!"};
}
function genBuildNumber() {
const now = new Date();
const formattedDate = Utilities.formatDate(now, "Asia/Taipei", "yyyyMMddHHmmss");
const milliseconds = now.getMilliseconds().toString().padStart(3, '0'); // 确保毫秒是 3 位数
return `${formattedDate}${milliseconds}`;
}
这一步,我们先把表单 GUI 完成,下一步再来串接 Github API 拿到 PR 分支列表。
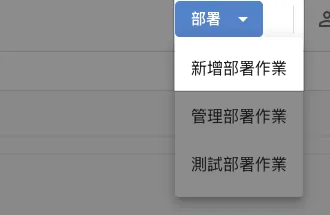
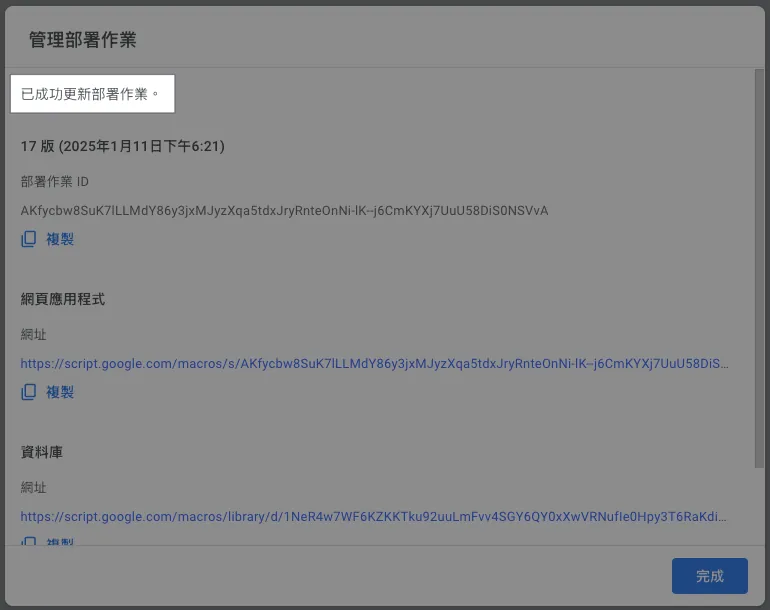
Step 2. 部署 Google Apps Script Web App Form
我们先把刚刚的内容部署一次,查看结果。
在 GAS 右上角选择「部署」-> 「新增部署作业」->「网页应用程式」:
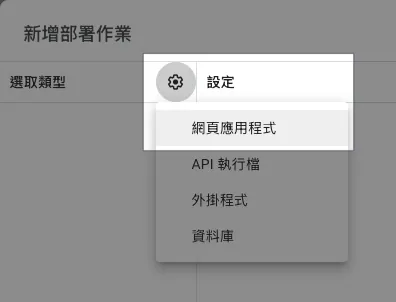
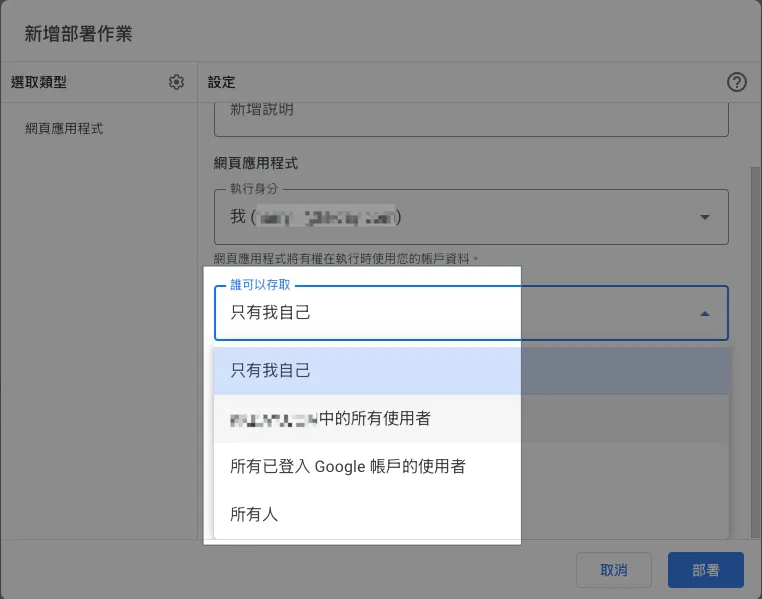
执行身份跟谁可以存取分别可以设置成:
执行身份:
我
统一都用你的帐号身分执行脚本。存取网页程式的使用者
会以当前登入的 Google 帐号使用者身份执行脚本。
谁可以存取:
只有我自己
XXX 同个组织中的所有使用者
只有同组织+已登入的 Google 帐号使用者可以存取。所有已登入 Google 帐号的使用者
已登入的 Google 帐号使用者都可以存取。所有人
不需要登入 Google 帐号、所有人都可以公开存取。
我们选择「谁可以存取:XXX 同个组织中的所有使用者」+「执行身份:存取网页程式的使用者」就能 自动限制只有组织帐号的人可以使用 ,并且用他自己的身份执行!
是一个很方便权限控管的功能!
选完点击右下「部署」。
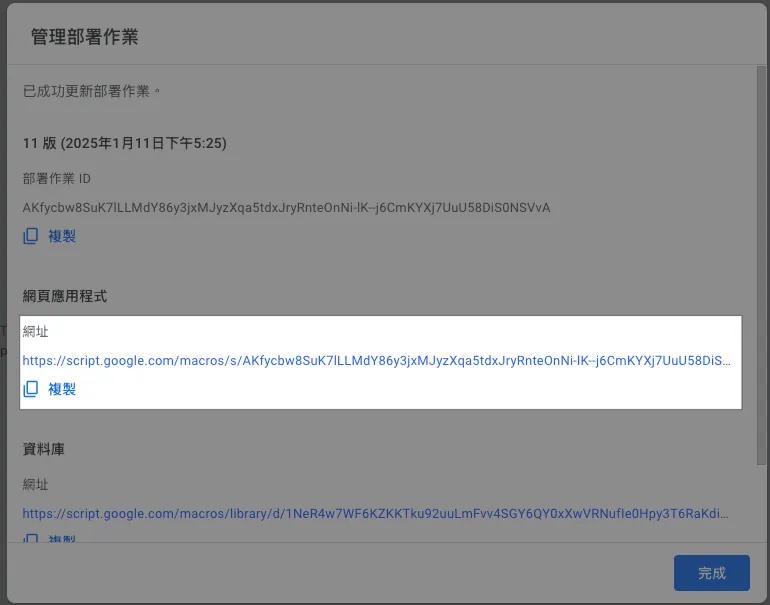
网页应用程式中的网址,就是 Web App 存取网址。
1
https://script.google.com/macros/s/AKfycbw8SuK7lLLMdY86y3jxMJyzXqa5tdxJryRnteOnNi-lK--j6CmKYXj7UuU58DiS0NSVvA/exec
网址很长很丑,但是没办法,只能自己找短网址工具缩短一下。
点网址打开页面查看效果:
这边要多提两个 GAS 限制:
GAS Web App 上方警告提示,预设无法隐藏
GAS Web App 是用 IFrame 把我们的页面嵌在里面,因此很难做到 100% RWD 效果 只能使用
.setWidth()调整视窗宽度
Google Apps Script 授权警告
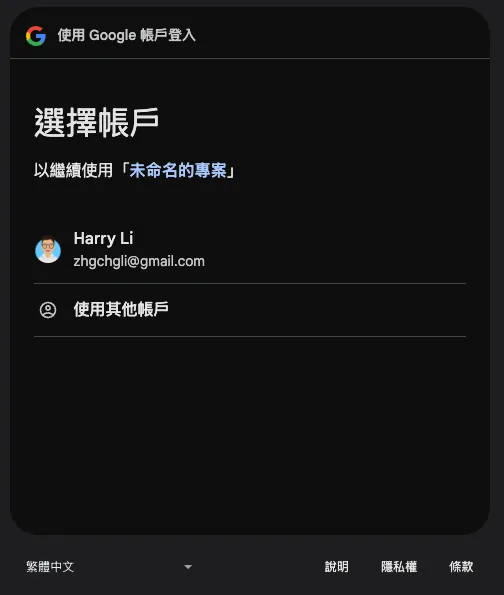
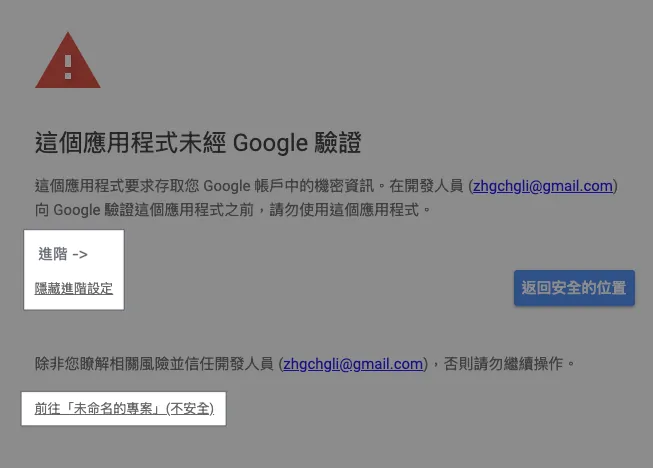
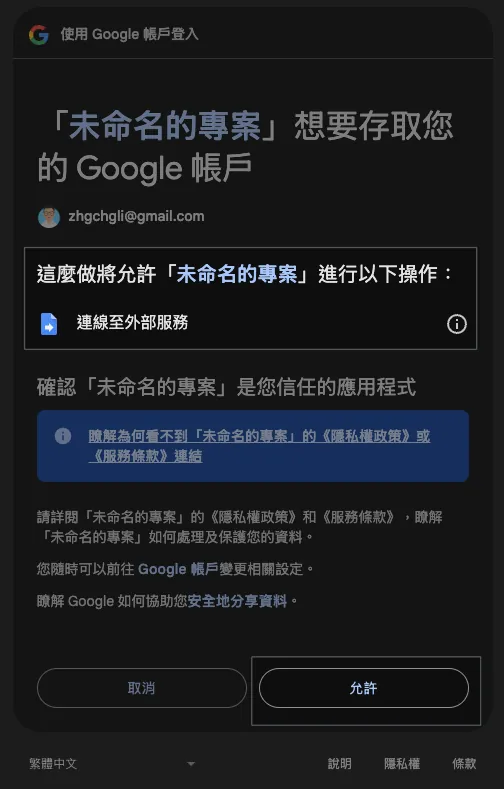
第一次使用 、点击「侦错」或「执行」可能会出下以下授权警告:
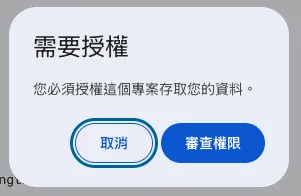
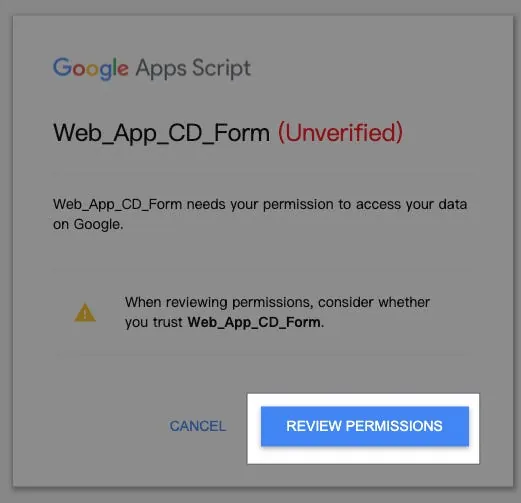
选择想要执行的身份帐号,如果有出现「这个应用程式未经 Google 验证」则点击「进阶」->「前往 XXX (不安全)」,选择「允许」:
如果 GAS 程式权限有变动(例如:多加存取 Google Sheet…etc)才会需要再重新授权,不然点过一次就不会再出现。
如遇到:已封锁存取权「XXX」未完成 Google 验证程序, 可参考我最新文章的 GCP 设定。
Step 3. 串接 Github API 取得 PR 分支列表
我们新增一个 Github.gs 程式档案存放 Github API 相关逻辑。
Github.gs:
1
2
3
4
5
6
7
8
9
10
11
12
13
14
15
16
17
18
19
20
21
22
23
24
25
26
27
28
29
30
31
32
33
34
35
36
37
38
39
40
41
42
43
44
45
46
47
48
49
50
51
52
53
54
55
56
57
58
59
60
61
62
63
64
65
66
67
68
69
70
71
72
73
74
75
76
77
78
79
80
81
82
83
84
85
86
87
88
89
90
// SECRET
const githubPersonalAccessToken = ""
// 使用你的 Github 帐号或组织共用的 Github 帐号创建 PAT
// https://docs.github.com/en/authentication/keeping-your-account-and-data-secure/managing-your-personal-access-tokens

// 方式 1: Restful API 存取
function githubAPI(method, path, payload = null) {
  try {
    const url = "https://api.github.com"+path;
    var options = {
      method: method,
      headers: {
        "Accept": "application/vnd.github+json",
        "Authorization": `Bearer ${githubPersonalAccessToken}`,
        "X-GitHub-Api-Version": "2022-11-28"
      }
    };

    if (method.toLowerCase().trim() == "post") {
      options.payload = JSON.stringify(payload);
    }

    const response = UrlFetchApp.fetch(url, options);
    const data = JSON.parse(response.getContentText());
    return data;
  } catch (error) {
    throw error;
  }
}

// 方式 2: GraphQL 存取
// Github API 部分更细的查询功能只有 GraphQL API 有提供
// https://docs.github.com/en/graphql
function githubGraphQL(query, variables) {
  const url = "https://api.github.com/graphql";
  const payload = {
    query: query,
    variables: variables
  };

  const options = {
    method: "post",
    contentType: "application/json",
    headers: {
      "Accept": "application/vnd.github+json",
      "Authorization": `Bearer ${githubPersonalAccessToken}`,
      "X-GitHub-Api-Version": "2022-11-28"
    },
    payload: JSON.stringify(payload)
  };

  try {
    const response = UrlFetchApp.fetch(url, options);
    const data = JSON.parse(response.getContentText());
    return data;
  } catch (error) {
    throw error;
  }
}

// GraphQL Example:
// const query = `
//   query($owner: String!, $repo: String!) {
//     repository(owner: $owner, name: $repo) {
//       pullRequests(states: OPEN, first: 100, orderBy: { field: CREATED_AT, direction: DESC }) {
//         nodes {
//           title
//           url
//           number
//           createdAt
//           author {
//             login
//           }
//           headRefName
//           baseRefName
//           body
//         }
//         pageInfo {
//           hasNextPage
//           endCursor
//         }
//       }
//     }
//   }
// `;
// const variables = {
//   owner: "swiftlang",
//   repo: "swift"
// };
// const response = githubGraphQL(query, variables);
Github API 有两种存取方式,一种是传统的 Restful,另一种是更弹性的 GraphQL;本文以 Restful 为例。
程式码.gs:
1
2
3
4
5
6
7
8
9
10
11
12
13
14
15
16
17
18
19
20
21
22
23
24
25
26
27
28
29
30
31
32
33
34
35
36
37
38
39
40
41
42
43
44
45
46
47
48
49
50
51
52
function doGet(e) {
  // 对应到左方档案 Form.html
  const htmlTemplate = HtmlService.createTemplateFromFile('Form');

  const email = Session.getActiveUser().getEmail();
  // 取得使用者信箱,只限 执行身份:存取网页程式的使用者 设定有效

  const title = "App CD 打包请求表单";

  const pullRequests = githubAPI("get", "/repos/swiftlang/swift/pulls");
  // 以 https://github.com/swiftlang/swift/pulls 为例

  const buildNumber = genBuildNumber();

  htmlTemplate.email = email;
  htmlTemplate.title = title;
  htmlTemplate.pullRequests = pullRequests;
  htmlTemplate.buildNumber = buildNumber;

  const html = htmlTemplate.evaluate();
  html.setTitle(title);
  //html.setWidth(600) // 设定页面宽度

  return html
}

function processForm(object) {
  if (object.buildNumber == "") {
    return {"ok": false, "message": "请输入版本号!"};
  }
  if (object.branch == "") {
    return {"ok": false, "message": "请选择分支版本!"};
  }

  // 带上你要带到 Github Action 的参数
  const payload = {
    ref: object.branch,
    inputs: {
      buildNumber: object.buildNumber
    }
  };

  //
  try {
    const response = githubAPI("post", "/repos/zhgchgli0718/ios-project-for-github-action-ci-cd-demo/actions/workflows/CD-Job.yml/dispatches", payload);
    // 以 https://github.com/zhgchgli0718/ios-project-for-github-action-ci-cd-demo/blob/main/.github/workflows/CD-Job.yml 为例

    return {"ok": true, "message": `打包请求发送成功!<br/>对应分支:<strong>${object.branch}</strong><br/>版号:<strong>${object.buildNumber}</strong>`};
  } catch (error) {
    return {"ok": false, "message": "发生错误:"+error.message};
  }
}
processForm 方法中处理表单回传的内容,也可以多加上更多吃
GAS x Github API x Github Action
这边多补充一下对应到的 Github Action。
CD-Job.yml:
1
2
3
4
5
6
7
8
9
10
11
12
13
14
15
16
17
18
19
20
21
# CD 打包工作

name: CD-Job

on:
  workflow_dispatch:
    inputs:
      buildNumber: # 对应 GAS payload.inpus.xxx
        description: '版本号码'
        required: false
        type: string
      # ...More
      # Inputs 类型可参考官方文件:https://docs.github.com/en/actions/writing-workflows/workflow-syntax-for-github-actions#onworkflow_dispatchinputs

jobs:
  some-job:
    runs-on: ubuntu-latest
    steps:
      - name: Print Inputs
        run: \\|
          echo "Release Build Number: ${{ github.event.inputs.buildNumber }}"
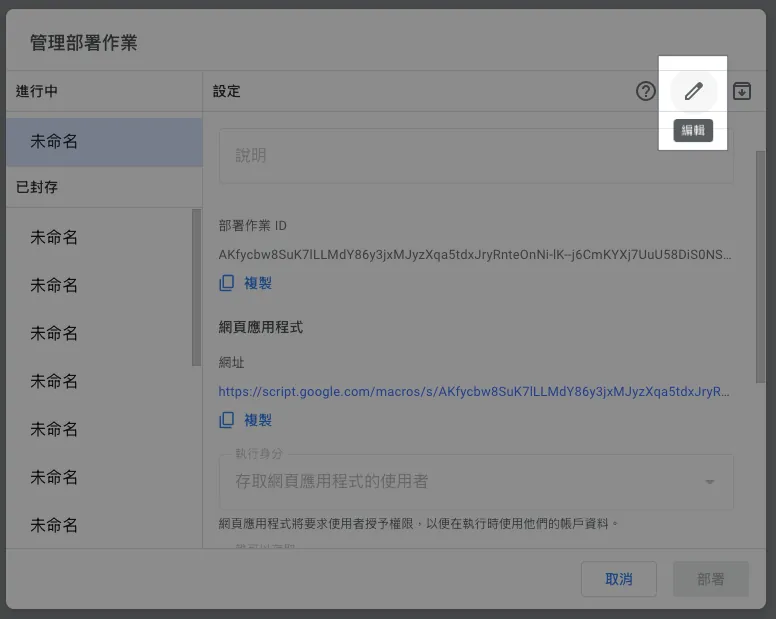
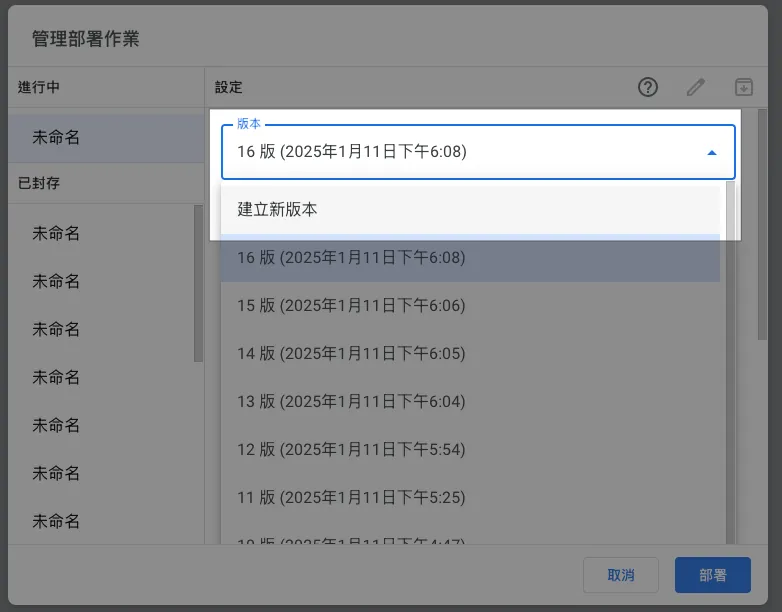
Step 4. 重新部署 Google Apps Script Web App Form
⚠️请注意,GAS 程式码的任何调整都需要重新部署,才会生效。⚠️
⚠️请注意,GAS 程式码的任何调整都需要重新部署,才会生效。⚠️
⚠️请注意,GAS 程式码的任何调整都需要重新部署,才会生效。⚠️
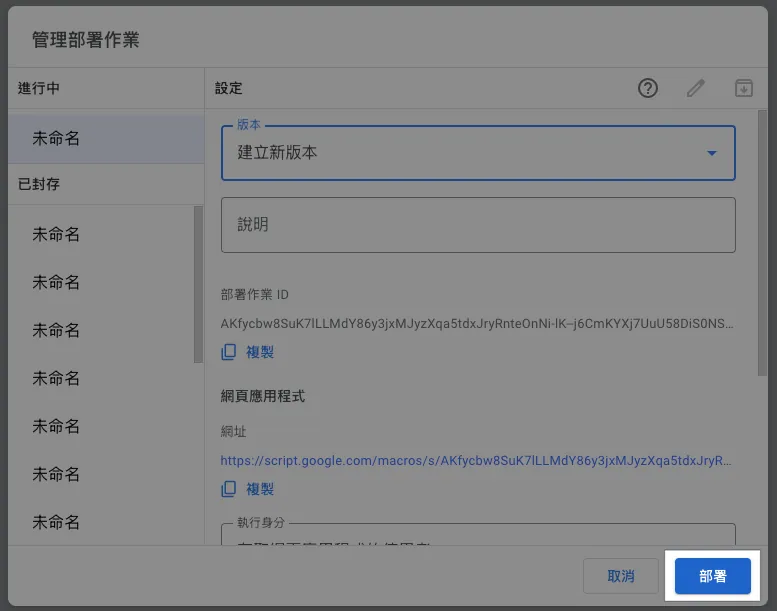
GAS 右上角选择「部署」-> 选择右上角「编辑」-> 版本选择「建立新版本」
点击「部署」-> 完成。
再回到网页上重新整理,就能看到修改后的结果了:
⚠️请注意,GAS 程式码的任何调整都需要重新部署,才会生效。⚠️
⚠️请注意,GAS 程式码的任何调整都需要重新部署,才会生效。⚠️
⚠️请注意,GAS 程式码的任何调整都需要重新部署,才会生效。⚠️
Done! 🎉🎉🎉
{:target="_blank"}](/assets/4cb4437818f2/1*9aaNeemezNPRlSgbLFrseA.webp)
现在你可以在组织内分享这个连结给其他伙伴,他们可以直接使用这个网页 GUI 执行 CI/CD 工作。
延伸 (1)— 用使用者的信箱查询 Slack User ID & 发送、更新进度通知
前文有提到,我们希望及时通知使用者 CI/CD 执行状况,我们可以使用使用者提供的信箱去查 Slack User ID。
Slack.gs:
1
2
3
4
5
6
7
8
9
10
11
12
13
14
15
16
17
18
19
20
21
22
23
24
25
26
27
28
29
30
31
32
33
34
35
36
37
38
39
40
41
42
43
44
45
46
47
48
49
50
51
52
53
54
55
56
57
58
59
60
61
62
63
64
65
66
67
const slackBotToken = ""
// https://medium.com/zrealm-robotic-process-automation/slack-chatgpt-integration-bd94cc88f9c9

function slackRequest(path, content) {
  const options = {
    method: "post",
    contentType: "application/json",
    headers: {
      Authorization: `Bearer ${slackBotToken}`, // Use the bot token for authorization,
      'X-Slack-No-Retry': 1
    },
    payload: JSON.stringify(content)
  };

  try {
    const response = UrlFetchApp.fetch("https://slack.com/api/"+path, options);
    const responseData = JSON.parse(response.getContentText());
    if (responseData.ok) {
      return responseData
    } else {
      throw new Error(`Slack: ${responseData.error}`);
    }
  } catch (error) {
    throw error;
  }
}

// 用信箱查询 Slask UID
function getSlackUserId(email) {
  return slackRequest(`users.lookupByEmail?email=${encodeURIComponent(email)}`)?.user?.id;
}

// 发送讯息给目标 Slack UID (channelID)
function sendSlackMessage(channelId, ts = null, value)  {
  var content = {
    channel: channelId
  };

  if (ts != null) {
    content.thread_ts = ts;
  }

  if (typeof value === "string") {
    content.text = value;
  } else {
    content.blocks = value;
  }
  return slackRequest("chat.postMessage", content);
}

// 更新发送的讯息内容
function updateSlackMessage(channelId, ts = null, value)  {
  var content = {
    channel: channelId
  };

  if (ts != null) {
    content.ts = ts;
  }

  if (typeof value === "string") {
    content.text = value;
  } else {
    content.blocks = value;
  }
  return slackRequest("chat.update", content);
}
Slack API 使用请参考 官方文件 。
Githun Action YAML 可以使用这个 Action 持续更新讯息、发送 Slack 讯息:
1
2
3
4
5
6
7
8
9
10
11
12
13
14
15
16
17
18
19
20
21
22
23
24
25
26
27
28
29
30
31
32
33
34
# ...
on:
  workflow_dispatch:
    inputs:
      buildNumber: # 对应 GAS payload.inpus.xxx
        description: '版本号码'
        required: false
        type: string
      # ...More
      SLACK_USER_ID:
        description: 'Slack User Id for receive action notification'
        type: string
      SLACK_CHANNEL_ID:
        description: 'Slack Channel Id for receive action notification'
        type: string
      SLACK_THREAD_TS:
        description: 'Slack message ts'
        type: string

jobs:
  # some jobs...

  if-deploy-failed-message:
    runs-on: ubuntu-latest
    if: failure()
      - name: update slack message
        uses: slackapi/slack-github-action@v2.0.0
        with:
            method: chat.update
            token: ${{ secrets.SLACK_BOT_TOKEN }}
            payload: \\|
              channel: ${{ github.event.inputs.SLACK_CHANNEL_ID }}
              ts: ${{ github.event.inputs.SLACK_THREAD_TS }}
              text: "❌ 打包任务失败,请检查执行状况结果或稍后再试。\n<${{ github.server_url }}/${{ github.repository }}/actions/runs/${{ github.run_id }}\\|点此查看执行状况> cc'ed <@${{ github.event.inputs.SLACK_USER_ID }}>"
效果:
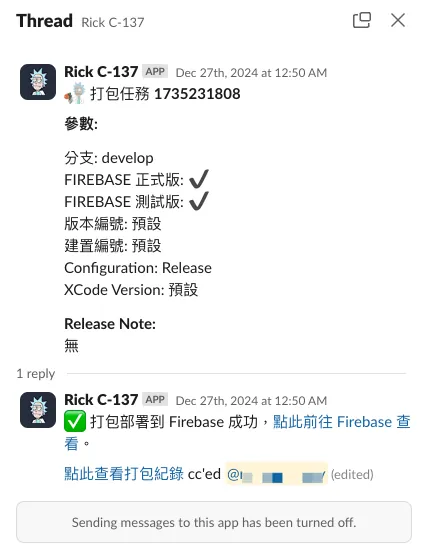
Slack App 串接细节可参考我之前的文章: Slack & ChatGPT Integration 。
延伸 (2) —查询 Jira 工单
Jira.gs:
1
2
3
4
5
6
7
8
9
10
11
12
13
14
15
16
17
18
19
20
21
22
23
24
25
26
27
28
29
30
31
32
33
34
const jiraPersonalAccessToken = ""
// https://confluence.atlassian.com/enterprise/using-personal-access-tokens-1026032365.html

function getJiraTickets() {
  const url = `https://xxx.atlassian.net/rest/api/3/search`;

  // JQL query
  const jql = `project = XXX`;
  const queryParams = {
    jql: jql,
    maxResults: 50, // Adjust as needed
  };

  const options = {
    method: "get",
    headers: {
      Authorization: "Basic " + jiraPersonalAccessToken,
      "Content-Type": "application/json",
    },
    muteHttpExceptions: true,
  };

  const queryString = Object.keys(queryParams).map(key => `${encodeURIComponent(key)}=${encodeURIComponent(queryParams[key])}`).join("&");
  const response = UrlFetchApp.fetch(url + "?" + queryString + "&fields=", options);
  // could specify only return some fields

  if (response.getResponseCode() === 200) {
    const issues = JSON.parse(response.getContentText()).issues;
    return issues;
  } else {
    Logger.log(`Error: ${response.getResponseCode()} - ${response.getContentText()}`);
    throw new Error("Failed to fetch Jira issues.");
  }
}
其他 Jira API 使用请参考 官方文件 。
延伸 (3) — 查询 Asana 工单
Asana.gs:
1
2
3
4
5
6
7
8
9
10
11
12
13
14
15
16
17
18
19
20
21
22
23
24
const asanaPersonalAccessToken = ""
// https://developers.asana.com/docs/personal-access-token

function asanaAPI(endpoint, method = "GET", data = null) {
    var options = {
      "method" : method,
      "contentType" : "application/json",
      "headers": {
          "Authorization":  "Bearer "+asanaPersonalAccessToken
      }
    };

    if (data != null) {
      options["payload"] = JSON.stringify({"data":data});
    }

    const url = "https://app.asana.com/api/1.0"+endpoint;
    const res = UrlFetchApp.fetch(url, options);
    const data = JSON.parse(res.getContentText());
    return data;
}

// 查找 tasks in project
// asanaAPI("/projects/PROJECT_ID/tasks");
其他 Asana API 使用请参考 官方文件 。
总结
自动化、工作及开发流程优化缺的永远不是技术,而是想法;只要有想法我们都能找到适合的技术来实现,共勉之!
2025/07 Update:
此功能已整合到实际打包工具使用,可参考最新文章案例:「 CI/CD 实战指南(四):使用 Google Apps Script Web App 串接 GitHub Actions 建置免费易用的打包工具平台 」
有任何问题及指教欢迎 与我联络 。

本文首次发表于 Medium (点击查看原始版本),由 ZMediumToMarkdown 提供自动转换与同步技术。