GA4 Data Alerts Automation|3-Step Guide to Build Free Telegram Bot Notifications
Discover how to automate GA4 data notifications using Google Apps Script in 3 simple steps. Eliminate manual monitoring with a free Telegram Bot that delivers real-time insights, boosting your data responsiveness effortlessly.
点击这里查看本文章简体中文版本。
點擊這裡查看本文章正體中文版本。
This post was translated with AI assistance — let me know if anything sounds off!
Table of Contents
Simple 3 Steps — Create a Free GA4 Automatic Data Notification Bot
Using Google Apps Script to Complete RPA, Integrating GA4 + Telegram Bot Data Notification Robot
{:target="_blank"}](/assets/1e85b8df2348/1*La0AKKSrGNP9EZUV-vrONQ.webp)
Photo by BoliviaInteligente
Introduction
Since around 2020, I have been exploring RPA using available tools. Initially, it was just to automate personal routine tasks. Later, at work, I joined larger organizations where I often encountered cross-team or person-dependent tasks, as well as repetitive tasks, which revealed the true benefits of RPA automation.
For example: a repetitive task occurs 10 times a month, each taking 30 minutes to complete, involving 60 people. The team spends 3,600 hours per year on this. If 100 hours are invested to develop automation, the time saved can be used for more valuable work; effectively turning 3,600 wasted hours into 3,600 hours of more worthwhile output.
For more details, please refer to my previous article:
Other RPA projects completed:
[GMail to Slack] Forward Gmail Emails to Slack Using Google Apps Script
[Google Form x Google Sheet x Slack] Slack Creates a Fully Automated WFH Employee Health Status Reporting System
[Big Query x Slack] Crashlytics + Big Query Build a More Real-Time and Convenient Crash Tracking Tool
[Google Analytics x Slack] Crashlytics + Google Analytics Automated Query for App Crash-Free Users Rate
[Github Webhook x Line Notify] Create a Github Repo Star Notifier for Free in Three Steps Using Google Apps Script
[Slack x OpenAI (ChatGPT)] Slack & ChatGPT Integration
[Google Analytics x Google Sheet] Automate Daily Data Reports with Google Apps Script RPA
[iOS Shortcut x Line x Reminders] iOS Shortcut Automation Use Case — Auto Forwarding SMS and Auto Creating Reminder Tasks
[Apple Store API x Google Play Console API x Github Action] Github Action x ZReviewTender Free Quick Deployment of Your App Store Review Monitoring Bot
[Telegram Bot] Quickly Migrate Line Notify to Telegram Bot Notifications in 10 Minutes
[Medium to Jekyllrb] Seamless Migration from Medium to Self-Hosted Website
From backend data, many articles have been indexed by ChatGPT and various GenAI services, indirectly helping many non-engineers who want to try using RPA to solve problems. Therefore, I will continue to share RPA scenarios from my life and work, along with my solutions — ZRealm Robotic Process Automation.
Commercial Time
If you and your team need automation tools or process integration, whether it’s Slack App development, Notion, Asana, Google Sheets, Google Forms, GA data, or any other integration needs, feel free to contact me for development.
This Article: Google Analytics 4 x Telegram Bot
The integration scenario introduced this time follows the previous article “10-Minute Quick Migration from Line Notify to Telegram Bot Notifications”. I realized that my Medium backup site “zhgchg.li” has never had its GA4 website data monitored. I thought it would be good to create another notification bot to send the past 7 days of website data daily to a specified Telegram Channel to keep me informed.
This article is just a brief piece. For a complete automated data report, please refer to the previous article “Using Google Apps Script to Implement Daily Data Report RPA Automation”. Also, a previous integration with GA4 to fetch the App Crash-free rate can be found in the article “Crashlytics + Google Analytics Automated Query for App Crash-Free Users Rate”.
This article will not cover the free limits, detailed usage, deployment, or features of Google Apps Script. Please refer to the previous article.
Creating and using a Telegram Bot will not be further explained here. Please refer to the previous article.
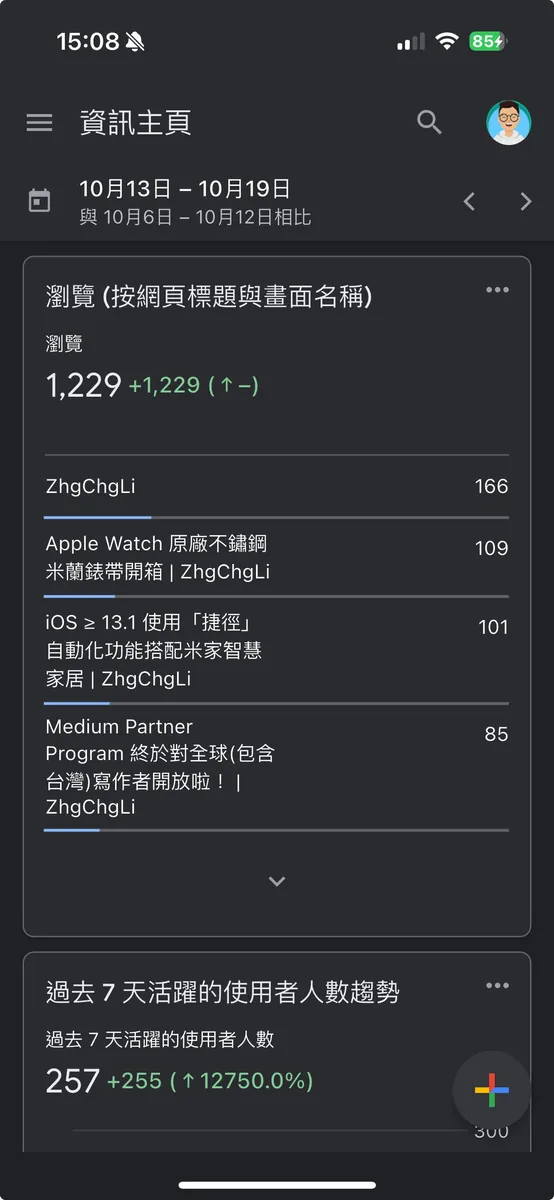
Results
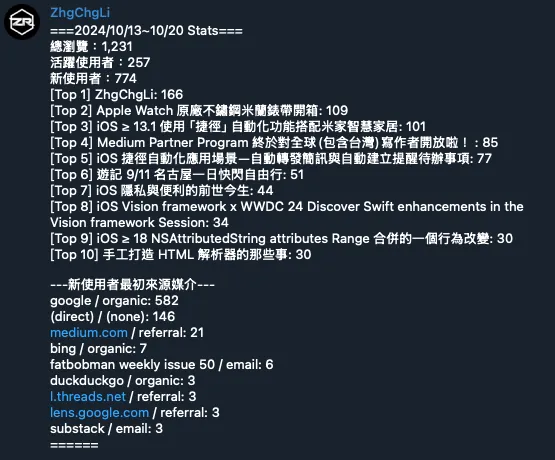
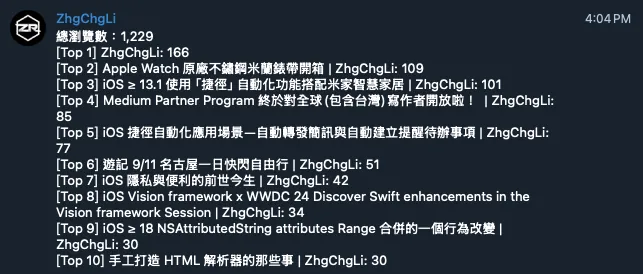
Here is the final result: Google Apps Script automatically fetches my desired Google Analytics 4 website data between 12 PM and 1 PM daily, then compiles the information and sends it to my Telegram Channel via a Telegram Bot. This allows me to quickly review the website data from the past 7 days.
The data I want to observe is:
Total page views
screenPageViewsfrom the past 7 days7daysAgo ~ todayActive Users
active7DayUsersNew Users
newUsersTop 10 page views
screenPageViews/pageTitleNew user initial source medium
newUsers/firstUserSourceMedium
You can actually use GA Dev Tools to generate and adjust according to your own needs.
Step 1. Use the GA4 Query Explorer official tool to generate data report query parameters
First, we need to use the official tool GA4 Query Explorer to generate the query parameters for the data report we need:
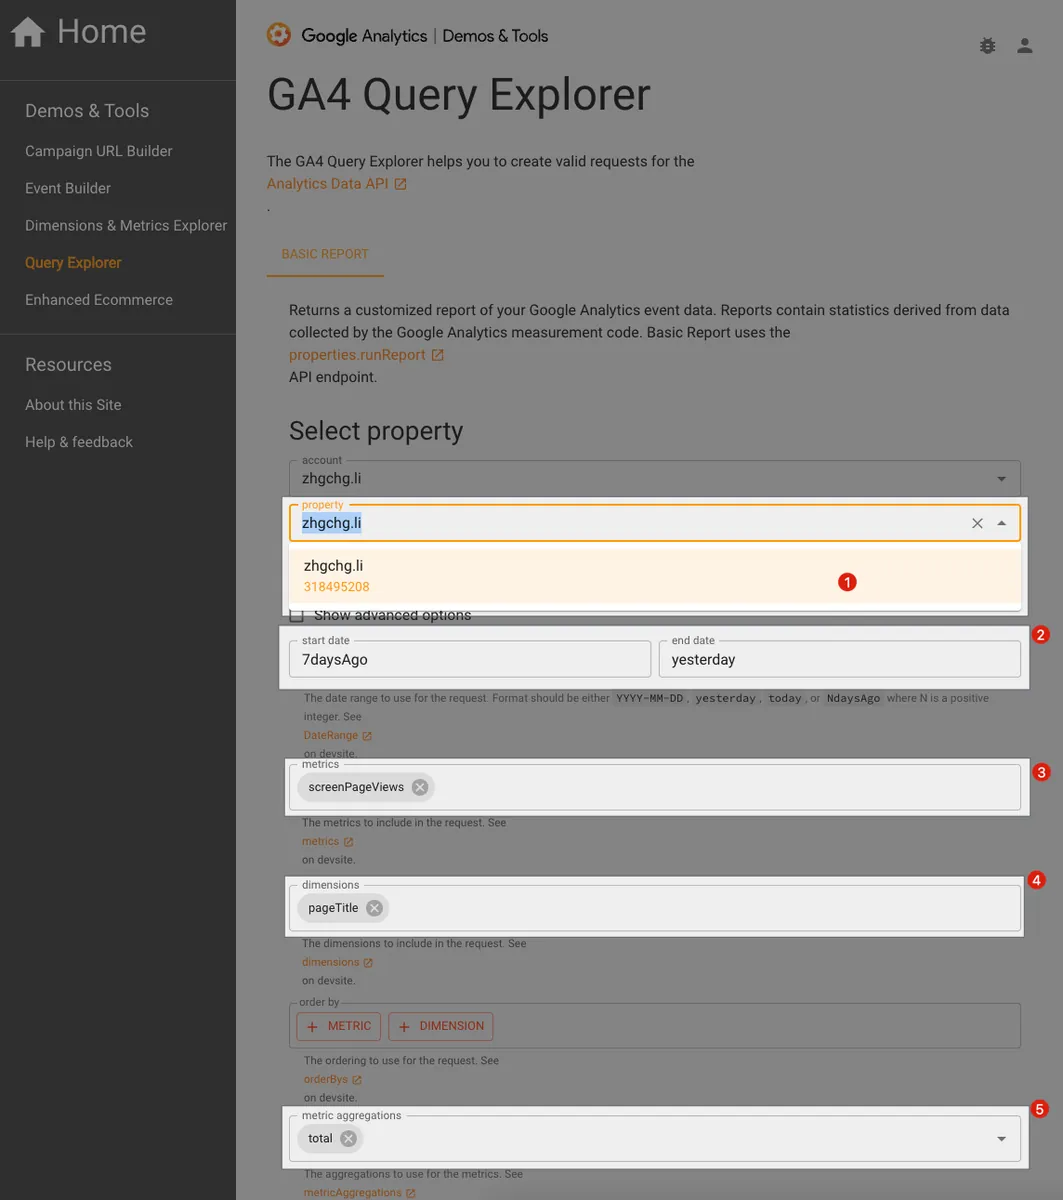
Select Property: Note down your
property ID
The property ID will be used later when writing Google Apps Script.start date, end date: The date range for the report start to end. You can use
YYYY-MM-DDor the magic variablesyesterday,today,NdaysAgo.metrics: Select the metrics you want to query
dimensions: Choose the dimension you want to query
metric aggregations: Data aggregation calculation rules
Here is an example based on my scenario:
Property ID:
318495208start_date:
7daysAgoend_date:
yesterday
Since GA data reports are delayed, querying from yesterday to seven days ago is the most accurate.metric aggregations:
total
Other filters and limits can be set according to your needs:
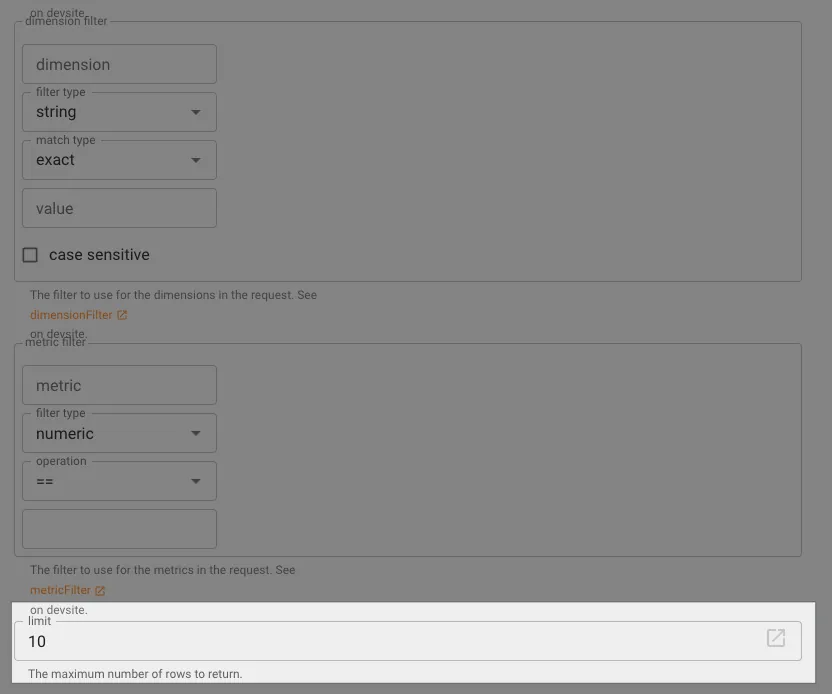
filter I don’t need, leave blank; limit I enter 10 because I only want to know the Top 10.
Click “MAKE REQUEST” to generate the corresponding data report query parameters and results:
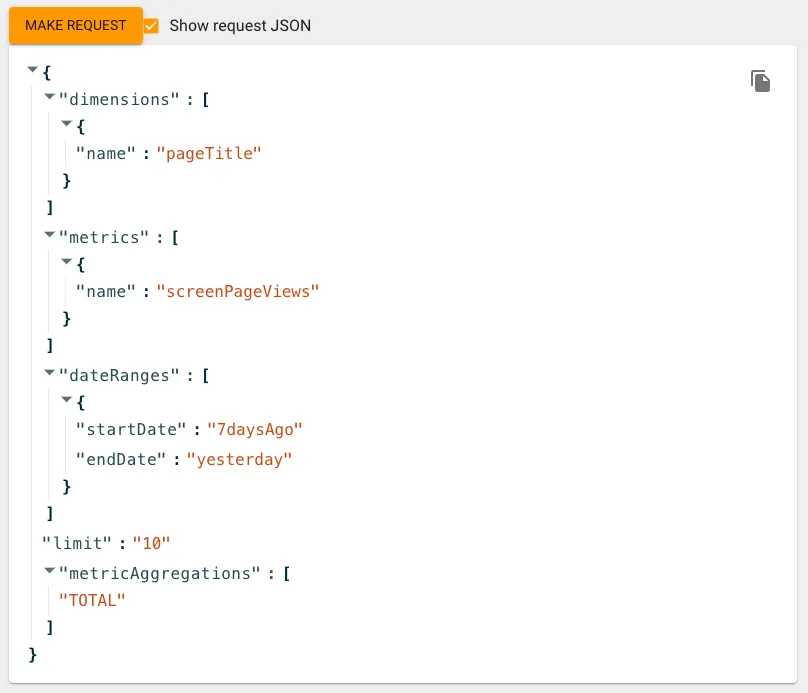
Note the following request parameters, which will be used later for writing Google Apps Script:
1
2
3
4
5
6
7
8
9
10
11
12
13
14
15
16
17
18
19
20
21
22
{
  "dimensions": [
    {
      "name": "pageTitle"
    }
  ],
  "metrics": [
    {
      "name": "screenPageViews"
    }
  ],
  "dateRanges": [
    {
      "startDate": "7daysAgo",
      "endDate": "yesterday"
    }
  ],
  "limit": "10",
  "metricAggregations": [
    "TOTAL"
  ]
}
Result:
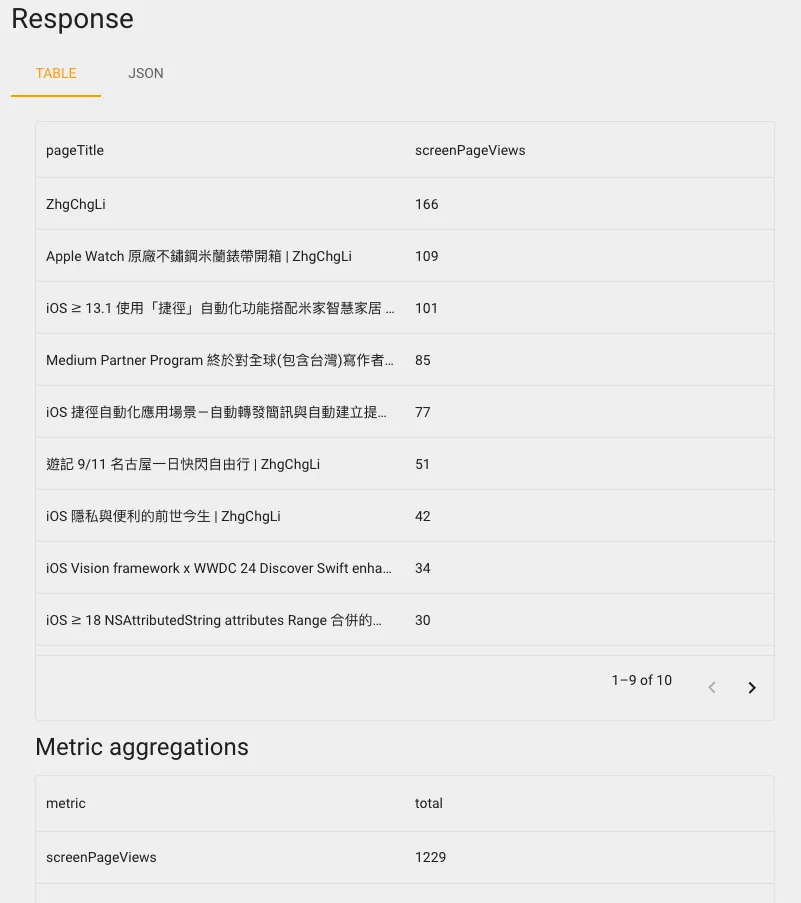
- Comparison with data on GA is accurate and consistent ✅✅✅
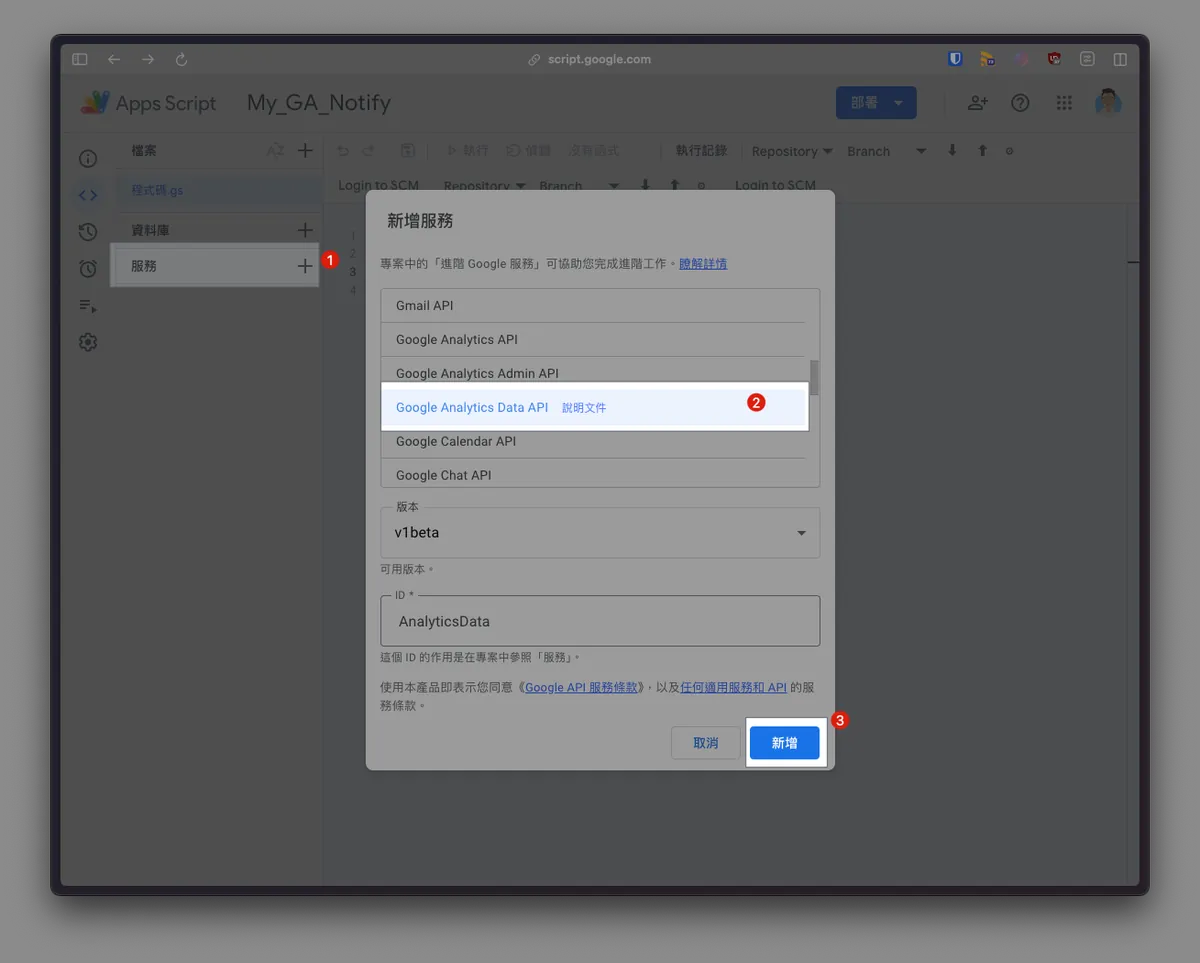
Step 2. Create Google Apps Script & Use Google Analytics Data API to Query Data
Create a new project and name the project.
Click “Services” -> “+” to add a new service
Select “Google Analytics Data API”
Click “Add”
Paste Google Analytics Data API Query Code and Combine:
Query data parameters generated from the previous steps:
1
2
3
4
5
6
7
8
9
10
11
12
13
14
15
16
17
18
19
20
21
22
{
  "dimensions": [
    {
      "name": "pageTitle"
    }
  ],
  "metrics": [
    {
      "name": "screenPageViews"
    }
  ],
  "dateRanges": [
    {
      "startDate": "7daysAgo",
      "endDate": "yesterday"
    }
  ],
  "limit": "10",
  "metricAggregations": [
    "TOTAL"
  ]
}
Convert to Code:
1
2
3
4
5
6
7
8
9
10
11
12
13
14
15
16
17
18
19
20
21
22
23
24
25
26
27
28
29
30
function execute() {
  Logger.log(JSON.stringify(fetchScreenPageViews("318495208")));
}

// Split into a separate function for easier reuse later...
// Default startDate=7daysAgo, endDate=yesterday
// Other usages:
// e.g. fetchScreenPageViews("1111", "3daysAgo", "yesterday")
// e.g. fetchScreenPageViews("2222", "yesterday", "today")
function fetchScreenPageViews(propertyId, startDate = "7daysAgo", endDate = "yesterday") {
  const screenPageViewsMetric = AnalyticsData.newMetric();
  screenPageViewsMetric.name = "screenPageViews";

  const dateRange = AnalyticsData.newDateRange();
  dateRange.startDate = startDate;
  dateRange.endDate = endDate;

  const pageTitleDimension = AnalyticsData.newDimension();
  pageTitleDimension.name = "pageTitle";

  const request = AnalyticsData.newRunReportRequest();
  request.dimensions = [pageTitleDimension];
  request.metrics = [screenPageViewsMetric];
  request.dateRanges = dateRange;

  request.limit = 10;
  request.metricAggregations = "TOTAL";

  return AnalyticsData.Properties.runReport(request, "properties/" + propertyId);
}
Code Analysis:
1
2
3
4
5
6
7
8
9
10
11
12
13
14
15
16
17
18
19
20
21
22
23
24
25
26
27
28
29
30
31
32
33
34
35
36
37
38
// Metrics can be multiple, declare separately...
const screenPageViewsMetric = AnalyticsData.newMetric();
screenPageViewsMetric.name = "screenPageViews";

// For example, another metric active1DayUsers:
const active1DayUsersMetric = AnalyticsData.newMetric();
active1DayUsersMetric.name = "active1DayUsers";

// Declare date range
const dateRange = AnalyticsData.newDateRange();
dateRange.startDate = startDate;
dateRange.endDate = endDate;

// Dimensions can be multiple, declare separately...
const pageTitleDimension = AnalyticsData.newDimension();
pageTitleDimension.name = "pageTitle";

// For example, another dimension:
const firstUserSourceMediumDimension = AnalyticsData.newDimension();
firstUserSourceMediumDimension.name = "firstUserSourceMedium";

//

// Create Request object
const request = AnalyticsData.newRunReportRequest();
request.metrics = [active1DayUsersMetric, active1DayUsersMetric]; // Include all metrics...
request.dimensions = [pageTitleDimension, firstUserSourceMediumDimension]; // Include all dimensions...

request.dateRanges = dateRange;

// Only need top 10 data entries
request.limit = 10;

// Set data aggregation logic: Total (SUM)
request.metricAggregations = "TOTAL";

// Generate query result
return AnalyticsData.Properties.runReport(request, "properties/" + propertyId).rows;
The first time you run it, authorization is required (if new permissions are added to the code later, reauthorization will be needed):
In fact, this authorizes Google Apps Script to use your account identity to run these scripts in the future, so you need to ensure the account you choose has access rights to the corresponding GA reports.
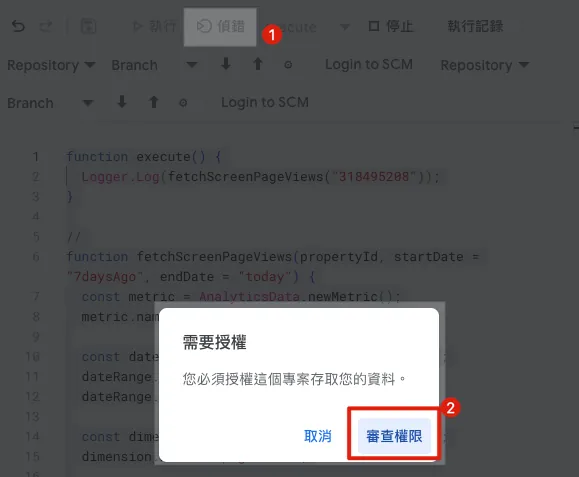
- After writing the code, click “Debug” -> click “Review Permissions”
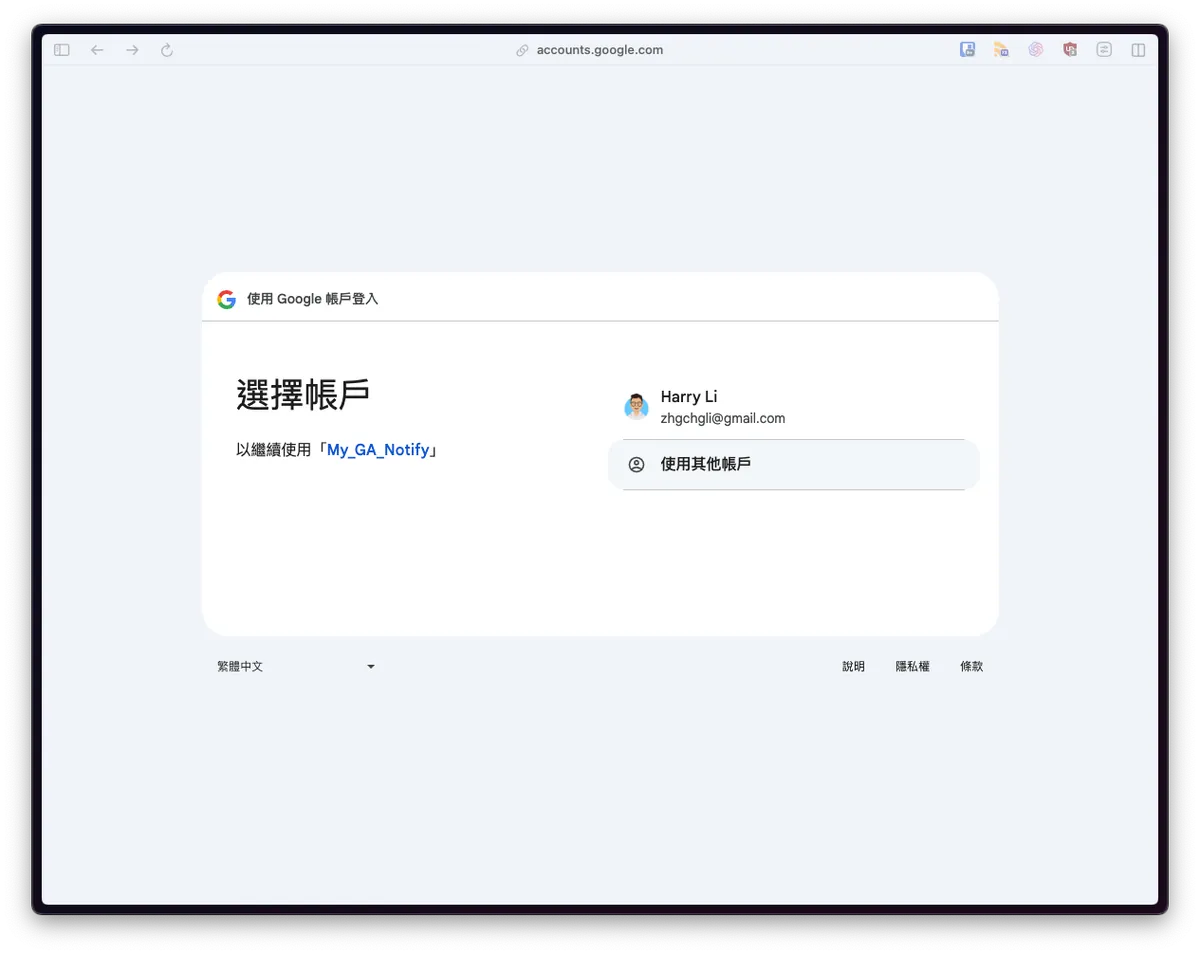
- Select the identity account to execute, usually the same as the current Google Apps Script account
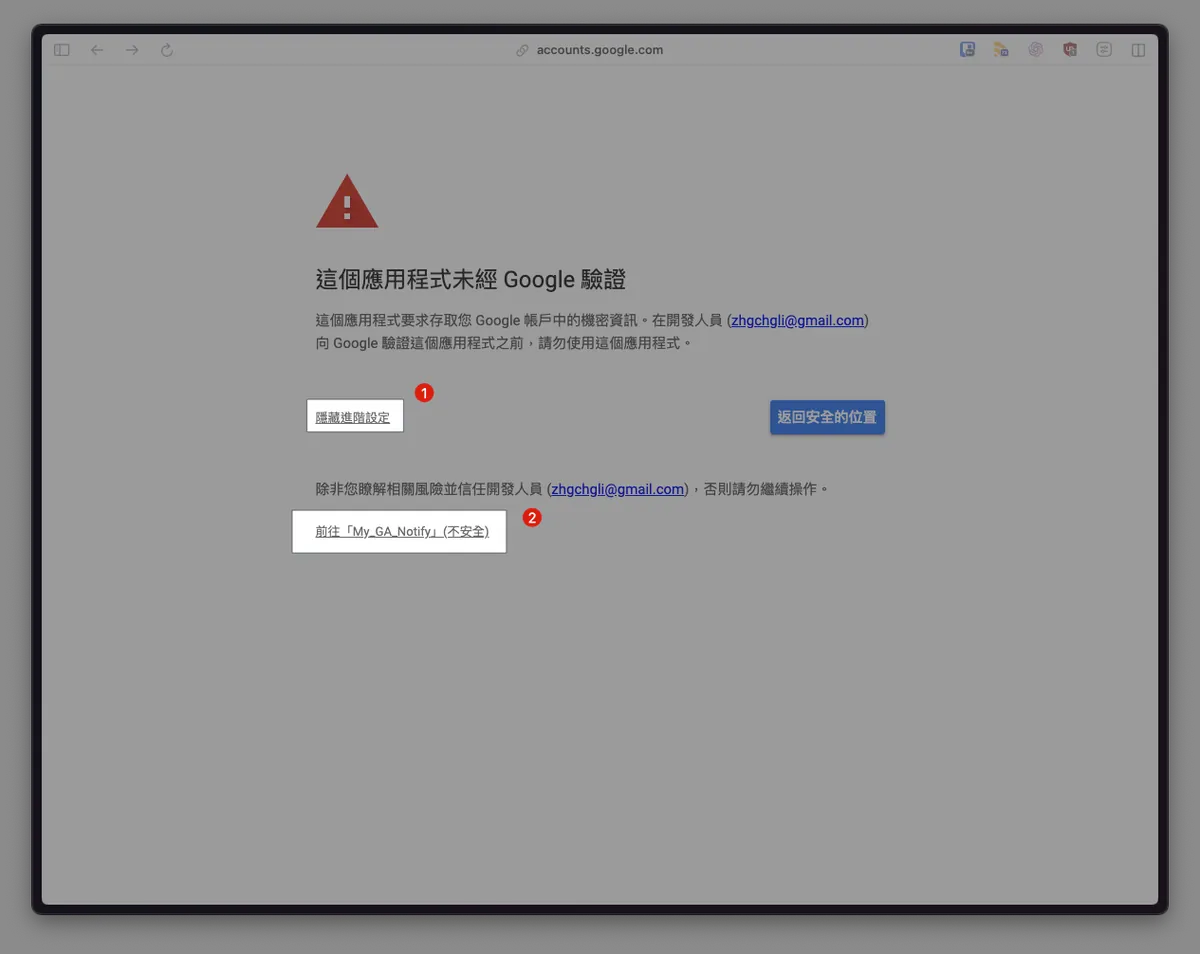
- Select “Advanced” to expand -> Click “Go to XXX”
This is an app we developed for our own use and does not require Google verification.
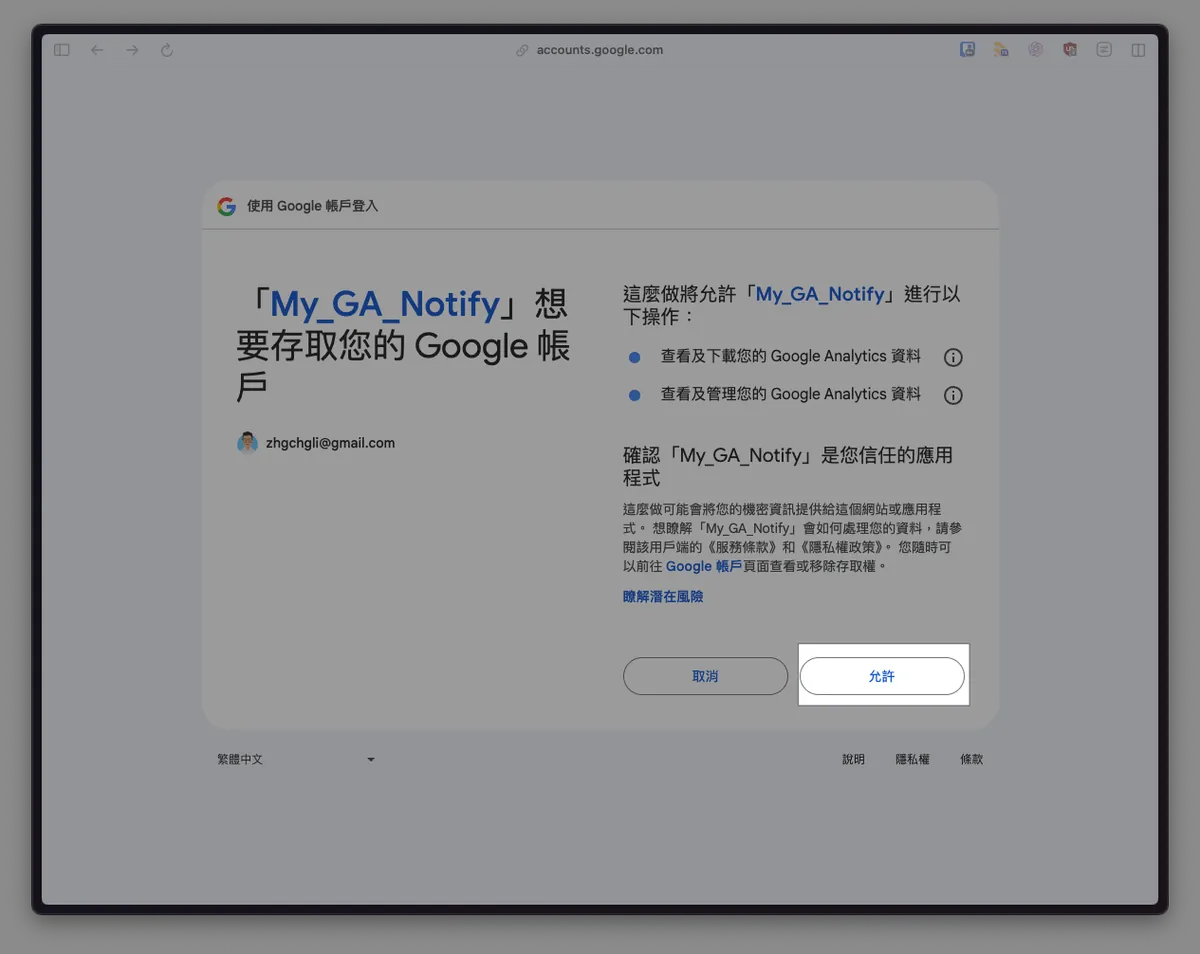
- Click “Allow”
Allow then click “Debug” or “Run” to execute the program:
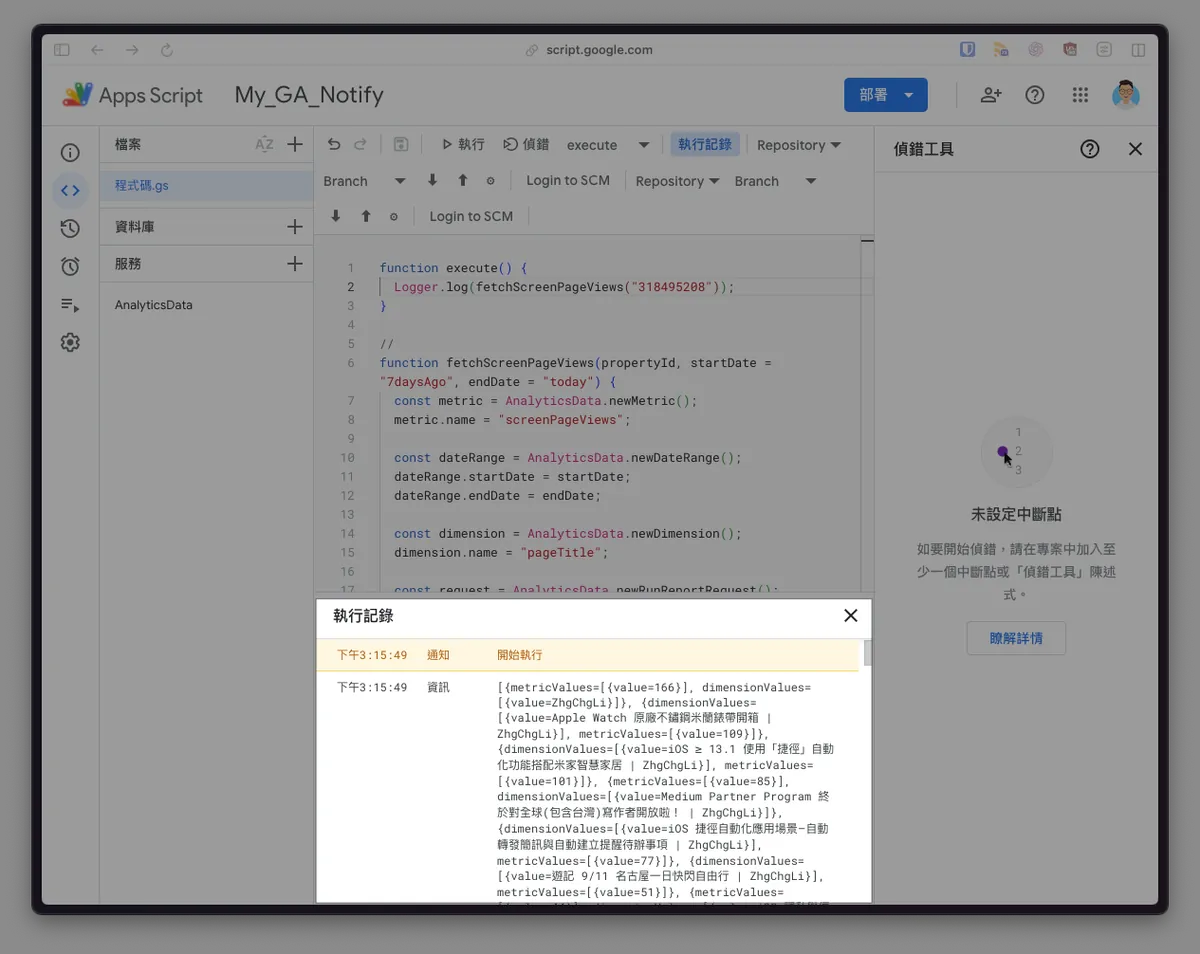
Here, we first use Logger.log(JSON.stringify()) to get the output result:
1
2
3
4
5
6
7
8
9
10
11
12
13
14
15
16
17
18
19
20
21
22
23
24
25
26
27
28
29
30
31
32
33
34
35
36
37
38
39
40
41
42
43
44
45
46
47
48
49
50
51
52
53
54
55
56
57
58
59
60
61
62
63
64
65
66
67
68
69
70
71
72
73
74
75
76
77
78
79
80
81
82
83
84
85
86
87
88
89
90
91
92
93
94
95
96
97
98
99
100
101
102
103
104
105
106
107
108
109
110
111
112
113
114
115
116
117
118
119
120
121
122
123
124
125
126
127
128
129
130
131
132
133
134
135
136
137
138
139
140
141
142
143
144
145
146
147
148
149
150
151
152
153
154
155
{
  "kind": "analyticsData#runReport",
  "dimensionHeaders": [
    {
      "name": "pageTitle"
    }
  ],
  "rowCount": 71,
  "metadata": {
    "currencyCode": "TWD",
    "timeZone": "Asia/Taipei"
  },
  "rows": [
    {
      "dimensionValues": [
        {
          "value": "ZhgChgLi"
        }
      ],
      "metricValues": [
        {
          "value": "166"
        }
      ]
    },
    {
      "metricValues": [
        {
          "value": "109"
        }
      ],
      "dimensionValues": [
        {
          "value": "Apple Watch Official Stainless Steel Milanese Band Unboxing \| ZhgChgLi"
        }
      ]
    },
    {
      "dimensionValues": [
        {
          "value": "iOS ≥ 13.1 Using the “Shortcuts” Automation Feature with Mijia Smart Home \| ZhgChgLi"
        }
      ],
      "metricValues": [
        {
          "value": "101"
        }
      ]
    },
    {
      "dimensionValues": [
        {
          "value": "Medium Partner Program Finally Open to Global (Including Taiwan) Writers! \| ZhgChgLi"
        }
      ],
      "metricValues": [
        {
          "value": "85"
        }
      ]
    },
    {
      "metricValues": [
        {
          "value": "77"
        }
      ],
      "dimensionValues": [
        {
          "value": "iOS Shortcuts Automation Use Cases — Auto Forward SMS and Auto Create Reminder To-Dos \| ZhgChgLi"
        }
      ]
    },
    {
      "metricValues": [
        {
          "value": "51"
        }
      ],
      "dimensionValues": [
        {
          "value": "Travelogue 9/11 Nagoya One-Day Flash Free Travel \| ZhgChgLi"
        }
      ]
    },
    {
      "metricValues": [
        {
          "value": "42"
        }
      ],
      "dimensionValues": [
        {
          "value": "iOS Privacy and Convenience: Past and Present \| ZhgChgLi"
        }
      ]
    },
    {
      "dimensionValues": [
        {
          "value": "iOS Vision Framework x WWDC 24 Discover Swift Enhancements in the Vision Framework Session \| ZhgChgLi"
        }
      ],
      "metricValues": [
        {
          "value": "34"
        }
      ]
    },
    {
      "dimensionValues": [
        {
          "value": "iOS ≥ 18 NSAttributedString Attributes Range Merging Behavior Change \| ZhgChgLi"
        }
      ],
      "metricValues": [
        {
          "value": "30"
        }
      ]
    },
    {
      "metricValues": [
        {
          "value": "30"
        }
      ],
      "dimensionValues": [
        {
          "value": "The Story of Handcrafted HTML Parsers \| ZhgChgLi"
        }
      ]
    }
  ],
  "metricHeaders": [
    {
      "type": "TYPE_INTEGER",
      "name": "screenPageViews"
    }
  ],
  "totals": [
    {
      "dimensionValues": [
        {
          "value": "RESERVED_TOTAL"
        }
      ],
      "metricValues": [
        {
          "value": "1229"
        }
      ]
    }
  ]
}
- Google Apps Script successfully requested GA data! 🎉🎉🎉
Step 3. Put It All Together! Google Apps Script + GA4 + Telegram Bot
According to the previous article “10-minute quick transfer from Line Notify to Telegram Bot notification”, create your Telegram Bot to get the Bot Token & the Channel Chat ID you want to send messages to.
1
2
3
4
5
6
7
8
9
10
11
12
13
14
15
16
17
18
19
20
21
22
23
24
25
26
27
28
29
30
31
32
33
34
35
36
37
38
39
40
41
42
43
44
45
46
47
48
49
50
51
52
53
54
55
56
57
58
59
60
61
62
63
64
65
66
67
68
69
const telegramToken = "XXXX" // Insert your Telegram Bot Token
//

function execute() {
  const screenPageViewsReport = fetchScreenPageViews("318495208");

  //
  const total = parseInt(screenPageViewsReport.totals[0].metricValues[0].value);
  var message = "Total Views: "+total.toLocaleString()+"\n";

  screenPageViewsReport.rows.forEach(function(element, index) {
    const pageTitle = element.dimensionValues[0].value;
    const value = parseInt(element.metricValues[0].value);

    message += "[Top "+(index + 1)+"] "+pageTitle+": "+value.toLocaleString()+"\n";
  });

  sendNotifyMessage(message, -xxxx); // Insert your Channel Chat ID
}


// Send message to specified Telegram Channel Chat ID
function sendNotifyMessage(message, chatId) {
  var url = "https://api.telegram.org/bot"+telegramToken+"/sendMessage";

  const payload = {
    "chat_id": chatId,
    "text": message,
    "disable_web_page_preview": true
  }
  const options = {
    'method': 'post',
    'contentType': 'application/json',
    'muteHttpExceptions': true,
    'payload': JSON.stringify(payload)
  };

  const response = UrlFetchApp.fetch(url, options);
  const data = JSON.parse(response.getContentText());

  if (data["ok"] == undefined \|\| data["ok"] != true) {
    if (data["error_code"] != undefined && data["error_code"] == 429) {
      Utilities.sleep(1000);
      sendNotifyMessage(message, chatId);
    }
  }
}

function fetchScreenPageViews(propertyId, startDate = "7daysAgo", endDate = "yesterday") {
  const screenPageViewsMetric = AnalyticsData.newMetric();
  screenPageViewsMetric.name = "screenPageViews";

  const dateRange = AnalyticsData.newDateRange();
  dateRange.startDate = startDate;
  dateRange.endDate = endDate;

  const pageTitleDimension = AnalyticsData.newDimension();
  pageTitleDimension.name = "pageTitle";

  const request = AnalyticsData.newRunReportRequest();
  request.dimensions = [pageTitleDimension];
  request.metrics = [screenPageViewsMetric];
  request.dateRanges = dateRange;

  request.limit = 10;
  request.metricAggregations = "TOTAL";

  return AnalyticsData.Properties.runReport(request, "properties/" + propertyId);
}
Code Analysis:
1
2
3
4
5
6
7
8
9
10
11
12
13
14
//...
  // Find the total position in the report's returned JSON, parseInt converts string to INT number format
  // .toLocaleString() -> formats number, 123456 -> 123,456
  const total = parseInt(screenPageViewsReport.totals[0].metricValues[0].value);
  var message = "Total views: " + total.toLocaleString() + "\n";

  // Iterate through the report's returned JSON data to compose the message
  screenPageViewsReport.rows.forEach(function(element, index) {
    const pageTitle = element.dimensionValues[0].value;
    const value = parseInt(element.metricValues[0].value);

    message += "[Top " + (index + 1) + "] " + pageTitle + ": " + value.toLocaleString() + "\n";
  });
//...
Execution: Click the “Run” or “Debug” button above and make sure the method name selected is execute:

- Success! 🎉🎉🎉
Set up scheduled automatic execution
The final step is to have the report bot run automatically on a schedule. Go to “Triggers” from the left menu:
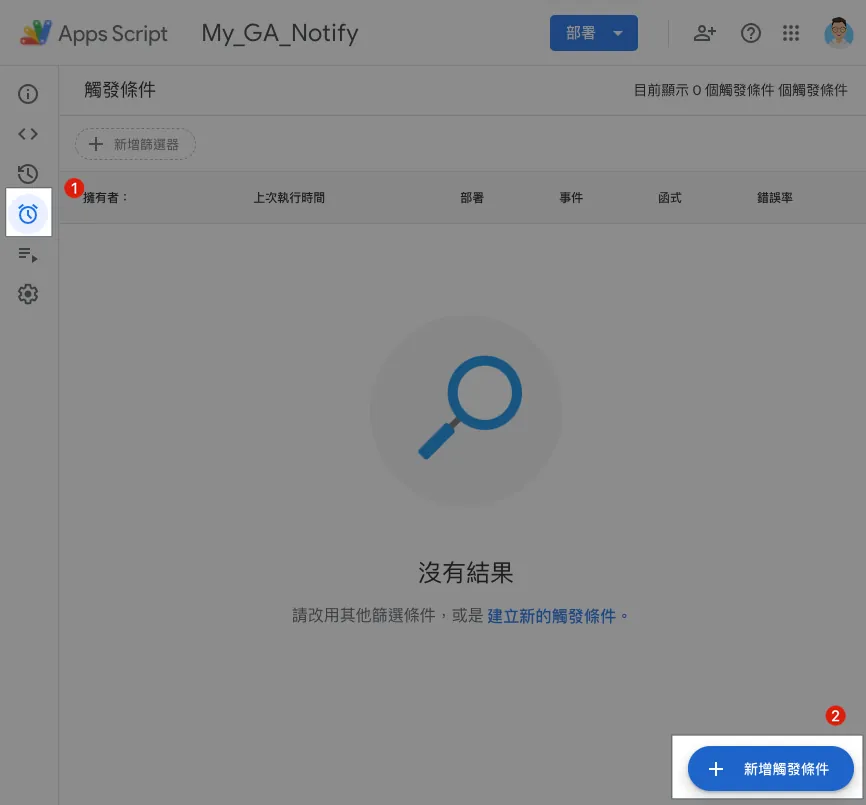
- Select the “Add Trigger” button at the bottom right corner
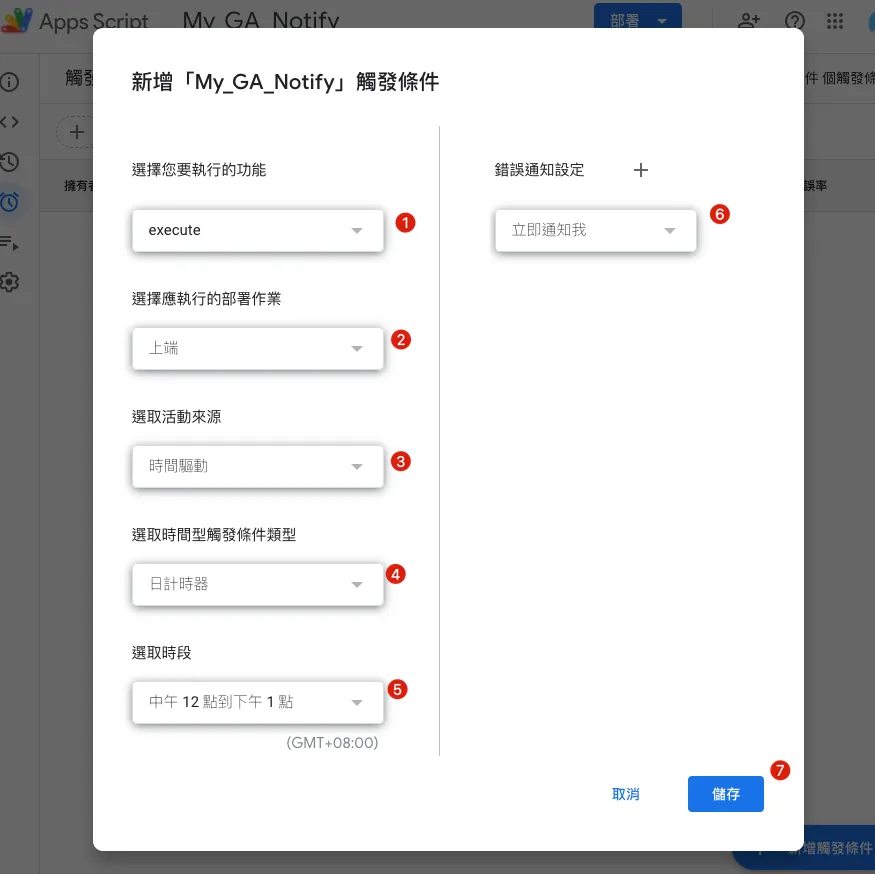
Choose the function to execute: select the method name “
execute”Select the deployment operation to execute: choose “
Top”Select event source: choose “
Time-driven”Select Time-Based Trigger Type: choose your desired trigger frequency
Select Time Slot: choose the time you want the daily automatic trigger to occur
If Execution Fails… Notification Email Frequency Settings
Save
Done! Now it will run automatically when the time comes. 🎉🎉🎉
Extended Exercises
Other data such as new users and source mediums can also be obtained using the previous code, so it won’t be repeated here. Consider it as homework for everyone.
If you have any questions or suggestions, feel free to contact me.

This post was originally published on Medium (View original post), and automatically converted and synced by ZMediumToMarkdown.