
linkyee — 使用 GitHub Pages 快速免費建立個人類 LinkTree 連結頁面
使用 GitHub Pages 快速建立自己的連結頁面,100% 免費、客製化並支援自訂義網域
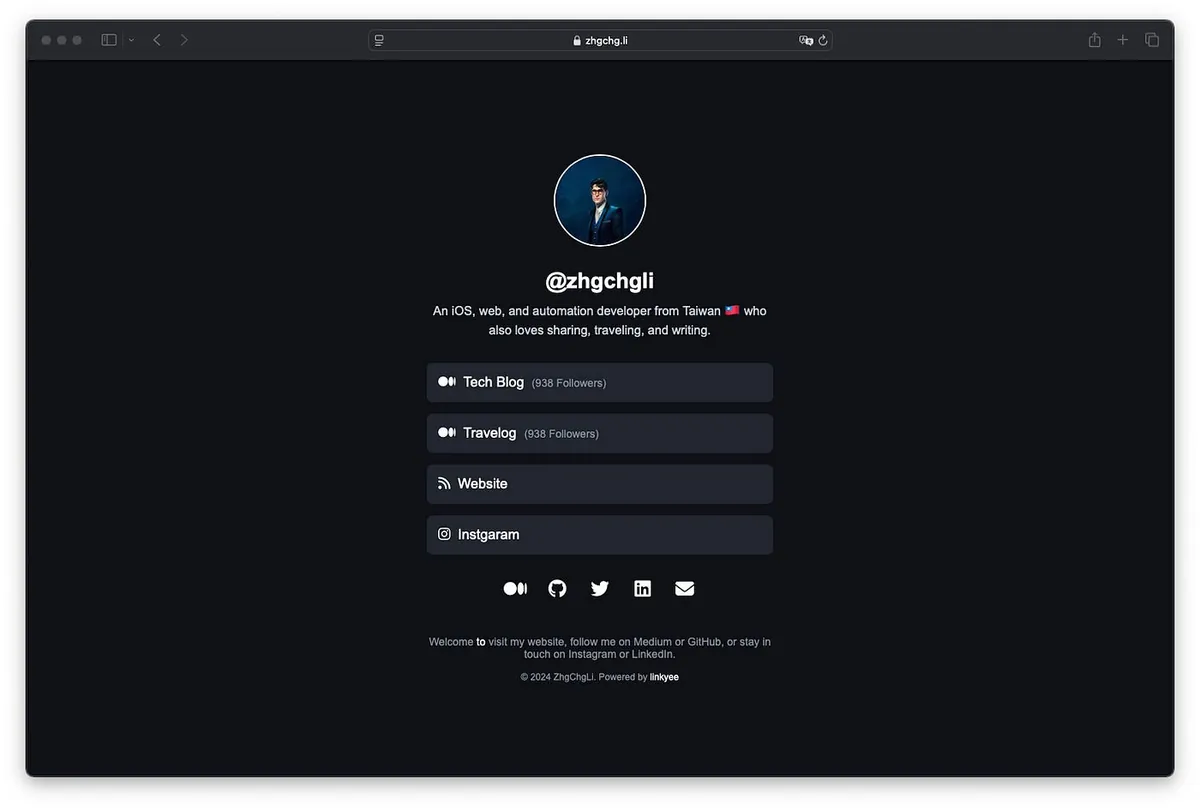
成果
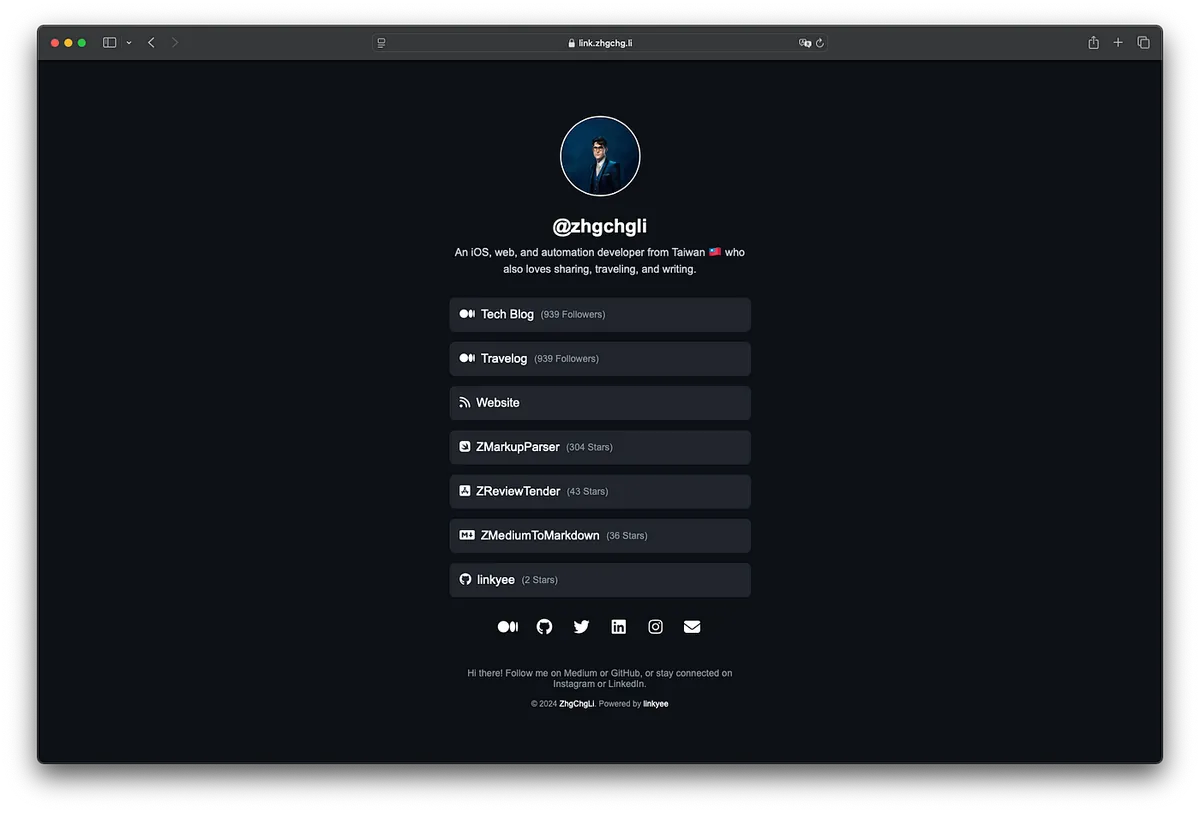
我以把成果開源並打包成 Template Repo (linkyee),有需要的朋友可以直接 Fork 快速部署使用。
linkyee — Your Own Link Pages
優點:
- 直接部署在 Github Pages 穩定、免費
- 掌握 HTML 原始檔案,可隨意修改排版、樣式、移除廣告、版權宣告; (預設樣式就是我用 GenAI ChatGPT 建立的)
- 支援自訂域名
- 支援動態變數,例如我預設建了 Medium 追蹤者、Github Repo 星星數變數,可自動帶入、更新追蹤者數量在頁面上。 🚀🚀🚀
- 頁面載入快速
- 照本文簡單幾步就能完成設定部署
Github Pages
Github Pages 是由 Github 提供的免費靜態頁面寄存服務,所有 Github Free 帳號只要是 Public Repo 都能直接使用,如果是 Private Repo 則須先付費升級 Github 帳號。
限制
- 只能寄存靜態檔案資源: HTML, CSS, JavaScript, 字體檔案, 圖片檔案, PDF, 音訊檔案, 文字檔案…等等
- 網站(Repo)大小不得超過: 1 GB 這猜測也是軟限制,因為我的 Github Pages Jekyll Repo 已經快 5 GB 了。
- 部署工作時間最長: 10 分鐘
- 每小時最多部署: 10 次 (軟限制)
- 每月流量限制 :100 GB (軟限制)
- 請求過於頻繁可能會響應 HTTP 429
其他 Github Pages 應用文章
開始使用 — 部署在 GitHub Pages
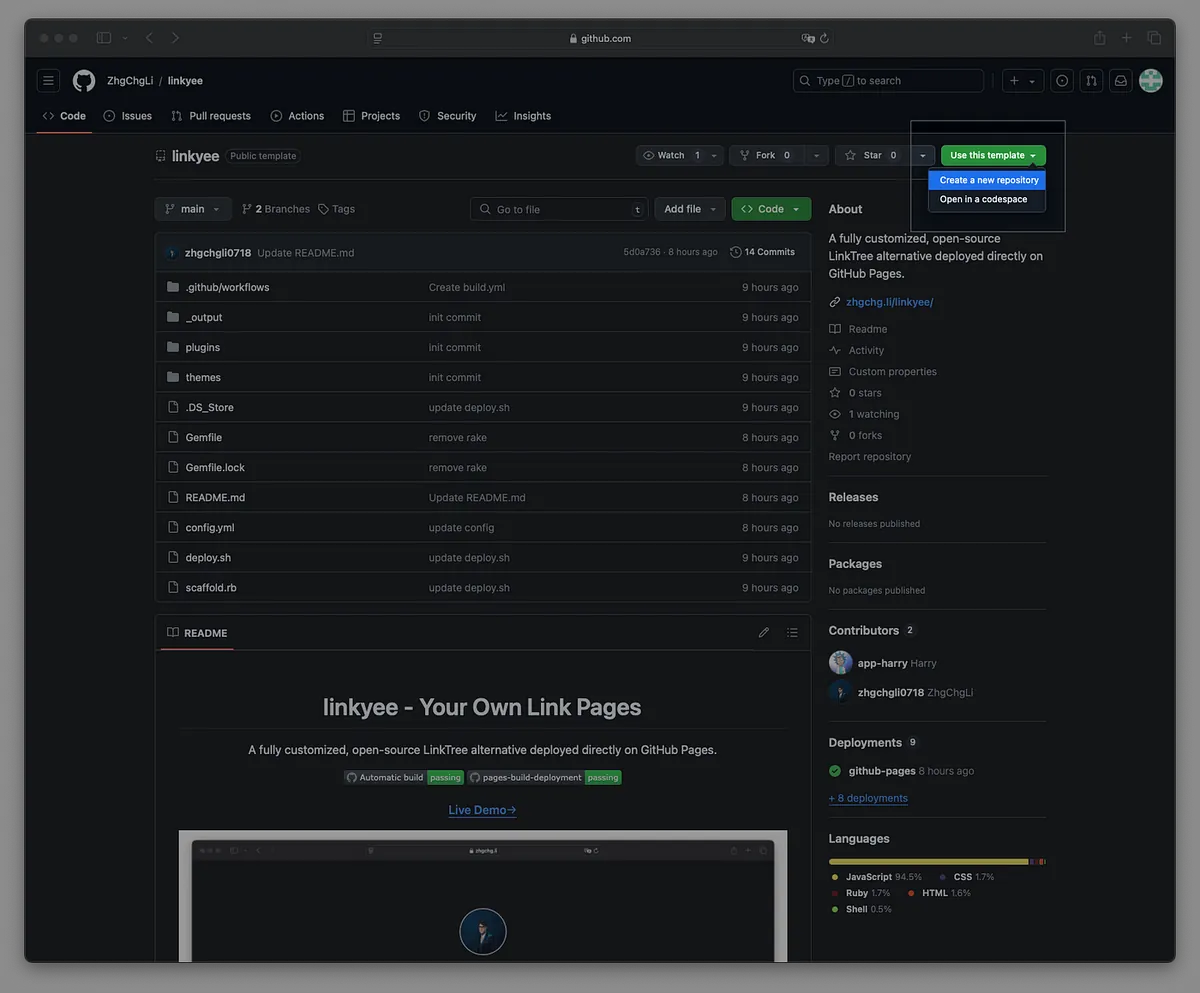
步驟 1. 點擊 linkyee 範本庫右上角的「Use this template」按鈕 ->「Create a new repository」:
步驟 2. 勾選「Include all branches」,輸入您想要的 GitHub Pages 倉庫名稱,完成後點擊「Create repository」:
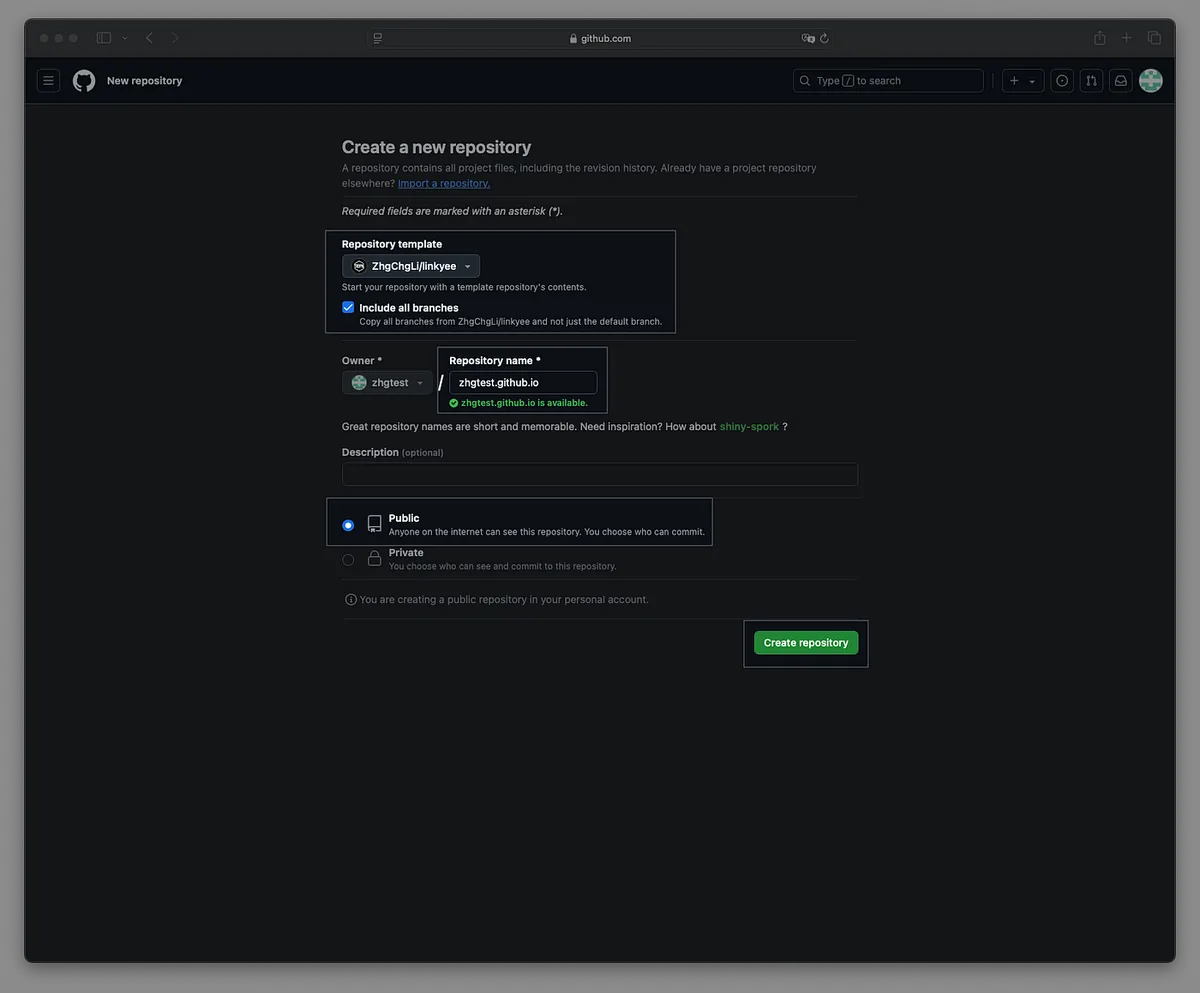
GitHub Pages Repo 名稱就會是訪問網址。
如果將 Repo 名稱輸入為
your-username.github.io,那麼這將成為您的 GitHub Pages 網站的直接訪問網址。
如果您已有
your-username.github.ioRepo,那麼 GitHub Pages 網址將會是your-username.github.io/Repo-Name。
等待 Fork 完成。初次建立時可能會遇到部署錯誤,這是由於 Fork 倉庫的權限問題。接下來我們按照步驟進行調整。

步驟 4. 前往 Settings -> Actions -> General,確保選擇以下選項:
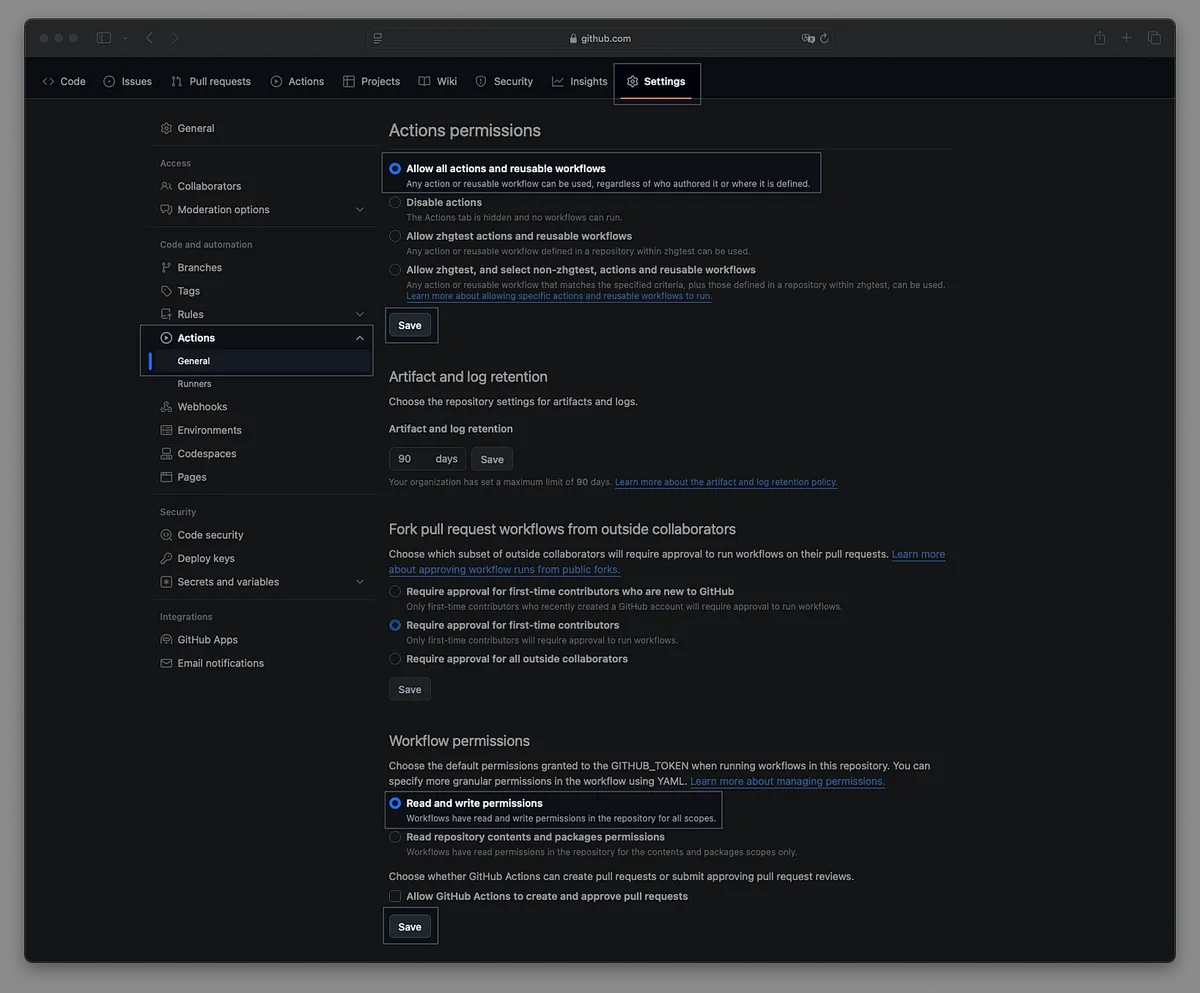
- Actions permissions: Allow all actions and reusable workflows
- Workflow permissions: Read and write permissions
選擇完畢後,點擊 Save 按鈕儲存變更。
步驟 5. 前往 Settings -> Pages,確認 GitHub Pages 的分支設定為「gh-pages」:
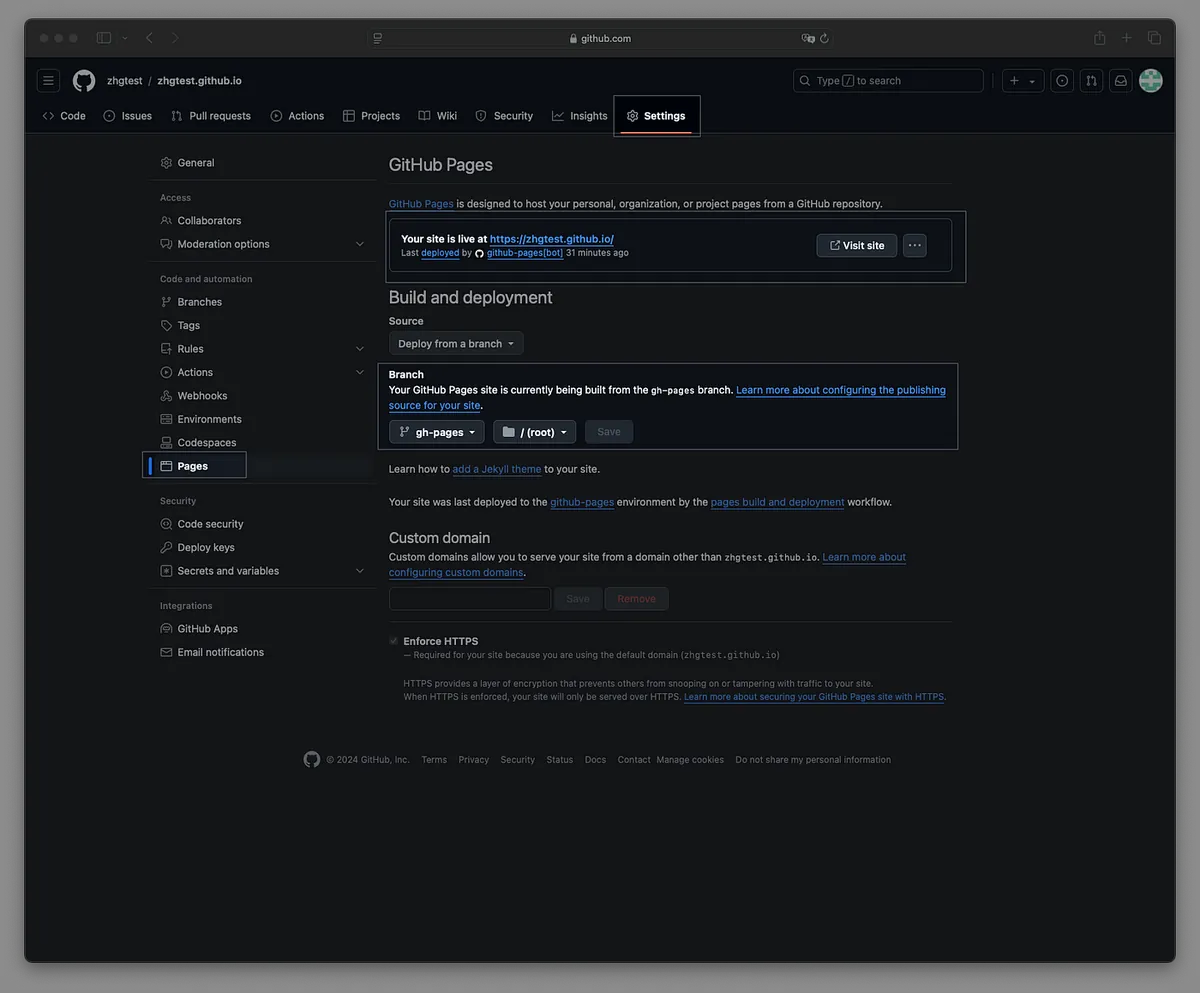
「Your site is live at: XXXX」訊息即為您的 GitHub Pages 公開訪問網址。
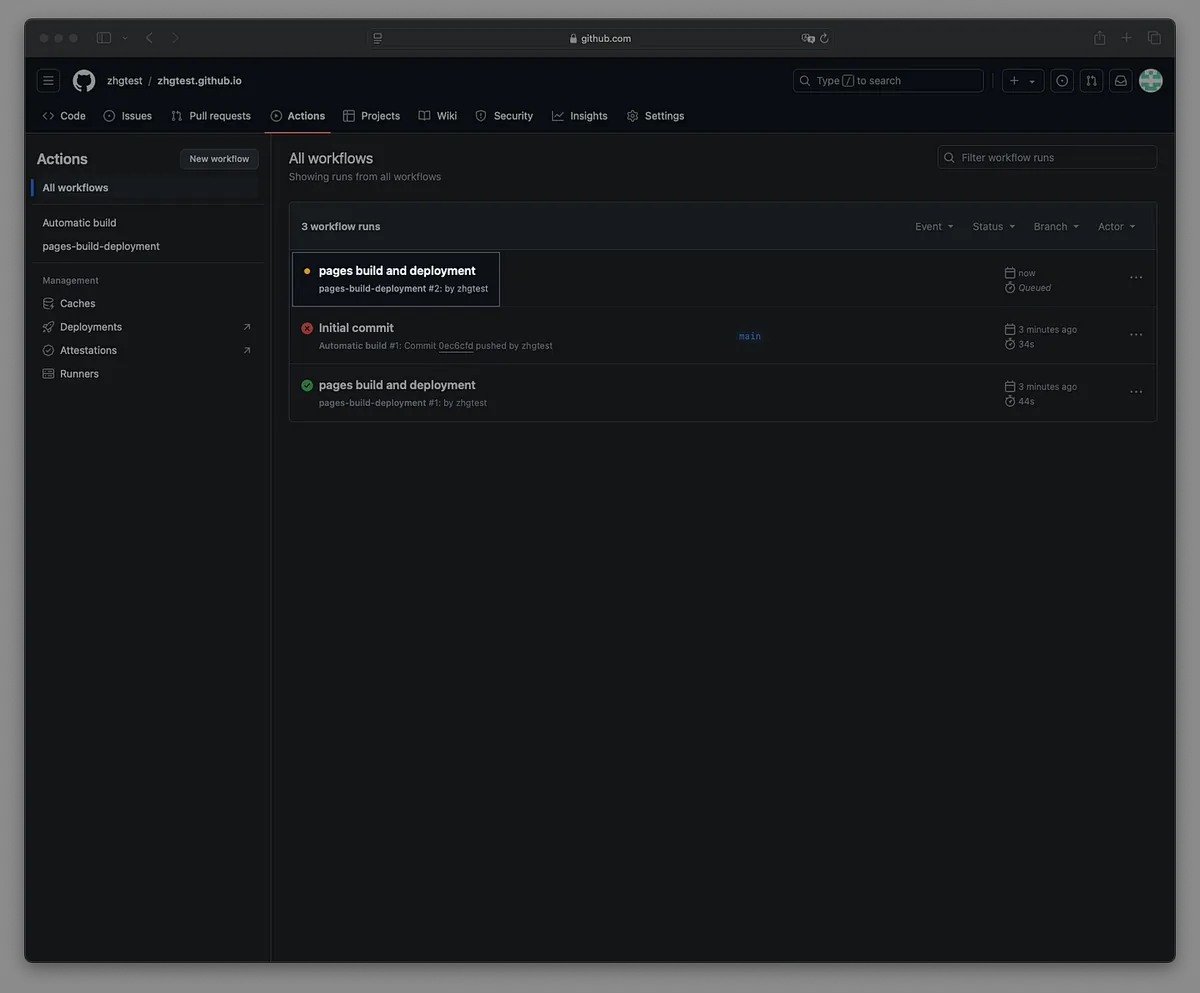
步驟 6. 前往 Settings -> Actions,等待第一次部署完成:
步驟 7. 訪問 GitHub Pages 網址,確認 Fork 是否成功:
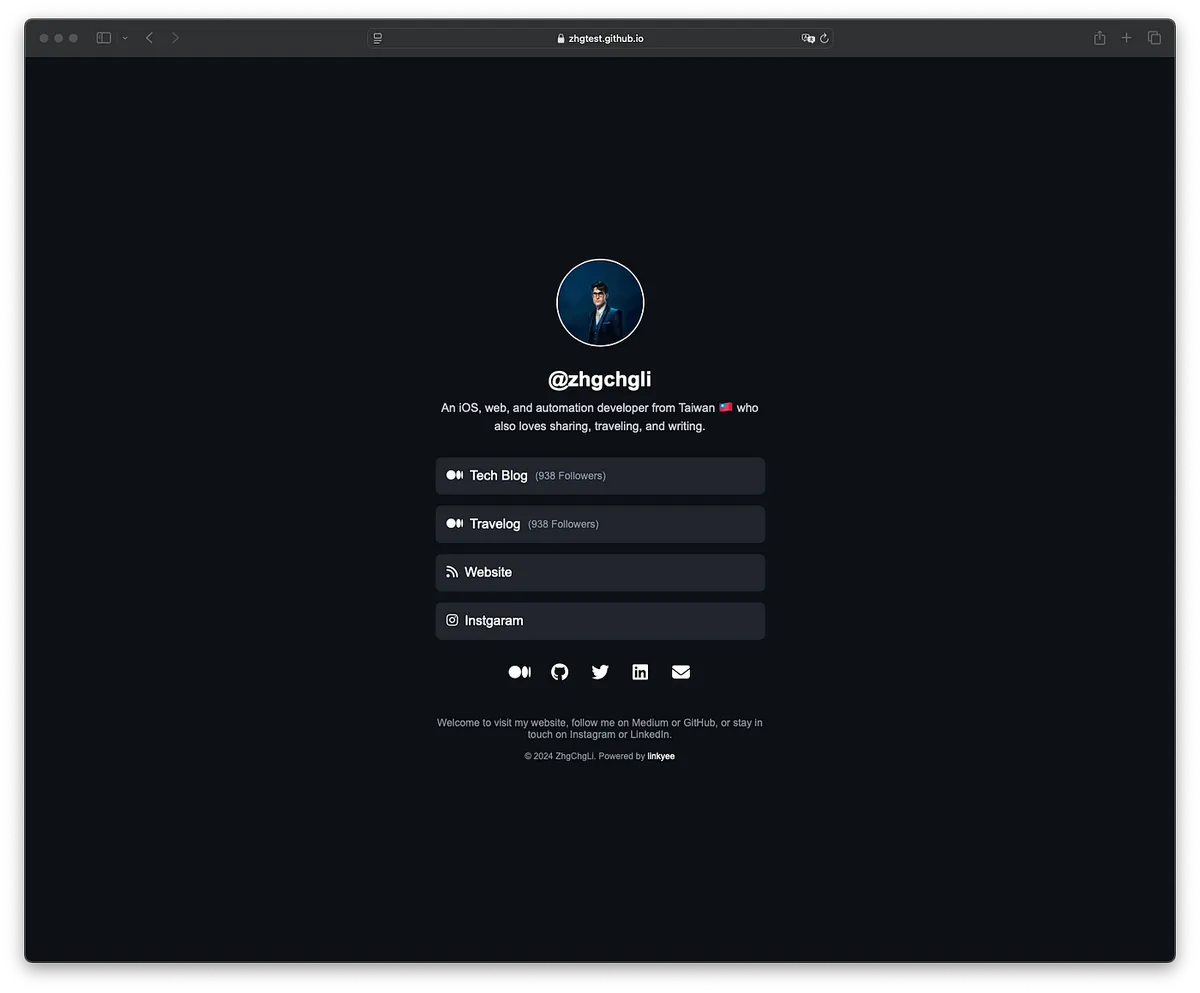
恭喜!部署成功,現在您可以修改設定檔案,將其替換為您的資料。🎉🎉🎉
設定
設定檔案
編輯位於根目錄中的 config.yml 文件。
# 網站配置

# 主題名稱,對應至目錄:./theme/xxxx
theme: default

# HTML 語言設定
lang: "en"

# 插件(實作於 ./plugins/PLUGIN_NAME)
# 在下方設定中使用 {{ vars.PLUGIN_NAME }}

# 插件的輸出結果可在下方使用,例如:{{vars.MediumFollowersCountPlugin}}
plugins:
  # 自動獲取 Medium 的追蹤者數量
  - MediumFollowersCountPlugin:
      username: zhgchgli
  # 自動獲取 GitHub 倉庫的星標數量
  - GithubRepoStarsCountPlugin:
      - ZhgChgLi/ZMarkupParser
      - ZhgChgLi/ZReviewTender
      - ZhgChgLi/ZMediumToMarkdown
      - ZhgChgLi/linkyee

# Google Analytics 追蹤 ID
google_analytics_id:

# HTML 標題
title: "ZhgChgLi 的連結集"

# 頭像圖片路徑
avatar: "./images/profile.jpeg"

# 名稱區塊文字
name: "@zhgchgli"

# 標語區塊文字
tagline: >-
    一位來自台灣的 iOS、網頁與自動化開發者,熱愛分享、旅行與寫作。

# 連結列表
# icon:使用 Font Awesome 圖示 (https://fontawesome.com/search?o=r&m=free)
# text:顯示在連結上的文字
# title:連結的標題
# url:連結的網址
# alt:替代文字(無障礙使用)
# target:`_blank` 在新頁籤打開,`_self` 在同頁面打開
links:
  - link:
      icon: "fa-brands fa-medium"
      text: "技術部落格 <span class='link-button-text'>({{vars.MediumFollowersCountPlugin}} Followers)</span>"
      url: "https://blog.zhgchg.li"
      alt: "ZhgChgLi 的技術部落格"
      title: "ZhgChgLi 的技術部落格"
      target: "_blank"
  - link:
      icon: "fa-brands fa-medium"
      text: "旅行日誌 <span class='link-button-text'>({{vars.MediumFollowersCountPlugin}} Followers)</span>"
      url: "https://medium.com/ztravel"
      alt: "ZhgChgLi 的旅行日誌"
      title: "ZhgChgLi 的旅行日誌"
      target: "_blank"
  - link:
      icon: "fa-solid fa-rss"
      text: "個人網站"
      url: "https://zhgchg.li/"
      alt: "ZhgChgLi 的網站"
      title: "ZhgChgLi 的網站"
      target: "_blank"
  - link:
      icon: "fa-brands fa-swift"
      text: "ZMarkupParser <span class='link-button-text'>({{vars.GithubRepoStarsCountPlugin['ZhgChgLi/ZMarkupParser']}} Stars)</span>"
      url: "https://github.com/ZhgChgLi/ZMarkupParser"
      alt: "ZMarkupParser 是一個純 Swift 庫,用於將 HTML 字串轉換為具自訂樣式的 NSAttributedString。"
      title: "ZMarkupParser 是一個純 Swift 庫,用於將 HTML 字串轉換為具自訂樣式的 NSAttributedString。"
      target: "_blank"
  - link:
      icon: "fa-brands fa-app-store-ios"
      text: "ZReviewTender <span class='link-button-text'>({{vars.GithubRepoStarsCountPlugin['ZhgChgLi/ZReviewTender']}} Stars)</span>"
      url: "https://github.com/ZhgChgLi/ZReviewTender"
      alt: "ZReviewTender 是一個從 App Store 和 Google Play Console 獲取應用評論並整合至工作流程的工具。"
      title: "ZReviewTender 是一個從 App Store 和 Google Play Console 獲取應用評論並整合至工作流程的工具。"
      target: "_blank"
  - link:
      icon: "fa-brands fa-markdown"
      text: "ZMediumToMarkdown <span class='link-button-text'>({{vars.GithubRepoStarsCountPlugin['ZhgChgLi/ZMediumToMarkdown']}} Stars)</span>"
      url: "https://github.com/ZhgChgLi/ZMediumToMarkdown"
      alt: "ZMediumToMarkdown 是一個強大的工具,可輕鬆下載並將 Medium 文章轉換為 Markdown 格式。"
      title: "ZMediumToMarkdown 是一個強大的工具,可輕鬆下載並將 Medium 文章轉換為 Markdown 格式。"
      target: "_blank"
  - link:
      icon: "fa-brands fa-github"
      text: "linkyee <span class='link-button-text'>({{vars.GithubRepoStarsCountPlugin['ZhgChgLi/linkyee']}} Stars)</span>"
      url: "https://github.com/ZhgChgLi/linkyee"
      alt: "linkyee 是一個完全自訂且開源的 LinkTree 替代方案,可直接部署在 GitHub Pages 上。"
      title: "linkyee 是一個完全自訂且開源的 LinkTree 替代方案,可直接部署在 GitHub Pages 上。"
      target: "_blank"

# 社交媒體連結列表
# icon:使用 Font Awesome 圖示 (https://fontawesome.com/search?o=r&m=free)
# title:連結的標題
# url:社交媒體連結的網址
# alt:替代文字(無障礙使用)
# target:`_blank` 在新頁籤打開,`_self` 在同頁面打開
socials:
  - social:
      icon: "fa-brands fa-medium"
      url: "https://blog.zhgchg.li"
      title: "ZhgChgLi 的 Medium"
      alt: "ZhgChgLi 的 Medium"
      target: "_blank"
  - social:
      icon: "fa-brands fa-github"
      url: "https://github.com/ZhgChgLi"
      title: "ZhgChgLi 的 GitHub"
      alt: "ZhgChgLi 的 GitHub"
      target: "_blank"
  - social:
      icon: "fa-brands fa-twitter"
      url: "https://twitter.com/zhgchgli"
      title: "ZhgChgLi 的 Twitter"
      alt: "ZhgChgLi 的 Twitter"
      target: "_blank"
  - social:
      icon: "fa-brands fa-linkedin"
      url: "https://www.linkedin.com/in/zhgchgli/"
      title: "ZhgChgLi 的 LinkedIn"
      alt: "ZhgChgLi 的 LinkedIn"
      target: "_blank"
  - social:
      icon: "fa-brands fa-instagram"
      url: "https://www.instagram.com/zhgchgli/"
      title: "Instagram"
      alt: "ZhgChgLi 的 Instagram"
      target: "_blank"
  - social:
      icon: "fa-solid fa-envelope"
      url: "[email protected]"
      title: "Email: [email protected]"
      alt: "[email protected]"
      target: "_blank"

# 頁尾文字
footer: >
    歡迎來到我的網站!追蹤我在 Medium 或 GitHub 上的最新動態,或在 Instagram 和 LinkedIn 上保持聯繫。

# 頁尾版權聲明
# Linkyee 是一個 100% 免費的開源專案—您可以隨意修改版權聲明。:)
copyright: >
  © 2024 <a href="https://zhgchg.li" target="_blank">ZhgChgLi</a>。由 <a href="https://github.com/ZhgChgLi/linkyee" target="_blank">linkyee</a> 提供技術支持。
請注意,每次修改文件後,您需要等待 GitHub Actions 完成自動建置和頁面建置與部署任務。
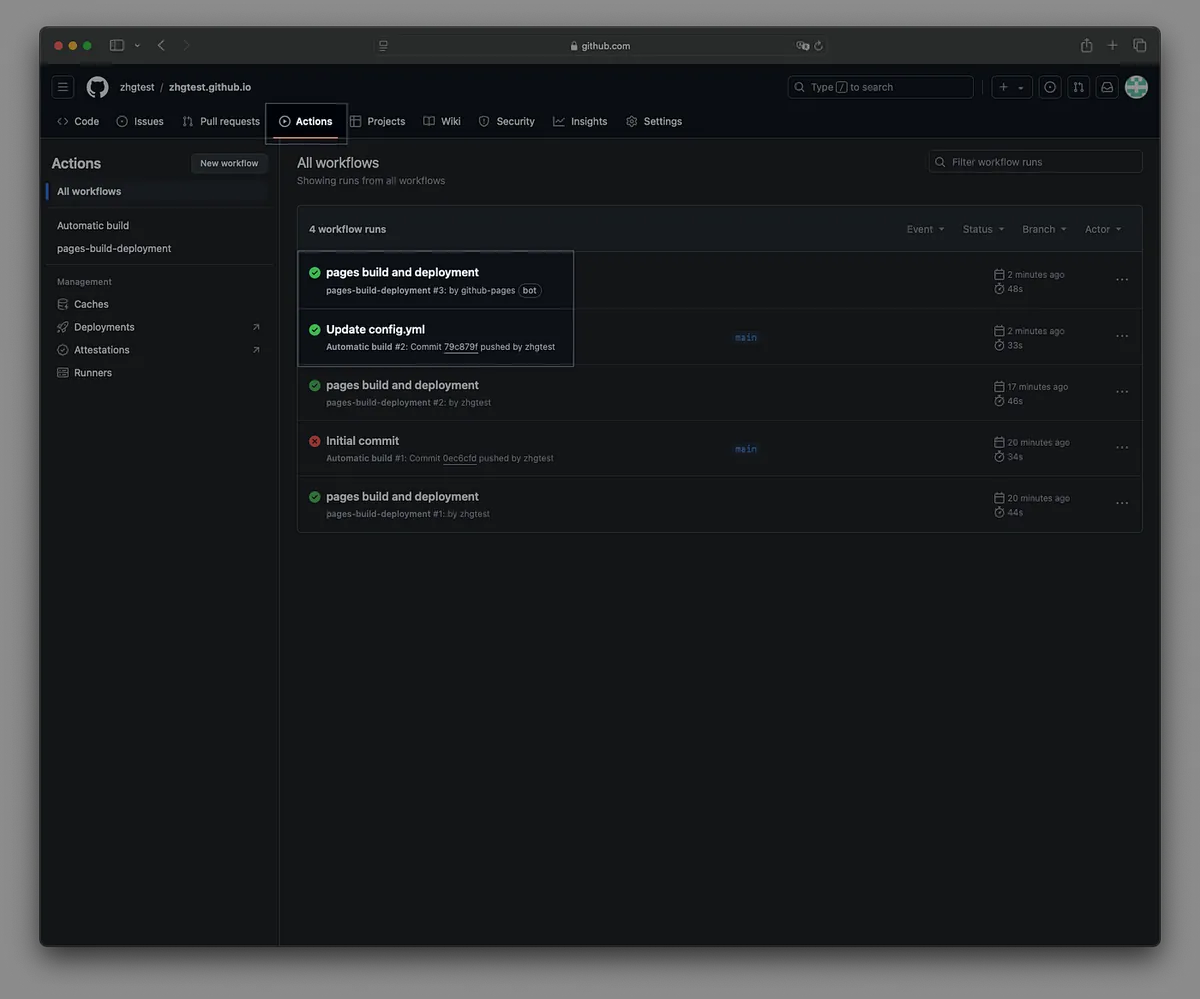
重新整理頁面以使變更生效。🚀
成功!!
自訂風格樣式、修改預設主題
./themes/default/index.html./themes/default/styles.css./themes/default/scripts.js
創建新主題
- ./themes/
YOUR_THEME - 在 config.yml 文件中更新為
theme:YOUR_THEME
沒錯,您可以使用像 ChatGPT 這樣的 GenAI 工具,來幫助您創建自訂的連結頁面!(預設樣式也是我用 ChatGPT 產的)
自動重新部署
預設情況下,專案每天會自動重新部署一次,以刷新插件的動態變數值。您可以在 Github Action — Automatic build (.github/workflows/build.yml) 中調整 cron 設定:
schedule:
 - cron: '0 0 * * *' # 每日午夜 00:00 (UTC) 執行
如果不需要定時重新部署,可以直接刪除 schedule 區塊。
自訂網域 ❤️❤️❤️
您可以設置自訂的 GitHub Pages 網域, 例如我的: https://link.zhgchg.li 。
可以找我之前的文章「 Github Pages 自訂網域教學 」一步一步從購買到綁定網域,也可以通過 我的 Namecheap 推廣連結購買網域 — 我將獲得部分分潤,這將幫助我繼續貢獻開源專案。
Buy me a coffee ❤️❤️❤️

https://www.paypal.com/ncp/payment/CMALMPT8UUTY2
如果這個專案對您有幫助,請考慮 Star Repo、推薦給朋友 , 或 贊助我一杯咖啡。感謝您的支持!
歡迎提出 Issue,或透過 Pull Request 提交修正或貢獻。:)


留言 · Comments