Visitor Pattern in TableView
使用 Visitor Pattern 增加 TableView 的閱讀和擴充性
ℹ️ℹ️ℹ️ Click here to view the English version of this article, translated by OpenAI.
Visitor Pattern in TableView
使用 Visitor Pattern 增加 TableView 的閱讀和擴充性
{:target="_blank"}](/assets/60473cb47550/1*0YcpTUOCDjuV6Ii4jgbK0g.jpeg)
Photo by Alex wong
前言
接上篇「 Visitor Pattern in Swift 」介紹 Visitor 模式及一個簡單的實務應用場景,此篇將介紹另一個在 iOS 需求開發上的實際應用。
需求場景
要開發一個動態牆功能,有多種不同類型的區塊需要動態組合顯示。
以 StreetVoice 的動態牆為例:
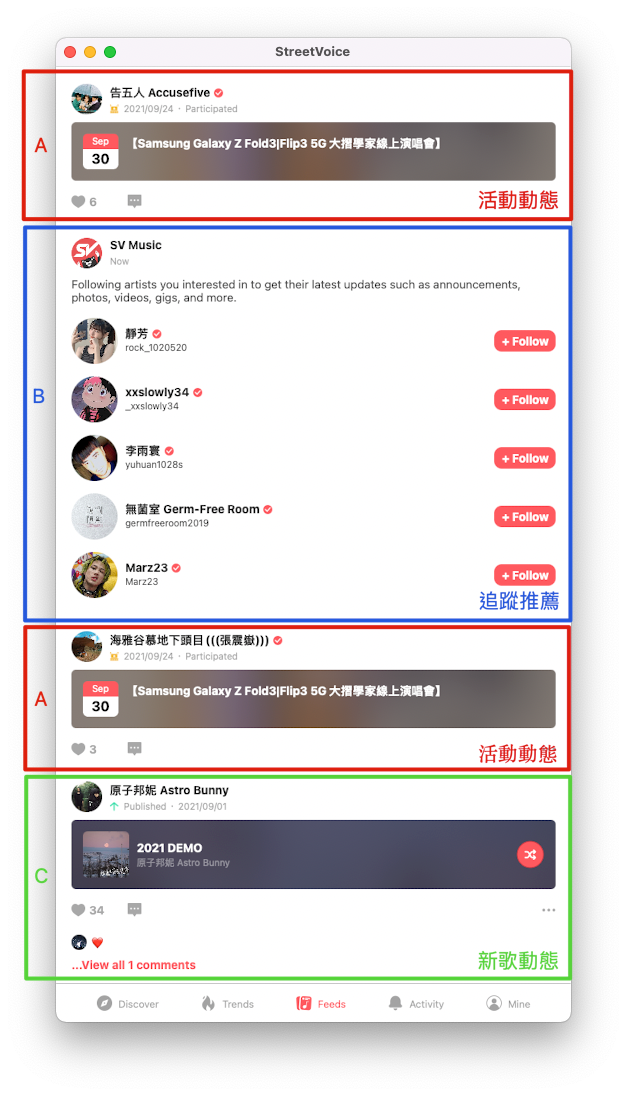
如上圖所示,動態牆是由多種不同類型的區塊動態組合而成:
- Type A: 活動動態
- Type B: 追蹤推薦
- Type C: 新歌動態
- Type D: 新專輯動態
- Type E: 新追縱動態
- Type …. 更多
類型可預期會在未來隨著功能迭代越來越多。
問題
在沒有任何架構設計的情況下 Code 可能會長這樣:
1
2
3
4
5
6
7
8
9
10
11
12
13
14
15
16
17
18
19
20
21
22
23
24
25
26
27
28
29
30
31
32
33
34
35
36
37
38
39
40
41
42
43
44
45
func tableView(_ tableView: UITableView, cellForRowAt indexPath: IndexPath) -> UITableViewCell {
    let row = datas[indexPath.row]
    switch row.type {
    case .invitation:
        let cell = tableView.dequeueReusableCell(withIdentifier: "invitation", for: indexPath) as! InvitationCell
        // config cell with viewObject/viewModel...
        return cell
    case .newSong:
        let cell = tableView.dequeueReusableCell(withIdentifier: "newSong", for: indexPath) as! NewSongCell
        // config cell with viewObject/viewModel...
        return cell
    case .newEvent:
        let cell = tableView.dequeueReusableCell(withIdentifier: "newEvent", for: indexPath) as! NewEventCell
        // config cell with viewObject/viewModel...
        return cell
    case .newText:
        let cell = tableView.dequeueReusableCell(withIdentifier: "newText", for: indexPath) as! NewTextCell
        // config cell with viewObject/viewModel...
        return cell
    case .newPhotos:
        let cell = tableView.dequeueReusableCell(withIdentifier: "newPhotos", for: indexPath) as! NewPhotosCell
        // config cell with viewObject/viewModel...
        return cell
    }
}

func tableView(_ tableView: UITableView, heightForRowAt indexPath: IndexPath) -> CGFloat {
    let row = datas[indexPath.row]
    switch row.type {
    case .invitation:
        if row.isEmpty {
            return 100
        } else {
            return 300
        }
    case .newSong:
        return 100
    case .newEvent:
        return 200
    case .newText:
        return UITableView.automaticDimension
    case .newPhotos:
        return UITableView.automaticDimension
    }
}
- 難以測試:什麼 Type 有什麼對應的邏輯輸出難以測試
- 難以擴充維護:需要新增新 Type 時,都要更動此 ViewController;cellForRow、heightForRow、willDisplay…四散在各個 Function 內,難保忘記改,或改錯
- 難以閱讀:全部邏輯都在 View 身上
Visitor Pattern 解決方案
Why?
整理了一下物件關係,如下圖所示:

我們有許多種類型的 DataSource (ViewObject) 需要與多種類型的操作器做交互,是一個很典型的 Visitor Double Dispatch 。
How?
為簡化 Demo Code 以下改用 PlainTextFeedViewObject 純文字動態、 MemoriesFeedViewObject 每日回憶、 MediaFeedViewObject 圖片動態,呈現設計。
套用 Visitor Pattern 的架構圖如下:

首先定義出 Visitor 介面,此介面用途是抽象宣告出操作器能接受的 DataSource 類型:
1
2
3
4
5
6
7
protocol FeedVisitor {
    associatedtype T
    func visit(_ viewObject: PlainTextFeedViewObject) -> T?
    func visit(_ viewObject: MediaFeedViewObject) -> T?
    func visit(_ viewObject: MemoriesFeedViewObject) -> T?
    //...
}
各操作器實現 FeedVisitor 介面:
1
2
3
4
5
6
7
8
9
10
11
12
13
14
15
struct FeedCellVisitor: FeedVisitor {
    typealias T = UITableViewCell.Type

    func visit(_ viewObject: MediaFeedViewObject) -> T? {
        return MediaFeedTableViewCell.self
    }

    func visit(_ viewObject: MemoriesFeedViewObject) -> T? {
        return MemoriesFeedTableViewCell.self
    }

    func visit(_ viewObject: PlainTextFeedViewObject) -> T? {
        return PlainTextFeedTableViewCell.self
    }
}
實現 ViewObject <-> UITableViewCell 對應。
1
2
3
4
5
6
7
8
9
10
11
12
13
14
15
struct FeedCellHeightVisitor: FeedVisitor {
    typealias T = CGFloat

    func visit(_ viewObject: MediaFeedViewObject) -> T? {
        return 30
    }

    func visit(_ viewObject: MemoriesFeedViewObject) -> T? {
        return 10
    }

    func visit(_ viewObject: PlainTextFeedViewObject) -> T? {
        return 10
    }
}
實現 ViewObject <-> UITableViewCell Height 對應。
1
2
3
4
5
6
7
8
9
10
11
12
13
14
15
16
17
18
19
20
21
22
23
24
25
26
struct FeedCellConfiguratorVisitor: FeedVisitor {

    private let cell: UITableViewCell

    init(cell: UITableViewCell) {
        self.cell = cell
    }

    func visit(_ viewObject: MediaFeedViewObject) -> Any? {
        guard let cell = cell as? MediaFeedTableViewCell else { return nil }
        // cell.config(viewObject)
        return nil
    }

    func visit(_ viewObject: MemoriesFeedViewObject) -> Any? {
        guard let cell = cell as? MediaFeedTableViewCell else { return nil }
        // cell.config(viewObject)
        return nil
    }

    func visit(_ viewObject: PlainTextFeedViewObject) -> Any? {
        guard let cell = cell as? MediaFeedTableViewCell else { return nil }
        // cell.config(viewObject)
        return nil
    }
}
實現 ViewObject <-> Cell 如何 Config 對應。
當需要支援新的 DataSource (ViewObject) 時,只需在 FeedVisitor 介面上多加一個開口,並在各操作器中實現對應的邏輯。
DataSource (ViewObject) 與操作器的綁定:
1
2
3
protocol FeedViewObject {
    @discardableResult func accept<V: FeedVisitor>(visitor: V) -> V.T?
}
ViewObject 實現綁定的介面:
1
2
3
4
5
6
7
8
9
10
struct PlainTextFeedViewObject: FeedViewObject {
    func accept<V>(visitor: V) -> V.T? where V : FeedVisitor {
        return visitor.visit(self)
    }
}
struct MemoriesFeedViewObject: FeedViewObject {
    func accept<V>(visitor: V) -> V.T? where V : FeedVisitor {
        return visitor.visit(self)
    }
}
UITableView 中的實現:
1
2
3
4
5
6
7
8
9
10
11
12
13
14
15
16
17
18
19
20
21
22
23
24
25
26
27
28
29
30
31
32
33
34
35
36
37
38
39
40
41
42
43
44
45
46
47
48
49
50
51
52
53
54
55
56
57
58
59
60
61
62
final class ViewController: UIViewController {

    @IBOutlet weak var tableView: UITableView!

    private let cellVisitor = FeedCellVisitor()

    private var viewObjects: [FeedViewObject] = [] {
        didSet {
            viewObjects.forEach { viewObject in
                let cellName = viewObject.accept(visitor: cellVisitor)
                tableView.register(cellName, forCellReuseIdentifier: String(describing: cellName))
            }
        }
    }

    override func viewDidLoad() {
        super.viewDidLoad()

        tableView.delegate = self
        tableView.dataSource = self

        viewObjects = [
            MemoriesFeedViewObject(),
            MediaFeedViewObject(),
            PlainTextFeedViewObject(),
            MediaFeedViewObject(),
            PlainTextFeedViewObject(),
            MediaFeedViewObject(),
            PlainTextFeedViewObject()
        ]
        // Do any additional setup after loading the view.
    }
}

extension ViewController: UITableViewDataSource {
    func numberOfSections(in tableView: UITableView) -> Int {
        return 1
    }

    func tableView(_ tableView: UITableView, numberOfRowsInSection section: Int) -> Int {
        return viewObjects.count
    }

    func tableView(_ tableView: UITableView, cellForRowAt indexPath: IndexPath) -> UITableViewCell {
        let viewObject = viewObjects[indexPath.row]
        let cellName = viewObject.accept(visitor: cellVisitor)

        let cell = tableView.dequeueReusableCell(withIdentifier: String(describing: cellName), for: indexPath)
        let cellConfiguratorVisitor = FeedCellConfiguratorVisitor(cell: cell)
        viewObject.accept(visitor: cellConfiguratorVisitor)
        return cell
    }
}

extension ViewController: UITableViewDelegate {
    func tableView(_ tableView: UITableView, heightForRowAt indexPath: IndexPath) -> CGFloat {
        let viewObject = viewObjects[indexPath.row]
        let cellHeightVisitor = FeedCellHeightVisitor()
        let cellHeight = viewObject.accept(visitor: cellHeightVisitor) ?? UITableView.automaticDimension
        return cellHeight
    }
}
結果
- 測試:符合單一職責原則,可針對每個操作器的每個資料單點進行測試
- 擴充維護:當需要支援新的 DataSource (ViewObject) 時只需在 Visitor 協議擴充一個開口,並在個別操作器 Visitor 上進行實現、需要抽離新操作器時,也只要 New 新的 Class 實現即可。
- 閱讀:只需瀏覽各操作器物件即可知道整個頁面各個 View 的組成邏輯
完整專案
Murmur…
2022/07 思維低谷期中撰寫的文章,內容如有描述不周、錯誤敬請海納!
延伸閱讀
- Design Patterns 的實戰應用紀錄 — In WKWebView with Builder, Strategy & Chain of Responsibility Pattern
- Design Patterns 的實戰應用紀錄
- Visitor Pattern in Swift (Share Object to XXX Example)
有任何問題及指教歡迎 與我聯絡 。
本文首次發表於 Medium ➡️ 前往查看
由 ZMediumToMarkdown 與 Medium-to-jekyll-starter 提供自動轉換與同步技術。
