
10 分鐘快速移轉 Line Notify 到 Telegram Bot 通知
手把手將 Line Notify 個人通知服務遷移至同樣免費、更強大的 Telegram Bot

Photo by Lana Codes
LINE Notify結束服務公告
感謝您長期以來使用LINE Notify。
LINE Notify自2016年9月推出以來,一直致力於為開發者提供服務。為能提供更優質的服務,並將經營資源集中於後續的類似商品服務,我們決定於2025年3月31日結束本服務。對於長期以來支持並使用LINE作為通知連動服務的所有用戶,我們深表感謝。
若您仍需使用LINE向用戶傳送通知的商品服務,建議可改用功能更豐富的Messaging API。
擷取自 Line Notify 官網 , Line 於 2024/10/08 發文公告 Line Notify 將於 2025/04/01 完全關閉,如需繼續使用 Line 做為訊息通知,只能用付費的 Message API 。
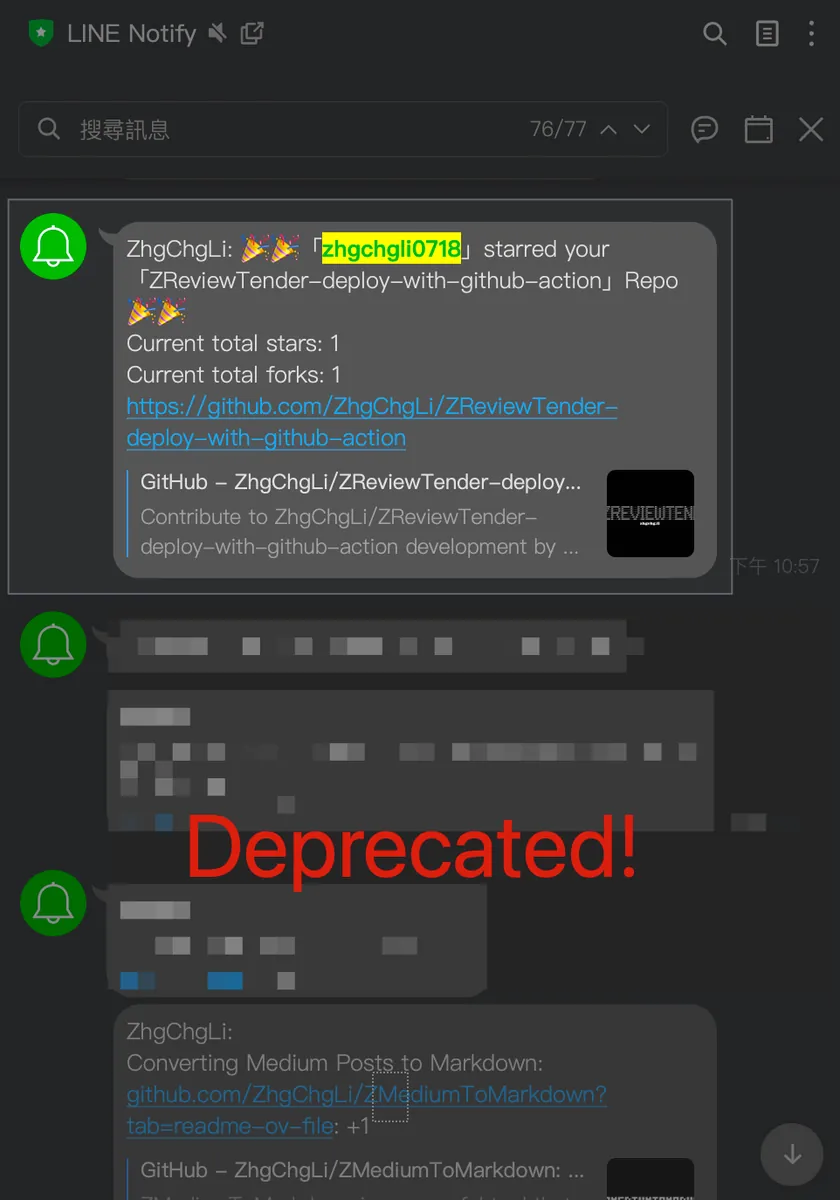
Line Notify 的優點是非常容易串接,拿來做個人通知機器人非常方便好用,一些 Line Bot 或第三方服務也會使用 Line Notify 進行通知 (例如:路易莎、你訂的訂單通知功能);但缺點也蠻多的,例如訊息內容單一、無法分群組(統一都是傳送到 Line Notify Bot)、訊息內容長度有限…等等
隨著 Line Notify 宣告終止,正好也給我了一個遷移至其他通訊、通知服務的機會:
- Slack:免費版訊息只保留 30 天、我的通知比較是個人,用 Slack 有點大材小用。(Slack 傳送訊息可參考我之前的文章: Slack & ChatGPT Integration )
- Discord:我的通知比較是個人,一樣有點大材小用。
- Telegram:免費、幾乎無限使用。
對我來說 Telegram 的通訊服務比較符合我原本 Line Notify 的使用需求,我需要一個能接收通知的頻道,最好是能依照不同需求有不同的頻道,可接受的內容、格式越豐富越好、並且能快速簡單串接;Telegram 都符合上述需求,還能多實現跟 Bot 的交互功能。
成果
先上最終效果圖(以 Github Star 通知、Repo Stats 通知為例 ):
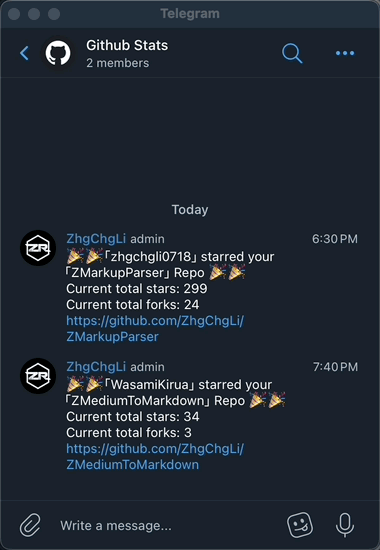
- ✅ 有人按 Repo 星星時會觸發 Webhook -> Google Apps Script -> Telegram Bot 發送通知到 Telegram — Github Stats Group
- ✅ Google Apps Script 每日定時 -> 撈取 Github Repo Stats 狀態 -> Telegram Bot 發送通知到 Telegram — Github Stats Group
- ✅ 使用
/updateTelegram Bot Command 觸發撈取 Github Repo Stats 狀態 -> Telegram Bot 發送通知到 Telegram — Github Stats Group
對比原本 Line Notify

- ❌ 所有訊息無法分類、分群組都傳到 Line Notify
- ❌ 無法針對個別訊息做特殊設定 (如通知聲、靜音…)
- ❌ 無法輸入訊息互動
本文目錄
- 設定 Telegram Bot
- 移轉 Line Notify 發送訊息到 Telegram Bot (Google Apps Script)
- 與 Telegram Bot 交互 (Command) x 使用 Google Apps Script
(1/2) 設定 Telegram Bot
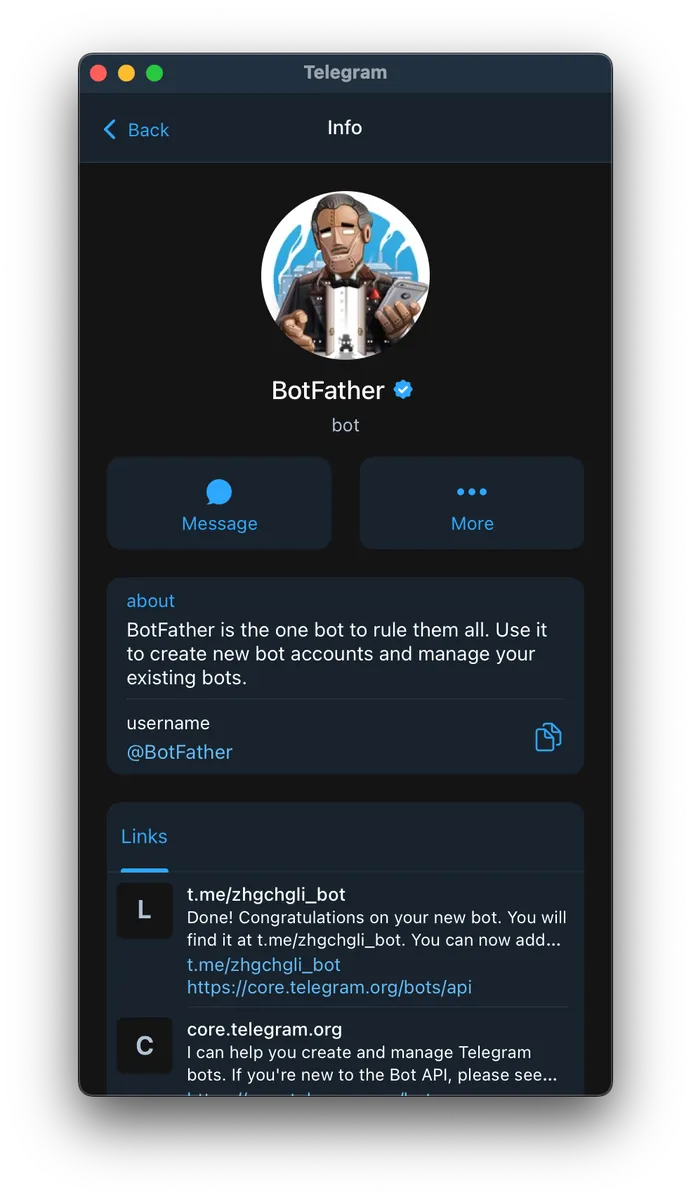
Telegram Bot 的申請非常簡單,連網頁都不需要開,只要跟官方的 BotFather 機器人 互動就可以了。
Step 1. 申請 Telegram Bot
安裝、註冊好 Telegram 服務 之後,點擊加「 BotFather 機器人 」為好友。
- 打開、加入 BotFather 機器人
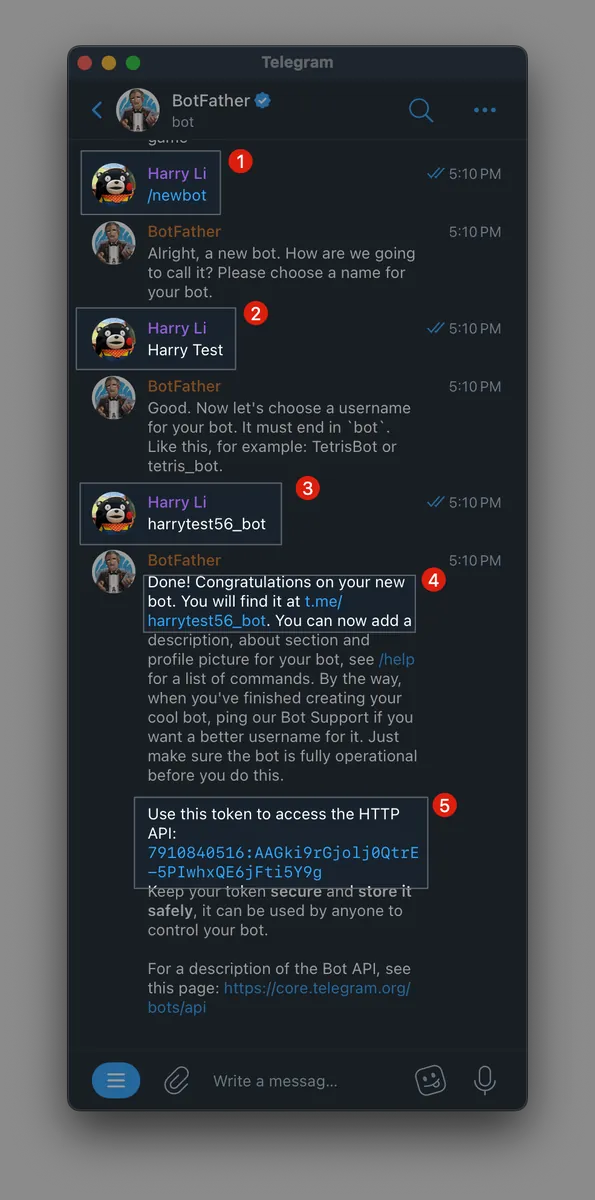
- 加入後直接傳送訊息「
/newbot」建立你的機器人。 - 輸入你的機器人名稱
- 輸入你的機器人帳號 (不可重複、必須以
bot為結尾,例如我的zhgchgli_bot) - 你的 Bot 連結,點進進入開始使用 (e.g. t.me/harrytest56_bot)
- 取得
你的_BOT_API_Token, 請妥善保存 ⚠️⚠️⚠️
點擊 4. 取得的 Bot 連結,開始使用 Bot:

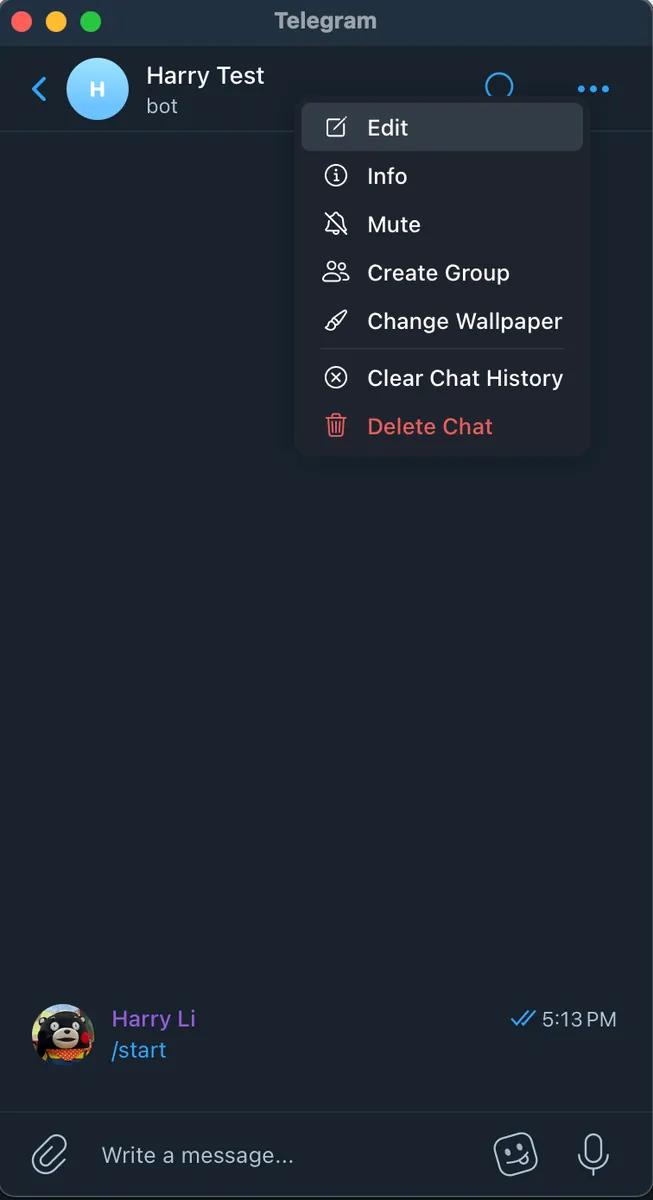
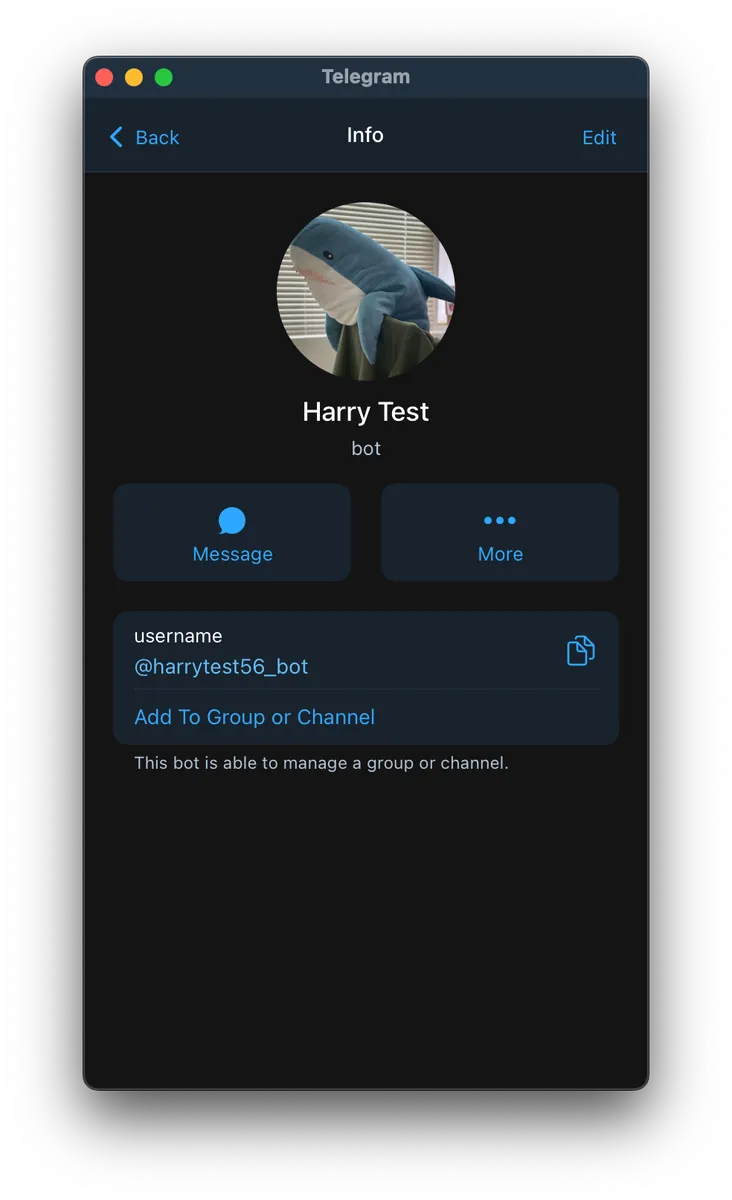
目前無任何功能,可以點右上角 Info,編輯名稱或上傳大頭貼。
Step 2. 創建 Telegram 通知 Group & 加入機器人帳號
我希望不同的個人通知類型傳到不同的 Group,這 邊因為 Demo 只創建一個 My Notify Group 。
你可以依據實際需求創建不同的 Group & 依照步驟加入、設定機器人。

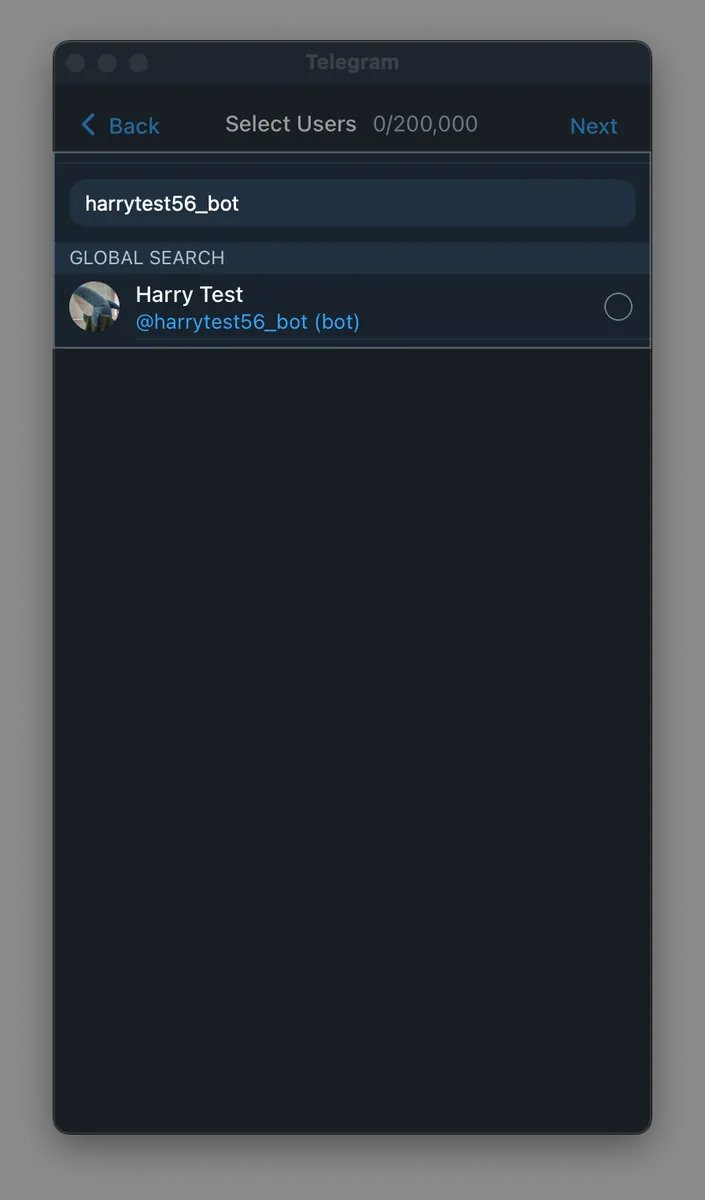
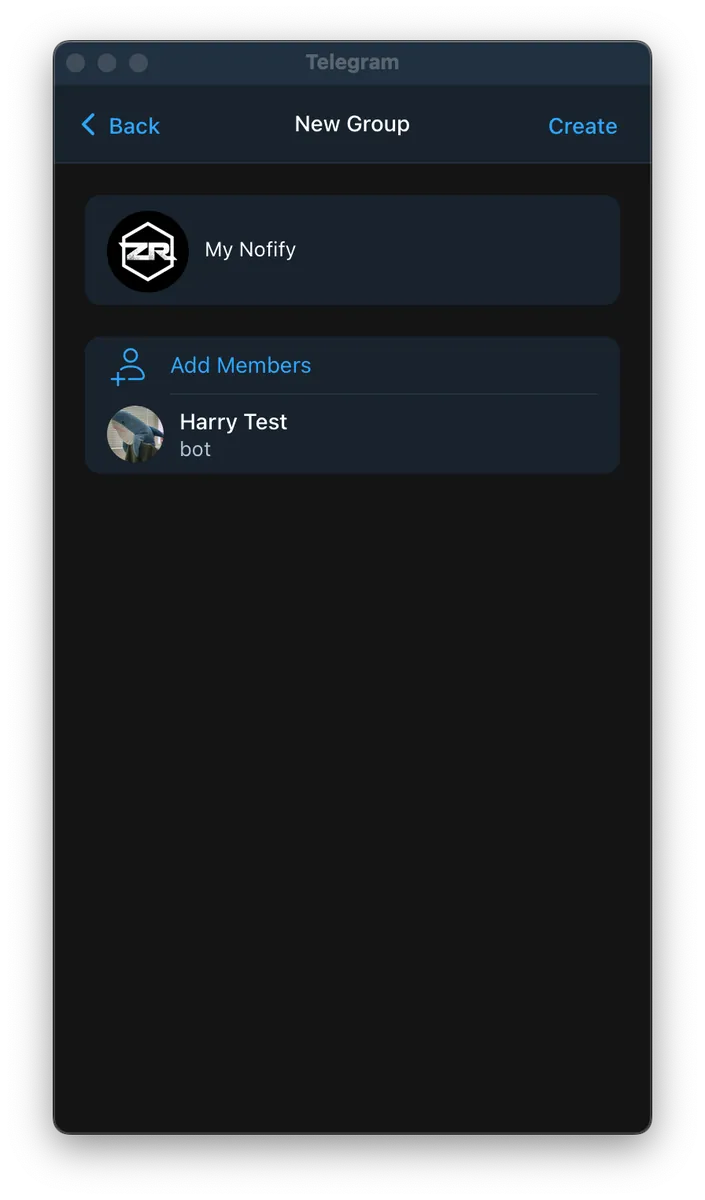
- New Group
- 搜尋你的機器人帳號&點擊加入
- 設定 Group 名稱、大頭貼
Step 3. 取得 Group Chat ID
Telegram Bot API 沒有直接取得 Group 列表、Group Chat ID 的 Endpoint,只能透過 /getUpdates 取得機器人訊息列表,並從中找到 Group Chat ID:
Request:
curl 'https://api.telegram.org/bot你的_BOT_API_Token/getUpdates'
- Telegram API 格式為
https://api.telegram.org/bot你的_BOT_API_Token/getUpdates, BOT API Token 字串前要加上bot字串 - 範例:
curl 'https://api.telegram.org/bot7814194578:AAEWpPJvKn06ID7D9FjV65aDKQLkGkz8cc8/getUpdates'
Response:
{
    "ok": true,
    "result": [
        {
            "update_id": 706454235,
            "my_chat_member": {
                "chat": {
                    "id": -4532420331,
                    "title": "My Nofify",
                    "type": "group",
                    "all_members_are_administrators": false
                },
                "from": {
                    "id": 986128250,
                    "is_bot": false,
                    "first_name": "Harry",
                    "last_name": "Li",
                    "username": "zhgchgli"
                },
                "date": 1728726861,
                "old_chat_member": {
                    "user": {
                        "id": 7814194578,
                        "is_bot": true,
                        "first_name": "Harry Test",
                        "username": "harrytest56_bot"
                    },
                    "status": "left"
                },
                "new_chat_member": {
                    "user": {
                        "id": 7814194578,
                        "is_bot": true,
                        "first_name": "Harry Test",
                        "username": "harrytest56_bot"
                    },
                    "status": "member"
                }
            }
        },
        {
            "update_id": 706454236,
            "message": {
                "message_id": 1,
                "from": {
                    "id": 986128250,
                    "is_bot": false,
                    "first_name": "Harry",
                    "last_name": "Li",
                    "username": "zhgchgli"
                },
                "chat": {
                    "id": -4532420331,
                    "title": "My Nofify",
                    "type": "group",
                    "all_members_are_administrators": true
                },
                "date": 1728726861,
                "group_chat_created": true
            }
        },
        {
            "update_id": 706454237,
            "message": {
                "message_id": 2,
                "from": {
                    "id": 986128250,
                    "is_bot": false,
                    "first_name": "Harry",
                    "last_name": "Li",
                    "username": "zhgchgli"
                },
                "chat": {
                    "id": -4532420331,
                    "title": "My Nofify",
                    "type": "group",
                    "all_members_are_administrators": true
                },
                "date": 1728726864,
                "new_chat_photo": [
                    {
                        "file_id": "AgACAgUAAxkBAAMCZwpHUEaLZSvFFYu8GiO-8qI_jVYAApfAMRu0B1BUJP-4u2wF6scBAAMCAANhAAM2BA",
                        "file_unique_id": "AQADl8AxG7QHUFQAAQ",
                        "file_size": 5922,
                        "width": 160,
                        "height": 160
                    },
                    {
                        "file_id": "AgACAgUAAxkBAAMCZwpHUEaLZSvFFYu8GiO-8qI_jVYAApfAMRu0B1BUJP-4u2wF6scBAAMCAANiAAM2BA",
                        "file_unique_id": "AQADl8AxG7QHUFRn",
                        "file_size": 15097,
                        "width": 320,
                        "height": 320
                    },
                    {
                        "file_id": "AgACAgUAAxkBAAMCZwpHUEaLZSvFFYu8GiO-8qI_jVYAApfAMRu0B1BUJP-4u2wF6scBAAMCAANjAAM2BA",
                        "file_unique_id": "AQADl8AxG7QHUFQB",
                        "file_size": 37988,
                        "width": 640,
                        "height": 640
                    }
                ]
            }
        }
    ]
}
可以從回應中找到對應 Group Name + type=group 的巢狀 JSON 資料,其中的 id 就是 Group Chat ID:
"chat": {
  "id": -4532420331,
  "title": "My Nofify",
  "type": "group",
  "all_members_are_administrators": false
}
Group Chat Id=-4532420331
⚠️⚠️⚠️️ 如果你的 Response 為空
{ "ok": true, "result": [] }請嘗試在你的 Group 發送訊息 (e.g.Hello) 再重新 Call API 應該就有了。
Step 4. 發送訊息
我們可以使用 /sendMessage 發送訊息到 Group。
Request:
curl 'https://api.telegram.org/bot你的_BOT_API_Token/sendMessage' \
--form 'chat_id="Group Chat Id"' \
--form 'text="訊息內容"'
範例:
curl 'https://api.telegram.org/bot7814194578:AAEWpPJvKn06ID7D9FjV65aDKQLkGkz8cc8/sendMessage' \
--form 'chat_id="-4532420331"' \
--form 'text="test"'
Response & Result:
{
  "ok": true,
  "result": {
    "message_id": 5,
    "from": {
      "id": 7814194578,
      "is_bot": true,
      "first_name": "Harry Test",
      "username": "harrytest56_bot"
    },
    "chat": {
      "id": -4532420331,
      "title": "My Nofify",
      "type": "group",
      "all_members_are_administrators": true
    },
    "date": 1728727847,
    "text": "test"
  }
}
- 發送成功取得以上 Response
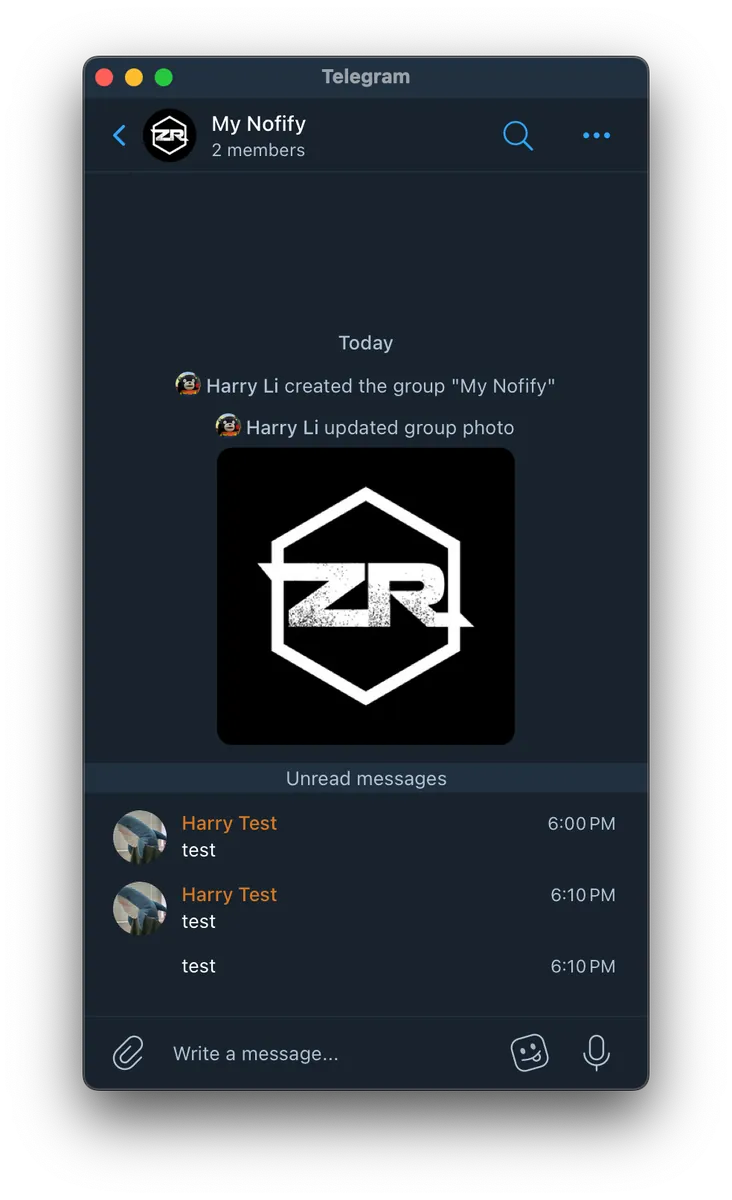
- 回 Telegram Group 就會出現剛發送的訊息內容。
(2/2) 移轉 Line Notify 發送訊息到 Telegram Bot (Google Apps Script)
我的個人通知機器人服務是使用 Google Apps Script 達成的,因此以 Google Apps Script 轉換為例 (類 JavaScript)。
原始的 Line Notify 發送程式碼:
const lineToken = "XXXX";

function sendLineNotifyMessage(message) {
  var url = 'https://notify-api.line.me/api/notify';

  var options = {
    method: 'post',
    headers: {
      'Authorization': 'Bearer '+lineToken
    },
    payload: {
      'message': message
    }
  };
  const response = UrlFetchApp.fetch(url, options);
  Logger.log(response.getContentText());
}
可以看到非常簡單方便好用…
移轉成 Telegram Bot 發送程式碼:
const telegramToken = "你的_BOT_API_Token";
const TelegramChatId = {
  GA: -123456,
  GITHUB: -123457,
  MEDIUM: -123458
};

function sendNotifyMessage(message, chatId) {
  var url = "https://api.telegram.org/bot"+telegramToken+"/sendMessage";

  const payload = {
    "chat_id": chatId,
    "text": message,
    "parse_mode": "Markdown"
  }
  const options = {
    'method': 'post',
    'contentType': 'application/json',
    'muteHttpExceptions': true,
    'payload': JSON.stringify(payload)
  };

  const response = UrlFetchApp.fetch(url, options);
  Logger.log(response.getContentText());
}
照前面 Telegram Bot 設定步驟取得的資訊。
telegramToken=你的_BOT_API_TokenTelegramChatId這邊是我自己多定義的方法,因為實務上我希望不同的通知分別傳送到不同的 Group,因此定義了一個結構管理目標 Group 與他的Group Chat Id。
/sendMessage API 參數,更多參數、細節可參考官方文件 ,以下是我自己會用到的參數:
- text: 訊息內容 (必帶)
- chat_id: 目標 Group Chat Id (必帶)
- parse_mode: 訊息內容解析方式,這邊我指定
Markdown - disable_web_page_preview: 訊息內容的連結是否不要預覽,這邊設
true關閉,可以讓訊息顯示更簡潔。
使用方式:
sendNotifyMessage("Hello", TelegramChatId.MEDIUM) // 發送 Hello 訊息到 MEDIUM Group Chat Id
sendNotifyMessage("Hello", -1234) // 發送 Hello 訊息到 -1234 Group Chat Id
成果
以我的 Github Repo Star Notifier 機器人 為例:
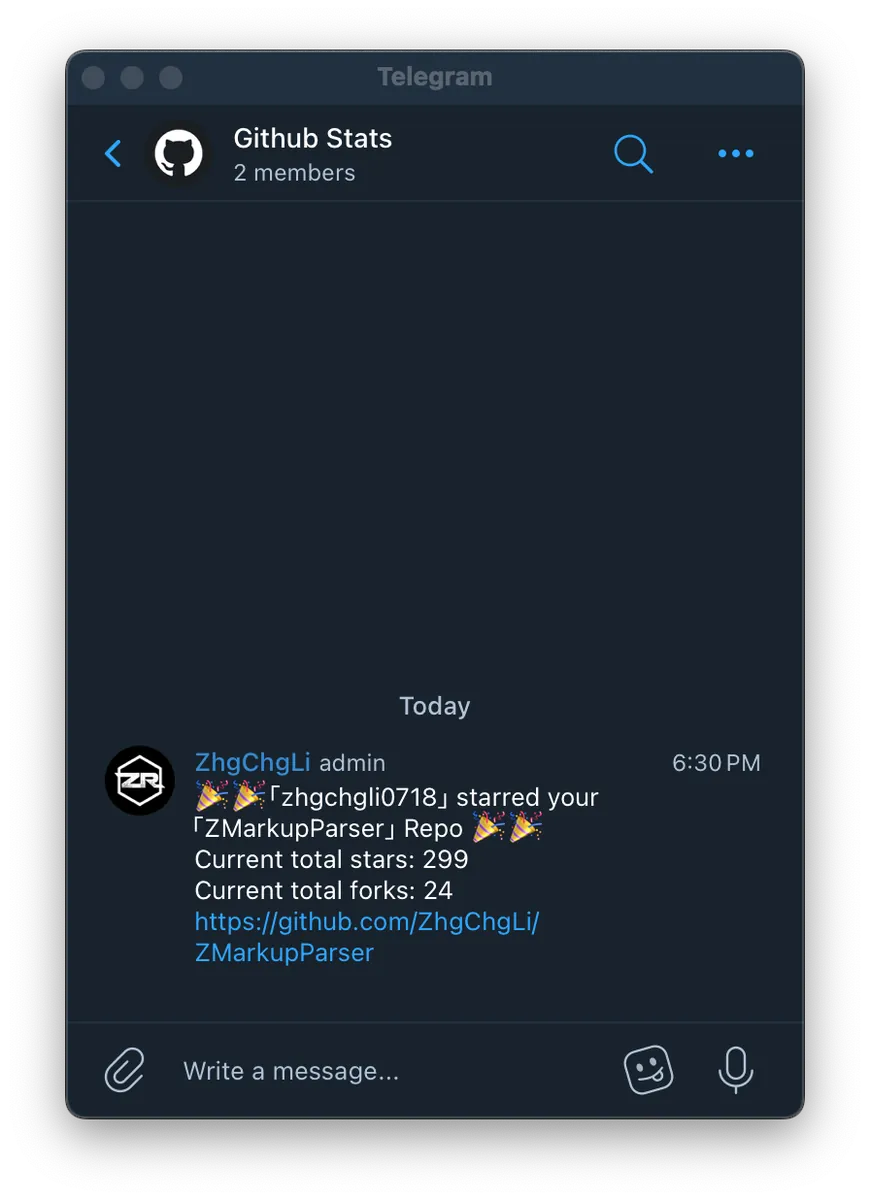
- 驗證成功! 當有人按我的 Repo Star 時能正確改發送通知到 Telegram Group!🎉🎉🎉
- 製作方式可參考我之前的文章「 使用 Google Apps Script 三步驟免費建立 Github Repo Star Notifier 」
設定特殊聲音或靜音
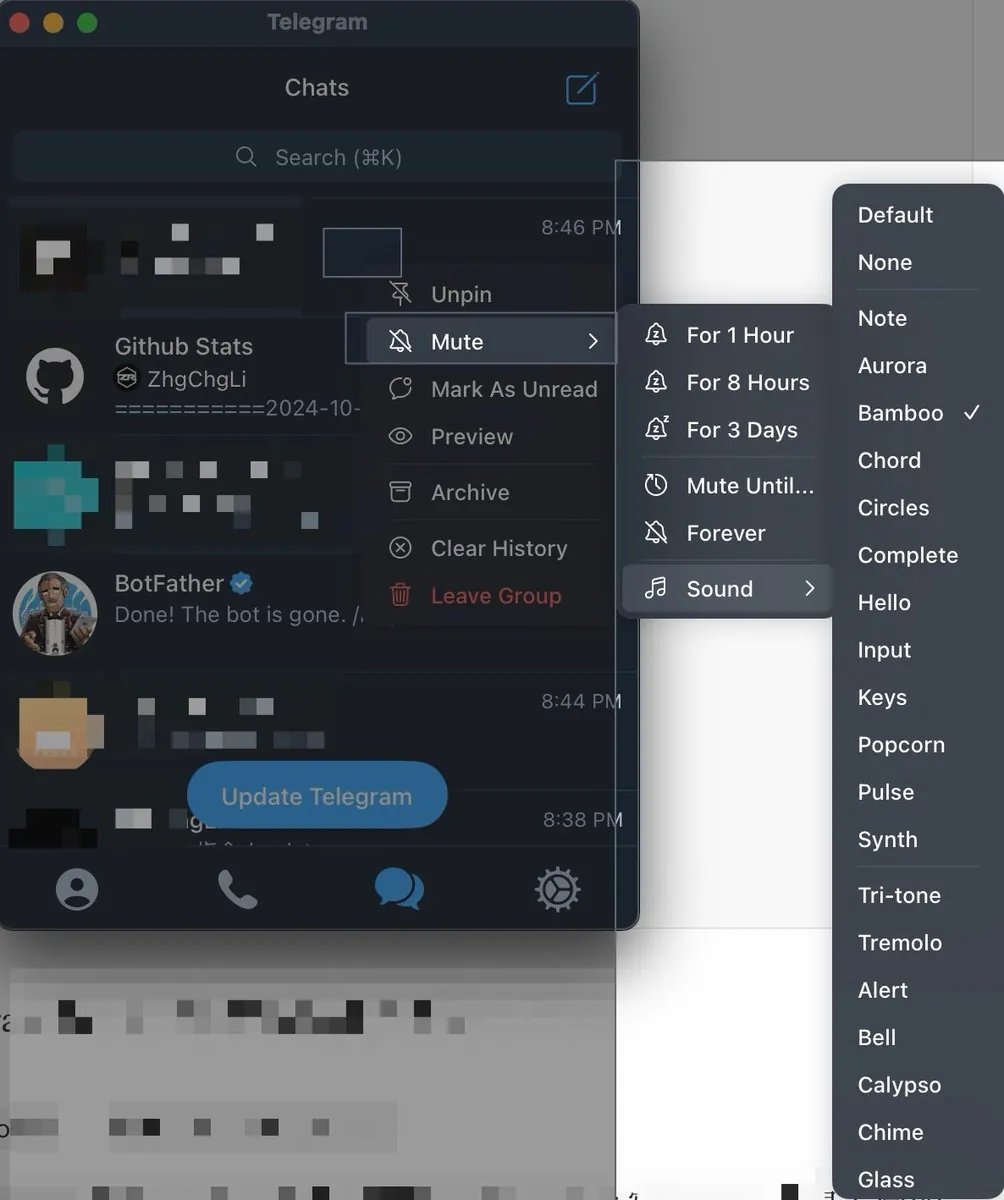
比 Line Notify 更棒的事是我們還可以對不同的 Group 設定不同的通知聲音或是靜音。
與 Telegram Bot 交互 (Command) x 使用 Google Apps Script
除了替代 Notify 功能之外, Telegram Bot 還能輕易地實現與使用者交互的功能 — Telegram Bot Command。
回到我的使用場景,我的機器人會定時或是 Webhook 觸發傳送通知訊息送給我;但有時候我也想手動觸發機器人立刻取得當前結果,以往 Line Notify 沒有這個功能,以 Google Apps Script 來說就只能暴力的設定一個網址,只要打開網址就會觸發,很不好用。
Telegram Bot Command 就能讓我直接輸入指令訊息,命令機器人立刻執行我想做的事情。
本文以 Goolge Apps Script 為例,Google Apps Script 詳細介紹可參考我之前文章「 使用 Google Apps Script 實現 Google 服務 RPA 自動化 」。
Step 1. 使用 Google Apps Script 實現 Command 處理邏輯
- 前往 Google Apps Script 首頁
- 左上方「建立新專案」
- 點擊「未命名專案」輸入專案名稱 e.g.
Telegram - 貼上基礎程式碼:
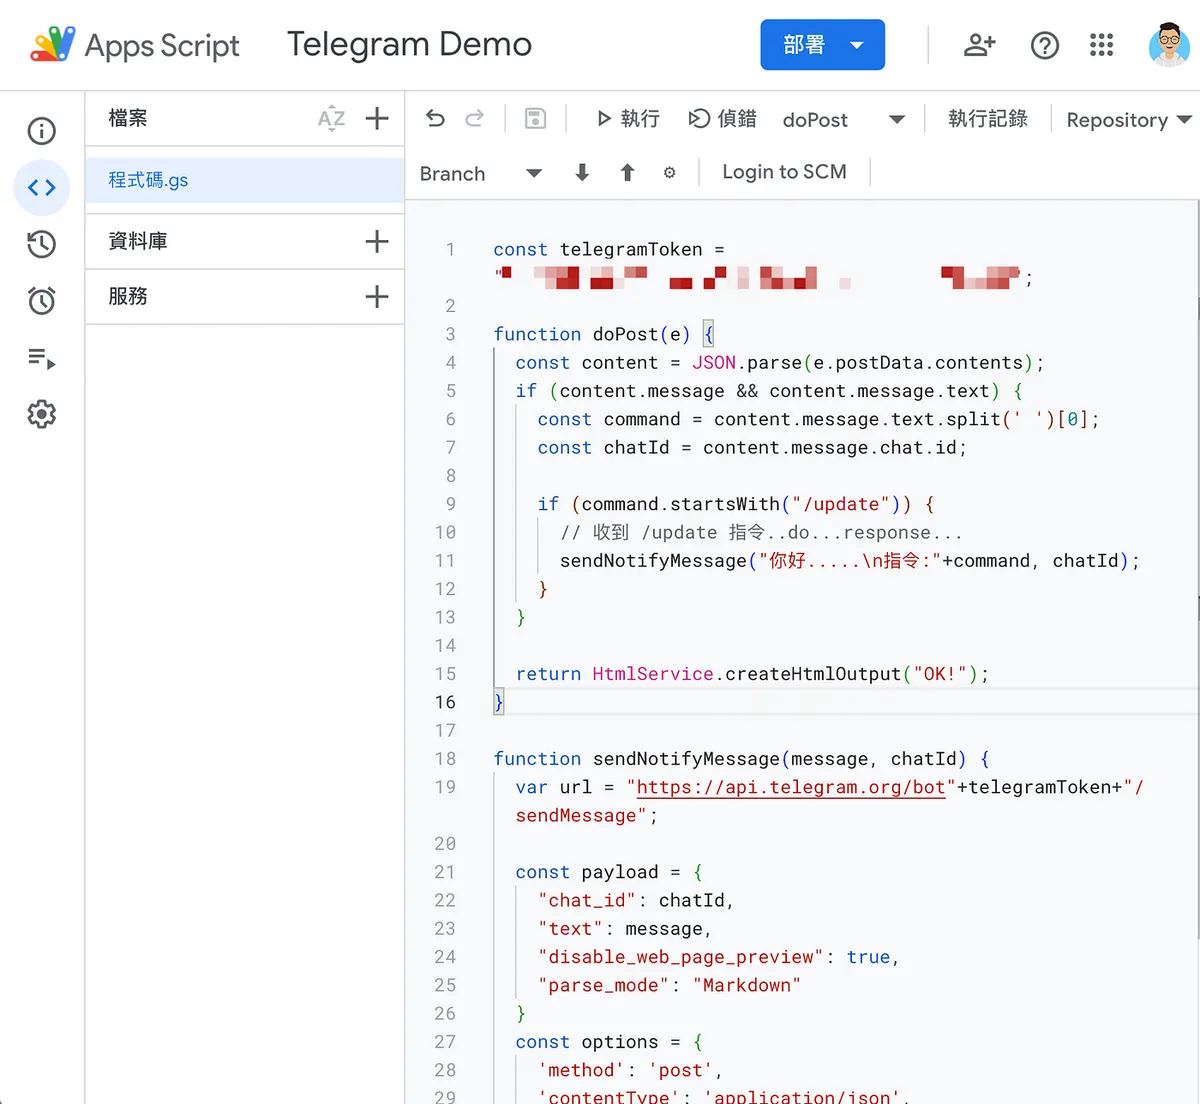
const telegramToken = "你的_BOT_API_Token";

function doPost(e) {
  const content = JSON.parse(e.postData.contents);
  if (content.message && content.message.text) {
    const command = content.message.text.split(' ')[0];
    const chatId = content.message.chat.id;

    if (command.startsWith("/update")) {
      // 收到 /update 指令
      // 在這邊處理你想做的事...然後回應...
      sendNotifyMessage("你好.....\n指令:"+command, chatId);
    }
  }

  return HtmlService.createHtmlOutput("OK!");
}

function sendNotifyMessage(message, chatId) {
  var url = "https://api.telegram.org/bot"+telegramToken+"/sendMessage";

  const payload = {
    "chat_id": chatId,
    "text": message,
    "disable_web_page_preview": true,
    "parse_mode": "Markdown"
  }
  const options = {
    'method': 'post',
    'contentType': 'application/json',
    'muteHttpExceptions': true,
    'payload': JSON.stringify(payload)
  };

  const response = UrlFetchApp.fetch(url, options);
  Logger.log(response.getContentText());
}
telegramToken=你的_BOT_API_Token- 上述 Demo 程式我們在收到 Post 請求、Command 參數等於
/update時回應你好…模擬收到指令後處理後回應的場景。
Step 2. 完成 Google Apps Script Web 部署
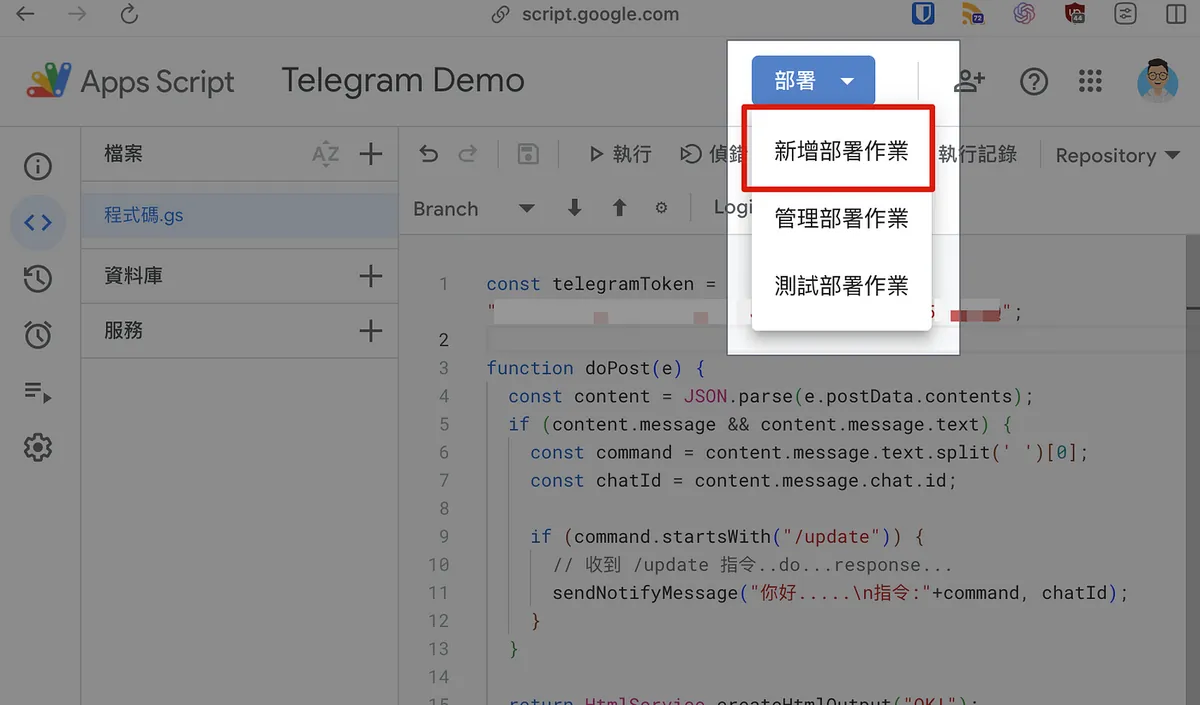
- 右上角「部署」-> 「新增部署作業」
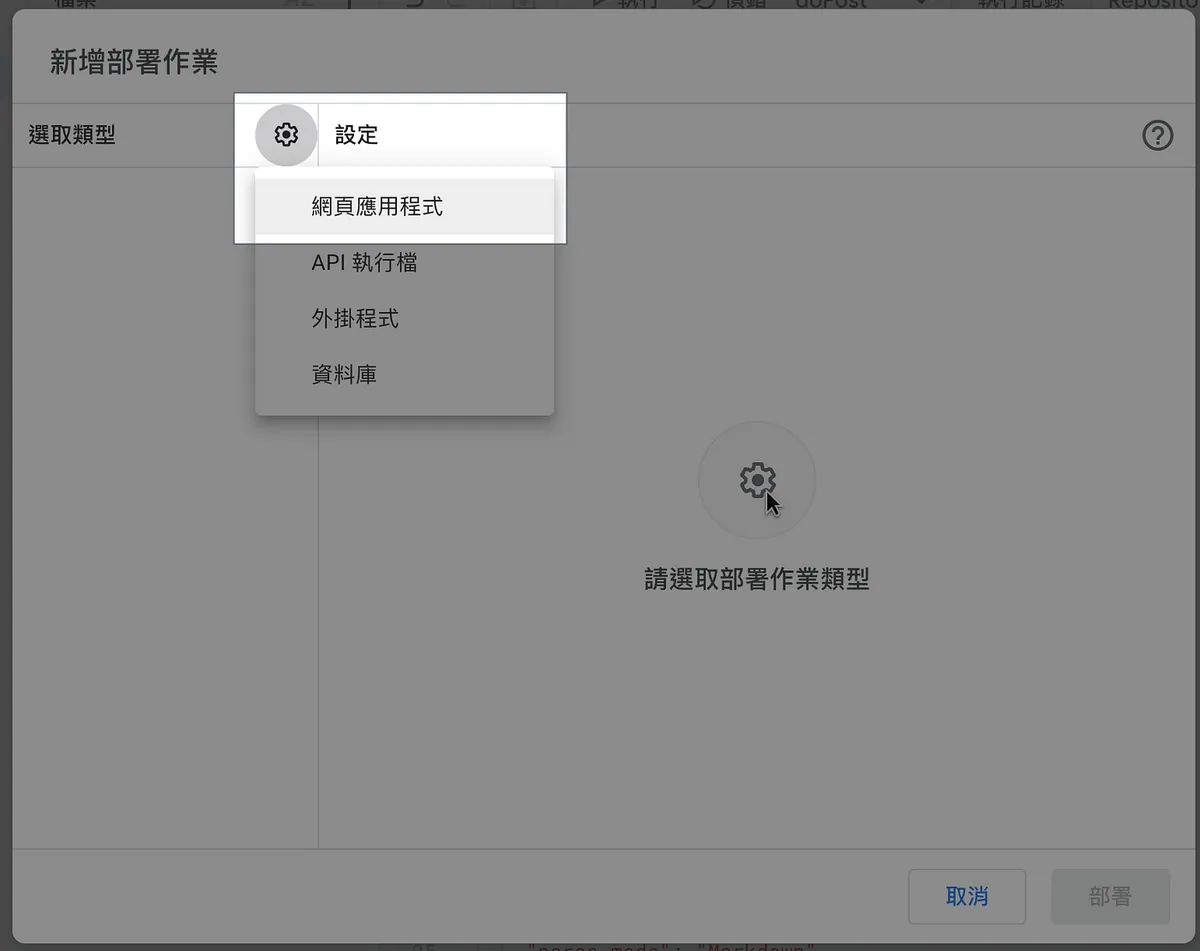
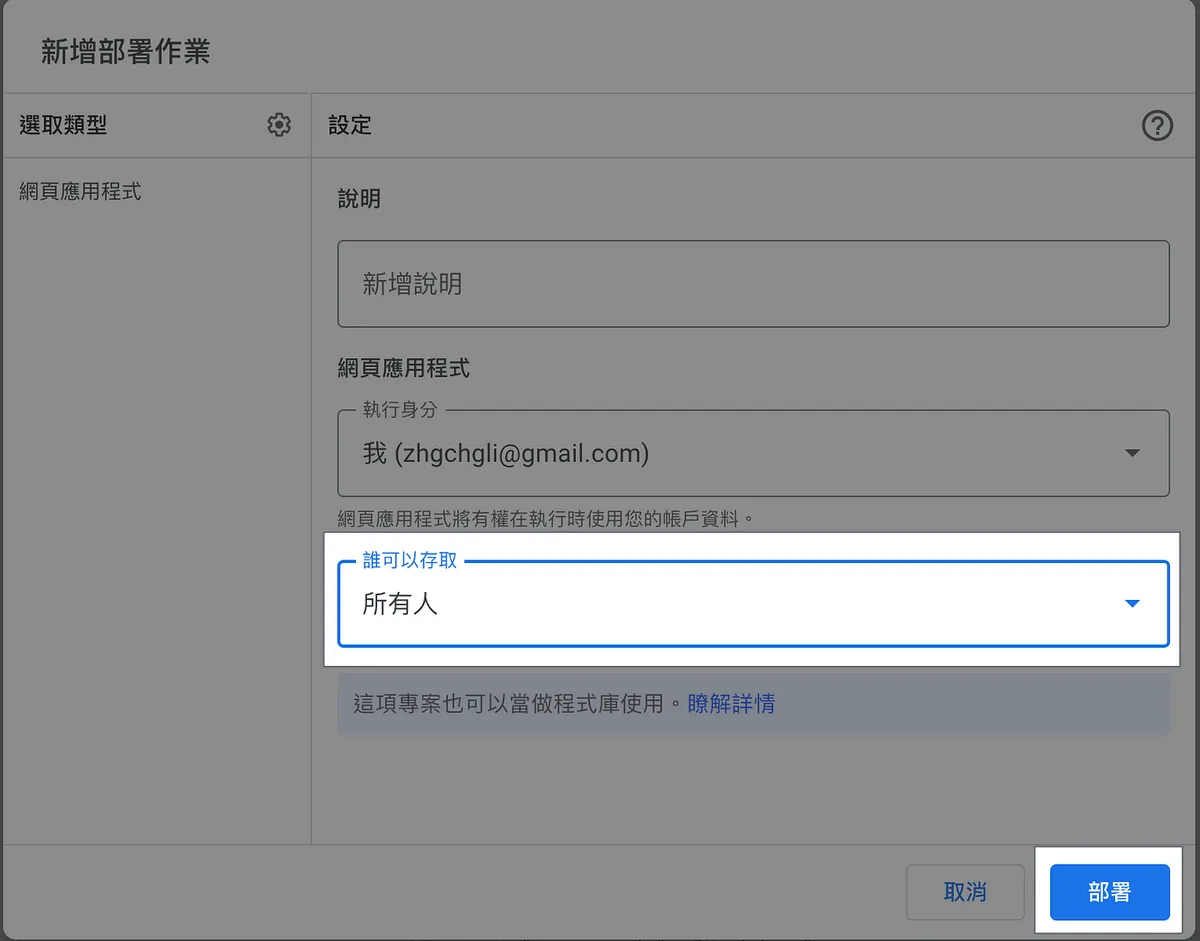
- 左上角「設定」->「網頁應用程式」
- 誰可以存取選擇「所有人」
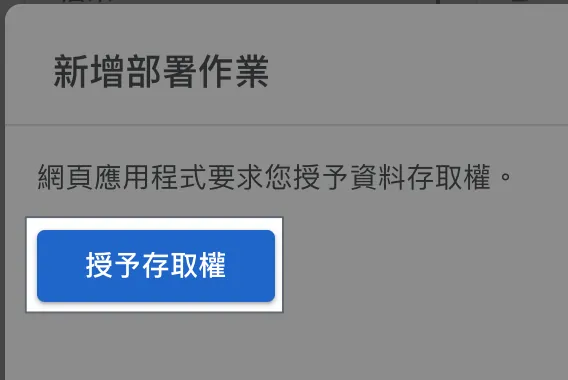
- 新增部署作業,選擇「授予存取權」
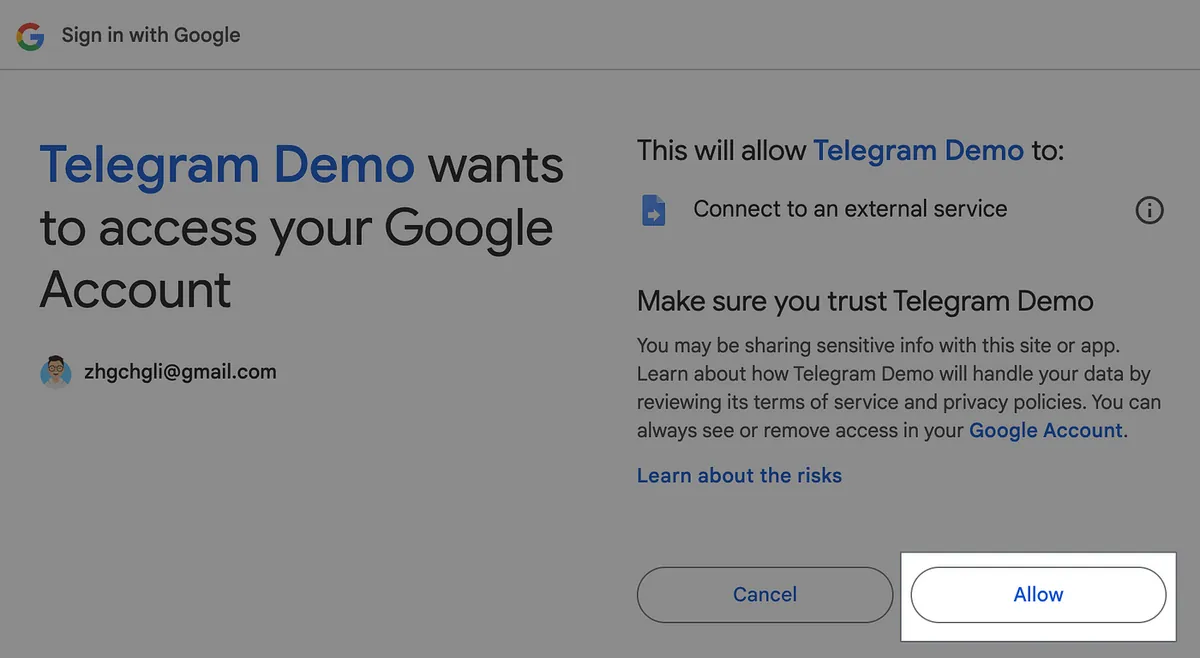
- 跳出帳號視窗,選擇你的 Google 登入帳號
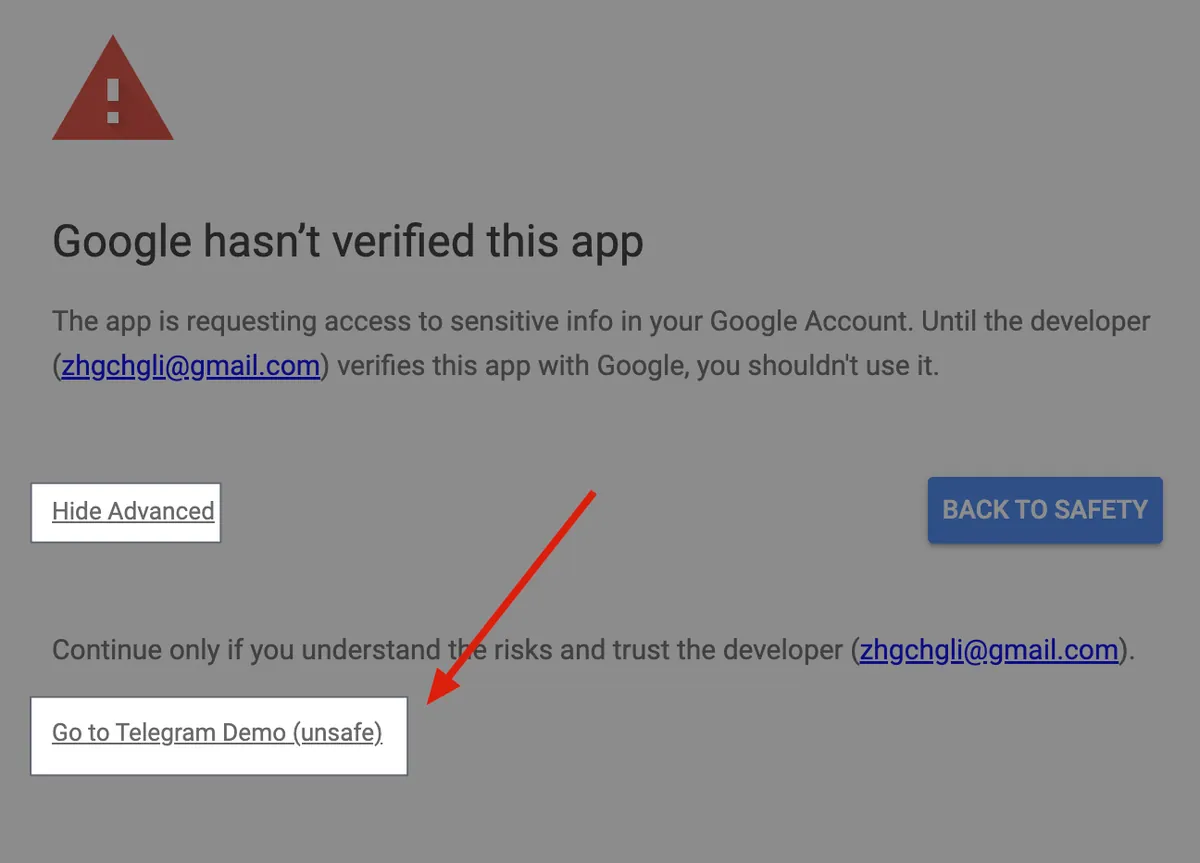
- 跳出警告視窗,選擇「Advanced」->「Go to
專案名稱(unsafe)」 - 選擇「Allow」

- 網頁應用程式網址:
你的 Webhook 網址。 複製下來。 e.g.https://script.google.com/macros/s/AKfycbx2oFv-eB4LezdOk3P3aoEZVhx_PI6n_YnTNP7WVVQSaiRU52di5bKNThsvIZxus3Si/exec
Google Apps Script 網頁應用程式部署、更新、使用、除錯可參考我之前的文章「 使用 Google Apps Script 實現 Google 服務 RPA 自動化 」。
⚠️⚠️⚠️ 請注意,如果 Google Apps Script 程式碼有變更要點擊部署->管理部署->選擇建立新版本才會生效,細節可參考上述文章。
⚠️⚠️⚠️請注意,如果 Google Apps Script 程式碼有變更要點擊部署->管理部署->選擇建立新版本才會生效,細節可參考上述文章。
⚠️⚠️⚠️請注意,如果 Google Apps Script 程式碼有變更要點擊部署->管理部署->選擇建立新版本才會生效,細節可參考上述文章。
Step 3. 註冊 Webhook
使用 Telegram API /setWebhook 註冊你的 Webhook 網址。
Request:
curl --location 'https://api.telegram.org/你的_BOT_API_Token/setWebhook' \
--form 'url="你的 Webhook 網址"'
Response:
{
    "ok": true,
    "result": true,
    "description": "Webhook was set"
}
測試
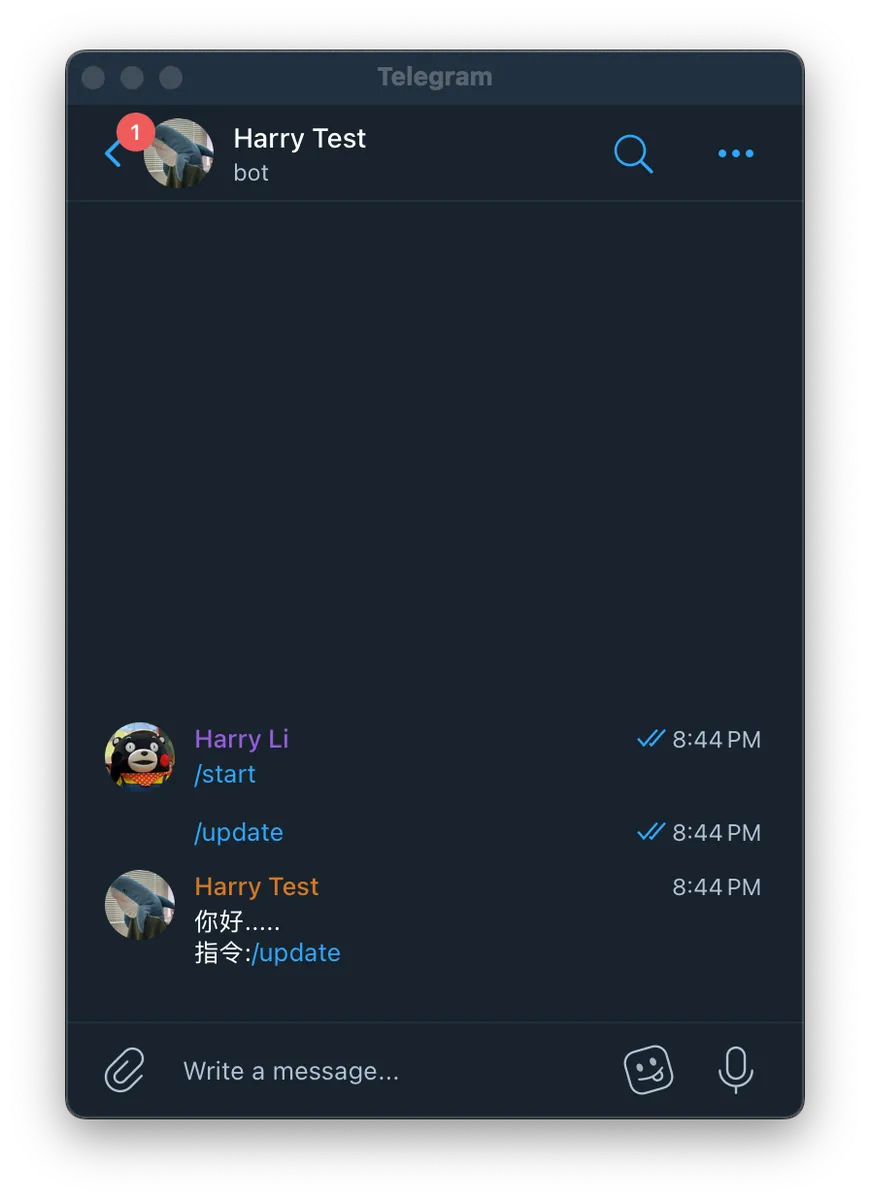
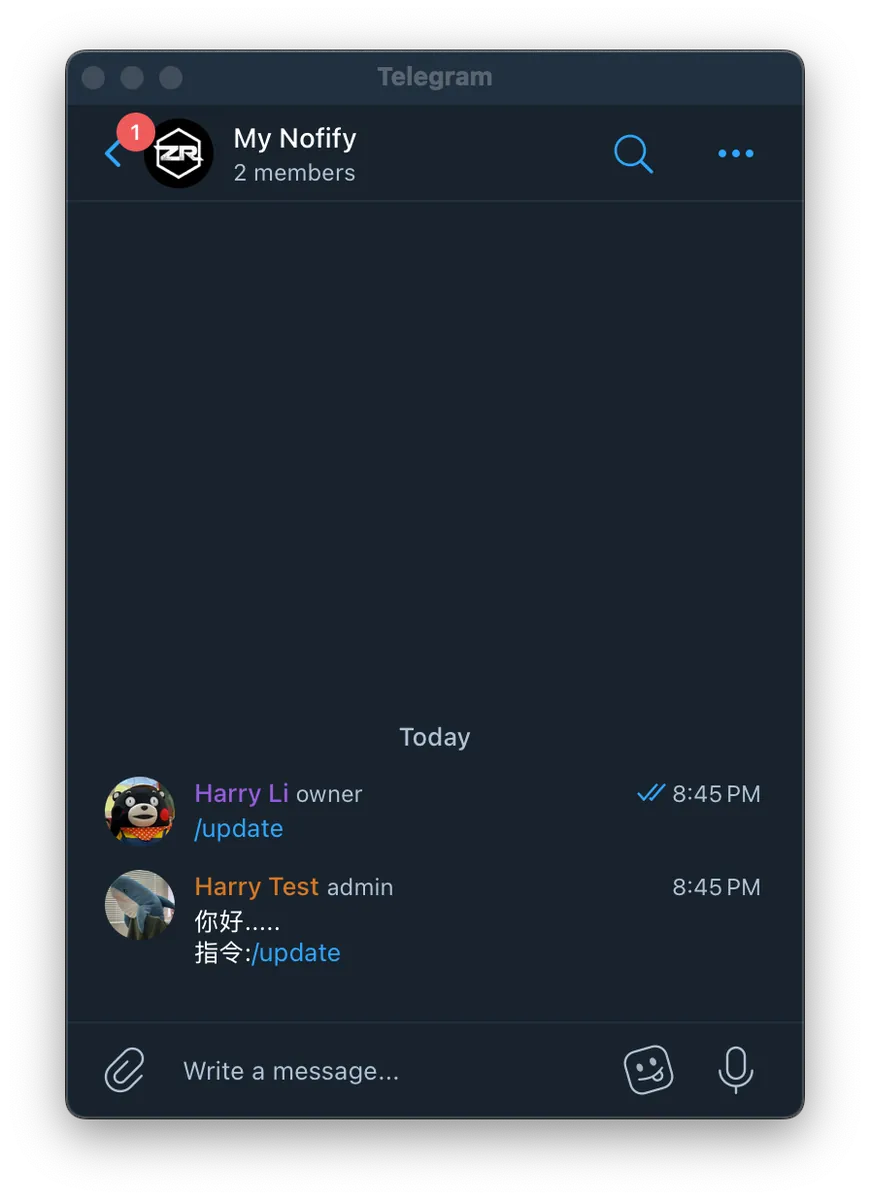
- 我們會根據不同的 Chat Id 回應,因此不管是 1:1 對機器人或是有機器人在的 Group 群組都能回應。
- 成功 🎉🎉🎉
下篇:
其他 Google Apps Script 自動化文章
- 使用 Google Apps Script 實現 Google 服務 RPA 自動化
- Slack & ChatGPT Integration
- 使用 Google Apps Script 三步驟免費建立 Github Repo Star Notifier
附註
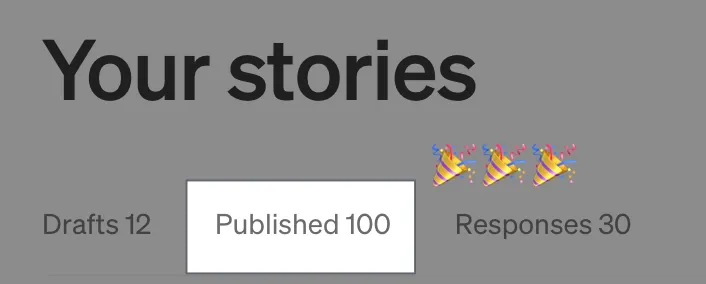
本文也是我 Medium 的第 100 篇文章(2018/10 發表 第一篇 ,6 年了),堅持不懈、繼續努力,詳細心得跟數據等到破 1000 Followers (2024/10 目前 925) 或是總瀏覽數破 1,000,000 (2024/10 目前 984,549) 時再來分享。

留言 · Comments