ZReviewTender — 免費開源的 App Reviews 監控機器人
實時監測 App 的最新評價內容並即時給予反饋,提升協作效率及消費者滿意度
ℹ️ℹ️ℹ️ Click here to view the English version of this article, translated by OpenAI.
ZReviewTender — 免費開源的 App Reviews 監控機器人
實時監測 App 的最新評價內容並即時給予反饋,提升協作效率及消費者滿意度
{:target="_blank"} [ZReviewTender](https://github.com/ZhgChgLi/ZReviewTender){:target="_blank"}](/assets/e36e48bb9265/1*DjHhZ7Yq-rE3LkFDiYW9lg.jpeg)
ZhgChgLi / ZReviewTender
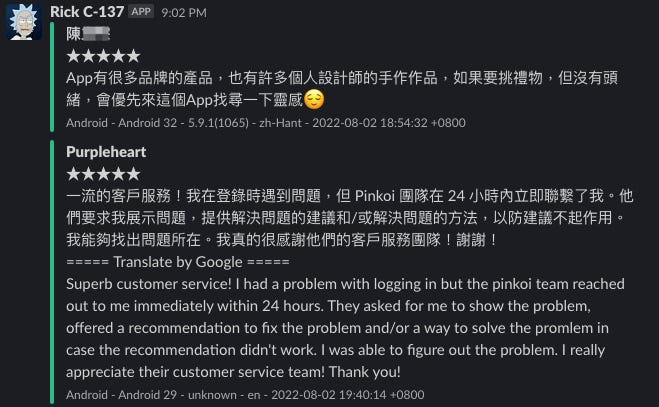
App Reviews to Slack Channel
ZReviewTender — 為您自動監控 App Store iOS/macOS App 與 Google Play Android App 的使用者最新評價訊息,並提供持續整合工具,串接進團隊工作流程,提升協作效率及消費者滿意度。
特色功能
- 取得 App Store iOS/macOS App 與 Google Play Android App 評價列表並篩選出尚未爬取過的最新評價內容
- [預設功能] 轉發爬取到的最新評價到 Slack,點擊訊息 Timestamp 連結能快速進入後台回覆評價
- [預設功能] 支援使用 Google Translate API 自動翻譯非指定語系、地區的評價內容成您的語言
- [預設功能] 支援自動記錄評價到 Google Sheet
- 支援彈性擴充,除包含的預設功能外您仍可依照團隊工作流程,自行開發所需功能並整合進工具中 e.g. 轉發評價到 Discord, Line, Telegram…
- 使用時間戳紀錄爬取位置,防止重複爬取評價
- 支援過濾功能,可指定只爬取 多少評分、評價內容包含什麼關鍵字、什麼地區/語系 的評價
- Apple 基於 全新的 App Store Connect API ,提供穩定可靠的 App Store App 評價資料來源,不再像 以往使用 XML 資料不可靠 or Fastlane Spaceship Session 會過期需定時人工維護
- Android 同樣使用官方 AndroidpublisherV3 API 撈取評價資料
- 支援使用 Github Repo w/ Github Action 部署,讓您免費快速的建立 ZReviewTender App Reviews 機器人
- 100% Ruby @ RubyGem
TL;DR [2024/09/27] Update
整理快速部署教學文件,請參考最新文章:[Quick Start! ] Github Action x ZReviewTender 免費快速部署你的 App 商城評價監控機器人。
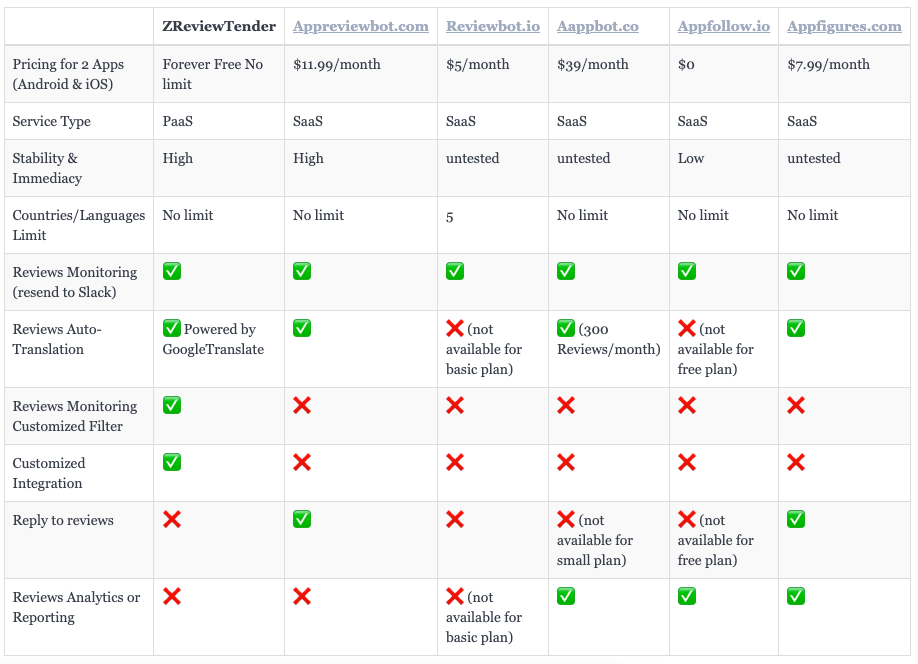
與類似服務比較
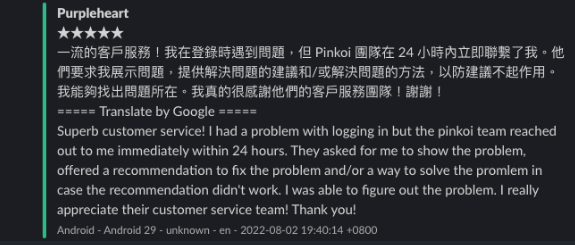
App Reviews 工作流程整合範例 (in Pinkoi)
問題:
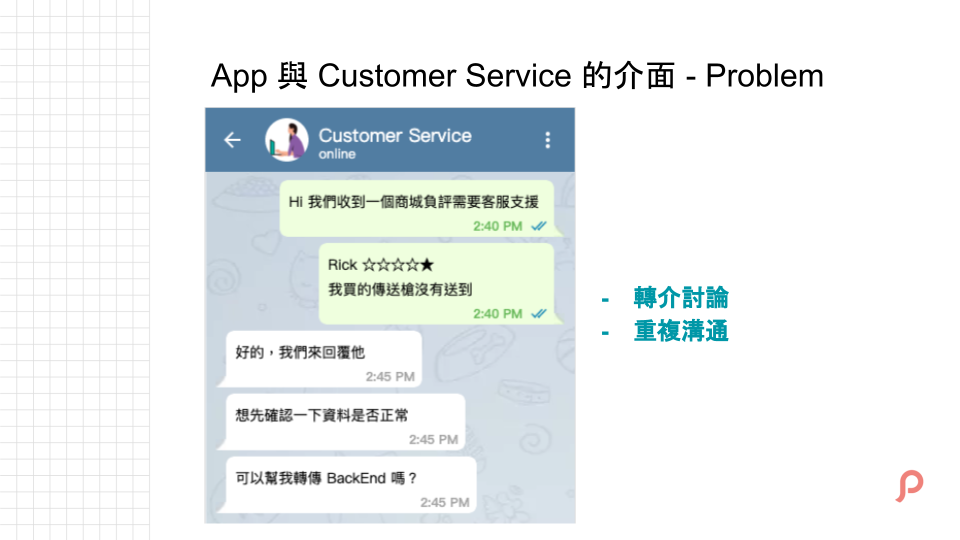
商城的評價對產品很重要但他卻是一個非常人工跟重複轉介溝通的事。
因為要時不時人工上去看一下新評價,如過有客服問題再將問題轉發給客服協助處理,很重複、人工。
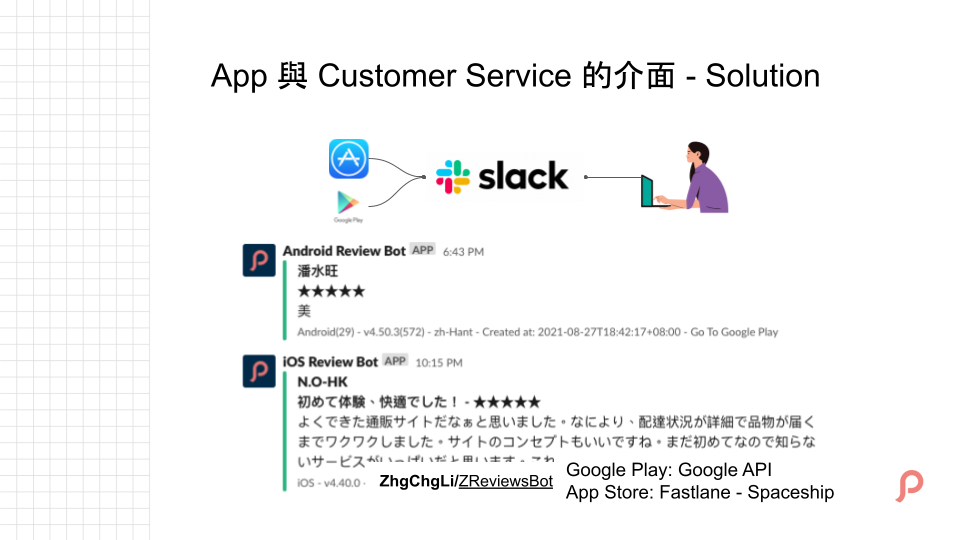
透過 ZReviewTender 評價機器人,將評價自動轉發到 Slack Channel,大家能快速收到最新評價資訊,並即時追蹤、討論;也能讓整個團隊了解目前使用者對產品的評價、建議。
更多資訊可參考: 2021 Pinkoi Tech Career Talk — 高效率工程團隊大解密 。
部署 — 只使用預設功能
如果您只需要 ZReviewTender 自帶的預設功能 (to Slack/Google Translate/Filter) 則可使用以下快速部署方式。
ZReviewTender 已打包發佈到 RubyGems ,您可以快速方便的使用 RubyGems 安裝使用 ZReviewTender。
[推薦] 直接使用 Github Repo Template 部署
- 無需任何主機空間 ✅
- 無需任何環境要求 ✅
- 無需了解工程原理 ✅
- 完成 Config 檔案配置即完成部署 ✅
- 8 個步驟即可完成部署 ✅
- 完全免費 ✅ Github Action 提供每個帳號 2,000+分鐘/月 執行用量,執行一次 ZReviewTender 評價撈取約只需要 15~30 秒。 預設每 6 小時執行一次,一天執行 4 次, 一個月約只消耗 60 分鐘額度 。 Github Private Repo 免費無限制建立。
1.前往 ZReviewTender Template Repo: ZReviewTender-deploy-with-github-action
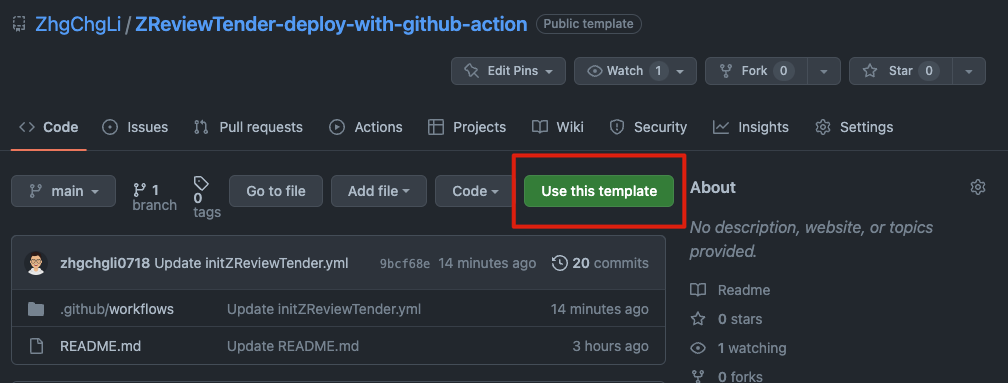
點擊右上方「Use this template」按鈕。
2. 建立 Repo
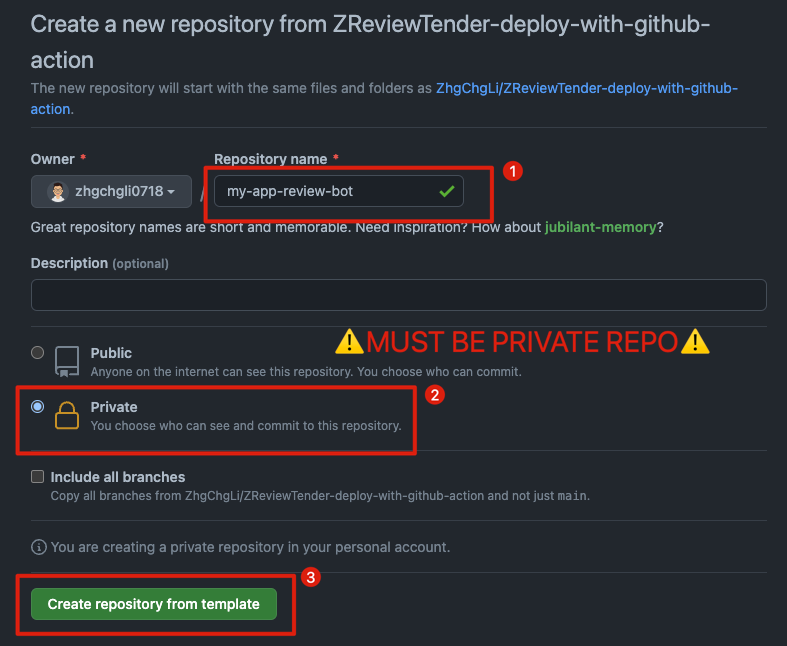
- Repository name: 輸入你想要的 Repo 專案名稱
- Access: Private
⚠️⚠️ 請務必建立 Private Repo ⚠️⚠️
因為你將上傳設定及私密金鑰到專案中
最後點擊下方「Create repository from template」按鈕。
3. 確認你建立的 Repo 是 Private Repo
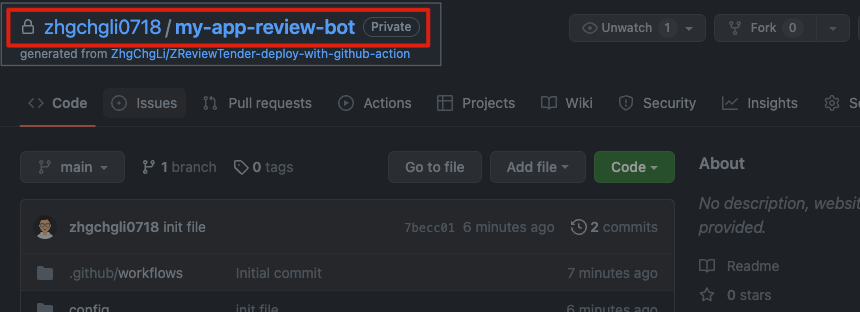
確認右上方 Repo 名稱有出現「🔒」和 Private 標籤。
若無則代表您建立的事 Public Repo 非常危險 ,請前往上方 Tab「Settings」-> 「General」-> 底部「Danger Zone」-> 「Change repository visibility」->「Make private」 改回 Private Repo 。
4. 等待 Project init 成功
可在 Repo 首頁 Readme 中的
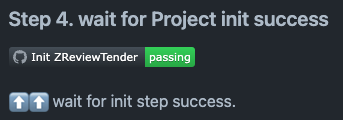
區塊查看 Badge,如果 passing 即代表 init 成功。
或是點擊上方 Tab「Actions」-> 等待「Init ZReviewTender」Workflow 執行完成:
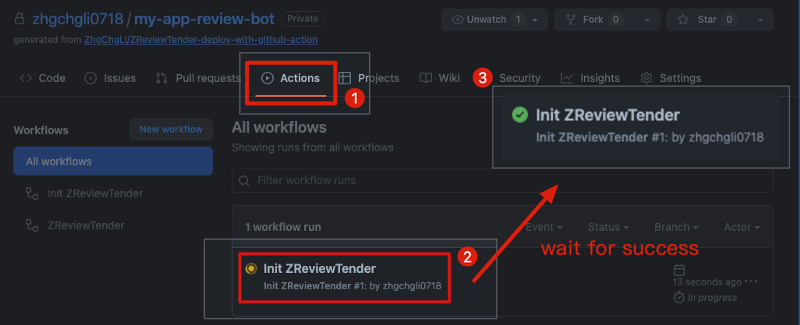
執行完成狀態會變 3「✅ Init ZReviewTender」-> Project init 成功。
5. 確認 init 檔案及目錄是否正確建立
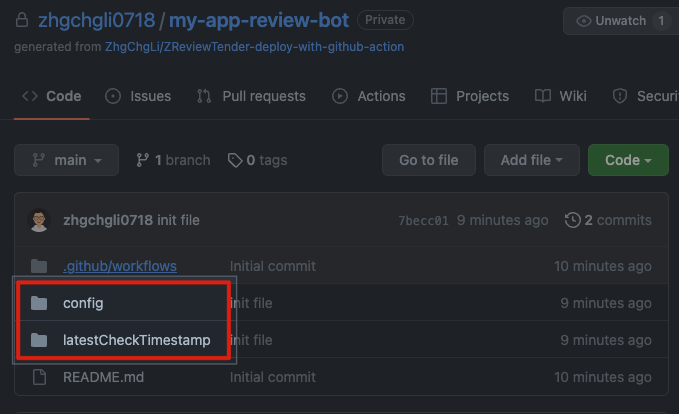
點擊上方 Tab「Code」回到專案目錄,Project init 成功的話會出現:
- 目錄:
config/ - 檔案:
config/android.yml - 檔案:
config/apple.yml - 目錄:
latestCheckTimestamp/ - 檔案:
latestCheckTimestamp/.keep
6. 完成 Configuration 配置好 android.yml & apple.yml
進入 config/ 目錄完成 android.yml & apple.yml 檔案配置。
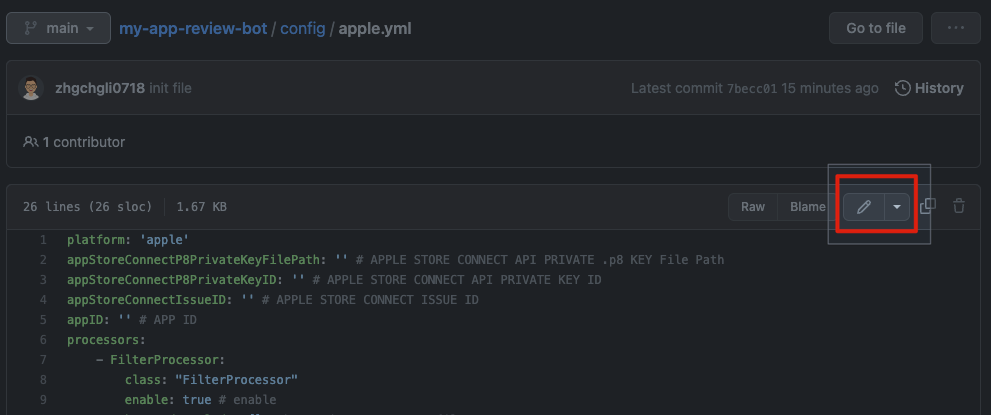
點擊進入要編輯的 confi YML 檔案點擊右上方「✏️」編輯檔案。
參考本文下方「 設定 」區塊完成配置好 android.yml & apple.yml 。

編輯完成後可以直接在下方「Commit changes」儲存設定。
上傳相應的 Key 檔案到 config/ 目錄下:
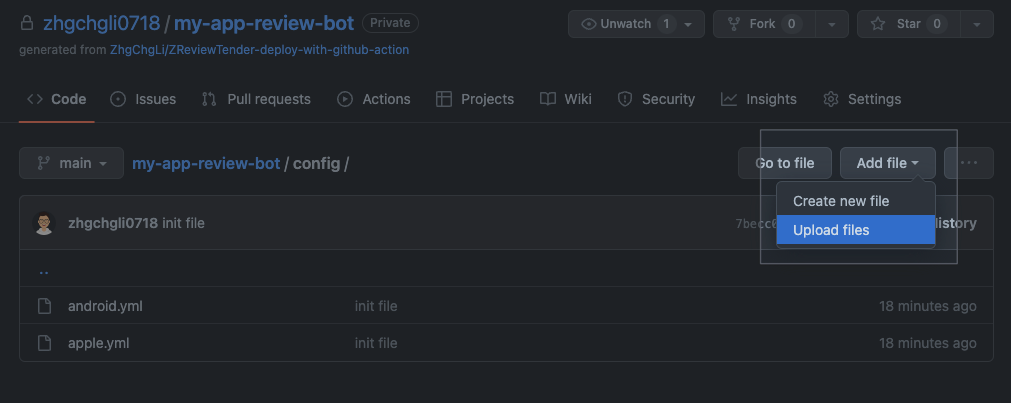
在 config/ 目錄下,右上角選擇「Add file」->「Upload files」
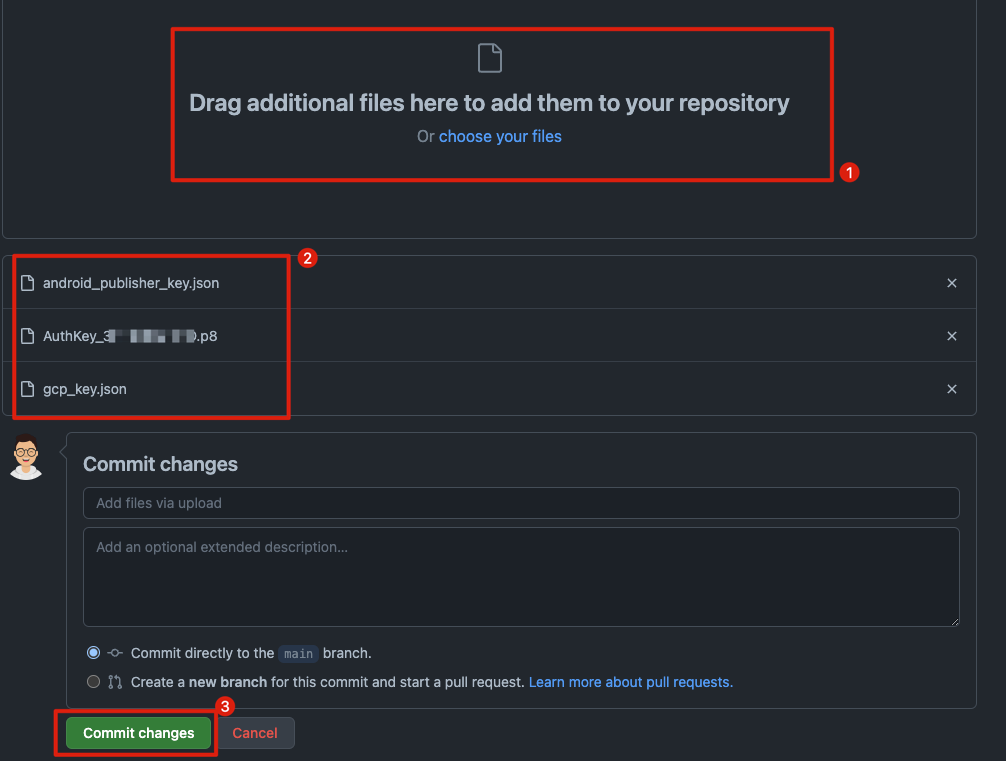
將 config yml 裡配置的相應 Key、外部檔案路徑一併上傳到 config/ 目錄下,拖曳檔案到「上方區塊」-> 等待檔案上傳完成 -> 下方直接「Commit changes」儲存。
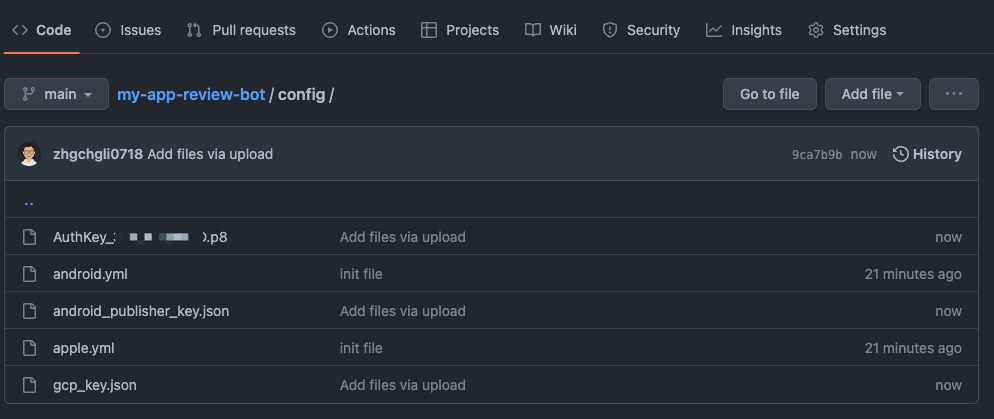
上傳完成後回到 /config 目錄查看檔案是否正確儲存&上傳。
7. 初始化 ZReviewTender (手動觸發執行一次)
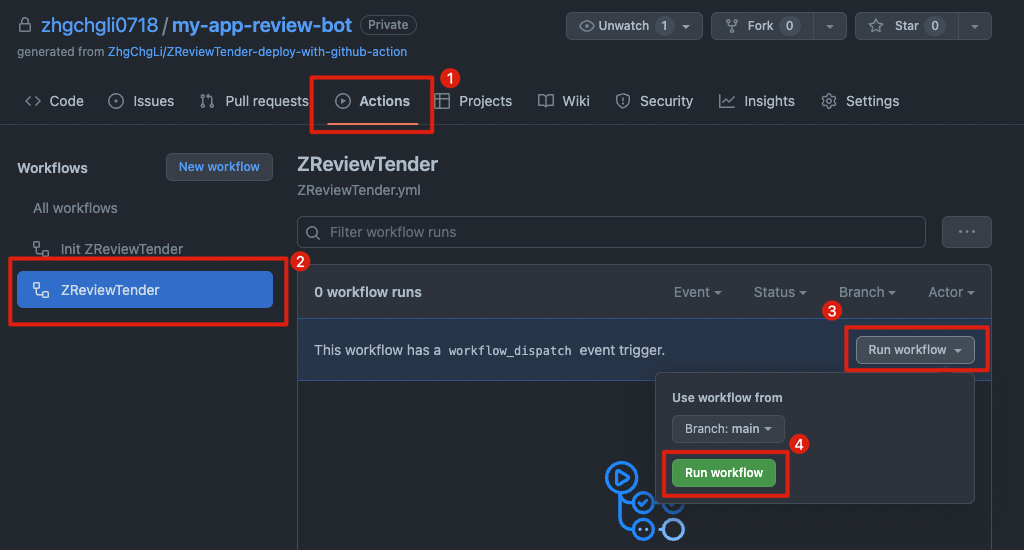
點擊上方 Tab「Actions」-> 左方選擇「ZReviewTender」-> 右方按鈕選擇「Run workflow」-> 點擊「Run workflow」按鈕執行一次 ZReviewTender。
點擊後,重新整理網頁 會出現:
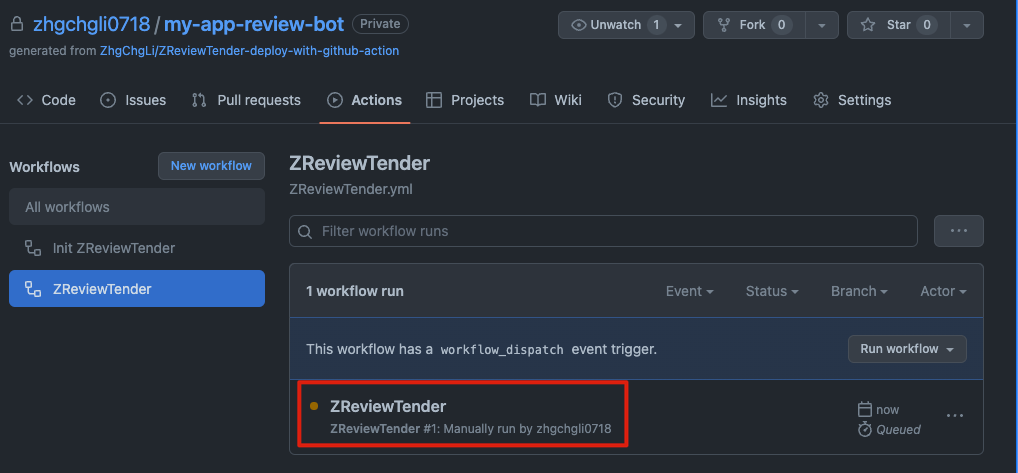
點擊「ZReviewTender」可進入查看執行狀況。
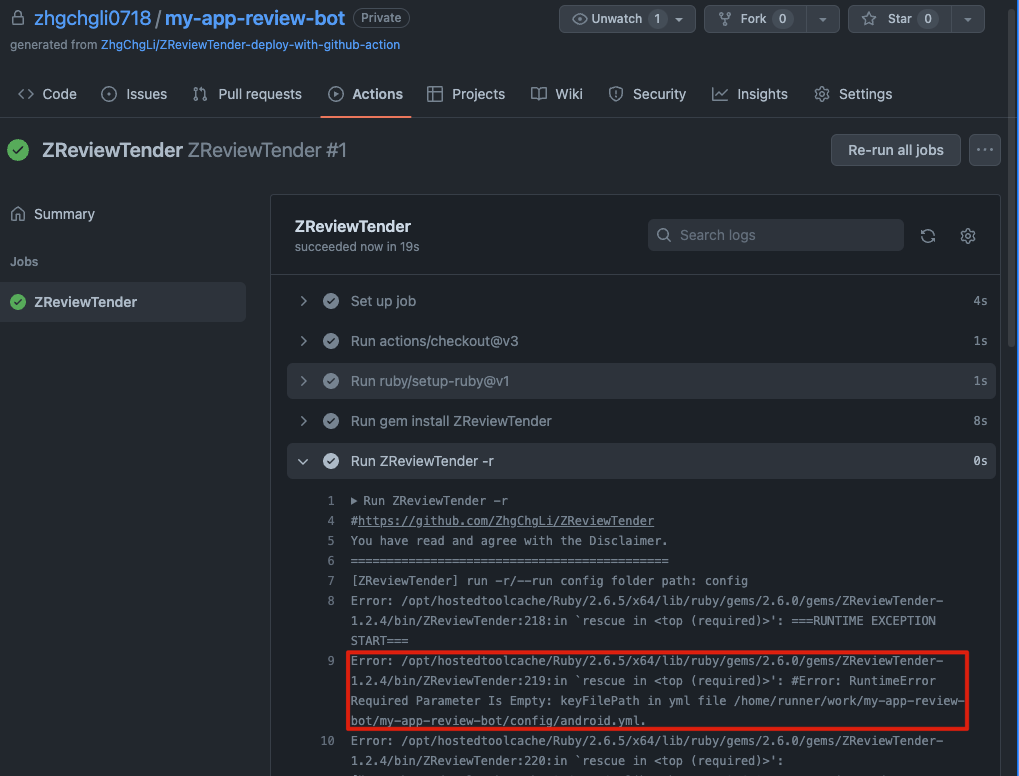
展開「 Run ZreviewTender -r 」區塊可查看執行 Log。
這邊可以看到出現 Error,因為我還沒配置好我的 config yml 檔案。
回頭調整好 android/apple config yml 後再回到 6. 步驟一開始重新觸發執行一次。

查看 「 ZReviewTender -r 」區塊的 log 確認執行成功!
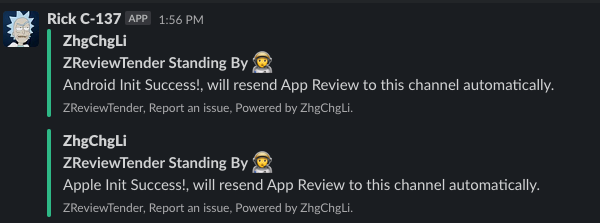
Slack 指定接收最新評價訊息的 Channel 也會出現 init Success 成功訊息 🎉
8. Done! 🎉 🎉 🎉
配置完成!爾後每 6 個小時會自動爬取期間內的最新評價並轉發到你的 Slack Channel 中!
可在 Repo 首頁 Readme 中的頂部查看最新一次執行狀況:

若出現 Error 即代表執行發生錯誤,請從 Acions -> ZReviewTender 進入查看紀錄;如果有意外的錯誤,請 建立一個 Issue 附上紀錄資訊,將會盡快修正!
❌❌❌執行發生錯誤同時 Github 也會寄信通知,不怕發生錯誤機器人掛掉但沒人發現!
Github Action 調整
您還可以依照自己需求配置 Github Action 執行規則。
點擊上方 Tab「Actions」-> 左方「ZReviewTender」-> 右上方「 ZReviewTender.yml 」
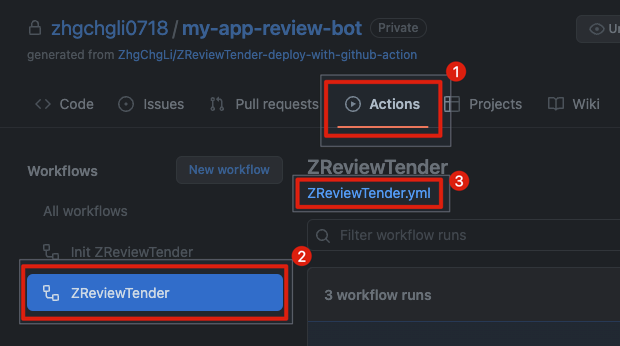

點擊右上方「✏️」編輯檔案。

有兩個參數可供調整:
cron : 設定多久檢查一次有無新評價,預設是 15 */6 * * * 代表每 6 小時 15 分鐘會執行一次。

可參考 crontab.guru 依照自己的需求配置。
請注意:
1. Github Action 使用的是 UTC 時區
2. 執行頻率越高會消耗越多Github Action 執行額度
run : 設定要執行的指令,可參考本文下方「 執行 」區塊,預設是 ZReviewTender -r
- 預設執行 Android App & Apple(iOS/macOS App):
ZReviewTender -r - 只執行 Android App:
ZReviewTender -g - 只執行 Apple(iOS/macOS App) App:
ZReviewTender -a
編輯完成後點擊右上方「Start commit」選擇「Commit changes」儲存設定。
手動觸發執行 ZReviewTender
參考前文「6. 初始化 ZReviewTender (手動觸發執行一次)」
使用 Gem 安裝
如果熟悉 Gems 可以直接使用以下指令安裝 ZReviewTender
1
gem install ZReviewTender
使用 Gem 安裝 (不熟悉 Ruby/Gems)
如果不熟悉 Ruby or Gems 可以 Follow 以下步驟 Step by Step 安裝 ZReviewTender
- macOS 雖自帶 Ruby,但建議使用 rbenv or rvm 安裝新的 Ruby 及管理 Ruby 版本 (我使用
2.6.5) - 使用 rbenv or rvm 安裝 Ruby 2.6.5,並切換至 rbenv/rvm 的 Ruby
- 使用
which ruby確認當前使用的 Ruby 非/usr/bin/ruby系統 Ruby - Ruby 環境 Ok 後使用以下指令安裝
ZReviewTender
1
gem install ZReviewTender
部署 — 想自行擴充功能
手動
- git clone ZReviewTender Source Code
- 確認 & 完善 Ruby 環境
- 進入目錄,執行
bundle installZReviewTender 安裝相關依賴
Processor 建立方式可參考後面文章內容。
設定
ZReviewTender — 使用 yaml 檔設定 Apple/Google 評價機器人。
[推薦] 直接使用文章下方的執行指令 — 「產生設定檔案」:
1
ZReviewTender -i
直接產生空白的 apple.yml & android.yml 設定檔。
Apple (iOS/macOS App)
參考 apple.example.yml 檔案:
⚠️ 下載下來
apple.example.yml後記得將檔名改成apple.yml
apple.yml:
1
2
3
4
5
6
platform: 'apple'
appStoreConnectP8PrivateKeyFilePath: '' # APPLE STORE CONNECT API PRIVATE .p8 KEY File Path
appStoreConnectP8PrivateKeyID: '' # APPLE STORE CONNECT API PRIVATE KEY ID
appStoreConnectIssueID: '' # APPLE STORE CONNECT ISSUE ID
appID: '' # APP ID
...
appStoreConnectIssueID:

- App Store Connect -> Keys -> App Store Connect API
- Issuer ID:
appStoreConnectIssueID
appStoreConnectP8PrivateKeyID & appStoreConnectP8PrivateKeyFilePath:
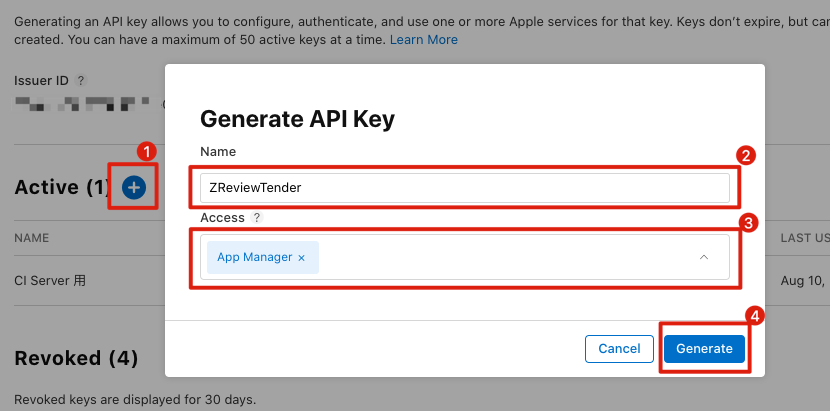
- Name:
ZReviewTender - Access:
App Manager

- appStoreConnectP8PrivateKeyID:
Key ID - appStoreConnectP8PrivateKeyFilePath:
/AuthKey_XXXXXXXXXX.p8,Download API Key,並將檔案放入與 config yml 同目錄下。
appID:
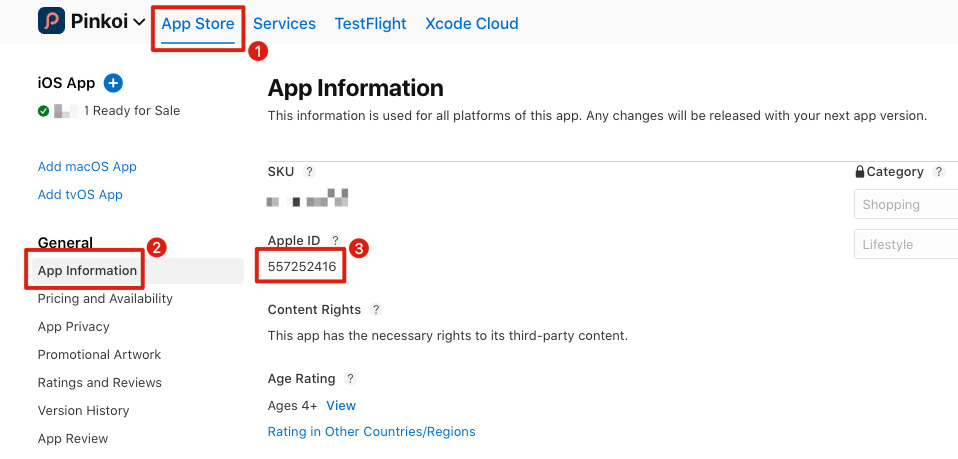
appID: App Store Connect -> App Store -> General -> App Information -> Apple ID
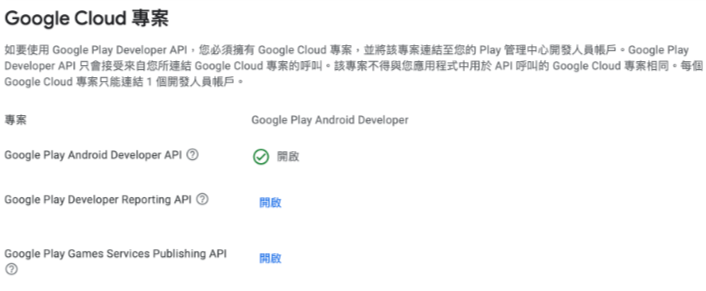
GCP Service Account
ZReviewTender 所使用到的 Google API 服務 (撈取商城評價、Google 翻譯、Google Sheet) 都是使用 Service Account 驗證方式。
可先依照 官方步驟建立 GCP & Service Account 下載保存 GCP Service Account 身份權限金鑰 ( *.json )。
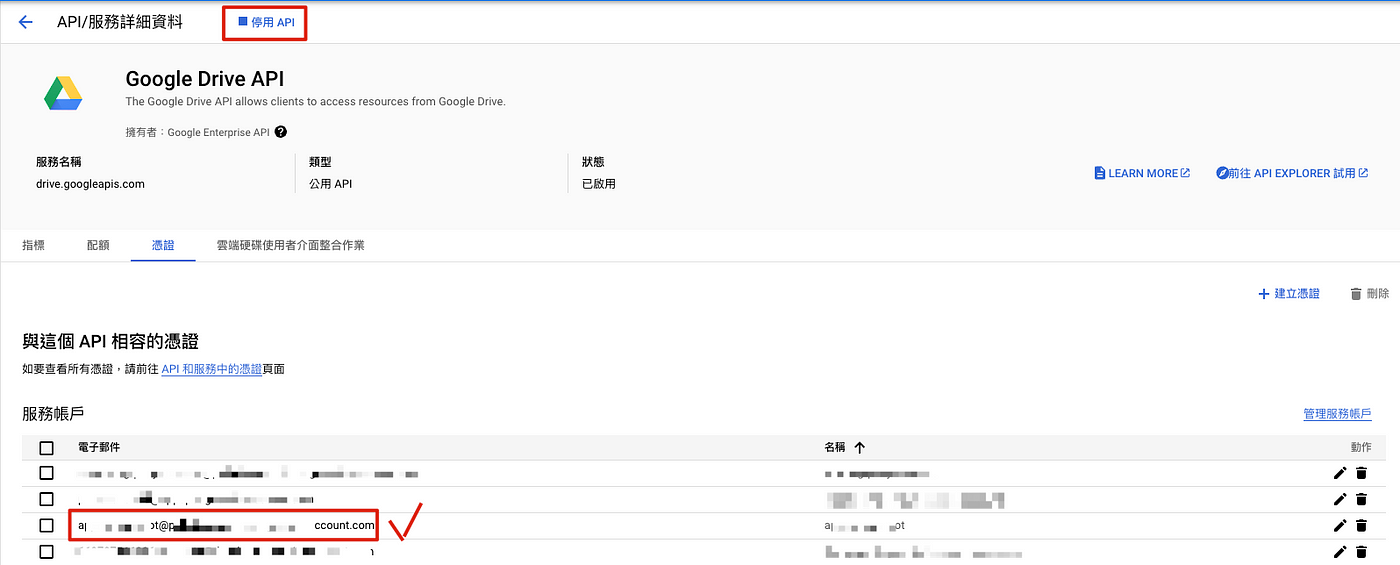
- 如要使用自動翻譯功能請確認 GCP有啟用
Cloud Translation API和使用的 Service Account 也有加入 - 如要使用記錄到 Google Sheet 功能請確認 GCP 有啟用
Google Sheets API、Google Drive API和使用的 Service Account 也有加入
Google Play Console (Android App)
參考 android.example.yml 檔案:
⚠️ 下載下來
android.example.yml後記得將檔名改成android.yml
android.yml:
1
2
3
4
5
6
platform: 'android'
packageName: '' # Android App Package Name
keyFilePath: '' # Google Android Publisher API Credential .json File Path
playConsoleDeveloperAccountID: '' # Google Console Developer Account ID
playConsoleAppID: '' # Google Console App ID
......
packageName:
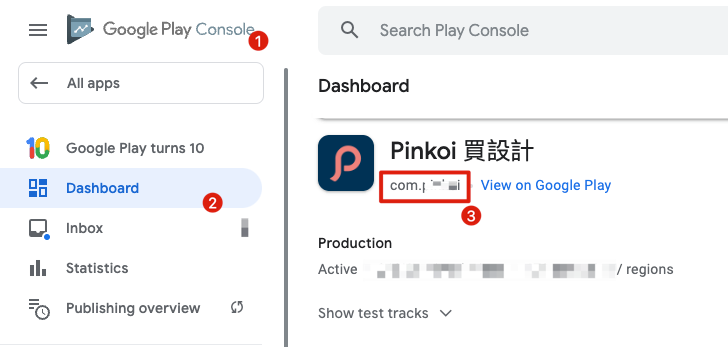
packageName: com.XXXXX 可於 Google Play Console -> Dashboard -> App 中取得
playConsoleDeveloperAccountID & playConsoleAppID:
可由 Google Play Console -> Dashboard -> App 頁面網址中取得:
將用於組合評價訊息連結,讓團隊可以點擊連結快速進入後台評價回覆頁面。
keyFilePath:
最重要的資訊,GCP Service Account 身份權限金鑰 ( *.json )
需要按照 官方文件 步驟,建立 Google Cloud Project & Service Account 並到 Google Play Console -> Setup -> API Access 中完成啟用 Google Play Android Developer API &連結專案,到 GCP 點擊下載服務帳戶的 JSON 金鑰。

JSON 金鑰範例內容如下:
gcp_key.json:
1
2
3
4
5
6
7
8
9
10
11
12
{
    "type": "service_account",
    "project_id": "XXXX",
    "private_key_id": "XXXX",
    "private_key": "-----BEGIN PRIVATE KEY-----\nXXXX\n-----END PRIVATE KEY-----\n",
    "client_email": "XXXX@XXXX.iam.gserviceaccount.com",
    "client_id": "XXXX",
    "auth_uri": "https://accounts.google.com/o/oauth2/auth",
    "token_uri": "https://oauth2.googleapis.com/token",
    "auth_provider_x509_cert_url": "https://www.googleapis.com/oauth2/v1/certs",
    "client_x509_cert_url": "https://www.googleapis.com/robot/v1/metadata/x509/XXXX.iam.gserviceaccount.com"
}
- keyFilePath:
/gcp_key.json金鑰檔案路徑,將檔案放入與 config yml 同目錄下。
Processors
1
2
3
4
5
6
7
8
9
10
11
12
13
14
15
16
17
18
19
20
21
22
processors:
    - FilterProcessor:
        class: "FilterProcessor"
        enable: true # enable
        keywordsInclude: [] # keywords you want to filter out
        ratingsInclude: [] # ratings you want to filter out
        territoriesInclude: [] # territories you want to filter out
    - GoogleTranslateProcessor: # Google Translate Processor, will translate review text to your language, you can remove whole block if you don't needed it.
        class: "GoogleTranslateProcessor"
        enable: false # enable
        googleTranslateAPIKeyFilePath: '' # Google Translate API Credential .json File Path
        googleTranslateTargetLang: 'zh-TW' # Translate to what Language
        googleTranslateTerritoriesExclude: ["TWN","CHN"] # Review origin Territory (language) that you don't want to translate.
    - SlackProcessor: # Slack Processor, resend App Review to Slack.
        class: "SlackProcessor"
        enable: true # enable
        slackTimeZoneOffset: "+08:00" # Review Created Date TimeZone
        slackAttachmentGroupByNumber: "1" # 1~100, how many review message in 1 slack message.
        slackBotToken: "" # Slack Bot Token, send slack message throught Slack Bot.
        slackBotTargetChannel: "" # Slack Bot Token, send slack message throught Slack Bot. (recommended, first priority)
        slackInCommingWebHookURL: "" # Slack In-Comming WebHook URL, Send slack message throught In-Comming WebHook, not recommended, deprecated.
    ...More Processors...
ZReviewTender 自帶四個 Processor,先後順序會影響到資料處理流程 FilterProcessor->GoogleTranslateProcessor->SlackProcessor-> GoogleSheetProcessor。
FilterProcessor:
依照指定條件過濾撈取的評價,只處理符合條件的評價。
- class:
FilterProcessor無需調整,指向 lib/Processors/FilterProcessor.rb - enable:
true/false啟用此 Processor or Not - keywordsInclude: [“
關鍵字1”,“關鍵字2”…] 篩選出內容包含這些關鍵字的評價 - ratingsInclude: [
1,2…] 1~5 篩選出包含這些評價分數的評價 - territoriesInclude: [“
zh-hant”,”TWN”…] 篩選出包含這些地區(Apple)或語系(Android)的評價
GoogleTranslateProcessor:
將評價翻譯成指定語言。
- class:
GoogleTranslateProcessor無需調整,指向 lib/Processors/GoogleTranslateProcessor.rb - enable:
true/false啟用此 Processor or Not - googleTranslateAPIKeyFilePath:
/gcp_key.jsonGCP Service Account 身份權限金鑰 File Path*.json,將檔案放入與 config yml 同目錄下,內容範例可參考上方 Google Play Console JSON 金鑰範例。 (請確認該 JSON key 之 service account 有Cloud Translation API使用權限) - googleTranslateTargetLang:
zh-TW、en…目標翻譯語言 - googleTranslateTerritoriesExclude: [“
zh-hant”,”TWN”…] 不需翻譯的地區(Apple)或語系(Android)
SlackProcessor:
轉發評價到 Slack。
- class:
SlackProcessor無需調整,指向 lib/Processors/SlackProcessor.rb - enable:
true/false啟用此 Processor or Not - slackTimeZoneOffset:
+08:00評價時間顯示時區 - slackAttachmentGroupByNumber:
1設定幾則 Reviews 合併成同一則訊息,加速發送;預設 1 則 Review 1 則 Slack 訊息。 - slackBotToken:
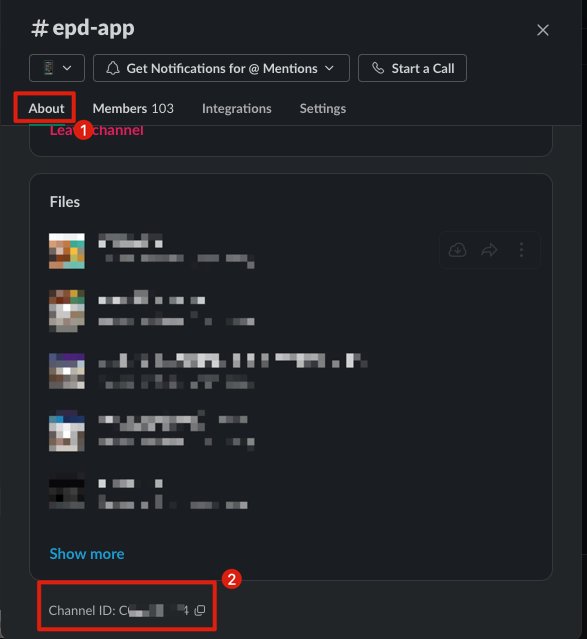
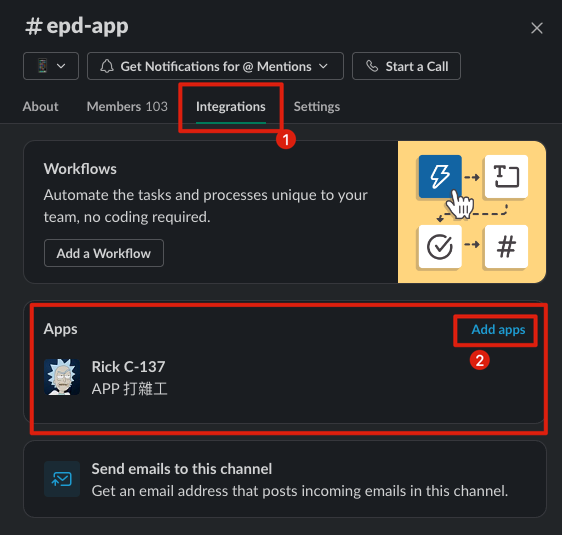
xoxb-xxxx-xxxx-xxxxSlack Bot Token ,Slack 建議建立一個 Slack Bot 包含postMessagesScope 並使用其發送 Slack 訊息 - slackBotTargetChannel:
CXXXXXX群組 ID ( 非群組名稱 ),Slack Bot 要發送到哪個 Channel 群組;且 需要把你的 Slack Bot 加入到該群組 - slackInCommingWebHookURL:
https://hooks.slack.com/services/XXXXX使用舊的 InComming WebHookURL 發送訊息到 Slack,注意!Slack 不建議再繼續使用此方法發送訊息。
Please note, this is a legacy custom integration — an outdated way for teams to integrate with Slack. These integrations lack newer features and they will be deprecated and possibly removed in the future. We do not recommend their use. Instead, we suggest that you check out their replacement: Slack apps .
- slackBotToken 與 slackInCommingWebHookURL,SlackProcessor 會優選選擇使用 slackBotToken
GoogleSheetProcessor
紀錄評價到 Google Sheet。
- class:
GoogleSheetProcessor無需調整,指向 lib/Processors/SlackProcessor.rb - enable:
true/false啟用此 Processor or Not - googleSheetAPIKeyFilePath:
/gcp_key.jsonGCP Service Account 身份權限金鑰 File Path*.json,將檔案放入與 config yml 同目錄下,內容範例可參考上方 Google Play Console JSON 金鑰範例。 (請確認該 JSON key 之 service account 有Google Sheets API、Google Drive API使用權限) - googleSheetTimeZoneOffset:
+08:00評價時間顯示時區 - googleSheetID:
Google Sheet ID可由 Google Sheet 網址中取得:https://docs.google.com/spreadsheets/d/googleSheetID/ - googleSheetName: Sheet 名稱, e.g.
Sheet1 - keywordsInclude: [“
關鍵字1”,“關鍵字2”…] 篩選出內容包含這些關鍵字的評價 - ratingsInclude: [
1,2…] 1~5 篩選出包含這些評價分數的評價 - territoriesInclude: [“
zh-hant”,”TWN”…] 篩選出包含這些地區(Apple)或語系(Android)的評價 - values: [ ] 評價資訊的欄位組合
1
2
3
4
5
6
7
8
9
10
%TITLE% 評價標題
%BODY% 評價內容
%RATING% 評價分數 1~5
%PLATFORM% 評價來源平台 Apple or Android
%ID% 評價ID
%USERNAME% 評價
%URL% 評價前往連結
%TERRITORY% 評價地區(Apple)或評價語系(Android)
%APPVERSION% 被評價的 App 版本
%CREATEDDATE% 評價建立日期
例如我的 Google Sheet 欄位如下:
1
評價分數,評價標題,評價內容,評價資訊
則 values 可設定成:
1
values: ["%TITLE%","%BODY%","%RATING%","%PLATFORM% - %APPVERSION%"]
自訂 Processor 串接自己的工作流程
若需要自訂 Processor 請改用手動部署,因 gem 上的 ZReviewTender 已打包無法動態調整。
您可參考 lib/Processors/ProcessorTemplate.rb 建立您的擴充功能:
1
2
3
4
5
6
7
8
9
10
11
12
13
14
15
16
17
18
19
20
21
22
23
24
25
26
27
28
29
30
31
32
33
34
35
36
37
38
$lib = File.expand_path('../lib', File.dirname(__FILE__))

require "Models/Review"
require "Models/Processor"
require "Helper"
require "ZLogger"

# Add to config.yml:
#
# processors:
#   - ProcessorTemplate:
#       class: "ProcessorTemplate"
#       parameter1: "value"
#       parameter2: "value"
#       parameter3: "value"
#       ...
#

class ProcessorTemplate < Processor

    def initialize(config, configFilePath, baseExecutePath)
        # init Processor
        # get paraemter from config e.g. config["parameter1"]
        # configFilePath: file path of config file (apple.yml/android.yml)
        # baseExecutePath: user excute path
    end

    def processReviews(reviews, platform)
        if reviews.length < 1
            return reviews
        end

        ## do what your want to do with reviews...

        ## return result reviews
        return reviews
    end
end
initialize 會給予:
- config Object: 對應 config yml 內的設定值
- configFilePath: 使用的 config yml 檔案路徑
- baseExecutePath: 使用者在哪個路徑執行 ZReviewTender
processReviews(reviews, platform):
爬取完新評價後,會進入這個 function 讓 Processor 有機會處理,處理完請 return 結果的 Reviews。
Review 資料結構定義在 lib/Models/ Review.rb
附註
XXXterritorXXX 參數:
- Apple 使用地區:TWM/JPN…
- Android 使用語系:zh-hant/en/…
若不需要某個 Processor: 可以設定 enable: false 或是直接移除該 Processor Config Block。
Processors 執行順序可依照您的需求自行調整: e.g. 先執行 Filter 再執行翻譯再執行 Slack 再執行 Log to Google Sheet…
執行
⚠️ 使用 Gem 可直接下
ZReviewTender,若為手動部署專案請使用bundle exec ruby bin/ZReviewTender執行。
產生設定檔案:
1
ZReviewTender -i
從 apple.example.yml & android.example.yml 產生 apple.yml & android.yml 到當前執行目錄的 config/ 目錄下。
執行 Apple & Android 評價爬取:
1
ZReviewTender -r
- 默認讀取
/config/下apple.yml&android.yml設定
執行 Apple & Android 評價爬取 & 指定設定檔目錄:
1
ZReviewTender --run=設定檔目錄
- 默認讀取
/config/下apple.yml&android.yml設定
只執行 Apple 評價爬取:
1
ZReviewTender -a
- 默認讀取
/config/下apple.yml設定
只執行 Apple 評價爬取 & 指定設定檔位置:
1
ZReviewTender --apple=apple.yml設定檔位置
只執行 Android 評價爬取:
1
ZReviewTender -g
- 默認讀取
/config/下android.yml設定
只執行 Android 評價爬取 & 指定設定檔位置:
1
ZReviewTender --googleAndroid=android.yml設定檔位置
清除執行紀錄回到初始設定
1
ZReviewTender -d
會刪除 /latestCheckTimestamp 裡的 Timestamp 紀錄檔案,回到初始狀態,再次執行爬取會再次收到 init success 訊息:
![]()
當前 ZReviewTender 版本
1
ZReviewTender -v
顯示當前 ZReviewTender 再 RubyGem 上的最新版本號。
更新 ZReviewTender 到最新版 (rubygem only)
1
ZReviewTender -n
第一次執行
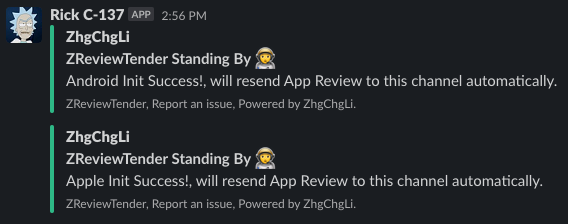
第一次執行成功會發送初始化成功訊息到指定 Slack Channel,並在執行相應目錄下產生 latestCheckTimestamp/Apple , latestCheckTimestamp/Android 檔案紀錄最後爬取的評價 Timestamp。

另外還會產生一個 execute.log 紀錄執行錯誤。

設定排程持續執行
設定排程定時( crontab )持續執行爬取新評價,ZReviewTender 會爬取 latestCheckTimestamp 上次爬取的評價 Timestamp 到這次爬取時間內的新評價,並更新 Timestamp 紀錄檔案。
e.g. crontab: 15 */6 * * * ZReviewTender -r
另外要注意因為 Android API 只提供查詢近 7 天新增或編修的評價,所以排成週期請勿超過 7 天,以免有評價遺漏。
{:target="_blank"}](/assets/e36e48bb9265/0*4atedIT5pjLul10U.png)
https://developers.google.com/android-publisher/reply-to-reviews#retrieving_a_set_of_reviews
Github Action 部署
{:target="_blank"}](/assets/e36e48bb9265/1*uDsJPUqtiltvCsNBFDTz-w.png)
ZReviewTender App Reviews Automatic Bot
1
2
3
4
5
6
7
8
9
10
11
12
13
14
name: ZReviewTender
on:
  workflow_dispatch:
  schedule:
    - cron: "15 */6 * * *" #每六小時跑一次,可參照上方 crontab 自行更改設定

jobs:
  ZReviewTender:
    runs-on: ubuntu-latest
    steps:
    - name: ZReviewTender Automatic Bot
      uses: ZhgChgLi/ZReviewTender@main
      with:
        command: '-r' #執行 Apple & iOS App 評價檢查,可參照上方改成其他執行指令
⚠️️️️️ 再次警告!
務必確保你的設定檔及金鑰無法被公開存取,因其中的敏感資訊可能導致 App/Slack 權限被盜用;作者不對被盜用負任何責任。
如果有發生意外的錯誤,請 建立一個 Issue 附上紀錄資訊,將會盡快修正!
Done
使用教學結束,再來是幕後開發祕辛分享。
=========================
與 App Reviews 的戰爭
本以為去年總結的 AppStore APP’s Reviews Slack Bot 那些事 及運用相關技術實現的 ZReviewsBot — Slack App Review 通知機器人 ,與整合 App 最新評價進入公司工作流程這件事就告一段落了;沒想到 Apple 居然在今年 更新了 App Store Connect API ,讓這件事能持續演進。
去年總結出來的 Apple iOS/macOS App 撈取評價的解決方案:
- Public URL API (RSS) ⚠️: 無法彈性篩選、給的資訊也少、有數量上限、還有我們偶爾會遇到資料錯亂問題,很不穩定;官方未來可能棄用
- 透過 Fastlane — SpaceShip 幫我們封裝複雜的網頁操作、Session 管理,去 App Store Connection 網站後台撈取評價資料 (等於是起一個網頁模擬器爬蟲去後台爬資料)。
依照去年做法就只能使用方法二來達成,但效果不太完美;Session 會過期,需要人工定期更新,且無法放在 CI/CD Server 上,因為 IP 一變 Session 會馬上過期。
{:target="_blank"} by Fastlane](/assets/e36e48bb9265/1*N6B1H_PdtB4bNDrX4BIYRA.png)
important-note-about-session-duration by Fastlane
今年收到 Apple 更新了 App Store Connect API 消息後立馬著手重新設計新的評價機器人,除了改用官方 API 外;還優化了之前的架構設計及更熟悉 Ruby 用法。
App Store Connect API 開發上遇到的問題
- List All Customer Reviews for an App 這個 Endpoint 不會給 App 版本資訊
很詭異,只能 workaround 先打這個 endpoint 篩出最新評價,再打 List All App Store Versions for an App & List All Customer Reviews for an App Store Version 組合出 App 版本資訊。
AndroidpublisherV3 開發上遇到的問題
- API 不提供取得所有評價列表的方法,只能取得近 7 天新增/編修的評價。
- 同樣使用 JWT 串接 Google API (不依賴相關類別庫 e.g. google-apis-androidpublisher_v3)
- 附上個 Google API JWT 產生&使用範例:
1
2
3
4
5
6
7
8
9
10
11
12
13
14
15
16
17
18
19
20
21
22
23
24
25
26
27
28
29
30
31
32
33
34
35
36
37
38
39
require "jwt"
require "time"

payload = {
  iss: "GCP API 身份權限金鑰 (*.json) 檔案中的 client_email 欄位",
  sub: "GCP API 身份權限金鑰 (*.json) 檔案中的 client_email 欄位",
  scope: ["https://www.googleapis.com/auth/androidpublisher"]].join(' '),
  aud: "GCP API 身份權限金鑰 (*.json) 檔案中的 token_uri 欄位",
  iat: Time.now.to_i,
  exp: Time.now.to_i + 60*20
}

rsa_private = OpenSSL::PKey::RSA.new("GCP API 身份權限金鑰 (*.json) 檔案中的 private_key 欄位")
token = JWT.encode payload, rsa_private, 'RS256', header_fields = {kid:"GCP API 身份權限金鑰 (*.json) 檔案中的 private_key_id 欄位", typ:"JWT"}

uri = URI("API 身份權限金鑰 (*.json) 檔案中的 token_uri 欄位")
https = Net::HTTP.new(uri.host, uri.port)
https.use_ssl = true
request = Net::HTTP::Post.new(uri)
request.body = "grant_type=urn%3Aietf%3Aparams%3Aoauth%3Agrant-type%3Ajwt-bearer&assertion=#{token}"

response = https.request(request).read_body

bearer = result["access_token"]

### use bearer token

uri = URI("https://androidpublisher.googleapis.com/androidpublisher/v3/applications/APP_PACKAGE_NAME/reviews")
https = Net::HTTP.new(uri.host, uri.port)
https.use_ssl = true

request = Net::HTTP::Get.new(uri)
request['Authorization'] = "Bearer #{bearer}";

response = https.request(request).read_body

result = JSON.parse(response)

# success!
有任何問題及指教歡迎 與我聯絡 。
本文首次發表於 Medium ➡️ 前往查看
由 ZMediumToMarkdown 與 Medium-to-jekyll-starter 提供自動轉換與同步技術。
