HTTPS Data Theft in iOS & MacOS Apps|Mitmproxy Man-in-the-Middle Attack Explained
Discover how iOS and MacOS apps using HTTPS still risk data theft via mitmproxy man-in-the-middle attacks. Learn to identify vulnerabilities in API transmissions and implement effective defenses to secure your data.
点击这里查看本文章简体中文版本。
點擊這裡查看本文章正體中文版本。
This post was translated with AI assistance — let me know if anything sounds off!
Table of Contents
The app uses HTTPS for transmission, but data was still stolen.
iOS+MacOS Using mitmproxy for Man-in-the-middle Attack to Sniff API Data Transmission: Tutorial and Prevention Methods?
Preface
A while ago, we just held an internal CTF competition at the company. When brainstorming challenges, I recalled a project I worked on in college as a backend (PHP) developer—a points collection app. It basically had a task list, and when a trigger condition was met, it would call an API to earn points. The boss thought that using HTTPS to encrypt data transmission made the API calls very secure—until I demonstrated a man-in-the-middle attack, sniffing the transmitted data and forging API calls to gain points….
With the rise of big data in recent years, web crawlers have become widespread; the battle between crawling and anti-crawling has intensified, with many tricks used on both sides, as described in Tips of Anti-Spider in FE. It’s truly a game of cat and mouse!
Another target for web scraping is the app’s API. Without any protection, it’s like leaving the door wide open; it’s not only easy to use but also has a clean format and is harder to detect and block. So, if the website has made all efforts to prevent scraping but data is still being extracted, it’s worth checking if the app’s API has any vulnerabilities.
Because I don’t know how to include this topic in a CTF competition, I am posting this article as a record; this is just a basic concept — HTTPS can be decrypted by certificate replacement during transmission, and how to enhance security to prevent it; actual network theory is not my strong suit and I have left that to the experts. If you already understand this concept, you don’t need to spend time reading this article, or scroll down to see how apps should be protected!
Practical Operation
Environment: MacOS + iOS
Android users can directly download Packet Capture (free). iOS users can use Surge 4 (paid) to enable the man-in-the-middle attack feature. MacOS users can also use another paid software, Charles.
This article mainly explains how to use the free mitmproxy on iOS. If you already have the above environment, you don’t need to go through these steps. Just open the app, enable the VPN on your phone, and replace the certificate to perform a man-in-the-middle attack! (Please scroll down to see how to protect yourself!)
[Updated 2021/02/25]: There is a new free graphical interface program for Mac (Proxyman) available, which can be used along with the first part of this article.
Install mitmproxy
Install directly using brew:
1
brew install mitmproxy
Installation Complete!
p.s If you encounter brew: command not found, please install the brew package manager first:
1
/usr/bin/ruby -e "$(curl -fsSL https://raw.githubusercontent.com/Homebrew/install/master/install)"
Using mitmproxy
After installation, enter the following command in Terminal to activate:
1
mitmproxy

Startup successful
Connect your phone and Mac on the same local network & find your Mac’s IP address
Method (1) Connect Mac to WiFi, and use the same WiFi on your phone
Mac’s IP Address = “System Preferences” -> “Network” -> “Wi-Fi” -> “IP Address”
Method (2) Use a wired network on Mac, enable Internet Sharing; connect your phone to this hotspot network:
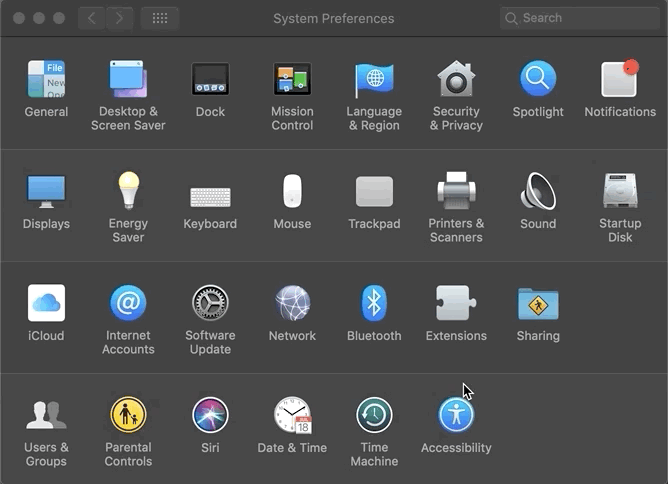
“System Preferences” -> “Sharing” -> Select “Ethernet” -> Check “Wi-Fi” -> Enable “Internet Sharing”
Mac’s IP Address = 192.168.2.1 (⚠️ Note: This is not the Ethernet network IP, but the IP Mac uses as a network sharing hotspot)
Mobile Network Settings WiFi — Proxy Server Information

“Settings” -> “WiFi” -> “HTTP Proxy” -> “Manual” -> “Enter Mac’s IP address in Server” -> “Enter 8080 in Port” -> “Save”
It is normal for the webpage to fail to load and show a certificate error at this point; let’s continue…
Installing mitmproxy Custom HTTPS Certificate
As mentioned above, the way a man-in-the-middle attack works is by using its own certificate to intercept and decrypt data during communication; therefore, we also need to install this custom certificate on the phone.
1. Open http://mitm.it on your mobile Safari
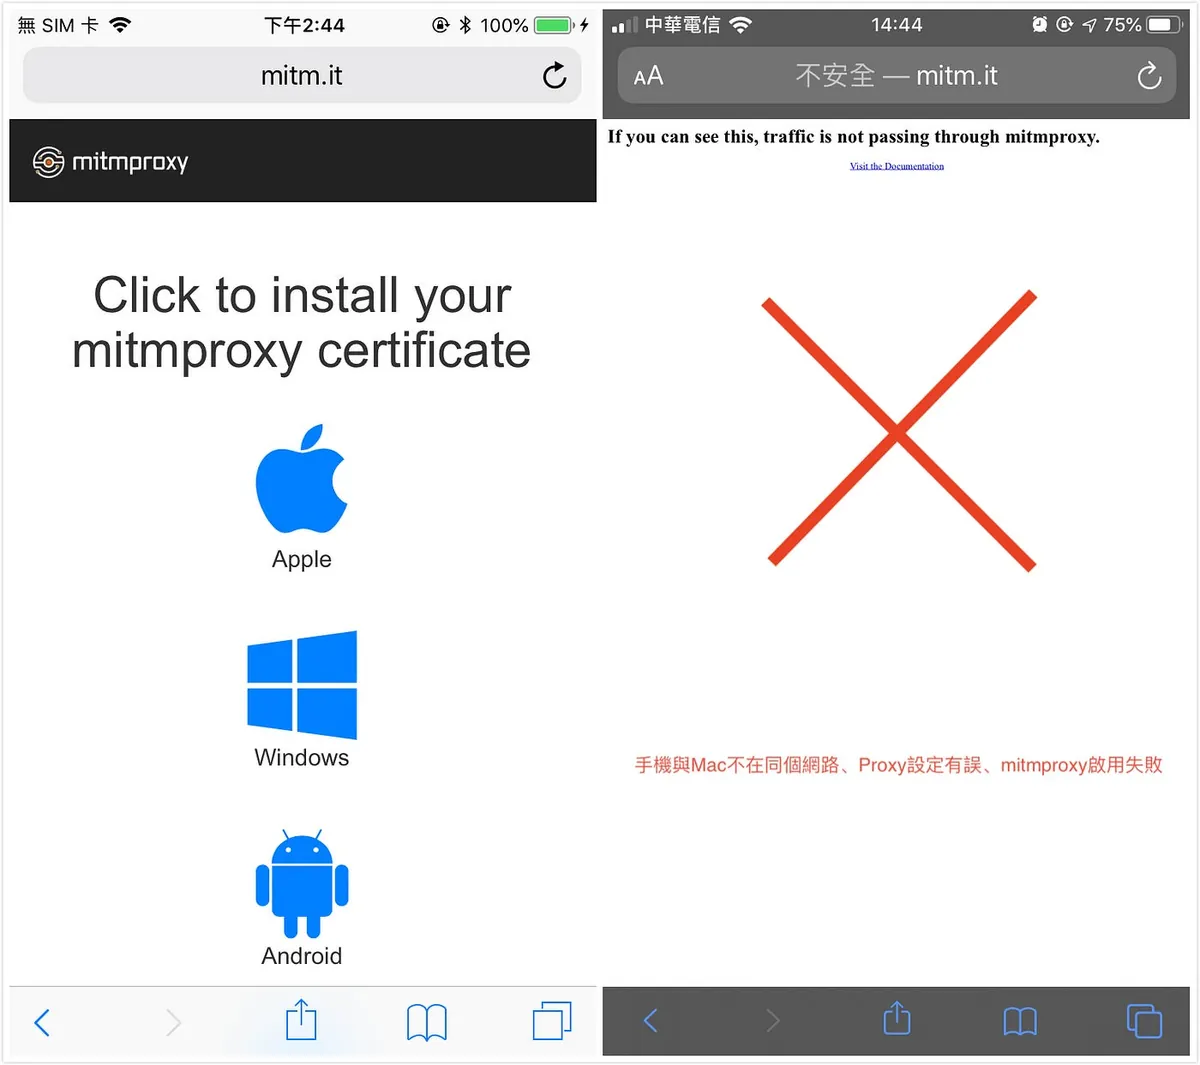
Left side -> Proxy setting is correct ✅ / Right side indicates Proxy setting error 🚫
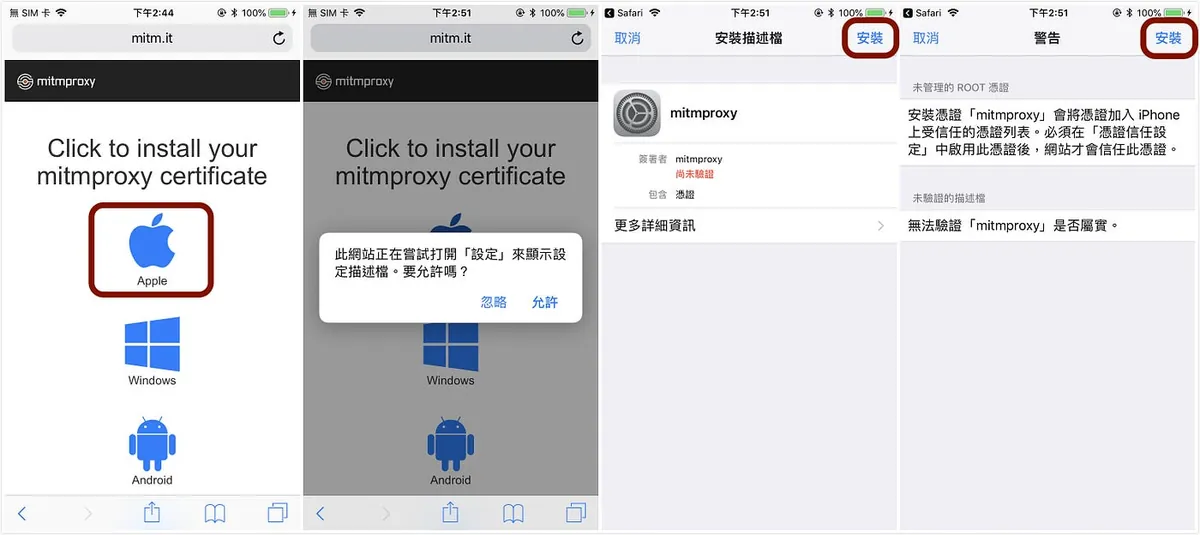
“Apple” -> “Install Profile” -> “Install”
⚠️ It’s not over yet; we still need to enable the provisioning profile inside.
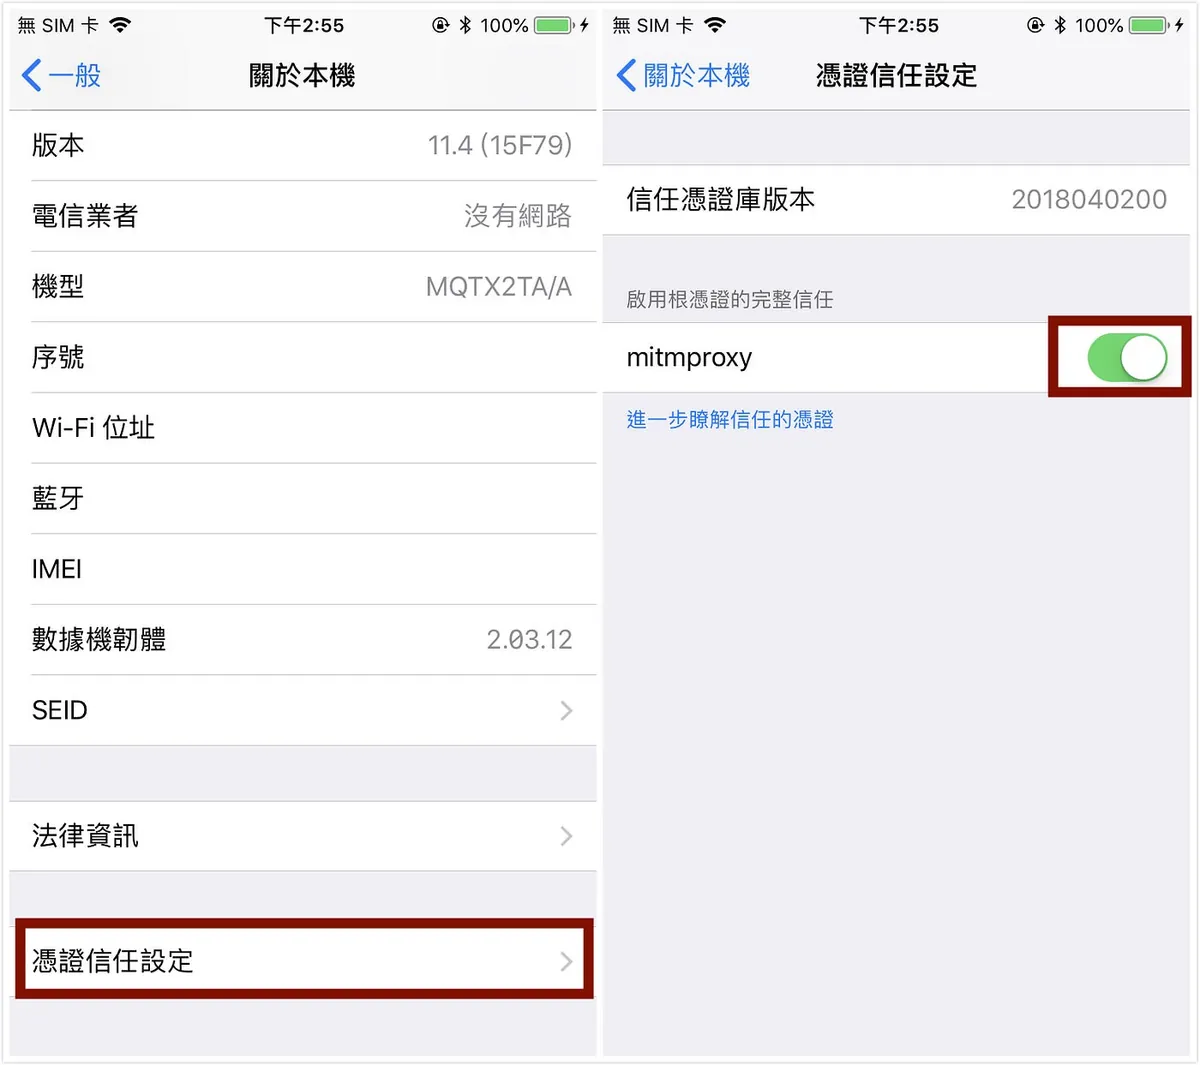
“General” -> “About” -> “Certificate Trust Settings” -> Enable “mitmproxy”
Done! Now, when we return to the browser, we can browse web pages normally.
Back to operating mitmproxy on Mac
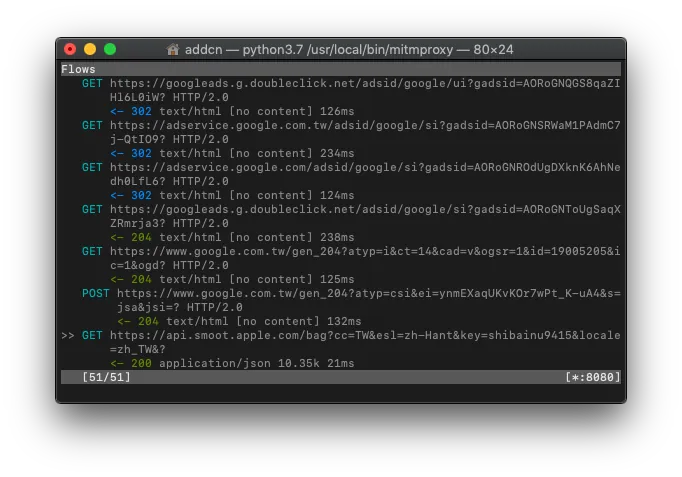
You can see the recent mobile data transmission records on the mitmproxy Terminal.
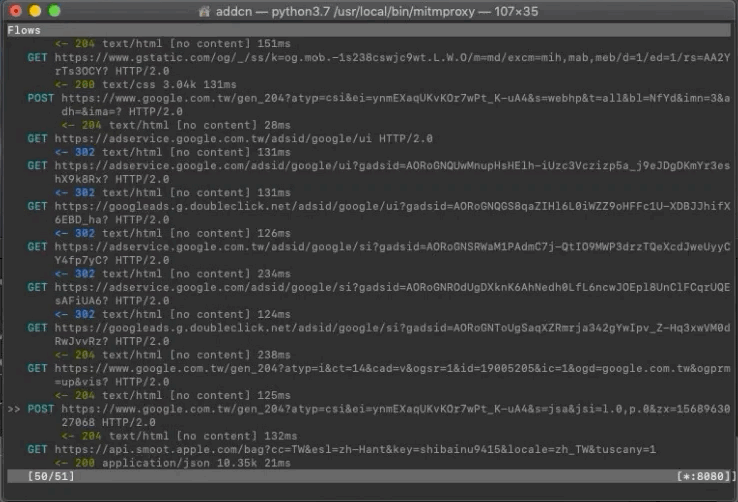
Find the record you want to sniff and view the Request (which parameters were sent) / Response (what content was returned)
Common Shortcut Keys:
1
2
3
4
5
6
7
8
9
10
11
12
13
「 ? 」= View key operation documentation
「 k 」/「⬆」= Up
「 j 」/「⬇」= Down
「 h 」/「⬅」= Left
「 l 」/「➡️」= Right
「 space 」= Next page
「 enter 」= Enter to view details
「 q 」= Go back/Exit
「 b 」= Export response body to specified path text file
「 f 」= Filter record conditions
「 z 」= Clear all records
「 e 」= Edit Request (cookie, headers, params...)
「 r 」= Resend Request
Not used to CLI? No worries, you can switch to a Web GUI!
Besides the mitmproxy activation method, we can change to:
1
mitmweb
You can use the new Web GUI for operation monitoring.
mitmweb
The main event: sniffing app data:
After setting up and becoming familiar with the above environment, we can move on to the main event: sniffing the data transmission of the app’s API!
This example uses a specific real estate app for academic purposes only, with no malicious intent!
We want to know how the object list API is requested and what content it returns!
First, press “z” to clear all records (to avoid confusion).

Open the target APP
Open the target app and try to perform a “pull-to-refresh” or trigger the “load next page” action.
🛑If your target APP won’t open or connect; sorry, it means the APP has protection and this sniffing method won’t work. Please scroll down to the “How to Protect” section🛑
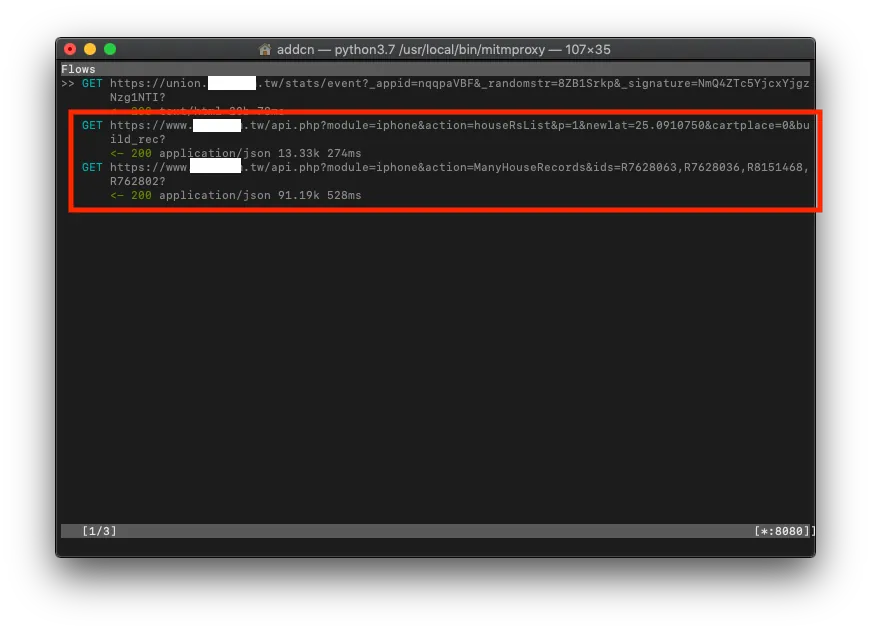
mitmproxy Recording
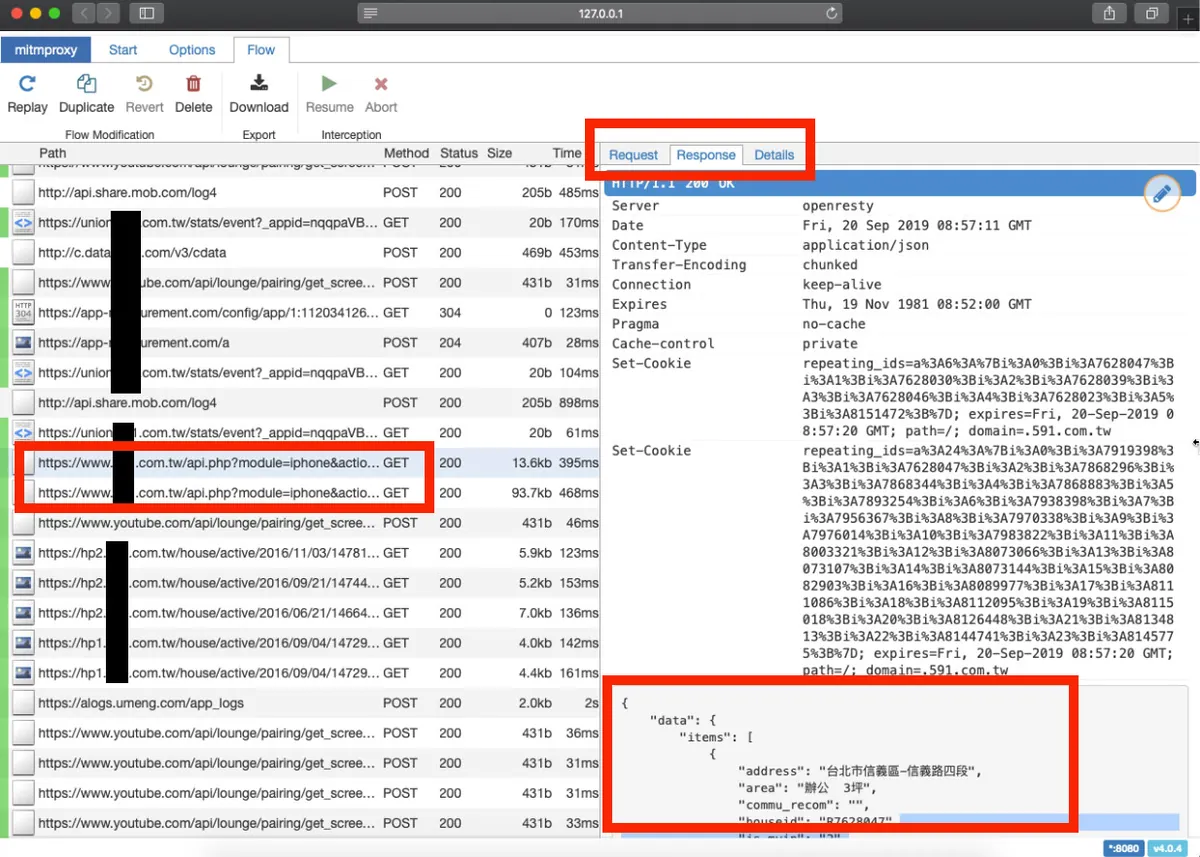
Return to mitmproxy to check the logs, use your detective skills to guess which API request record is the one we want, and then view the details!
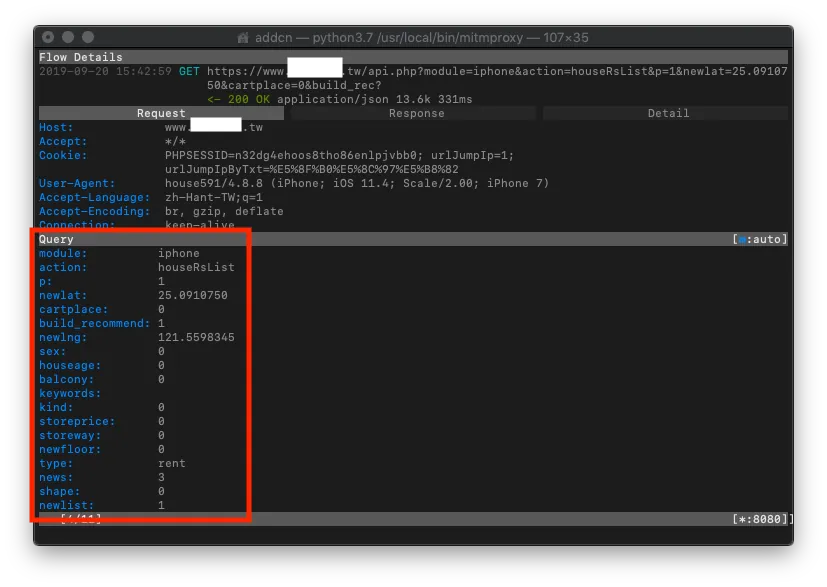
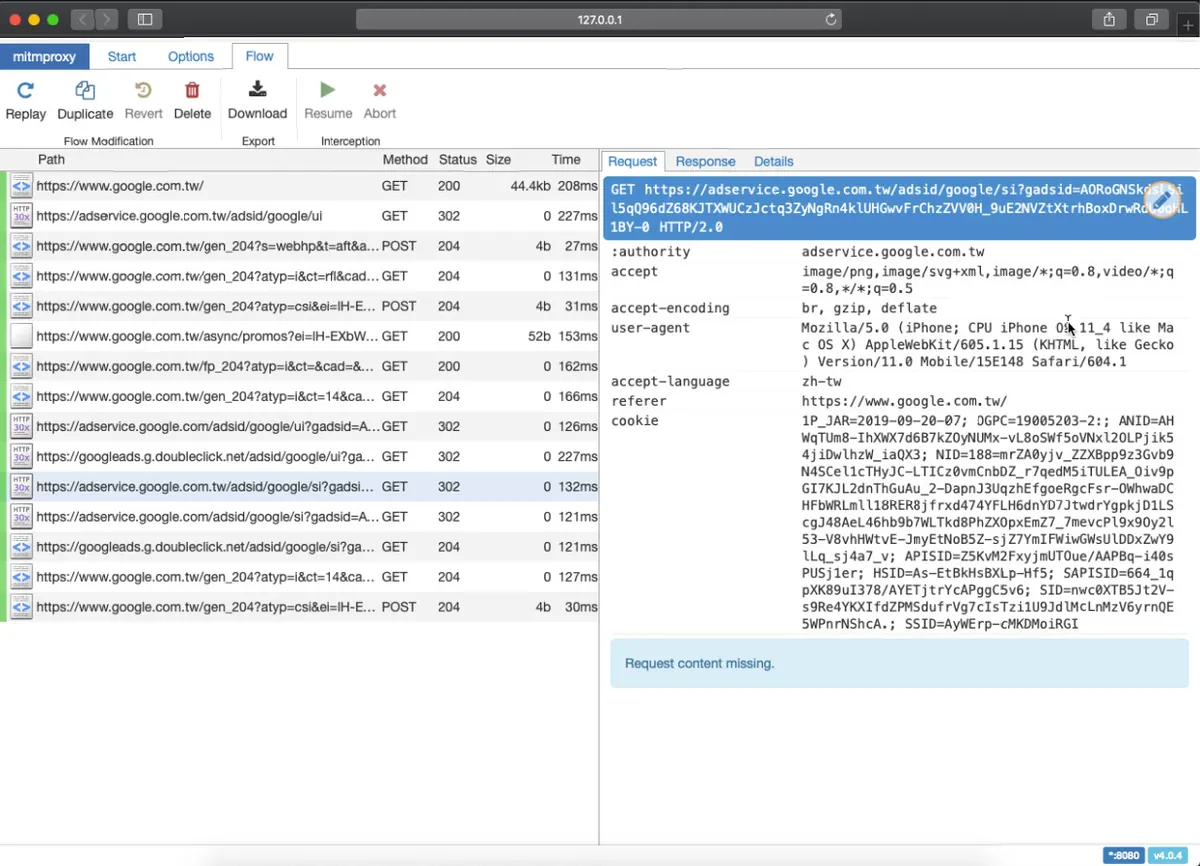
Request
In the Request section, you can see which parameters were passed in the request.
Use “e” to edit and “r” to resend, then observe the Response to guess the purpose of each parameter!
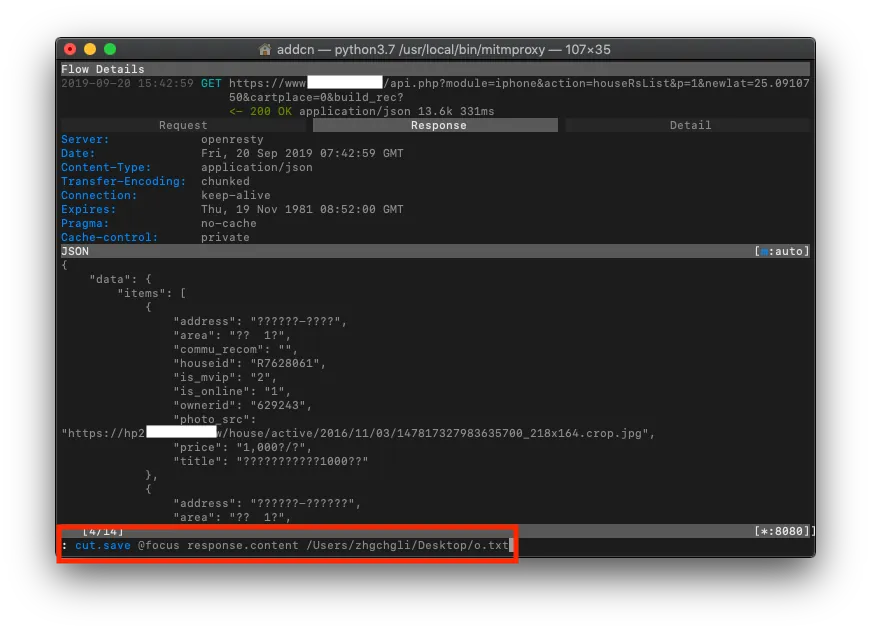
Response
Response can also directly obtain the raw returned content.
🛑If the response content is a bunch of encoded data; sorry, it means the app may be encrypting or decrypting again, and this method cannot be used to sniff it. Please scroll down directly to the section on how to protect🛑
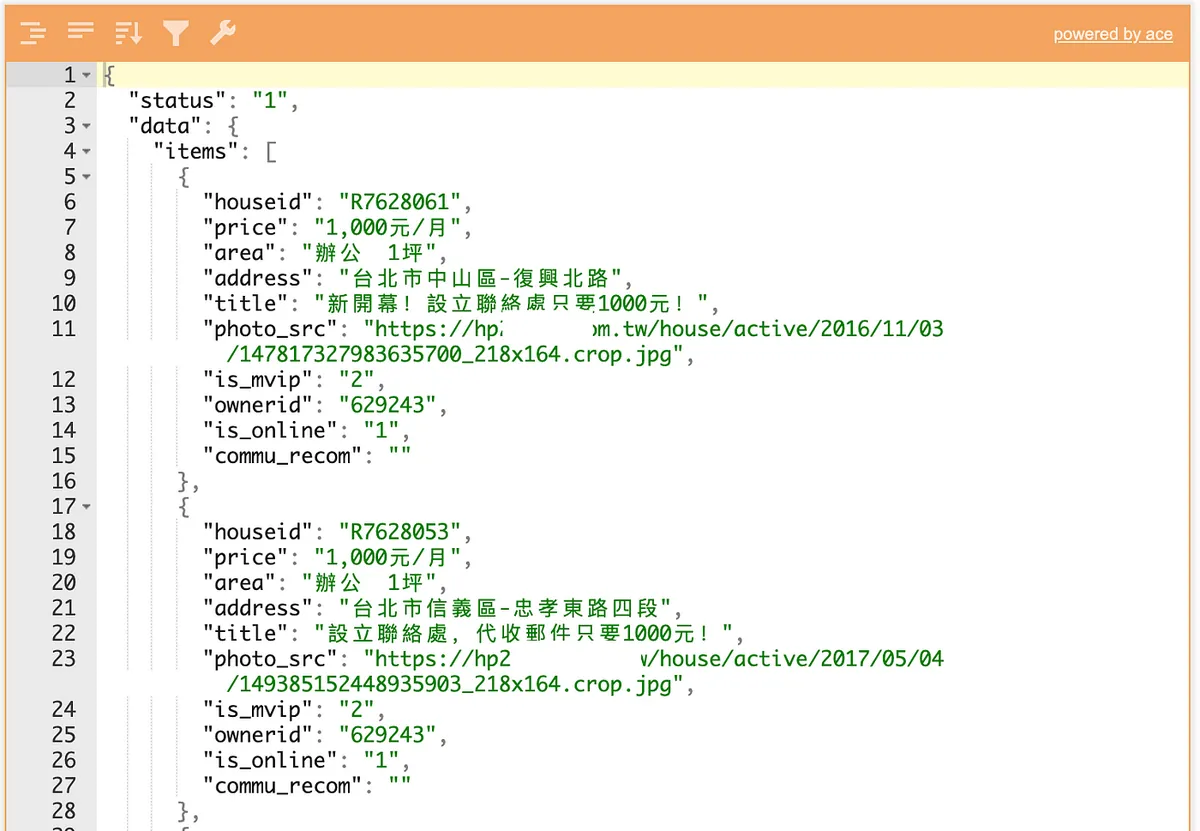
Hard to read? Chinese characters garbled? No problem. You can export as a text file to the desktop using “b,” then copy the content to Json Editor Online for parsing!
**Or directly use mitmweb to browse and operate via the web GUI*
mitmweb
After sniffing, observing, filtering, and testing, you can understand how the app API works, allowing you to use it for data scraping with crawlers.
*After collecting the required information, remember to close mitmproxy and set your phone’s network proxy back to automatic to use the internet normally.
How Should the APP Protect Itself?
If the app stops working or returns encoded content after attaching mitmproxy, it means the app has protection implemented.
Method (1):
Basically, the certificate information is embedded in the app. If the current HTTPS certificate does not match the one in the app, access is denied. For more details, you can see here or look for resources related to SSL Pinning. The downside is that you need to pay attention to the certificate’s validity period!
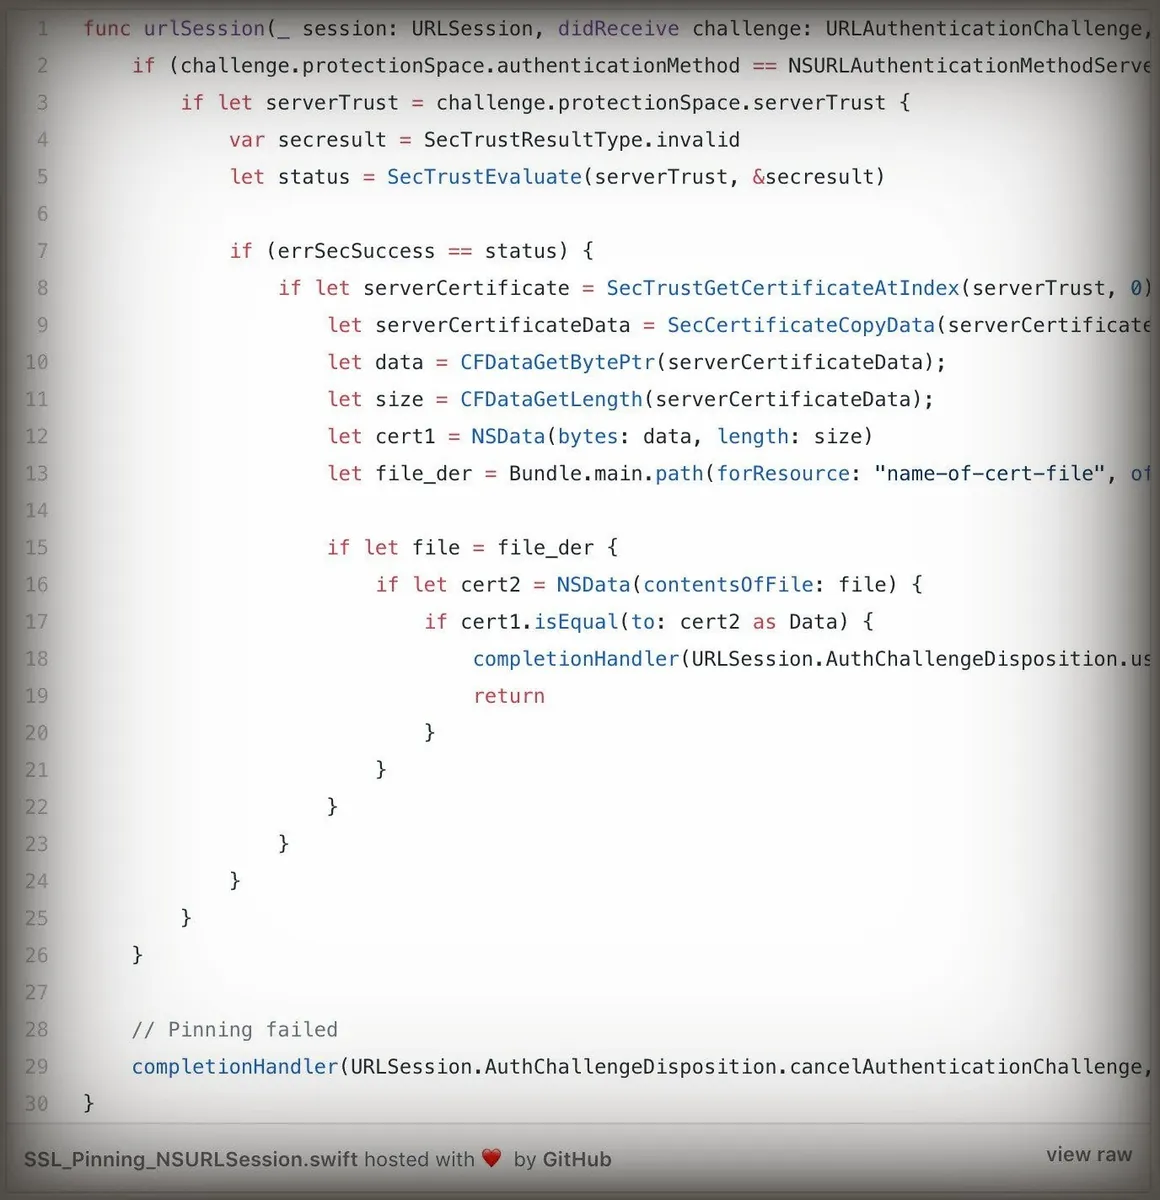
https://medium.com/@dzungnguyen.hcm/ios-ssl-pinning-bffd2ee9efc
Method (2):
Before data transmission, the APP performs encoding and encryption. The API backend decrypts the data to get the original request content; the API response is also encoded and encrypted first. The APP decrypts the received data to obtain the response content. The process is tedious and resource-consuming but is indeed a method; as far as I know, some digital banks use this approach for protection!
However….
Method 1 still has a bypass: How to Bypass SSL Pinning on iOS 12
Method 2: Obtain the encryption key for encoding through reverse engineering
⚠️ Not 100% Secure ⚠️
Or just dig a hole for it to crawl through, collecting all kinds of evidence along the way, then let the legal team handle it (?)
The same phrase:
“NEVER TRUST THE CLIENT”
More Ways to Use mitmproxy:
1. Using mitmdump
Except for mitmproxy and mitmweb, mitmdump can directly export all records to a text file.
1
mitmdump -w /log.txt
And you can use Method (2) Python script to set and filter traffic:
1
mitmdump -ns examples/filter.py -r /log.txt -w /result.txt
2. Using Python to Set Request Parameters, Access Control, and Redirect:
1
2
3
4
5
6
7
8
9
10
11
12
13
from mitmproxy import http

def request(flow: http.HTTPFlow) -> None:
    # pretty_host takes the "Host" header of the request into account,
    # which is useful in transparent mode where we usually only have the IP
    # otherwise.

    # Request parameter setting example:
    flow.request.headers['User-Agent'] = 'MitmProxy'

    if flow.request.pretty_host == "123.com.tw":
        flow.request.host = "456.com.tw"
    # Redirect all visits from 123.com.tw to 456.com.tw
Redirect Example
Add parameters when enabling mitmproxy:
1
2
3
4
5
mitmproxy -s /redirect.py
or
mitmweb -s /redirect.py
or
mitmdump -s /redirect.py
Filling the Gap
When using mitmproxy to observe requests with HTTP 1.1 and Accept-Ranges: bytes, Content-Range for continuous partial resource retrieval over a persistent connection, it waits until the entire response is received before displaying it, rather than showing the segments or continuing the download over the persistent connection!
Further Reading
Using a Check-in Reward APP as an Example to Create a Daily Auto Check-in Script
Revealing a Clever Website Vulnerability Discovered a Few Years Ago
Postscript
Because I don’t have domain permissions, I can’t obtain the SSL certificate information, so I can’t implement it; from the code, it doesn’t seem difficult. Although there’s no 100% secure method, adding an extra layer of protection can at least improve security. Further attacks would require a lot of time to study and should deter about 90% of crawlers!
This article might lack substantial content as I neglected Medium for a while (went off to play with a DSLR). This is mainly a warm-up post for this weekend (2019/09/21–2019/09/22) at iPlayground 2019; looking forward to this year’s sessions 🤩 and hoping to produce more quality articles after returning!
[Article updated on 2019/02/22] What is the experience of iPlayground 2019?
If you have any questions or feedback, feel free to contact me.

This post was originally published on Medium (View original post), and automatically converted and synced by ZMediumToMarkdown.