iOS Shortcut Automation|Auto-Forward SMS & Create Reminder Tasks Effortlessly
Discover how iOS Shortcuts automate forwarding specific SMS to parents and generate package pickup and credit card payment reminders, saving time and ensuring you never miss important tasks.
点击这里查看本文章简体中文版本。
點擊這裡查看本文章正體中文版本。
This post was translated with AI assistance — let me know if anything sounds off!
iOS Shortcut Automation Use Cases — Automatically Forward SMS and Create Reminder Tasks
iOS Using Shortcuts: Automatically Forward Specific SMS to Line and Automatically Create Package Delivery and Credit Card Payment Reminder Tasks in a Few Simple Steps
{:target="_blank"}](/assets/309d0302877b/1*UKv5iaN9jJTI0ug4Zrrthw.webp)
Photo by Jakub Żerdzicki
Background
Shortcut (formerly known as Workflow) is a new feature introduced in iOS 12; it allows users to create a series of tasks that can be executed with one tap and set to trigger automatically in the background.
Besides the built-in Shortcuts feature in iOS, Apple has also opened Siri Shortcut / App Intents to developers in recent years, allowing third-party apps to integrate some functions into Shortcuts for users to combine and use.
The conditions for automatic execution are currently limited to iOS itself or its own apps, such as: specific time, arriving at or leaving a location, detecting NFC, receiving messages, emails, or connecting to Wi-Fi, battery level, Do Not Disturb mode, detecting sound, and so on.
Apple’s own services do not require jailbreaking like early SMS forwarding; the Shortcuts feature works without jailbreaking or installing strange third-party apps.
There are already many online resources explaining how to use Shortcuts and providing ready-made scripts, so this article will not go into detail.
iOS’s cross-device message forwarding feature (Settings -> Messages -> Message Forwarding) only works for devices signed in with the same Apple ID. Therefore, we need to use Shortcuts to help us forward specific messages.
This article only introduces 3 practical, convenient, and simple use cases that I find very useful.
Scenario 1 — Automatic SMS Forwarding
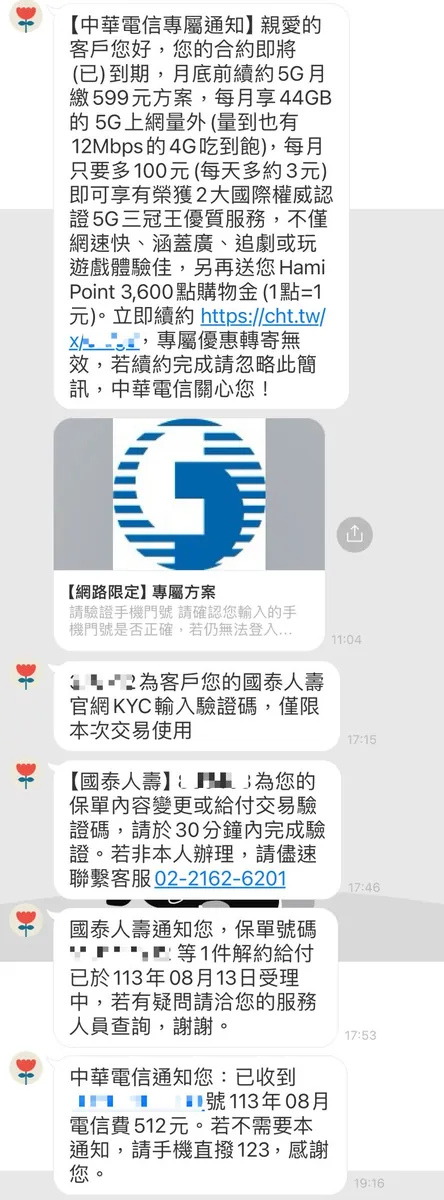
In this era full of scam text messages, I worry that elderly family members or children might accidentally enter information and get scammed. Also, elders may not understand the SMS verification process for account security and need remote help to receive messages and complete verification. Additionally, I am concerned that kids might use their phones for unauthorized activities.
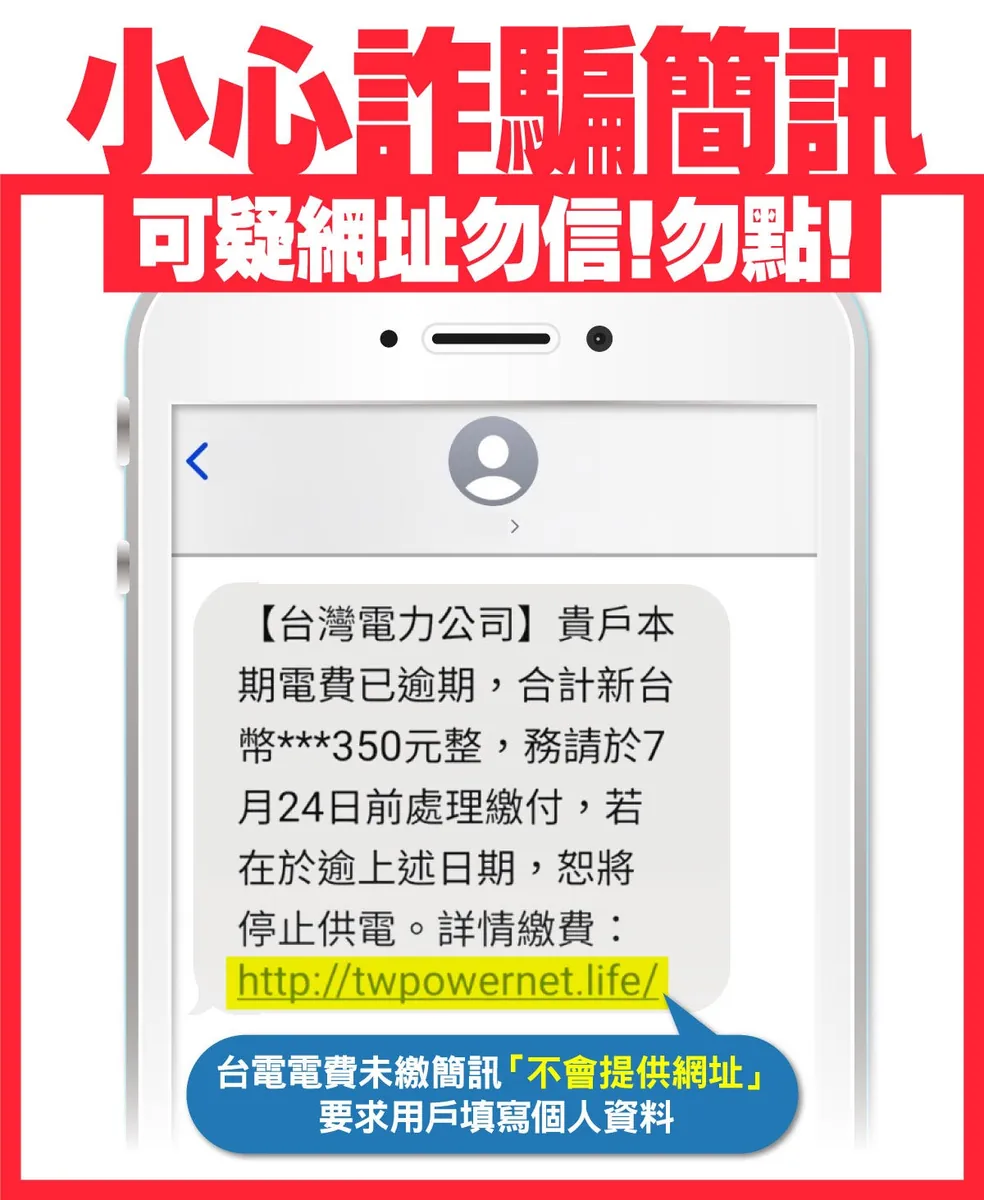
https://branch.taipower.com.tw/d112/xmdoc/cont?xsmsid=0M242581319225466606&sid=0N209616847897374705
Effect
Set the conditions as follows:
When receiving a text message containing “http,” forward the message “content” to me on Line.
When receiving an SMS containing “notification,” forward the message “content” to me on Line.
When receiving an SMS containing “verification code,” forward the message “content” to me on Line.
When receiving an SMS containing “verification code,” forward the message “content” to me on Line.
Tested and confirmed that sending works correctly even when the phone is locked and in standby mode.
Setup Method
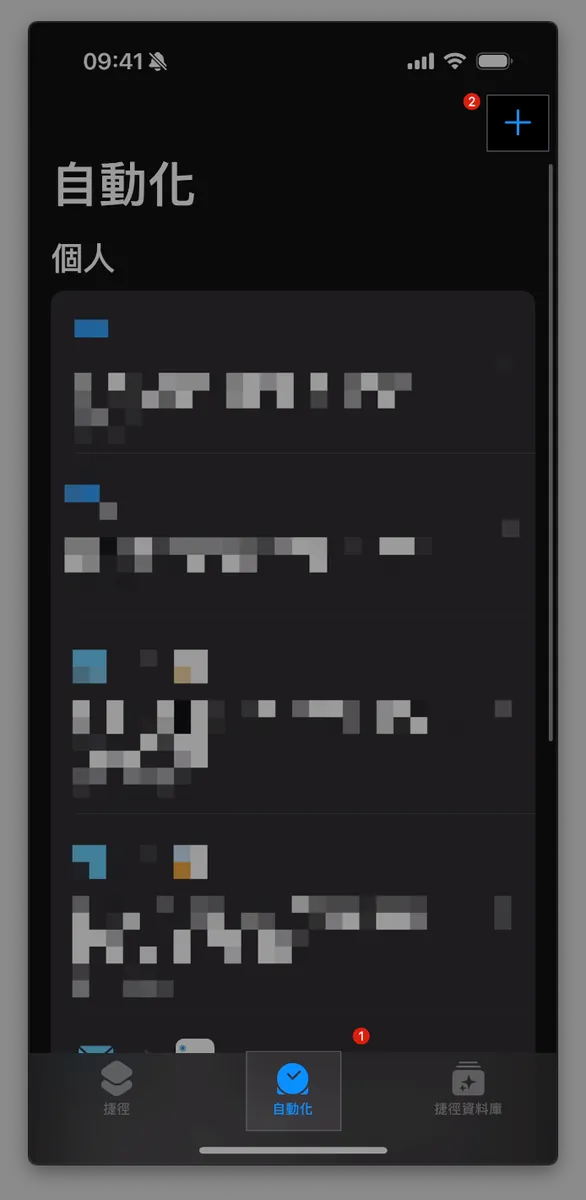
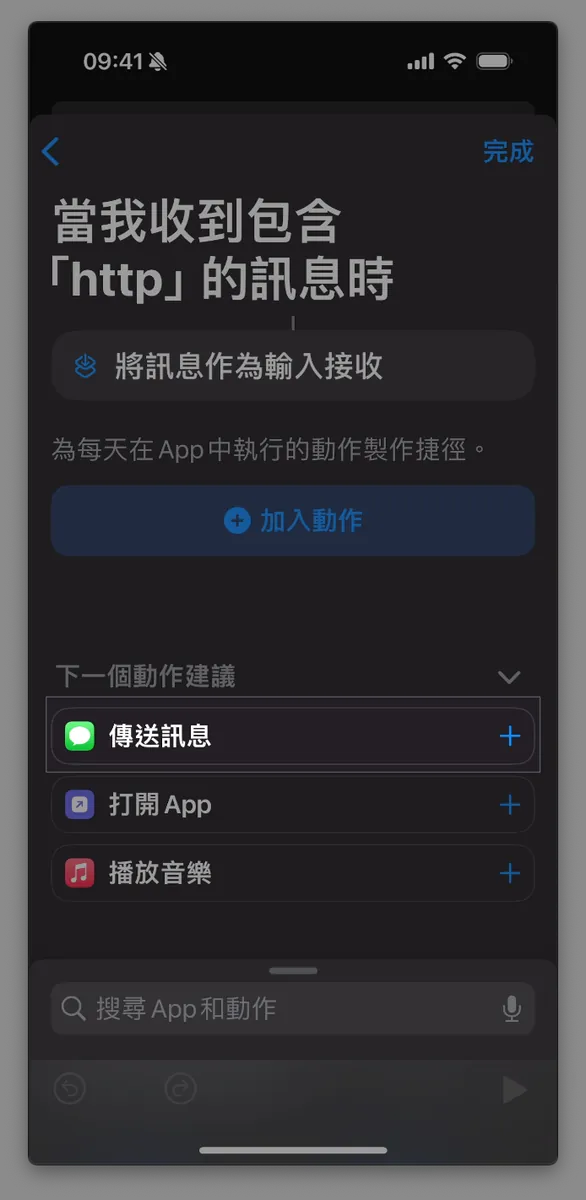
1. Install & Open the Shortcuts App
2. Switch to the “Automation” tab, tap the “+” at the top right, then scroll down to find “Messages”
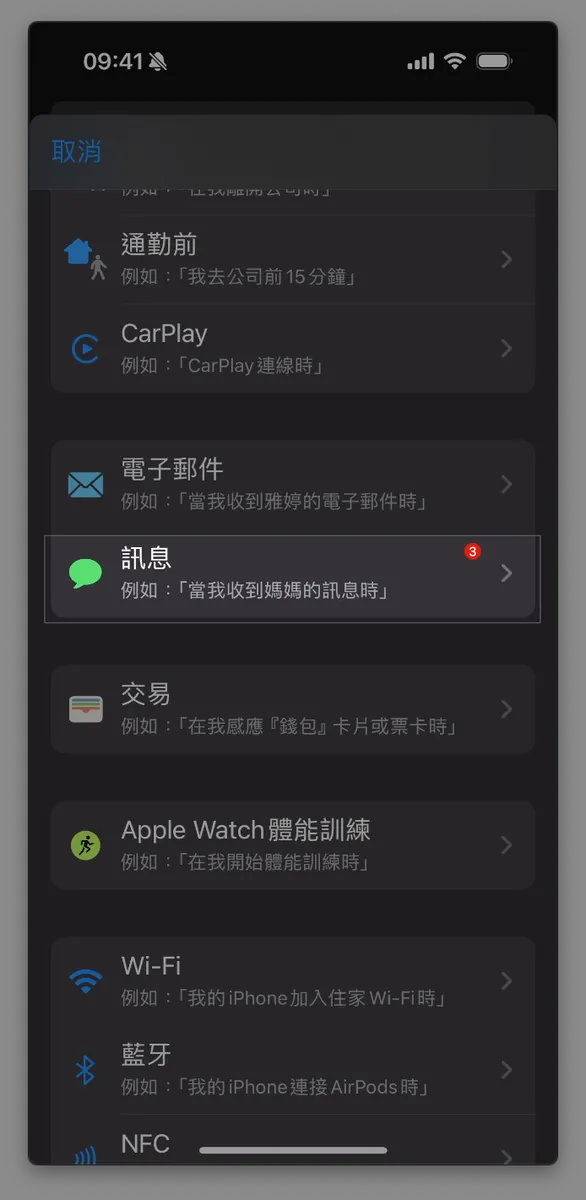
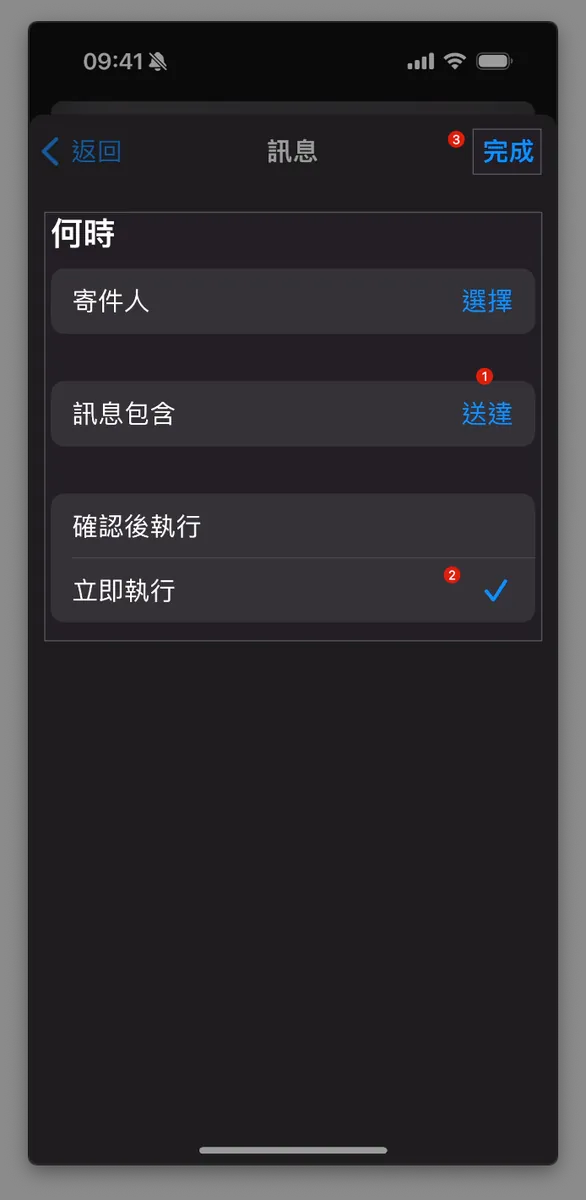
3. Set Message Conditions
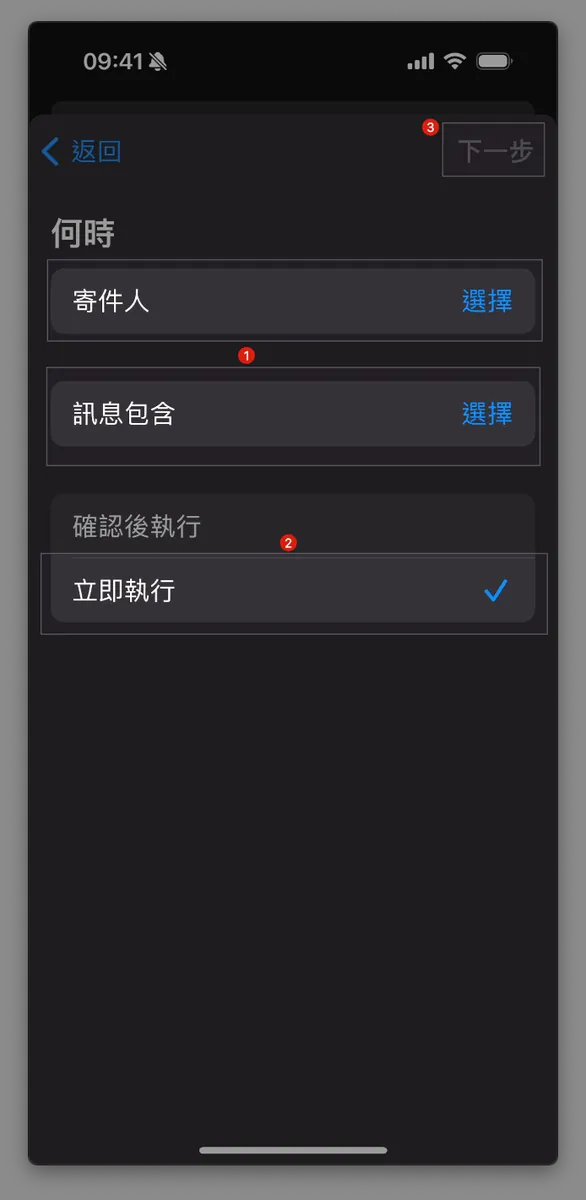
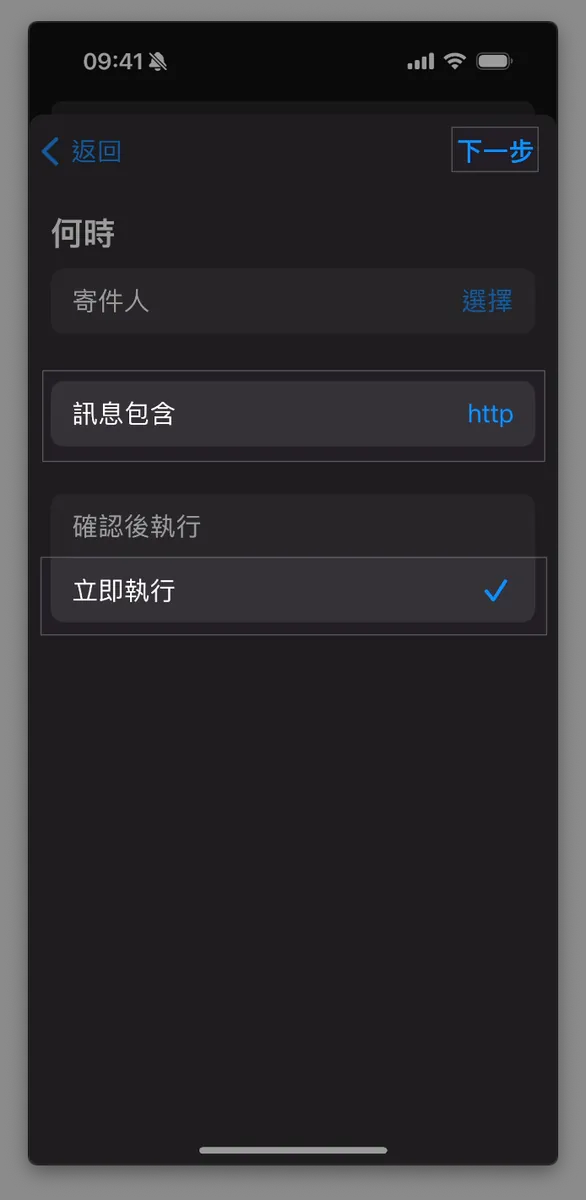
“Message contains”:
http( = All messages with URLs will be forwarded )
Create separate shortcuts for multiple keywords."Confirm and Execute"changed to"Execute Immediately"Click
Next
When — Other Settings:
“Sender”: Multiple, but need to add to contacts
“Message contains” and “Sender” conditions require at least one to be set, so it is not possible to process all messages without setting any conditions
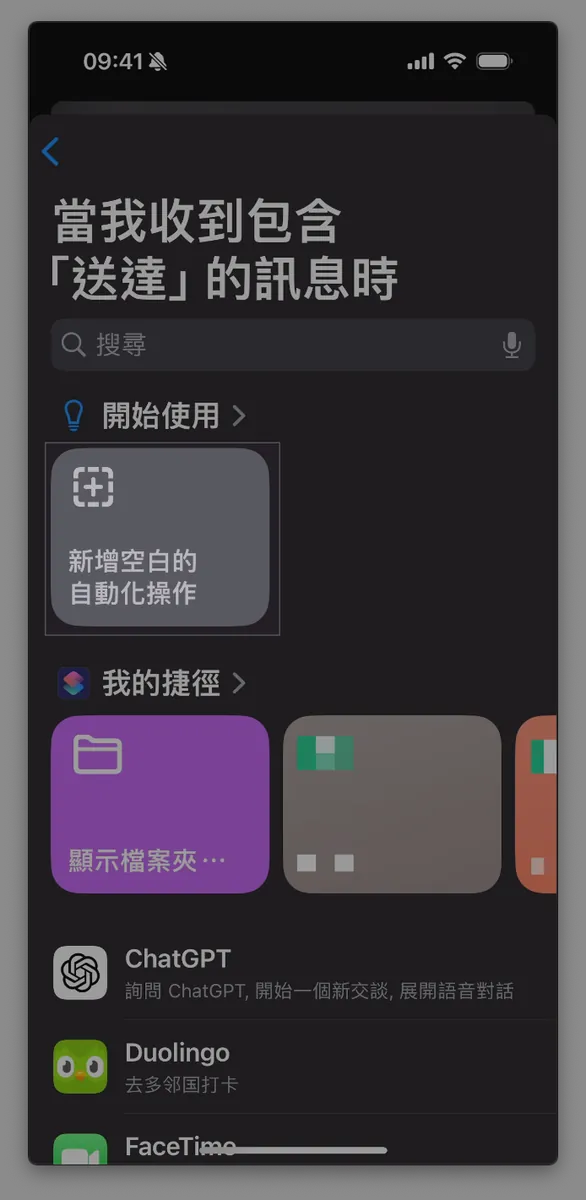
4. Add Automation Actions
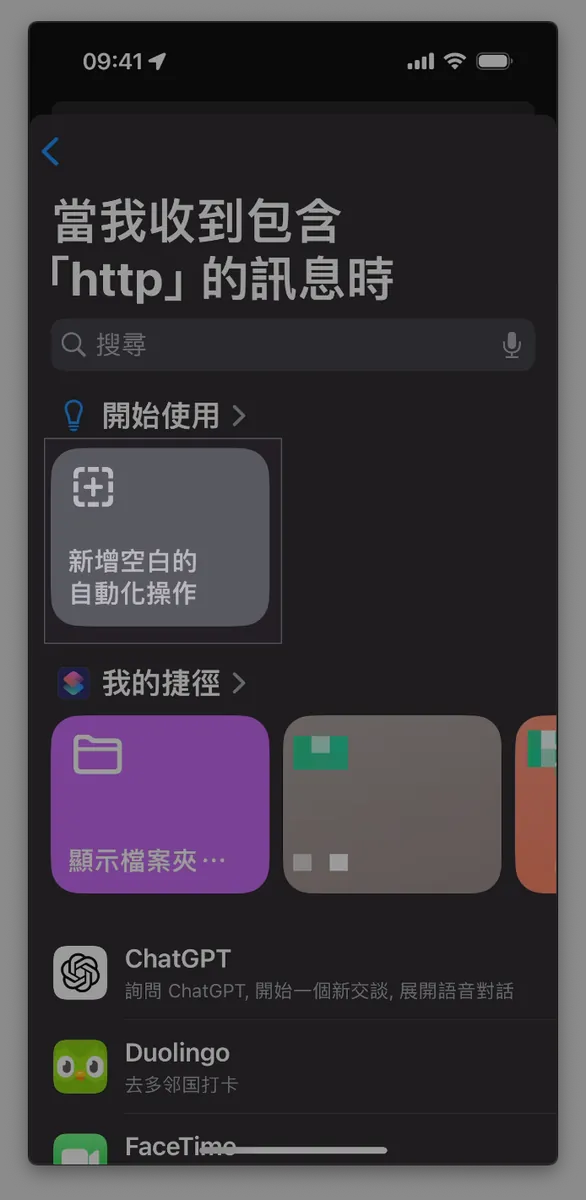

Select
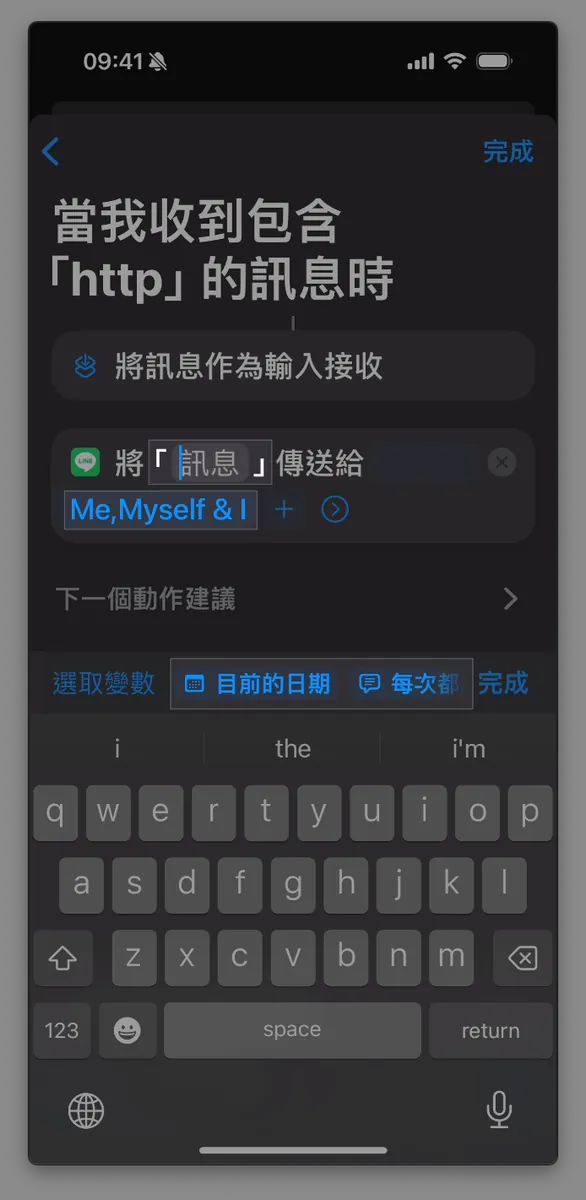
Add Blank AutomationIf you want to share to Line messages, type
「line」in the search box to find Line’s shortcut features, then select Line’s「Send Message」and choose the target to send.
Here, only the four most recent chat contacts or groups will appear. If your target does not show up, you can first go back to Line and send a few messages to the target contact or group, then come back and it will appear.
The feature to select phone numbers from contacts is ineffective when sending messages in Line.
- Similarly, you can also use the “Send Message” or “Send Email” actions (as shown in the third image) to forward the received message content to SMS (if iCloud Messages is not enabled, SMS fees may apply) or Email.
After Adding a Recipient
First, click
Send "Message" to "XXX", then the"Message"input box.Swipe right to find & click
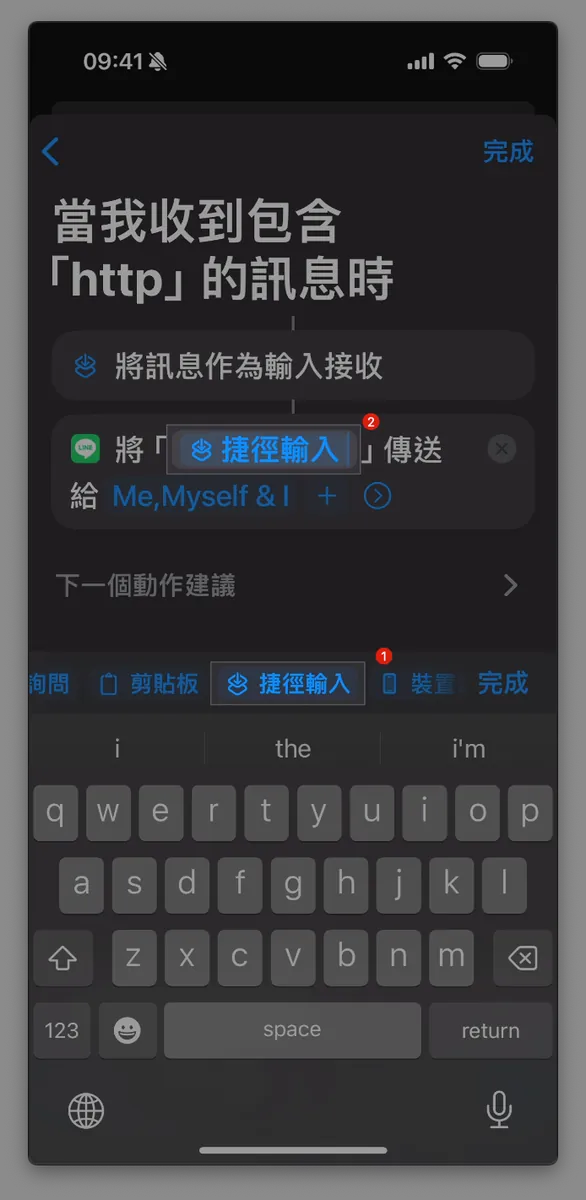
「Shortcut Input」Go back to the top and click the
「Shortcut Input」input box ofSend 「Shortcut Input」 to 「XXX」.Exit the dropdown menu below and change the original selection from
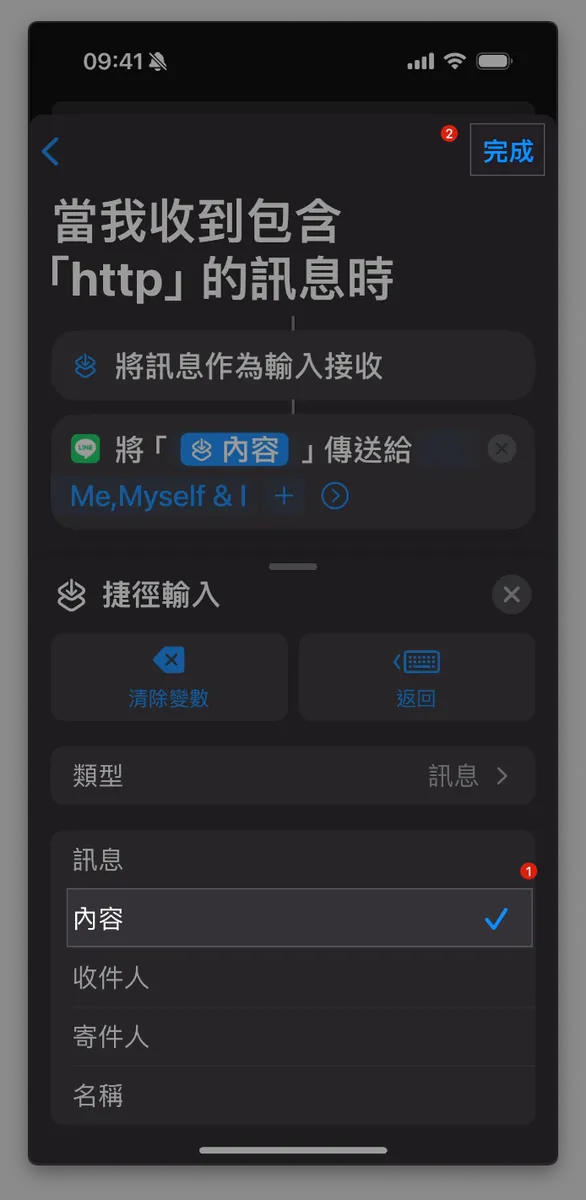
“Message”to“Content”.Click the “X” next to the menu to close it
Click the “Done” button in the top right corner
If you want to change the recipient to XXX, first click the X on the right to remove the entire Line action, then add the Line send message action again with the new recipient.
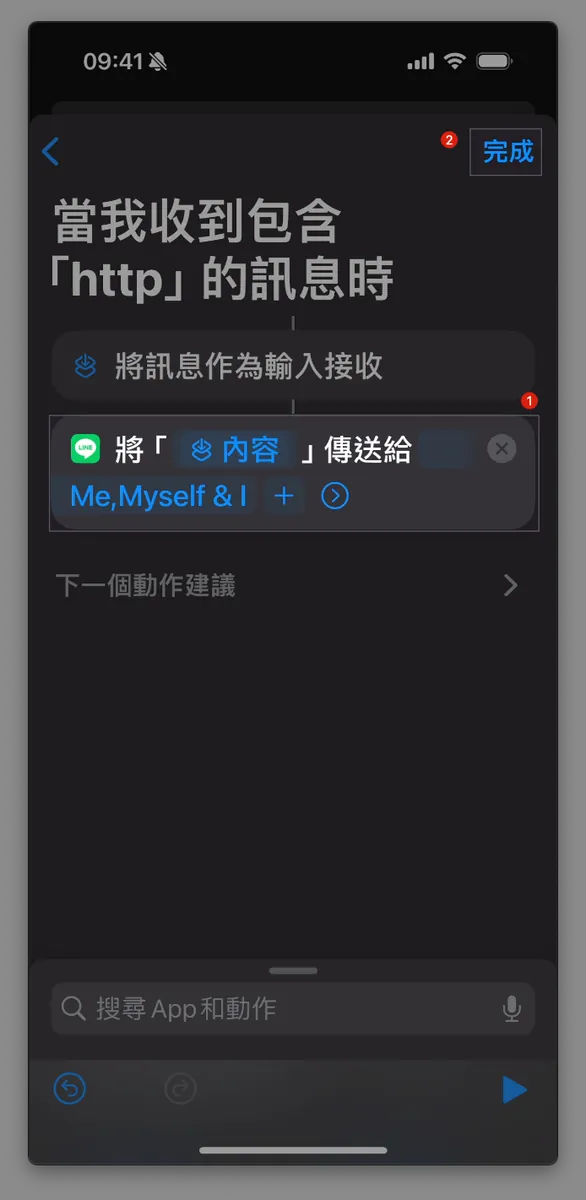
Confirm the final setting result as:
When I receive a message containing "XXX", take the message as input and have Line send the "content" to "XXX"No problem, tap “Done” at the top right corner.
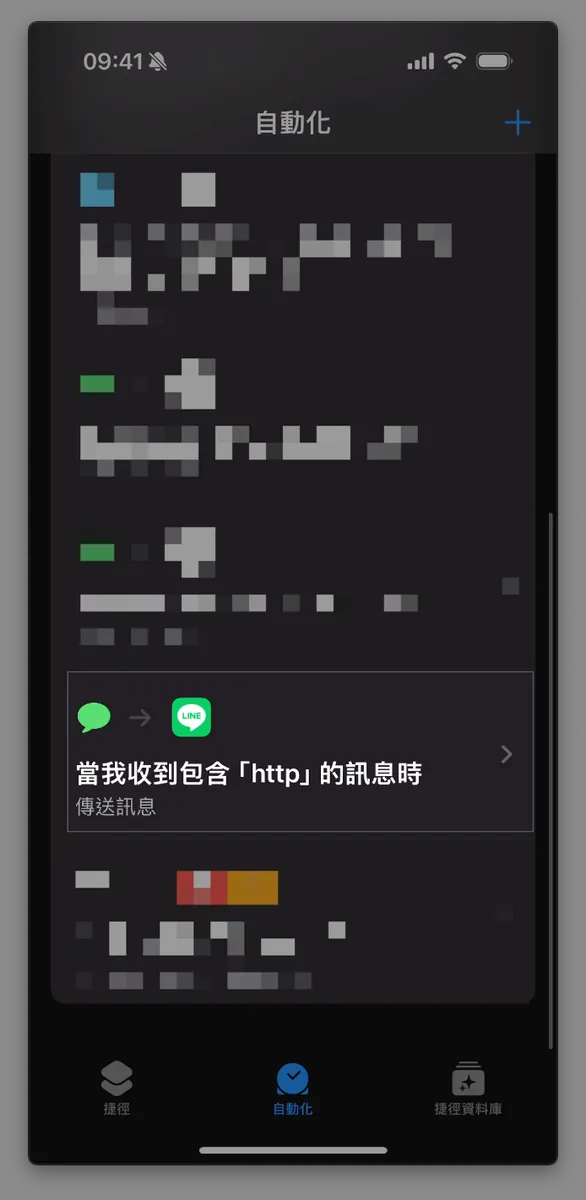
If tapping Done does nothing, it might be an iOS bug. You can ignore it and just tap Back to return to the home page.Returning to the Shortcuts automation homepage allows you to view, pause, or edit this shortcut.
Done!
Just wait for new messages to arrive; if they contain the specified keywords, they will be automatically forwarded (even if the phone is locked). Due to current feature limitations, each keyword requires its own shortcut, so if a single message contains multiple keywords, it will be sent twice.
Scenario 2 — Automatically Create Reminder To-Do When Package Arrives at Convenience Store
I currently use Apple’s built-in Reminders app to manage my daily to-do tasks, so I also want to integrate other reminders, such as package deliveries to convenience stores, credit card payment notifications, and more.
Effect

Set the conditions as follows:
Add a reminder when receiving a text message containing “已在” (Coupang uses “已在”)
Add a reminder when receiving a text message containing “delivered” (usually “delivered”)
Setup Instructions
1. Install & Open the Shortcuts App
2. Switch to the “Automation” tab, select the “+” at the top right, and scroll down to find “Messages”
3. Set Message Conditions
Following the previous introduction of automatic SMS forwarding conditions, here set the condition to Message content contains "delivered" and change to Execute immediately.
4. Add Automation Actions & Set Reminder Time
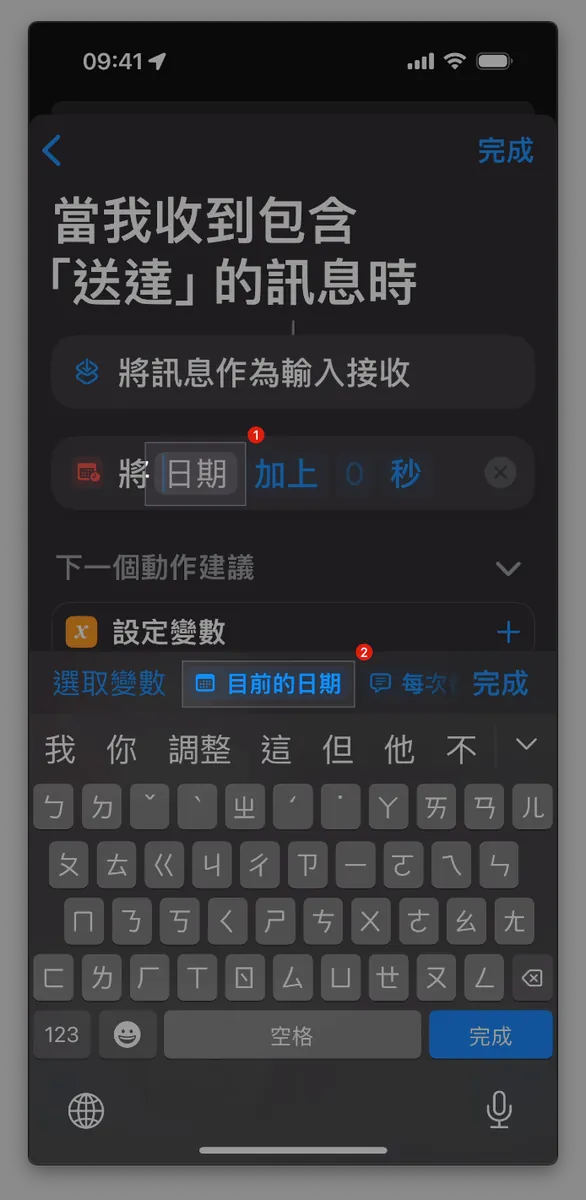
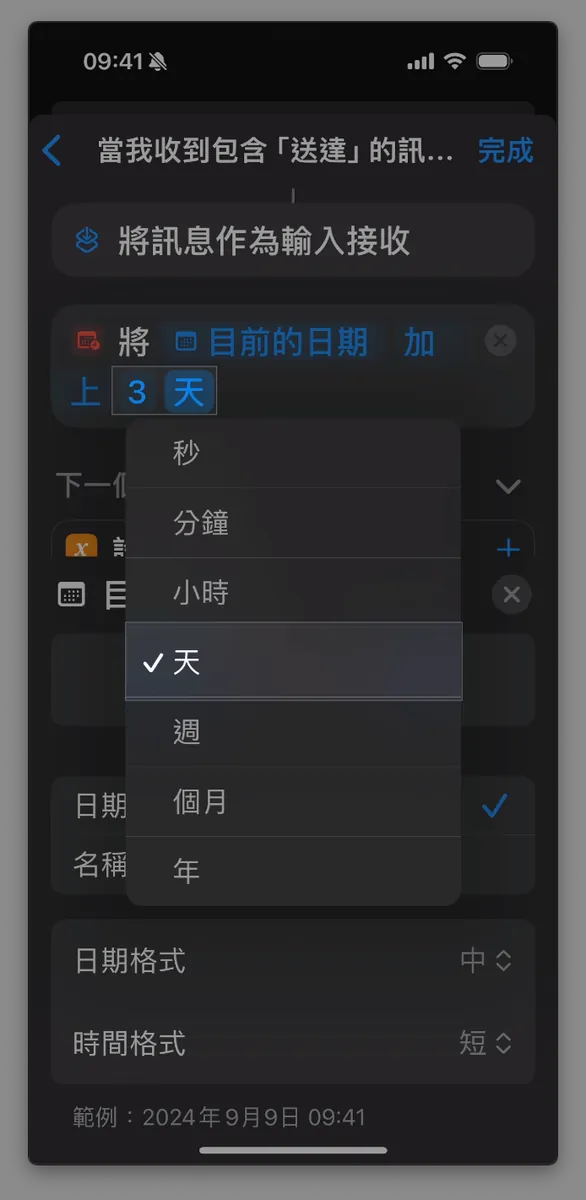
First, we need to set the reminder’s due date by creating a date variable that calculates the reminder time as the received message time plus a certain duration.
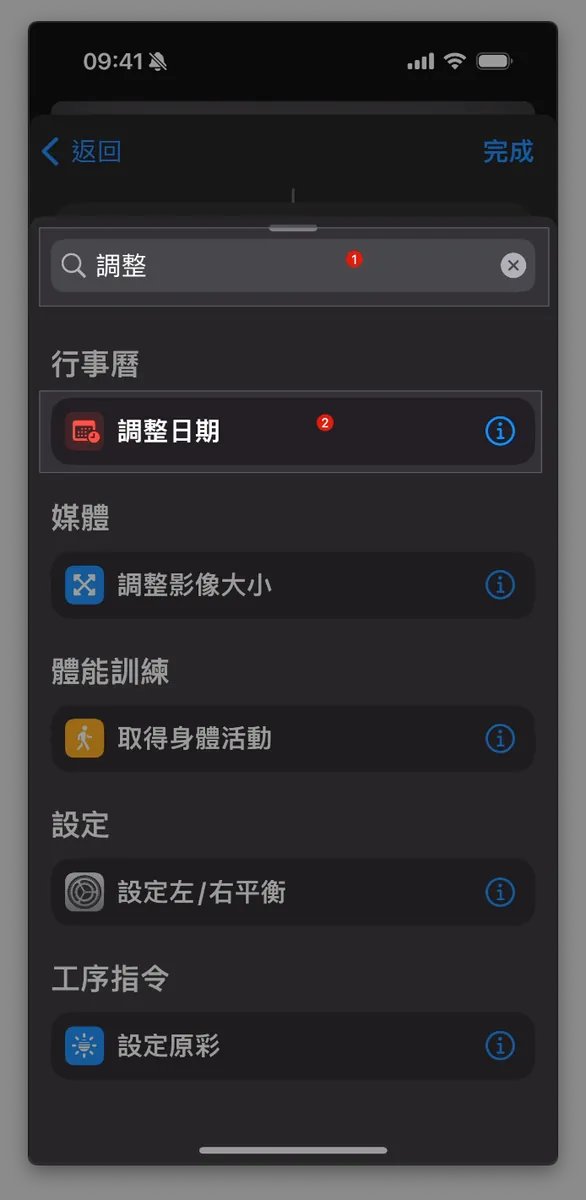
Choose
「Add Blank Automation」Search for
「調整日期」in the box below.Select
「Adjust Date」Select the input box for “Date” in the option
Add 0 seconds to "Date"Select the variable below and choose
「Current Date」Change the
“seconds”input box inAdd 0 “seconds”to“days”Enter the number of days before expiration you want to be reminded. Here, I enter 3 days.
Click the “X” next to the menu to close it
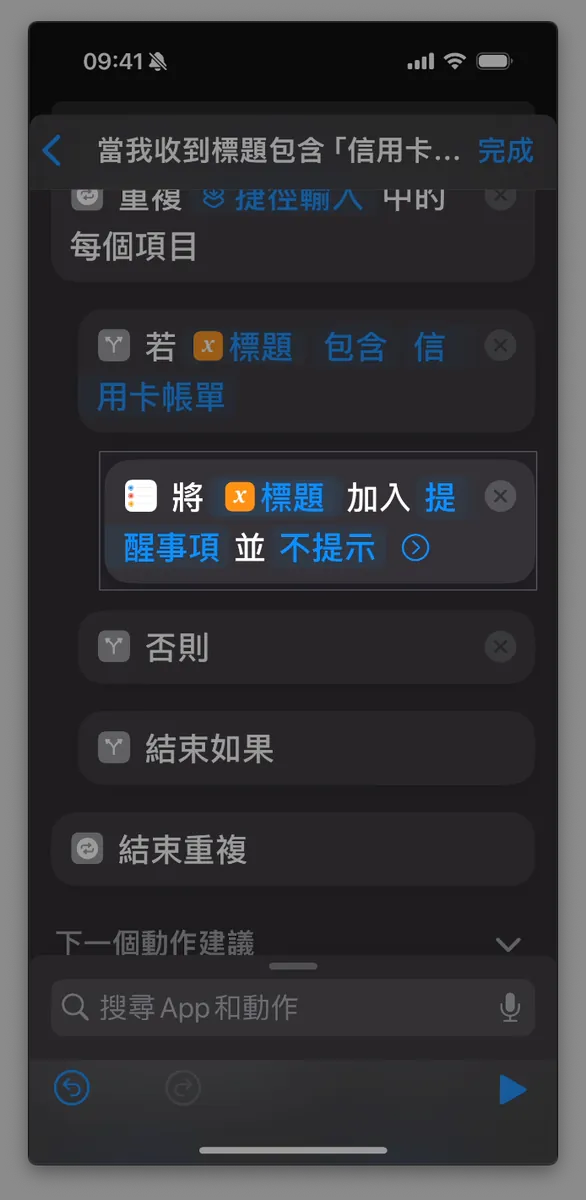
5. Add Reminder Action
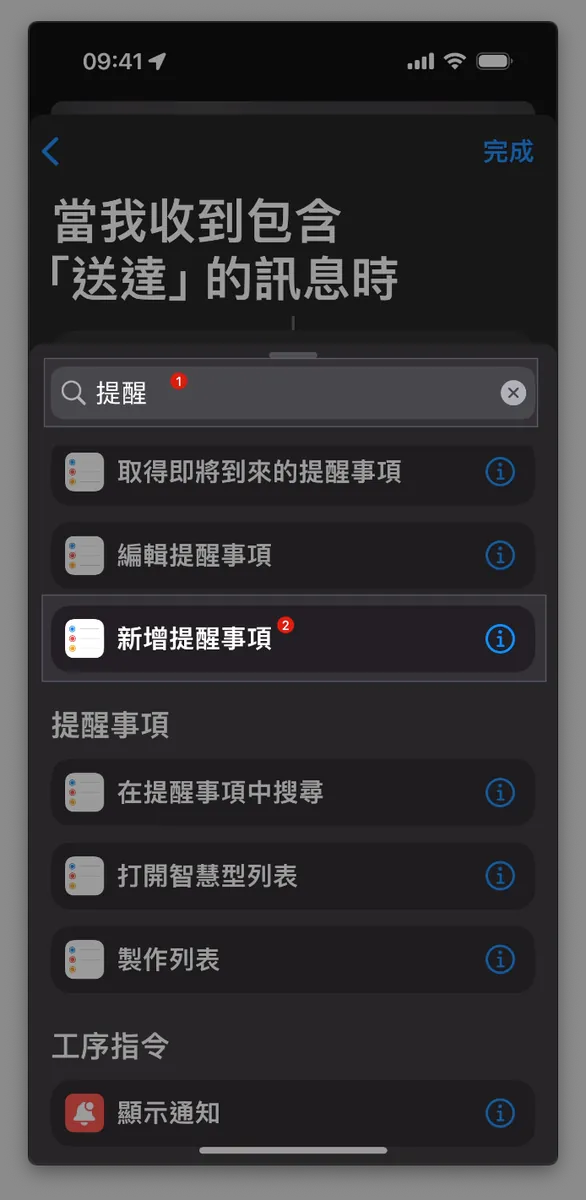
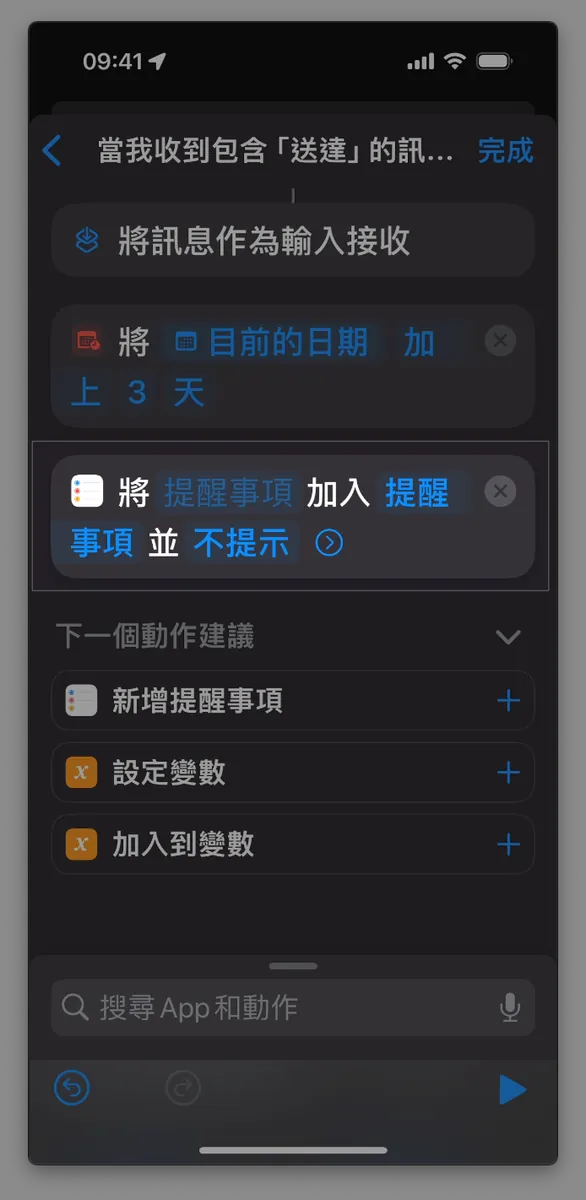
- In the search bar, type
"Reminders", scroll down, and click"Add Reminder"
After adding a “New Reminder”
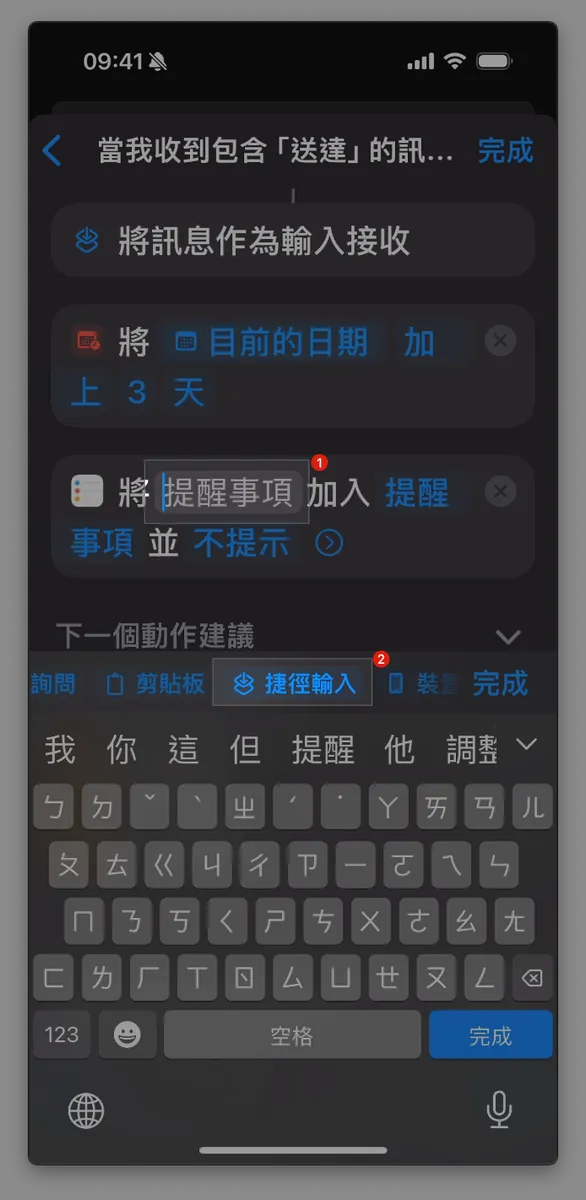
First, click the first
「提醒事項」input box inAdd "Reminders" to "Reminders" without prompting.Swipe right to find & click
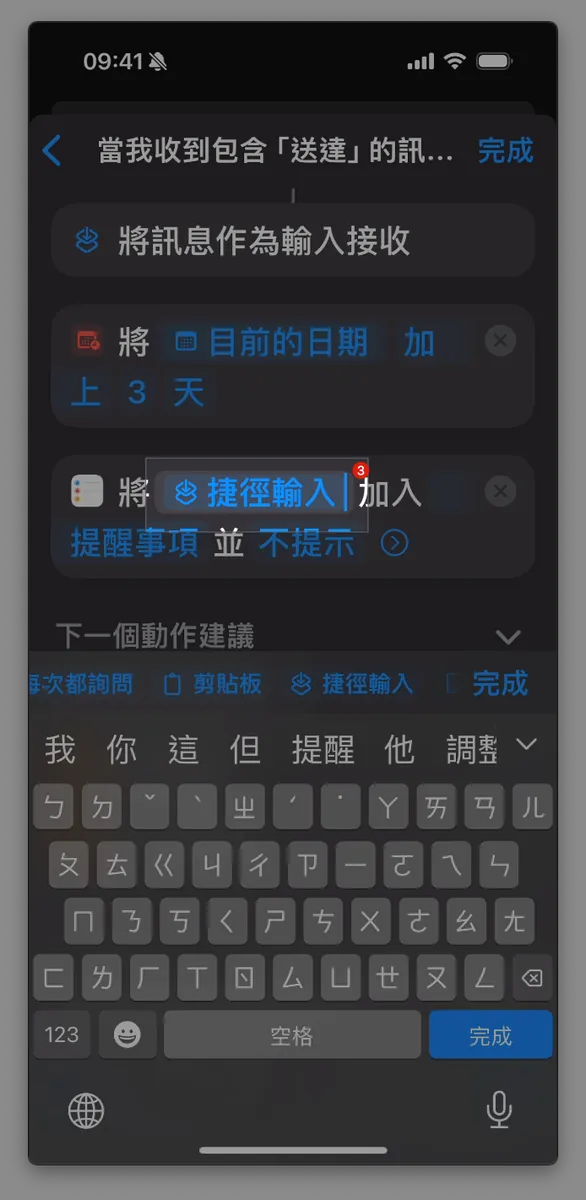
「捷徑輸入」Click the
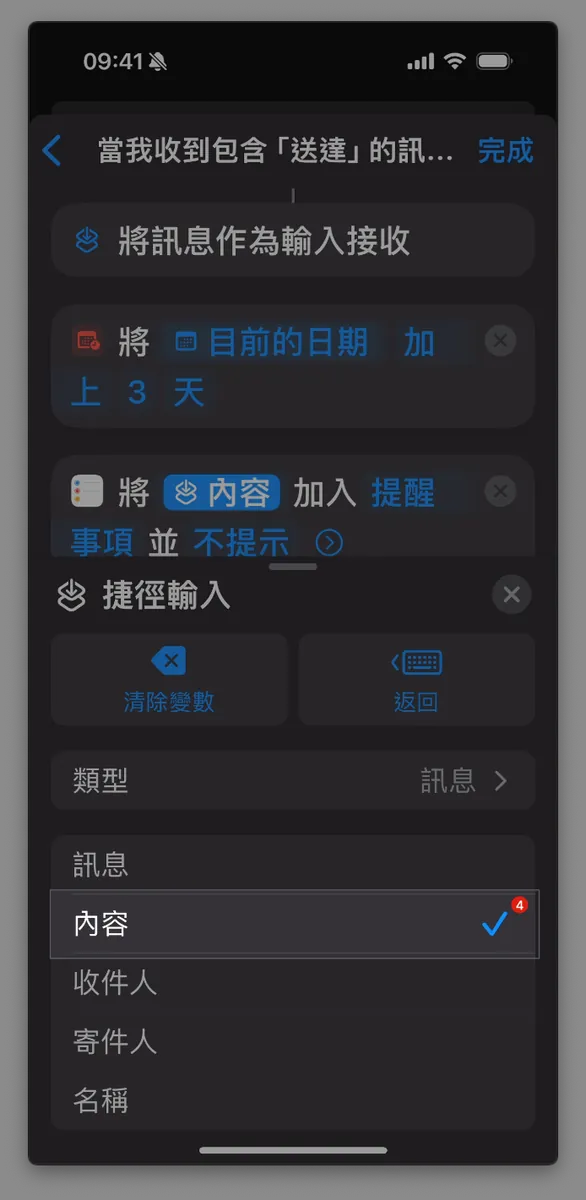
「Shortcut Input」input box inAdd "Shortcut Input" to "Reminders" without prompt.Open the dropdown menu below and change the original selection from
「訊息」to「內容」.Click the “X” next to the menu to close it
6. Set Reminder Notifications
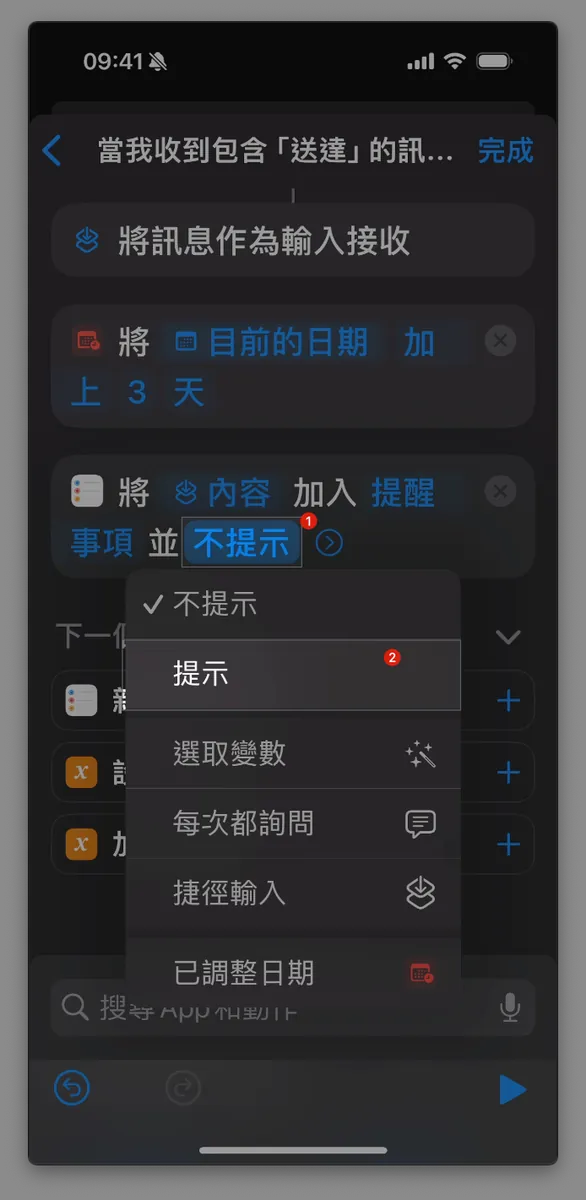
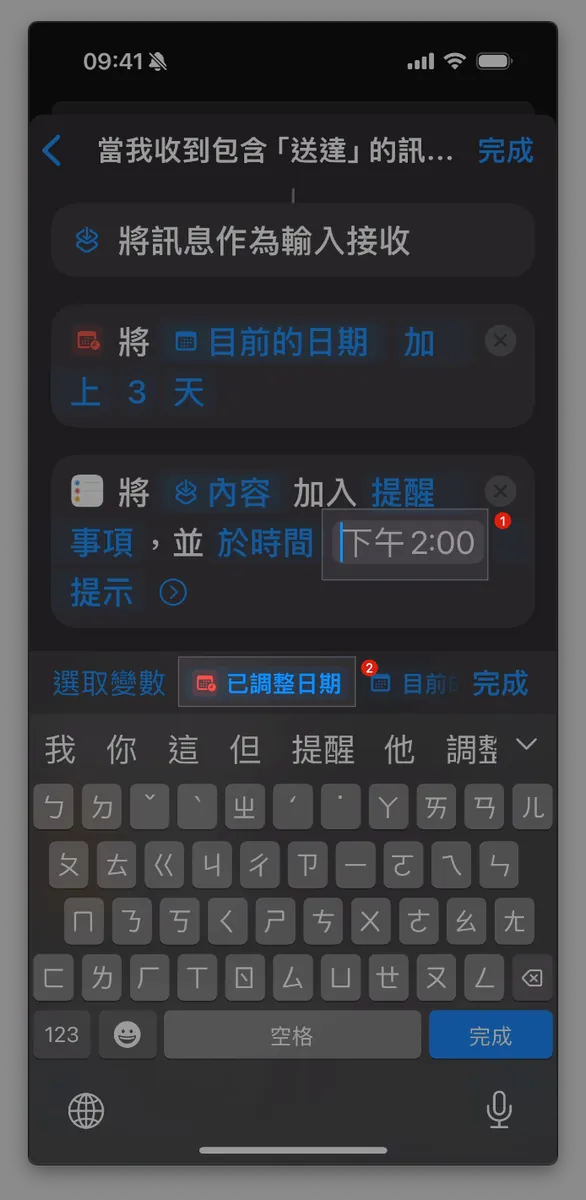
Change
「No Prompt」to「Prompt」Select the input box for
“2:00 PM”at the time“2:00 PM”, then choose the variable“Adjusted Date”Click the “X” next to the menu to close
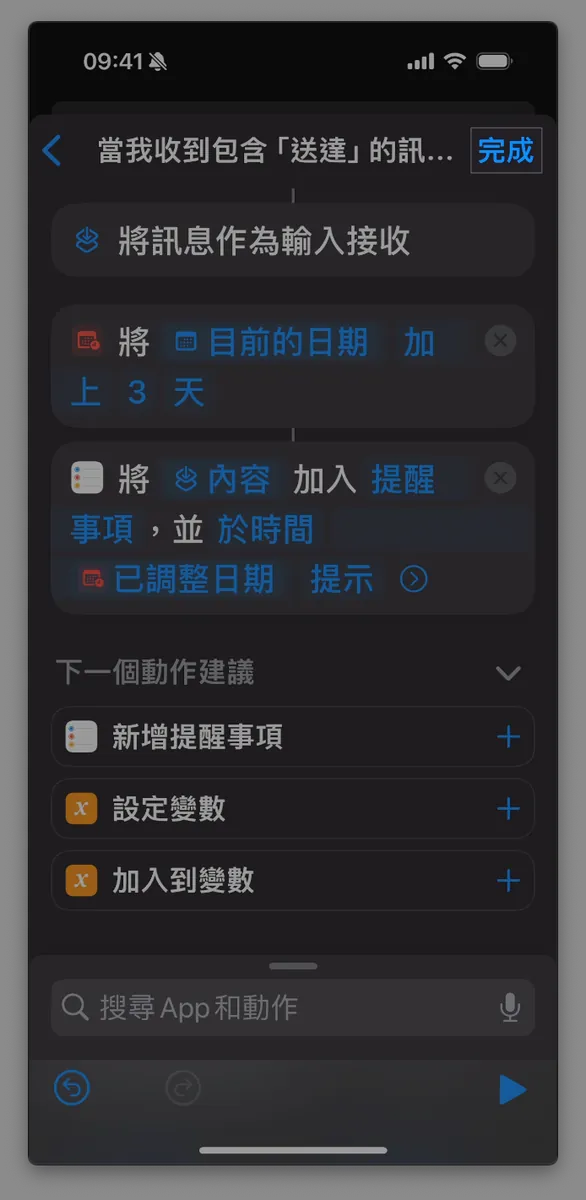
If everything is fine, tap “Done” at the top right corner.
If tapping Done has no response, it might be an iOS bug. You can ignore it and just tap Back to return to the home page.
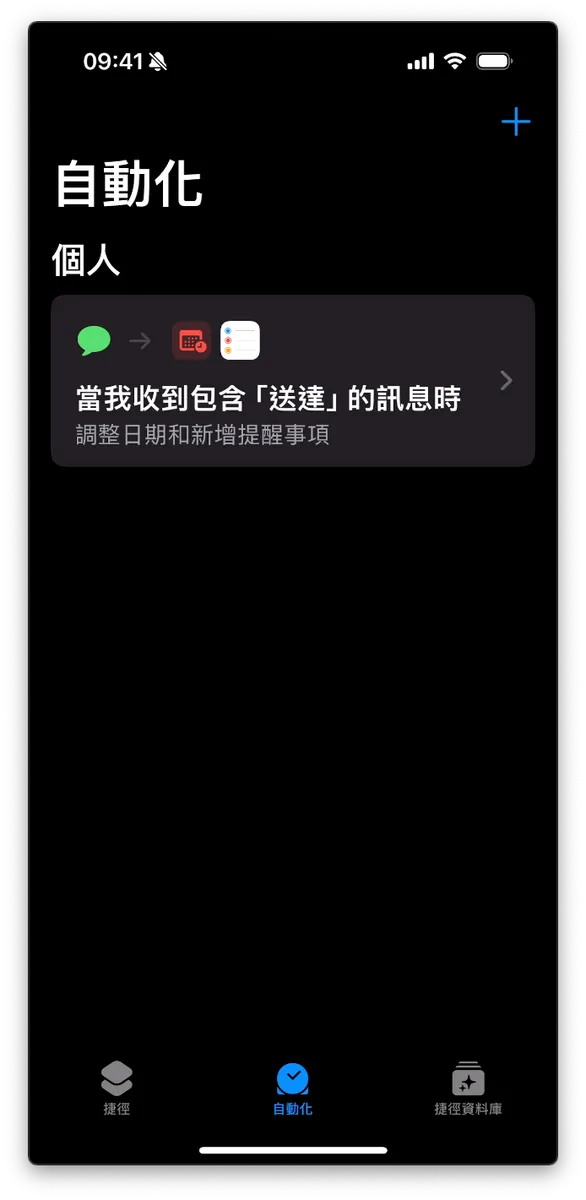
- Returning to the Shortcuts automation homepage lets you view, pause, or edit this shortcut.
Done!
As mentioned before, just wait for a new message to arrive. If it contains the specified keywords, a reminder will be created automatically (even if the phone is locked). Due to current feature limitations, each keyword requires a separate shortcut, so if one message contains multiple keywords, it will create reminders multiple times.
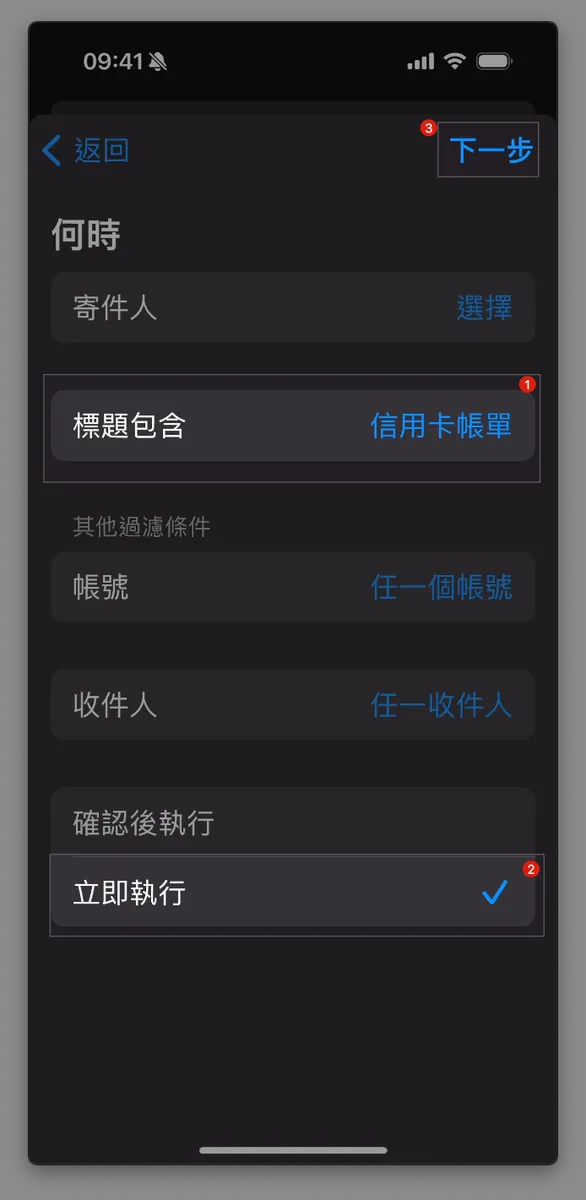
Scenario 3 — Automatically Create Reminder Tasks When Receiving Credit Card Bill Emails
Another lifestyle notification is the credit card bill alert; set it up similarly to SMS, so when an email is received, it can also trigger a shortcut automation to add a reminder. However, since automation features are not yet open to third-party apps, only Apple’s Mail App can be used to trigger it.
Effect

Set the conditions as follows:
- Add Reminder When Email Subject Contains “Credit Card Statement”
Please note that each company uses a different format Orz, some call it “Credit Card Electronic Statement,” others “Credit Card Electronic Reconciliation Statement,” and Cathay even calls it “Credit Card XXXX Year X Month Electronic Statement.”
Because Regex is not supported yet, only text matching can be used. As mentioned earlier, each keyword requires a separate shortcut.
1. Make sure you have installed the Mail App and completed your mailbox account login (Gmail is also supported)
2. Confirm Email Capture Settings
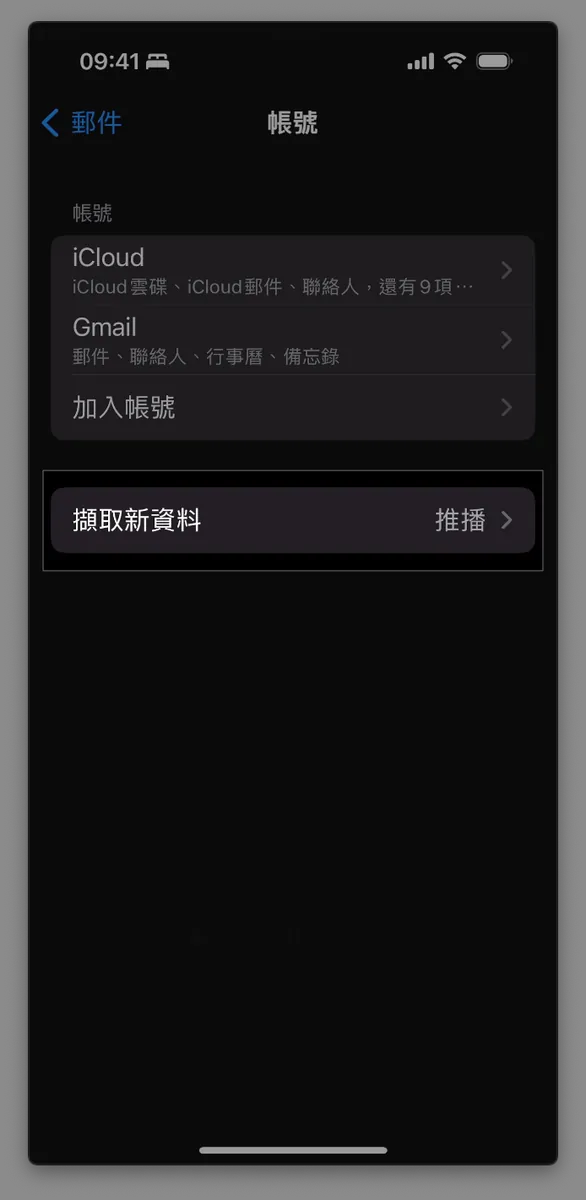
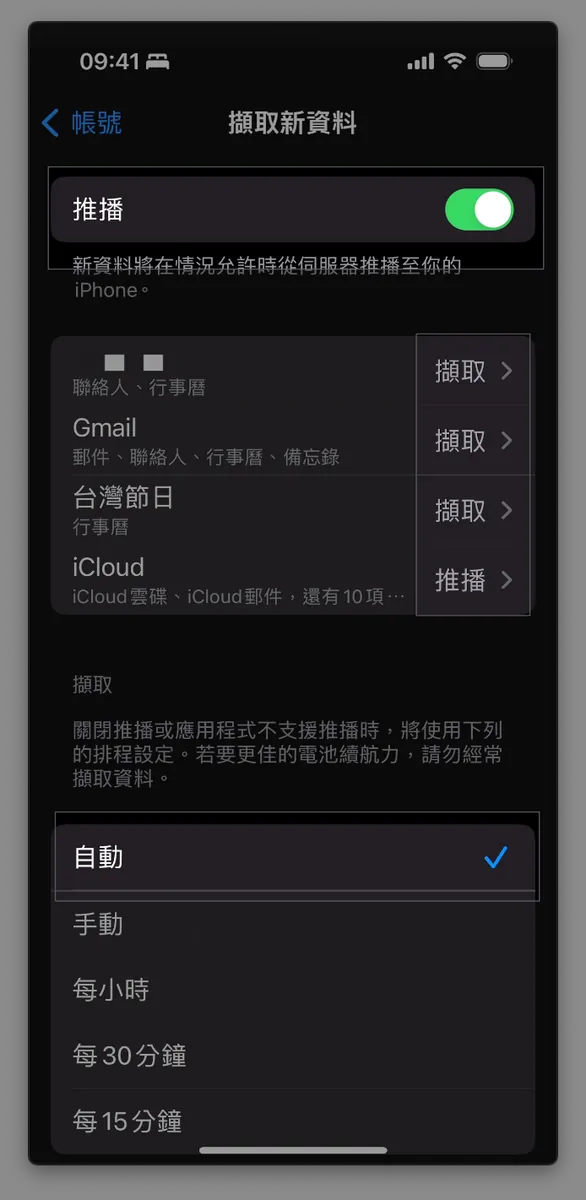
Confirm that “Settings” -> “Mail” -> “Accounts” -> “Fetch New Data” is set to Fetch or Push.
3. Install & Open the Shortcuts App
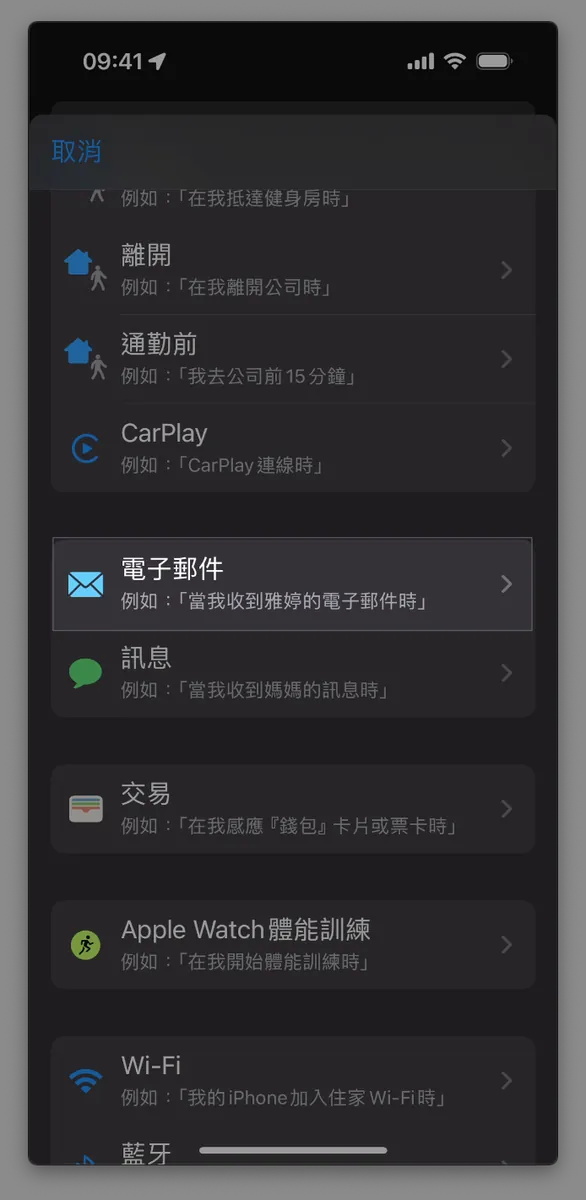
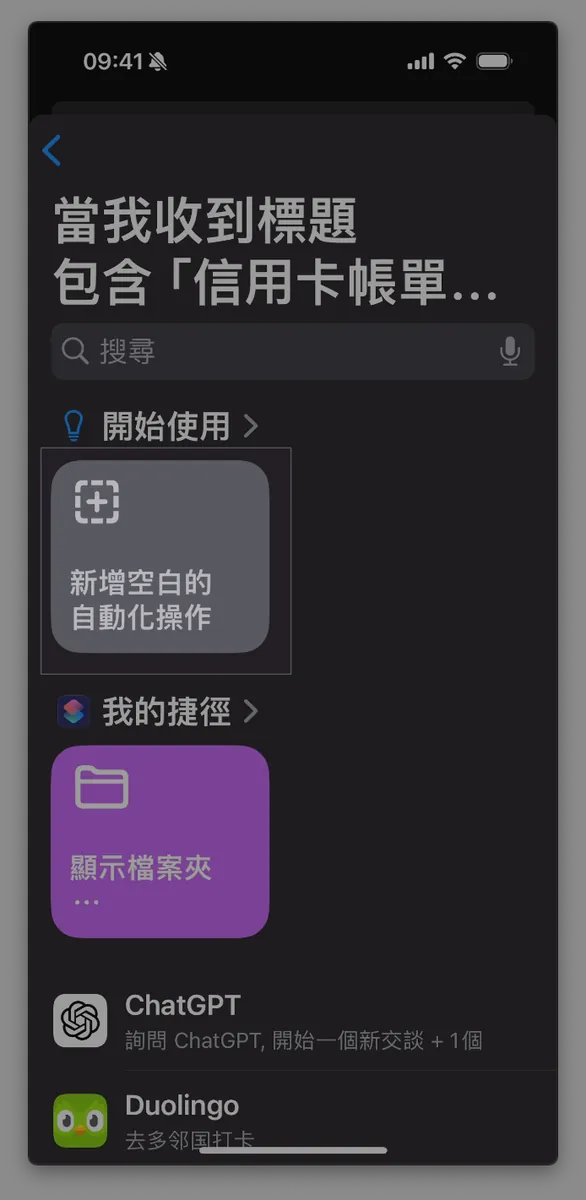
4. Switch to the “Automation” tab, tap the “+” at the top right, then scroll down to find “Email”
3. Set Email Conditions
“Title contains”:
Credit Card StatementCreate multiple shortcuts for multiple keywords individually.Change “Confirm and Execute” to
Execute ImmediatelyClick “Next”
When — Other Settings:
“Sender”: Multiple, but must be added to contacts
Other Filters — Account: You can filter sources from iCloud or Gmail
Other Filter Criteria — Recipients: Multiple, but must be added to contacts, usually multiple accounts of oneself
4. Add Automation Actions & Set Reminder Time
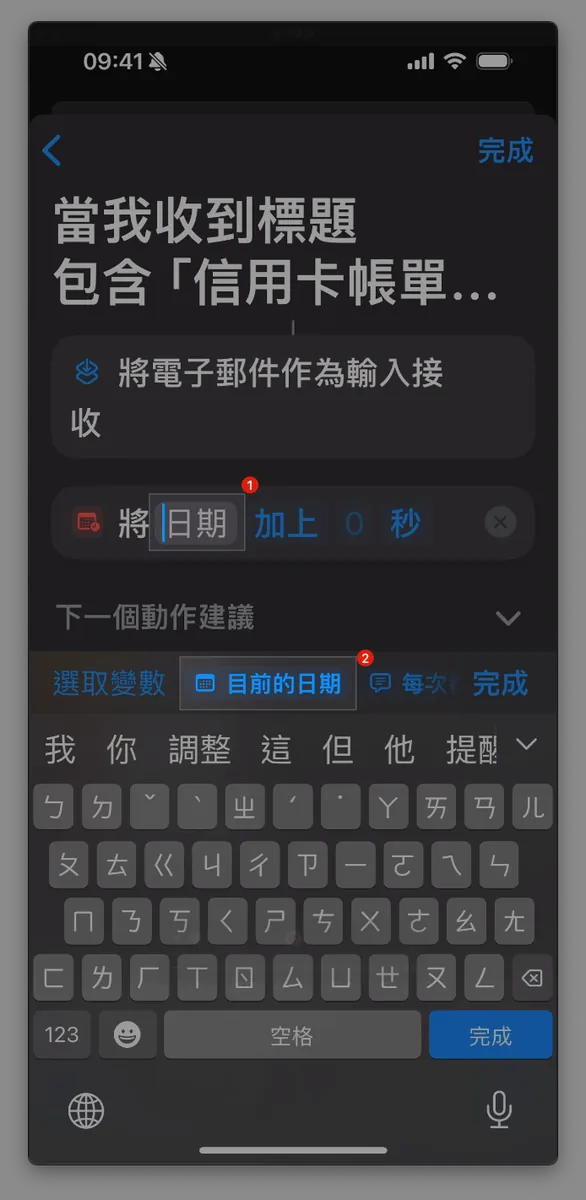
First, set the due date for the reminder by adding a date variable that calculates the reminder time as the received message time plus the desired duration.
Select
「Add Blank Automation」Search for
「調整日期」in the box below.Select
「Adjust Date」Select the input box for
DateinAdd 0 seconds to DateSelect the variable below and choose
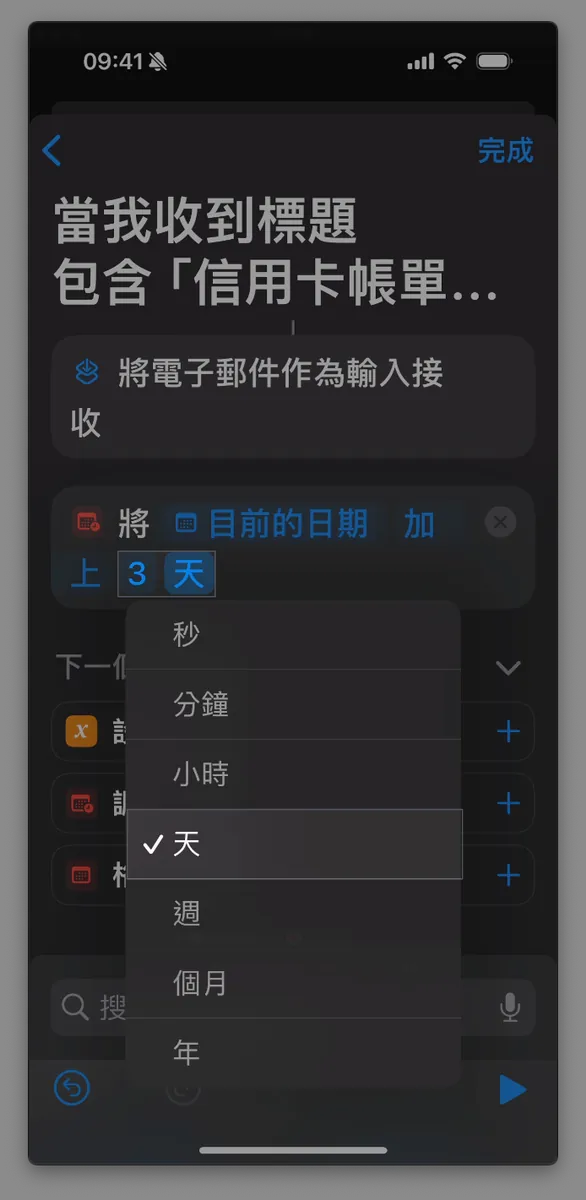
「Current Date」Add 0 "seconds"change"seconds"to"days"Enter the number of days before expiration you want to be reminded. Here, I enter 3 days.
Click the “X” next to the menu to close it
5. Setting Up Email Filters
Triggering messages one by one is different; email triggers fetch in batches. As long as there are emails with the keyword in the batch, all those new emails will be delivered together.
Not sure if this is a Shortcuts bug, but this is the result anyway.
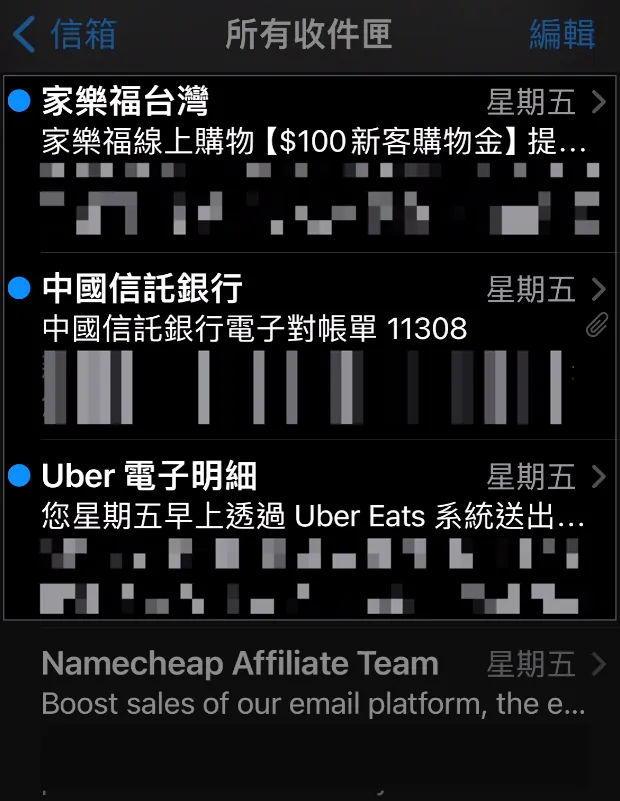
Example: Batch fetching three emails, including a Carrefour notification, a credit card statement, and an Uber notification. All three will be input into our shortcut; therefore, we need to add a step to filter out the emails with the keywords we want.
Virtual Logic:
1
2
3
4
5
6
for email_subject in emails
  if email_subject.contain("credit card statement") then
    add reminder
  else
  end
end
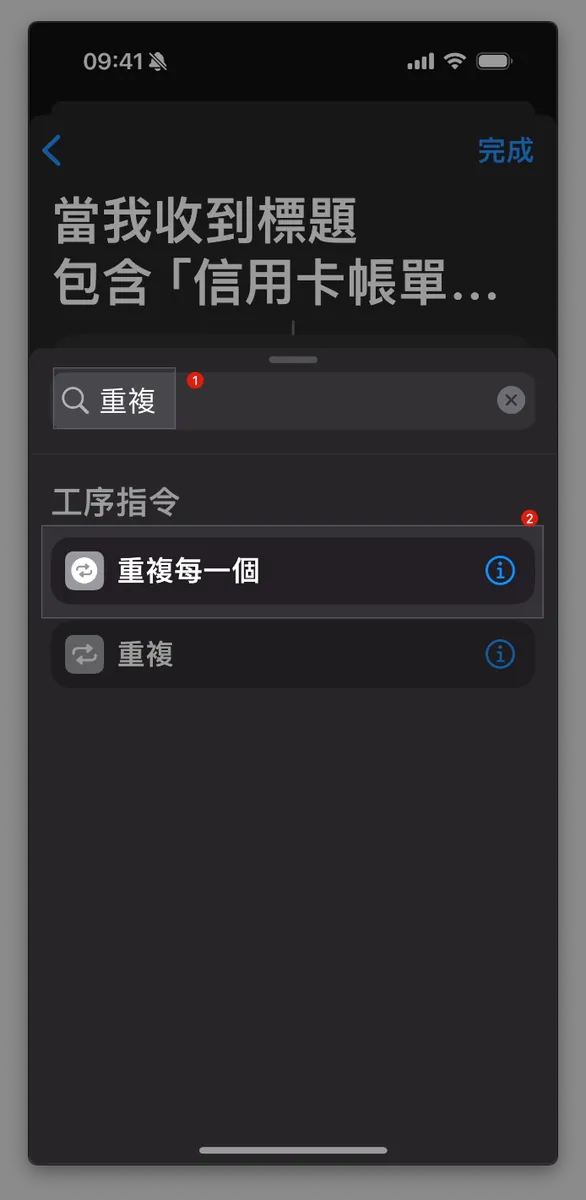

In the search bar, type
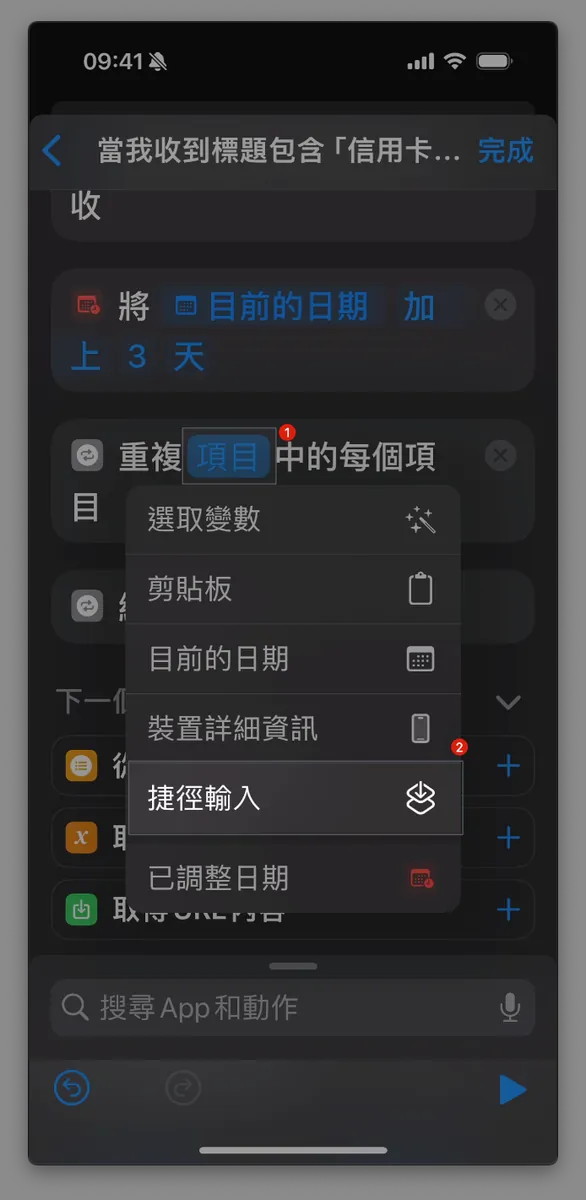
「Duplicate」, scroll down to find & click「Duplicate Each」.After adding, it will capture the wrong variable. In the input box for
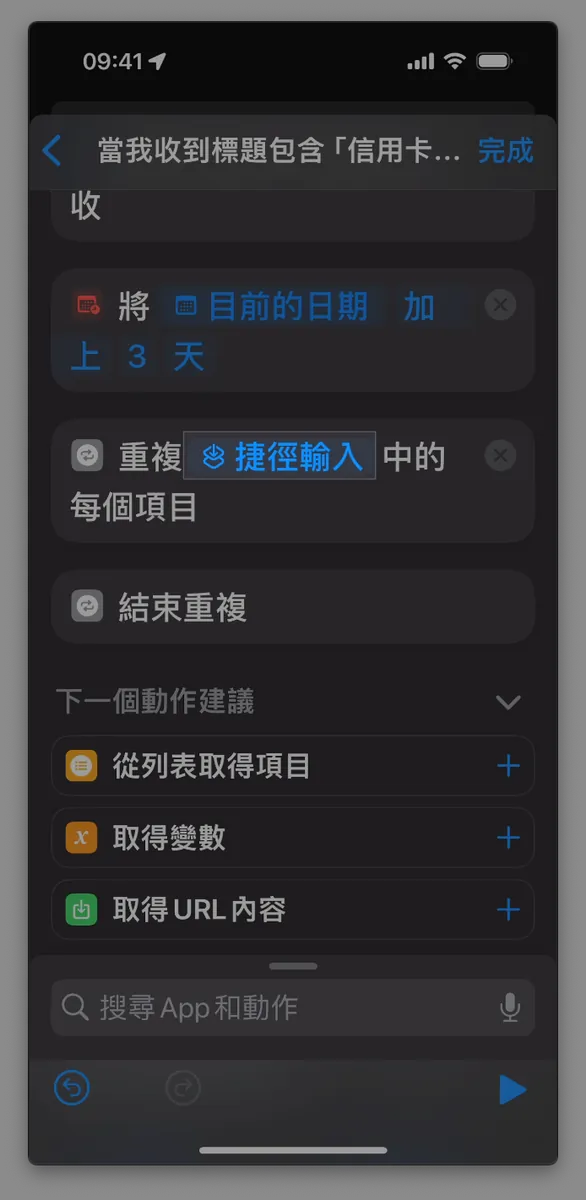
Repeat Each Item in "Adjusted Date", selectClear Variablefor"Adjusted Date".After clearing, select the input box for “Repeat Each Item in ‘Items’” and choose “Shortcut Input”.
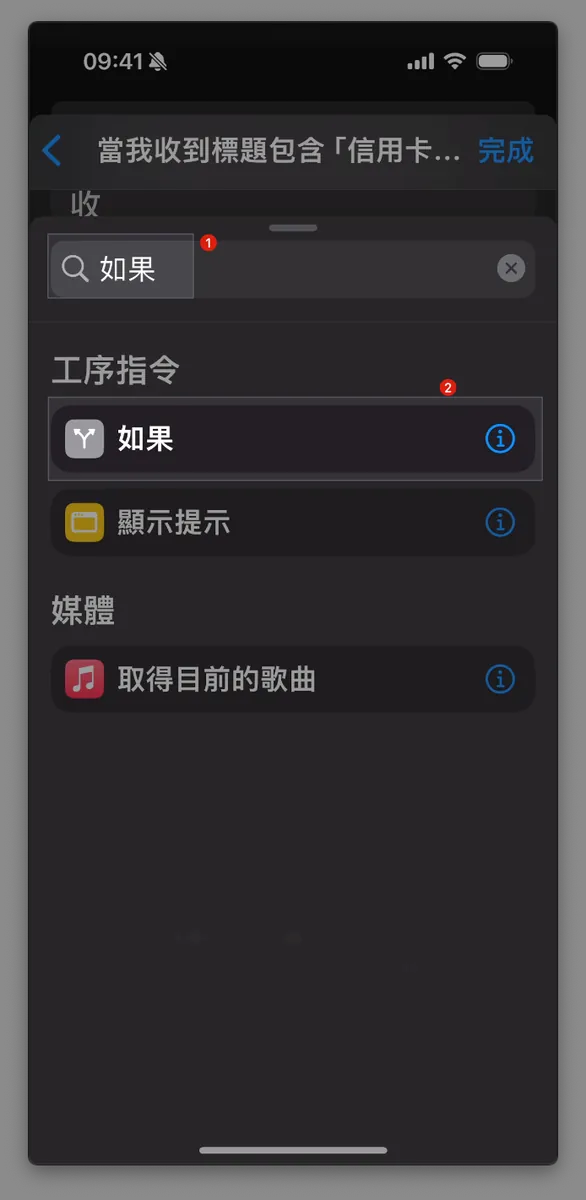
Type
「如果」in the search box, scroll down to find & click「如果」At this point, the position will be incorrect
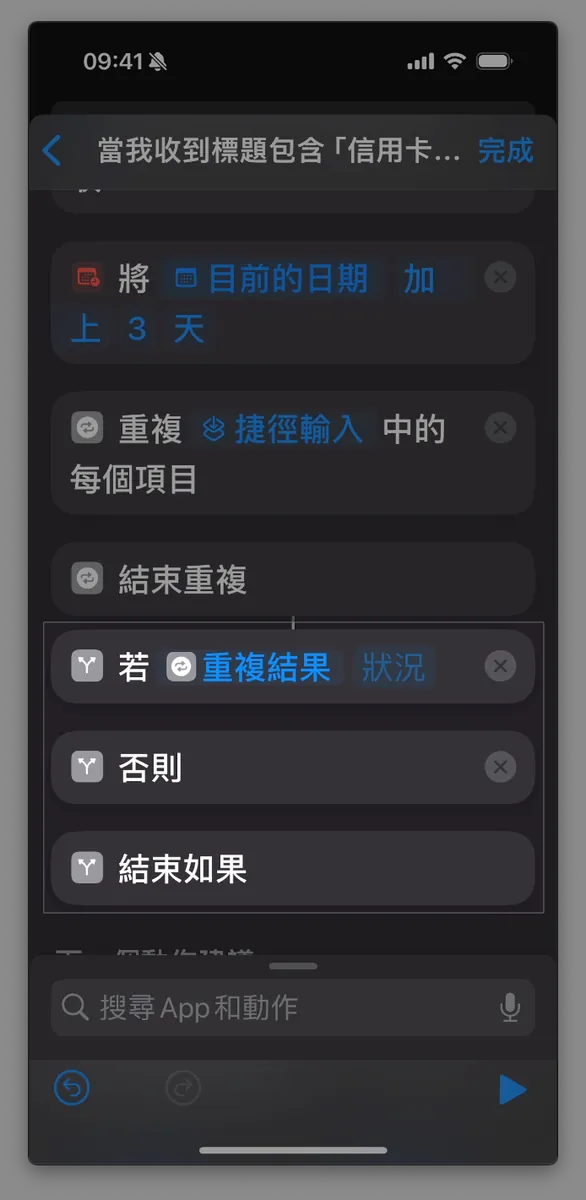
Drag the
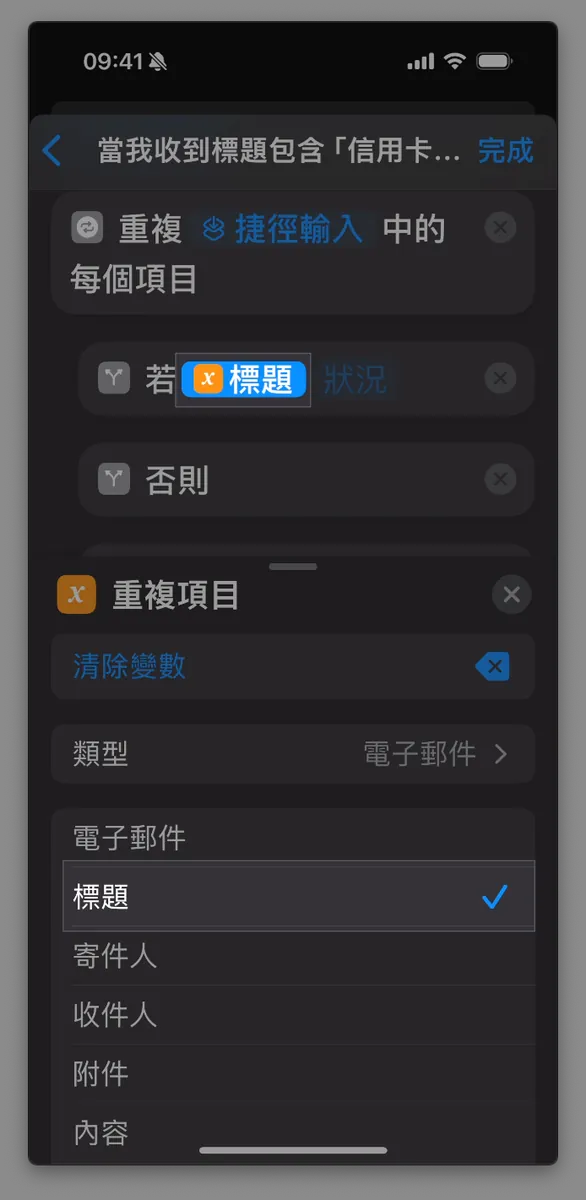
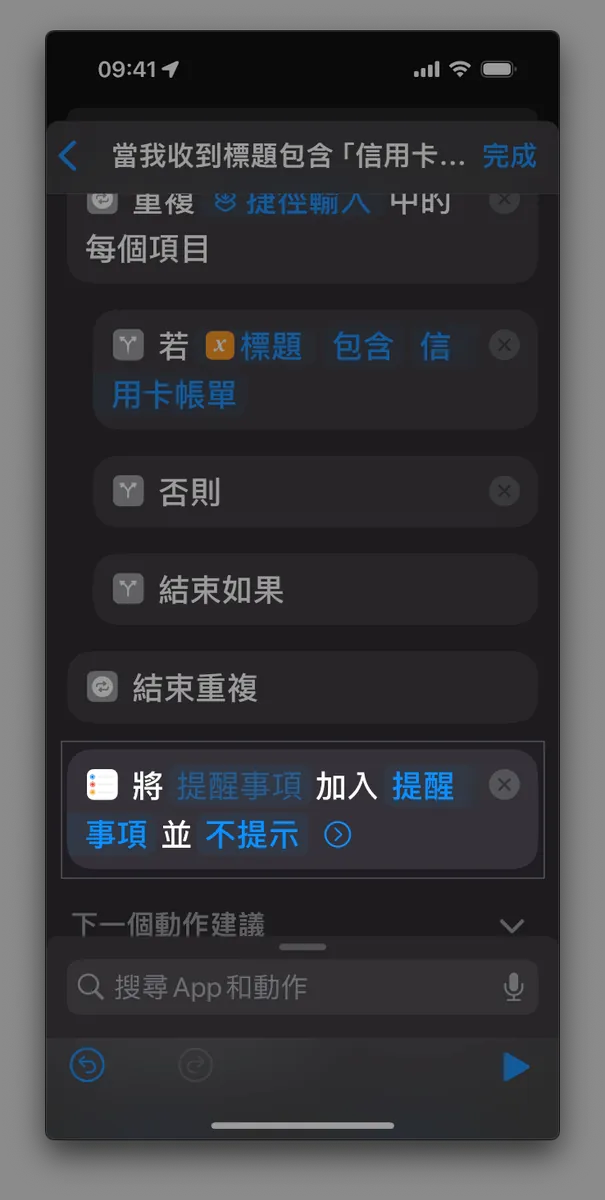
If "Repeat Results" "Condition"action inside and belowRepeat Each Item in "Shortcut Input".Confirm the final location map as shown in Figure 2 above. If incorrect, delete duplicates and redo from the previous step.
Click the
Duplicate Resultsinput box underDuplicate ResultsandStatus, then change the selection below toTitle. Click the “X” next to the menu to close it.
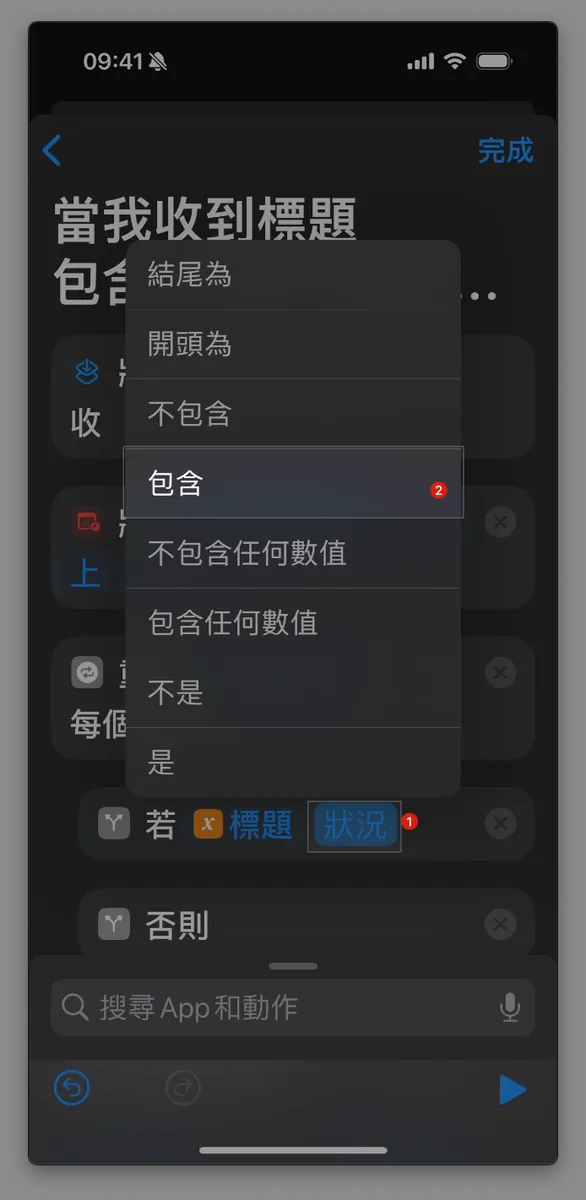
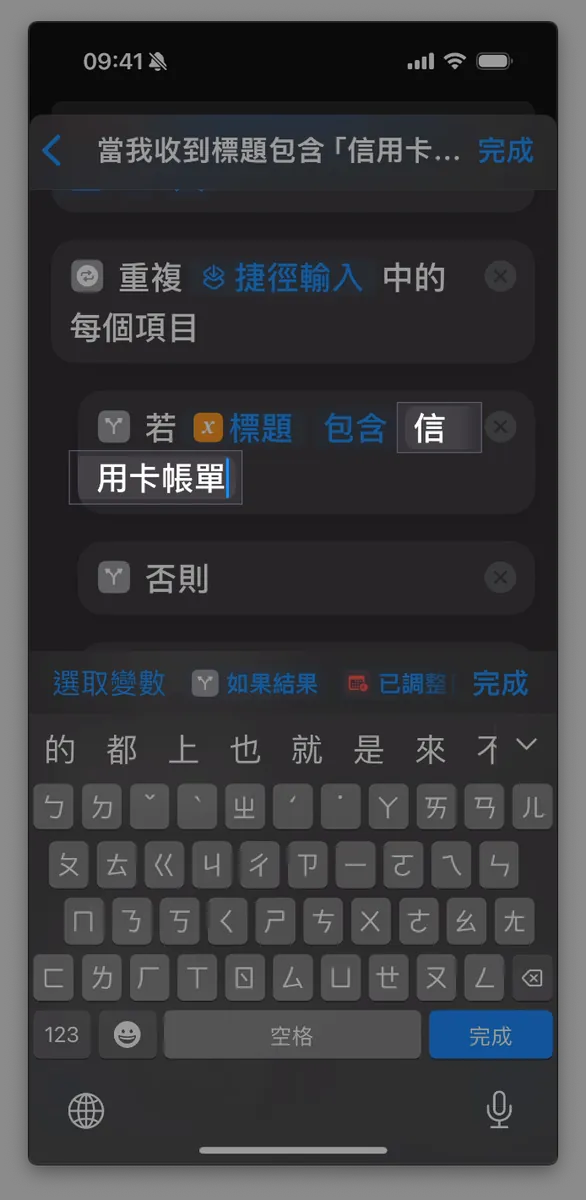
- Click the
Titleinput box underIf "Title" "Status", change the selection toContains, enterCredit Card Statement, and tap the keyboard’sDone.
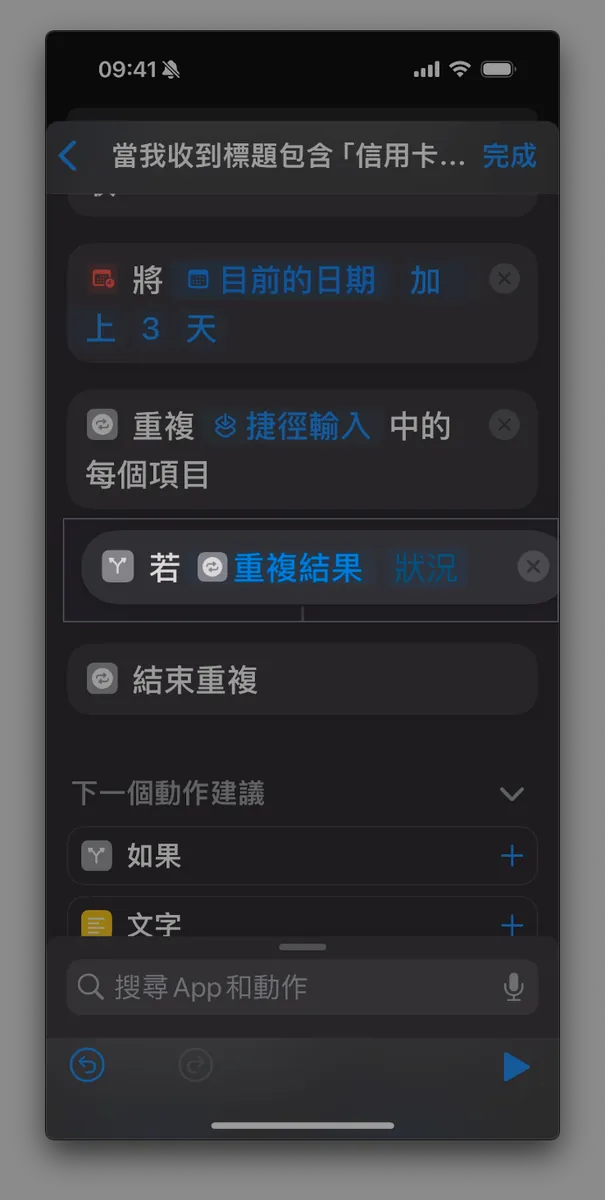
6. Set Up Email Filters
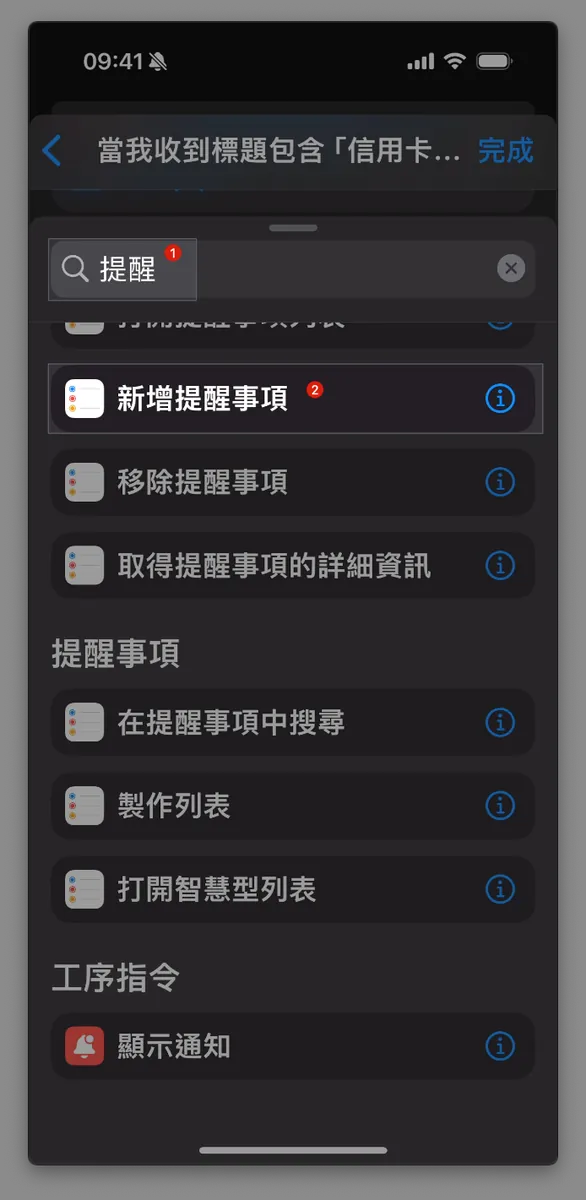
In the search bar, type “Reminder,” scroll down, and click “Add Reminder.”
The position will still be incorrect at this time.
Drag the action
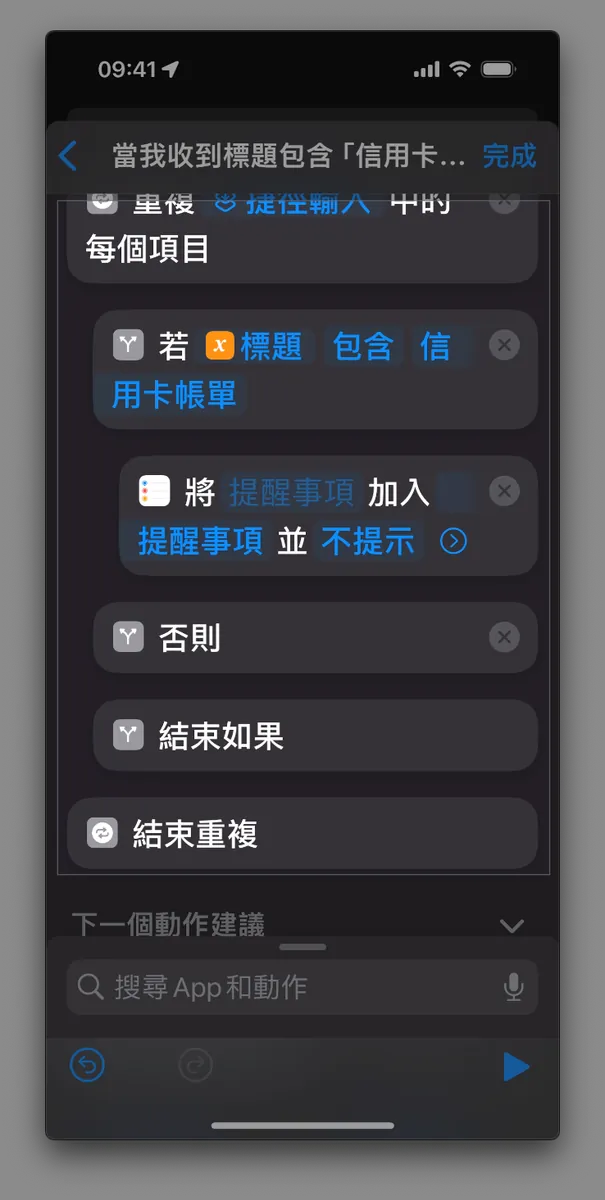
Add "Reminders" to "Reminders" and "Do Not Notify"underIf "Title" "Contains" "Credit Card Bill"(inside)Confirm the final location map as shown in Figure 3 above. If it is incorrect, please delete duplicates and redo the previous step.
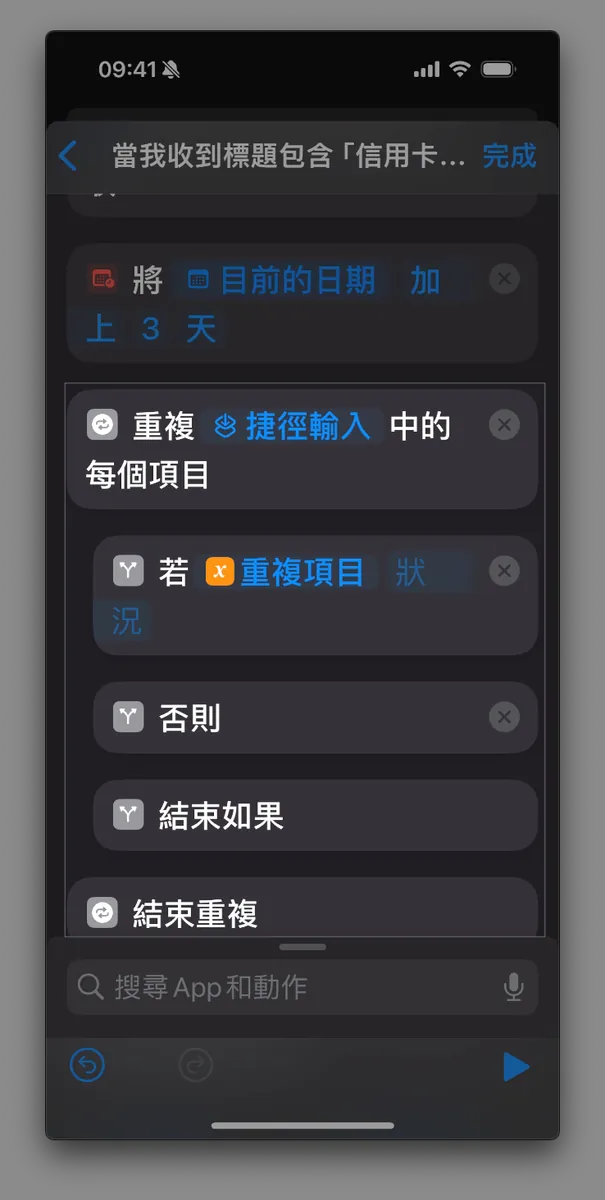
After adding “Add Reminder”
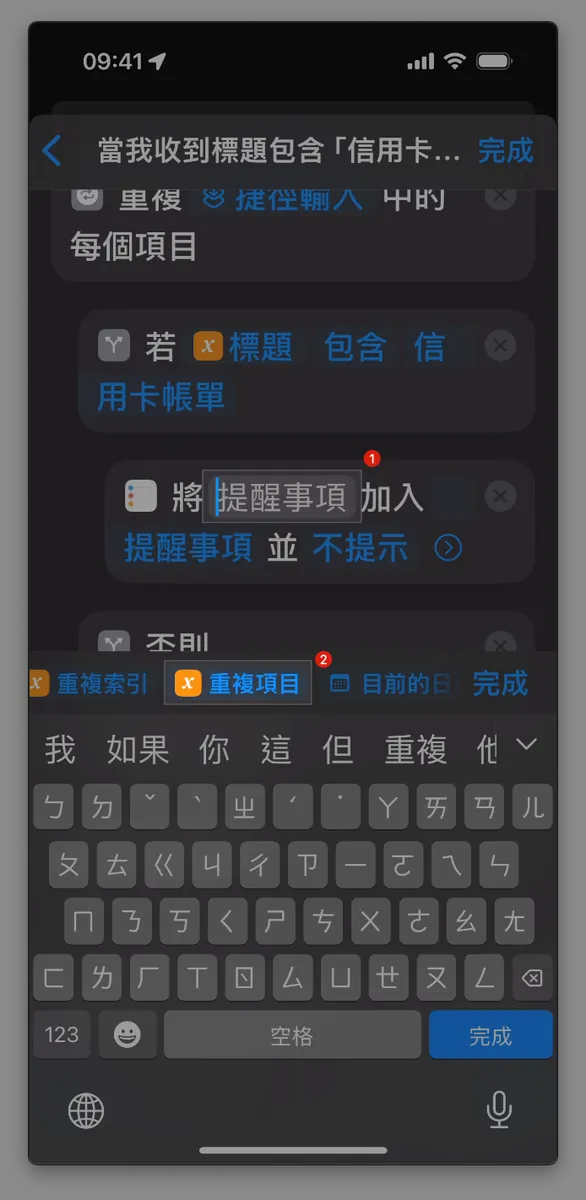
Click the first
「Reminders」input box inAdd "Reminders" to "Reminders" and "Do Not Notify".Swipe right to find and tap
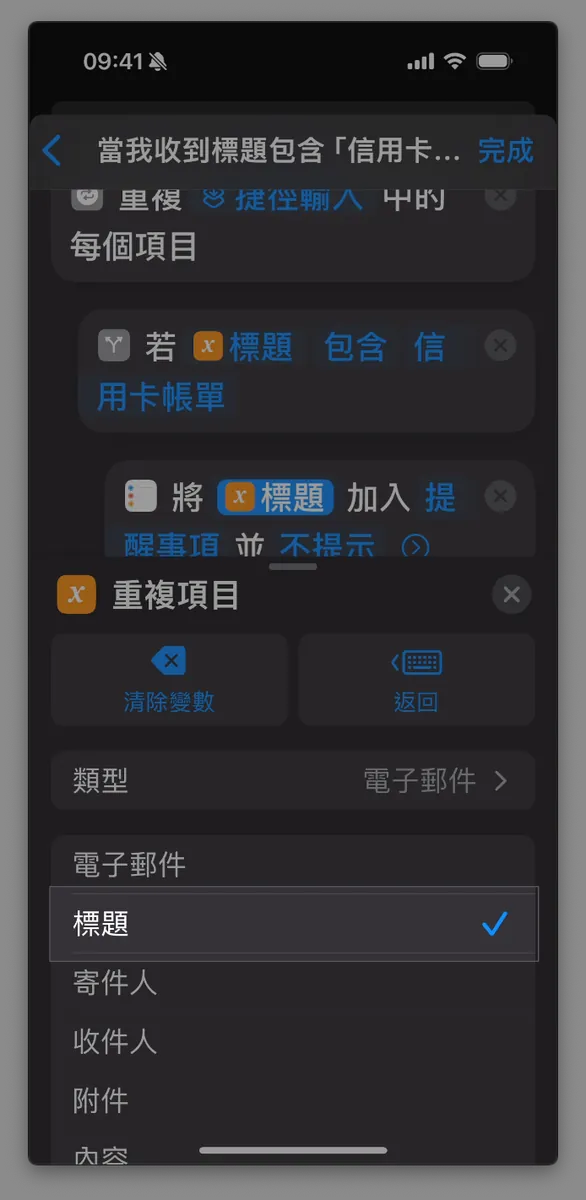
「Duplicate Items」.Go back to the top and click the
Duplicate Itemsinput box, then change the originally selectedEmailtoTitle.Click the “X” next to the menu to close it.
6. Set Prompt Reminders
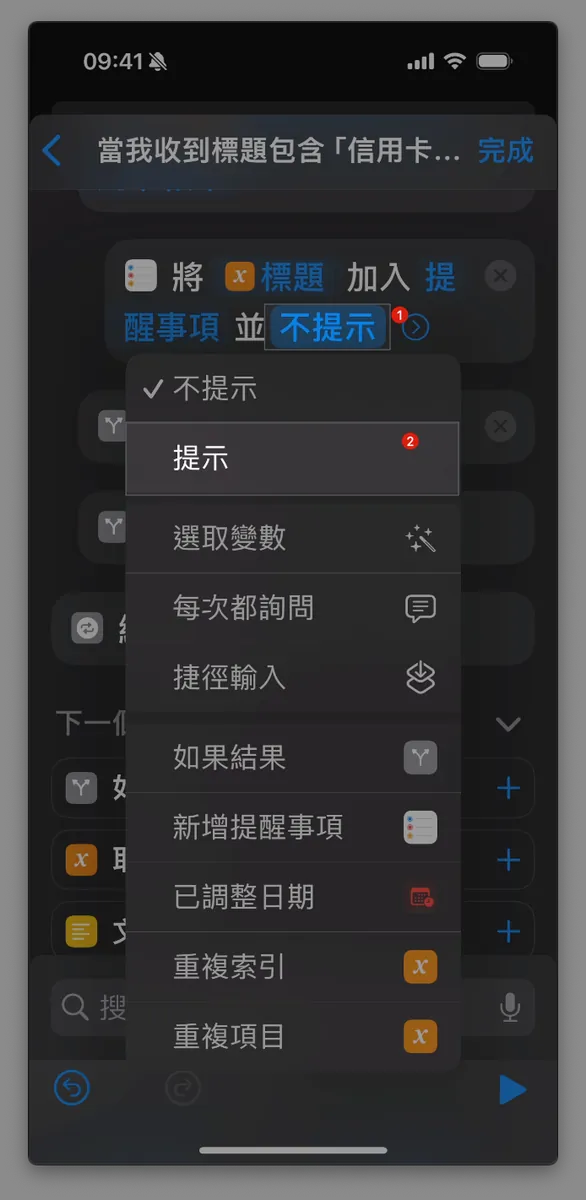
Change
「No Prompt」to「Prompt」Select the
「2:00 PM」input box at2:00 PM, then choose the variable「Adjusted Date」.Click the “X” next to the menu to close it
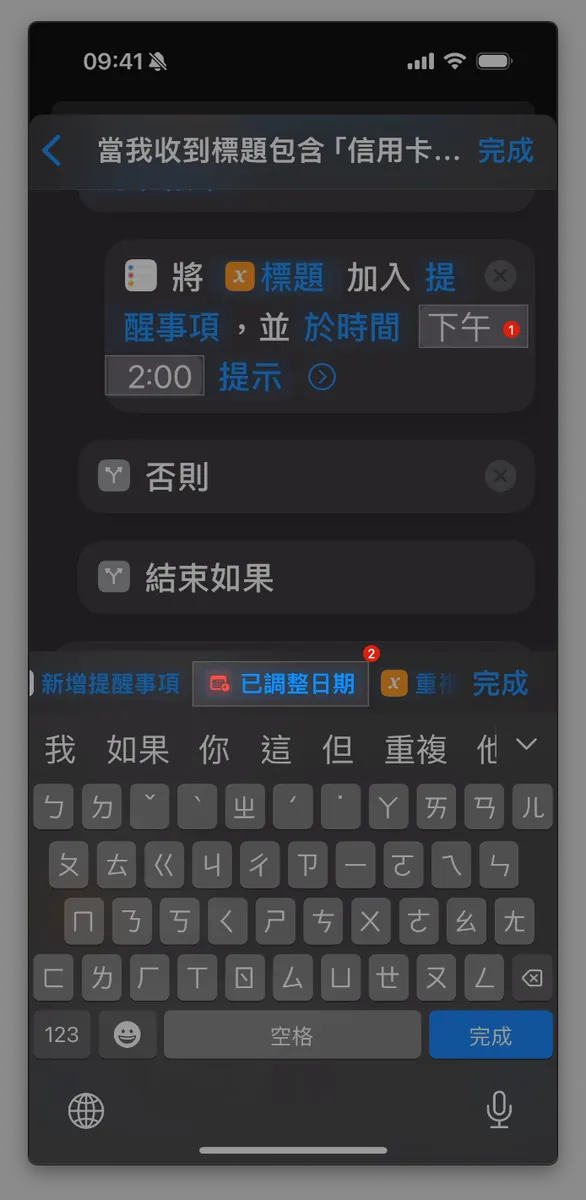
No problem, tap “Done” at the top right corner.
If tapping Done does nothing, it might be an iOS bug. You can ignore it and just tap Back to return to the home page.
- Returning to the Shortcuts automation homepage lets you view, pause, or edit this shortcut.
Done!
The email setup is relatively more complex because it involves batch retrieval, requiring an additional filtering step, followed by creating reminders based on the filtered results.
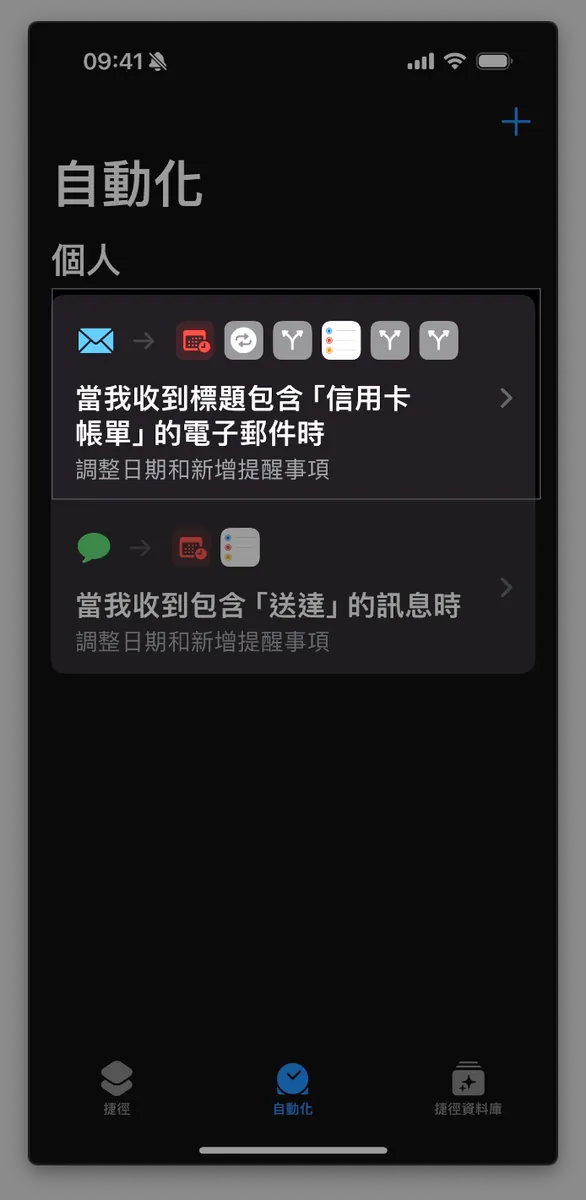
There is a new email, and Apple Mail has finished fetching it. If it contains a credit card statement title, it will be created automatically!
Since Apple Mail uses fetching (if not iCloud), email retrieval is not instant and will be delayed for some time.
Others
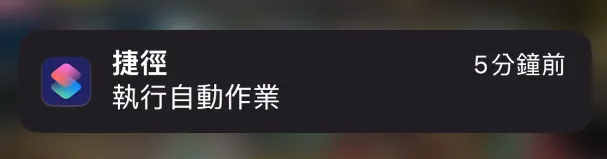
The shortcut automation will show a notification after execution, and this notification cannot be turned off.
End
Several basic automation integrations have been completed, saving you effort in just a few simple steps; other advanced integrations, such as API connections to Notion or more complex setups, are also technically feasible. What’s missing is not the technology but your imaginative automation ideas!
Other Automation Further Reading
If you have any questions or feedback, feel free to contact me.

This post was originally published on Medium (View original post), and automatically converted and synced by ZMediumToMarkdown.