GitHub Actions iOS CI/CD|完整实作自动化建置、测试与部署流程教学
针对iOS开发者打造的GitHub Actions CI/CD流程,解决手动建置与测试繁琐问题,结合Fastlane与Firebase实现自动化打包与部署,提升团队开发效率与产品品质。
Click here to view the English version of this article.
點擊這裡查看本文章正體中文版本。
基于 SEO 考量,本文标题与描述经 AI 调整,原始版本请参考内文。
文章目录
CI/CD 实战指南(三):使用 GitHub Actions 实作 App iOS CI 与 CD 工作流程
iOS App 自动化建置、测试、部署的 GitHub Actions 实作步骤完整教学
{:target="_blank"}](/assets/4b001d2e8440/1*0LK6m6CTImL6rcsrliiOQA.webp)
Photo by Robs
前言
前篇「 CI/CD 实战指南(二):GitHub Actions 与 Self-hosted Runner 使用与建置大全 」我们介绍了 GitHub Actions 的基础知识与运作流程还有如何使用自己的机器当成 Runner、带大家实现了三个简单的自动化 Actions; 本篇将深入著重在现实使用 GitHub Actions 建置 App (iOS) CI/CD 工作流程上 ,一样手把手带大家一步一步完成并一边补足 GitHub Actions 相关知识。
App CI/CD 流程关系图
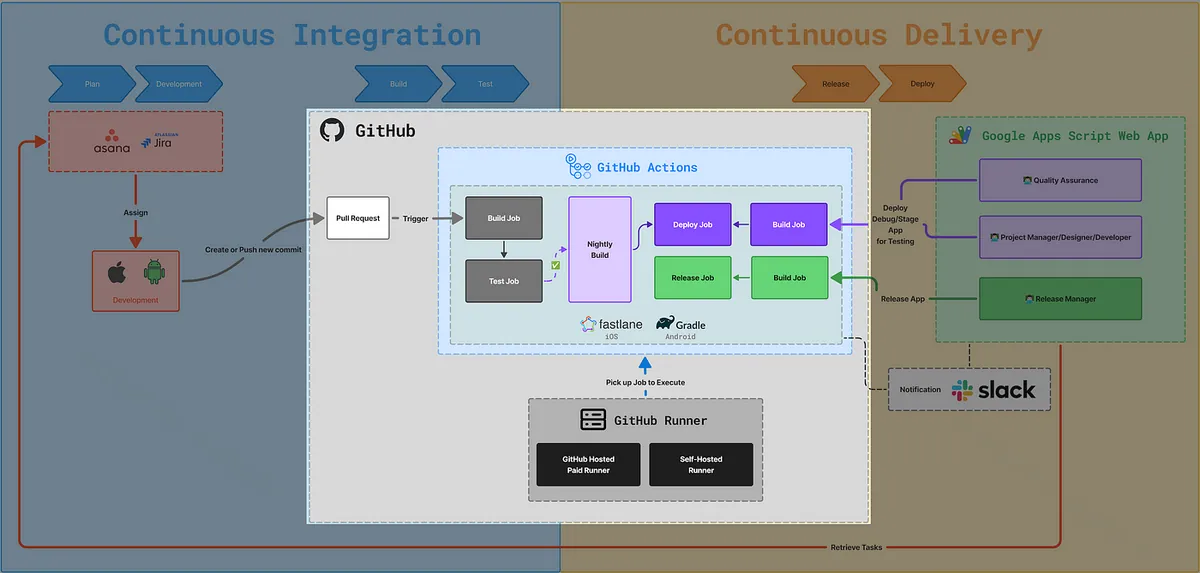
本篇将关注在 GitHub Actions 建置 CI/CD 的区块,下一篇「 CI/CD 实战指南(四):使用 Google Apps Script Web App 串接 GitHub Actions 建置免费易用的打包工具平台 」才会介绍右半部分的使用 Google Apps Script Web App 建置跨团队协作打包平台。
运作流程:
GitHub Actions 开 Pull Request 触发 or 表单触发 or 定时触发
执行对应 Workflow Jobs/Steps
Step 执行对应 Fastlane (iOS) or (Android Gradle) 脚本
Fastlane 执行对应 xcodebuild (iOS) 指令
取得执行结果
后续 Workflow Jobs/Steps 处理结果
完成
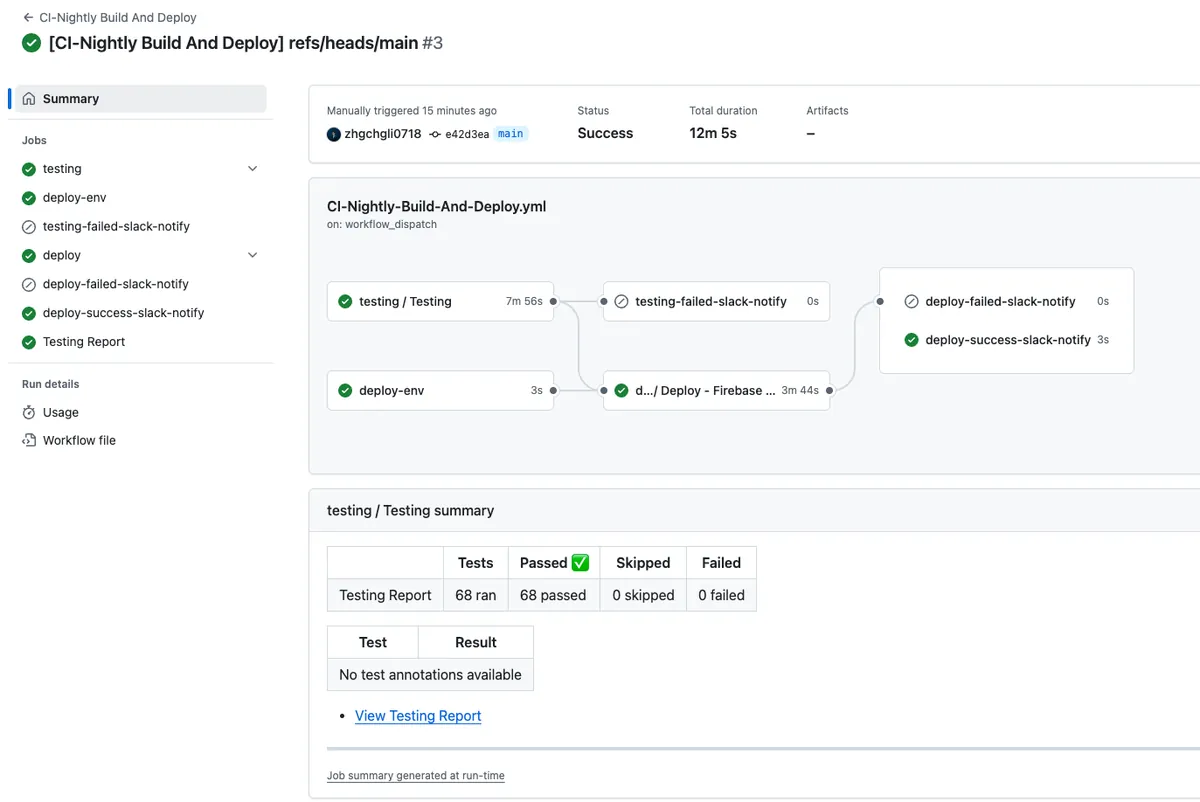
GitHub Actions 成果图
先上最终成果给大家一点实作动力!
{:target="_blank"}](/assets/4b001d2e8440/1*5gnQYdVAOtGR-bMK4ZrOhA.webp)
{:target="_blank"}](/assets/4b001d2e8440/1*t9PrQfcTANyvG7gfXXC-bw.webp)
GitHub Actions x Self-hosted Runner 基础知识
如果你对 GitHub Actions 与架设 Self-hosted Runner 还不熟悉强烈建议先看过上篇「 CI/CD 实战指南(二):GitHub Actions 与 Self-hosted Runner 使用与建置大全 」或是搭配上篇知识一起实作。
实作开始!
iOS Demo 专案的 Infra 架构
本文用到的 iOS 专案内容包含测试项目都是用 AI 产生的 ,不需在意 iOS 的程式细节,只针对 Infra & CI/CD 部分做讨论。
Mint
Mint 工具可以帮我们统一管理依赖工具的版本(Gemfile 只能管理 Ruby Gems),例如 XCodeGen、XCodeGen、SwiftFormat、SwiftLint、Periphery
…etc
Mintfile:
1
2
3
yonaskolb/Mint@0.17.5
yonaskolb/XcodeGen@2.35.0
nicklockwood/SwiftFormat@0.51.13
这边我们只用到三个。
觉得太复杂不使用也可以,直接在 Action Workflow Step 中用 brew install 安装需要的工具即可。
Bundle
Gemfile:
1
2
3
4
5
6
source 'https://rubygems.org'
gem 'cocoapods', '~>1.16.0'
gem 'fastlane', '~>2.228.0'

plugins_path = File.join(File.dirname(__FILE__), 'Product', 'fastlane', 'Pluginfile')
eval_gemfile(plugins_path) if File.exist?(plugins_path)
管理 Ruby (Gems) 相关依赖,一般 iOS 专案最常用的就是这两个 cocoapods 跟 fastlane 。
Cocoapods
Product/podfile:
1
2
3
4
5
6
platform :ios, '13.0'
use_frameworks!

target 'app-ci-cd-github-actions-demo' do
  pod 'SnapKit'
end
虽然已宣告 即将停止维护 ,但 Cocoapods 在有年代的 iOS 专案中仍很常见,这边简单加一个 Snapkit 当 Demo。
XCodeGen
避免多人开发中 .xcodeproj / .xcworkspace 异动造成的冲突,统一使用 Project.yaml 定义 XCode Project 内容,然后在本地自己 Gen Project 档案(不上 Git)。
Product/project.yaml:
1
2
3
4
5
6
7
8
9
10
11
12
13
14
15
16
17
18
19
20
21
22
23
24
25
26
27
28
29
30
31
32
33
34
35
36
37
38
39
40
41
42
43
44
45
46
47
48
49
50
51
52
53
54
55
56
57
58
59
60
61
62
63
64
65
66
67
68
69
70
71
72
73
74
75
76
77
78
name: app-ci-cd-github-actions-demo
options:
  bundleIdPrefix: com.example
  deploymentTarget:
    iOS: '13.0'
  usesTabs: false
  indentWidth: 2
  tabWidth: 2

configs:
  Debug: debug
  Release: release

targets:
  app-ci-cd-github-actions-demo:
    type: application
    platform: iOS
    sources:
      - app-ci-cd-github-actions-demo
    resources:
      - app-ci-cd-github-actions-demo/Assets.xcassets
      - app-ci-cd-github-actions-demo/Base.lproj
    info:
      path: app-ci-cd-github-actions-demo/Info.plist
      properties:
        CFBundleIdentifier: $(PRODUCT_BUNDLE_IDENTIFIER)
    settings:
      base:
        PRODUCT_BUNDLE_IDENTIFIER: com.test.appcicdgithubactionsdemo
    cocoapods: true

  app-ci-cd-github-actions-demoTests:
    type: bundle.unit-test
    platform: iOS
    sources:
      - app-ci-cd-github-actions-demoTests
    dependencies:
      - target: app-ci-cd-github-actions-demo
    info:
      path: app-ci-cd-github-actions-demoTests/Info.plist
    settings:
      base:
        PRODUCT_BUNDLE_IDENTIFIER: com.test.appcicdgithubactionsdemo.tests

  app-ci-cd-github-actions-demoUITests:
    type: bundle.ui-testing
    platform: iOS
    sources:
      - app-ci-cd-github-actions-demoUITests
    dependencies:
      - target: app-ci-cd-github-actions-demo
    info:
      path: app-ci-cd-github-actions-demoUITests/Info.plist
    settings:
      base:
        PRODUCT_BUNDLE_IDENTIFIER: com.test.appcicdgithubactionsdemo.uitests

  app-ci-cd-github-actions-demoSnapshotTests:
    type: bundle.unit-test
    platform: iOS
    sources:
      - path: app-ci-cd-github-actions-demoSnapshotTests
        excludes:
          - "**/__Snapshots__/**"
    dependencies:
      - target: app-ci-cd-github-actions-demo
      - product: SnapshotTesting
        package: SnapshotTesting
    info:
      path: app-ci-cd-github-actions-demoSnapshotTests/Info.plist
      settings:
        base:
          PRODUCT_BUNDLE_IDENTIFIER: com.test.appcicdgithubactionsdemo.snapshottests

packages:
  SnapshotTesting:
    url: https://github.com/pointfreeco/swift-snapshot-testing
    from: 1.18.4
SnapshotTesting: 使用 Swift Package Manager 管理。
Fastlane
封装 xcodebuild 指令、封装串接 App Store Connect API、Firebase API. .等服务的复杂步骤。
Product/fastlane/Fastfile:
1
2
3
4
5
6
7
8
9
10
11
12
13
14
15
16
17
18
19
20
21
22
23
24
25
26
27
28
29
30
31
32
33
34
35
36
37
38
39
40
41
42
43
44
45
46
47
48
49
50
51
52
53
54
55
56
57
58
59
60
61
62
63
64
65
66
67
68
69
70
71

default_platform(:ios)

platform :ios do
  desc "Run all tests (Unit Tests + UI Tests)"
  lane :run_all_tests do \\|options\\|
    device = options[:device]
    scan(
      scheme: "app-ci-cd-github-actions-demo",
      device: device,
      clean: true,
      output_directory: "fastlane/test_output",
      output_types: "junit"
    )
  end

  desc "Run only Unit Tests"
  lane :run_unit_tests do \\|options\\|
    device = options[:device]
    scan(
      scheme: "app-ci-cd-github-actions-demo",
      device: device,
      clean: true,
      only_testing: [
        "app-ci-cd-github-actions-demoTests"
      ],
      output_directory: "fastlane/test_output",
      output_types: "junit"
    )
  end

  desc "Build and upload to Firebase App Distribution"
  lane :beta do \\|options\\|

    if options[:version_number] && options[:version_number].to_s.strip != ""
      increment_version_number(version_number: options[:version_number])
    end

    if options[:build_number] && options[:build_number].to_s.strip != ""
      increment_build_number(build_number: options[:build_number])
    end

    update_code_signing_settings(
      use_automatic_signing: false,
      path: "app-ci-cd-github-actions-demo.xcodeproj",
      team_id: ENV['TEAM_ID'],
      code_sign_identity: "iPhone Developer",
      sdk: "iphoneos*",
      profile_name: "cicd"
    )

    gym(
      scheme: "app-ci-cd-github-actions-demo",
      clean: true,
      export_method: "development",
      output_directory: "fastlane/build",
      output_name: "app-ci-cd-github-actions-demo.ipa",
      export_options: {
          provisioningProfiles: {
            "com.test.appcicdgithubactionsdemo" => "cicd",
          },
      }
    )

    firebase_app_distribution(
      app: "1:127683058219:ios:98896929fa131c7a80686e",
      firebase_cli_token: ENV["FIREBASE_CLI_TOKEN"],
      release_notes: options[:release_notes] \\|\\| "New beta build"
    )
  end
end
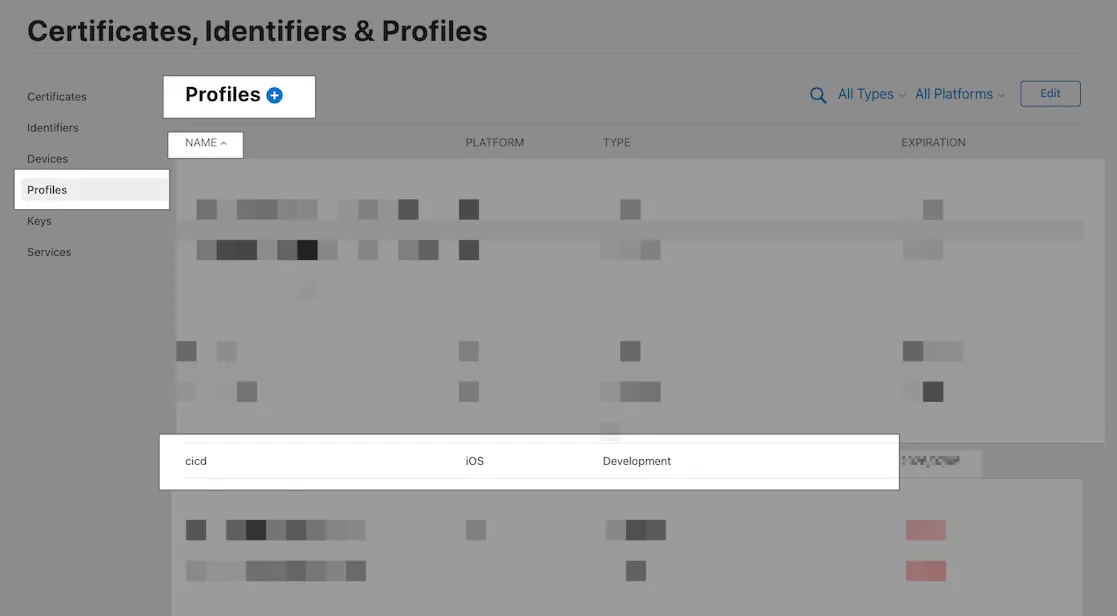
注: provisioningProfiles、profile_name 对应的是 App Developer 中的 Profiles 凭证名称 。(如果有用 match 则也不需要这些指定。)
Fastlane 是 iOS CI/CD 当中不可或缺的一部分 ,直接使用它封装好的方法就能快速开发 CI/CD 实际执行的步骤;我们只需关注在整体的脚本设计,而不需去处理复杂的 API 串接或指令撰写。
例如:Fastlane 只需要写「scan(xxx)」就能执行测试,如果要写成 xcodebuild 则需要「 xcodebuild -workspace ./xxx.xcworkspace -scheme xxx -derivedDataPath xxx ‘platform=iOS Simulator,id=xxx’ clean build test 」,打包部署要自己做更是麻烦,要自行串接 App Store Connect/Firebase API,光金钥验证都要写超过 10 行程式了。
Demo 专案我们只有三个 Lane:
run_all_tests: 跑所有类型的测试 (Snapshot+Unit)
run_unit_tests: 只跑单元测试 (Unit)
beta: 打包部署到 Firebase App Distribution
Fastlane — Match
因 Demo 专案限制,这边没用到 Match 管理团队开发、部署凭证,但这边还是要提一下,建议使用 Match 去管理团队的所有开发、部署凭证,方便控管跟统一更新。
有用 Match 就能在专案 Setup 步骤直接使用
match all之类的指令一键安装好所有开发需要的凭证。
- Fastlane Match 会使用另一个 Private Repo 管理凭证金钥,在 GitHub Actions 中需要设定好 SSH Agent 才能 Clone 另一个 Private Repo。 (请参考文末补充)
— — —
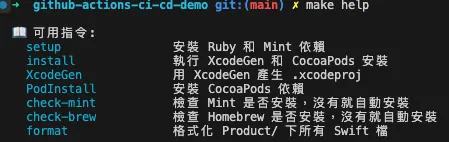
Makefile
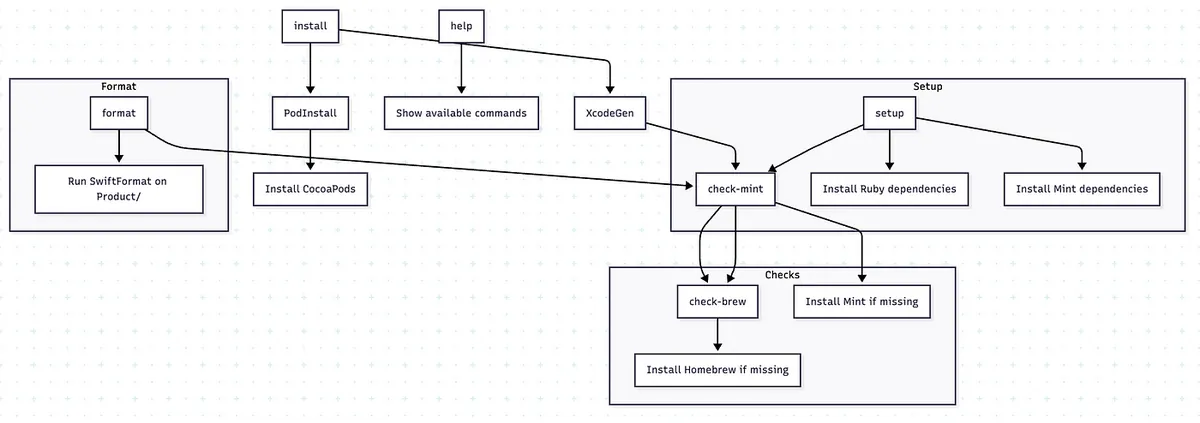
Makefile
让开发端与 CI/CD 统一都使用 Makefile 执行指令,方便我们封装同样的环境、路径与操作行为。
经典的案例是有的人使用的是本机安装的
pod install有的人则使用的是 Bundel 管理的bundle exec pod install如果版本不同就可能产生差异。
觉得太复杂不使用也可以,那就是在 Action Workflow Step 中直接写要执行的指令即可。
Makefile:
1
2
3
4
5
6
7
8
9
10
11
12
13
14
15
16
17
18
19
20
21
22
23
24
25
26
27
28
29
30
31
32
33
34
35
36
37
38
39
40
41
42
43
44
45
46
47
48
49
50
51
52
53
54
55
56
57
58
59
60
#!make
PRODUCT_FOLDER = ./Product/
SHELL         := /bin/zsh
.DEFAULT_GOAL := install
MINT_DIRECTORY := ./mint/

export MINT_PATH=$(MINT_DIRECTORY)

## 👇 Help function
.PHONY: help
help:
 @echo ""
 @echo "📖 可用指令:"
 @grep -E '^[a-zA-Z_-]+:.*?## .*$$' $(MAKEFILE_LIST) \\| \
  awk 'BEGIN {FS = ":.*?## "}; {printf "  \033[36m%-20s\033[0m %s\n", $$1, $$2}'
 @echo ""

## Setup
.PHONY: setup
setup: check-mint ## 安装 Ruby 和 Mint 依赖
 @echo "🔨 Installing Ruby dependencies..."
 bundle config set path 'vendor/bundle'
 bundle install
 @echo "🔨 Installing Mint dependencies..."
 mint bootstrap

## Install
.PHONY: install
install: XcodeGen PodInstall ## 执行 XcodeGen 和 CocoaPods 安装

.PHONY: XcodeGen
XcodeGen: check-mint ## 用 XcodeGen 产生 .xcodeproj
 @echo "🔨 Execute XcodeGen"
 cd $(PRODUCT_FOLDER) && \
 mint run yonaskolb/XcodeGen --quiet

.PHONY: PodInstall
PodInstall: ## 安装 CocoaPods 依赖
 @echo "📦 Installing CocoaPods dependencies..."
 cd $(PRODUCT_FOLDER) && \
 bundle exec pod install

### Mint
check-mint: check-brew ## 检查 Mint 是否安装,没有就自动安装
 @if ! command -v mint &> /dev/null; then \
  echo "🔨 Installing mint..."; \
  brew install mint; \
 fi

### Brew
check-brew: ## 检查 Homebrew 是否安装,没有就自动安装
 @if ! command -v brew &> /dev/null; then \
  echo "🔨 Installing Homebrew..."; \
  /bin/bash -c "$$(curl -fsSL https://raw.githubusercontent.com/Homebrew/install/HEAD/install.sh)"; \
 fi

## Format only git swift files
.PHONY: format
format: check-mint ## 格式化 Product/ 下所有 Swift 档
 mint run swiftformat $(PRODUCT_FOLDER)
为了避免污染整个系统或其他专案,我们尽可能把 Dependency 套件(e.g. mint, bundle…etc)的路径都改指定在专案目录之下 (再搭配 .gitignore 排除)。
1
2
3
4
5
6
7
8
9
10
11
12
13
├── mint (Mint 依赖)
│   └── packages
├── Product
│   ├── app-ci-cd-github-actions-demo
│   ├── app-ci-cd-github-actions-demo.xcodeproj
│   ├── app-ci-cd-github-actions-demo.xcworkspace
│   ├── app-ci-cd-github-actions-demoSnapshotTests
│   ├── app-ci-cd-github-actions-demoTests
│   ├── app-ci-cd-github-actions-demoUITests
│   ├── fastlane
│   └── Pods (Cocoapods 依赖)
└── vendor (Bundle 依赖)
    └── bundle
make help
使用 Makefine 的统一专案 Setup 步骤:
git clone repocd ./repomake setup安装必要的工具依赖 ( brew , mint , bundle , xcodegen, swiftformat,…)make install产生专案 (执行 pod install, xcodegen)完成
打开、执行专案
不管是 CI/CD 或新人 onboard 都是照以上步骤把专案建置起来。
本篇 GitHub Actions CI/CD 案例
本篇会介绍三个 GitHub Actions CI/CD 工作流程建置案例,大家也可以参考其中的步骤建置符合自己团队工作流程的 CI/CD。
CI — 发 Pull Request 执行单元测试
CD — 打包+部署到 Firebase App Distribution
CI +CD— Nightly Build 执行快照+单元测试+打包+部署到 Firebase App Distribution
因 Demo 限制,本文只会串接 打包部署到 Firebase App Distribution,打包到 Testflight 或是 App Store 也是同样步骤只差别在 Fastlane 里的脚本不同,大家可以自行发挥。
CI — 发 Pull Request 执行单元测试
流程
Develop 分支 无法直接推送 ,必须发 Pull Request 才能更新;所有 Pull Request 均需 Review 通过加上单元测试通过才能 Merge 、有新 Commit Push 会重新测试。
CI-Testing.yml
Repo → Actions → New workflow → set up a workflow yourself。
1
2
3
4
5
6
7
8
9
10
11
12
13
14
15
16
17
18
19
20
21
22
23
24
25
26
27
28
29
30
31
32
33
34
35
36
37
38
39
40
41
42
43
44
45
46
47
48
49
50
51
52
53
54
55
56
57
58
59
60
61
62
63
64
65
66
67
68
69
70
71
72
73
74
75
76
77
78
79
80
81
82
83
84
85
86
87
88
89
90
91
92
93
94
95
96
97
98
99
100
101
102
103
104
105
106
107
108
109
110
111
112
113
114
115
116
117
118
119
120
121
122
123
124
125
126
127
128
129
130
131
132
133
134
135
136
137
138
139
140
141
142
143
144
145
146
147
148
149
150
151
152
153
154
155
156
157
158
159
160
161
162
163
164
165
166
167
168
169
170
171
172
173
174
175
176
177
178
179
180
181
182
183
184
185
186
187
188
189
190
191
192
193
194
195
196
197
198
199
200
201
202
203
204
205
206
207
208
209
210
211
212
213
214
215
216
217
218
219
220
221
222
223
224
225
226
227
228
229
230
231
232
233
234
235
236
237
238
239
240
241
242
243
244
245
246
247
248
249
250
251
252
253
254
255
256
257
258
259
260
261
262
263
264
265
266
267
268
269
270
271
272
273
274
275
276
277
278
279
280
281
282
283
284
285
286
287
288
289
290
291
292
293
294
295
296
297
298
299
300
301
# Workflow(Action) 名称
name: CI-Testing
# Actions Log 的标题名称
run-name: "[CI-Testing] ${{ github.event.pull_request.title \\|\\| github.ref }}"
# 同个 Concurrency Group 如果有新的 Job 会取消正在跑的
# 例如 Push Commit 触发的任务还没执行就又 Push Commit 时,会取消前一个任务
concurrency:
group: ${{ github.workflow }}-${{ github.event_name }}-${{ github.event.pull_request.number \\|\\| github.ref }}
cancel-in-progress: true
# 触发事件
on:
# PR 事件
pull_request:
# PR - 开启、重开、有新 Push Commit 时
types: [opened, synchronize, reopened]
# 手动表单触发
workflow_dispatch:
# 表单 Inputs 栏位
inputs:
# 执行的 Test Fastlane Lane
TEST_LANE:
description: 'Test Lane'
default: 'run_unit_tests'
type: choice
options:
- run_unit_tests
- run_all_tests
# 其他 Workflow 呼叫此 Workflow 触发
# Nightly Build 会呼叫使用
workflow_call:
# 表单 Inputs 栏位
inputs:
# 执行的 Test Fastlane Lane
TEST_LANE:
description: 'Test Lane'
default: 'run_unit_tests'
# workflow_call inputs 不支援 choice
type: string
BRANCH:
description: 'Branch'
type: string
# Job 工作项目
# Job 会并发执行
jobs:
# Job ID
testing:
# Job 名称 (可省略,有设定在 Log 显示比较好读)
name: Testing
# Runner Label - 使用 GitHub Hosted Runner macos-15 来执行工作
# 请注意:因为此专案是 Public Repo 可以无限免费使用
# 请注意:因为此专案是 Public Repo 可以无限免费使用
# 请注意:因为此专案是 Public Repo 可以无限免费使用
# 如果是 Private Repo 需要按计量收费,macOS 机器是最贵的(10倍),可能跑 10 次就达到 2,000 分钟免费上限
# 建议使用 self-hosted Runner
runs-on: macos-15
# 设定最长 Timeout 时间,防止异常情况发生时无止尽的等待
timeout-minutes: 30
# use zsh
# 可省略,只是我习惯用 zsh,预设是 bash
defaults:
run:
shell: zsh {0}
# 工作步骤
# 工作步骤会照顺序执行
steps:
# git clone 当前专案 & checkout 到执行的分支
- name: Checkout repository
uses: actions/checkout@v3
with:
# Git Large File Storage,我们的测试环境用不到
# default: false
lfs: false
# 如果有指定则 Checkout 指定分支,没有则使用预设(当前分支)
# 因 on: schedule 事件只能在 main 主分支执行,因此想做 Nightly Build 之类的工作就需要指定分支
# e.g. on: schedule -> main 分支,Nightly Build master 分支
ref: ${{ github.event.inputs.BRANCH \\|\\| '' }}
# ========== Env Setup Steps ==========
# 读取专案指定的 XCode 版本
# 在后续之中,我们自己手动指定使用的 XCode_x.x.x.app
# 而不使用 xcversion,因为 xcversion 已经 sunset 不稳定。
- name: Read .xcode-version
id: read_xcode_version
run: \\|
XCODE_VERSION=$(cat .xcode-version)
echo "XCODE_VERSION: ${XCODE_VERSION}"
echo "xcode_version=${XCODE_VERSION}" >> $GITHUB_OUTPUT
# 也可以直接在这指定全域 XCode 版本,这样就不用在后续步骤指定 DEVELOPER_DIR
# 但此指令需要 sudoer 权限,如果是 self-hosted runner 就要确定 runner 执行环境有 sudo 权限
# sudo xcode-select -s "/Applications/Xcode_${XCODE_VERSION}.app/Contents/Developer"
# 读取专案指定的 Ruby 版本
- name: Read .ruby-version
id: read_ruby_version
run: \\|
RUBY_VERSION=$(cat .ruby-version)
echo "RUBY_VERSION: ${RUBY_VERSION}"
echo "ruby_version=${RUBY_VERSION}" >> $GITHUB_OUTPUT
# 安装或设定 Runner Ruby 版本成专案指定版本
- name: Set up Ruby
uses: ruby/setup-ruby@v1
with:
ruby-version: "${{ steps.read_ruby_version.outputs.ruby_version }}"
# 可设可不设,原因是之前在 self-hosted 起多个 runner 跑 CI/CD 因为 cocoapods repos 是共用目录
# 解决的问题是:有很小的机率会出现在同时 pod install 时拉 cocoapods repos 出现冲突(因为预设都是用) $HOME/.cocoapods/
# GitHub Hosted Runner 则不需此设定
# - name: Change Cocoapods Repos Folder
# if: contains(runner.labels, 'self-hosted')
# run: \\|
# # 每个 Runner 用自己的 .cocoapods 资料夹,防止资源冲突
# mkdir -p "$HOME/.cocoapods-${{ env.RUNNER_NAME }}/"
# export CP_HOME_DIR="$HOME/.cocoapods-${{ env.RUNNER_NAME }}"
# rm -f "$HOME/.cocoapods-${{ env.RUNNER_NAME }}/repos/cocoapods/.git/index.lock"
# ========== Cache Setting Steps ==========
# 请注意,就算是 self-hosted,Cache 目前也是 Cloud Cache 会计算用量
# 规则:7 天未 hit 自动删除、单个 Cache 上限 10 GB、Action 成功才会 Cache
# Public Repo: 免费无限制
# Private Repo: 5 GB 起
# Self-hosted 可以自己用 shell script 撰写 Cache & Restore 策略或使用其他工具协助
# Bundle Cache (Gemfile)
# 对应 Makefile 中我们指定了 Bundle 安装路径 ./vendor 下
- name: Cache Bundle
uses: actions/cache@v3
with:
path: \\|
./vendor
key: ${{ runner.os }}-bundle-${{ hashFiles('Gemfile.lock') }}
restore-keys: \\|
${{ runner.os }}-bundle-
# CocoaPods Cache (Podfile)
# 默认就是 专案/Pods 下
- name: Cache CocoaPods
uses: actions/cache@v3
with:
path: \\|
./Product/Pods
key: ${{ runner.os }}-cocoapods-${{ hashFiles('Product/Podfile.lock') }}
restore-keys: \\|
${{ runner.os }}-cocoapods-
# Mint cache
# 对应 Makefile 中我们指定的 Mint 安装路径 ./mint 下
- name: Cache Mint
uses: actions/cache@v3
with:
path: ./mint
key: ${{ runner.os }}-mint-${{ hashFiles('Mintfile') }}
restore-keys: \\|
${{ runner.os }}-mint-
# ====================
# 专案 Setup & 依赖安装
- name: Setup & Install Dependency
run: \\|
# 执行 Makefile 中封装的 Setup 指令,对应成指令大概是:
# brew install mint
# bundle config set path 'vendor/bundle'
# bundle install
# mint bootstrap
# ...
# 等等 setup 指令
make setup
# 执行 Makefile 中封装的 Install 指令,对应成指令大概是:
# mint run yonaskolb/XcodeGen --quiet
# bundle exec pod install
# ...
# 等等 install 指令
make install
# 执行 Fastlane Unit 测试 Lane
- name: Run Tests
id: testing
# 指定工作目录,这样后续指令就不用在特别 cd ./Product/
working-directory: ./Product/
env:
# 测试计划,全跑还是只跑单元测试
# 如为开 PR 触发则使用 run_unit_tests,否则看 inputs.TEST_LANE 的值,预设值 run_all_tests
TEST_LANE: ${{ github.event_name == 'pull_request' && 'run_unit_tests' \\|\\| github.event.inputs.TEST_LANE \\|\\| 'run_all_tests' }}
# 指定这个 Job 要使用 XCode_x.x.x 指定的版本执行
DEVELOPER_DIR: "/Applications/Xcode_${{ steps.read_xcode_version.outputs.xcode_version }}.app/Contents/Developer"
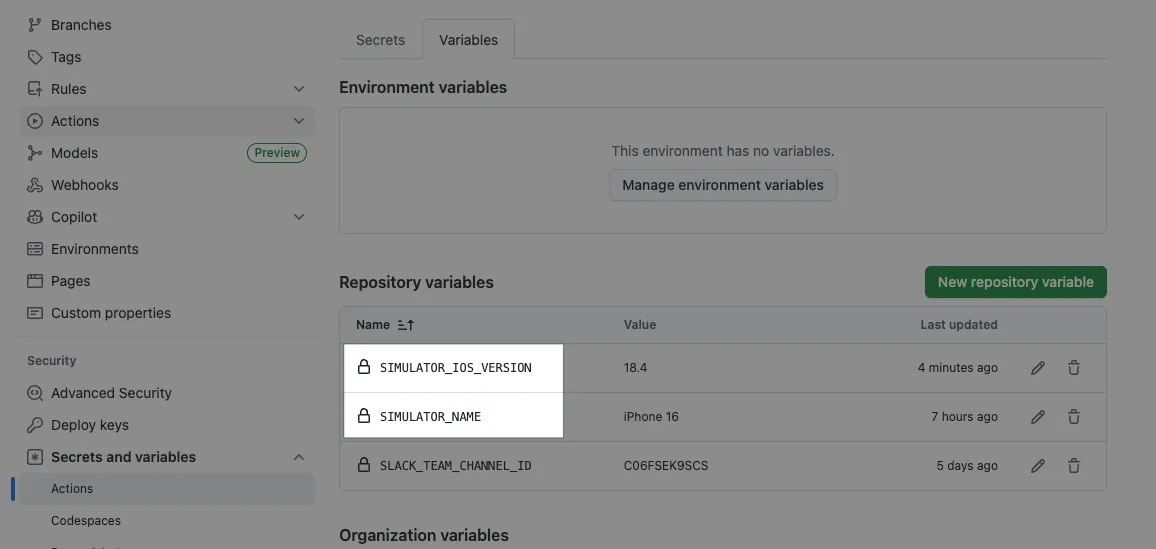
# Repo -> Settings -> Actions secrets and variables -> variables
# 使用的模拟器名称
SIMULATOR_NAME: ${{ vars.SIMULATOR_NAME }}
# 模拟器的 iOS 版本
SIMULATOR_IOS_VERSION: ${{ vars.SIMULATOR_IOS_VERSION }}
# 当前 Runner 名称
RUNNER_NAME: ${{ runner.name }}
# 提升 XCodebuild 指令 timeout 时间, retry 次数
# 因为机器 Loading 比较大的时候可能 3 次就失败了
FASTLANE_XCODEBUILD_SETTINGS_TIMEOUT: 60
FASTLANE_XCODEBUILD_SETTINGS_RETRIES: 10
run: \\|
# 如果是 self-hosted 在同一台机器起多个 Runner 会出现抢模拟器的问题 (文章后会讲)
# 要避免这问题建议将模拟名称命名成 Runner 名称,每个 Runner 都设一个模拟器,这样就不会互抢导致测试失败
# e.g. bundle exec fastlane run_unit_tests device:"${RUNNER_NAME} (${SIMULATOR_IOS_VERSION})"
# 这边是用 GitHub Hosted Runner 没这问题,所以直接用 device:"${SIMULATOR_NAME} (${SIMULATOR_IOS_VERSION})"
# 发生错误不直接退出并将所有输出都写入 temp/testing_output.txt 档案
# 后续我们会分析档案内容区分出是 Build Failed 还是 Test Failed,Comment 不同讯息到 PR
set +e
# EXIT_CODE 储存执行结果的 exit code.
# 0 = OK
# 1 = exit
EXIT_CODE=0
# 所有输出都写入档案
bundle exec fastlane ${TEST_LANE} device:"${SIMULATOR_NAME} (${SIMULATOR_IOS_VERSION})" \\| tee "$RUNNER_TEMP/testing_output.txt"
# 如果目前 EXIT_CODE 是 0,则将 ${pipestatus[1]} 赋值给 EXIT_CODE
[[ $EXIT_CODE -eq 0 ]] && EXIT_CODE=${pipestatus[1]}
# 恢复出错就退出
set -e
# 检查 Testing Output
# 如果 Testing Output 包含 "Error building",则设 is_build_error=true 给 Actions 环境变数,为 Build 就失败
# 如果 Testing Output 包含 "Tests have failed",则设 is_test_error=true 给 Actions 环境变数,为测试失败
if grep -q "Error building" "$RUNNER_TEMP/testing_output.txt"; then
echo "is_build_error=true" >> $GITHUB_OUTPUT
echo "❌ Detected Build Error"
elif grep -q "Tests have failed" "$RUNNER_TEMP/testing_output.txt"; then
echo "is_test_error=true" >> $GITHUB_OUTPUT
echo "❌ Detected Test Error"
fi
# 恢复 Exit Code Output
exit $EXIT_CODE
# ========== Handle Result Steps ==========
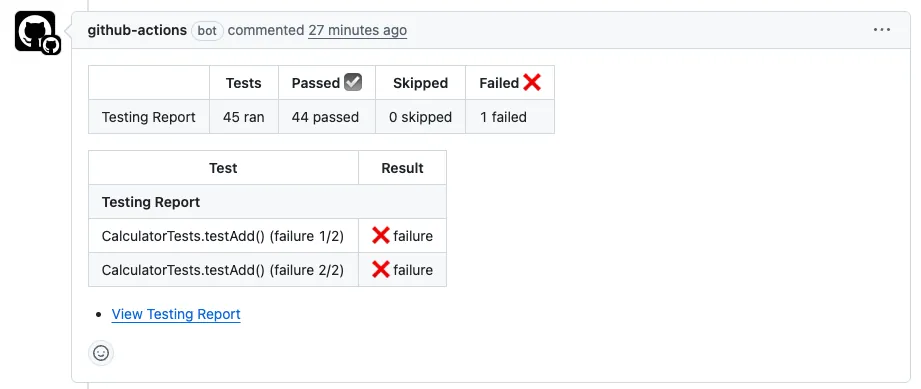
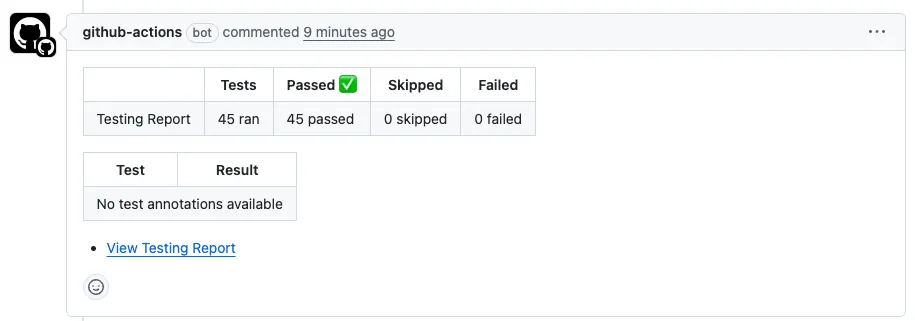
# 解析 *.junit 测试报告,并标记结果、Comment(如果是 PR 的话)
- name: Publish Test Report
# 直接复用别人写好的 .junit Paser Actions: https://github.com/mikepenz/action-junit-report
uses: mikepenz/action-junit-report@v5
# if:
# 上一步(Testing) success or
# 上一步(Testing) failed and is_test_error (build failed 不执行这个 step)
if: ${{ (failure() && steps.testing.outputs.is_test_error == 'true') \\|\\| success() }}
with:
check_name: "Testing Report"
comment: true
updateComment: false
require_tests: true
detailed_summary: true
report_paths: "./Product/fastlane/test_output/*.junit"
# 测试建置失败 Comment
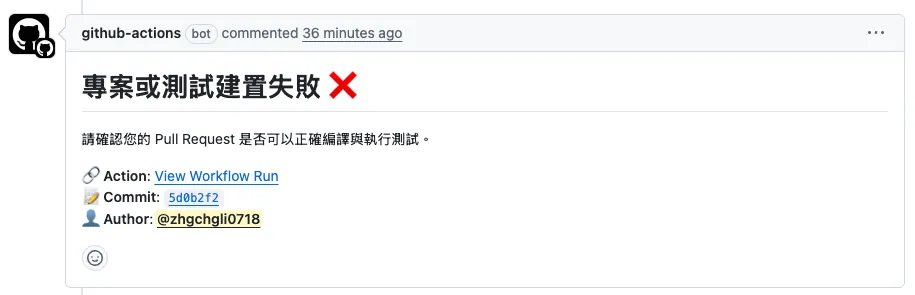
- name: Build Failure Comment
# if:
# 上一步(Testing) failed and is_build_error and 有 PR Number
#
if: ${{ failure() && steps.testing.outputs.is_build_error == 'true' && github.event.pull_request.number }}
uses: actions/github-script@v6
env:
action_url: "${{ github.server_url }}/${{ github.repository }}/actions/runs/${{ github.run_id }}/attempts/${{ github.run_attempt }}"
with:
script: \\|
const action_url = process.env.action_url
const pullRequest = context.payload.pull_request \\|\\| {}
const commitSha = pullRequest.head?.sha \\|\\| context.sha
const creator = pullRequest.user?.login \\|\\| context.actor
const commentBody = [
`# 专案或测试建置失败 ❌`,
`请确认您的 Pull Request 是否可以正确编译与执行测试。`,
``,
`🔗 **Action**: [View Workflow Run](${action_url})`,
`📝 **Commit**: ${commitSha}`,
`👤 **Author**: @${creator}`
].join('\n')
await github.rest.issues.createComment({
owner: context.repo.owner,
repo: context.repo.repo,
issue_number: context.payload.pull_request.number,
body: commentBody
})
技术重点说明:
runs-on: 建议改用 self-hosted Runner, GitHub Hosted Runner macOS 很贵的 。
手动读取
.xcode-version档案取得指定的 XCode 版本并在需要指定 XCode 的 Step 设定DEVELOPER_DIRenv 可以轻松免 Sudo 切换 XCodeCache: 可以加速依赖安装速度,但需注意就算是 self-hosted Runner 依然会使用 GitHub Cloud Cache,受到收费限制
使用
set +e使指令执行失败不会马上退出+将 output 都输出到档案+读取档案判断是 Build Failed or Test Failed;如果不这样做讯息统一都会是 Test Failed。 也可以延伸去判断其他错误,例如:Underlying Error: Unable to boot the Simulator.模拟器启动失败,请重新尝试。Checkout Code 可接受指定分支:因为
on: schedule事件只能在 main (Default Branch) 触发,如果我们希望排程对某个其他分支操作,就需要指定分支。指定 .cocoapods Repo 路径可做可不做,之前是遇过 self-hosted 同一台机器两个 Runner 同时卡在 pod install 就是因为刚好都在针对 .cocoapods Repo 操作造成 git lock。 (但机率很低就是了)
如果你有 Private Pods Repo 需要设定 SSH Agent 才有权限 Clone。 (请参考文末补充)
记得到 Repo -> Settings -> Actions secrets and variables -> variables 新增:
SIMULATOR_IOS_VERSION模拟器 iOS 版本SIMULATOR_NAME模拟器名称
Commit 档案到 Repo 主分支,手动触发一次验证正不正确:
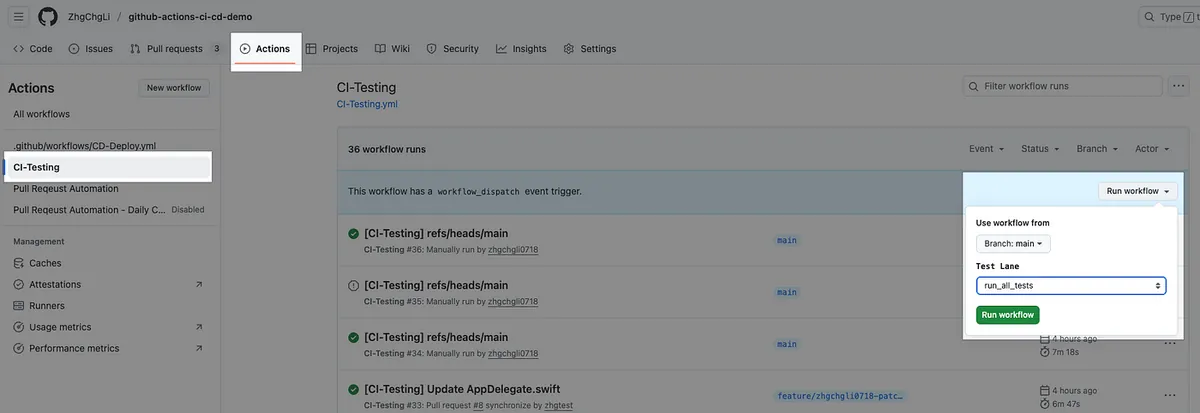
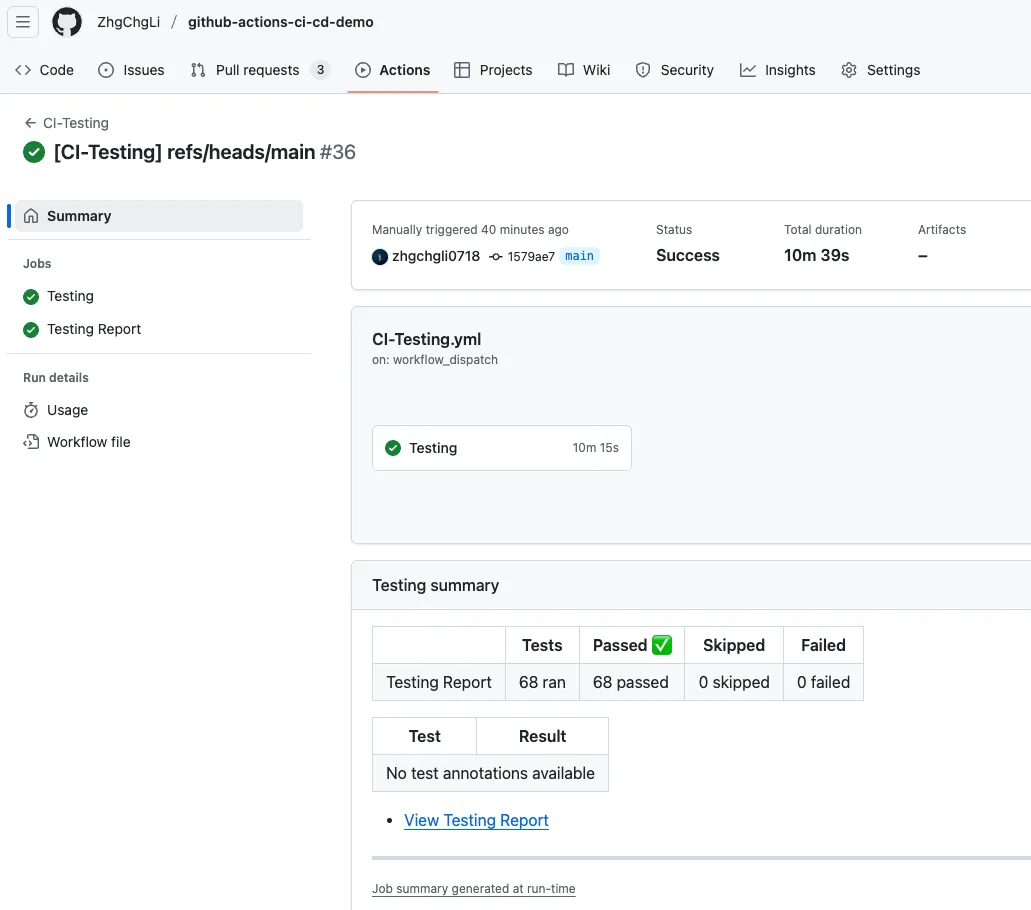
正确后继续设定。
GitHub 流程设定
Repo → Settins → Rules → Rulesets。
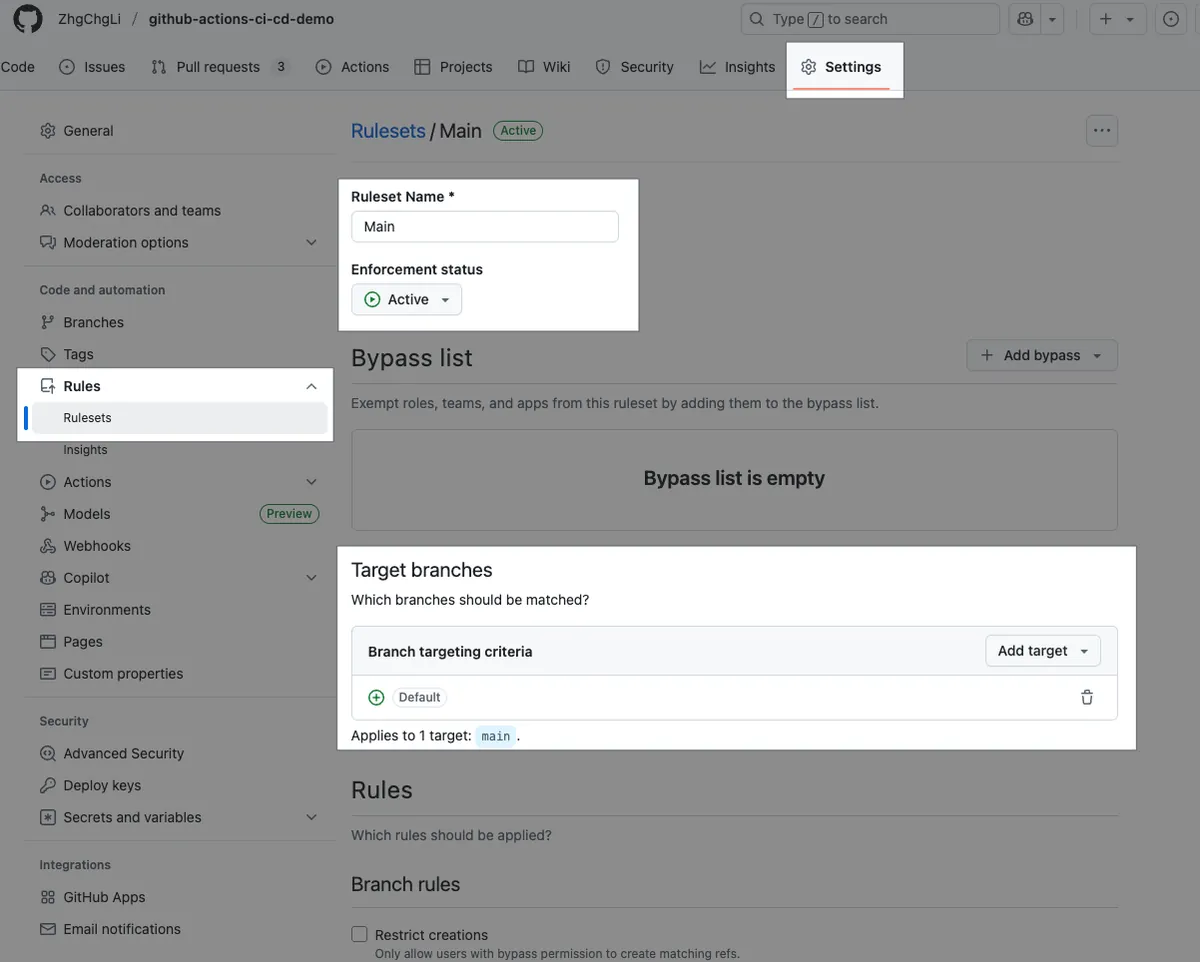
Ruleset Name: 规则名称
Enforcement status: 启用/停用 此规则限制
Target branches: 目标的 Base 分支,设 Default Branch 就是所有想合进到 main or develop 的分支都受到此规则限制
Bypass list: 可指定特殊身份、Team 可以不受此限
Branch rules:
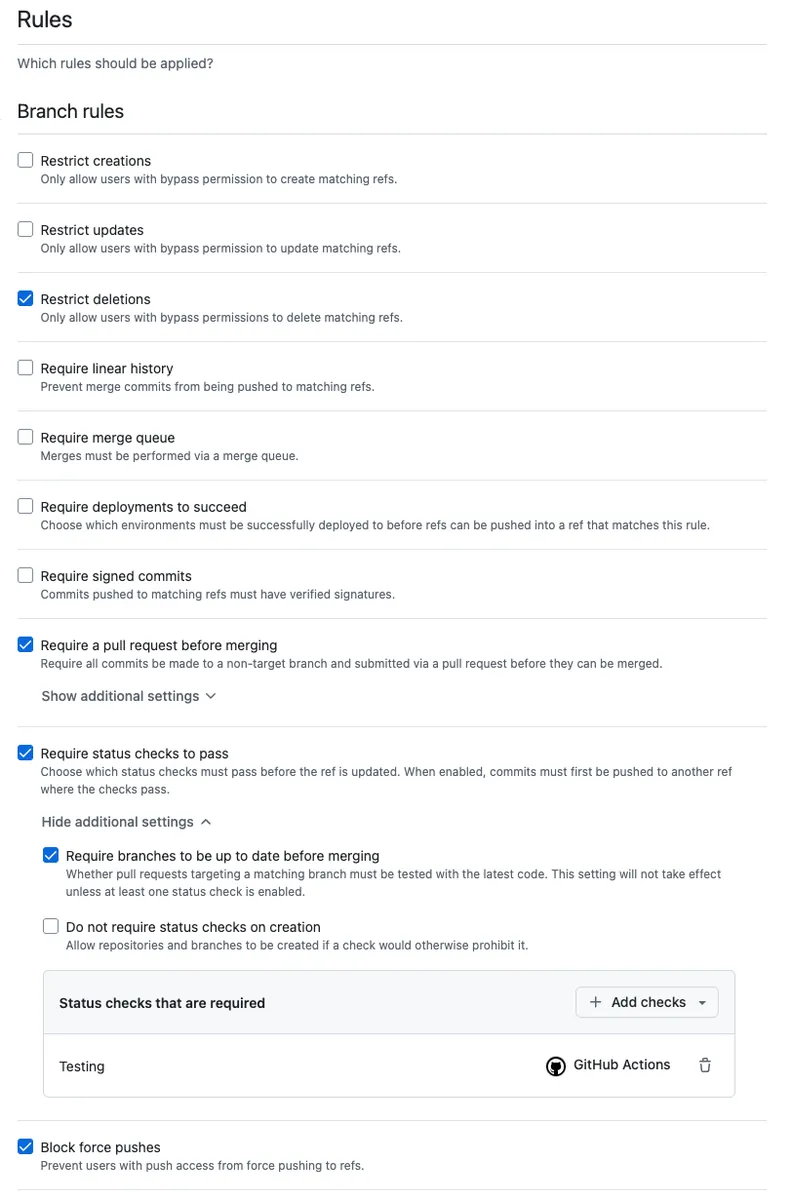
Restrict deletions: 禁止删除分支
Require a pull request before mergin: 只能透过 PR Merge Required approvals: 限制需要几人 Approve
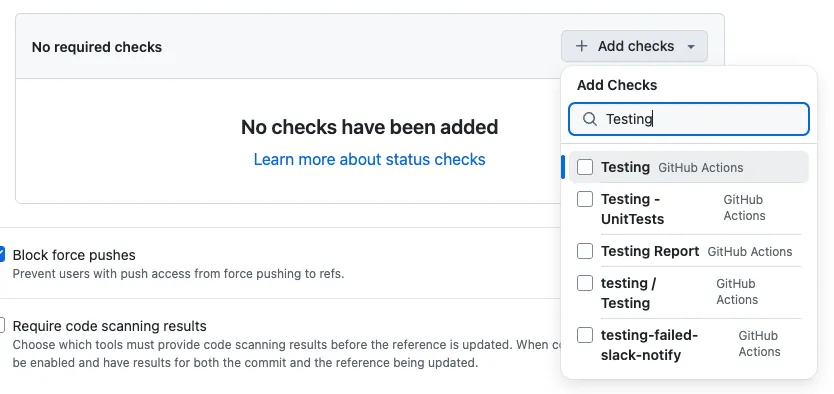
Require status checks to pass: 限制哪些 Checks 要 Passed 才能 Merge 点 + Add checks 输入
Testing选择有 GitHub Actions 标志的。 这边有个小问题,如果 Suggestions 找不到Testing那需要先回到 Actions 触发(开 PR 试试)成功一次,这里才会出现。
- Block force pushes: 禁止 Force push
储存、确定 Enforcement status 是 Active 后,规则就会生效了。
都设定好之后,开 PR 测试看看:
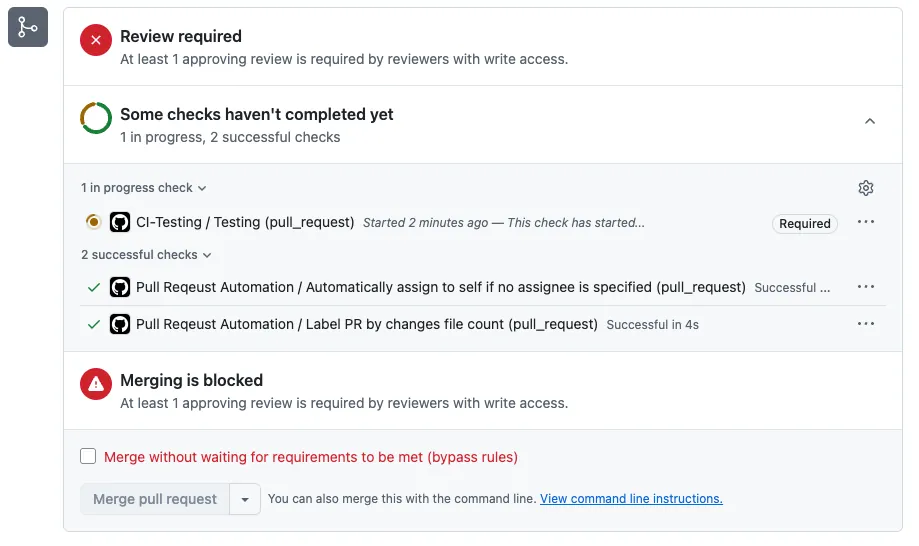
- Checks 有出现 CI-Testing ( Requried )、Merging is blocked、At least X approving review is required by reviewers with write access. 代表设置成功了。
如果专案建置失败 (Build Failed) 会 Comment:
如果专案建置成功但测试案例失败 (Test Failed) 会 Comment:
如果专案建置成功测试也成功(Test Success) 会 Comment:
完成 Review Approve + Check 测试通过后:
就能 Merge PR。
- 如果有 Push New Commit 会自动重跑 Checks 测试。
完整程式码: CI-Testing.yml
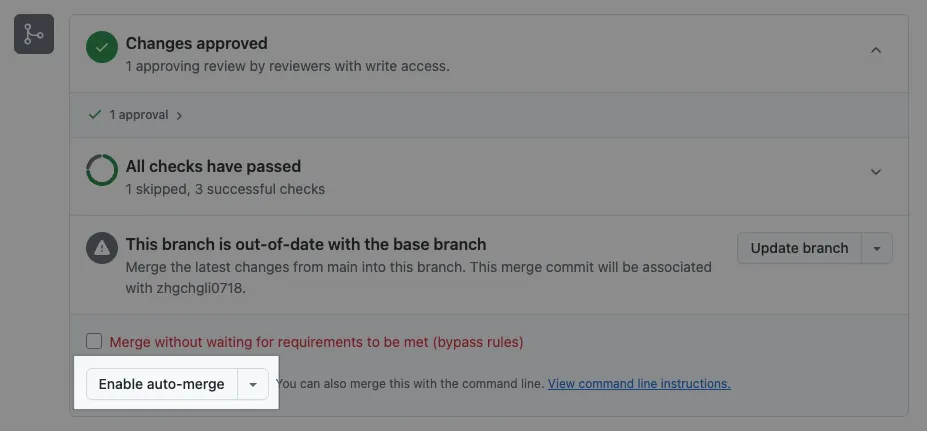
Auto-merge:
另外,也可以打开 Repo Settings → General → Pull Request 中的:
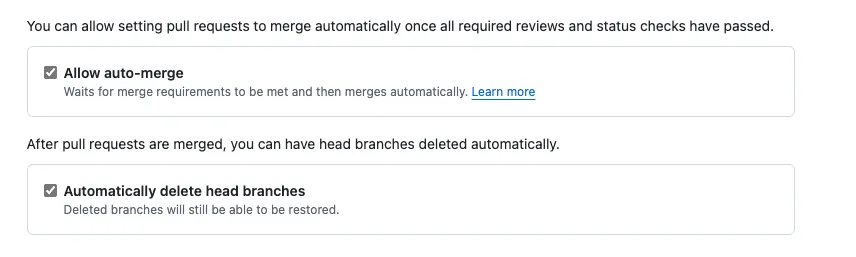
Automatically delete head branches: Merge PR 后自动删除分支
Allow Auto-merge: 当 Checks 通过+符合条件的 Approvals 达成会自动 Merge PR 只有当有设条件+当前条件还不能 Merge 时才会出现 Enable auto-merge 按钮。
CD — 打包+部署到 Firebase App Distribution
流程
使用 GitHub Actions 表单触发打包工作,可指定版本号、Release Notes,打包完会自动上传到 Firebase App Distribution 供团队下载测试使用。
CD-Deploy.yml
Repo → Actions → New workflow → set up a workflow yourself。
1
2
3
4
5
6
7
8
9
10
11
12
13
14
15
16
17
18
19
20
21
22
23
24
25
26
27
28
29
30
31
32
33
34
35
36
37
38
39
40
41
42
43
44
45
46
47
48
49
50
51
52
53
54
55
56
57
58
59
60
61
62
63
64
65
66
67
68
69
70
71
72
73
74
75
76
77
78
79
80
81
82
83
84
85
86
87
88
89
90
91
92
93
94
95
96
97
98
99
100
101
102
103
104
105
106
107
108
109
110
111
112
113
114
115
116
117
118
119
120
121
122
123
124
125
126
127
128
129
130
131
132
133
134
135
136
137
138
139
140
141
142
143
144
145
146
147
148
149
150
151
152
153
154
155
156
157
158
159
160
161
162
163
164
165
166
167
168
169
170
171
172
173
174
175
176
177
178
179
180
181
182
183
184
185
186
187
188
189
190
191
192
193
194
195
196
197
198
199
200
201
202
203
204
205
206
207
208
209
210
211
212
213
214
215
216
217
218
219
220
221
222
223
224
225
226
227
228
229
230
231
232
233
234
235
236
237
238
239
240
241
242
243
244
245
246
247
248
249
250
251
252
253
254
255
256
257
258
259
260
261
262
263
264
265
266
267
268
269
270
271
272
273
274
275
276
277
278
279
280
281
282
283
284
285
286
287
288
289
290
291
292
293
294
295
296
297
298
299
300
301
302
303
304
305
306
307
308
309
310
311
312
313
314
315
316
317
318
# Workflow(Action) 名称
name: CD-Deploy

# Actions Log 的标题名称
run-name: "[CD-Deploy] ${{ github.ref }}"

# 同个 Concurrency Group 如果有新的 Job 会取消正在跑的
# 例如 重复触发相同分支的打包任务,会取消前一个任务
concurrency:
  group: ${{ github.workflow }}-${{ github.event_name }}-${{ github.ref }}
  cancel-in-progress: true

# 触发事件
on:
  # 手动表单触发
  workflow_dispatch:
    # 表单 Inputs 栏位
    inputs:
      # App 版本号
      VERSION_NUMBER:
        description: 'Version Number of the app (e.g., 1.0.0). Auto-detect from the Xcode project if left blank.'
        required: false
        type: string
      # App Build Number
      BUILD_NUMBER:
        description: 'Build number of the app (e.g., 1). Will use a timestamp if left blank.'
        required: false
        type: string
      # App Release Note
      RELEASE_NOTE:
        description: 'Release notes of the deployment.'
        required: false
        type: string
  # 其他 Workflow 呼叫此 Workflow 触发
  # Nightly Build 会呼叫使用
  workflow_call:
    inputs:
      # App 版本号
      VERSION_NUMBER:
        description: 'Version Number of the app (e.g., 1.0.0). Auto-detect from the Xcode project if left blank.'
        required: false
        type: string
      # App Build Number
      BUILD_NUMBER:
        description: 'Build number of the app (e.g., 1). Will use a timestamp if left blank.'
        required: false
        type: string
      # App Release Note
      RELEASE_NOTE:
        description: 'Release notes of the deployment.'
        required: false
        type: string
      BRANCH:
        description: 'Branch'
        type: string


# 定义全域静态变数
env:
  APP_STORE_CONNECT_API_KEY_FILE_NAME: "app_store_connect_api_key.json"

# Job 工作项目
# Job 会并发执行
jobs:
  # Job ID
  deploy:
    # Job 名称 (可省略,有设定在 Log 显示比较好读)
    name: Deploy - Firebase App Distribution

    # Runner Label - 使用 GitHub Hosted Runner macos-15 来执行工作
    # 请注意:因为此专案是 Public Repo 可以无限免费使用
    # 请注意:因为此专案是 Public Repo 可以无限免费使用
    # 请注意:因为此专案是 Public Repo 可以无限免费使用
    # 如果是 Private Repo 需要按计量收费,macOS 机器是最贵的(10倍),可能跑 10 次就达到 2,000 分钟免费上限
    # 建议使用 self-hosted Runner
    runs-on: macos-15

    # 设定最长 Timeout 时间,防止异常情况发生时无止尽的等待
    timeout-minutes: 30

    # use zsh
    # 可省略,只是我习惯用 zsh,预设是 bash
    defaults:
      run:
        shell: zsh {0}

    # 工作步骤
    # 工作步骤会照顺序执行
    steps:
      # git clone 当前专案 & checkout 到执行的分支
      - name: Checkout repository
        uses: actions/checkout@v3
        with:
          # Git Large File Storage,我们的测试环境用不到
          # default: false
          lfs: false

          # 如果有指定则 Checkout 指定分支,没有则使用预设(当前分支)
          # 因 on: schedule 事件只能在 main 主分支执行,因此想做 Nightly Build 之类的工作就需要指定分支
          # e.g. on: schedule -> main 分支,Nightly Build master 分支
          ref: ${{ github.event.inputs.BRANCH \\|\\| '' }}

      # ========== Certificates Steps ==========

      # 建议是使用 Fastlnae - Match 管理开发凭证并在 Lane 中直接执行 match 安装设定好
      # Match 会用另一个 Private Repo 管理凭证,但要设定好 SSH Agent 才有权限 git clone private repo
      # ref: https://stackoverflow.com/questions/57612428/cloning-private-github-repository-within-organisation-in-actions
      #
      #
      # --- 以下是没有使用 Fastlane - Match 的情况下直接下载 & Import 凭证给 Runner 的做法 ---
      # ref: https://docs.github.com/en/actions/how-tos/use-cases-and-examples/deploying/installing-an-apple-certificate-on-macos-runners-for-xcode-development
      #
      # GitHub Actions Secret 无法储存档案,因此所有凭证档案都要先转成 Base64 Encoded 文字格式存在 Secret
      # 在 GitHub Actions Step 中再动态读出来写入 TEMP 档案并移动到正确位置给系统读取使用
      # 其他设定细节请参考文章
      #
      - name: Install the Apple certificate and provisioning profile
        env:
          BUILD_CERTIFICATE_BASE64: ${{ secrets.BUILD_CERTIFICATE_BASE64 }}
          P12_PASSWORD: ${{ secrets.BUILD_CERTIFICATE_P12_PASSWORD }}
          BUILD_PROVISION_PROFILE_BASE64: ${{ secrets.BUILD_PROVISION_PROFILE_BASE64 }}
          # GitHub Hosted Runner 为自定义字串
          # Self-hosted Runner 为机器登入密码
          KEYCHAIN_PASSWORD: ${{ secrets.KEYCHAIN_PASSWORD }}
        run: \\|
          # create variables
          CERTIFICATE_PATH=$RUNNER_TEMP/build_certificate.p12
          PP_PATH=$RUNNER_TEMP/build_pp.mobileprovision
          KEYCHAIN_PATH=$RUNNER_TEMP/app-signing.keychain-db

          # import certificate and provisioning profile from secrets
          echo -n "$BUILD_CERTIFICATE_BASE64" \\| base64 --decode -o $CERTIFICATE_PATH
          echo -n "$BUILD_PROVISION_PROFILE_BASE64" \\| base64 --decode -o $PP_PATH

          # create temporary keychain
          security create-keychain -p "$KEYCHAIN_PASSWORD" $KEYCHAIN_PATH
          security set-keychain-settings -lut 21600 $KEYCHAIN_PATH
          security unlock-keychain -p "$KEYCHAIN_PASSWORD" $KEYCHAIN_PATH

          # import certificate to keychain
          security import $CERTIFICATE_PATH -P "$P12_PASSWORD" -A -t cert -f pkcs12 -k $KEYCHAIN_PATH
          security set-key-partition-list -S apple-tool:,apple: -k "$KEYCHAIN_PASSWORD" $KEYCHAIN_PATH
          security list-keychain -d user -s $KEYCHAIN_PATH

          # apply provisioning profile
          mkdir -p ~/Library/MobileDevice/Provisioning\ Profiles
          cp $PP_PATH ~/Library/MobileDevice/Provisioning\ Profiles

      # App Store Connect API Fastlane JSON Key
      # 另一个在打包环境几乎是必须的 App Store Connect API Fastlane JSON Key (.json)
      # format: .json 内容格式:https://docs.fastlane.tools/app-store-connect-api/
      # 里面包含 App Store Connect API .p8 Key
      # 会在后续带给 Fastlane,用于上传到 Testflight、App Store API 使用
      #
      # GitHub Actions Secret 无法储存档案,因此所有凭证档案都要先转成 Base64 Encoded 文字格式存在 Secret
      # 在 GitHub Actions Step 中再动态读出来写入 TEMP 档案供其他步骤引用使用
      # 其他设定细节请参考文章
      - name: Read and Write Apple Store Connect API Key to Temp
        env:
          APP_STORE_CONNECT_API_KEY_BASE64: ${{ secrets.APP_STORE_CONNECT_API_KEY_BASE64 }}
          APP_STORE_CONNECT_API_KEY_PATH: "${{ runner.temp }}/${{ env.APP_STORE_CONNECT_API_KEY_FILE_NAME }}"
        run: \\|
          # import certificate and provisioning profile from secrets
          echo -n "$APP_STORE_CONNECT_API_KEY_BASE64" \\| base64 --decode -o $APP_STORE_CONNECT_API_KEY_PATH

      # ========== Env Setup Steps ==========

      # 读取专案指定的 XCode 版本
      # 在后续之中,我们自己手动指定使用的 XCode_x.x.x.app
      # 而不使用 xcversion,因为 xcversion 已经 sunset 不稳定。
      - name: Read .xcode-version
        id: read_xcode_version
        run: \\|
          XCODE_VERSION=$(cat .xcode-version)
          echo "XCODE_VERSION: ${XCODE_VERSION}"
          echo "xcode_version=${XCODE_VERSION}" >> $GITHUB_OUTPUT

          # 也可以直接在这指定全域 XCode 版本,这样就不用在后续步骤指定 DEVELOPER_DIR
          # 但此指令需要 sudoer 权限,如果是 self-hosted runner 就要确定 runner 执行环境有 sudo 权限
          # sudo xcode-select -s "/Applications/Xcode_${XCODE_VERSION}.app/Contents/Developer"

      # 读取专案指定的 Ruby 版本
      - name: Read .ruby-version
        id: read_ruby_version
        run: \\|
          RUBY_VERSION=$(cat .ruby-version)
          echo "RUBY_VERSION: ${RUBY_VERSION}"
          echo "ruby_version=${RUBY_VERSION}" >> $GITHUB_OUTPUT

      # 安装或设定 Runner Ruby 版本成专案指定版本
      - name: Set up Ruby
        uses: ruby/setup-ruby@v1
        with:
          ruby-version: "${{ steps.read_ruby_version.outputs.ruby_version }}"

      # 可设可不设,原因是之前在 self-hosted 起多个 runner 跑 CI/CD 因为 cocoapods repos 是共用目录
      # 解决的问题是:有很小的机率会出现在同时 pod install 时拉 cocoapods repos 出现冲突(因为预设都是用) $HOME/.cocoapods/
      # GitHub Hosted Runner 则不需此设定
      # - name: Change Cocoapods Repos Folder
      #   if: contains(runner.labels, 'self-hosted')
      #   run: \\|
      #     # 每个 Runner 用自己的 .cocoapods 资料夹,防止资源冲突
      #     mkdir -p "$HOME/.cocoapods-${{ env.RUNNER_NAME }}/"
      #     export CP_HOME_DIR="$HOME/.cocoapods-${{ env.RUNNER_NAME }}"
      #     rm -f "$HOME/.cocoapods-${{ env.RUNNER_NAME }}/repos/cocoapods/.git/index.lock"

      # ========== Cache Setting Steps ==========
      # 请注意,就算是 self-hosted,Cache 目前也是 Cloud Cache 会计算用量
      # 规则:7 天未 hit 自动删除、单个 Cache 上限 10 GB、Action 成功才会 Cache
      # Public Repo: 免费无限制
      # Private Repo: 5 GB 起
      # Self-hosted 可以自己用 shell script 撰写 Cache & Restore 策略或使用其他工具协助

      # Bundle Cache (Gemfile)
      # 对应 Makefile 中我们指定了 Bundle  安装路径 ./vendor 下
      - name: Cache Bundle
        uses: actions/cache@v3
        with:
          path: \\|
            ./vendor
          key: ${{ runner.os }}-bundle-${{ hashFiles('Gemfile.lock') }}
          restore-keys: \\|
            ${{ runner.os }}-bundle-

      # CocoaPods Cache (Podfile)
      # 默认就是 专案/Pods 下
      - name: Cache CocoaPods
        uses: actions/cache@v3
        with:
          path: \\|
            ./Product/Pods
          key: ${{ runner.os }}-cocoapods-${{ hashFiles('Product/Podfile.lock') }}
          restore-keys: \\|
            ${{ runner.os }}-cocoapods-

      # Mint cache
      # 对应 Makefile 中我们指定的 Mint 安装路径 ./mint 下
      - name: Cache Mint
        uses: actions/cache@v3
        with:
          path: ./mint
          key: ${{ runner.os }}-mint-${{ hashFiles('Mintfile') }}
          restore-keys: \\|
            ${{ runner.os }}-mint-

      # ====================

      # 专案 Setup & 依赖安装
      - name: Setup & Install Dependency
        run: \\|
          # 执行 Makefile 中封装的 Setup 指令,对应成指令大概是:
          # brew install mint
          # bundle config set path 'vendor/bundle'
          # bundle install
          # mint bootstrap
          # ...
          # 等等 setup 指令
          make setup

          # 执行 Makefile 中封装的 Install 指令,对应成指令大概是:
          # mint run yonaskolb/XcodeGen --quiet
          # bundle exec pod install
          # ...
          # 等等 install 指令
          make install

      - name: Deploy Beta
        id: deploy
        # 指定工作目录,这样后续指令就不用在特别 cd ./Product/
        working-directory: ./Product/
        env:
          # 打包 Input 参数
          VERSION_NUMBER: ${{ inputs.VERSION_NUMBER \\|\\| '' }}
          BUILD_NUMBER: ${{ inputs.BUILD_NUMBER \\|\\| '' }}
          RELEASE_NOTE: ${{ inputs.RELEASE_NOTE \\|\\| '' }}
          AUTHOR: ${{ github.actor }}

          # Repo -> Settings -> Actions secrets and variables -> secrets
          # Firebase CLI Token 密钥 (取得方式请参考文章)
          FIREBASE_CLI_TOKEN: ${{ secrets.FIREBASE_CLI_TOKEN }}
          # Apple Developer Program Team ID
          TEAM_ID: ${{ secrets.TEAM_ID }}

          # 指定这个 Job 要使用 XCode_x.x.x 指定的版本执行
          DEVELOPER_DIR: "/Applications/Xcode_${{ steps.read_xcode_version.outputs.xcode_version }}.app/Contents/Developer"
        run: \\|
          # 取得当前 Timestamp
          BUILD_TIMESTAMP=$(date +'%Y%m%d%H%M%S')

          # 如果 BUILD_NUMBER 没有值,用 Timestamp 当 App Build Number
          BUILD_NUMBER="${BUILD_NUMBER:-$BUILD_TIMESTAMP}"

          ID="${{ github.run_id }}"
          COMMIT_SHA="${{ github.sha }}"
          BRANCH_NAME="${{ github.ref_name }}"
          AUTHOR="${{ env.AUTHOR }}"

          # 组合 Release Note
          RELEASE_NOTE="${{ env.RELEASE_NOTE }}
          ID: ${ID}
          Commit SHA: ${COMMIT_SHA}
          Branch: ${BRANCH_NAME}
          Author: ${AUTHOR}
          "

          # 执行 Fastlane 打包&部署 Lane
          bundle exec fastlane beta release_notes:"${RELEASE_NOTE}" version_number:"${VERSION_NUMBER}" build_number:"${BUILD_NUMBER}"

      # GitHub Actions 建议的 self-hosted 安全性设定:
      # ref: https://docs.github.com/en/actions/how-tos/use-cases-and-examples/deploying/installing-an-apple-certificate-on-macos-runners-for-xcode-development#required-clean-up-on-self-hosted-runners
      # 对应 Step: Install the Apple certificate and provisioning profile
      # 用途是删除机器上下载下来的金钥凭证
      # 如果你是用 Match 则需要改写成 Match 的 Clean
      - name: Clean up keychain and provisioning profile
        if: ${{ always() && contains(runner.labels, 'self-hosted') }}
        run: \\|
          security delete-keychain $RUNNER_TEMP/app-signing.keychain-db
          rm ~/Library/MobileDevice/Provisioning\ Profiles/build_pp.mobileprovision
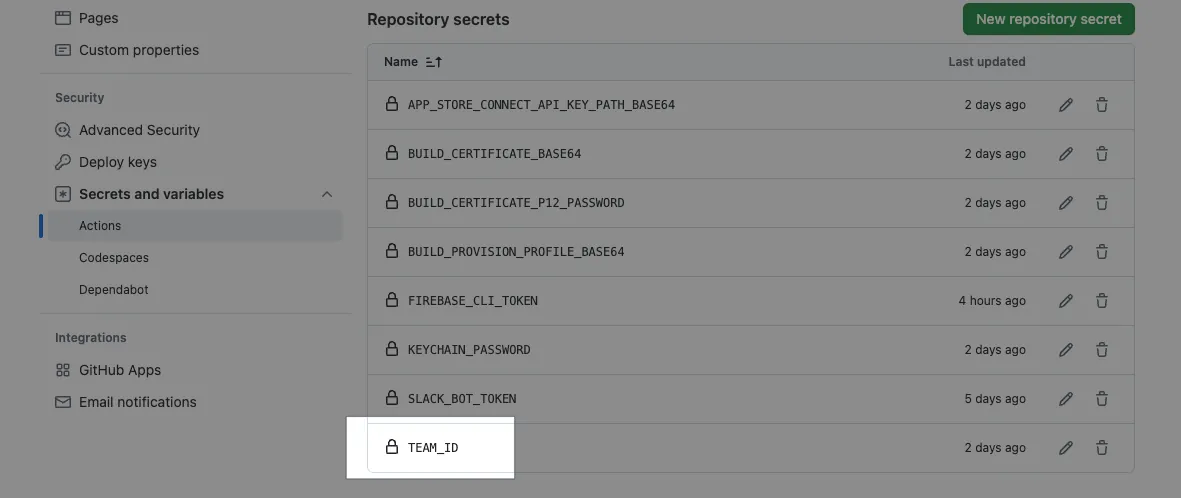
- 记得到 Repo -> Settings -> Actions secrets and variables -> secrets 新增一个
TEAM_ID变数,内容是 Apple Developer Team ID 字串。
Commit 档案到 Repo 主分支,测试看看打包功能:
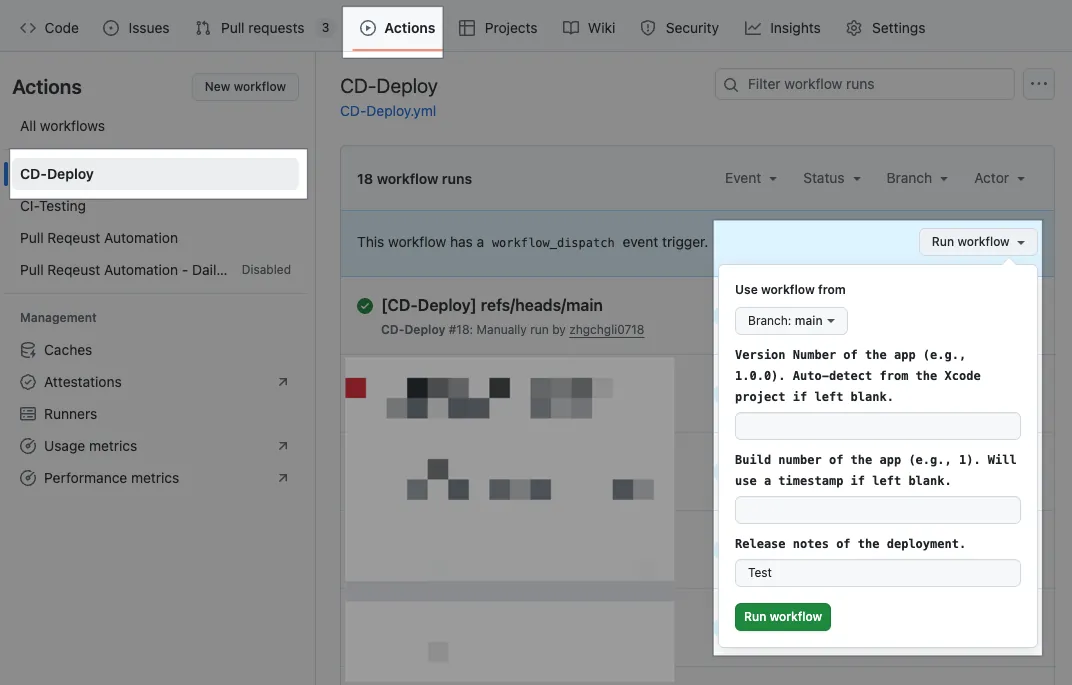
请注意若其他分支要使用此 Action 需要先 Merge 主分支的 CD-Deploy.yml 档案。
等待任务跑完:

{:target="_blank"}](/assets/4b001d2e8440/1*W8PBkatfsITMDFSlp7xpjg.webp)
打包+部署成功 ✅
完整程式码: CD-Deploy.yml
技术细节 — Firebase CLI Token 取得&设定
按照 Firebase 官方文件步骤 :
先安装好 Firebase CLI 工具:
1
curl -sL https://firebase.tools \\| bash
执行:
1
firebase login:ci
完成登入、授权:
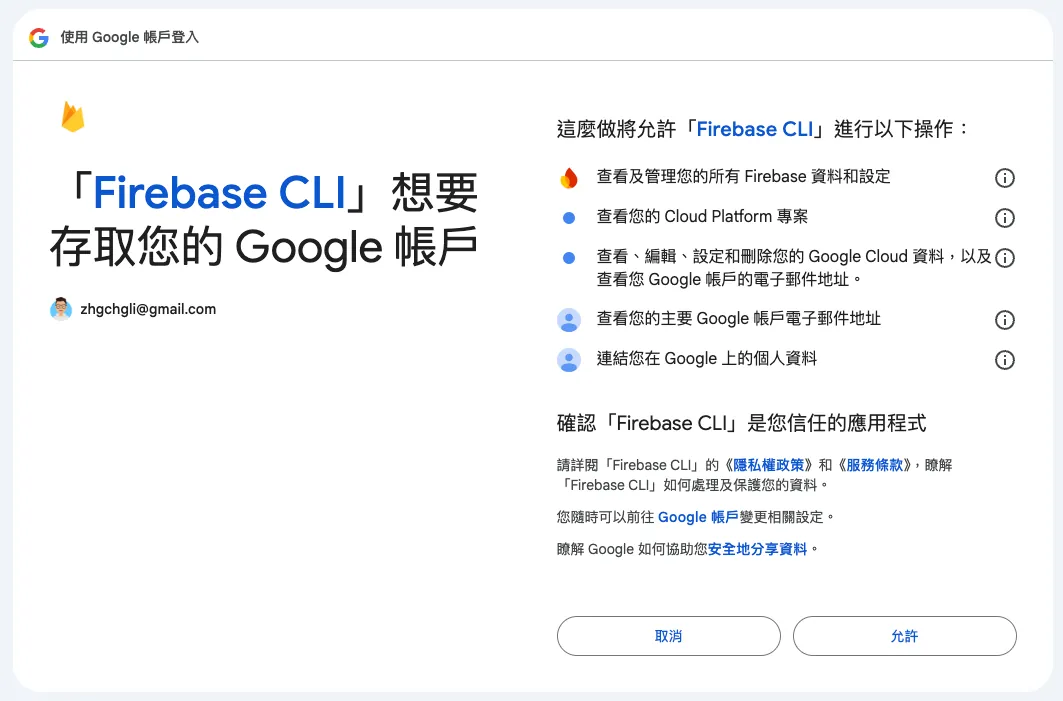

回到 Terminal 复制 Firebase CLI Token:
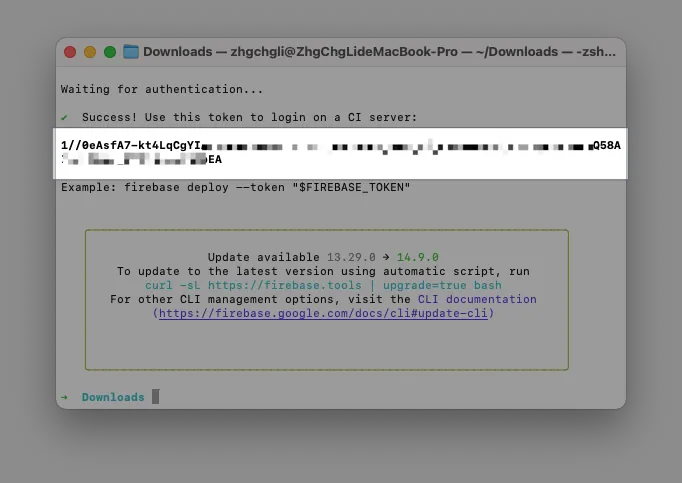
到 Repo → Settings → Secrets and variables → Actions → 新增一个 Secret: FIREBASE_CLI_TOKEN 并贴上 Firebase CLI Token。
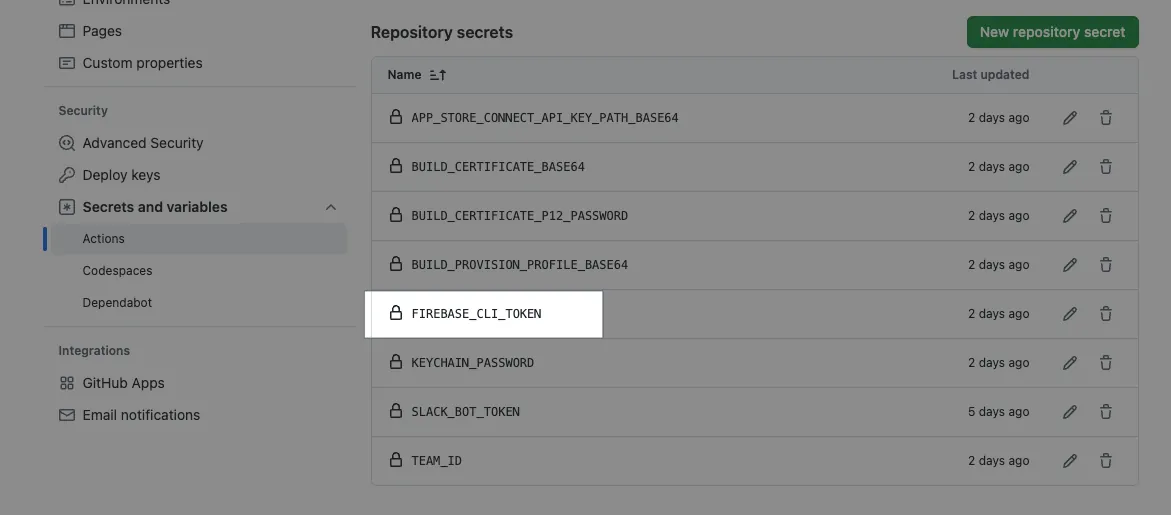
这个 Token = 你的登入身份 ,请妥善保存,如果帐号离职也需要进行更换。
技术细节 — Install the Apple certificate and provisioning profile
补充开发凭证汇入 Runner 的步骤细节。
因 GitHub Actions Secret 无法储存档案,因此所有凭证档案都要先转成 Base64 Encoded 文字格式存在 Secrets,GitHub Actions Step 中再动态读出来写入 TEMP 档案并移动到正确位置给系统读取使用。
打包 Development 需要两把金钥凭证:
cicd.mobileprovision
development.cer
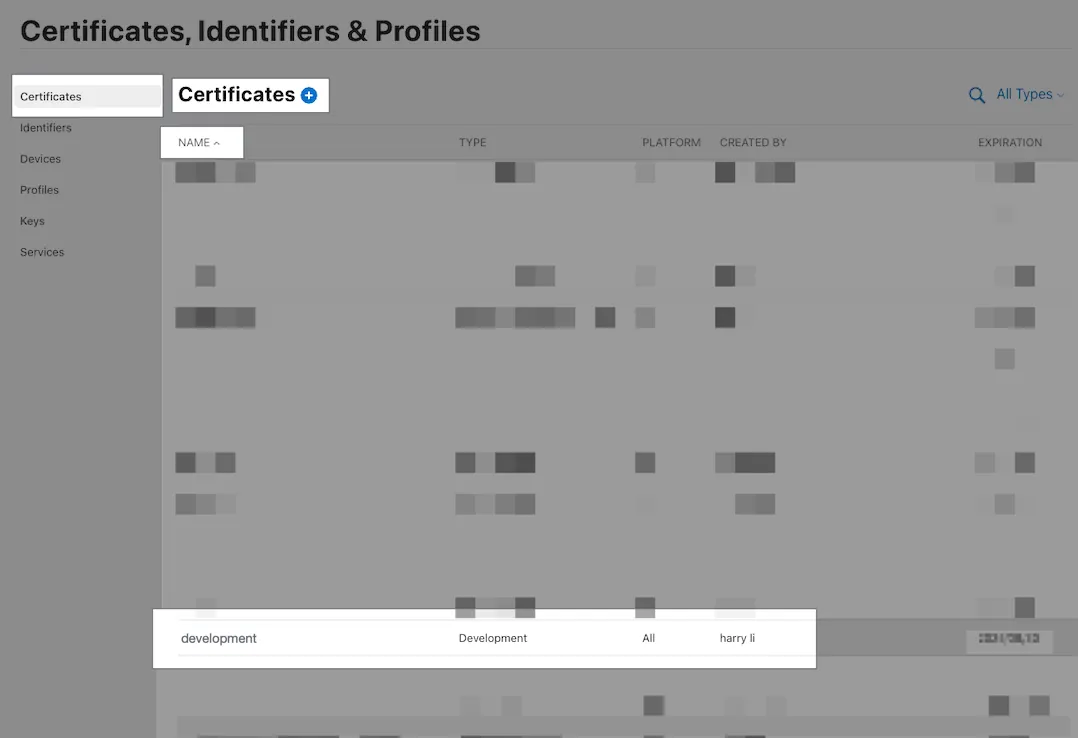
从 Apple Developer 中下载的 Certificate 是 .cer 格式,而我们需要的是 .p12 格式,可以先把下载下来的 .cer 点两下安装到 Keychain,然后打开 Keychain 选择该凭证右键 Export 汇出。
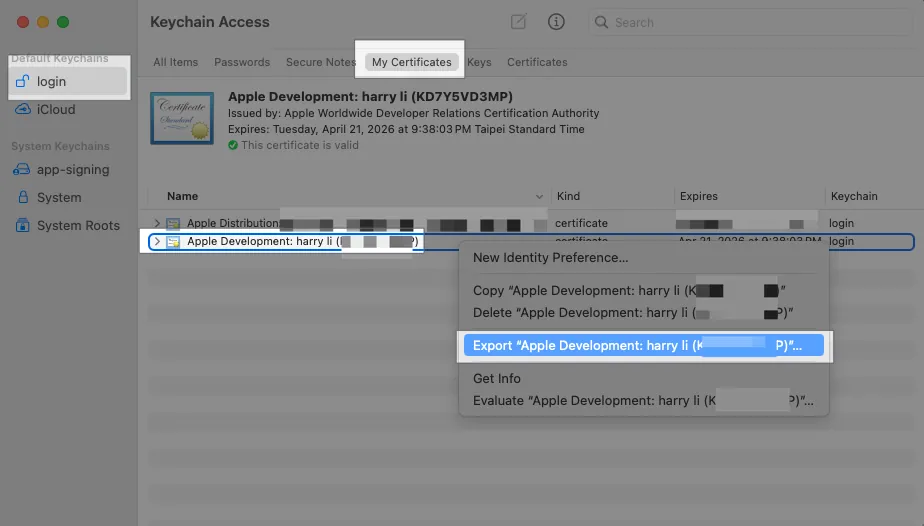
档案名称:cicd.p12、格式 .p12
P12 金钥密码:输入一组安全的自订义字串 (范例是不好的示范,用 123456 )
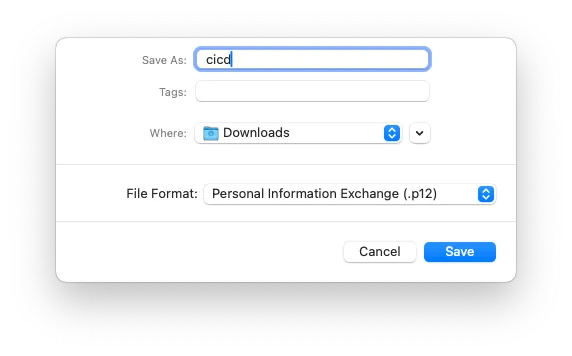

现在两个档案: cicd.p12、cicd.mobileprovision 都准备好了
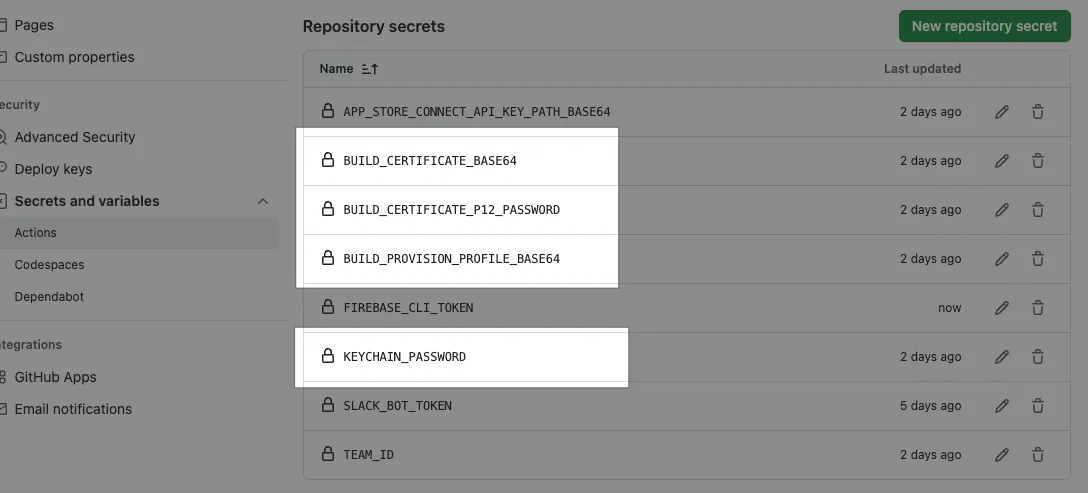
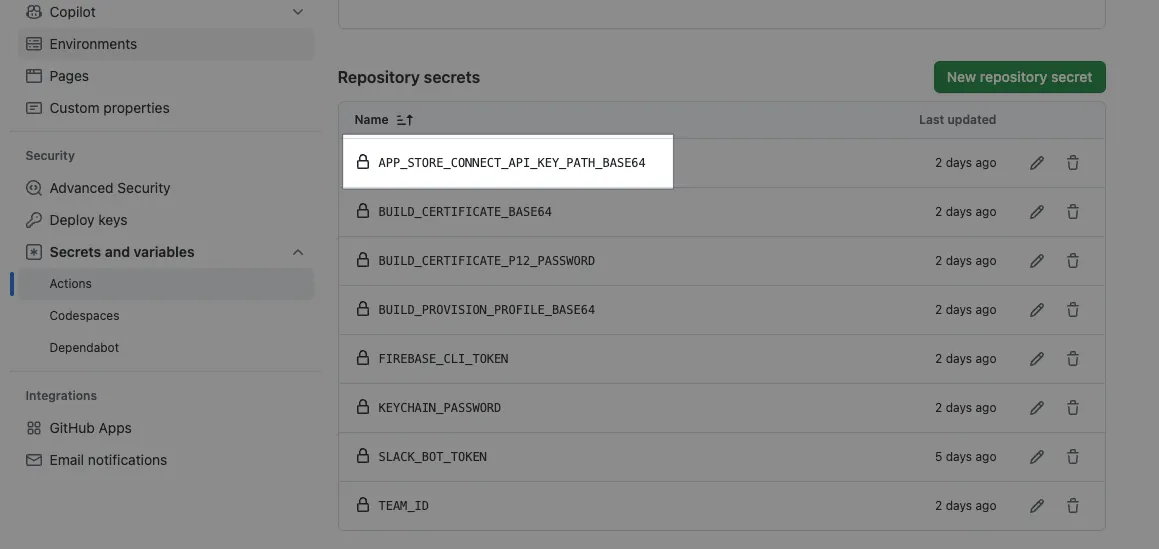
转换成 BASE64 格式字串并存到 Repo Secrets:
1
base64 -i cicd.mobileprovision \\| pbcopy
到 Repo → Settings → Secrets and variables → Actions → 新增一个 Secret: BUILD_PROVISION_PROFILE_BASE64 并贴上以上内容。
-
1
base64 -i cicd.p12 \\| pbcopy
到 Repo → Settings → Secrets and variables → Actions → 新增一个 Secret: BUILD_CERTIFICATE_BASE64 并贴上以上内容。
-
到 Repo → Settings → Secrets and variables → Actions → 新增一个 Secret: P12_PASSWORD 内容是刚汇出 P12 金钥设定的密码。
- 到 Repo → Settings → Secrets and variables → Actions → 新增一个 Secret: KEYCHAIN_PASSWORD : 如果是 GitHub Hosted Runner 则随便输入一个任意字串, 如果是 Self-hosted Runner 则为 macOS Runner 使用者的登入密码 。
技术细节 —App Store Connect API Key
Fastlane 打包部署到 App Store, Testflight 必须提供的 .json 金钥 ,同样受限 GitHub Actions Secrets 只能存字串不能存档案,所以我们也要把金钥内容转成 Base64 字串,GitHub Actions Step 中再动态读出来写入 TEMP 档案并把档案路径给 Fastlane 引用使用。
首先到 App Store Connect 建立&下载好 App Store Connect API Key ( .p8) :
-----BEGIN PRIVATE KEY-----
sss
axzzvcxz
zxzvzcxv
vzxcvzxvczxcvz
-----END PRIVATE KEY-----
新增一个 app_store_connect_api.json 档案( 内容参考 ):
1
2
3
4
5
6
7
{
  "key_id": "App Store Connect 上写的 Key ID",
  "issuer_id": "App Store Connect 上写的 Issuer ID",
  "key": "-----BEGIN PRIVATE KEY-----记得把换行改成\n-----END PRIVATE KEY-----",
  "duration": 1200, # optional (maximum 1200)
  "in_house": false # optional but may be required if using match/sigh
}
储存档案后执行:
1
base64 -i app_store_connect_api.json \\| pbcopy
将字串内容贴到 Repo → Settings → Secrets and variables → Actions → 新增一个 Secret: APP_STORE_CONNECT_API_KEY_BASE64 并贴上以上内容。
Read and Write Apple Store Connect API Key to Temp Step 完成之后在后续的 Step 只要传入 env APP_STORE_CONNECT_API_KEY_PATH :
1
2
3
4
5
- name: Deploy
  env:
    APP_STORE_CONNECT_API_KEY_PATH: "${{ runner.temp }}/${{ env.APP_STORE_CONNECT_API_KEY_FILE_NAME }}"
  run: \\|
    ....
Fastlane 就能自动取得使用。
技术延伸 — Reuse Action Workflow 拆分打包和部署动作
在这个案例中我们直接使用 Fastlane beta Lane 执行打包+部署两个动作。
在实际案例中我们可能需要将同一包打包结果分别部署到不同平台上(Firebase, Testflight…etc) 因此比较好的做法是打包是一个 Action、部署是一个 Action,不然会重复跑两次打包;而且也更符合 CI/CD 的权责划分。
以下为范例介绍:
CI-Build.yml:
1
2
3
4
5
6
7
8
9
10
11
12
13
14
15
16
17
18
19
20
21
22
23
24
25
26
27
28
29
30
31
32
33
34
name: Build

on:
  push:
    branches:
      - main
  workflow_call:
     inputs:
        RELEASE_NOTE:
          description: 'Release notes of the deployment.'
          required: false
          type: string

jobs:
  build:
    runs-on: macos-latest

    steps:
      - name: Checkout Code
        uses: actions/checkout@v4

      - name: Install Dependencies
        run: \\|
          make steup
          make instal

      - name: Build Project
        run: bundle exec fastlane build

      - name: Upload Build Artifact
        uses: actions/upload-artifact@v4
        with:
          name: build-artifact
          path: ./fastlane/build/
CD-Deploy-Firebase.yml:
1
2
3
4
5
6
7
8
9
10
11
12
13
14
15
16
17
18
19
20
21
22
23
24
25
26
27
28
29
30
31
32
name: Deploy Firebase

on:
  # 当 Build Action 完成时自动触发执行
  workflow_run:
    workflows: ["Build"]
    types:
      - completed

jobs:
  deploy:
    runs-on: ubuntu-latest
    # 完成+执行成功才执行部署
    if: ${{ github.event.workflow_run.conclusion == 'success' }}

    steps:
      - name: Checkout Code
        uses: actions/checkout@v4

      - name: Install Dependencies
        run: \\|
          make steup

      - name: Download Build Artifact
        uses: actions/download-artifact@v4
        with:
          name: build-artifact
          path: ./fastlane/build/

      - name: Deploy to Production
        run: \\|
          bundle exec fastlane deploy-firebase
CD-Deploy-Testflight.yml:
1
2
3
4
5
6
7
8
9
10
11
12
13
14
15
16
17
18
19
20
21
22
23
24
25
26
27
28
29
30
31
32
name: Deploy Testflight

on:
  # 当 Build Action 完成时自动触发执行
  workflow_run:
    workflows: ["Build"]
    types:
      - completed

jobs:
  deploy:
    runs-on: ubuntu-latest
    # 完成+执行成功才执行部署
    if: ${{ github.event.workflow_run.conclusion == 'success' }}

    steps:
      - name: Checkout Code
        uses: actions/checkout@v4

      - name: Install Dependencies
        run: \\|
          make steup

      - name: Download Build Artifact
        uses: actions/download-artifact@v4
        with:
          name: build-artifact
          path: ./fastlane/build/

      - name: Deploy to Production
        run: \\|
          bundle exec fastlane deploy-testflight
另外也可以用 Reusing Workflow :
CD-Deploy-Firebase.yml:
1
2
3
4
5
6
7
8
9
10
11
12
13
14
15
16
17
18
19
20
21
22
23
24
25
26
27
28
29
30
31
32
33
34
35
36
37
38
39
40
41
name: Deploy Firebase

on:
  # 任意的触发条件,这里以手动表单触发为例
  workflow_dispatch:
    inputs:
      RELEASE_NOTE:
        description: 'Release notes of the deployment.'
        required: false
        type: string
jobs:
  build:
    needs: Build
    uses: ./.github/workflows/CD-Build.yml
    secrets: inherit
    with:
      RELEASE_NOTE: ${{ inputs.RELEASE_NOTE }}

  deploy:
    runs-on: ubuntu-latest
    # Job 预设是并发执行,用 needs 限制需等待 build 完成才执行
    needs: [build]
    # 执行成功,才部署
    if: ${{ always() && needs.deploy.result == 'success' }}
    steps:
      - name: Checkout Code
        uses: actions/checkout@v4

      - name: Install Dependencies
        run: \\|
          make steup

      - name: Download Build Artifact
        uses: actions/download-artifact@v4
        with:
          name: build-artifact
          path: ./fastlane/build/

      - name: Deploy to Production
        run: \\|
          bundle exec fastlane deploy-firebase
GitHub Actions — Artifact
同 Cache,目前 就算是 Self-hosted Runner Artifcact 功能依然会走 GitHub Cloud 受到使用量限制 ( 免费帐号 500MB 起 )。
Self-hosted Runner 要达到类似的效果可以自行建立共享主机目录或找其他工具替代。
因此目前 Artifact 实际我只用来存放小资料,例如 Snapshot Tests 的错误结果、测试报告…等等
CI— Nightly Build 执行快照+单元测试+打包+CD 部署到 Firebase App Distribution
流程
每天凌晨 3 点自动针对 main(develop or master) 分支跑全部测试(unit+snapshot tests),如果失败则传送失败通知到 Slack 工作群组;如果成功则打包+部署一个版本到 Firebase App Disturbution,打包成功/失败都会传送 Slack 通知。
CI-Nightly-Build-And-Deploy.yml
Repo → Actions → New workflow → set up a workflow yourself。
1
2
3
4
5
6
7
8
9
10
11
12
13
14
15
16
17
18
19
20
21
22
23
24
25
26
27
28
29
30
31
32
33
34
35
36
37
38
39
40
41
42
43
44
45
46
47
48
49
50
51
52
53
54
55
56
57
58
59
60
61
62
63
64
65
66
67
68
69
70
71
72
73
74
75
76
77
78
79
80
81
82
83
84
85
86
87
88
89
90
91
92
93
94
95
96
97
98
99
100
101
102
# Workflow(Action) 名称
name: CI-Nightly Build And Deploy

# Actions Log 的标题名称
run-name: "[CI-Nightly Build And Deploy] ${{ github.ref }}"

# 触发事件
on:
  # 排程定时自动执行
  # https://crontab.guru/
  # UTC 时间
  schedule:
    # UTC 的 19:00 = 每天 UTC+8 的 03:00
    - cron: '0 19 * * *'
  # 手动触发
  workflow_dispatch:

# Job 工作项目
# Job 会并发执行
jobs:
  # 测试工作
  testing:
    # Reuse Workflow (workflow_call)
    uses: ./.github/workflows/CI-Testing.yml
    # 传递所有 Secrets 给 CD-Testing.yml
    secrets: inherit
    with:
      # 执行全部测试
      TEST_LANE: "run_all_tests"
      # 目标分支:main, develop or master...etc
      BRANCH: "main"

  deploy-env:
    runs-on: ubuntu-latest
    outputs:
      DATE_STRING: ${{ steps.get_date.outputs.DATE_STRING }}
    steps:
      - name: Get Date String
        id: get_date
        run: \\|
          VERSION_DATE=$(date -u '+%Y%m%d')
          echo "${VERSION_DATE}"
          echo "DATE_STRING=${VERSION_DATE}" >> $GITHUB_ENV
          echo "DATE_STRING=${VERSION_DATE}" >> $GITHUB_OUTPUT

  deploy:
    # Job 预设是并发执行,用 needs 限制需等待 testing 和 deploy-env 完成才执行
    needs: [testing, deploy-env]
    # 如果测试成功才执行
    if: ${{ needs.testing.result == 'success' }}
    # Reuse Workflow (workflow_call)
    uses: ./.github/workflows/CD-Deploy.yml
    # 传递所有 Secrets 给 CD-Deploy.yml
    secrets: inherit
    with:
      VERSION_NUMBER: NightlyBuild-${{ needs.deploy-env.outputs.DATE_STRING }}
      RELEASE_NOTE: NightlyBuild-${{ needs.deploy-env.outputs.DATE_STRING }}
      # 目标分支:main, develop or master...etc
      BRANCH: "main"

# ----- Slack Notify -----
  testing-failed-slack-notify:
    needs: [testing]
    runs-on: ubuntu-latest
    if: ${{ needs.testing.result == 'failure' }}
    steps:
      - name: Post text to a Slack channel
        uses: slackapi/slack-github-action@v2.1.0
        with:
          method: chat.postMessage
          token: ${{ secrets.SLACK_BOT_TOKEN }}
          payload: \\|
            channel: ${{ vars.SLACK_TEAM_CHANNEL_ID }}
            text: ":x: Nightly Build - Testing 失败\nWorkflow: <${{ github.server_url }}/${{ github.repository }}/actions/runs/${{ github.run_id }}\\|View Run>"

  deploy-failed-slack-notify:
    needs: [deploy]
    runs-on: ubuntu-latest
    if: ${{ needs.deploy.result == 'failure' }}
    steps:
      - name: Post text to a Slack channel
        uses: slackapi/slack-github-action@v2.1.0
        with:
          method: chat.postMessage
          token: ${{ secrets.SLACK_BOT_TOKEN }}
          payload: \\|
            channel: ${{ vars.SLACK_TEAM_CHANNEL_ID }}
            text: ":x: Nightly Build Deploy 失败\nWorkflow: <${{ github.server_url }}/${{ github.repository }}/actions/runs/${{ github.run_id }}\\|View Run>"

  deploy-success-slack-notify:
    needs: [deploy]
    runs-on: ubuntu-latest
    if: ${{ needs.deploy.result == 'success' }}
    steps:
      - name: Post text to a Slack channel
        uses: slackapi/slack-github-action@v2.1.0
        with:
          method: chat.postMessage
          token: ${{ secrets.SLACK_BOT_TOKEN }}
          payload: \\|
            channel: ${{ vars.SLACK_TEAM_CHANNEL_ID }}
            text: ":white_check_mark: Nightly Build Deploy 成功\nWorkflow: <${{ github.server_url }}/${{ github.repository }}/actions/runs/${{ github.run_id }}\\|View Run>"
Commit 档案到 Repo 主分支,手动触发测试、打包功能看看结果:
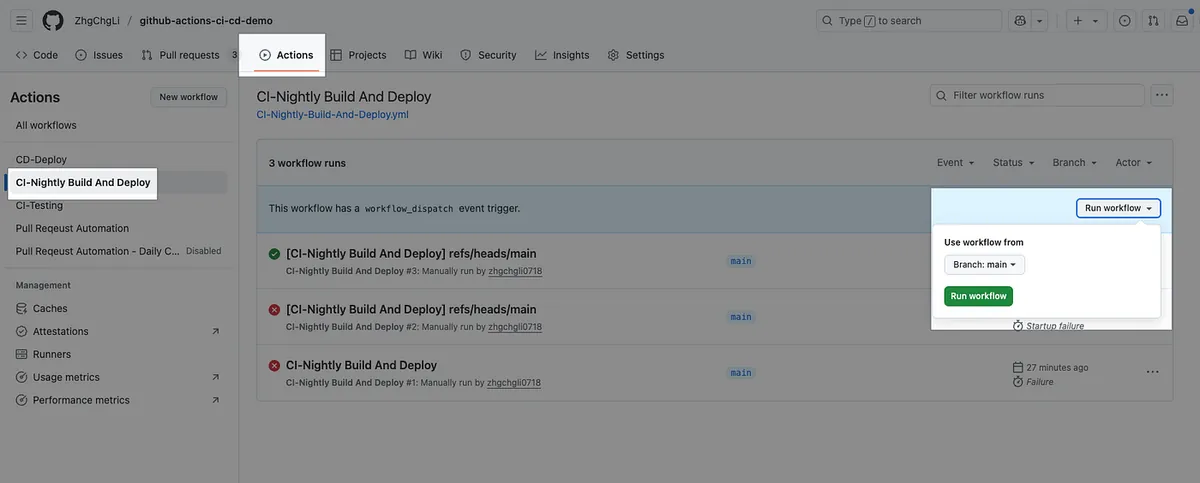
日后会每日自动触发。

等待测试任务、打包部署任务、通知任务都完成后,查看结果。
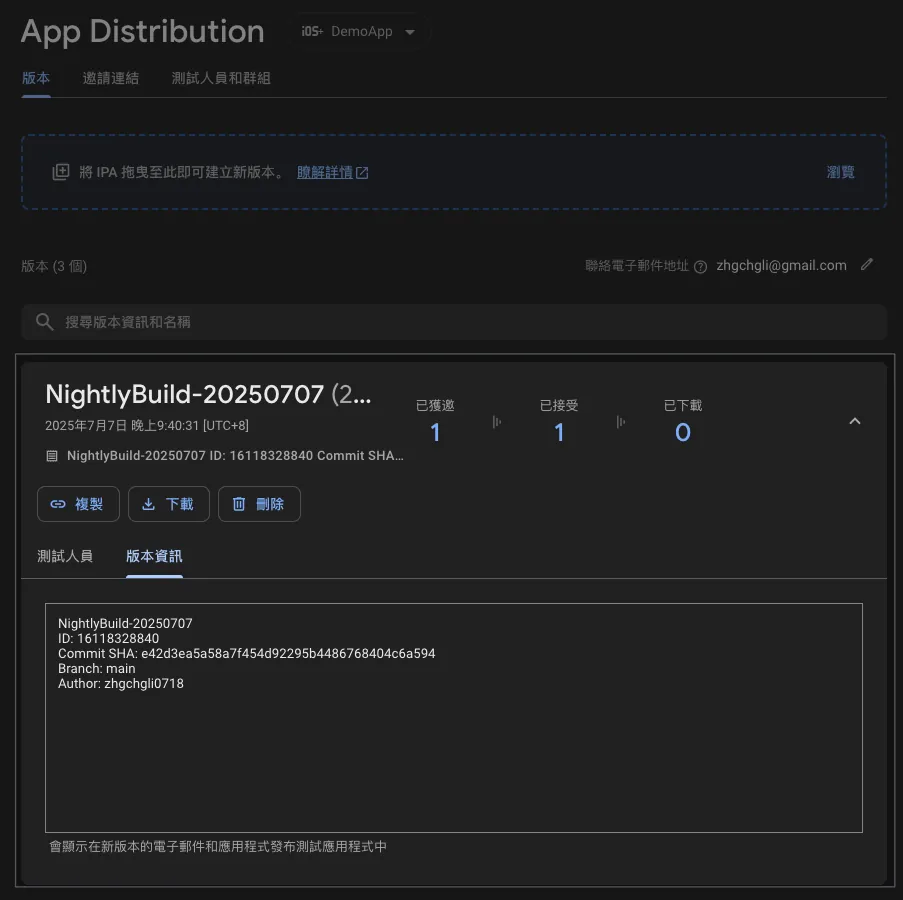
我们就能直接在手机上安装 Nightly Build 版本来进行抢先体验测试。
技术细节
这个 Action 我们直接复用前面设计的 CI-Testing 和 CD-Deploy,组合成我们的 Nightly Build,非常弹性好用!
完整程式码: CI-Nightly-Build-And-Deploy.yml
Self-hosted Runner 注意事项
本文是 Public Repo 因此直接使用 GitHub Hosted 的 macOS Runner,但在实际工作上我们的 Repo 一定是 Private,直接使用 GitHub Hosted Runner 超贵不划算(约一个月就能买一台 Mac Mini 放在公司吃到饱爽爽跑),每一台依照效能可以起多个 Runner 同时并发接任务来做。
细节可参考 上一篇 「 Self-hosted Runner 建置与改用 」部分 ,在本地电脑安装好 XCode 跟基本环境后注册、启用 Runner、Action Worflow YAML 中把
runs-on改成[self-hosted]即可。
多个 Runner 在同一台电脑的问题,我们多半已在上面的 Actions 里解决了,例如把所有依赖的共用目录都改成本地目录,还有一个测试会遇到的问题要解决,就是抢模拟器问题:「 当两个测试 Job 被两个 Runner 在同一台机器上同时检来做,如果指定同个模拟器就会互相干扰导致测试失败。」
解决方法也很容易,就是为个别 Runner 都设定一台模拟器。
多个 Runner 在同台机器的模拟器设定
假设我 同一台电脑上有两个 Runner 在并行接收任务:
ZhgChgLideMacBook-Pro-Runner-AZhgChgLideMacBook-Pro-Runner-B
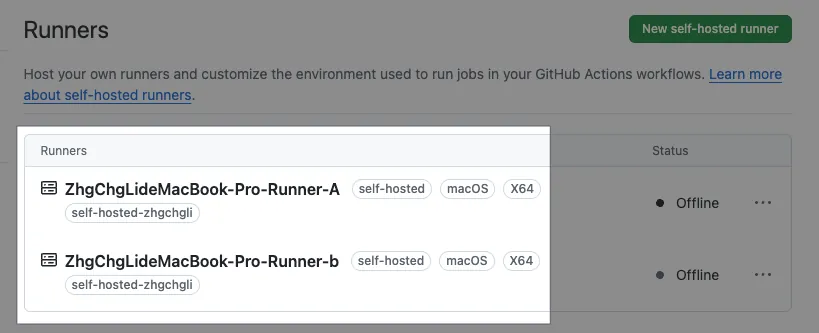
在 XCode 模拟器设定我们就需要新增两个模拟器:
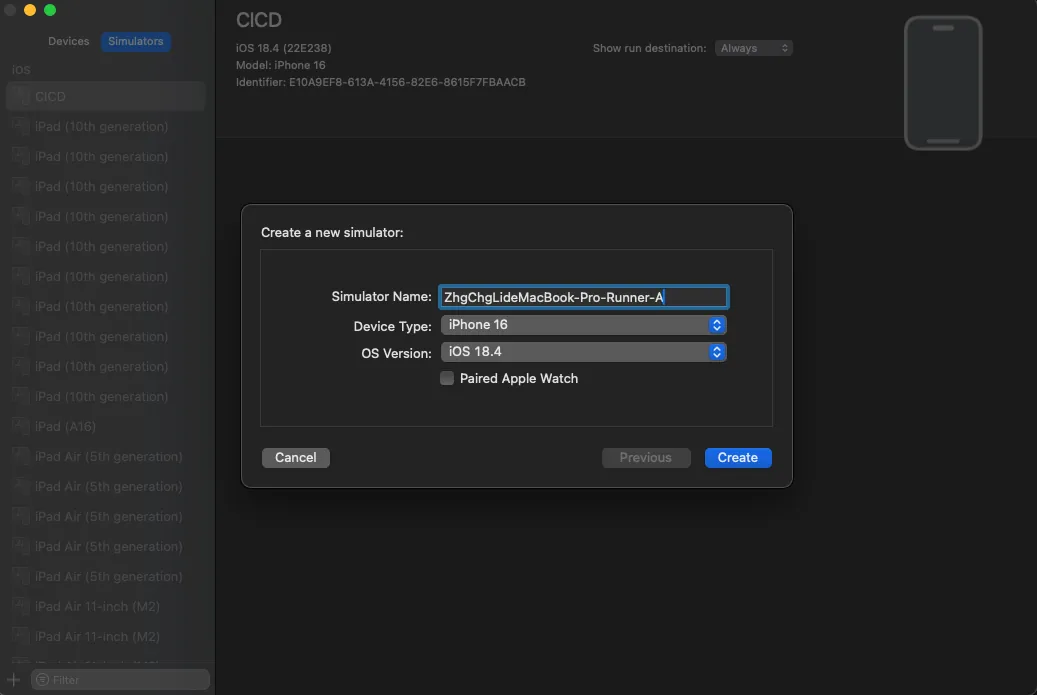
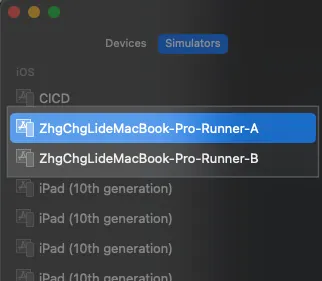
- 型号、iOS 版本同测试环境
CI-Testing.yml 中测试步骤改成:
1
2
3
4
5
6
7
8
9
10
11
12
13
14
15
16
17
18
19
20
# 执行 Fastlane Unit 测试 Lane
      - name: Run Tests
        id: testing
        # 指定工作目录,这样后续指令就不用在特别 cd ./Product/
        working-directory: ./Product/
        env:
          # ...
          # Repo -> Settings -> Actions secrets and variables -> variables
          # 模拟器的 iOS 版本
          SIMULATOR_IOS_VERSION: ${{ vars.SIMULATOR_IOS_VERSION }}

          # 当前 Runner 名称
          RUNNER_NAME: ${{ runner.name }}

          # ...
        run: \\|

          # ...
          bundle exec fastlane ${TEST_LANE} device:"${RUNNER_NAME} (${SIMULATOR_IOS_VERSION})" \\| tee "$RUNNER_TEMP/testing_output.txt"
          # ...
device改成${RUNNER_NAME} (${SIMULATOR_IOS_VERSION})SIMULATOR_IOS_VERSION还是统一看 Repo variables 变数
组合结果就会是(以 18.4 为例):
Runner:
ZhgChgLideMacBook-Pro-Runner-A模拟器: ZhgChgLideMacBook-Pro-Runner-A(18.4)Runner:
ZhgChgLideMacBook-Pro-Runner-B模拟器: ZhgChgLideMacBook-Pro-Runner-B(18.4)
这样两个 Runner 同时在执行测试时就会起两个模拟器自己跑自己的了。
完整专案 Repo
补充 SSH Agent 设定 — For Fastlane Match or Private CocoaPods Repo
在使用 Fastlane Match 或 Private CocoaPods Repo,因为是在另一个 Private Repo 当中,当前 Repo/Action 环境无法直接 git clone,需要使用 ssh agent 设定好环境,在 Action 执行时才有权限操作。
Step 1. 产生 SSH Key
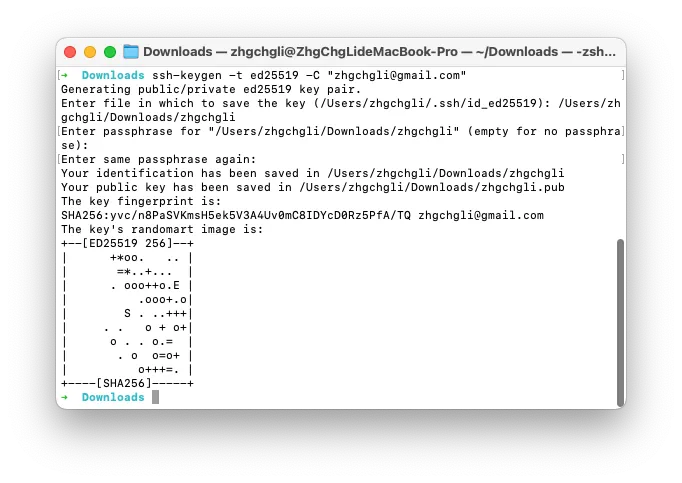
1
ssh-keygen -t ed25519 -C "zhgchgli@gmail.com"
Enter file in which to save the key (/Users/zhgchgli/.ssh/id_ed25519): /Users/zhgchgli/Downloads/zhgchgli
- 输入到下载路径方便我们拷贝内容
Enter passphrase for “/Users/zhgchgli/Downloads/zhgchgli” (empty for no passphrase):
留空: CI/CD 使用,无法在 CLI 交互下输入 Passphrase, 因此请留空
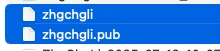
产生完毕 ( .pub/private_key)
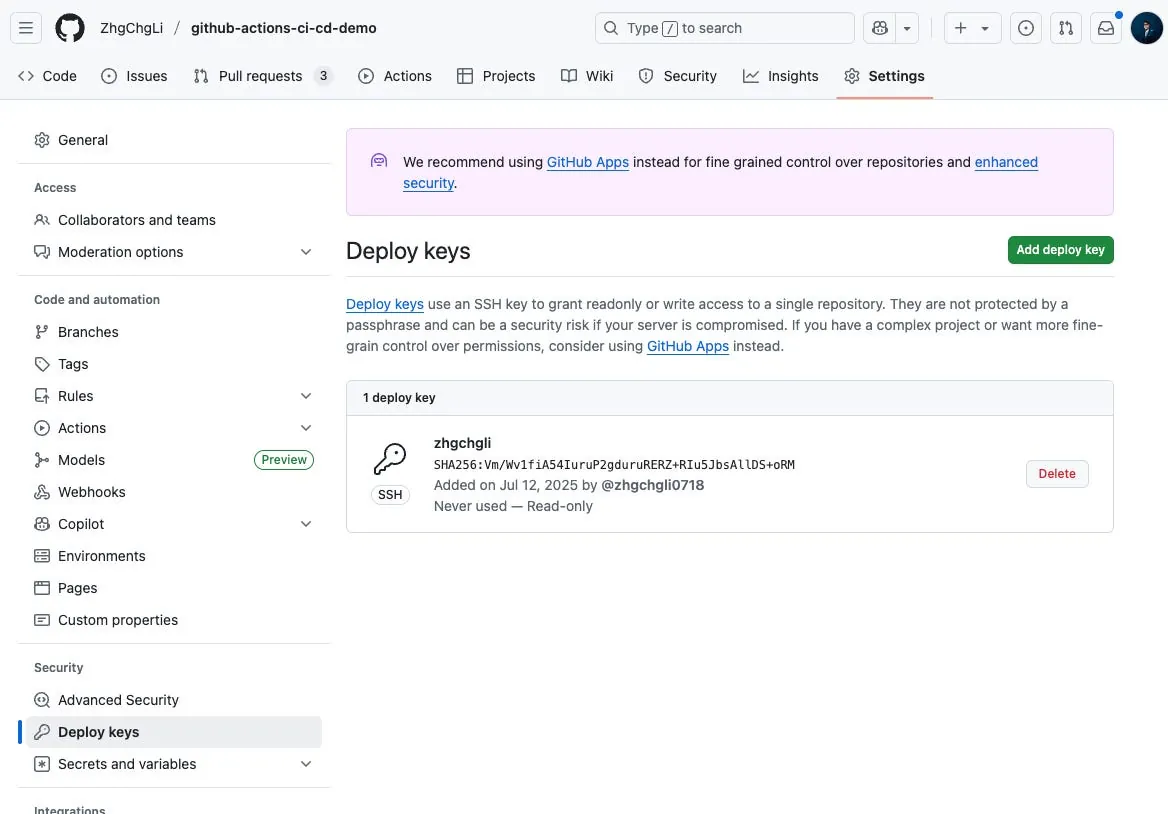
Step 2. 到 Private Repo 设定 Deploy Key
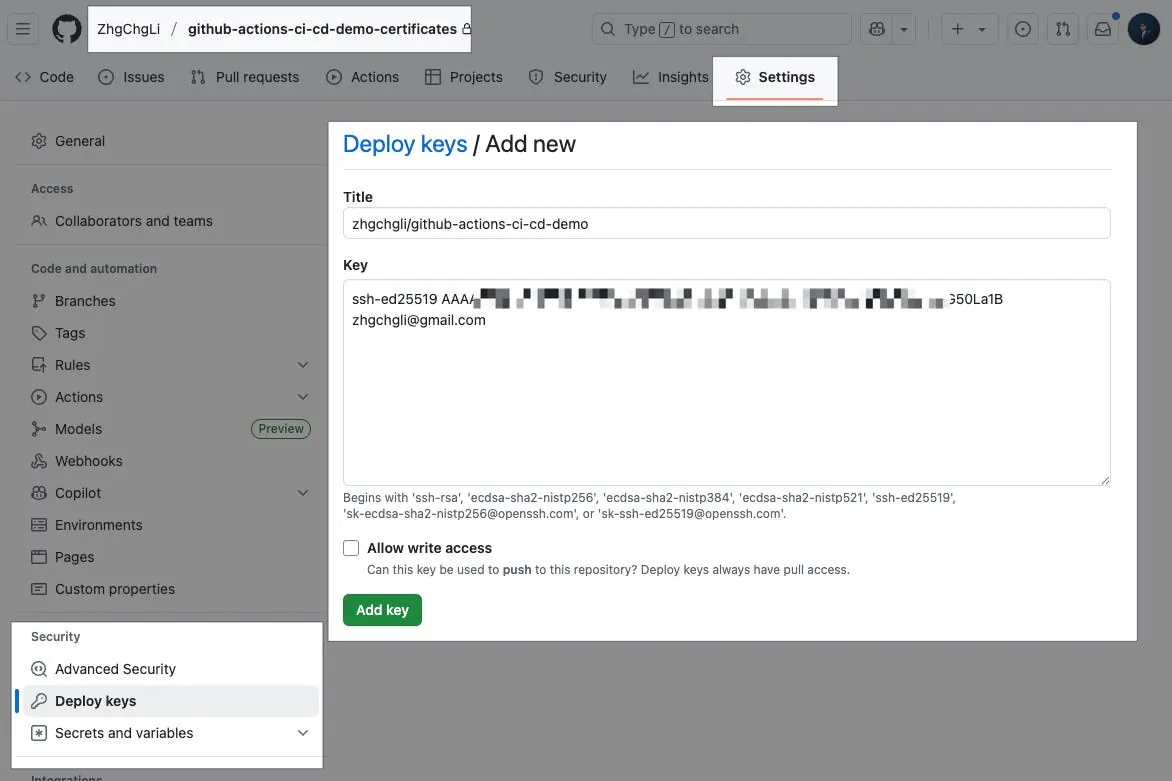
github-actions-ci-cd-demo-certificates Repo
Settings → Security → Deploy keys → Add deploy key。
Title: 输入 Key 名称
Key:
贴上 .pub Key 内容
完成。
Step 3. 回 Action 的 Repo 设定 SSH Private Key to Secrets

github-actions-ci-cd-demo Repo
Settings → Secrets and variables → Actions → New repository secret。
Name: 输入密钥变数名称
SSH_PRIVATE_KEYSecret:
贴上 private_key 内容
完成。
Step 4. SSH Agent 设定完成,来验证一下 Git Clone Private Repo 的权限
Demo-Git-Clone-Private-Repo.yml :
1
2
3
4
5
6
7
8
9
10
11
12
13
14
15
16
17
18
19
20
21
22
23
24
25
26
27
28
29
30
31
32
33
34
35
name: Demo Git Clone Private Repo

on:
  workflow_dispatch:

jobs:
  clone-private-repo:
    name: Git Clone Private Repo
    runs-on: ubuntu-latest
    timeout-minutes: 30

    steps:
      # 🔐 启用 SSH Agent 并加入私钥
      - name: Setup SSH Agent
        uses: webfactory/ssh-agent@v0.9.0
        with:
          ssh-private-key: ${{ secrets.SSH_PRIVATE_KEY }}

      # 🛡️ 将 github.com 加入 known_hosts 以避免 host verification 错误
      - name: Add GitHub to known_hosts
        run: \\|
          mkdir -p ~/.ssh
          ssh-keyscan github.com >> ~/.ssh/known_hosts
      # 📦 使用 SSH clone private repo 并验证
      - name: Clone and Verify Private Repo
        run: \\|
          git clone git@github.com:ZhgChgLi/github-actions-ci-cd-demo-certificates.git ./fakeMatch/
          if [ -d "./fakeMatch/.git" ]; then
            echo "✅ Repo cloned successfully into ./fakeMatch/"
            cd ./fakeMatch
            echo "📌 Current commit: $(git rev-parse --short HEAD)"
          else
            echo "❌ Clone failed. SSH Agent may not be configured properly."
            exit 1
          fi
可以用以上 Action 验证一下是否设定成功。
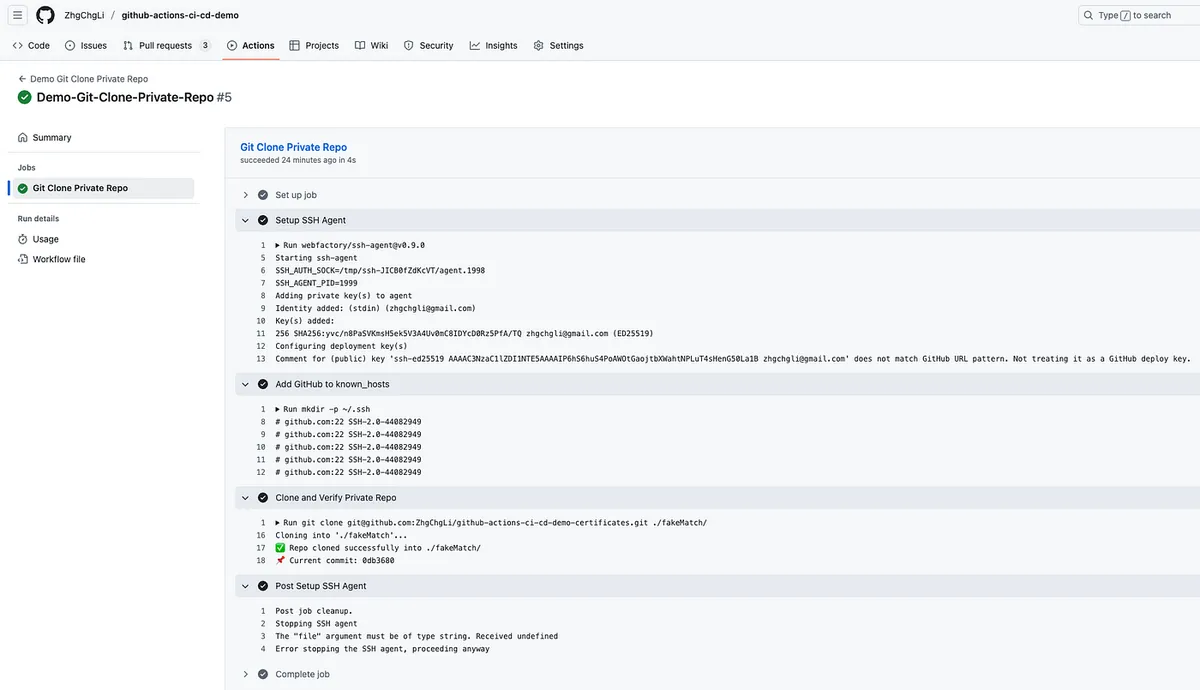
成功,后续 fastlane match or pod install private pods 应该就能正确执行。
总结
这篇文章详细纪录了使用 GitHub Actions 开发完整的 iOS CI/CD 流程,下一篇将优化使用者端(工程师/PM/设计师)体验, 完善 Slack 通知及使用 Google Apps Script Web App 串接 GitHub Actions 打造免费易用的跨团队打包平台工具。
系列文章:
Buy me a coffee
本系列文章花费了大量的时间精力撰写,如果内容对您有帮助、对您的团队有实质提升工作效率与产品品质;欢迎请我喝杯咖啡,感谢支持!
{:target="_blank"}](/assets/4b001d2e8440/1*QJj54G9gOjtQS-rbHVT1SQ.webp)
有任何问题及指教欢迎 与我联络 。

本文首次发表于 Medium (点击查看原始版本),由 ZMediumToMarkdown 提供自动转换与同步技术。