iOS UIViewController 轉場二三事
UIViewController 下拉關閉/上拉出現/全頁右滑返回 效果全解
iOS UIViewController 轉場二三事
UIViewController 下拉關閉/上拉出現/全頁右滑返回 效果全解
前言
一直以來都很好奇諸如 Facebook、Line、Spotify…等等常用的 APP 是如何實作「Present 的 UIViewController 可下拉關閉」、「上拉漸入 UIViewController」、「全頁面支援手勢右滑返回」這些效果的。
因為這些效果內建都沒有,下拉關閉也直到 iOS ≥ 13 才有系統的卡片樣式支援。
探索之路
不知道是不會下關鍵字還是資料本身難找,一直找不到這類功能的實踐做法,找到的資料都很含糊零散,只能東拼西湊。
一開始自己研究做法時找到 UIPresentationController 這個 API ,沒再深掘其他資料,就用這個方法搭配 UIPanGestureRecognizer 用很土炮的方式完成下拉關閉的效果;一直都覺得哪裡怪怪的,感覺會有更好的方式。
直到最近接觸新專案拜讀 大大的文章 ,擴大眼界才發現有其他 API 更漂亮、更有彈性的做法可以用。
本篇一方面是自我紀錄,另一方面希望有幫助到跟我有一樣困惑的朋友。
內容有點多,嫌麻煩的可以直接拉到底看範例,或直接下載 Github 專案回來研究!
iOS 13 卡片樣式呈現頁面
首先講最新系統內建的效果 iOS ≥ 13 後 UIViewController.present(_:animated:completion:) 默認的 modalPresentationStyle 效果就是 UIModalPresentationAutomatic 片樣式呈現頁面,若想要保持之前的全頁面呈現就要特別指定回 UIModalPresentationFullScreen 即可。

內建行事曆新增效果
如何取消下拉關閉?關閉確認?
更好的使用者體驗應該要能在觸發下拉關閉時檢查有無輸入資料,有的話需要提示使用者是否捨棄動作離開。
這部分蘋果也幫我們想好了,只需實作 UIAdaptivePresentationControllerDelegate 裡的方法即可。
1
2
3
4
5
6
7
8
9
10
11
12
13
14
15
16
17
18
19
20
21
22
23
24
25
26
27
28
29
30
31
32
33
34
35
36
37
38
39
40
import UIKit

class DetailViewController: UIViewController {
    private var onEdit:Bool = true;
    override func viewDidLoad() {
        super.viewDidLoad()

        //設置代理
        self.presentationController?.delegate = self
        //if uiviewcontroller embed in navigationController:
        //self.navigationController?.presentationController?.delegate = self

        //取消下拉關閉方式(1):
        self.isModalInPresentation = true;

    }

}

//代理實作
extension DetailViewController: UIAdaptivePresentationControllerDelegate {
    //取消下拉關閉方式(2):
    func presentationControllerShouldDismiss(_ presentationController: UIPresentationController) -> Bool {
        return false;
    }

    //下拉關閉取消時,下拉手勢觸發
    func presentationControllerDidAttemptToDismiss(_ presentationController: UIPresentationController) {
        if (onEdit) {
          let alert = UIAlertController(title: "資料尚未存儲", message: nil, preferredStyle: .actionSheet)
          alert.addAction(UIAlertAction(title: "捨棄離開", style: .default) { _ in
              self.dismiss(animated: true)
          })
          alert.addAction(UIAlertAction(title: "繼續編輯", style: .cancel, handler: nil))
          self.present(alert, animated: true)
        } else {
          self.dismiss(animated: true, completion: nil)
        }
    }
}
取消下拉關閉可指定 UIViewController 的變數 isModalInPresentation 為 false 或實作 UIAdaptivePresentationControllerDelegate presentationControllerShouldDismiss 並回傳 true 擇一都可。
UIAdaptivePresentationControllerDelegate presentationControllerDidAttemptToDismiss 這個方法只有在 下拉關閉取消時 才會呼叫使用。
By the way…
卡片樣式呈現頁面對系統來說就是 Sheet ,行為上跟 FullScreen 有所不同。
假設今天
RootViewController是HomeViewController
在卡片樣式呈現下 (UIModalPresentationAutomatic) 則:
HomeViewControllerPresentDetailViewController時…
HomeViewController的viewWillDisAppear/viewDidDisAppear都不會觸發。
當
DetailViewControllerDismiss時…
HomeViewController的viewWillAppear/viewDidAppear都不會觸發。
⚠️ 因 XCODE 11 之後版本打包的 iOS ≥ 13 APP 預設 Present 都會使用卡片樣式 (UIModalPresentationAutomatic)
如果之前有把一些邏輯放在 viewWillAppear/viewWillDisappear/viewDidAppear/viewDidDisappear 的要多加檢查注意! ⚠️
看完系統內建的,來看本篇重頭戲吧!如何自幹這些效果?
哪裡可做轉場動畫?
首先先整理哪裡可以做視窗切換轉場動畫。
UITabBarController/UIViewController/UINavigationController
UITabBarController 切換時
我們可以在 UITabBarController 設定 delegate 然後實作 animationControllerForTransitionFrom 方法,就能在切換 UITabBarController 時對內容套用自訂轉場特效。
系統預設無動畫,上方展示圖的是淡入淡出切換特效。
1
2
3
4
5
6
7
8
9
10
11
12
13
14
15
16
17
import UIKit

class MainTabBarViewController: UITabBarController {

    override func viewDidLoad() {
        super.viewDidLoad()
        self.delegate = self

    }

}

extension MainTabBarViewController: UITabBarControllerDelegate {
    func tabBarController(_ tabBarController: UITabBarController, animationControllerForTransitionFrom fromVC: UIViewController, to toVC: UIViewController) -> UIViewControllerAnimatedTransitioning? {
        //return UIViewControllerAnimatedTransitioning
    }
}
UIViewController Present/Dismiss 時
理所當然,在 Present/Dismiss UIViewController 時可以指定要套用的動畫效果,不然就不會有此篇文章了XD;不過值得一提的是,如果只是單純要做 Present 動畫沒有要做手勢控制,可以直接使用 UIPresentationController 方便快速 (詳見文末參考資料)。
系統預設是上滑出現下滑消失!自己客製的話可以加入淡入、圓角、出現位置控制…等效果。
1
2
3
4
5
6
7
8
9
10
11
12
13
14
15
16
17
18
19
20
21
22
23
24
25
import UIKit

class HomeAddViewController: UIViewController {

    override func viewDidLoad() {
        super.viewDidLoad()

        self.modalPresentationStyle = .custom
        self.transitioningDelegate = self
    }

}

extension HomeAddViewController: UIViewControllerTransitioningDelegate {

    func animationController(forPresented presented: UIViewController, presenting: UIViewController, source: UIViewController) -> UIViewControllerAnimatedTransitioning? {
        //回傳 nil 即走預設動畫
        return //UIViewControllerAnimatedTransitioning Present時要套用的動畫
    }

    func animationController(forDismissed dismissed: UIViewController) -> UIViewControllerAnimatedTransitioning? {
        //回傳 nil 即走預設動畫
        return //UIViewControllerAnimatedTransitioning Dismiss時要套用的動畫
    }
}
任何
UIViewController都能實作transitioningDelegate告知Present/Dismiss動畫;UITabBarViewController、UINavigationController、UITableViewController….都可
UINavigationController Push/Pop 時
UINavigationController 大概是最不太需要會改動畫的,因為系統預設的左滑出現右滑返回動畫已經是最好的效果,能想得到要做這部分的客製可能可以用來做無縫 UIViewController 左右切換效果。
因為我們要做全頁都可手勢返回,需要配合自訂 POP 動畫,所以需要自己實作一個返回動畫效果。
1
2
3
4
5
6
7
8
9
10
11
12
13
14
15
16
17
18
19
20
21
22
23
24
25
import UIKit

class HomeNavigationController: UINavigationController {

    override func viewDidLoad() {
        super.viewDidLoad()

        self.delegate = self
    }

}

extension HomeNavigationController: UINavigationControllerDelegate {
    func navigationController(_ navigationController: UINavigationController, animationControllerFor operation: UINavigationController.Operation, from fromVC: UIViewController, to toVC: UIViewController) -> UIViewControllerAnimatedTransitioning? {

        if operation == .pop {
            return //UIViewControllerAnimatedTransitioning 返回時要套用的動畫
        } else if operation == .push {
            return //UIViewControllerAnimatedTransitioning push時要套用的動畫
        }

        //回傳 nil 即走預設動畫
        return nil
    }
}
交互非交互動畫?
再講動畫實作、手勢控制前,先講一下何謂交互與非交互。
交互動畫: 手勢觸發動畫,如 UIPanGestureRecognizer
非交互動畫: 系統呼叫動畫,如 self.present( )
怎麼實作動畫效果?
講完哪裡可以做,再來看怎麼做動畫效果。
我們需要實作 UIViewControllerAnimatedTransitioning 這個 Protocol 並在裡面對視窗做動畫。
一般轉場動畫: UIView.animate
直接使用 UIView.animate 做動畫處理,此時的 UIViewControllerAnimatedTransitioning 需要實作 transitionDuration 告知動畫時長、 animateTransition 實作動畫內容這兩個方法。
1
2
3
4
5
6
7
8
9
10
11
12
13
14
15
16
17
18
19
20
21
22
23
24
25
26
27
28
29
30
31
32
33
34
35
36
37
38
39
40
41
42
43
44
45
import UIKit

class SlideFromLeftToRightTransition: NSObject, UIViewControllerAnimatedTransitioning {

    func transitionDuration(using transitionContext: UIViewControllerContextTransitioning?) -> TimeInterval {
        return 0.4
    }

    func animateTransition(using transitionContext: UIViewControllerContextTransitioning) {

        //可用參數:
        //取得要展示的目標 UIViewController 的 View 內容:
        let toView = transitionContext.view(forKey: .to)
        //取得要展示的目標 UIViewController:
        let toViewController = transitionContext.viewController(forKey: .to)
        //取得要展示的目標 UIViewController 的 View 的初始化 Frame 資訊:
        let toInitalFrame = transitionContext.initialFrame(for: toViewController!)
        //取得要展示的目標 UIViewController 的 View 的最終 Frame 資訊:
        let toFinalFrame = transitionContext.finalFrame(for: toViewController!)

        //取得當前 UIViewController 的 View 內容:
        let fromView = transitionContext.view(forKey: .from)
        //取得當前 UIViewController:
        let fromViewController = transitionContext.viewController(forKey: .from)
        //取得當前 UIViewController 的 View 的初始化 Frame 資訊:
        let fromInitalFrame = transitionContext.initialFrame(for: fromViewController!)
        //取得當前 UIViewController 的 View 的最終 Frame 資訊: (在關閉動畫時可以取得之前顯示動畫時的最終Frame)
        let fromFinalFrame = transitionContext.finalFrame(for: fromViewController!)

        //toView.frame.origin.y = UIScreen.main.bounds.size.height

        UIView.animate(withDuration: transitionDuration(using: transitionContext), delay: 0, options: [.curveLinear], animations: {
            //toView.frame.origin.y = 0
        }) { (_) in
            if (!transitionContext.transitionWasCancelled) {
                //動畫沒中斷
            }

            // 告知系統動畫完成
            transitionContext.completeTransition(!transitionContext.transitionWasCancelled)
        }

    }

}
To 跟 From:
假設今天
HomeViewController要Present/PushDetailViewController時,
From = HomeViewController / To = DetailViewController
DetailViewController要Dismiss/Pop時,
From = DetailViewController / To = HomeViewController
⚠️⚠️⚠️⚠️⚠️
官方建議從
transitionContext.view拿 View 使用,而不是從transitionContext.viewController拿 .view 使用。
但這邊有個問題,就是在做 Present/Dismiss 動畫時當
modalPresentationStyle = .custom;
Present 時使用
transitionContext.view(forKey: .from)會是 nil 、
Dismiss 時使用
transitionContext.view(forKey: .to)也會是 nil ;
還是需要從 viewController.view 拿值來用。
⚠️⚠️⚠️⚠️⚠️
transitionContext.completeTransition(!transitionContext.transitionWasCancelled)動畫完成必須呼叫,否則 畫面會卡死 ;
但因
UIView.animate若無可執行動畫就不會 Callcompletion造成前述方法未被呼叫;所以務必確保動畫是會執行的 (EX: y從100到0)。
ℹ️ℹ️ℹ️ℹ️ℹ️
參與動畫的
ToView/FromView,若因 View 較為複雜或動畫時有些問題;可改用snapshotView(afterScreenUpdates:)截圖作為動畫展示,先截圖然後transitionContext.containerView.addSubview(snapShotView)上去圖層,接著隱藏原本的ToView/FromView (isHidden = true),在動畫結束時在snapShotView.removeFromSuperview()和恢復顯示原本的ToView/FromView (isHidden = true)。
可中斷、繼續的轉場動畫: UIViewPropertyAnimator
另外也可以使用 iOS ≥ 10 新的動畫類別來實作動畫效果, 看個人習慣或是動畫要做到多細節來做選擇, 雖然官方的建議是有交互就使用 UIViewPropertyAnimator 但 不管是交互非交互(手勢控制) 一般都使用 UIView.animate 即可 ; UIViewPropertyAnimator 的轉場動畫能做到中斷繼續的效果,雖然我不知道實際能應用在哪,有興趣的朋友可參考 此篇文章 。
1
2
3
4
5
6
7
8
9
10
11
12
13
14
15
16
17
18
19
20
21
22
23
24
25
26
27
28
29
30
31
32
33
34
35
36
37
38
39
40
41
42
43
44
45
46
47
48
import UIKit

class FadeInFadeOutTransition: NSObject, UIViewControllerAnimatedTransitioning {

    private var animatorForCurrentTransition: UIViewImplicitlyAnimating?

    func interruptibleAnimator(using transitionContext: UIViewControllerContextTransitioning) -> UIViewImplicitlyAnimating {

        //當前有轉場動畫時直接返回
        if let animatorForCurrentTransition = animatorForCurrentTransition {
            return animatorForCurrentTransition
        }

        //參數同前述

        //fromView.frame.origin.y = 100

        let animator = UIViewPropertyAnimator(duration: transitionDuration(using: transitionContext), curve: .linear)

        animator.addAnimations {
            //fromView.frame.origin.y = 0
        }

        animator.addCompletion { (position) in
            transitionContext.completeTransition(!transitionContext.transitionWasCancelled)
        }

        //抓著動畫
        self.animatorForCurrentTransition = animator
        return animator
    }

    func transitionDuration(using transitionContext: UIViewControllerContextTransitioning?) -> TimeInterval {
        return 0.4
    }

    func animateTransition(using transitionContext: UIViewControllerContextTransitioning) {
        //如果是非交互會走這,就讓它也走交互的動畫
        let animator = self.interruptibleAnimator(using: transitionContext)
        animator.startAnimation()
    }

    func animationEnded(_ transitionCompleted: Bool) {
        //動畫完成,清空
        self.animatorForCurrentTransition = nil
    }

}
交互情況下 (後面講控制會細提),會使用
interruptibleAnimator方法的動畫;非交互的情況則還是使用animateTransition方法。
因為能繼續、中斷的特性;所以
interruptibleAnimator是有可能會重複呼叫使用的;所以我們需要用一個全域變數做存取返回。
Murmur… 其實我本來是想全都改用新的 UIViewPropertyAnimator 也想推薦大家都用新的來做,但我遇到一個很奇怪的問題,就是在做全頁手勢返回 Pop 動畫時,若手勢放開,動畫歸位,上方的 Navigation Bar 的 Item 會淡入淡出閃一下…找不到解,但回去用 UIView.animate 就沒這問題;如果有地方沒注意到歡迎跟我說<( _ _ )>。
問題圖; + 按鈕是上一頁的
所以保險起見還是用舊的方式吧!
實際會依照不同的動畫效果建立個別的 Class,若覺得很檔案雜,可參考文末包好的方案;或是將同個連貫(Present+Dismii)動畫放在一起。
transitionCoordinator
另外如果需要更細緻的控制,例如 ViewController 裡面有某個元件需要配合轉場動畫改變;可在 UIViewController 中使用 transitionCoordinator 進行協作,這部分我沒用到;有興趣可參考 此篇文章 。
怎麼控制動畫?
這邊就是前述所說的「交互」,實際就是手勢控制;本篇最重要的章節,因為我們的要做的是手勢操作與轉場動畫的連動功能,才能達成我們要的下拉關閉、全頁返回功能。
控制代理設置:
同前面 ViewController 代理動畫設計,交互處理的類也需要在代理中告知 ViewController 。
UITabBarController: 無 UINavigationController (Push/Pop):
1
2
3
4
5
6
7
8
9
10
11
12
13
14
15
16
17
18
19
20
21
22
23
24
25
26
27
28
29
30
31
32
33
34
35
36
import UIKit

class HomeNavigationController: UINavigationController {

    override func viewDidLoad() {
        super.viewDidLoad()

        self.delegate = self
    }

}

extension HomeNavigationController: UINavigationControllerDelegate {
    func navigationController(_ navigationController: UINavigationController, animationControllerFor operation: UINavigationController.Operation, from fromVC: UIViewController, to toVC: UIViewController) -> UIViewControllerAnimatedTransitioning? {

        if operation == .pop {
            return //UIViewControllerAnimatedTransitioning 返回時要套用的動畫
        } else if operation == .push {
            return //UIViewControllerAnimatedTransitioning push時要套用的動畫
        }
        //回傳 nil 即走預設動畫
        return nil
    }

    //新增交互代理方法:
    func navigationController(_ navigationController: UINavigationController, interactionControllerFor animationController: UIViewControllerAnimatedTransitioning) -> UIViewControllerInteractiveTransitioning? {
        //這邊無法得知是Pop還是Push 只能從要做的動畫本身做判斷
        if animationController is push時套用的動畫 {
            return //UIPercentDrivenInteractiveTransition push動畫的交互控制方法
        } else if animationController is 返回時套用的動畫 {
            return //UIPercentDrivenInteractiveTransition pop動畫的交互控制方法
        }
        //回傳 nil 即不做交互處理
        return nil
    }
}
UIViewController (Present/Dismiss):
1
2
3
4
5
6
7
8
9
10
11
12
13
14
15
16
17
18
19
20
21
22
23
24
25
26
27
28
29
30
31
32
33
34
35
36
import UIKit

class HomeAddViewController: UIViewController {

    override func viewDidLoad() {
        super.viewDidLoad()

        self.modalPresentationStyle = .custom
        self.transitioningDelegate = self
    }

}

extension HomeAddViewController: UIViewControllerTransitioningDelegate {

    func interactionControllerForDismissal(using animator: UIViewControllerAnimatedTransitioning) -> UIViewControllerInteractiveTransitioning? {
        //return nil 即不做交互處理
        return //UIPercentDrivenInteractiveTransition Dismiss時交互控制方法
    }

    func interactionControllerForPresentation(using animator: UIViewControllerAnimatedTransitioning) -> UIViewControllerInteractiveTransitioning? {
        //return nil 即不做交互處理
        return //UIPercentDrivenInteractiveTransition Present時交互控制方法
    }

    func animationController(forPresented presented: UIViewController, presenting: UIViewController, source: UIViewController) -> UIViewControllerAnimatedTransitioning? {
        //回傳 nil 即走預設動畫
        return //UIViewControllerAnimatedTransitioning Present時要套用的動畫
    }

    func animationController(forDismissed dismissed: UIViewController) -> UIViewControllerAnimatedTransitioning? {
        //回傳 nil 即走預設動畫
        return //UIViewControllerAnimatedTransitioning Dismiss時要套用的動畫
    }

}
⚠️⚠️⚠️⚠️⚠️
有實作 interactionControllerFor … 這些方法,就算動畫是非交互(EX: self.present 系統呼叫轉場) 也會 Call 這些方法處理;我們需要控制的是裡面的
wantsInteractiveStart參數(下面介紹)。
動畫交互處理類 UIPercentDrivenInteractiveTransition:
再來講核心要實作的 UIPercentDrivenInteractiveTransition 。
1
2
3
4
5
6
7
8
9
10
11
12
13
14
15
16
17
18
19
20
21
22
23
24
25
26
27
28
29
30
31
32
33
34
35
36
37
38
39
40
41
42
43
44
45
46
47
48
49
50
51
52
53
54
55
56
57
58
59
60
61
62
63
64
65
66
67
68
69
70
71
72
73
74
75
76
77
78
79
80
81
82
83
84
85
86
87
88
89
90
91
92
93
94
95
96
97
98
import UIKit

class PullToDismissInteractive: UIPercentDrivenInteractiveTransition {

    //要加手勢控制交互的UIView
    private var interactiveView: UIView!
    //當前的UIViewController
    private var presented: UIViewController!
    //當托拉超過多少%後就完成執行,否則復原
    private let thredhold: CGFloat = 0.4

    //不同轉場效果可能需要不同資訊,可自訂
    convenience init(_ presented: UIViewController, _ interactiveView: UIView) {
        self.init()
        self.interactiveView = interactiveView
        self.presented = presented
        setupPanGesture()

        //默認值,告知系統當前非交互動畫
        wantsInteractiveStart = false
    }

    private func setupPanGesture() {
        let panGesture = UIPanGestureRecognizer(target: self, action: #selector(handlePan(_:)))
        panGesture.maximumNumberOfTouches = 1
        panGesture.delegate = self
        interactiveView.addGestureRecognizer(panGesture)
    }

    @objc func handlePan(_ sender: UIPanGestureRecognizer) {
        switch sender.state {
        case .began:
            //reset 手勢位置
            sender.setTranslation(.zero, in: interactiveView)
            //告知系統當前開始的是手勢觸發的交互動畫
            wantsInteractiveStart = true

            //在手勢began時呼叫要做的轉場效果(不會直接執行,系統會抓住)
            //然後轉場效果有設對應的動畫就會跳到 UIViewControllerAnimatedTransitioning 處理
            // animated 一定為 true 否則沒動畫

            //Dismiss:
            self.presented.dismiss(animated: true, completion: nil)
            //Present:
            //self.present(presenting,animated: true)
            //Push:
            //self.navigationController.push(presenting)
            //Pop:
            //self.navigationController.pop(animated: true)

        case .changed:
            //手勢滑動的位置計算 對應動畫完成百分比 0~1
            //實際依動畫類型不同,計算方式不同
            let translation = sender.translation(in: interactiveView)
            guard translation.y >= 0 else {
                sender.setTranslation(.zero, in: interactiveView)
                return
            }
            let percentage = abs(translation.y / interactiveView.bounds.height)

            //update UIViewControllerAnimatedTransitioning 動畫百分比
            update(percentage)
        case .ended:
            //手勢放開完成時,看完成度有沒有超過 thredhold
            wantsInteractiveStart = false
            if percentComplete >= thredhold {
              //有,告知動畫完成
              finish()
            } else {
              //無,告知動畫歸位復原
              cancel()
            }
        case .cancelled, .failed:
          //取消、錯誤時
          wantsInteractiveStart = false
          cancel()
        default:
          wantsInteractiveStart = false
          return
        }
    }
}

//當UIViewController內有UIScrollView元件(UITableView/UICollectionView/WKWebView....),防止手勢衝突
//當裡面的UIScrollView元件已滑到頂部,則啟用交互轉場的手勢操作
extension PullToDismissInteractive: UIGestureRecognizerDelegate {
    func gestureRecognizer(_ gestureRecognizer: UIGestureRecognizer, shouldRecognizeSimultaneouslyWith otherGestureRecognizer: UIGestureRecognizer) -> Bool {
        if let scrollView = otherGestureRecognizer.view as? UIScrollView {
            if scrollView.contentOffset.y <= 0 {
                return true
            } else {
                return false
            }
        }
        return true
    }

}
*關於 sender.setTranslation( .zero, in:interactiveView) 原因的補充點我<
我們需要依據不同的手勢操作效果,實作不同的 Class;若是同個連貫(Present+Dismii)的操作也可包在一起。
⚠️⚠️⚠️⚠️⚠️
wantsInteractiveStart務必處於符合的狀態 ,若在交互動畫時告知wantsInteractiveStart = false也會造成卡畫面;
要退出重進 APP 才會恢復正。
⚠️⚠️⚠️⚠️⚠️
interactiveView 也一定要是 isUserInteractionEnabled = true 哦
可以多加設置確保一下!
組合
當我們把這裡個 Delegate 設好、 Class 建好後就能做到我們想要的功能了。 再來不囉唆,直接上完成範例。
自製下拉關閉頁面效果
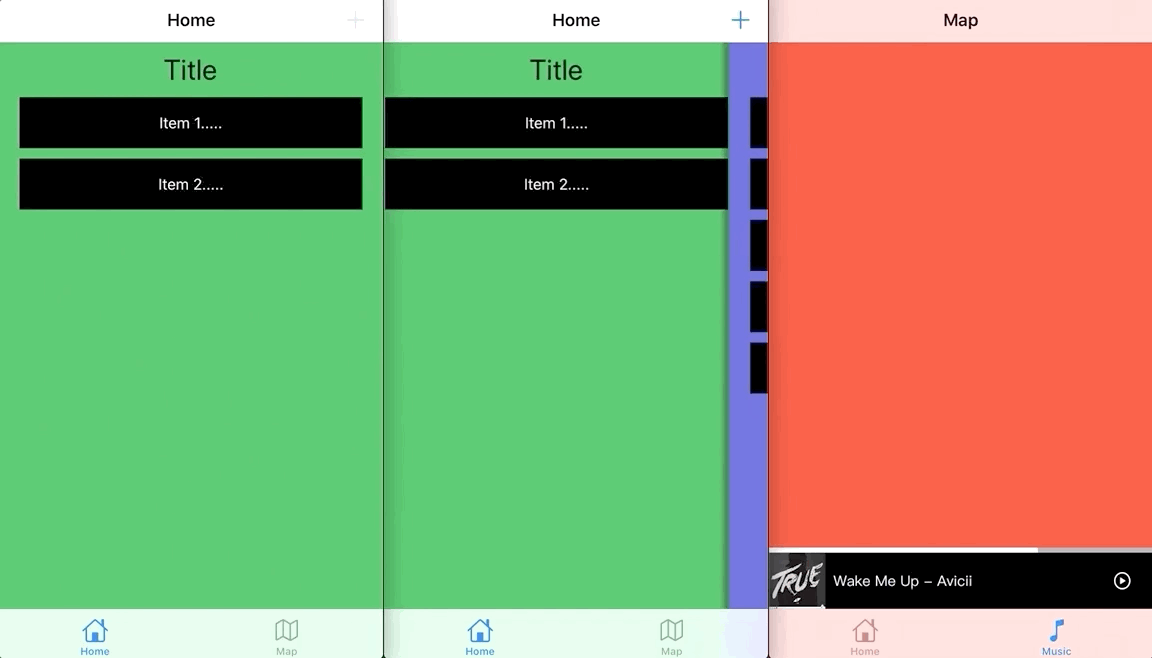
自製下拉的好處在能支援市面所有 iOS 版本、可控制蓋板百分比、控制觸發關閉位置、客製化動畫效果。
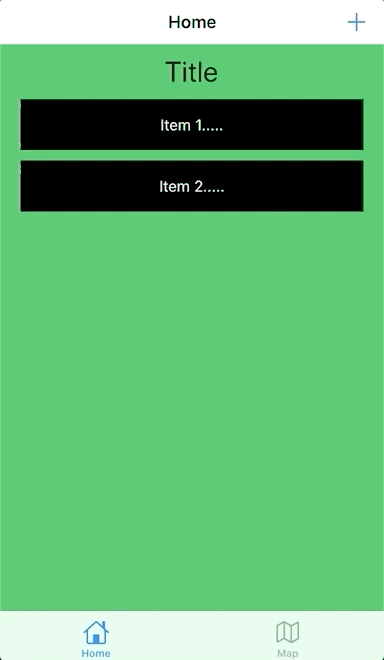
點右上方 + Present 頁面
這是一個 HomeViewController Present HomeAddViewController 和 HomeAddViewController Dismiss的範例。
1
2
3
4
5
6
7
8
9
10
11
12
13
14
15
16
17
18
19
20
21
22
23
24
25
26
27
28
29
30
31
32
33
34
35
36
37
38
39
40
41
42
43
44
45
46
47
48
49
50
51
52
53
54
55
56
57
58
59
60
61
62
63
64
65
66
67
68
69
70
71
72
73
74
75
76
77
78
79
80
81
82
83
84
85
86
87
88
89
90
91
92
93
94
95
96
97
98
99
100
101
102
103
104
105
106
107
108
109
110
111
112
113
114
115
116
117
118
119
120
121
122
import UIKit

class HomeViewController: UIViewController {

    @IBAction func addButtonTapped(_ sender: Any) {
        guard let homeAddViewController = UIStoryboard(name: "Main", bundle: nil).instantiateViewController(identifier: "HomeAddViewController") as? HomeAddViewController else {
            return
        }

        //transitioningDelegate 可指定目標ViewController處理或當前的ViewController處理
        homeAddViewController.transitioningDelegate = homeAddViewController
        homeAddViewController.modalPresentationStyle = .custom
        self.present(homeAddViewController, animated: true, completion: nil)
    }

}
import UIKit

class HomeAddViewController: UIViewController {

    private var pullToDismissInteractive:PullToDismissInteractive!

    override func viewDidLoad() {
        super.viewDidLoad()

        //綁定轉場交互資訊
        self.pullToDismissInteractive = PullToDismissInteractive(self, self.view)
    }

}

extension HomeAddViewController: UIViewControllerTransitioningDelegate {

    func interactionControllerForDismissal(using animator: UIViewControllerAnimatedTransitioning) -> UIViewControllerInteractiveTransitioning? {
        return pullToDismissInteractive
    }

    func animationController(forPresented presented: UIViewController, presenting: UIViewController, source: UIViewController) -> UIViewControllerAnimatedTransitioning? {
        return PresentAndDismissTransition(false)
    }

    func animationController(forDismissed dismissed: UIViewController) -> UIViewControllerAnimatedTransitioning? {
        return PresentAndDismissTransition(true)
    }

    func interactionControllerForPresentation(using animator: UIViewControllerAnimatedTransitioning) -> UIViewControllerInteractiveTransitioning? {
        //這邊無Present操作手勢
        return nil
    }
}
import UIKit

class PullToDismissInteractive: UIPercentDrivenInteractiveTransition {

    private var interactiveView: UIView!
    private var presented: UIViewController!
    private var completion:(() -> Void)?
    private let thredhold: CGFloat = 0.4

    convenience init(_ presented: UIViewController, _ interactiveView: UIView,_ completion:(() -> Void)? = nil) {
        self.init()
        self.interactiveView = interactiveView
        self.completion = completion
        self.presented = presented
        setupPanGesture()

        wantsInteractiveStart = false
    }

    private func setupPanGesture() {
        let panGesture = UIPanGestureRecognizer(target: self, action: #selector(handlePan(_:)))
        panGesture.maximumNumberOfTouches = 1
        panGesture.delegate = self
        interactiveView.addGestureRecognizer(panGesture)
    }

    @objc func handlePan(_ sender: UIPanGestureRecognizer) {
        switch sender.state {
        case .began:
            sender.setTranslation(.zero, in: interactiveView)
            wantsInteractiveStart = true

            self.presented.dismiss(animated: true, completion: self.completion)
        case .changed:
            let translation = sender.translation(in: interactiveView)
            guard translation.y >= 0 else {
                sender.setTranslation(.zero, in: interactiveView)
                return
            }

            let percentage = abs(translation.y / interactiveView.bounds.height)
            update(percentage)
        case .ended:
            if percentComplete >= thredhold {
                finish()
            } else {
                wantsInteractiveStart = false
                cancel()
            }
        case .cancelled, .failed:
            wantsInteractiveStart = false
            cancel()
        default:
            wantsInteractiveStart = false
            return
        }
    }
}

extension PullToDismissInteractive: UIGestureRecognizerDelegate {
    func gestureRecognizer(_ gestureRecognizer: UIGestureRecognizer, shouldRecognizeSimultaneouslyWith otherGestureRecognizer: UIGestureRecognizer) -> Bool {
        if let scrollView = otherGestureRecognizer.view as? UIScrollView {
            if scrollView.contentOffset.y <= 0 {
                return true
            } else {
                return false
            }
        }
        return true
    }

}
以上就能達到如圖的效果,這邊因教學展示不想弄的路太複雜,所以程式碼很醜,還有很多優化整合的空間。
值得一提的是…
iOS ≥ 13,如果遇到 View 內容有 UITextView,在做下拉關閉動畫時,動畫當中 UITextView 的文字內容會一片空白;造成體驗會閃一下 (影片範例) …
這邊的解決方案是在做動畫時用
snapshotView(afterScreenUpdates:)截圖取代原本的 View 圖層。
全頁右滑返回
在尋找全畫面都能手勢右滑返回的解決方案時,找到個 Tricky 的方法: 直接在畫面上加一個 UIPanGestureRecognizer 然後將 target 、 action 都指定到原生的 interactivePopGestureRecognizer , action:handleNavigationTransition 。 *詳細方法點我<
沒錯!看起來就很 Private API,感覺審核會被拒;而且不確定 Swift 是否可用,應該有用到 OC 才有的 Runtime 特性。
還是走正規的吧:
ㄧ樣使用本篇的方式,我們在 navigationController POP 返回時自行處理;添加一個全頁右滑手勢控制配合自訂右滑動畫,即可!
其他省略,只貼關鍵的動畫跟交互處理類別:
1
2
3
4
5
6
7
8
9
10
11
12
13
14
15
16
17
18
19
20
21
22
23
24
25
26
27
28
29
30
31
32
33
34
35
36
37
38
39
40
41
42
43
44
45
46
47
48
49
50
51
52
53
54
55
56
57
58
import UIKit

class SwipeBackInteractive: UIPercentDrivenInteractiveTransition {

    private var interactiveView: UIView!
    private var navigationController: UINavigationController!

    private let thredhold: CGFloat = 0.4

    convenience init(_ navigationController: UINavigationController, _ interactiveView: UIView) {
        self.init()
        self.interactiveView = interactiveView

        self.navigationController = navigationController
        setupPanGesture()

        wantsInteractiveStart = false
    }

    private func setupPanGesture() {
        let panGesture = UIPanGestureRecognizer(target: self, action: #selector(handlePan(_:)))
        panGesture.maximumNumberOfTouches = 1
        interactiveView.addGestureRecognizer(panGesture)
    }

    @objc func handlePan(_ sender: UIPanGestureRecognizer) {

        switch sender.state {
        case .began:
            sender.setTranslation(.zero, in: interactiveView)
            wantsInteractiveStart = true

            self.navigationController.popViewController(animated: true)
        case .changed:
            let translation = sender.translation(in: interactiveView)
            guard translation.x >= 0 else {
                sender.setTranslation(.zero, in: interactiveView)
                return
            }

            let percentage = abs(translation.x / interactiveView.bounds.width)
            update(percentage)
        case .ended:
            if percentComplete >= thredhold {
                finish()
            } else {
                wantsInteractiveStart = false
                cancel()
            }
        case .cancelled, .failed:
            wantsInteractiveStart = false
            cancel()
        default:
            wantsInteractiveStart = false
            return
        }
    }
}
上拉漸入 UIViewController
在View上上拉漸入+下拉關閉,就是在做類似 Spotify 的播放器轉場效果了!
這部分較為繁瑣,但原理一樣,這邊就不 PO 出來了,有興趣的朋友可參考 GitHub 範例內容。
要說哪裡要注意,大概就是 在上拉漸入時,動畫要確保是使用「.curveLinear 線性」否則會出現上拉不跟手的問題 ;拉的程度跟顯示的位置不是正比。
完成!
完成圖
此篇很長,也花了我許久時間整理製作,感謝您的耐心閱讀。
全篇 GitHub 範例下載:
參考資料:
- Draggable view controller? Interactive view controller!
- 系统学习iOS动画之四:视图控制器的转场动画
- 系统学习iOS动画之五:使用UIViewPropertyAnimator
- 用UIPresentationController来写一个简洁漂亮的底部弹出控件 (單純只做Present 動畫效果可直接用這個)
若需要參考優雅的程式碼封裝使用:
- Swift: https://github.com/Kharauzov/SwipeableCards
- Objective-C: https://github.com/saiday/DraggableViewControllerDemo
有任何問題及指教歡迎 與我聯絡 。
本文首次發表於 Medium ➡️ 前往查看
由 ZMediumToMarkdown 與 Medium-to-jekyll-starter 提供自動轉換與同步技術。
