End-to-End Testing|用 Snapshot API Local Mock Server 解決 iOS App 測試資料不穩定問題
針對 iOS App 及現有 API 無法輕易補足單元測試的痛點,透過 Snapshot API Local Mock Server 實現 API Request & Response 錄製與回放,穩定模擬測試環境,降低測試誤報率,提升自動化 E2E 測試可靠度與開發效率。
基於 SEO 考量,本文標題與描述經 AI 調整,原始版本請參考內文。
文章目錄
[POC] App End-to-End Testing Local Snapshot API Mock Server
為現成 App 及現有 API 架構實現 E2E Testing 的可能性驗證
Photo by freestocks
前言
作為一個已在線上運作多年的專案,如何持續提升穩定性是一件極具挑戰的問題。
Unit Testing
App 因開發語言 Swift/Kotlin 靜態+編譯+強型別 或 Objective-C to Swift 動態轉靜態,在開發時沒考慮到可測試性把介面依賴切乾淨,後面要補 Unit Testing 幾乎不可能;但在重構的過程也會帶來不穩定因素,會陷入一個雞生蛋蛋生雞問題。
UI Testing
對 UI 交互、按鈕測試;新開發或舊有的畫面稍微解耦資料依賴就可以實現。
SnapShot Testing
驗證調整前後的 UI 顯示內容、樣式是否一致;同 UI Testing,新開發或舊有的畫面稍微解耦資料依賴就可以實現。
用在 Storyboard/XIB 轉 Code Layout or UIView from OC to Swift 很實用;可以直接導入 pointfreeco / swift-snapshot-testing 快速實現。
雖然我們可以後期補上 UI Testing、SnapShot Testing,但能涵蓋的測試範圍很有限;因為多半的錯誤不會是 UI 樣式,而是流程或是邏輯問題,導致使用者中斷操作, 如果出現在結帳流程,牽涉到營收,問題層級就很嚴重 。
End-to-End Testing
如前述,無法在現行專案簡易的補上單元測試也無法聚攏單元做整合測試,對於邏輯、流程的防護,還剩下從外部做 End-to-End 黑箱測試的方法,直接以使用者角度出發,操作流程檢查重要的流程(註冊/結帳…)是否正常。
對重大功能的重構也能先建立重構前的流程測試,重構後重新驗證,確保重構後功能如預期。
重構中一併補上 Unit Testing、Integration Testing 增加穩定性,打破雞生蛋蛋生雞的問題。
QA Team
End-to-End Testing 最直接暴力的方式就是請一組 QA Team 依照 Test Plan 進行手動測試,然後再持續優化或引入自動化操作;計算了一下成本至少需要 2 位工程師 + 1 位 Leader 花費至少半年一年時間才能看到成果。
評估時間與成本,有沒有什麼是現況我們能做的或是能為未來 QA Team 做好準備,當有 QA Team 時能直接跳到優化與自動化操作甚至導入 AI(?)。
Automation
現階段以導入自動化 End-to-End Testing 為目標,放在 CI/CD 環節自動檢查,測試內容可以不用太完整、只要能防止重大流程問題就已經很有價值了;後面再慢慢迭代 Test Plan 逐步補齊守備範圍。
End-to-End Testing —技術難點
UI 操作問題
App 的原理比較像是透過另一個測試 App 去操作我們的被測試 App,然後從 View Hierarchy 去找尋目標物件;並且在測試時無法取得被測試 App 的 Log 或 Output,因為本質上就是兩個不同 App。
iOS 需要完善 View Accessibility Identifier 增加效率與準確性還有要處理 Alert (e.g. 推播請求)。
Android 在之前的實作上有遇到混用 Compose 與 Fragment 時會找不到目標物件的問題,但據 Teammate 表示,新版的 Compose 已經解決。
除以上傳統常見問題外,更大的問題是雙平台難以整合(寫一個測試跑兩個平台);目前我們在嘗試使用新的測試工具 mobile-dev-inc / maestro :
可以用 YAML 寫 Test Plan 然後在雙平台執行測試,細節使用方式、試用心得,靜待另一位 Teammate 的文章分享 cc’ed Alejandra Ts. 😝。
API 資料問題
對於 App E2E Testing 最大的測試變量就是 API 資料,如果無法提供保證確定的資料,會增加測試的不穩定性,導致誤報,最後大家對 Test Plan 也不再有信心了。
例如測試結帳流程,如果商品有可能被下架或消失,且這些狀態改變不是 App 可控的就很有可能出現以上狀況。
解決資料問題的方式有很多種,可以建立乾淨的 Staging 或 Testing 環境;或是基於 Open API 的 Auto-Gen Mock API Server;但都需要依賴後端、依賴 API 的外部因素,加上後端 API 同 App 一樣是在線上運作多年的專案,部份規格也還在重構 Migrate 暫時無法有 Mock Server。
基於以上因素,如果就卡在這,那問題一樣不會改變、雞生蛋蛋生雞問題也無法突破,真的就只能「挺而走險」的直接先改、出問題再說了。
Snapshot API Local Mock Server
「只要思想不滑坡,方法總比困難多」
我們可以換一個想法,如果 UI 可以用 Snapshot 快照成圖片下來 Replay 進行驗證測試,那 API 是否也可以? 我們是否可以把 API Request & Response 存下來,在後續 Replay 進行驗證測試?
藉此引入本篇文章的重點:建立「Snapshot API Local Mock Server」Record API Request & Replay Response 剝離與 API 資料的依賴。
本文只做了 POC 概念驗證,還沒有真正全面實現高覆蓋率的 End To End Testing,因此做法僅供參考, 希望對大家在現有環境下有新的啟發 。
Snapshot API Local Mock Server
核心概念 — Record & Replay API Data
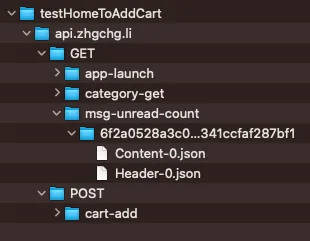
[Record] — End-to-End Testing Test Case 開發完成後,打開錄製參數,執行一次測試,過程中所有 API Request & Response 會存下來放在各個 Test Case 目錄內。
[Replay] — 後面在跑 Test Case 時,依照請求從 Test Case 目錄中找到對應錄製下來的 Response Data,完成測試流程。
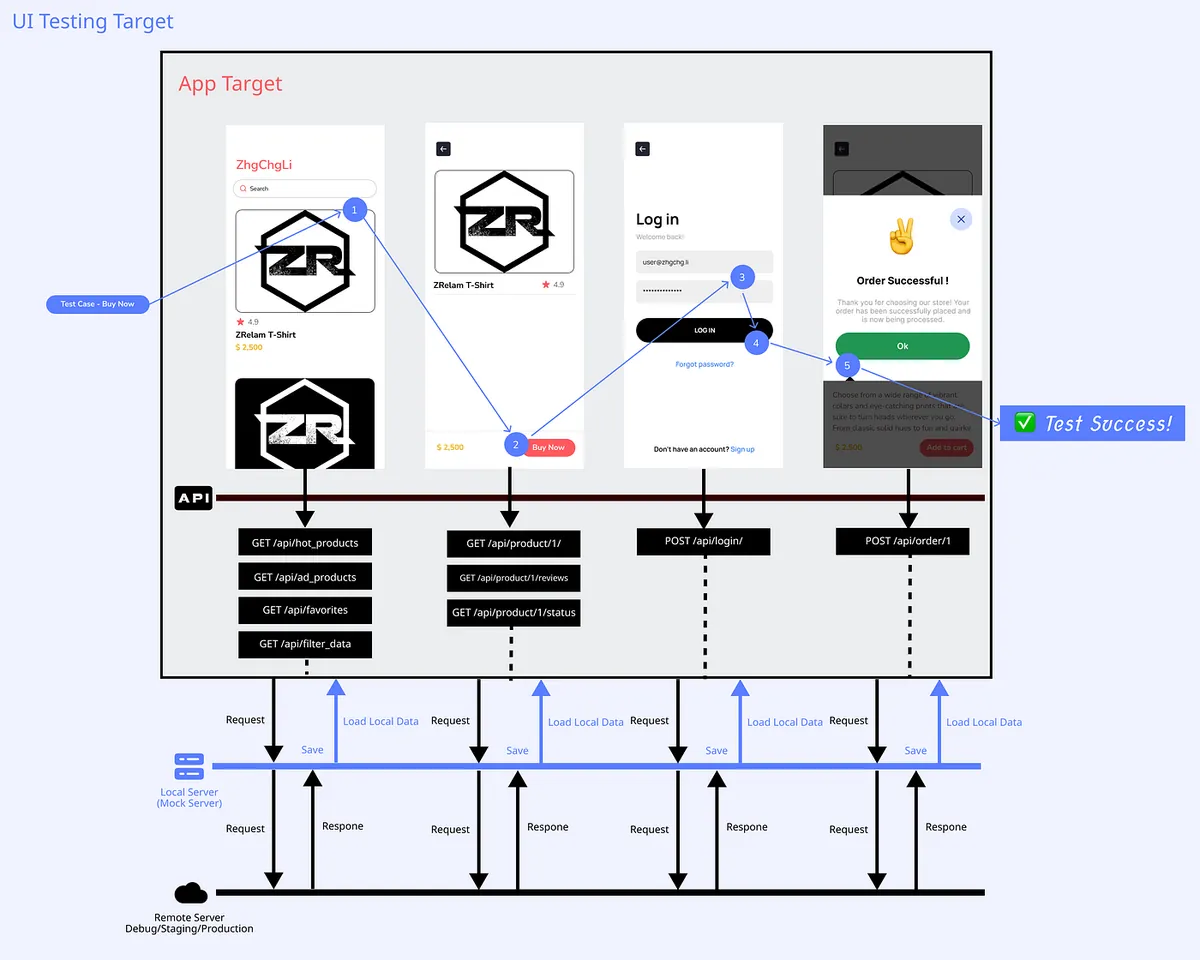
示意圖
假設我們要測試加入購買流程,使用者打開 App 後在首頁點擊商品卡進入商品詳細頁,按底部購買,跳出登入匡完成登入,完成購買,跳出購買成功提示:
UI Testing 如何控制按鈕點擊、輸入匡輸入…等等,不是本文主要研究重點;可參考現有的測試框架直接使用。
Regular Proxy or Reverse Proxy
要達成 Record & Replay API 需要在 App 與 API 之間加上 Proxy 做中間人攻擊,可參考我早期的文章「 APP有用HTTPS傳輸,但資料還是被偷了。 」
簡單來說就是在 App 與 API 之間多了一個代理的傳遞者,如同傳紙條一樣,雙方傳遞的請求與回應都會經過他,他可以打開來紙條的內容,也可以偽造紙條內容給彼此,雙方不會察覺你從中做梗。
正向代理 Regular Proxy:
正向代理是客戶端向代理伺服器發送請求,代理伺服器再將請求轉發給目標伺服器,並將目標伺服器的回應返回給客戶端。在正向代理模式下,代理伺服器代表客戶端發起請求。客戶端需要明確指定代理伺服器的位址和埠號,並將請求發送給代理伺服器。
反向代理 Reverse Proxy:
反向代理與正向代理相反,它位於目標伺服器和客戶端之間。客戶端向反向代理伺服器發送請求,反向代理伺服器根據一定的規則將請求轉發給後端的目標伺服器,並將目標伺服器的回應返回給客戶端。對於客戶端來說,目標伺服器看起來就像是反向代理伺服器,客戶端不需要知道目標伺服器的真實位址。
對我們的需求來說正向或反向都可以達成目的,唯一要考慮的事是代理設置的方式:
正向代理需要在電腦上或手機、模擬起的網路設置中掛上 Proxy 代理:
- Android 能在模擬器中個別直接設置 Proxy 代理
- iOS Simulator 同電腦的網路環境,無法個設置 Proxy,變成要去改電腦的設置才能掛上 Proxy,電腦的所有流量也都會經過這個 Proxy 並且如果同時開啟 Proxyman 或 Charles 等等其他網路工具,有機會會強制更改 Proxy 設置成該軟體的,導致失效。
反向代理需要改 Codebase 中的 API Host 並且要宣告要代理的所有 API Domains:
- Codebase 中的 API Host 要在測試時替換成 Proxy Server IP
- 在啟用 Reverse Proxy 時要宣告哪些 Domain 要掛上 Proxy
- 只有宣告的 Domain 才會走 Proxy,沒宣告的會直通出去
配合 iOS App,以下以 iOS & 使用 Reverse Proxy 反向代理為例做 POC,Android 一樣可以使用。
讓 iOS App 知道現在正在跑 End-to-End Testing
我們需要讓 App 知道現在正在跑 End-to-End Testing 才能在 App 程式裡加上 API Host 替換邏輯:
1
2
3
4
// UI Testing Target:
let app = XCUIApplication()
app.launchArguments = ["duringE2ETesting"]
app.launch()
我們在 Network 層做判斷抽換。
這是不得已的調整,盡量還是不要為了測試而去改 App 的 Code。
使用 MITMProxy 實現 Reverse Proxy Server
亦可使用 Swift 自行開發 Swift Server 達成,本文只是 POC 因此直接使用 MITMProxy 工具。
[2023–09–04 Update] Mitmproxy-rodo 已開源
以下實作內容已經開源到 mitmproxy-rodo 專案,歡迎直接前往對照使用。
部份結構與本文章內容有所調整,開源時後續調整了:
- 儲存目錄的結構,改為
host / requestPath / method / hash - 修正 Header 資訊儲存,應該為 Bytes Data 而非純 JSON String
- 修正部份錯誤
- 增加自動延長 Set-Cookie 時效功能
⚠️ 以下腳本僅共 Demo 參考,後續腳本調整將移至開源專案維護。
⚠️ 以下腳本僅共 Demo 參考,後續腳本調整將移至開源專案維護。
⚠️ 以下腳本僅共 Demo 參考,後續腳本調整將移至開源專案維護。
⚠️ 以下腳本僅共 Demo 參考,後續腳本調整將移至開源專案維護。
⚠️ 以下腳本僅共 Demo 參考,後續腳本調整將移至開源專案維護。
MITMProxy
照著 MITMProxy 官網 完成安裝:
1
brew install mitmproxy
MITMProxy 細節用法可參考我早期的文章「 APP有用HTTPS傳輸,但資料還是被偷了。 」
mitmproxy提供一個互動式的命令行界面。mitmweb提供基於瀏覽器的圖形用戶界面。mitmdump提供非互動的終端輸出。
實現 Record & Replay
因 MITMProxy Reverse Proxy 原生沒有 Record (or dump) request & Mapping Request Replay 的功能,因此我們需要自行撰寫腳本實現此功能。
mock.py :
1
2
3
4
5
6
7
8
9
10
11
12
13
14
15
16
17
18
19
20
21
22
23
24
25
26
27
28
29
30
31
32
33
34
35
36
37
38
39
40
41
42
43
44
45
46
47
48
49
50
51
52
53
54
55
56
57
58
59
60
61
62
63
64
65
66
67
68
69
70
71
72
73
74
75
76
77
78
79
80
81
82
83
84
85
86
87
88
89
90
91
92
93
94
95
96
97
98
99
100
101
102
103
104
105
106
107
108
109
110
111
112
113
114
115
116
117
118
119
120
121
122
123
124
125
126
127
128
129
130
131
132
133
134
135
136
137
138
139
140
141
142
143
144
145
146
147
148
149
150
151
152
153
154
155
156
157
158
159
160
161
162
163
164
165
166
167
168
169
170
171
172
173
174
175
176
177
178
179
180
181
182
183
184
185
186
187
188
189
190
191
192
193
194
195
196
197
198
199
200
201
202
203
204
205
206
207
208
209
210
"""
Example:
    Record: mitmdump -m reverse:https://yourapihost.com -s mock.py --set record=true --set dumper_folder=loginFlow --set config_file=config.json
    Replay: mitmdump -m reverse:https://yourapihost.com -s mock.py --set dumper_folder=loginFlow --set config_file=config.json
"""

import re
import logging
import mimetypes
import os
import json
import hashlib

from pathlib import Path
from mitmproxy import ctx
from mitmproxy import http

class MockServerHandler:

    def load(self, loader):
        self.readHistory = {}
        self.configuration = {}

        loader.add_option(
            name="dumper_folder",
            typespec=str,
            default="dump",
            help="Response Dump 目錄,可以 by Test Case Name 建立",
        )

        loader.add_option(
            name="network_restricted",
            typespec=bool,
            default=True,
            help="本地沒有 Mapping 資料...設置 true 會 return 404、false 會去打真實請求拿資料。",
        )

        loader.add_option(
            name="record",
            typespec=bool,
            default=False,
            help="設置 true 錄製 Request's Response",
        )

        loader.add_option(
            name="config_file",
            typespec=str,
            default="",
            help="設置檔案路徑,範例檔案在下面",
        )

    def configure(self, updated):
        self.loadConfig()

    def loadConfig(self):
        configFile = Path(ctx.options.config_file)
        if ctx.options.config_file == "" or not configFile.exists():
            return

        self.configuration = json.loads(open(configFile, "r").read())

    def hash(self, request):
        query = request.query
        requestPath = "-".join(request.path_components)

        ignoredQueryParameterByPaths = self.configuration.get("ignored", {}).get("paths", {}).get(request.host, {}).get(requestPath, {}).get(request.method, {}).get("queryParamters", [])
        ignoredQueryParameterGlobal = self.configuration.get("ignored", {}).get("global", {}).get("queryParamters", [])

        filteredQuery = []
        if query:
            filteredQuery = [(key, value) for key, value in query.items() if key not in ignoredQueryParameterByPaths + ignoredQueryParameterGlobal]

        formData = []
        if request.get_content() != None and request.get_content() != b'':
            formData = json.loads(request.get_content())

        # or just formData = request.urlencoded_form
        # or just formData = request.multipart_form
        # depends on your api design

        ignoredFormDataParametersByPaths = self.configuration.get("ignored", {}).get("paths", {}).get(request.host, {}).get(requestPath, {}).get(request.method, {}).get("formDataParameters", [])
        ignoredFormDataParametersGlobal = self.configuration.get("ignored", {}).get("global", {}).get("formDataParameters", [])

        filteredFormData = []
        if formData:
            filteredFormData = [(key, value) for key, value in formData.items() if key not in ignoredFormDataParametersByPaths + ignoredFormDataParametersGlobal]

        # Serialize the dictionary to a JSON string
        hashData = {"query":sorted(filteredQuery), "form": sorted(filteredFormData)}
        json_str = json.dumps(hashData, sort_keys=True)

        # Apply SHA-256 hash function
        hash_object = hashlib.sha256(json_str.encode())
        hash_string = hash_object.hexdigest()

        return hash_string

    def readFromFile(self, request):
        host = request.host
        method = request.method
        hash = self.hash(request)
        requestPath = "-".join(request.path_components)

        folder = Path(ctx.options.dumper_folder) / host / method / requestPath / hash

        if not folder.exists():
            return None

        content_type = request.headers.get("content-type", "").split(";")[0]
        ext = mimetypes.guess_extension(content_type) or ".json"


        count = self.readHistory.get(host, {}).get(method, {}).get(requestPath, {}) or 0

        filepath = folder / f"Content-{str(count)}{ext}"

        while not filepath.exists() and count > 0:
            count = count - 1
            filepath = folder / f"Content-{str(count)}{ext}"

        if self.readHistory.get(host) is None:
            self.readHistory[host] = {}
        if self.readHistory.get(host).get(method) is None:
            self.readHistory[host][method] = {}
        if self.readHistory.get(host).get(method).get(requestPath) is None:
            self.readHistory[host][method][requestPath] = {}

        if filepath.exists():
            headerFilePath = folder / f"Header-{str(count)}.json"
            if not headerFilePath.exists():
                headerFilePath = None

            count += 1
            self.readHistory[host][method][requestPath] = count

            return {"content": filepath, "header": headerFilePath}
        else:
            return None


    def saveToFile(self, request, response):
        host = request.host
        method = request.method
        hash = self.hash(request)
        requestPath = "-".join(request.path_components)

        iterable = self.configuration.get("ignored", {}).get("paths", {}).get(request.host, {}).get(requestPath, {}).get(request.method, {}).get("iterable", False)

        folder = Path(ctx.options.dumper_folder) / host / method / requestPath / hash

        # create dir if not exists
        if not folder.exists():
            os.makedirs(folder)

        content_type = response.headers.get("content-type", "").split(";")[0]
        ext = mimetypes.guess_extension(content_type) or ".json"

        repeatNumber = 0
        filepath = folder / f"Content-{str(repeatNumber)}{ext}"
        while filepath.exists() and iterable == False:
            repeatNumber += 1
            filepath = folder / f"Content-{str(repeatNumber)}{ext}"

        # dump to file
        with open(filepath, "wb") as f:
            f.write(response.content or b'')


        headerFilepath = folder / f"Header-{str(repeatNumber)}.json"
        with open(headerFilepath, "wb") as f:
            responseDict = dict(response.headers.items())
            responseDict['_status_code'] = response.status_code
            f.write(json.dumps(responseDict).encode('utf-8'))

        return {"content": filepath, "header": headerFilepath}

    def request(self, flow):
        if ctx.options.record != True:
            host = flow.request.host
            path = flow.request.path

            result = self.readFromFile(flow.request)
            if result is not None:
                content = b''
                headers = {}
                statusCode = 200

                if result.get('content') is not None:
                    content = open(result['content'], "r").read()

                if result.get('header') is not None:
                    headers = json.loads(open(result['header'], "r").read())
                    statusCode = headers['_status_code']
                    del headers['_status_code']


                headers['_responseFromMitmproxy'] = '1'
                flow.response = http.Response.make(statusCode, content, headers)
                logging.info("Fullfill response from local with "+str(result['content']))
                return

            if ctx.options.network_restricted == True:
                flow.response = http.Response.make(404, b'', {'_responseFromMitmproxy': '1'})

    def response(self, flow):
        if ctx.options.record == True and flow.response.headers.get('_responseFromMitmproxy') != '1':
            result = self.saveToFile(flow.request, flow.response)
            logging.info("Save response to local with "+str(result['content']))

addons = [MockServerHandler()]
可以自行參考 官方文件 ,依照需求調整腳本內容。
此腳本設計邏輯如下:
- 檔案路徑邏輯:
dumper_folder(a.k.a Test Case Name)/Reverse's api host/HTTP Method/Path join with -(e.g.app/launch->app-launch) /Hash(Get Query & Post Content)/ - 檔案邏輯:回應的內容:
Content-0.xxx、Content-1.xxx(同個請求打第二次)…以此類推;回應的 Header 資訊:Header-0.json(同Content-x邏輯)
- 儲存時會依照路徑、檔案邏輯依序儲存;在 Replay 時同樣依序取出
- 如果次數不匹配,例如 Replay 時同個路徑打了 3 次,但 Record 儲存的資料只存到第 2 次;則還是會持續回應第 2 次,也就是最後一次的結果
record為True時,會去打目標 Server 取得回應並依照上述邏輯儲存下來;False時則只會從本地讀資料 (等於 Replay Mode)network_restricted為False時,本地沒 Mapping 資料會直接回應404;為True時會去打目標 Server 拿資料。_responseFromMitmproxy用於告知 Response Method 當前回應來自 Local,可以忽略不管、_status_code借用 Header.json 欄位儲存 HTTP Response 狀態碼。
config_file.json 設置檔案邏輯設計如下:
1
2
3
4
5
6
7
8
9
10
11
12
13
14
15
16
17
18
19
20
21
22
23
24
25
26
27
{
  "ignored": {
    "paths": {
      "yourapihost.com": {
        "add-to-cart": {
          "POST": {
            "queryParamters": [
              "created_timestamp"
            ],
            "formDataParameters": []
          }
        },
        "api-status-checker": {
          "GET": {
            "iterable": true
          }
        }
      }
    },
    "global": {
      "queryParamters": [
        "timestamp"
      ],
      "formDataParameters": []
    }
  }
}
queryParamters & formDataParameters :
因部分 API 參數可能會隨呼叫改變,例如有的 Endpoint 會帶上時間參數,此時依照 Server 的設計, Hash(Query Parameter & Body Content) 的值就會在 Replay Request 時不一樣,導致 Mapping 不到 Local Response,因此多開了一個 config.json 處理這個情況,可以 by Endpoint Path or Global 設定某個參數應該在排除 Hash 時排除,就能取得同樣的 Mapping 結果。
iterable :
因部分輪詢檢查的 API 可能會重複定時不斷呼叫,照 Server 的設計會產出很多 Content-x.xxx & Header-x.json 檔案;但假設我們不在意則可設定為 True ,Response 會持續儲存覆蓋到 Content-0.xxx & Header-0.json 第一個檔案內。
啟用 Reverse Proxy Record Mode:
1
mitmdump -m reverse:https://yourapihost.com -s mock.py --set record=true --set dumper_folder=loginFlow --set config_file=config.json
啟用 Reverse Proxy Replay Mode:
1
mitmdump -m reverse:https://yourapihost.com -s mock.py --set dumper_folder=loginFlow --set config_file=config.json
組裝 & Proof Of Concept
0. 完成 Codebase 中 Host 的抽換
並確認在跑測試時,API 已改用 http://127.0.0.1:8080
1. 啟動 Snapshot API Local Mock Server (a.k.a Reverse Proxy Server) Record Mode
1
mitmdump -m reverse:https://yourapihost.com -s mock.py --set record=true --set dumper_folder=addCart --set config_file=config.json
2. 執行 E2E Testing UI 操作
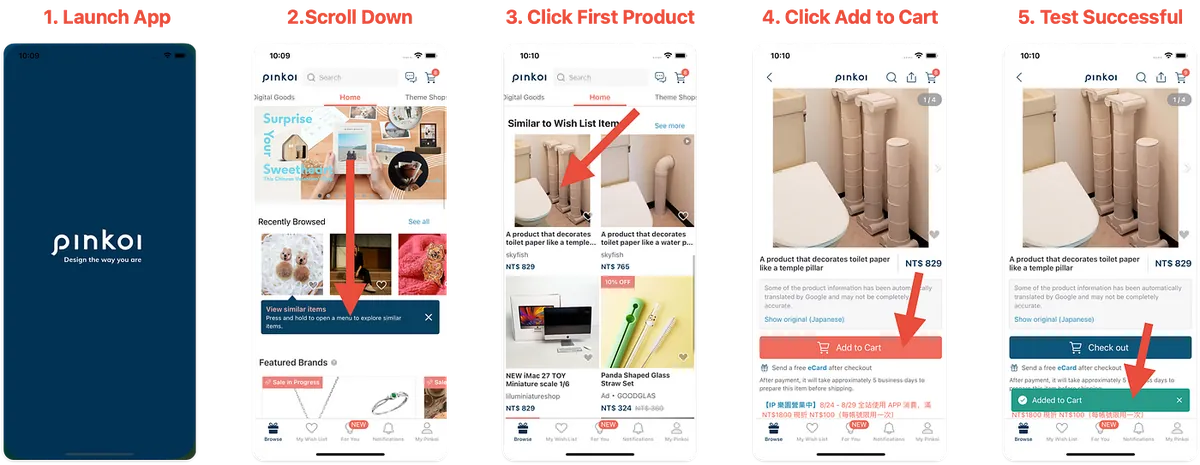
以 Pinkoi iOS App 為例,測試以下流程:
Launch App -> Home -> Scroll Down -> Similar to Wish List Items Section -> First Product -> Click First Product -> Enter Product Page -> Click Add to Cart -> UI Response Added to Cart -> Test Successful ✅
UI 自動化操作方式前面有提到,這邊先手動測試相同的流程驗證結果。
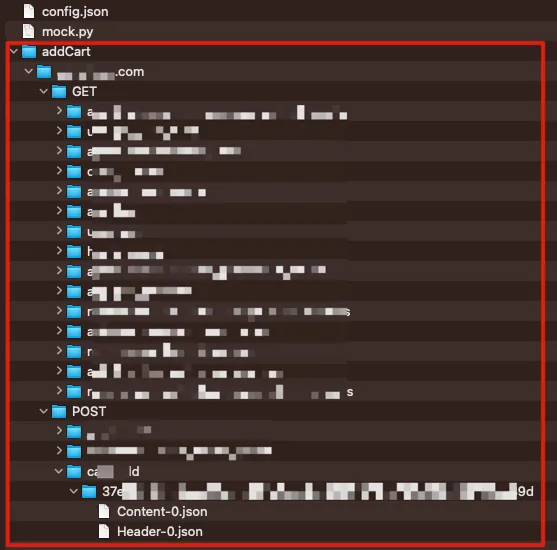
3. 取得 Record 結果
操作完成後可以下 ^ + C 終止 Snapshot API Mock Server,到檔案目錄查看錄製結果:
4. Replay 驗證同個流程,啟動 Server & Using Replay Mode
1
mitmdump -m reverse:https://yourapihost.com -s mock.py --set dumper_folder=addCart --set config_file=config.json
5. 再次執行剛剛的 UI 操作驗證結果
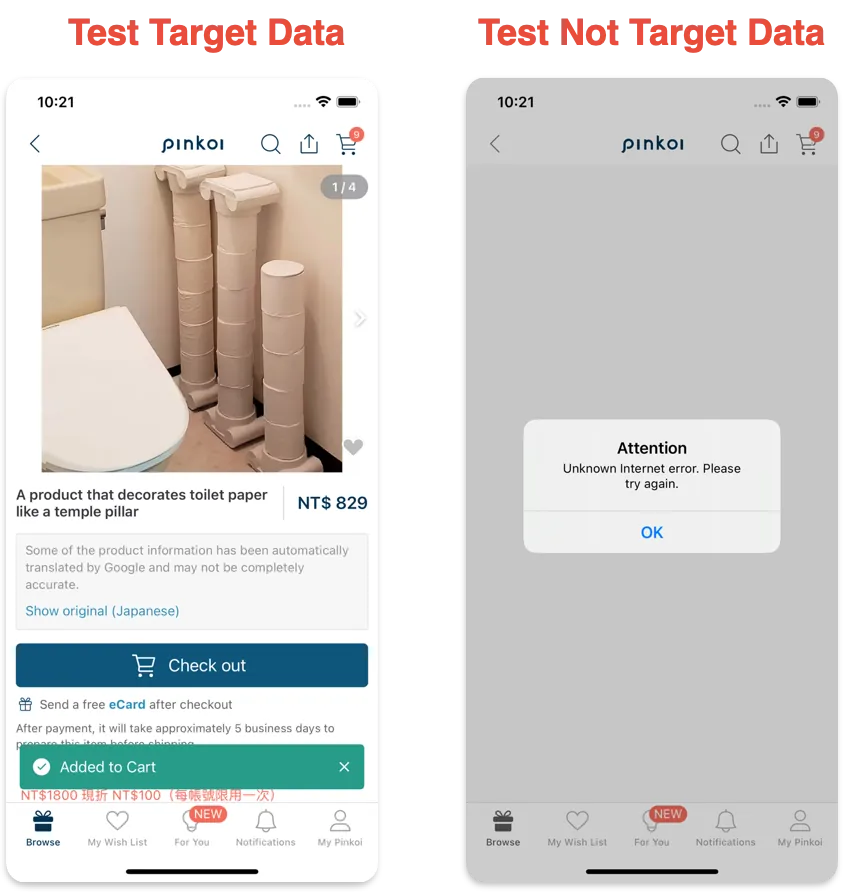
- 左:Test Successful ✅
- 右:測試點擊錄製以外的商品,此時會出現 Error (因本地沒資料 +
network_restricted預設是False本地沒資料直接傳 404,不會從網路拿資料)
6. Proof Of Concept ✅
概念驗證通過,我們確實能透過實現 Reverse Proxy Server 來自行儲存 API Request & Response 並作為 Mock API Server 在測試時回應資料給 App 🎉🎉🎉。
[2023–09–04] mitmproxy-rodo 已開源
後續和雜記
本文只探討了概念驗證,後續還有許多地方要補齊也還有更多功能可以實現。
- 與 maestro UI Testinga 工具整合
- CI/CD 流程整合設計 (怎麼自動起 Reverse Proxy? 起在哪裡? )
- 怎麼把 MITMProxy 封裝在開發工具內?
- 驗證更複雜的測試場景
- 針對發送的 Tracking Request 做驗證,需多實現存 Request Body,然後從中取得打了哪些 Tracking Event Data、是否符合流程該送的事件
Cookie 問題
1
2
3
4
5
6
7
8
9
10
11
12
13
14
15
#...
    def response(self, flow):
        setCookies = flow.response.headers.get_all("set-cookie")
        # setCookies = ['ad=0; Domain=.xxx.com; expires=Wed, 23 Aug 2023 04:59:07 GMT; Max-Age=1800; Path=/', 'sessionid=xxxx; Secure; HttpOnly; Domain=.xxx.com; expires=Wed, 23 Aug 2023 04:59:07 GMT; Max-Age=1800; Path=/']

        # OR Replace Cookie Domain From .xxx.com To 127.0.0.1
        setCookies = [re.sub(r"\s*\.xxx\.com\s*", "127.0.0.1", s) for s in setCookies]

        # AND 移除安全性相關限制
        setCookies = [re.sub(r";\s*Secure\s*", "", s) for s in setCookies]
        setCookies = [re.sub(r";\s*HttpOnly;\s*", "", s) for s in setCookies]

        flow.response.headers.set_all("Set-Cookie", setCookies)

        #...
如果有遇到 Cookie 方面的問題,例如 API 有回應 Cookie 但 App 沒接到,可參考以上的調整。
在 Pinkoi 的最後一篇文章
在 Pinkoi 900 多天的日子裡,實現了許多我職涯上還有 iOS / App 開發、流程的想像,感謝所有隊友,一起走過疫情、經歷風雨;告別的勇氣如同當初追尋夢想入職的勇氣。
正在啟航找尋新的人生挑戰(包括但不限於工程),如果您有合適的機會(iOS or 工程管理 or 新創產品)歡迎與我聯絡。 🙏🙏🙏
有任何問題及指教歡迎 與我聯絡 。
本文首次發表於 Medium (點此查看原始版本),由 ZMediumToMarkdown 提供自動轉換與同步技術。
