Quick Start! Deploy Your App Store Review Monitoring Bot for Free with Github Action x ZReviewTender
In just three simple steps, create a free, stable, and secure App review bot to keep track of the latest user reviews.
ℹ️ℹ️ℹ️ The following content is translated by OpenAI.
Click here to view the original Chinese version. | 點此查看本文中文版
[Quick Start! ] Deploy Your App Store Review Monitoring Bot for Free with Github Action x ZReviewTender
In just three simple steps, you can create a free, stable, and secure App review bot that keeps you updated on the latest user reviews.
{:target="_blank"}](/assets/0095528cf875/1*k8RswW3es9L19jIgbRDLpQ.png)
ZReviewTender
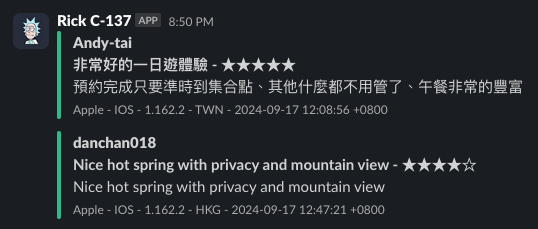
ZReviewTender is an open-source App review bot I created in August 2022. It automatically fetches user reviews from the iOS App Store and Android Google Play Store and forwards them to a specified Slack channel.
Additionally, you can set review fetching rules, integrate with Google Translate, Asana, Google Sheets, and customize operations.
Github Action
Github Action is a CI/CD automation integration tool provided by Github. You can use your own machine as a server (Github Runner) or directly use the machines provided by Github to run CI/CD and automation scripts.
Costs and Limitations
- Using your own machine (Github Runner): No special costs, only limits on maximum execution counts, concurrency limits, and some API short-term maximum request limits.
- Using Github’s provided machines:
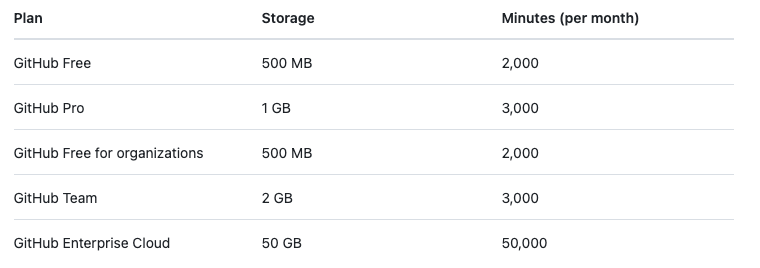
GitHub Free provides a basic 500 MB Storage (for CI/CD Artifacts) and 2,000 minutes of execution time per month.
Please note due to machine cost issues:
- If using Github’s Windows machines, the consumed minutes equal actual minutes x 2.
- If using Github’s macOS machines, the consumed minutes equal actual minutes x 10.
For detailed pricing calculations, please refer to the official pricing calculator.
ZReviewTender Estimated monthly minutes consumed: about 120 minutes
It only needs to run on a basic pricing Linux machine, consuming about ≤ 1 minute per execution. By default, it runs every 6 hours, spending 4 minutes a day, totaling about 120 minutes a month, which is well within the free quota.
ZReviewTender Storage consumption: 0
No artifacts are stored, so there are no storage costs.
Slack
The internal communication tool used by the company. A Slack App will be created to forward App Store review notifications to a specified channel.
ZReviewTender x Github Action x Slack
We use Github Action to execute the ZReviewTender script and forward the results to Slack. The Github Repo (Action) is just a carrier, so even if your main project is not hosted on Github, you can still easily complete the ZReviewTender deployment by following the steps below. 🎉🎉🎉
I have successfully deployed it for 5 different companies’ apps and it has been running stably and for free for over 2 years.
Advantages:
- Free: ZReviewTender is an open-source free service I created, deployed on Github Action with ample free quota. You won’t need to spend money each month on subscription-based App Review Bot services.
- Secure: The credentials and keys used to fetch reviews are securely stored in your Github Private Repo, and no one else has access. You won’t have to risk leaking important credentials and keys by uploading them to third-party services; ZReviewTender is an open-source project, and all operations can be publicly reviewed.
- Reliable: ZReviewTender uses the latest official API to fetch review information, making it more accurate and stable compared to other services that rely on RSS to fetch reviews.
Buy me coffee ❤️❤️❤️
{:target="_blank"}](/assets/0095528cf875/1*QCQqlZr6doDP-cszzpaSpw.png)
https://www.buymeacoffee.com/zhgchgli
If this project has helped you, feel free to buy me a coffee. Thank you!
Quick Start! 🚀
The entire setup process takes about 30 minutes, but you only need to set it up once. Unless the credentials change, it can run permanently for free and stably. 🚀🚀🚀🚀🚀
Step 1. Create a Slack App
If your organization already has a Slack App with permissions like chat:write, you can reuse it without creating a new one.
{:target="_blank"}](/assets/0095528cf875/1*JDaxmORRL3ipdeA0ZaHW3w.png)
Click “Create New App” in the top right corner.
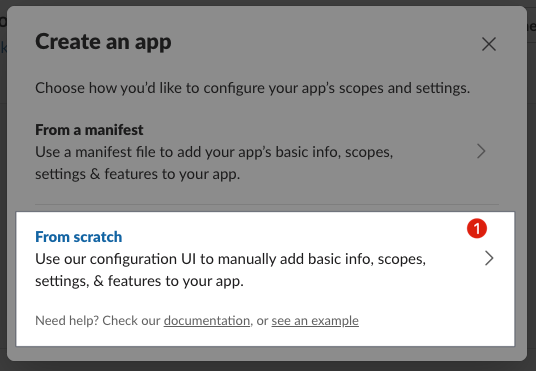
- Choose: From scratch
- Enter App Name:
ZReviewTenderor a custom Slack App name - Select the target Slack Workspace: Make sure you choose a Workspace where you have permission to add a Slack App.
- Create App
Add OAuth & Permissions Scopes: After creating the Slack app, go to the “OAuth & Permissions” tab to set the Scopes.
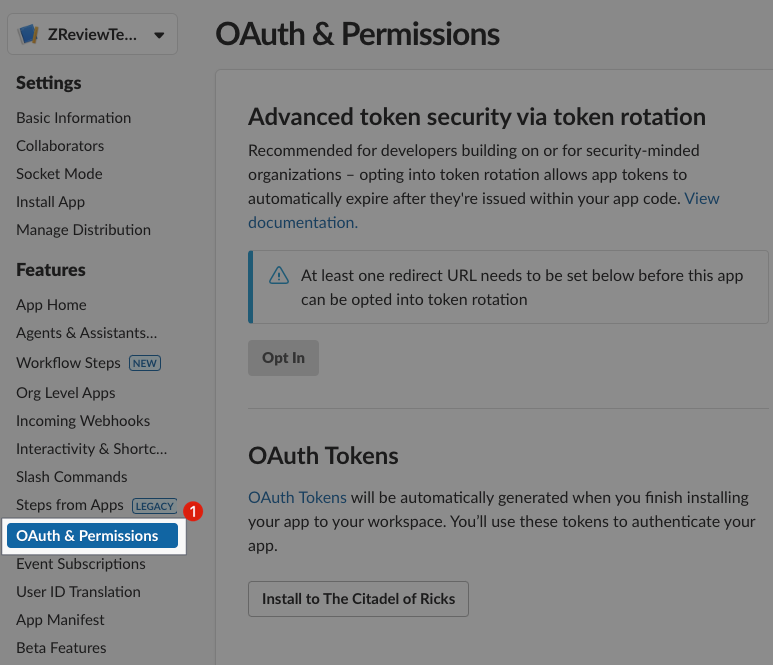
- Select “OAuth & Permissions”
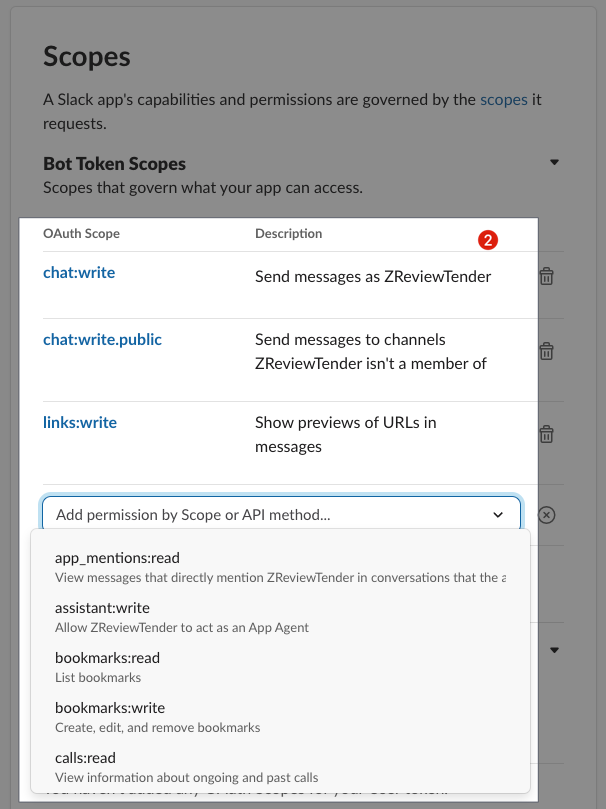
- Scroll down to find the Scopes Section
- Sequentially add the three required Scopes for the ZReviewTender Slack App:
chat:write
chat:write.public
links:write
Install App Return to the Install App tab to install the Slack App to your Workspace.
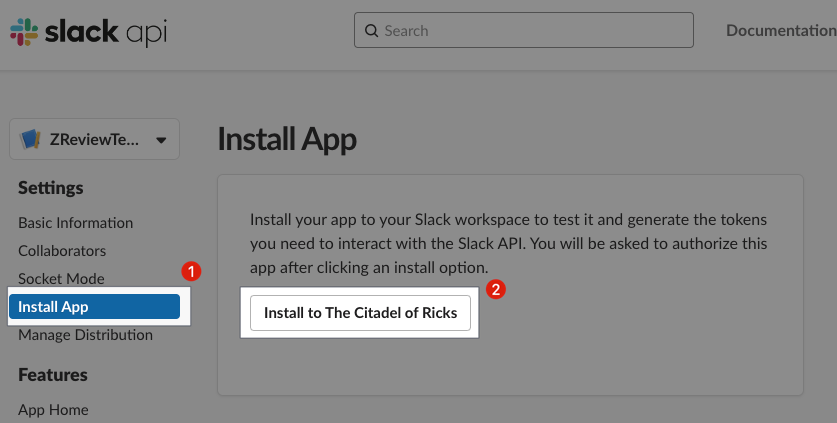
- Select “Install App”
- Click “Install to YOUR_WORKSPACE”
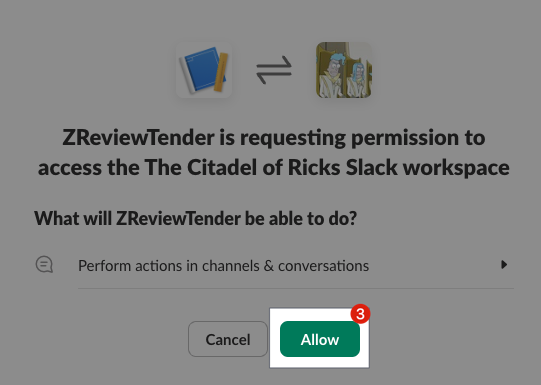
- Click “Allow”
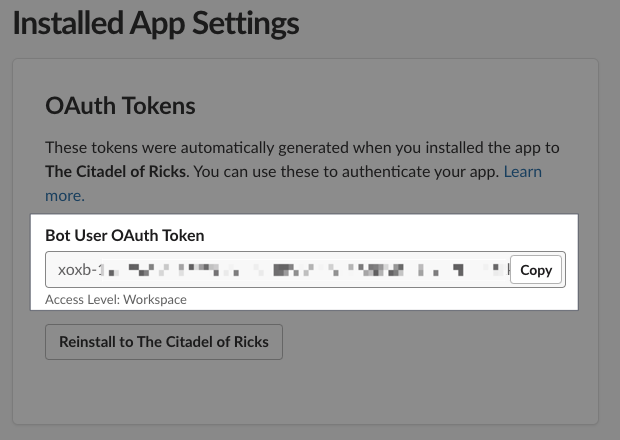
After installation, return to the Install App page where you will see the Slack App Bot User OAuth Token. Click “Copy” to copy it. Make a note of it for later use.
Create a channel to receive review notifications:
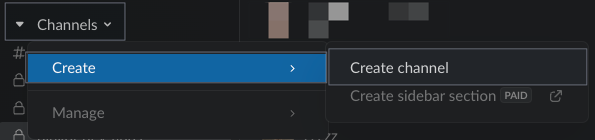
- Sidebar -> Channels -> Create -> Create channel
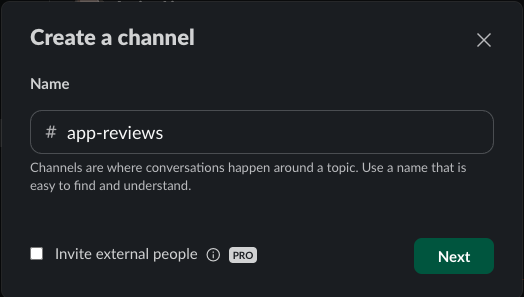
- Name: Enter your desired channel name
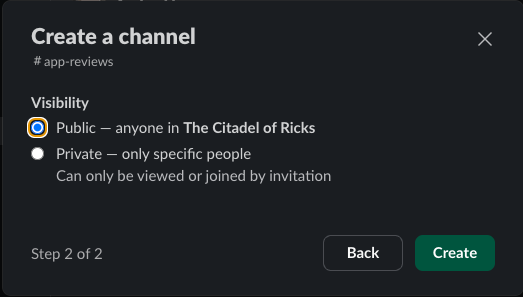
Visibility:
- Public: Open to everyone, no further action needed.
- Private: Private channel, ⭐️⭐️⭐️ you need to add the Slack App you just created:
How to add the Slack App to the channel:
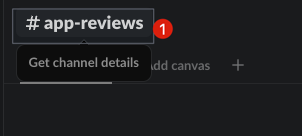
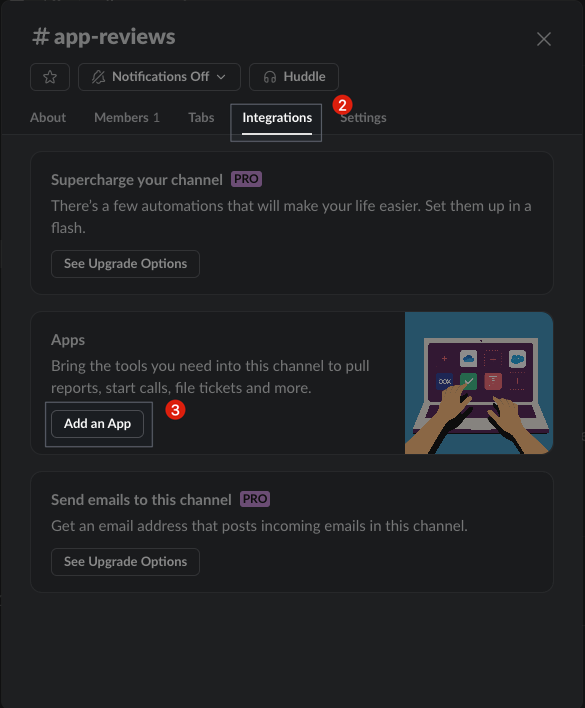
- Click on the channel name at the top
- Click “Settings”
- Click “Add an App”
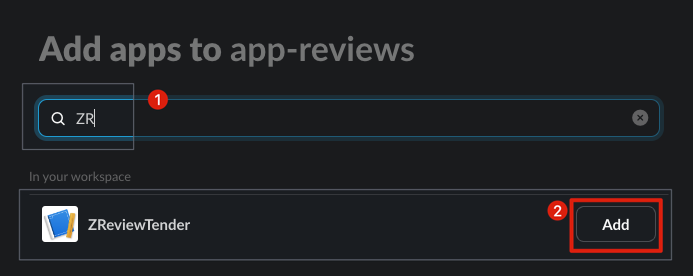
- Search for the name of the Slack App you just created
- Click “Add”

Once added successfully, the channel will display a message: ZReviewTender joined.
⭐️⭐️⭐️ I noticed a Slack bug here; the Slack App may not be searchable immediately after creation. It may take some time to appear; you can use a Public Channel in the meantime, which does not require adding the Slack App.
Obtain Channel ID: The last and most important step is to obtain the Channel ID for later configuration.
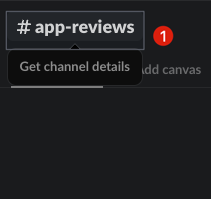

- Click on the channel name at the top
- At the bottom of the About section, you will find the Channel ID information
- Make a note of the
Channel IDfor later use
Slack steps completed.
— — —
Additional Notes:
You can edit the Slack App name and icon in “Basic Information” -> “Display Information”:
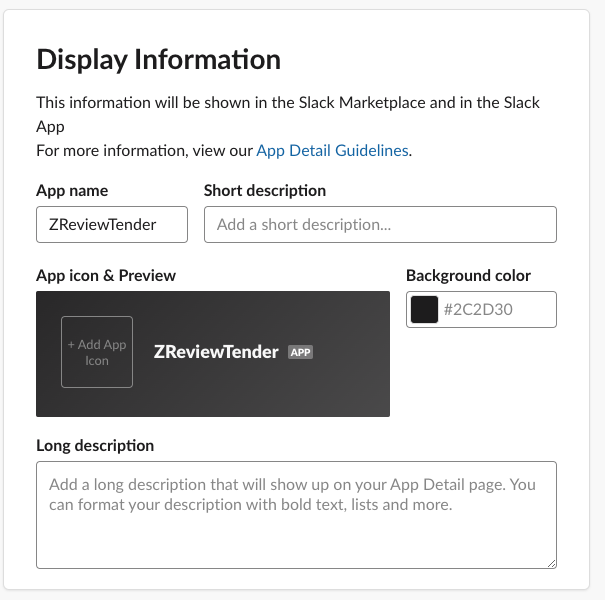
After making changes, remember to click “Save Changes” in the bottom right corner to save.
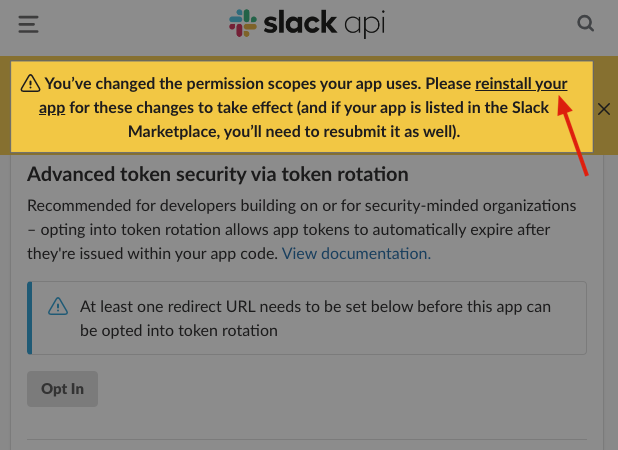
If you add new OAuth & Permissions Scopes, you need to click “reinstall your app” for the changes to take effect:
Step 2. Generate Apple App Store Connect API & Google Play Android Developer API Credentials
Apple App Store Connect API Credentials
iOS is relatively easier; we just need to obtain the following four pieces of information from App Store Connect:
Issuer ID:
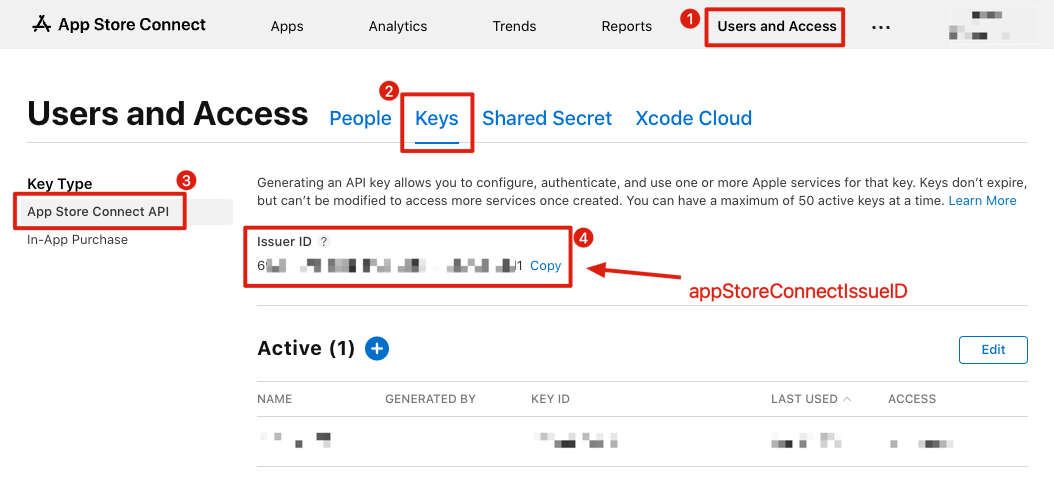
- App Store Connect -> Keys -> App Store Connect API
- Make a note of the
Issuer IDfor later use.
Private Key ID & Private Key:
Click the “+” button to add:
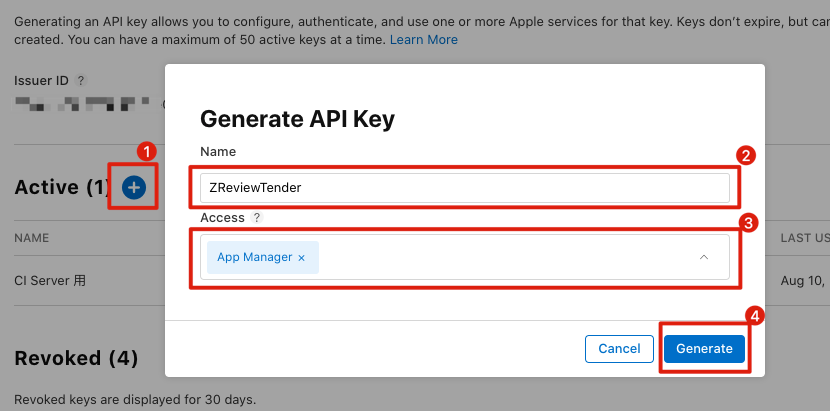
- Name:
ZReviewTender - Access:
App Manager
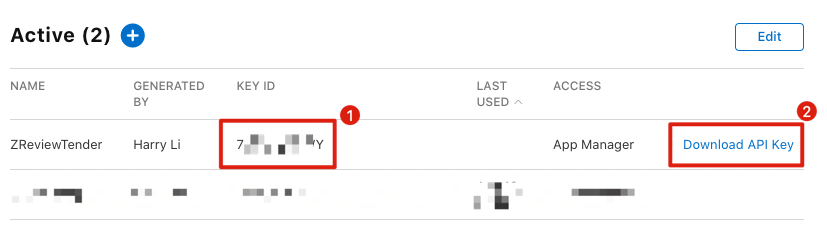
Key IDMake a note of it for later use.- Click “Download API Key” to save the downloaded file named
AuthKey_XXXXXXXXXX.p8for later use.
App ID: (the target App ID for fetching reviews)
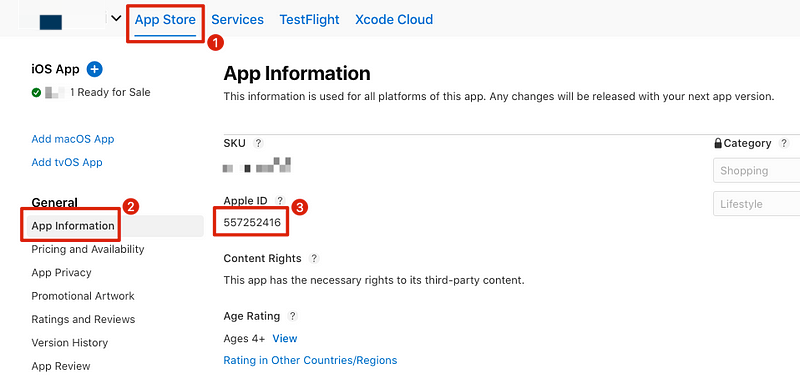
You can find the App ID in App Store Connect -> App Store -> General -> App Information -> App ID.
- Make a note of the
App IDfor later use.
Google Play Android Developer API Credentials
Android is more complex; you need to enable the API from the Google Cloud Project associated with the App, create a Service Account, and grant the Service Account access to the Google Play Console with permissions for the target App.
Select the Google Cloud Project associated with the App or create a new Project.
Enable “Android Developer API”:
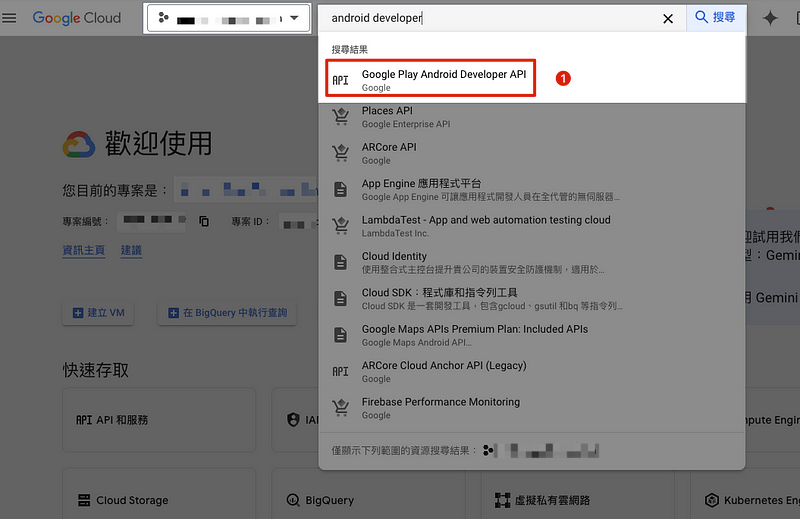
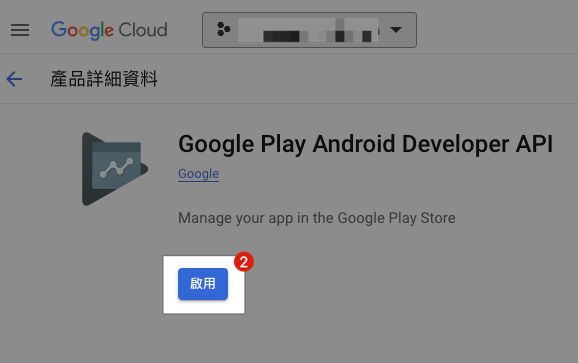
- Search for “Android Developer API” and click to enter
- Select “Enable”
[Optional Step] You can also enable “Cloud Translation API”:
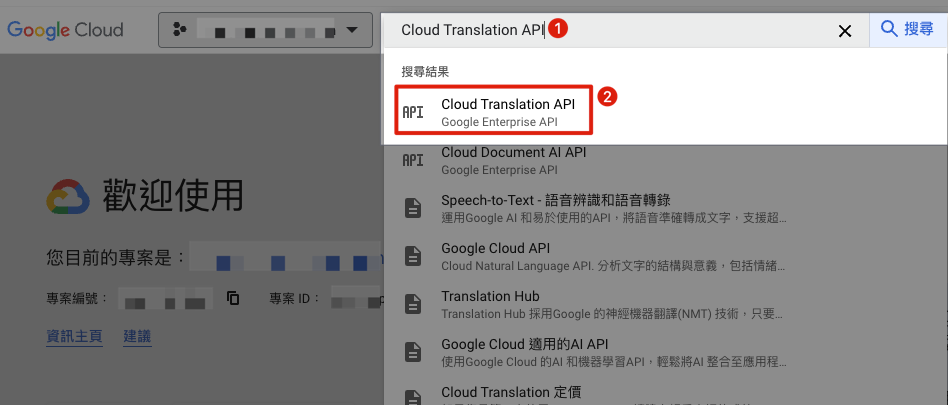
- Enabling this allows you to use the same Service Account credentials for automatic review translation.
- Please note: The Cloud Translation API is not free; detecting languages and translations will incur costs!
- Please note: The Cloud Translation API is not free; detecting languages and translations will incur costs!
- Please note: The Cloud Translation API is not free; detecting languages and translations will incur costs!
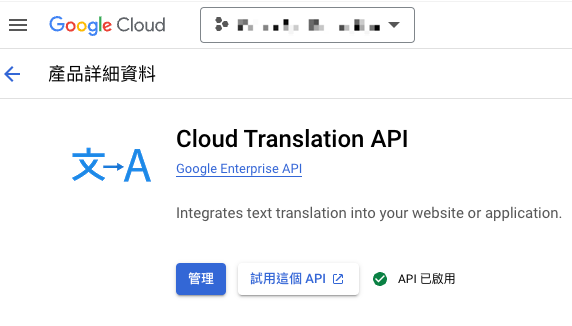
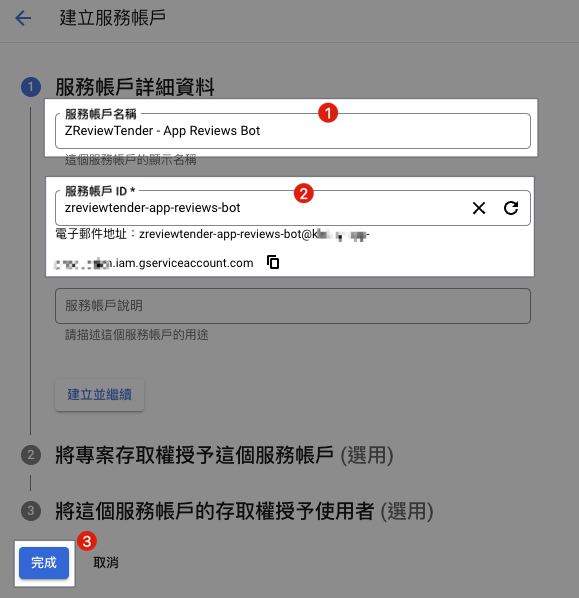
Create a Service Account:
- Search for “IAM”
- Select “IAM & Admin”

- Select “Service Accounts”
- Choose “Create Service Account”
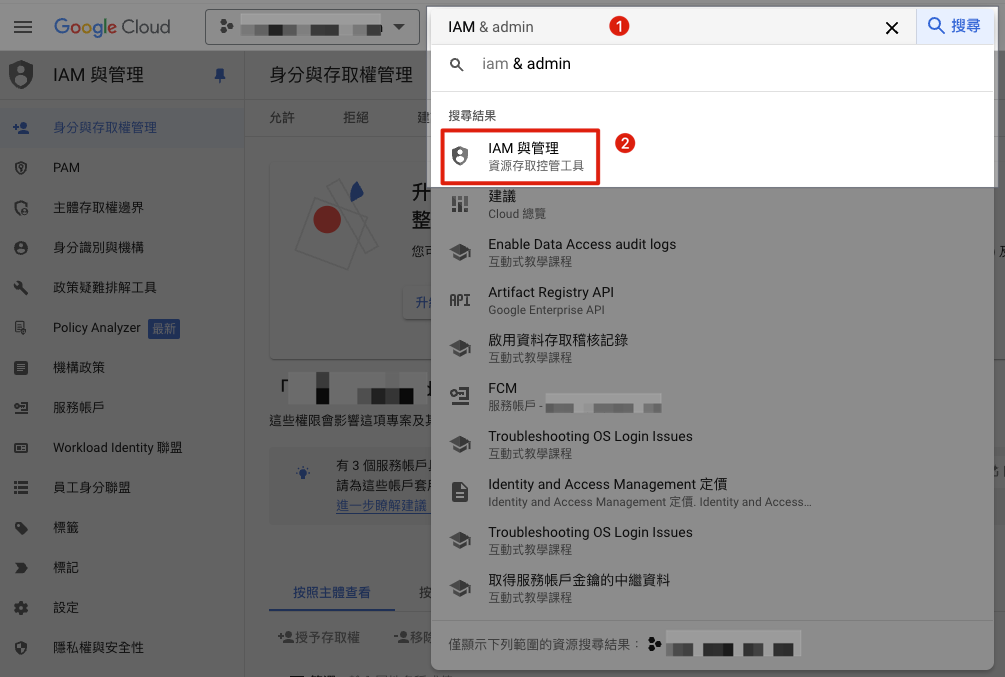
- Service Account Name: Enter a name, you can use “
ZReviewTender“ or “Google Play Review Bot“ - Service Account ID: This will auto-fill; no need to change unless necessary, this will also be your Service Account Email.
- Click “Done”
Make a note of this Service Account’s email address:

- The list page will also display the Service Account Email address.
- Make a note of the
Service Account Emailfor later use.
Create a Service Account Key Credential:
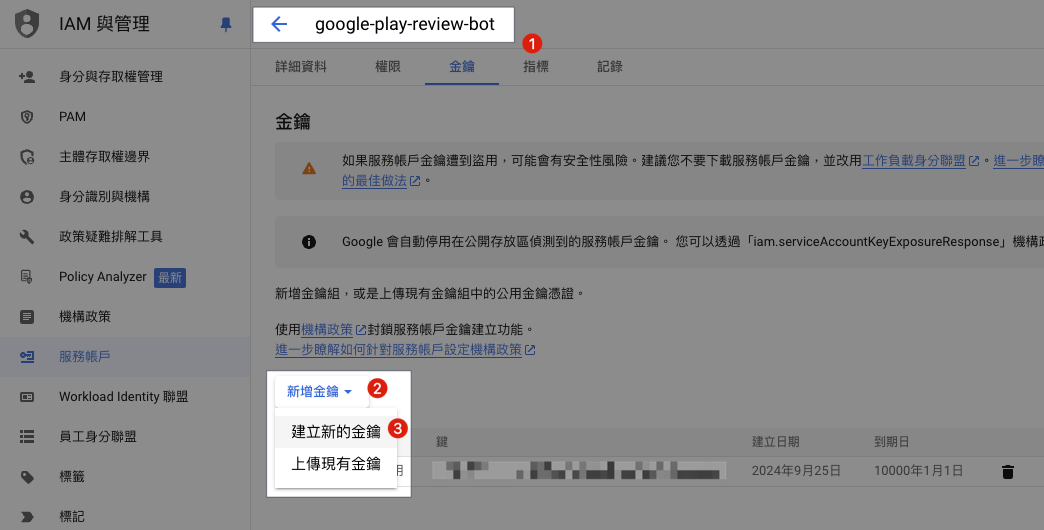
- Refresh the list page and click on the Service Account you just created.
- Click “Add Key”
- Select “Create new key”
- Choose “JSON” as the key type.
- Click “Create”
- Save the downloaded file named
XXXX-XXXX.jsonfor later use.
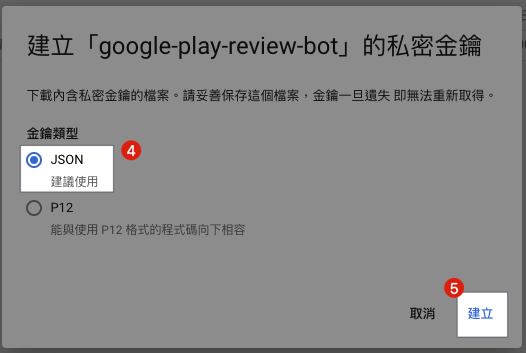
Add the Service Account to Google Play Console and grant permissions for the target App:
- Click “Users and permissions”
- Click “Invite new users” on the right
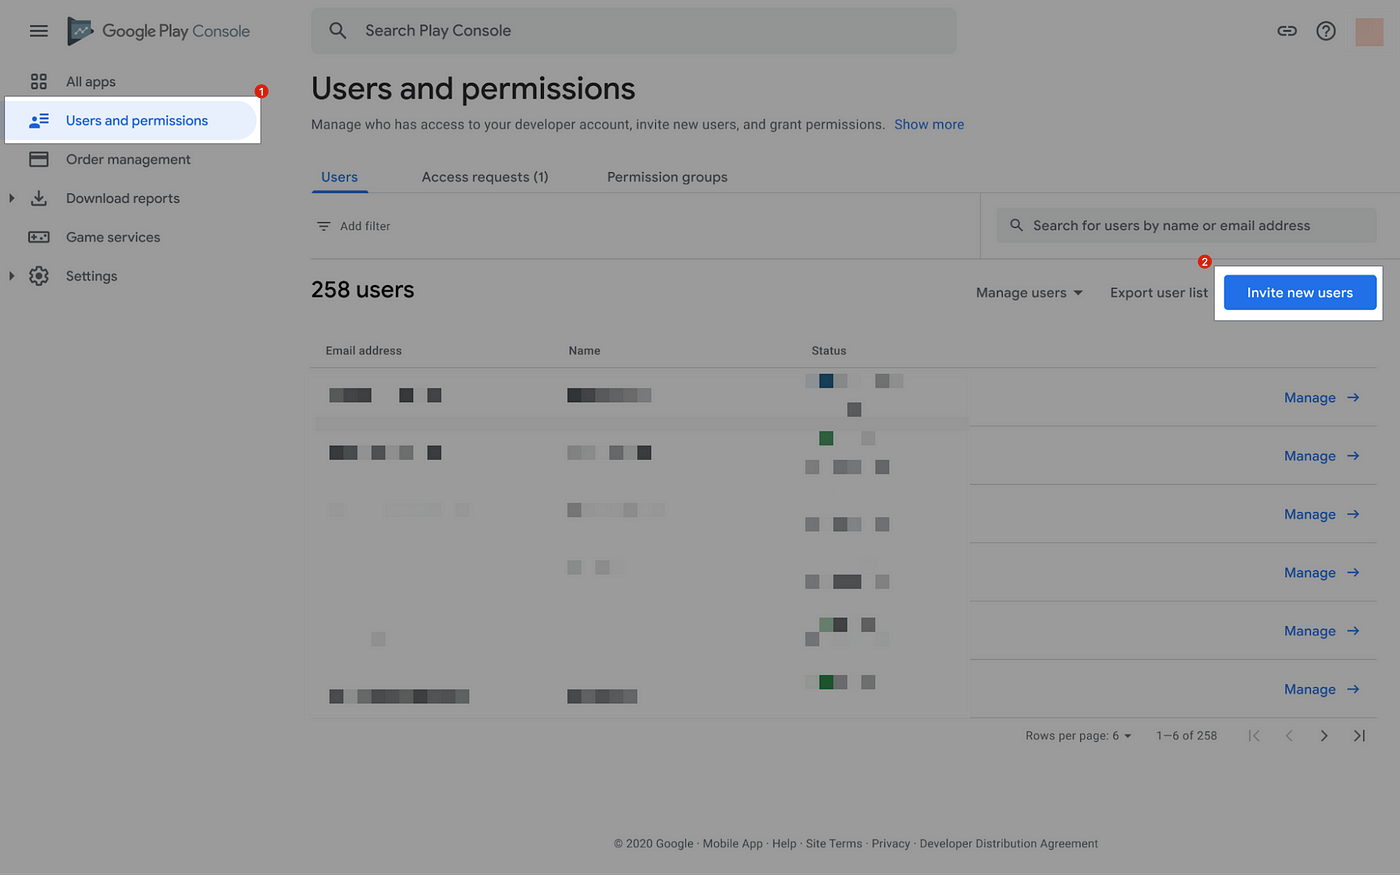
- Enter the
Service Account Emailyou noted earlier in the Email address field. - Under App permissions -> Add app
- Add the target App for fetching reviews.
- Click “Invite user” to complete the invitation without verification.
Obtain Google Play Console Developer ID, App ID, and Package Name information:
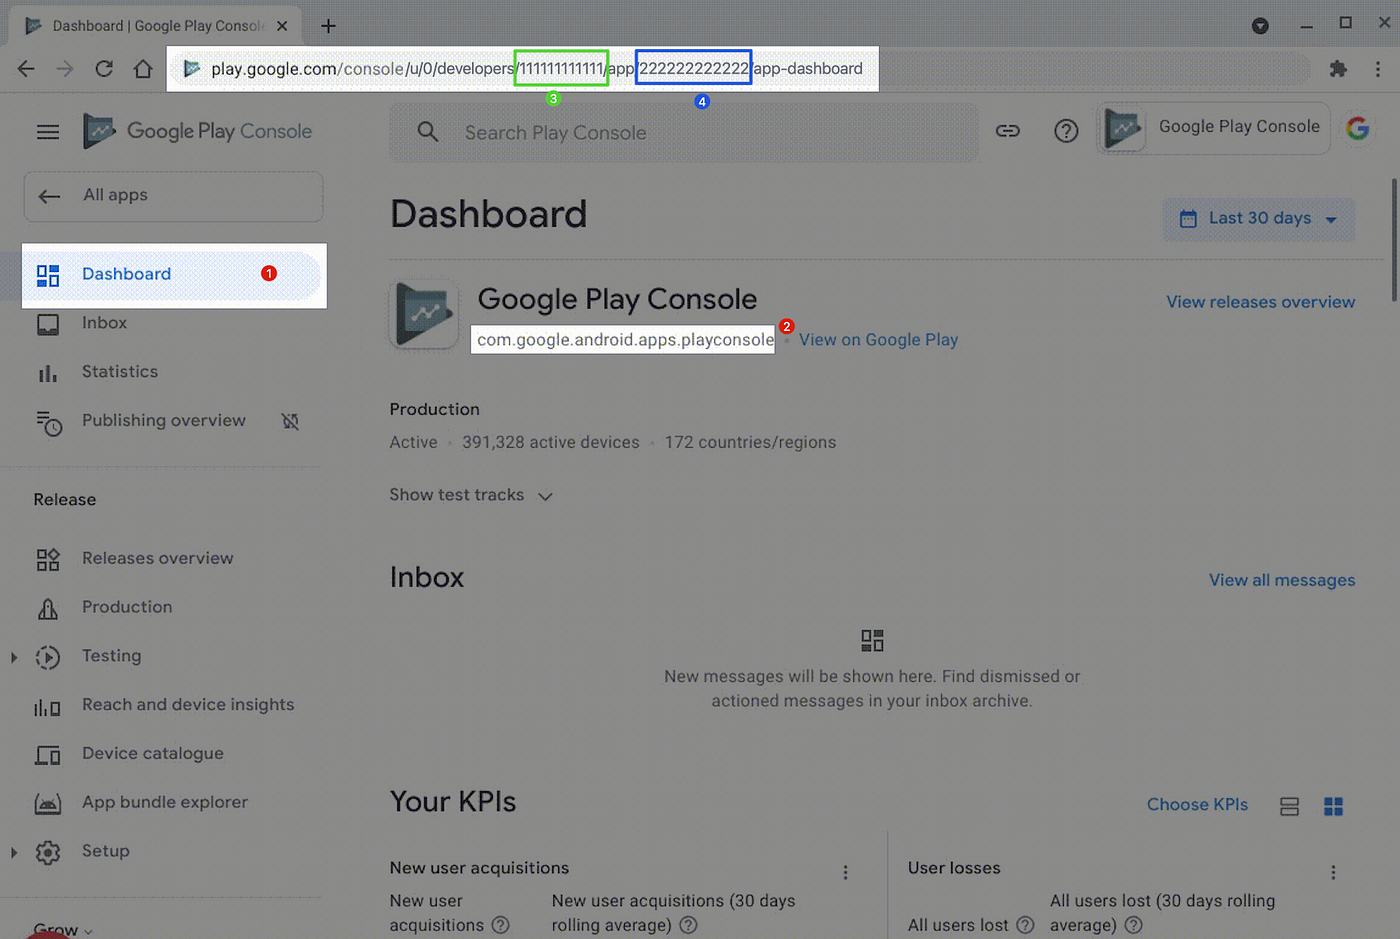
- Click on the target App to enter the Dashboard.
- Make a note of the
Package Namefor later use.
Copy the Dashboard URL and find:
The
/developers/XXXis yourDeveloper ID. Make a note of this Developer ID for later use.In the /app/
XXX, this is yourApp ID. Make sure to note down this App ID, as you’ll need it for the setup later.
Credential setup completed.
Step 3. Deploying with Github Action and Filling in Configuration Files
The exciting news is that I have packaged the tedious Github Repo and Github Action setup process into a Repo Template & Marketplace Github Action. You can complete the work by following these simple steps.
Go to: ZReviewTender-deploy-with-github-action:
{:target="_blank"}](/assets/0095528cf875/1*LXuZQnLMsH-_ULX-DEiL9w.png)
https://github.com/ZhgChgLi/ZReviewTender-deploy-with-github-action
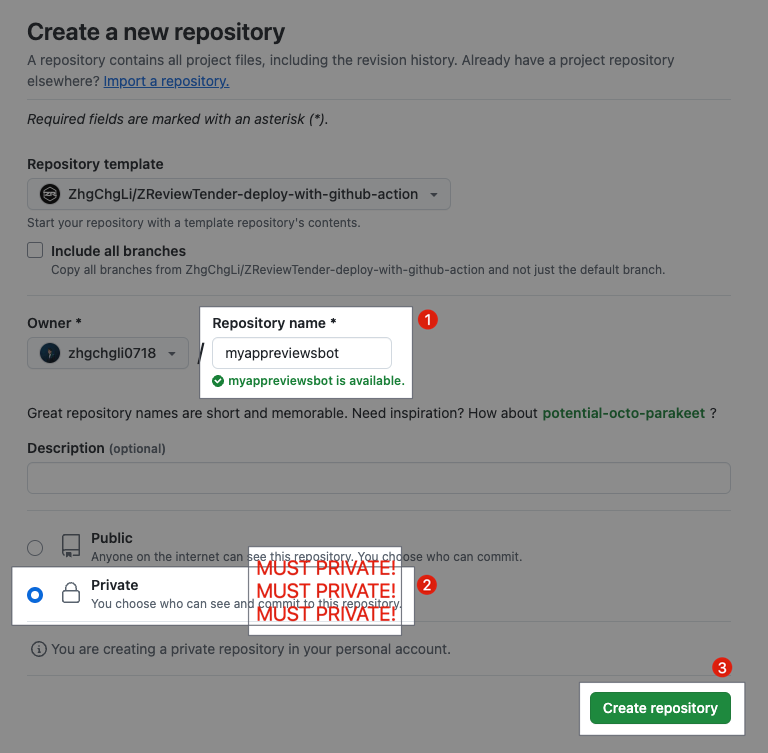
- Repository name: Enter your desired Repo name.
- Private: Since the Repo will store access keys, make sure to set it as a Private Repo ⭐️⭐️⭐️.
- Private: Since the Repo will store access keys, make sure to set it as a Private Repo ⭐️⭐️⭐️.
- Private: Since the Repo will store access keys, make sure to set it as a Private Repo ⭐️⭐️⭐️.
- Click “Create repository”.
The author and contributors of ZReviewTender, ZhgChgLi, are not responsible for any losses incurred from your use of ZReviewTender.
Wait for the Repository to be created:
Double-check that you have created a Private Repo:
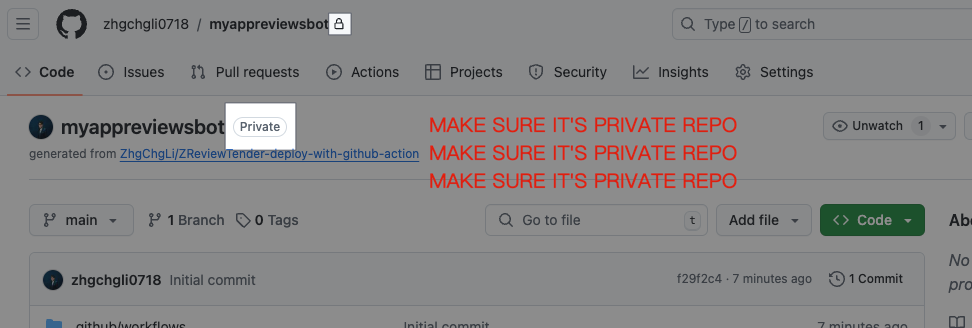
- Private: Since the Repo will store access keys, make sure to set it as a Private Repo ⭐️⭐️⭐️.
- Private: Since the Repo will store access keys, make sure to set it as a Private Repo ⭐️⭐️⭐️.
- Private: Since the Repo will store access keys, make sure to set it as a Private Repo ⭐️⭐️⭐️.
Enable Github Actions Permissions: After the Repo is created, due to Github’s security settings, you need to go to Repo Settings to allow Github Actions to run.
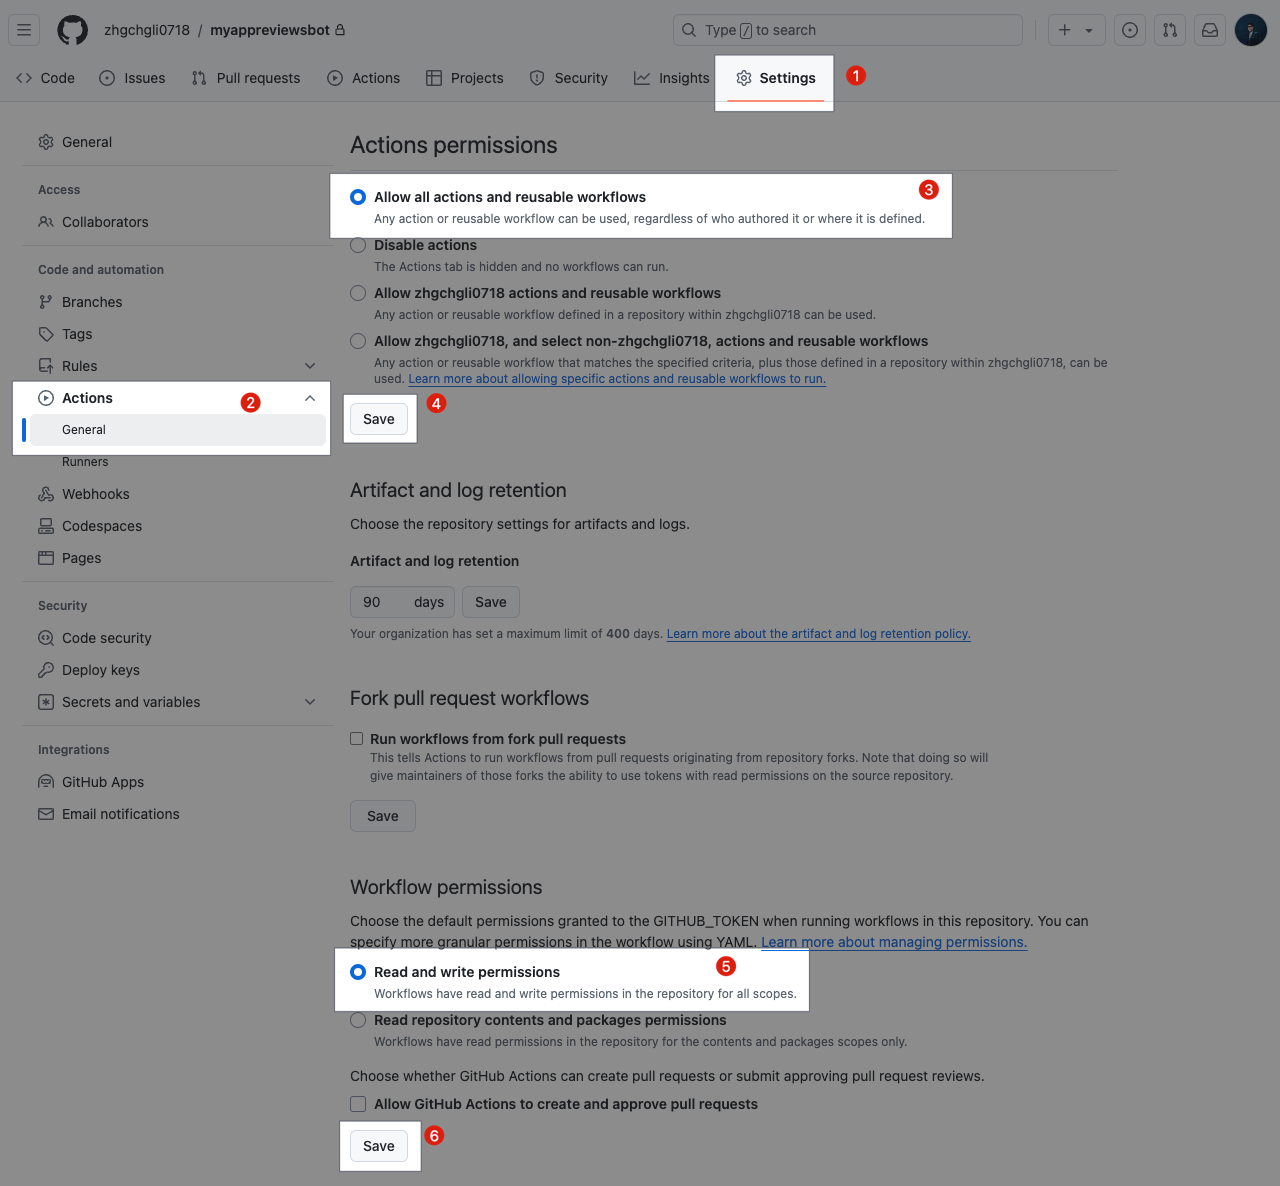
- Repo -> Settings
- Select “Actions” -> “General”
- For Actions permissions, select “Allow all actions and reusable workflows”.
- Click “Save”.
- For Workflow permissions, select “Read repository contents and packages permissions”.
First Run, Initialize ZReviewTender:
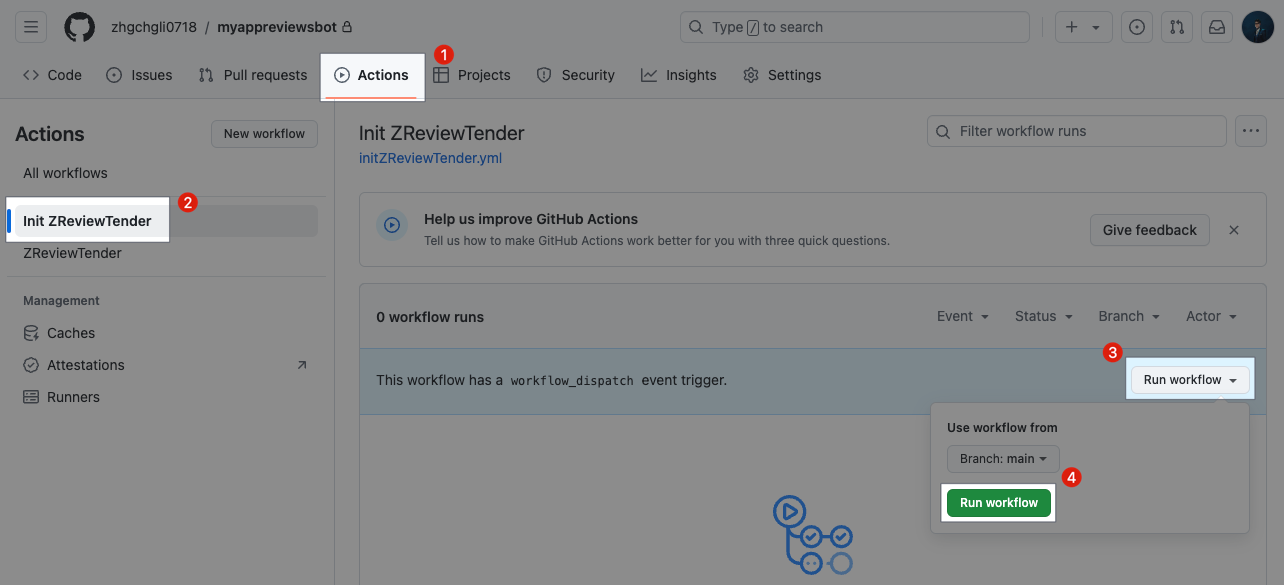
- Repo -> Actions
- Select “Init ZReviewTender”.
- Choose “Run workflow”.
- Click “Run workflow”.
- Refresh the page.
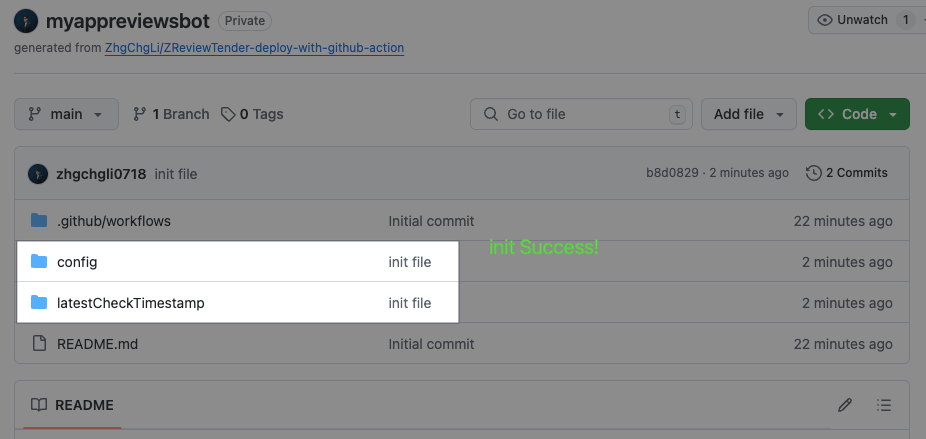
Wait for the init ZReviewTender Action to complete:

If you see ❌ Error: please double-check the Github Actions permissions settings mentioned earlier to ensure they are correct.
If initialization is successful, you will see two new directories on the Repo homepage:
Upload the required credential files:
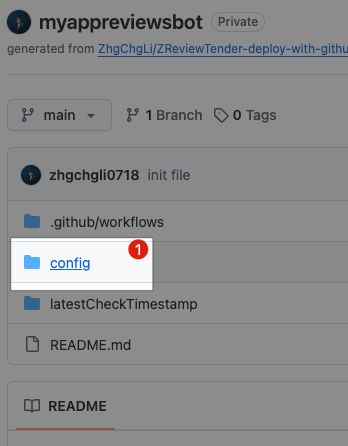
- Enter the
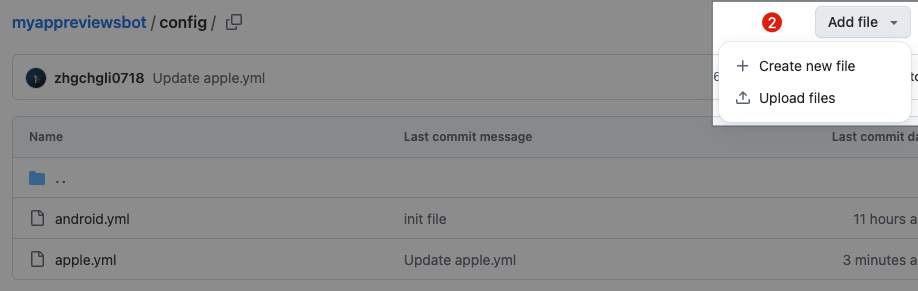
/configdirectory. - Click “Add file” in the upper right corner -> “Upload files”.
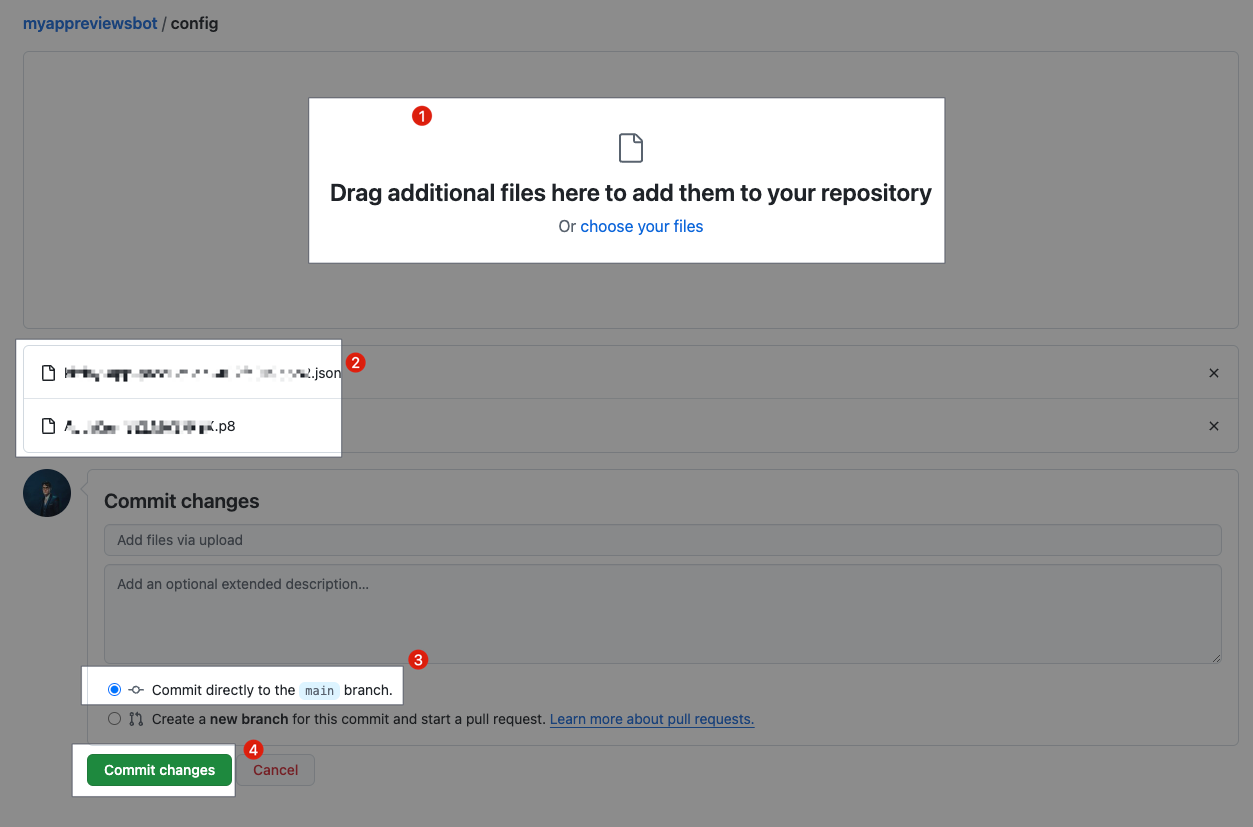
- Upload the GCP Service Account
XXXX-XXXX.json(for Android) saved in Step 2 and theAuthKey_XXXXXXXXXX.p8saved from App Store Connect (for iOS). - Wait for the upload to complete.
- Select “Commit directly to the main branch”.
- Click “Commit changes”.
Configure Apple (iOS):
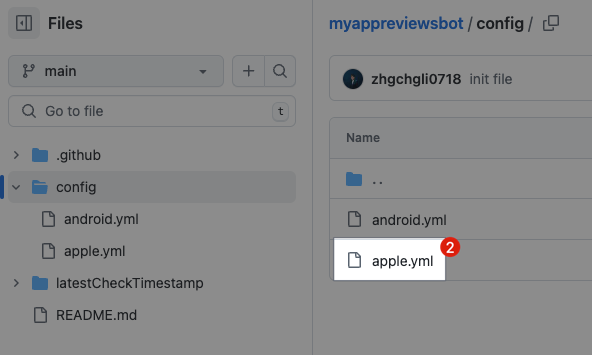
- Enter the
config/directory and click on theapple.ymlfile.
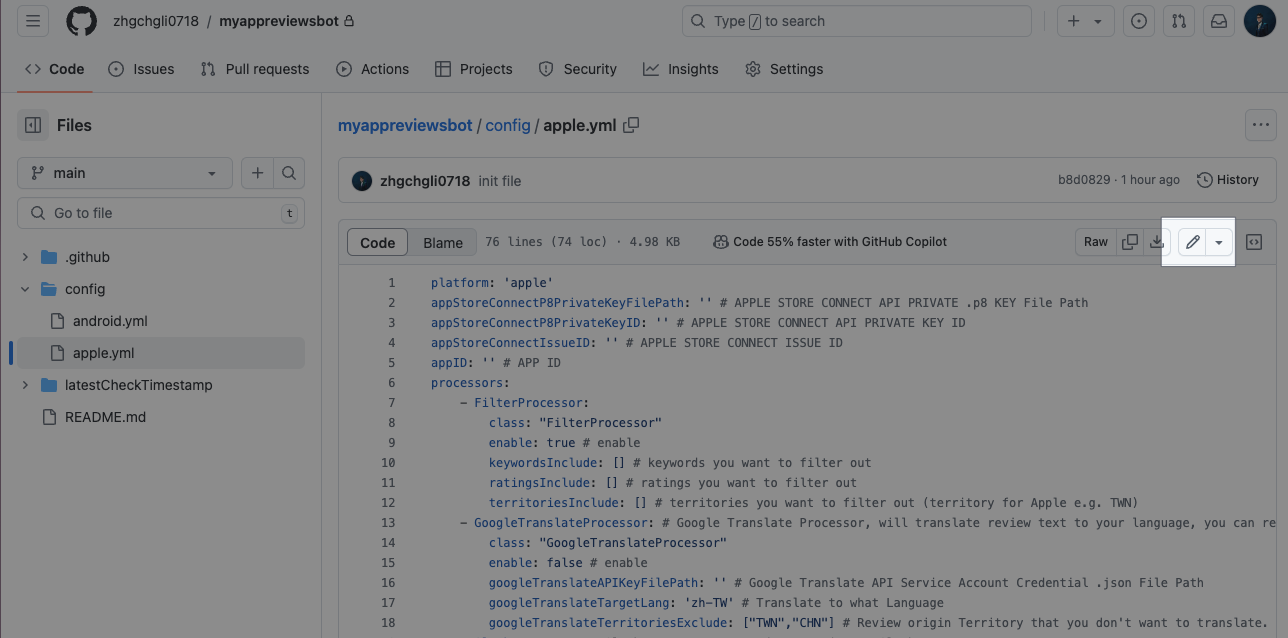
- Click the “🖊️ Edit” button in the upper right corner.
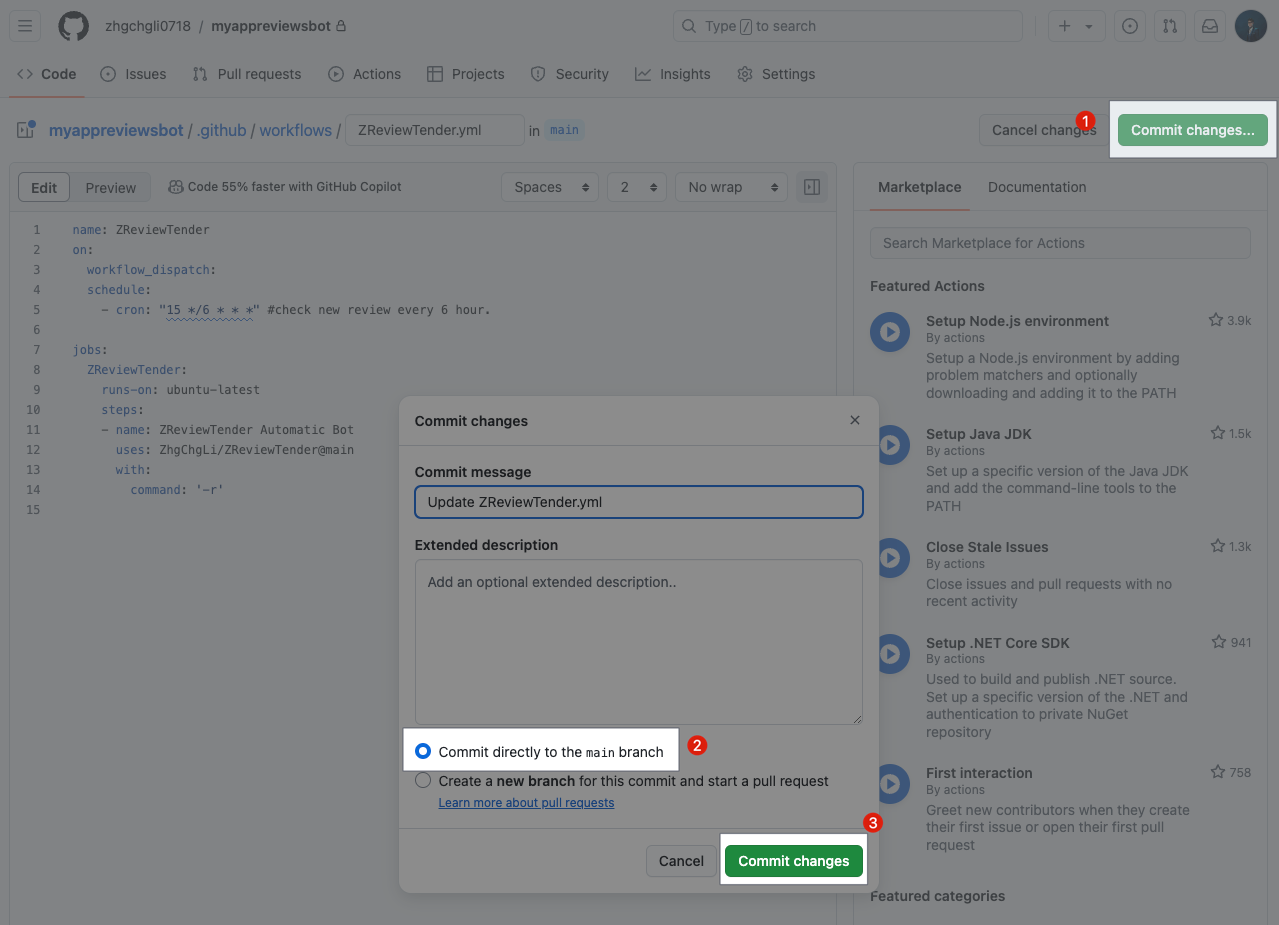
Edit apple.yml, paste the following content, and fill in the information you noted down in the previous steps:
1
2
3
4
5
6
7
8
9
10
11
12
13
14
platform: 'apple'
appStoreConnectP8PrivateKeyFilePath: './config/AuthKey_XXXXXXXXXX.p8' # APPLE STORE CONNECT API PRIVATE .p8 KEY File Path
appStoreConnectP8PrivateKeyID: 'Private Key ID' # APPLE STORE CONNECT API PRIVATE KEY ID
appStoreConnectIssueID: 'Issuer ID' # APPLE STORE CONNECT ISSUE ID
appID: 'App ID' # APP ID
processors:
    - SlackProcessor: # Slack Processor, resend App Review to Slack.
        class: "SlackProcessor"
        enable: true # enable
        slackTimeZoneOffset: "+08:00" # Review Created Date TimeZone
        slackAttachmentGroupByNumber: "1" # 1~100, how many review messages in 1 slack message.
        slackBotToken: "Slack App Bot User OAuth Token" # Slack Bot Token, send slack messages through Slack Bot.
        slackBotTargetChannel: "Target Channel ID" # Slack Bot Token, send slack messages through Slack Bot. (recommended, first priority)
        slackInCommingWebHookURL: "" # Slack In-Coming WebHook URL, send slack messages through In-Coming WebHook, not recommended, deprecated.
appStoreConnectP8PrivateKeyFilePath: Enter./config/AuthKey_XXXXXXXXXX.p8(the filename of theAuthKey_XXXXXXXXXX.p8file saved in Step 2).appStoreConnectP8PrivateKeyID: ThePrivate Key IDnoted down from App Store Connect in Step 2.appStoreConnectIssueID: TheIssuer IDnoted down from App Store Connect in Step 2.appID: TheApp IDnoted down from App Store Connect in Step 2.slackBotToken: Enter theSlack App Bot User OAuth Tokennoted down in Step 1.slackBotTargetChannel: Enter theChannel IDwhere you want to send messages noted down in Step 1.
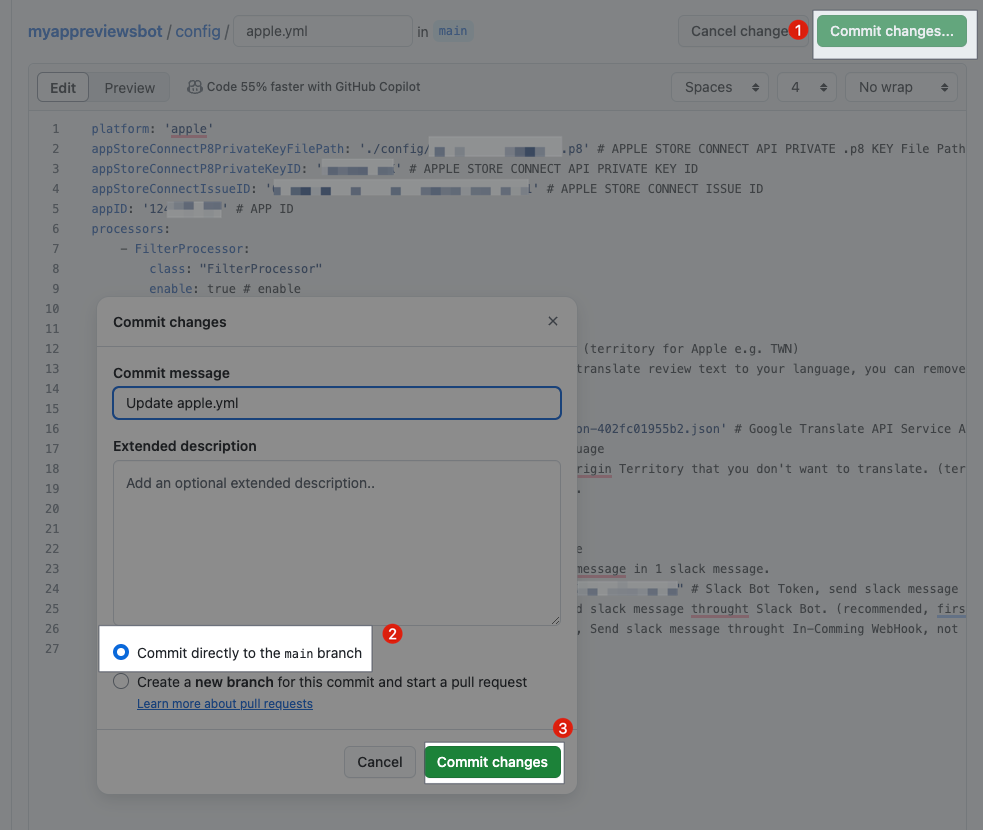
- After editing, click “Commit changes…” in the upper right corner.
- Select “Commit directly to the main branch”.
- Click “Commit changes”.
Configure Android:

- Enter the
config/directory and click on theandroid.ymlfile.
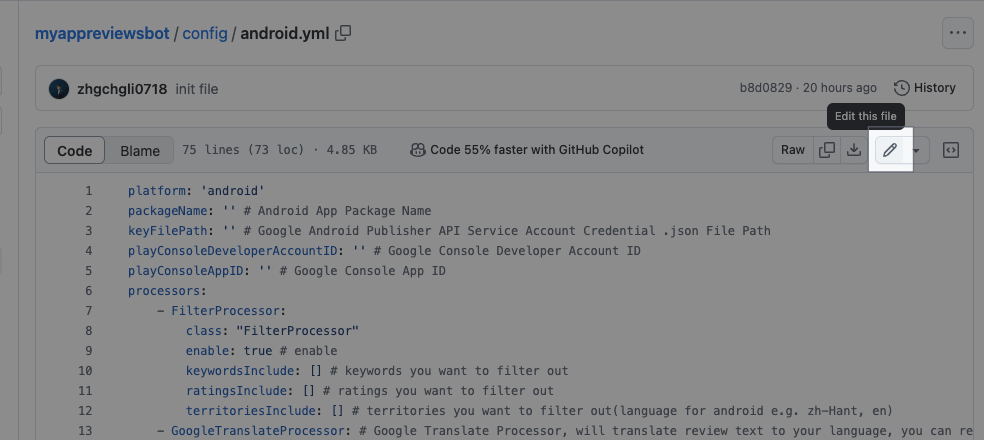
- Click the “🖊️ Edit” button in the upper right corner.
Edit android.yml, paste the following content, and fill in the information you noted down in the previous steps:
1
2
3
4
5
6
7
8
9
10
11
12
13
14
platform: 'android'
packageName: 'Package Name' # Android App Package Name
keyFilePath: './config/XXXX-XXXX.json' # Google Android Publisher API Service Account Credential .json File Path
playConsoleDeveloperAccountID: 'Developer ID' # Google Console Developer Account ID
playConsoleAppID: 'App ID' # Google Console App ID
processors:
- SlackProcessor: # Slack Processor, resend App Review to Slack.
        class: "SlackProcessor"
        enable: true # enable
        slackTimeZoneOffset: "+08:00" # Review Created Date TimeZone
        slackAttachmentGroupByNumber: "1" # 1~100, how many review messages in 1 slack message.
        slackBotToken: "Slack App Bot User OAuth Token" # Slack Bot Token, send slack messages through Slack Bot.
        slackBotTargetChannel: "Target Channel ID" # Slack Bot Token, send slack messages through Slack Bot. (recommended, first priority)
        slackInCommingWebHookURL: "" # Slack In-Coming WebHook URL, send slack messages through In-Coming WebHook, not recommended, deprecated.
packageName: ThePackage Namenoted down from the Google Play Console in Step 2.keyFilePath: Enter./config/XXXX-XXXX.json(the filename of theXXXX-XXXX.jsonService Account key file saved in Step 2).playConsoleDeveloperAccountID: TheDeveloper IDnoted down from the Google Play Console in Step 2.playConsoleAppID: TheApp IDnoted down from the Google Play Console in Step 2.slackBotToken: Enter theSlack App Bot User OAuth Tokennoted down in Step 1.slackBotTargetChannel: Enter theChannel IDwhere you want to send messages noted down in Step 1.
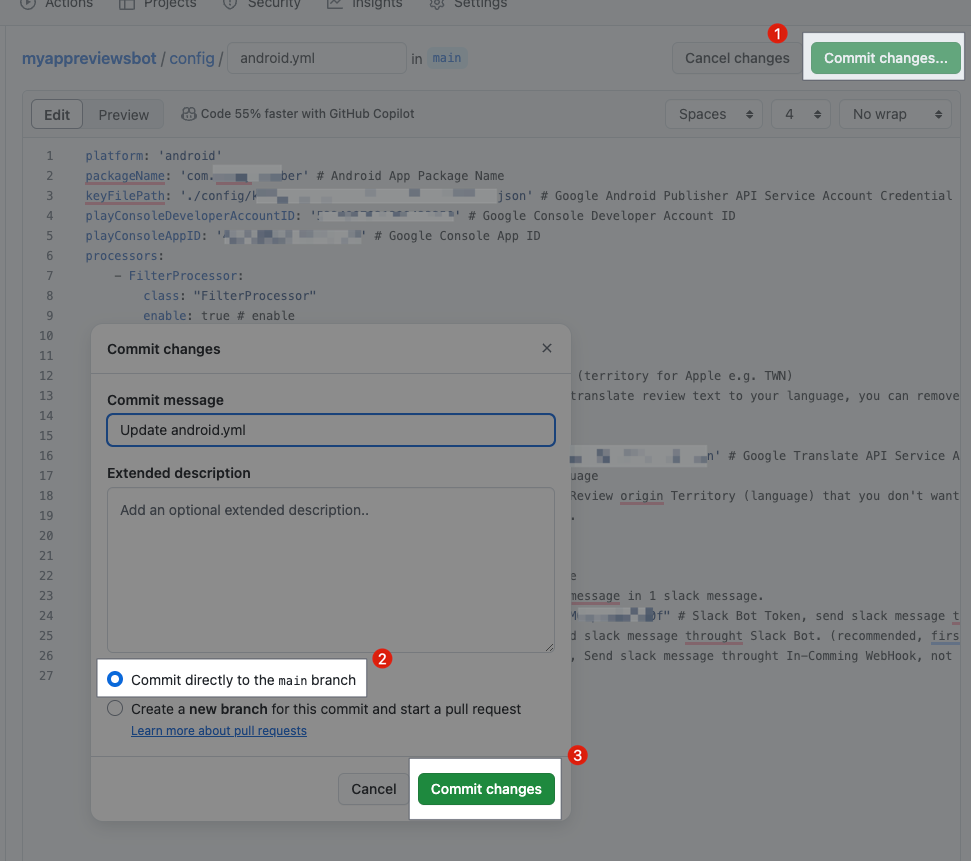
- After editing, click “Commit changes…” in the upper right corner.
- Select “Commit directly to the main branch”.
- Click “Commit changes”.
Setup completed! 🚀🚀🚀🚀
Verify if the setup was successful:
We can manually run it once to confirm that the setup is correct.
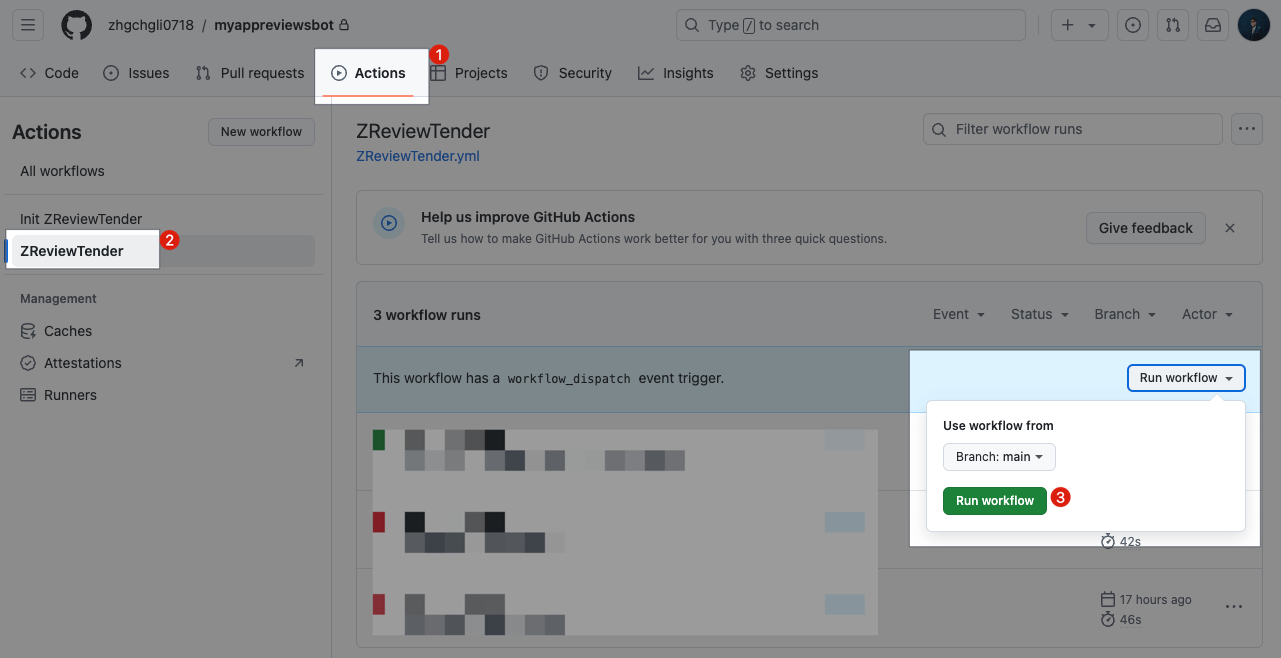
- Repo -> Actions
- Select “ZReviewTender”.
- Choose “Run workflow”.
- Click “Run workflow”.
- Refresh the page.
Wait for the ReviewTender Action to complete:
Verification successful 🎉🎉🎉🎉
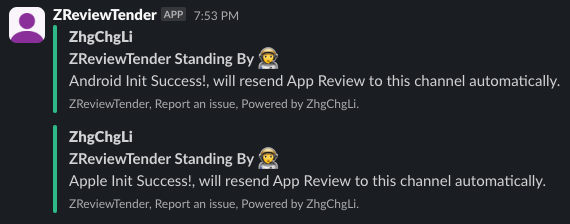
If you see ❌ Error or the Slack Channel did not receive the startup message: please double-check the contents of the configuration files to ensure they are correct.
Completion 🎉🎉🎉
Now you can rely on this free and reliable App review bot to keep track of the latest user reviews!
Buy me coffee ❤️❤️❤️
https://www.buymeacoffee.com/zhgchgli
If this project has helped you, feel free to buy me a coffee. Thank you.
Additional Settings
Add Filtering Functionality
Only forward reviews that meet certain criteria.
1
2
3
4
5
6
    - FilterProcessor:
        class: "FilterProcessor"
        enable: true # enable
        keywordsInclude: [] # keywords you want to filter out
        ratingsInclude: [] # ratings you want to filter out
        territoriesInclude: [] # territories you want to filter out (territory for Apple e.g. TWN)
- You just need to add the
FilterProcessorsettings in theprocessorssection of either/config/apple.ymlor/config/android.yml.
Add Automatic Translation Functionality
Automatically translate reviews in languages other than yours using the Google Cloud Translation API (this incurs costs).
- Make sure that the GCP Project associated with the Service Account created in Step 2 has the “Cloud Translation API” enabled.
- The settings for
apple.ymlandandroid.ymldiffer slightly.
apple.yml:
1
2
3
4
5
6
    - GoogleTranslateProcessor: # Google Translate Processor, will translate review text to your language, you can remove the whole block if you don't need it.
        class: "GoogleTranslateProcessor"
        enable: true # enable
        googleTranslateAPIKeyFilePath: './config/XXXX-XXXX.json' # Google Translate API Service Account Credential .json File Path
        googleTranslateTargetLang: 'zh-TW' # Translate to what Language
        googleTranslateTerritoriesExclude: ["TWN","CHN"] # Review origin Territory that you don't want to translate. (territory for Apple e.g. TWN)
./config/XXXX-XXXX.json(the filename of theXXXX-XXXX.jsonService Account key file saved in Step 2).
android.yml:
1
2
3
4
5
6
    - GoogleTranslateProcessor: # Google Translate Processor, will translate review text to your language, you can remove the whole block if you don't need it.
        class: "GoogleTranslateProcessor"
        enable: true # enable
        googleTranslateAPIKeyFilePath: './config/XXXX-XXXX.json' # Google Translate API Service Account Credential .json File Path
        googleTranslateTargetLang: 'zh-TW' # Translate to what Language
        googleTranslateTerritoriesExclude: ["zh-Hant","zh-Hans"] # Review origin Territory (language) that you don't want to translate. (language for android e.g. zh-Hant, en)
./config/XXXX-XXXX.json(the filename of theXXXX-XXXX.jsonService Account key file saved in Step 2).
Complete Combination Example:
1
2
3
4
5
6
7
8
9
10
11
12
13
14
15
16
17
18
19
20
21
22
23
24
25
26
platform: 'android'
packageName: '' # Android App Package Name
keyFilePath: '' # Google Android Publisher API Service Account Credential .json File Path
playConsoleDeveloperAccountID: '' # Google Console Developer Account ID
playConsoleAppID: '' # Google Console App ID
processors:
    - FilterProcessor:
        class: "FilterProcessor"
        enable: true # enable
        keywordsInclude: [] # keywords you want to filter out
        ratingsInclude: [] # ratings you want to filter out
        territoriesInclude: [] # territories you want to filter out (territory for Apple e.g. TWN)
    - GoogleTranslateProcessor: # Google Translate Processor, will translate review text to your language, you can remove the whole block if you don't need it.
        class: "GoogleTranslateProcessor"
        enable: true # enable
        googleTranslateAPIKeyFilePath: '' # Google Translate API Service Account Credential .json File Path
        googleTranslateTargetLang: 'zh-TW' # Translate to what Language
        googleTranslateTerritoriesExclude: ["zh-Hant","zh-Hans"] # Review origin Territory (language) that you don't want to translate. (language for android e.g. zh-Hant, en)
    - SlackProcessor: # Slack Processor, resend App Review to Slack.
        class: "SlackProcessor"
        enable: true # enable
        slackTimeZoneOffset: "+08:00" # Review Created Date TimeZone
        slackAttachmentGroupByNumber: "1" # 1~100, how many review messages in 1 slack message.
        slackBotToken: "" # Slack Bot Token, send slack messages through Slack Bot.
        slackBotTargetChannel: "" # Slack Bot Token, send slack messages through Slack Bot. (recommended, first priority)
        slackInCommingWebHookURL: "" # Slack In-Coming WebHook URL, send slack messages through In-Coming WebHook, not recommended, deprecated.
After adjustments, save the .yml as follows:
- After editing, click “Commit changes…”.
- Select “Commit directly to the main branch”.
- Click “Commit changes”.
Execution Parameter Settings
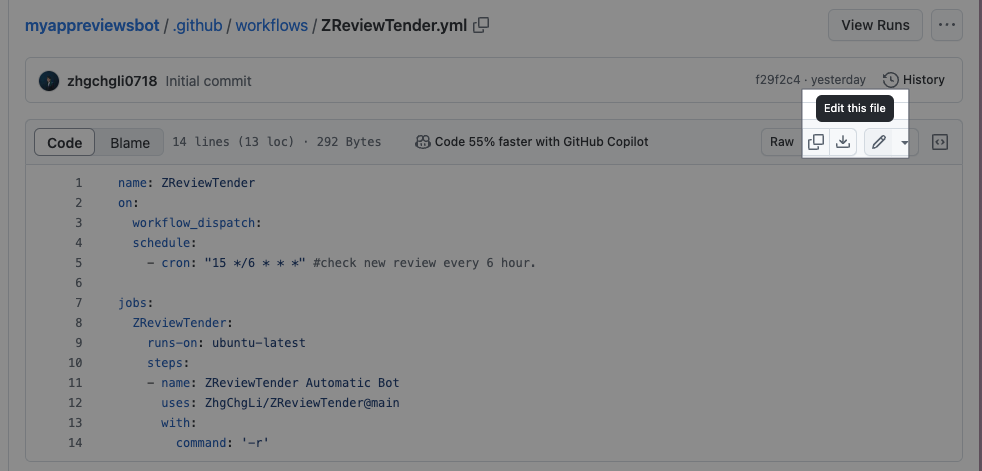
You can edit the ZReviewTender.yml file to set execution parameters.
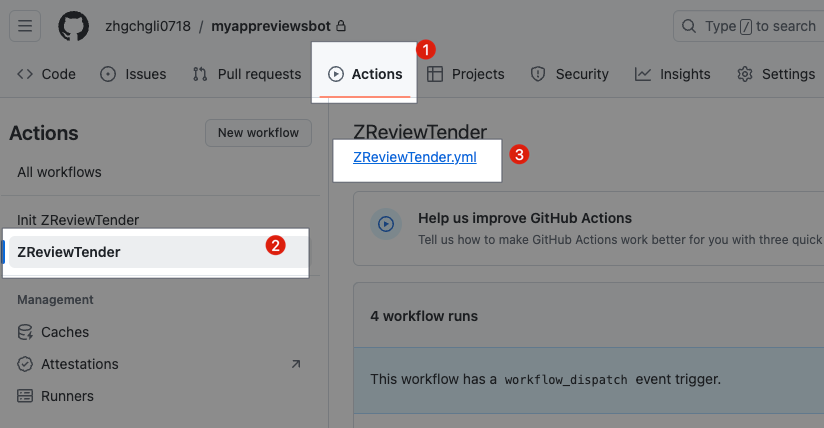
- Repo -> Actions.
- Click “ZReviewTender”.
- Click on the
ZReviewTender.yml. - Click the “🖊️ Edit” button in the upper right corner.
1
2
3
4
5
6
7
8
9
10
11
12
13
14
name: ZReviewTender
on:
  workflow_dispatch:
  schedule:
    - cron: "15 */6 * * *" # check new reviews every 6 hours.

jobs:
  ZReviewTender:
    runs-on: ubuntu-latest
    steps:
    - name: ZReviewTender Automatic Bot
      uses: ZhgChgLi/ZReviewTender@main
      with:
        command: '-r'
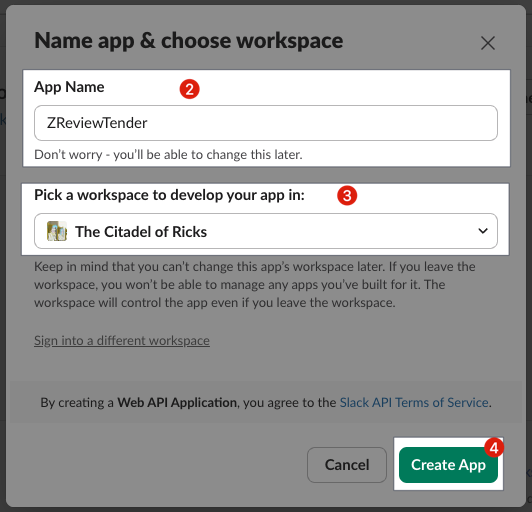
Adjust the Check Frequency (How often to fetch and forward new reviews?)
Adjust the settings in cron: "15 */6 * * *".
Parameters use Crontab notation; you can use this website to generate the desired settings:
{:target="_blank"}](/assets/0095528cf875/1*iWYVPC8AYalzLiRiQdd_yg.png)
Adjust the Execution Script
Adjust the settings in command: "-r".
-r: Run both Android and Apple (iOS) review checks simultaneously.-a: Run only Apple (iOS) review checks.-g: Run only Android review checks.
After adjustments:
- After editing, click “Commit changes…”.
- Select “Commit directly to the main branch”.
- Click “Commit changes”.
Temporarily Stop Checks
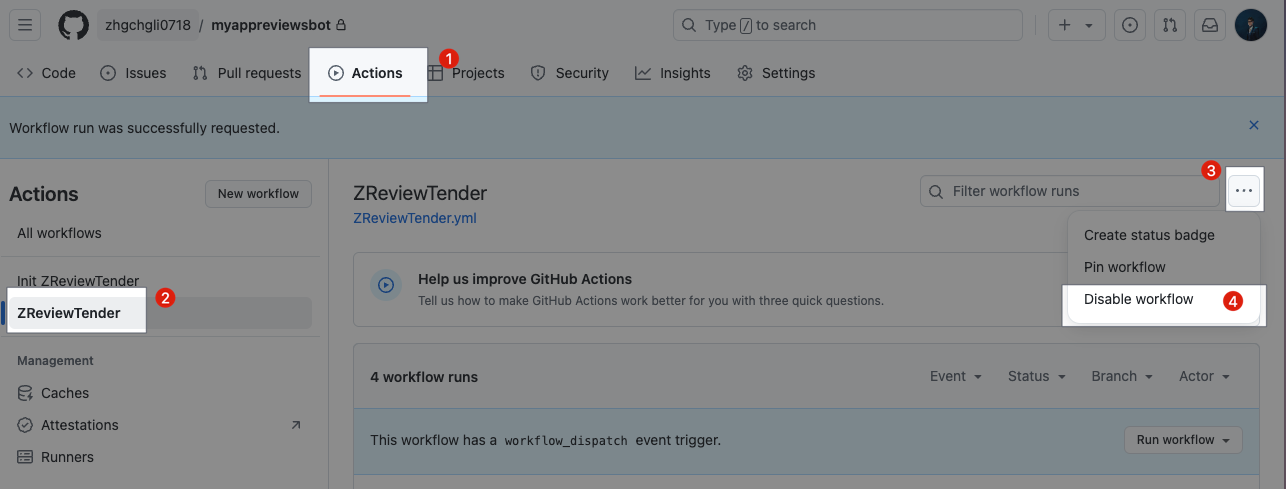
- Repo -> Actions.
- Select “ZReviewTender”.
- Click the “…” on the right.
- Select “Disable workflow”.
Report Issues and Suggest Features
If you have any feature suggestions, questions, or bugs, please visit the above Github Repo to create an Issue report. Thank you.
Advanced Usage and Development Stories
- ZReviewTender — A Free and Open Source App Reviews Monitoring Bot
- App Store Connect API Now Supports Reading and Managing Customer Reviews
- ZReviewsBot — Slack App Review Notification Bot
- The Story Behind AppStore APP’s Reviews Slack Bot
If you have any questions or suggestions, feel free to contact me.
This article was first published on Medium ➡️ Click Here
Automatically converted and synchronized using ZMediumToMarkdown and Medium-to-jekyll-starter.
