
Using Google Apps Script Web App Form to Connect with Github Action CI/CD Workflow
Github Action Workflow Form Optimization and Integration with Other Workflow Tools (Jira, Asana, Slack..) to Improve Development Efficiency.

Left: Original Github Action Workflow Form / Right: Final Result (GAS Web App Form)
2025/07 Update:
This feature has been integrated into an actual packaging tool. You can refer to the latest article case: “CI/CD Practical Guide (Part 4): Using Google Apps Script Web App to Connect GitHub Actions and Build a Free and Easy Packaging Tool Platform”
Background
The previous team built a complete CI/CD service using GitHub Actions, Self-hosted GitHub Runner, and Slack. The overall result was good. For app developers, setup and maintenance were relatively easy—just follow the official documentation to configure the YAML parameters, and the triggers run automatically. On the machine side, it was also easy to use your own machine as a runner. Since the service is maintained by GitHub, we didn’t have to worry about version upgrades, and the runner pulls tasks from GitHub, so there was no need to open external network ports.
It combines the GUI YAML build style similar to Bitrise with the flexibility and lower build costs of using self-hosted machines like Jenkins, but without the maintenance effort required for Jenkins itself.
Will write a complete article on App CI/CD x GitHub Action setup process when I have time in the future.
Problem: Github Action CI/CD GUI Form
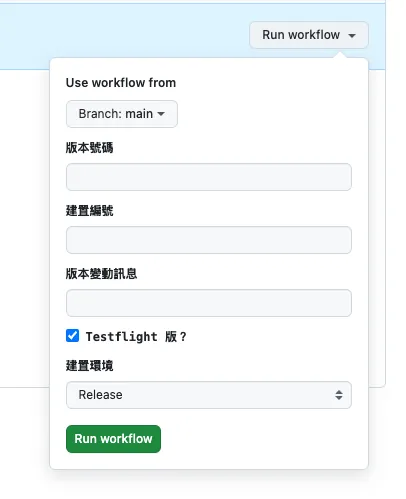
Github Action GUI Form
In app development, when triggering CD to build test versions, official releases, or submit for review, it usually requires providing some external parameters or selecting environments and branches based on needs before starting the workflow.
Unlike Jenkins, which is a self-hosted service with a complete Web GUI, GitHub Actions does not have one. The only Web GUI form is a simple customizable form available when clicking “Run workflow” in Actions, allowing users to input external parameters to trigger the CI/CD workflow.
Users who trigger this CD packaging are not necessarily the app developers themselves, nor do they always have permissions for the project. For example, QA may need to package a specific version, or PM/Backend may need to package a development version for testing. The GitHub Action Form requires project permissions to use, but users may not have project permissions or even an engineering background.
And we cannot create dynamic forms or data validation here.
Therefore, we need to create a separate GUI service for other users to operate.
Building a Custom Slack App Solution
Previously, team members who loved automation built a complete Slack App web service using Kotlin+Ktor. It integrated Slack messages, forms, commands, and more to receive and forward CD packaging requests, trigger GitHub Actions, and send the results back to Slack.
Currently, there are no development resources to build the service using Kotlin+Ktor as before
Writing Your Own Web/iOS/macOS App Tools
Currently, the team uses Jenkins, which provides a basic web interface for other users to log in. Additionally, they developed an app that connects to Jenkins and wraps some parameters to make it easier for non-engineering users to operate.
However, this entire setup was abandoned after migrating to GitHub Actions.
❌ Private Github Pages
It might be possible to directly build a GitHub Pages site as a CI/CD Web GUI, but currently only GitHub Enterprise allows setting access permissions for GitHub Pages. Other options, even with Private Repos, will be public and lack security.
❌ Slack App, but built with Google Apps Script
At first, we thought of using a Slack App as the CI/CD GUI form service based on our team’s previous experience. However, we currently don’t have the resources to build the service with Kotlin+Ktor like before. So, we considered quickly trying to build it using Function as a Service instead.
There are many types of Function as a Service. Cloud Functions offer more flexibility, but due to organizational IT restrictions, we cannot freely add Public Cloud Functions and there are cost concerns. Therefore, we return to our old friend — Google Apps Script.
Previously, I have written several articles about automation using Google Apps Script. Interested readers can refer to them:
1. “Automate Daily Data Reports with RPA Using Google Apps Script“
2. “Simple 3 Steps — Build a Free GA4 Automated Data Notification Bot “
3. “Crashlytics + Google Analytics Automatic Query for App Crash-Free Users Rate”
4. Crashlytics + Big Query: Building a More Real-Time and Convenient Crash Tracking Tool
In summary, Google Apps Script is another Function as a Service (FaaS) offered by Google, mainly featuring free usage and quick integration with Google services. However, it has several limitations, such as only supporting its own language, a maximum execution time of 6 minutes, limits on the number of executions, no multi-threading support, and more. For details, please refer to my previous article.
The conclusion is that it is not feasible, because:
-
Function as a Service cold start issue.
If a service is idle for a while, it goes to sleep, causing the next call to take longer to start (3 to ≥ 5 seconds); Slack Apps require API responses within 3 seconds or they are considered failures. Slack will then throw an error, and event listening will be lost, leading to repeated sends. -
Google Apps Script doGet and doPost methods cannot access Headers.
This prevents using official security verification and disables the ability to turn off Slack Retry. -
Google Apps Script single-thread limitation.
If connecting to other services takes more than 3 seconds to respond, Slack will immediately mark it as failed.
Tried to use Slack messages, Block Kit, and Forms to connect the entire process, but it was too prone to the issues mentioned above, so it was eventually abandoned.
If you want to implement this system, you still need to run your own server and service; do not use Function as a Service!!
❌ Slack Workflow Form
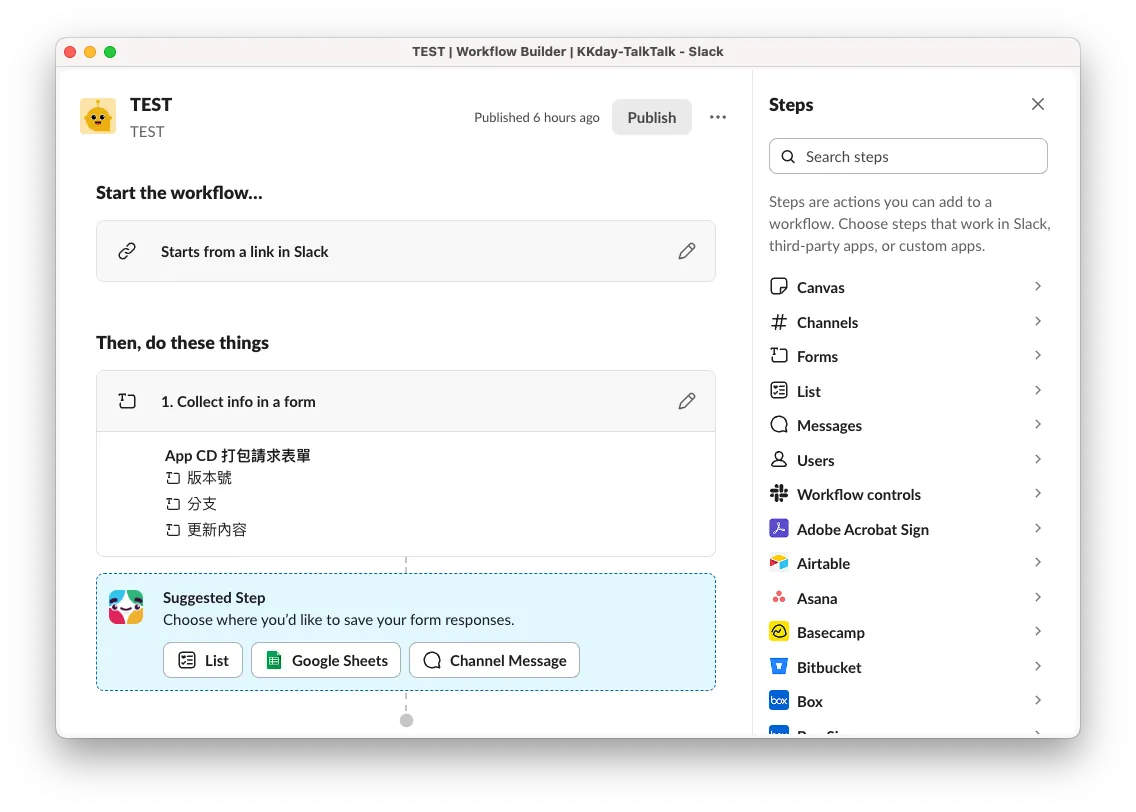
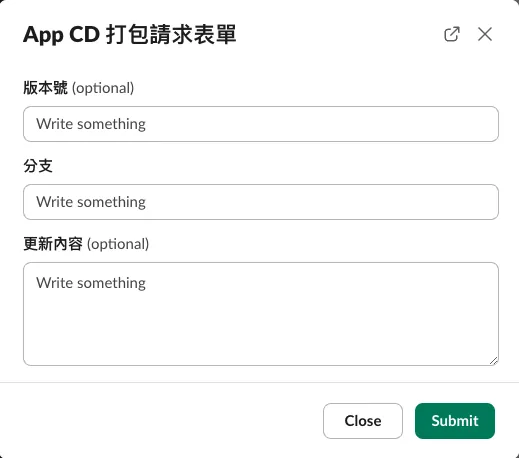
Slack Workflow Form (❌ Not customizable)
I also tried Slack’s built-in automation feature, Workflow Form, but it cannot create dynamic form content (e.g., fetching branches for users to select). The only customizable part is the subsequent data submission step.
✅ Google Apps Script Web App GUI Form
If the mountain doesn’t turn, the road turns. On second thought, it’s not necessary to be stuck on integrating with Slack. Using Slack integration is the best solution because it directly fits into the existing team collaboration tool, avoiding the need to learn new tools. However, due to resource constraints, we have to settle for other stable and easy-to-use methods.
Looking back, Google Apps Script itself can be deployed as a Web App, which can respond with a GUI form during a Web doGet. After submitting the form, it triggers subsequent GitHub integration processes.
Final Result 🎉

Workflow
We use Google Apps Script Web App to build a CI/CD form, directly linked to Google Workspace accounts, restricting access to users within the organization. It automatically obtains the current logged-in user’s email and uses a GitHub repo shared account (or borrows a personal access token from an authorized account) to call the GitHub API to get the branch list. Upon submission, it calls the API again to trigger the GitHub Action to start the CI/CD process.
Additionally, we can use the user’s email to call the Slack API via the Slack App to get the user’s Slack ID, then send messages through the Slack App to notify the status of the CI/CD tasks.
It can also be integrated with other tools and development processes, such as retrieving tasks from Asana or Jira first, then selecting them to search branches via the GitHub API, trigger GitHub Actions, and finally notify users through Slack.
Step 1. Create Google Apps Script Web App Form
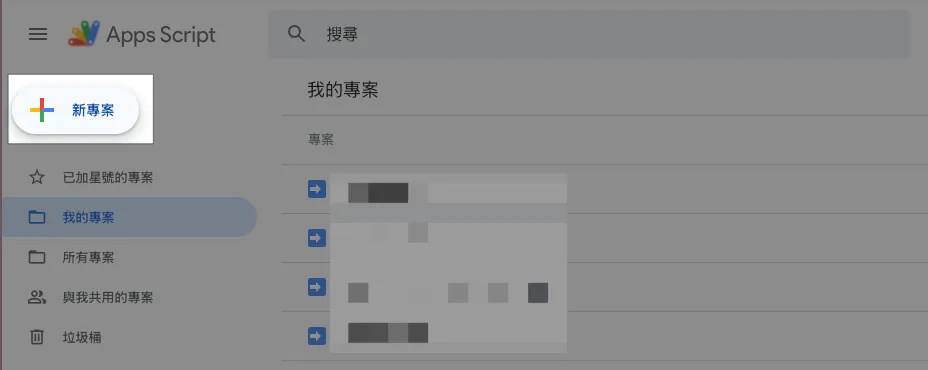
Go to > Google Apps Script and create a new project.
Step 2. Create Form Content and GAS Script
Haven’t written HTML for a long time and too lazy to design styles myself, so I just asked ChatGPT to generate a nicely styled HTML form template.
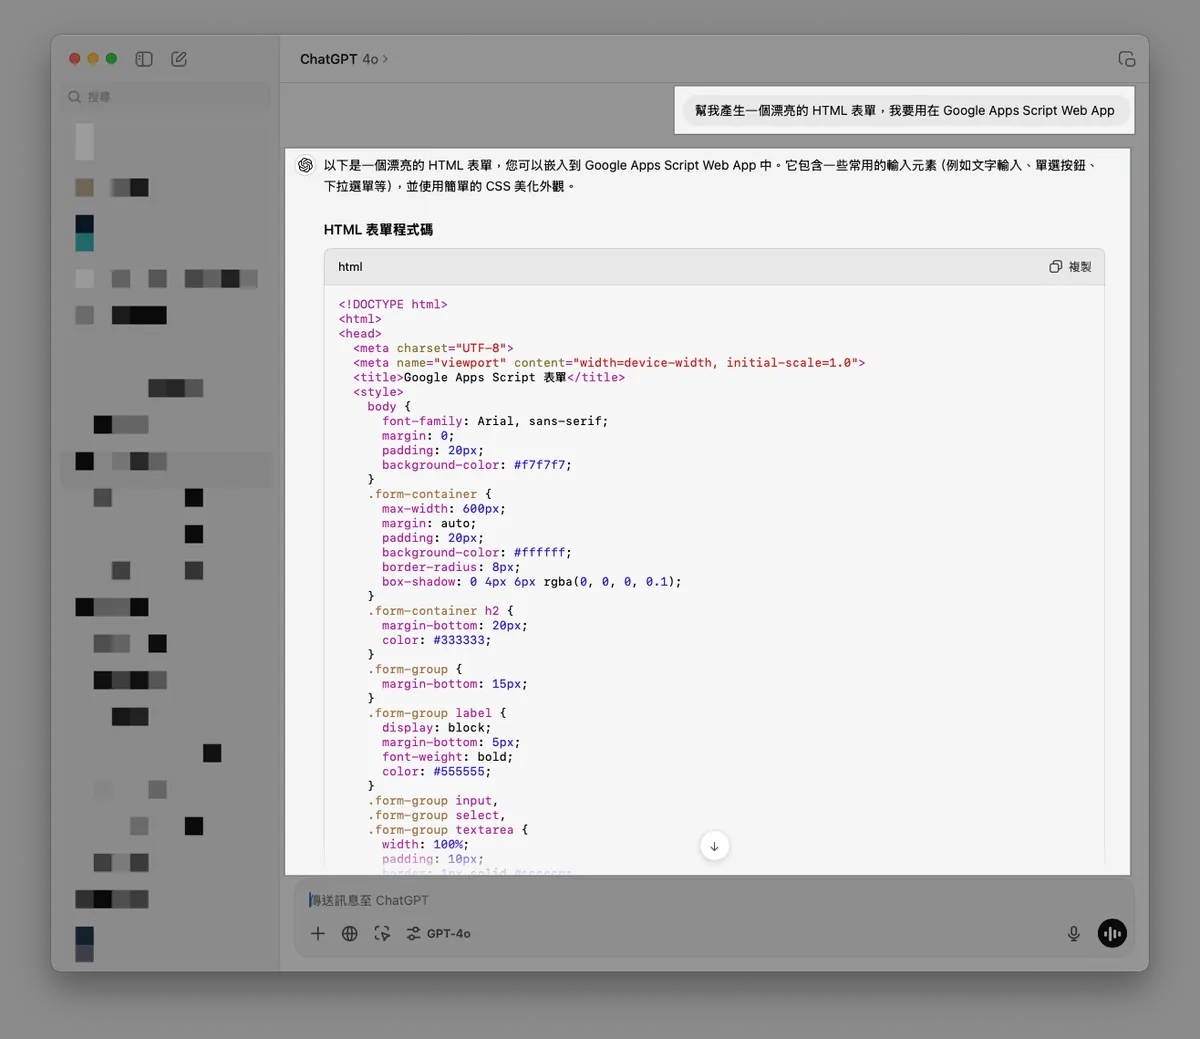
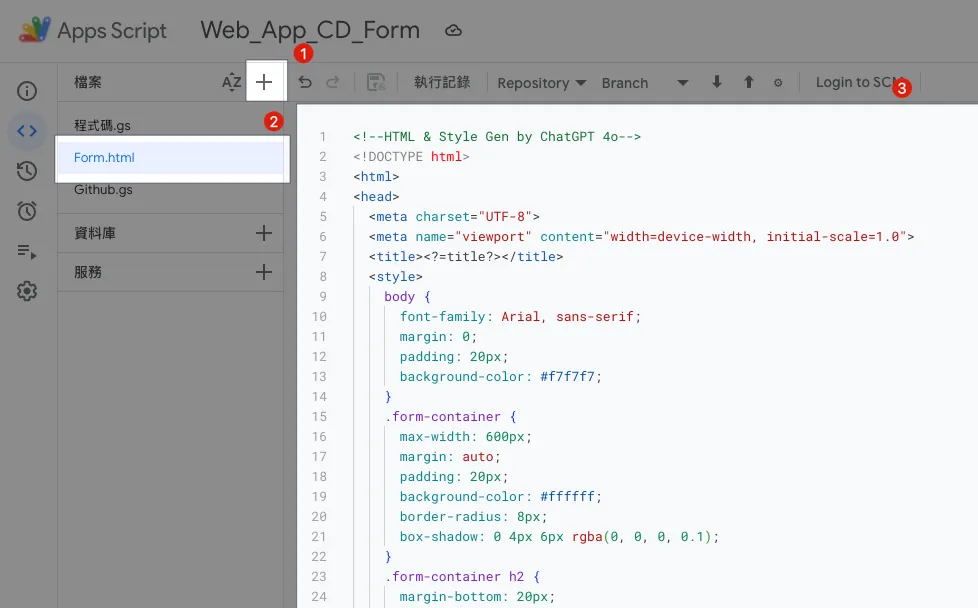
In the GAS file list on the left, click “+” to add a new file, enter the file name Form.html, and paste the GPT-generated HTML form template content.
Form.html:
<!--HTML & Style Gen by ChatGPT 4o-->
<!DOCTYPE html>
<html>
<head>
  <meta charset="UTF-8">
  <meta name="viewport" content="width=device-width, initial-scale=1.0">
  <title><?=title?></title>
  <style>
    body {
      font-family: Arial, sans-serif;
      margin: 0;
      padding: 20px;
      background-color: #f7f7f7;
    }
    .form-container {
      max-width: 600px;
      margin: auto;
      padding: 20px;
      background-color: #ffffff;
      border-radius: 8px;
      box-shadow: 0 4px 6px rgba(0, 0, 0, 0.1);
    }
    .form-container h2 {
      margin-bottom: 20px;
      color: #333333;
    }
    .form-group {
      margin-bottom: 15px;
    }
    .form-group label {
      display: block;
      margin-bottom: 5px;
      font-weight: bold;
      color: #555555;
    }
    .form-group input,
    .form-group select,
    .form-group textarea {
      width: 95%;
      padding: 10px;
      border: 1px solid #cccccc;
      border-radius: 4px;
      font-size: 16px;
    }
    .form-group input[type="radio"] {
      width: auto;
      margin-right: 10px;
    }
    .form-group .radio-label {
      display: inline-block;
      margin-right: 20px;
    }
    .form-group button {
      background-color: #4CAF50;
      color: white;
      padding: 10px 20px;
      border: none;
      border-radius: 4px;
      cursor: pointer;
      font-size: 16px;
    }
    .form-group button:hover {
      background-color: #45a049;
    }
    .message {
      margin-top: 20px;
      padding: 15px;
      border-radius: 5px;
      font-size: 1em;
      text-align: center;
    }
    .message.success {
      background-color: #d4edda;
      color: #155724;
      border: 1px solid #c3e6cb;
    }
    .message.error {
      background-color: #f8d7da;
      color: #721c24;
      border: 1px solid #f5c6cb;
    }
    .hidden {
      display: none;
    }
  </style>
</head>
<body>
  <div class="form-container">
    <h2><?=title?></h2>
    <form id="myForm">
      <div id="message-block" class="hidden"></div>
      <div class="form-group">
        <label for="email">Email:</label>
        <input type="email" value="<?=email?>" readonly/>
      </div>
      <div class="form-group">
        <label for="buildNumber">Build Number:</label>
        <input type="number" value="<?=buildNumber?>"/>
      </div>
      <div class="form-group">
        <label for="branch">PRs Under Review:</label>
        <select id="branch" name="branch">
          <option>Please select</option>
          <? pullRequests.forEach(pullRequest => { ?>
            <option value="<?=pullRequest.head.ref?>">[<?=pullRequest.state?>] <?=pullRequest.title?></option>
          <? }); ?>
        </select>
      </div>
      <div class="form-group">
        <label for="message">Update Details:</label>
        <textarea id="message" name="message" rows="4" placeholder="Please enter your message"></textarea>
      </div>
      <div class="form-group">
        <button type="submit">Submit</button>
      </div>
    </form>
  </div>
  <script>
    function displayMessage(ok, message) {
      const messageBlock = document.getElementById('message-block');
      messageBlock.className = ok ? 'message success' : 'message error';
      messageBlock.innerHTML = message;
      messageBlock.classList.remove('hidden');
    }

    document.getElementById("myForm").addEventListener("submit", function(e) {
      e.preventDefault();
      const formData = new FormData(this);
      const formObject = Object.fromEntries(formData);
      google.script.run.withSuccessHandler((response) => {
        displayMessage(response.ok, response.message);
      }).processForm(formObject);
    });
  </script>
</body>
</html>
The form content can be adjusted according to your needs.
Code.gs:
function doGet(e) {
  // Corresponds to the Form.html file on the left
  const htmlTemplate = HtmlService.createTemplateFromFile('Form');

  const email = Session.getActiveUser().getEmail();
  // Get the user's email, valid only if execution identity: user accessing the web app is set

  const title = "App CD Packaging Request Form";

  const buildNumber = genBuildNumber();

  htmlTemplate.email = email;
  htmlTemplate.title = title;
  htmlTemplate.pullRequests = []; // Next step: integrate with Github...
  htmlTemplate.buildNumber = buildNumber;

  const html = htmlTemplate.evaluate();
  html.setTitle(title);
  //html.setWidth(600) // Set page width

  return html
}

function processForm(object) {
  return {"ok": true, "message": "Request submitted successfully!"};
}

function genBuildNumber() {
  const now = new Date();
  const formattedDate = Utilities.formatDate(now, "Asia/Taipei", "yyyyMMddHHmmss");
  const milliseconds = now.getMilliseconds().toString().padStart(3, '0'); // Ensure milliseconds are 3 digits
  return `${formattedDate}${milliseconds}`;
}
In this step, we first complete the form GUI. Next, we will connect to the GitHub API to get the PR branch list.
Step 2. Deploy Google Apps Script Web App Form
Let’s first deploy the previous content and check the results.
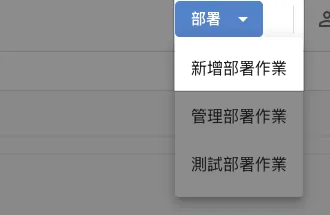
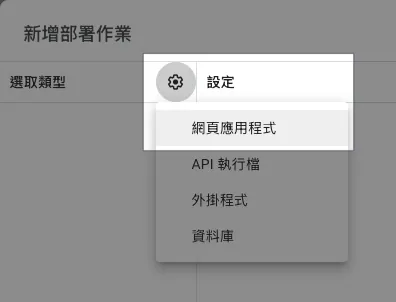
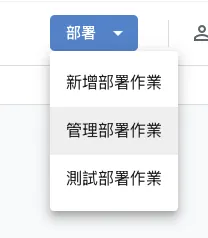
In the top right corner of GAS, select “Deploy” -> “New deployment” -> “Web app”:
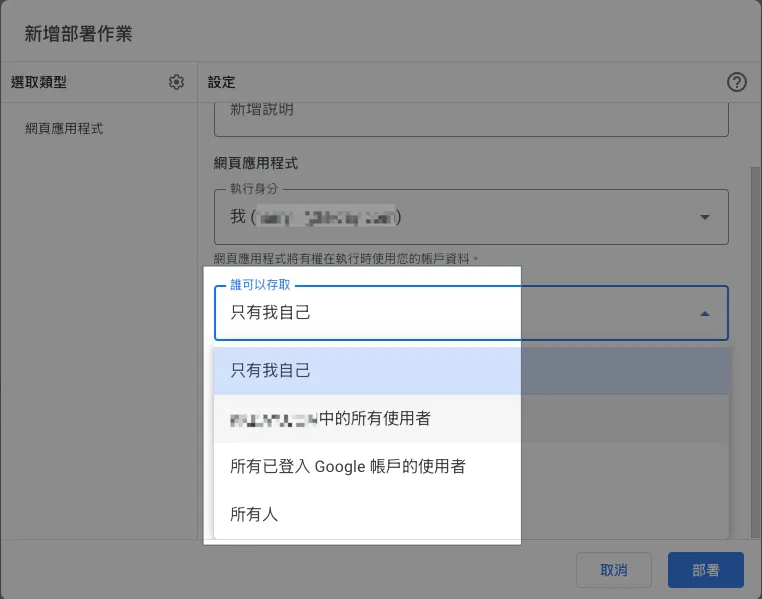
The execution identity and who can access it can be set separately as:
Execution Identity:
-
I
always run the script using your account identity. -
The user accessing the web app
will run the script as the currently signed-in Google account user.
Who can access:
-
Only me
-
All users within the same XXX organization
Only users from the same organization who are logged in with a Google account can access. -
All signed-in Google account users
All signed-in Google account users can access. -
Everyone
does not need to sign in with a Google account, and the app is publicly accessible to all.
We chose “Who has access: All users in the XXX organization” + “Execute as: User accessing the web app” to automatically restrict access to only organization accounts, and run with their own identity!
It’s a very convenient feature for permission management!
After selecting, click “Deploy” at the bottom right.
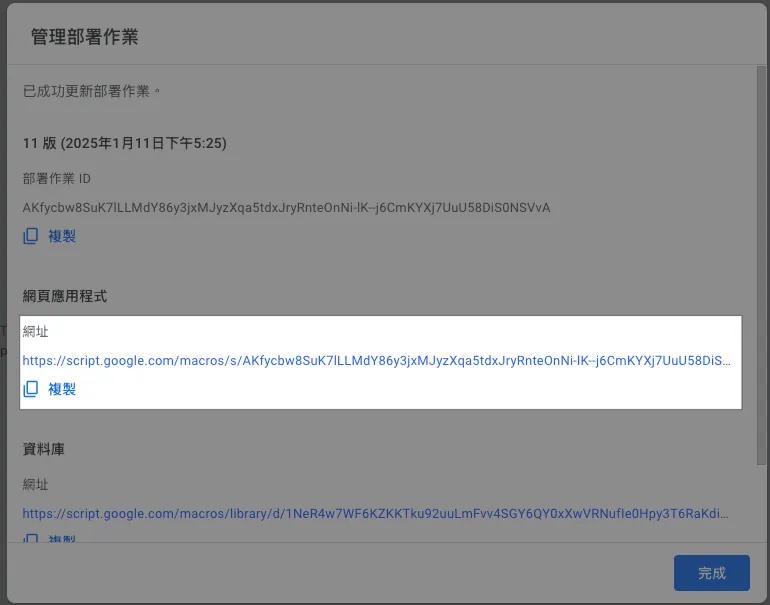
The URL in the web application is the Web App access URL.
https://script.google.com/macros/s/AKfycbw8SuK7lLLMdY86y3jxMJyzXqa5tdxJryRnteOnNi-lK--j6CmKYXj7UuU58DiS0NSVvA/exec
The URL is long and ugly, but there’s no choice; just have to use a URL shortener.
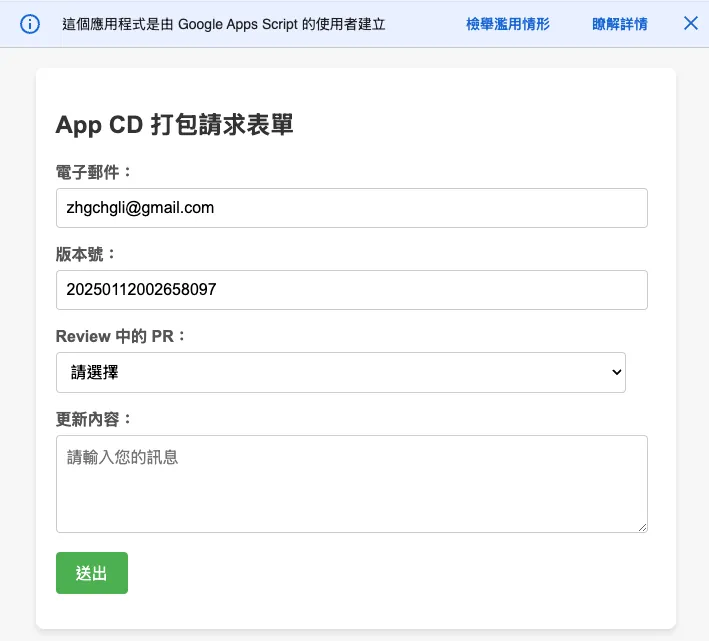
Click the link to open the page and see the effect:
Here are two more GAS limitations to mention:
-
Warning message at the top of GAS Web App cannot be hidden by default
-
GAS Web App uses an IFrame to embed our page, so achieving 100% RWD is difficult.
You can only adjust the window width using.setWidth().
Google Apps Script Authorization Warning
First time use, clicking “Debug” or “Run” may trigger the following authorization warning:
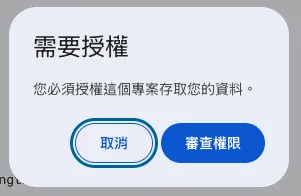
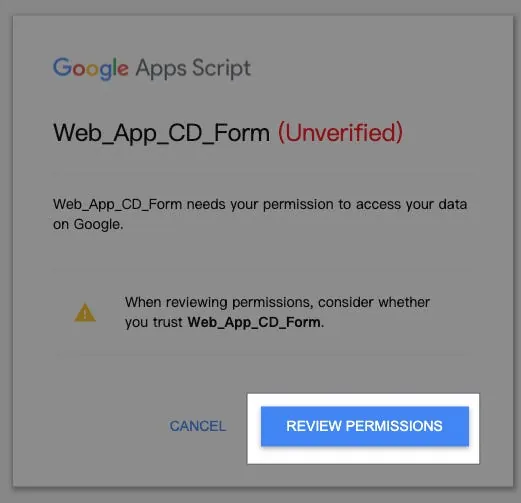
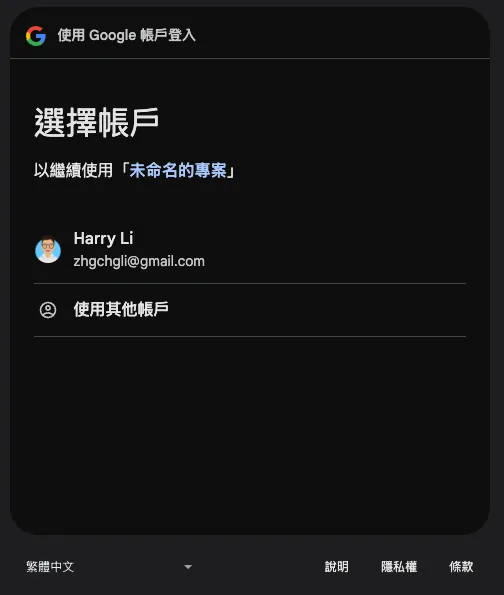
Select the account you want to use. If you see “This app isn’t verified by Google,” click “Advanced” -> “Go to XXX (unsafe),” then choose “Allow”:
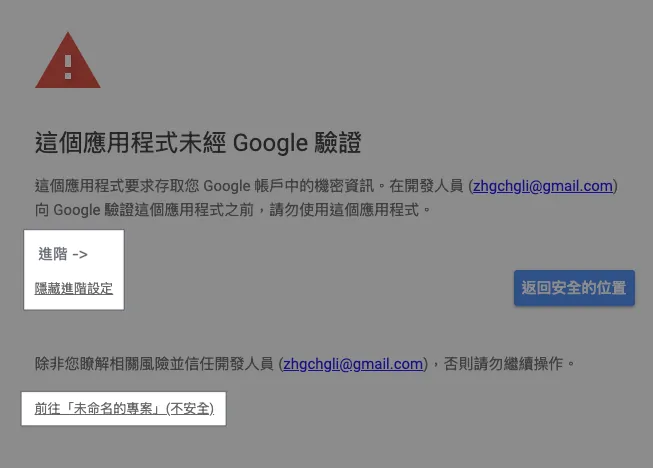
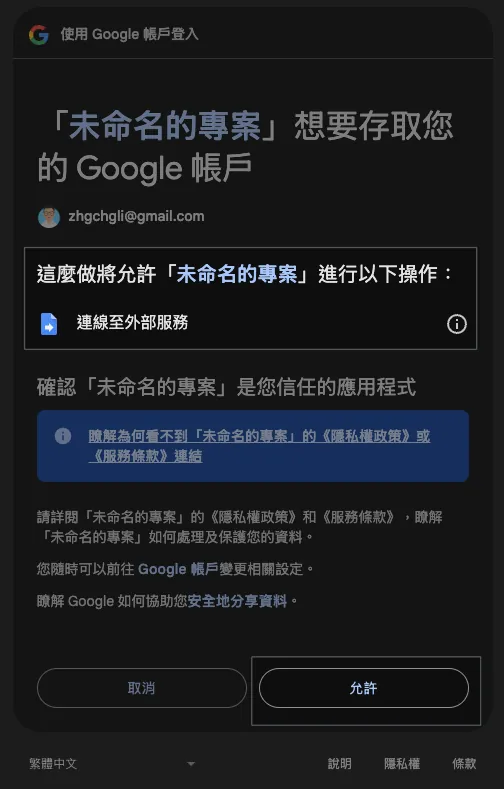
If the GAS script permissions change (e.g., adding access to Google Sheets, etc.), re-authorization is required; otherwise, after authorizing once, it will not prompt again.
If you encounter: Access blocked for “XXX” due to incomplete Google verification process, please refer to my latest article on GCP settings.
Step 3. Connect to GitHub API to Get PR Branch List
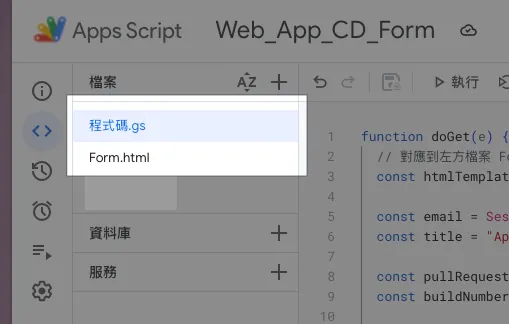
We add a new file Github.gs to store GitHub API related logic.
Github.gs:
// SECRET
const githubPersonalAccessToken = ""
// Create a PAT using your Github account or a shared Github account for your organization
// https://docs.github.com/en/authentication/keeping-your-account-and-data-secure/managing-your-personal-access-tokens

// Method 1: Access via Restful API
function githubAPI(method, path, payload = null) {
  try {
    const url = "https://api.github.com"+path;
    var options = {
      method: method,
      headers: {
        "Accept": "application/vnd.github+json",
        "Authorization": `Bearer ${githubPersonalAccessToken}`,
        "X-GitHub-Api-Version": "2022-11-28"
      }
    };

    if (method.toLowerCase().trim() == "post") {
      options.payload = JSON.stringify(payload);
    }

    const response = UrlFetchApp.fetch(url, options);
    const data = JSON.parse(response.getContentText());
    return data;
  } catch (error) {
    throw error;
  }
}

// Method 2: Access via GraphQL
// Some more detailed queries are only available via the Github GraphQL API
// https://docs.github.com/en/graphql
function githubGraphQL(query, variables) {
  const url = "https://api.github.com/graphql";
  const payload = {
    query: query,
    variables: variables
  };

  const options = {
    method: "post",
    contentType: "application/json",
    headers: {
      "Accept": "application/vnd.github+json",
      "Authorization": `Bearer ${githubPersonalAccessToken}`,
      "X-GitHub-Api-Version": "2022-11-28"
    },
    payload: JSON.stringify(payload)
  };

  try {
    const response = UrlFetchApp.fetch(url, options);
    const data = JSON.parse(response.getContentText());
    return data;
  } catch (error) {
    throw error;
  }
}

// GraphQL Example:
// const query = `
//   query($owner: String!, $repo: String!) {
//     repository(owner: $owner, name: $repo) {
//       pullRequests(states: OPEN, first: 100, orderBy: { field: CREATED_AT, direction: DESC }) {
//         nodes {
//           title
//           url
//           number
//           createdAt
//           author {
//             login
//           }
//           headRefName
//           baseRefName
//           body
//         }
//         pageInfo {
//           hasNextPage
//           endCursor
//         }
//       }
//     }
//   }
// `;
// const variables = {
//   owner: "swiftlang",
//   repo: "swift"
// };
// const response = githubGraphQL(query, variables);
GitHub API has two access methods: the traditional Restful and the more flexible GraphQL; this article uses Restful as an example.
Code.gs:
function doGet(e) {
// Corresponds to the Form.html file on the left
const htmlTemplate = HtmlService.createTemplateFromFile('Form');
const email = Session.getActiveUser().getEmail();
// Get user email, effective only when execution identity is set to Access web app as user
const title = "App CD Packaging Request Form";
const pullRequests = githubAPI("get", "/repos/swiftlang/swift/pulls");
// Example using https://github.com/swiftlang/swift/pulls
const buildNumber = genBuildNumber();
htmlTemplate.email = email;
htmlTemplate.title = title;
htmlTemplate.pullRequests = pullRequests;
htmlTemplate.buildNumber = buildNumber;
const html = htmlTemplate.evaluate();
html.setTitle(title);
//html.setWidth(600) // Set page width
return html
}
function processForm(object) {
if (object.buildNumber == "") {
return {"ok": false, "message": "Please enter the build number!"};
}
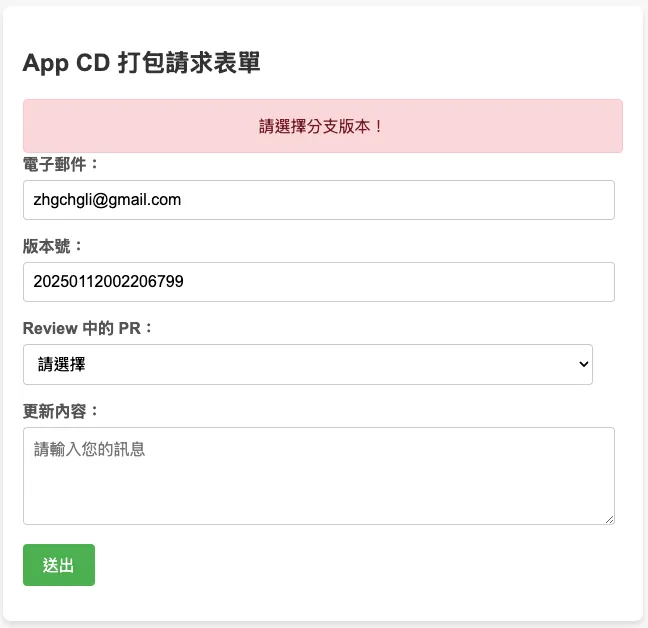
if (object.branch == "") {
return {"ok": false, "message": "Please select a branch version!"};
}
// Parameters to pass to Github Action
const payload = {
ref: object.branch,
inputs: {
buildNumber: object.buildNumber
}
};
//
try {
const response = githubAPI("post", "/repos/zhgchgli0718/ios-project-for-github-action-ci-cd-demo/actions/workflows/CD-Job.yml/dispatches", payload);
// Example using https://github.com/zhgchgli0718/ios-project-for-github-action-ci-cd-demo/blob/main/.github/workflows/CD-Job.yml
return {"ok": true, "message": `Packaging request sent successfully!<br/>Branch: <strong>${object.branch}</strong><br/>Build Number: <strong>${object.buildNumber}</strong>`};
} catch (error) {
return {"ok": false, "message": "An error occurred: "+error.message};
}
}
The processForm method handles the form submission content, and you can also add more processing logic.
GAS x Github API x Github Action
Here is some additional information related to the corresponding GitHub Action.
CD-Job.yml:
# CD Packaging Job

name: CD-Job

on:
  workflow_dispatch:
    inputs:
      buildNumber: # Corresponds to GAS payload.inputs.xxx
        description: 'Version number'
        required: false
        type: string
      # ...More
      # Input types can be referenced from the official docs: https://docs.github.com/en/actions/writing-workflows/workflow-syntax-for-github-actions#onworkflow_dispatchinputs

jobs:
  some-job:
    runs-on: ubuntu-latest
    steps:
      - name: Print Inputs
        run: \\|
          echo "Release Build Number: ${{ github.event.inputs.buildNumber }}"
Step 4. Redeploy Google Apps Script Web App Form
⚠️Please note that any changes to the GAS code require redeployment to take effect.⚠️
⚠️Please note that any changes to the GAS code require redeployment to take effect.⚠️
⚠️Please note that any changes to the GAS code require redeployment to take effect.⚠️
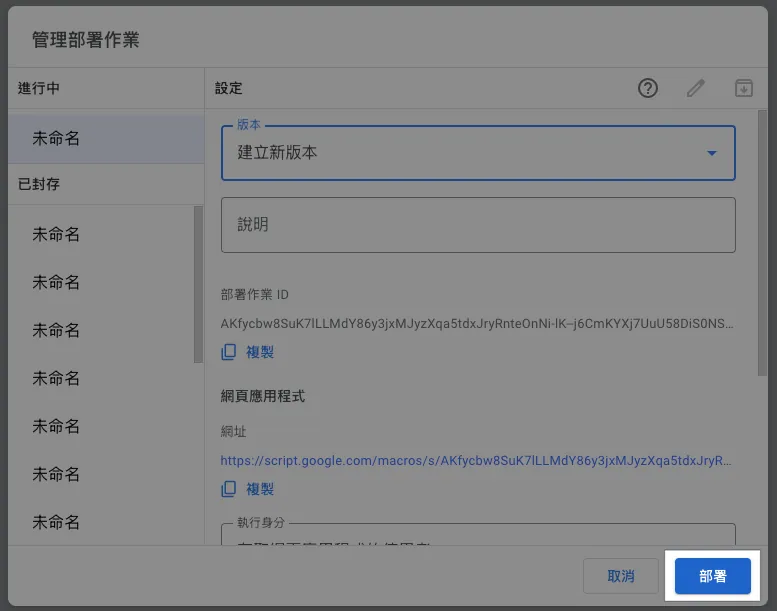
In GAS, click “Deploy” at the top right -> select “Edit” at the top right -> choose “Create new version” under Versions
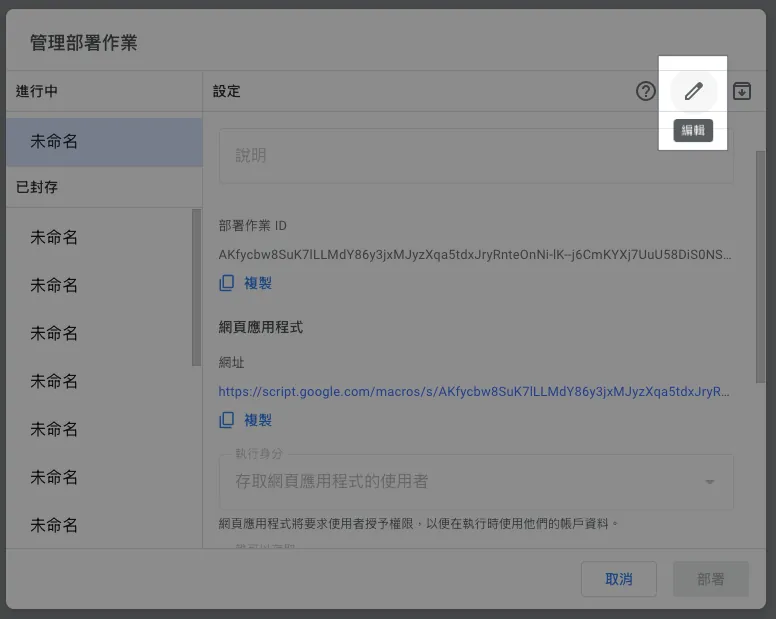
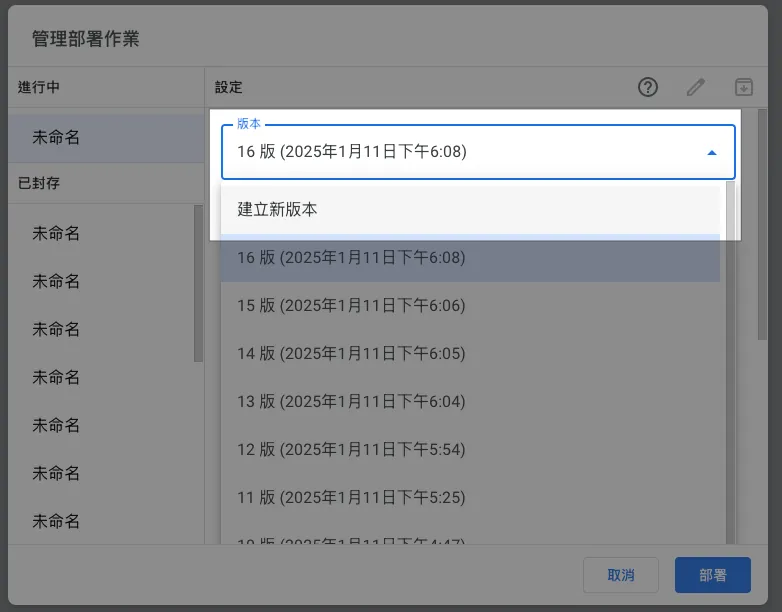
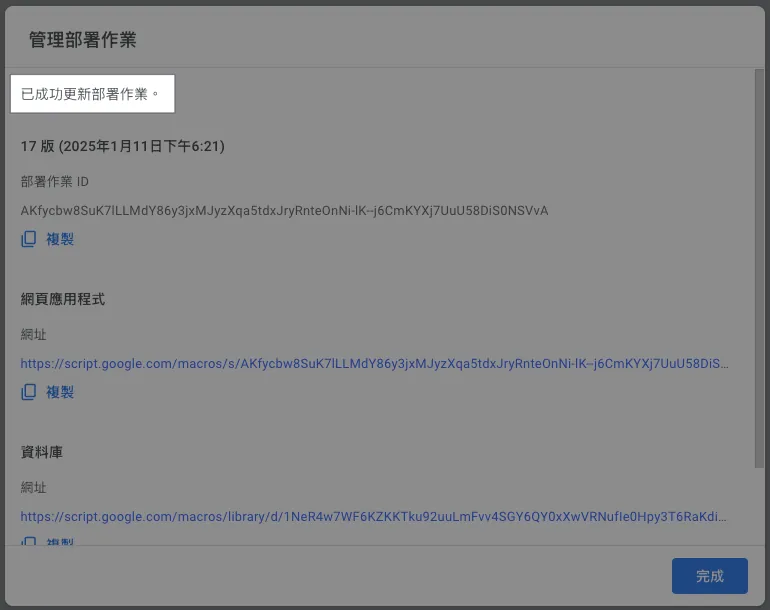
Click “Deploy” -> Done.
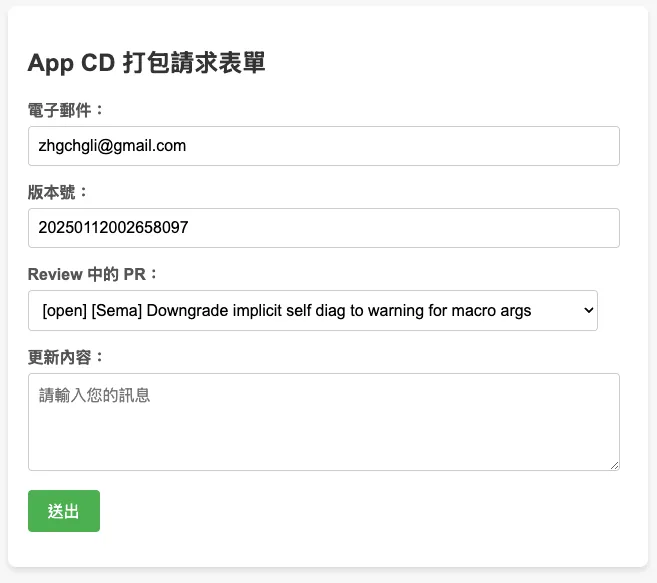
Go back to the webpage and refresh to see the updated results:
⚠️Please note that any changes to the GAS code require redeployment to take effect.⚠️
⚠️Please note that any changes to the GAS code require redeployment to take effect.⚠️
⚠️Please note that any changes to the GAS code require redeployment to take effect.⚠️
Done! 🎉🎉🎉
You can now share this link within your organization, allowing your teammates to directly use this web GUI to perform CI/CD tasks.
Extension (1)— Query Slack User ID with User Email & Send/Update Progress Notifications
As mentioned earlier, we want to notify users promptly about the CI/CD execution status. We can use the email provided by the user to look up their Slack User ID.
Slack.gs:
const slackBotToken = ""
// https://medium.com/zrealm-robotic-process-automation/slack-chatgpt-integration-bd94cc88f9c9

function slackRequest(path, content) {
  const options = {
    method: "post",
    contentType: "application/json",
    headers: {
      Authorization: `Bearer ${slackBotToken}`, // Use the bot token for authorization
      'X-Slack-No-Retry': 1
    },
    payload: JSON.stringify(content)
  };

  try {
    const response = UrlFetchApp.fetch("https://slack.com/api/"+path, options);
    const responseData = JSON.parse(response.getContentText());
    if (responseData.ok) {
      return responseData
    } else {
      throw new Error(`Slack: ${responseData.error}`);
    }
  } catch (error) {
    throw error;
  }
}

// Lookup Slack UID by email
function getSlackUserId(email) {
  return slackRequest(`users.lookupByEmail?email=${encodeURIComponent(email)}`)?.user?.id;
}

// Send message to target Slack UID (channelID)
function sendSlackMessage(channelId, ts = null, value)  {
  var content = {
    channel: channelId
  };

  if (ts != null) {
    content.thread_ts = ts;
  }

  if (typeof value === "string") {
    content.text = value;
  } else {
    content.blocks = value;
  }
  return slackRequest("chat.postMessage", content);
}

// Update sent message content
function updateSlackMessage(channelId, ts = null, value)  {
  var content = {
    channel: channelId
  };

  if (ts != null) {
    content.ts = ts;
  }

  if (typeof value === "string") {
    content.text = value;
  } else {
    content.blocks = value;
  }
  return slackRequest("chat.update", content);
}
For using the Slack API, please refer to the official documentation.
GitHub Action YAML can use this Action to continuously update messages and send Slack notifications:
# ...
on:
  workflow_dispatch:
    inputs:
      buildNumber: # Corresponds to GAS payload.inputs.xxx
        description: 'Version number'
        required: false
        type: string
      # ...More
      SLACK_USER_ID:
        description: 'Slack User Id for receiving action notification'
        type: string
      SLACK_CHANNEL_ID:
        description: 'Slack Channel Id for receiving action notification'
        type: string
      SLACK_THREAD_TS:
        description: 'Slack message ts'
        type: string

jobs:
  # some jobs...

  if-deploy-failed-message:
    runs-on: ubuntu-latest
    if: failure()
      - name: update slack message
        uses: slackapi/[email protected]
        with:
            method: chat.update
            token: ${{ secrets.SLACK_BOT_TOKEN }}
            payload: \\|
              channel: ${{ github.event.inputs.SLACK_CHANNEL_ID }}
              ts: ${{ github.event.inputs.SLACK_THREAD_TS }}
              text: "❌ Build task failed, please check the execution status or try again later.\n<${{ github.server_url }}/${{ github.repository }}/actions/runs/${{ github.run_id }}\\|Click here to view execution status> cc'ed <@${{ github.event.inputs.SLACK_USER_ID }}>"
Effect:
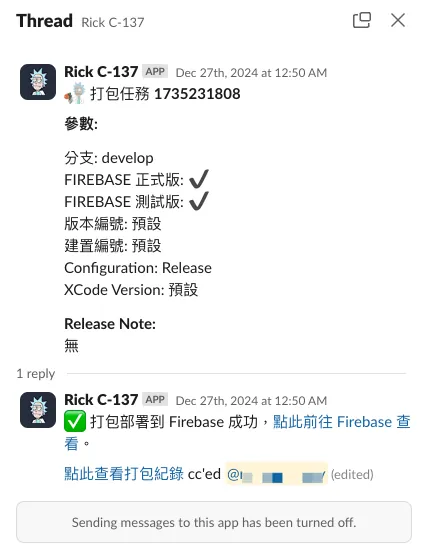
For Slack App integration details, please refer to my previous article: Slack & ChatGPT Integration .
Extension (2) — Query Jira Tickets
Jira.gs:
const jiraPersonalAccessToken = ""
// https://confluence.atlassian.com/enterprise/using-personal-access-tokens-1026032365.html

function getJiraTickets() {
  const url = `https://xxx.atlassian.net/rest/api/3/search`;

  // JQL query
  const jql = `project = XXX`;
  const queryParams = {
    jql: jql,
    maxResults: 50, // Adjust as needed
  };

  const options = {
    method: "get",
    headers: {
      Authorization: "Basic " + jiraPersonalAccessToken,
      "Content-Type": "application/json",
    },
    muteHttpExceptions: true,
  };

  const queryString = Object.keys(queryParams).map(key => `${encodeURIComponent(key)}=${encodeURIComponent(queryParams[key])}`).join("&");
  const response = UrlFetchApp.fetch(url + "?" + queryString + "&fields=", options);
  // could specify only return some fields

  if (response.getResponseCode() === 200) {
    const issues = JSON.parse(response.getContentText()).issues;
    return issues;
  } else {
    Logger.log(`Error: ${response.getResponseCode()} - ${response.getContentText()}`);
    throw new Error("Failed to fetch Jira issues.");
  }
}
For other Jira API uses, please refer to the official documentation.
Extension (3) — Query Asana Tasks
Asana.gs:
const asanaPersonalAccessToken = ""
// https://developers.asana.com/docs/personal-access-token

function asanaAPI(endpoint, method = "GET", data = null) {
    var options = {
      "method" : method,
      "contentType" : "application/json",
      "headers": {
          "Authorization":  "Bearer "+asanaPersonalAccessToken
      }
    };

    if (data != null) {
      options["payload"] = JSON.stringify({"data":data});
    }

    const url = "https://app.asana.com/api/1.0"+endpoint;
    const res = UrlFetchApp.fetch(url, options);
    const data = JSON.parse(res.getContentText());
    return data;
}

// Find tasks in project
// asanaAPI("/projects/PROJECT_ID/tasks");
For other Asana API uses, please refer to the official documentation.
Summary
What automation, work, and development process optimization always lack is not technology, but ideas; as long as we have ideas, we can find the right technology to realize them. Let’s encourage each other!
2025/07 Update:
This feature has been integrated into an actual packaging tool. You can refer to the latest article case: “CI/CD Practical Guide (Part 4): Using Google Apps Script Web App to Connect GitHub Actions and Build a Free and Easy Packaging Tool Platform”

Comments