
Automate Routine Tasks Using Python + Google Cloud Platform + Line Bot
Using a Check-in Reward App as an Example to Create a Daily Auto Check-in Script

Photo by Paweł Czerwiński
Origin
I have always been accustomed to using Python for small tools; sometimes for serious tasks like automating data scraping and report generation at work, and sometimes for casual purposes like scheduling automatic checks for desired information or letting scripts handle tasks that were originally manual.
I’ve always handled “automation” by simply running a Python script on a computer continuously; the advantage is simplicity and convenience, but the downside is needing a device connected to the internet and power. Even a Raspberry Pi consumes some electricity and network fees, and remote control to start or stop it is possible but cumbersome. This time, during some free work time, I explored free and cloud-based methods.
Goal
Move the Python script to the cloud for execution, schedule automatic runs, and enable remote on/off control via the internet.
This article uses a clever trick to create a script for a check-in reward app that automatically checks in for me daily, so I don’t need to open the app manually; it also sends me a notification after completion.
Notification completed!
Chapter Order of This Article
-
Using Proxyman for Man-in-the-middle API Sniffing
-
Writing a Python script to spoof APP API requests (simulate check-in actions)
-
Deploying the Python Script to Google Cloud
-
Setting Up Automatic Scheduling in Google Cloud
-
Due to the sensitive nature, this article will not reveal which check-in reward app is used. Readers can apply the method to other apps on their own.
-
If you only want to learn how to automate with Python, you can skip the first half about Man-in-the-middle attack API sniffing and start from Chapter 3.
Tools Used
-
Proxyman: Man-in-the-middle attack API sniffing
-
Python: Writing the Script
-
Linebot: Send script execution result notifications to yourself
-
Google Cloud Function: Python Script Hosting Service
-
Google Cloud Scheduler: Automated Scheduling Service
1. Using Proxyman for Man-in-the-middle Attack API Sniffing
I previously published an article titled “The APP uses HTTPS, but data was still stolen.” The principle is similar, but this time I use Proxyman instead of mitmproxy; both are free, but Proxyman is easier to use.
-
Go to the official website https://proxyman.io/ to download the Proxyman tool
-
After downloading, launch Proxyman and install the Root certificate (to perform a Man-in-the-middle attack and decrypt HTTPS traffic).
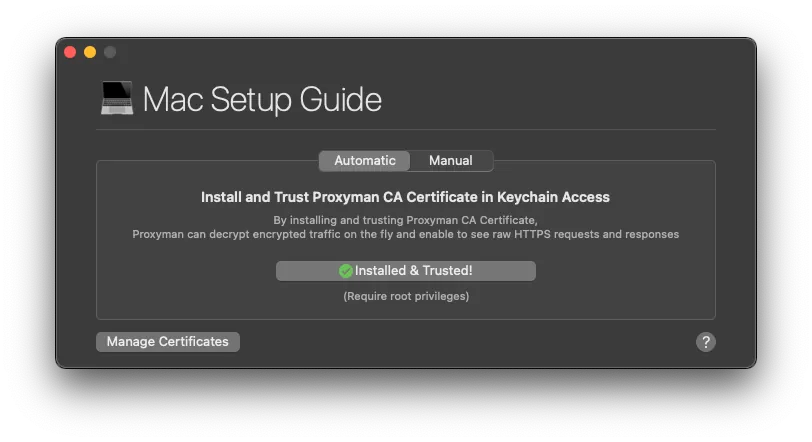
“Certificate” -> “Install Certificate On this Mac” -> “Installed & Trusted”
After installing the Root certificate on the computer, switch to the phone:
“Certificate” -> “Install Certificate On iOS” -> “Physical Devices…”
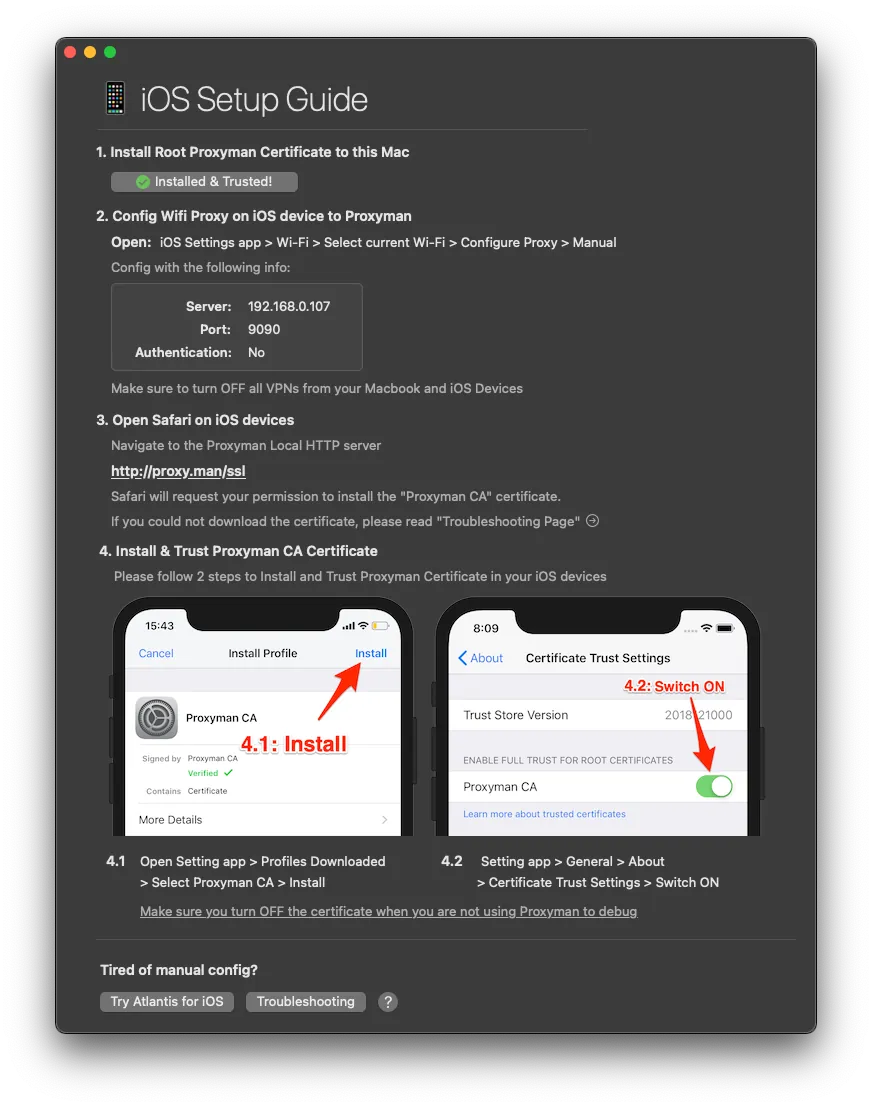
Set up the proxy on your phone as instructed and complete the certificate installation and activation.
- Open the APP on your phone whose API transmissions you want to sniff.
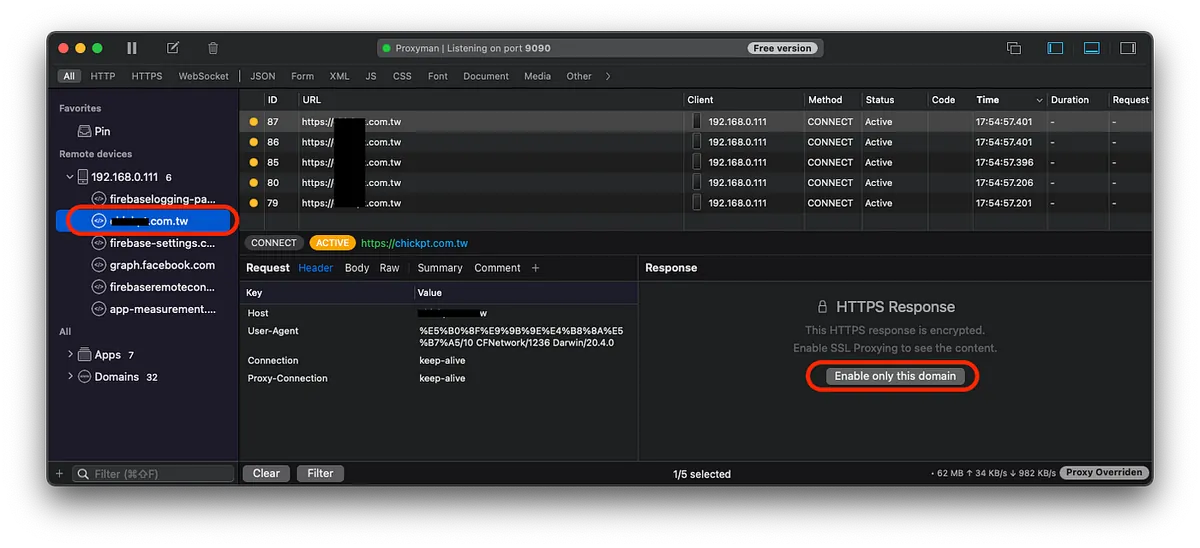
At this point, Proxyman on your Mac will display the sniffed traffic. Click on the desired APP API domain under the device IP to view it; the first time, you need to click “Enable only this domain” for the traffic to be unpacked.
After enabling “Enable only this domain,” you can see the newly intercepted traffic showing the original Request and Response details:
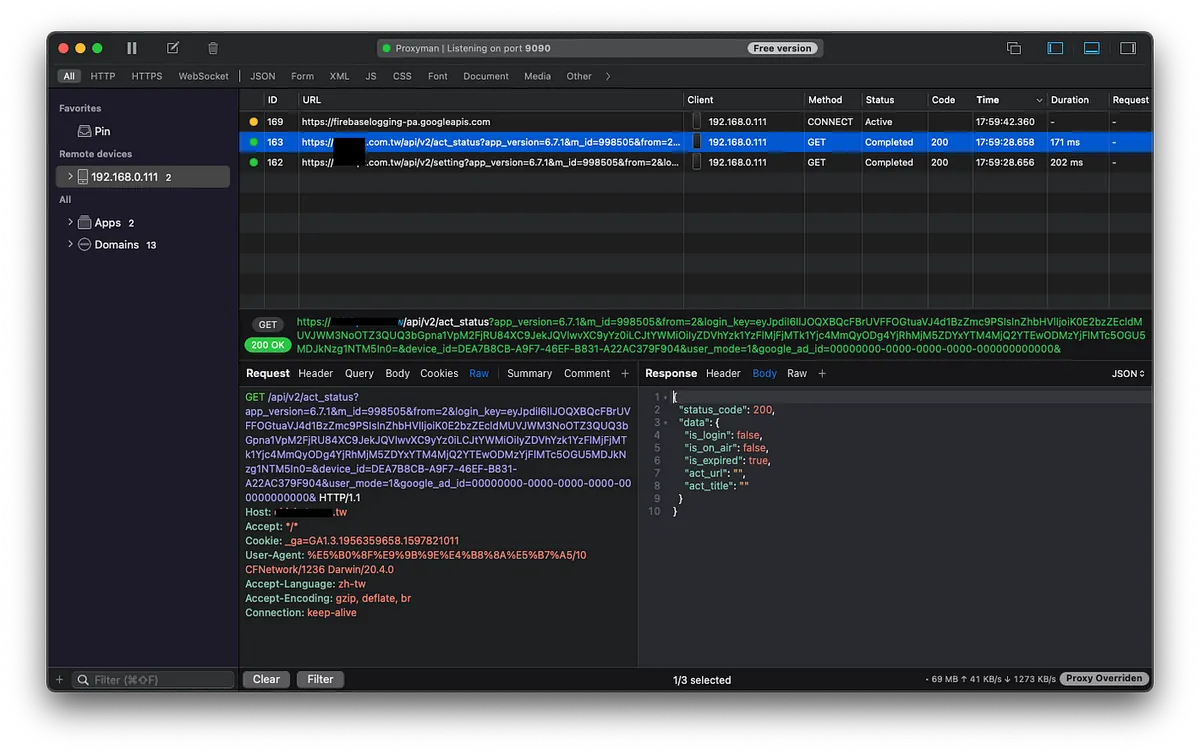
We use this method to sniff which API endpoint the APP calls during the check-in operation and what data it sends. We record this information to later simulate the request directly with Python.
⚠️ Note that some APP token information may change, causing future Python simulated requests to fail. It’s important to understand how the APP token is exchanged.
⚠️If Proxyman is confirmed to be working properly but the APP cannot send requests when using Proxyman, it means the APP may have SSL Pinning; currently no solution, so you have to give up.
⚠️App developers who want to know how to prevent sniffing can refer to the previous article.
Assuming we have obtained the following information:
POST /usercenter HTTP/1.1
Host: zhgchg.li
Content-Type: application/x-www-form-urlencoded
Cookie: PHPSESSID=dafd27784f94904dd586d4ca19d8ae62
Connection: keep-alive
Accept: */*
User-Agent: (iPhone12,3;iOS 14.5)
Content-Length: 1076
Accept-Language: zh-tw
Accept-Encoding: gzip, deflate, br
AuthToken: 12345
action=checkIn
2. Write a Python script to spoof the APP API request (simulate the check-in action)
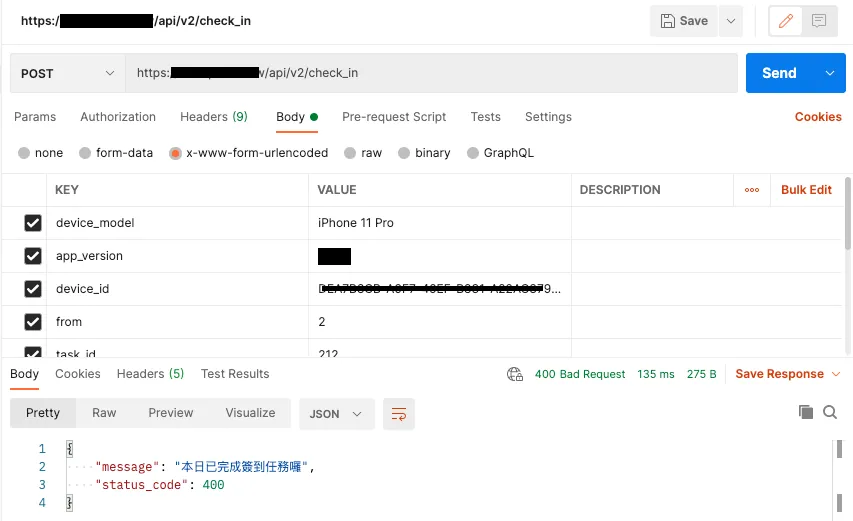
Before writing the Python script, we can use Postman to test the parameters and check which are necessary or time-sensitive; but copying them directly also works.
checkIn.py:
import requests
import json

def main(args):
    results = {}
    try:
      data = { "action" : "checkIn" }
      headers = { "Cookie" : "PHPSESSID=dafd27784f94904dd586d4ca19d8ae62",
      "AuthToken" : "12345",
      "User-Agent" : "(iPhone12,3;iOS 14.5)"
      }

      request = requests.post('https://zhgchg.li/usercenter', data = data, headers = headers)
      result = json.loads(request.content)
      if result['status_code'] == 200:
        return "CheckIn Success!"
      else:
        return result['message']
    except Exception as e:
      return str(e)
⚠️ The purpose of
argsinmain(args)will be explained later. For local testing, just passmain(True).
Use the Requests package to perform HTTP Requests for us. If the following occurs:
ImportError: No module named requests
First, install the package using pip install requests.
Add execution result Linebot notification:
This part is very simple; it only serves as a reference and notifies myself.
-
Go to & enable Line Developers Console
-
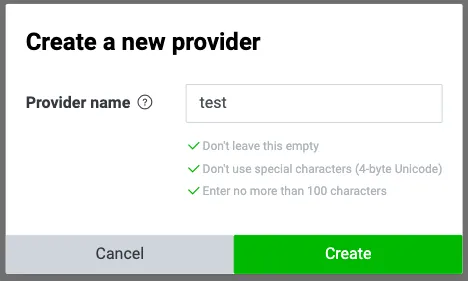
Create a Provider
- Select “Create a Messaging API channel”

Next, after filling in the basic information, click “Create” to submit and create.
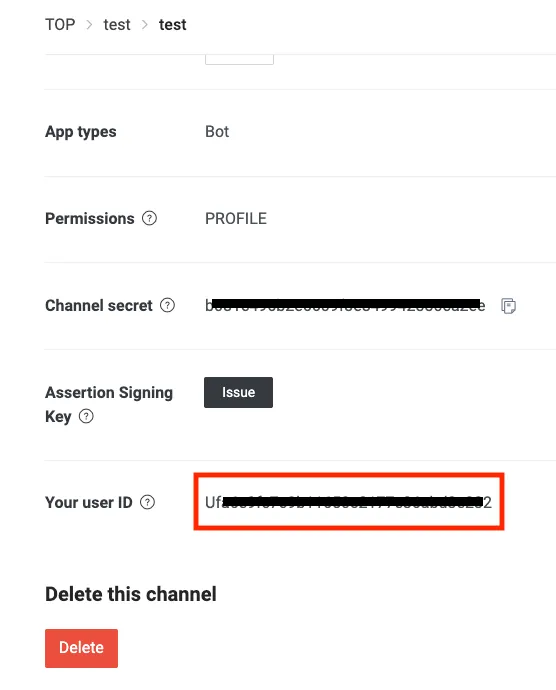
- After setting up, find the “Your user ID” section under the first “Basic settings” tab. This is your User ID.
- After setting it up, select the “Messaging API” tab and scan the QR code to add the bot as a friend.
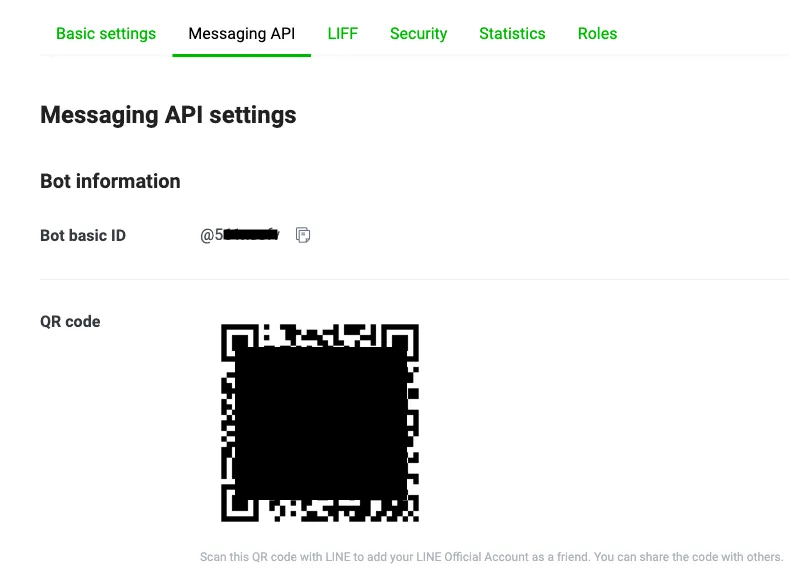
- Scroll down to the “Channel access token” section and click “Issue” to generate the token.

- The copied Token allows us to send messages to the user.

With the User Id and Token, we can now send messages to ourselves.
Since no other features are needed, there’s no need to install the Python Line SDK; just send HTTP requests directly.
After integrating with the previous Python script…
checkIn.py:
import requests
import json

def main(args):
    results = {}
    try:
      data = { "action" : "checkIn" }
      headers = { "Cookie" : "PHPSESSID=dafd27784f94904dd586d4ca19d8ae62",
      "AuthToken" : "12345",
      "User-Agent" : "(iPhone12,3;iOS 14.5)"
      }

      request = requests.post('https://zhgchg.li/usercenter', data = data, headers = headers)
      result = json.loads(request.content)
      if result['status_code'] == 200:
        sendLineNotification("CheckIn Success!")
        return "CheckIn Success!"
      else:
        sendLineNotification(result['message'])
        return result['message']
    except Exception as e:
      sendLineNotification(str(e))
      return str(e)

def sendLineNotification(message):
    data = {
        "to" : "Place your User ID here",
        "messages" : [
            {
                "type" : "text",
                "text" : message
            }
        ]
    }
    headers = {
        "Content-Type" : "application/json",
        "Authorization" : "Place your channel access token here"
    }
    request = requests.post('https://api.line.me/v2/bot/message/push',json = data, headers = headers)
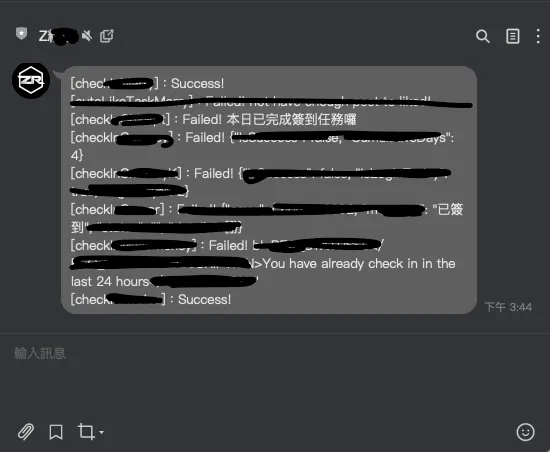
Test if the notification was sent successfully:

Success!
A side note: I originally planned to use Gmail SMTP to send notifications via email, but after moving to Google Cloud, I found it wasn’t possible…
3. Moving the Python Script to Google Cloud
The basics are covered, now let’s move on to the main part of this article: deploying the Python script to the cloud.
At first, I considered using Google Cloud Run but found it too complicated and didn’t want to spend time studying it, as my needs were too small to require so many features. So, I used Google Cloud Function, a serverless solution; it is actually more commonly used to build serverless web services.
-
If you haven’t used Google Cloud before, please first go to the Console to create a new project and set up your billing information.
-
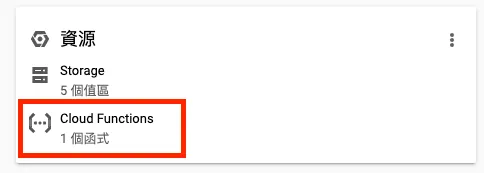
On the project console homepage, click “Cloud Functions” under Resources.
- Select “Create Function” above
- Enter Basic Information
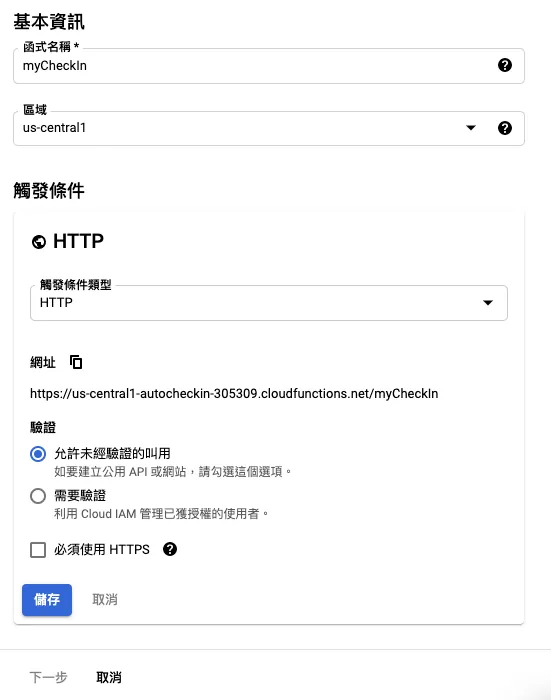
⚠️Note the “trigger URL“**
Selectable Area:
-
The
US-WEST1,US-CENTRAL1, andUS-EAST1regions offer a free tier for Cloud Storage services. -
asia-east2(Hong Kong) is closer to us but requires a small Cloud Storage fee.
⚠️ When creating Cloud Functions, Cloud Storage is required to store the code.
⚠️For detailed pricing, please refer to the end of the article.
Trigger type: HTTP
Verification: According to the requirement, I want to trigger the script from an external link, so I choose “Allow unauthenticated invocations”; if authentication is required, the Scheduler service must be configured accordingly.
Variables, network, and advanced settings can be configured in variables for Python to use (this way, if parameters change, you don’t need to modify the Python code):
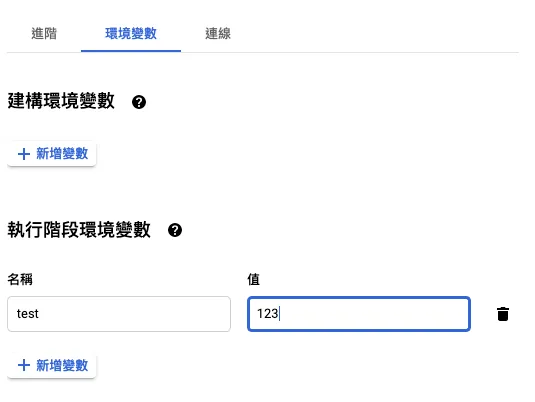
How to call in Python:
import os

def main(request):
  return os.environ.get('test', 'DEFAULT VALUE')
No other settings need to be changed. Just click “Save” -> “Next.”
- Select “Python 3.x” as the runtime, paste the written Python script, and set the entry point to “main”.
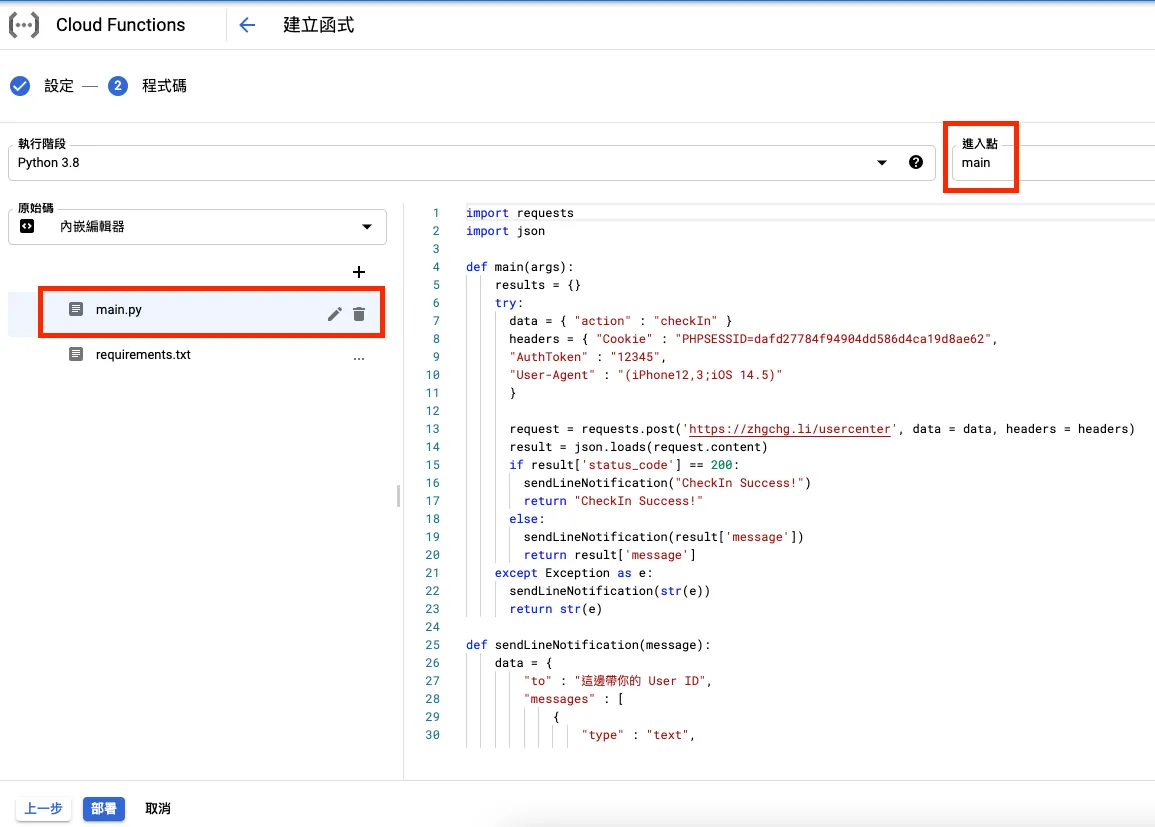
Supplement main(args) As mentioned before, this service is mainly used for serverless web; therefore, args is actually a Request object. You can extract HTTP GET query and HTTP POST body data from it as follows:
Get GET Query information:
request_args = args.args
example: ?name=zhgchgli => request_args = [“name”:”zhgchgli”]
Get POST Body data:
request_json = request.get_json(silent=True)
example: name=zhgchgli => request_json = [“name”:”zhgchgli”]
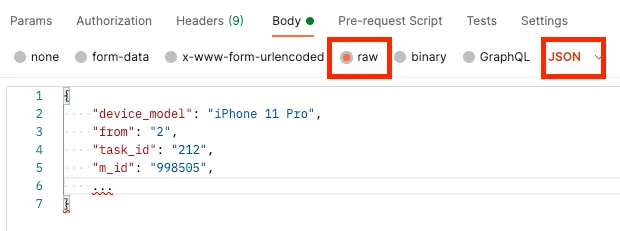
If using Postman to test POST, remember to use “Raw + JSON” for the POST data, otherwise nothing will be received:
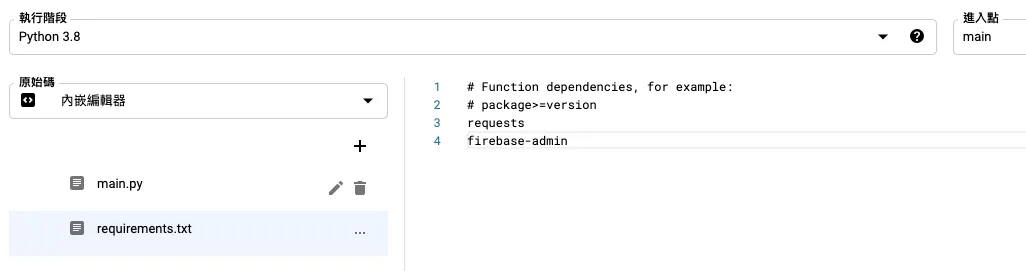
- After the code part is done, switch to “requirements.txt” and enter the required package dependencies:
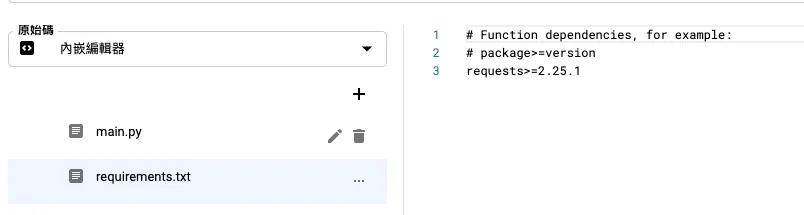
We use the “request” package to make API calls. This package is not included in the native Python library; therefore, we need to add it here:
requests>=2.25.1
Here, the version is specified as ≥ 2.25.1, but you can also omit the version and just install the latest by using requests.
- Once everything is OK, click “Deploy” to start the deployment.
![]()
It takes about 1 to 3 minutes to complete the deployment.
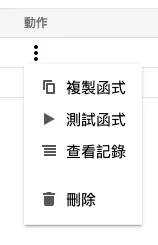
- After deployment, you can use the previously noted “Trigger URL” to run and verify if it works correctly, or use “Actions” -> “Test Function” to perform a test.
If a 500 Internal Server Error occurs, it means there is an error in the program. You can click the name to view the “Logs” and find the cause there:
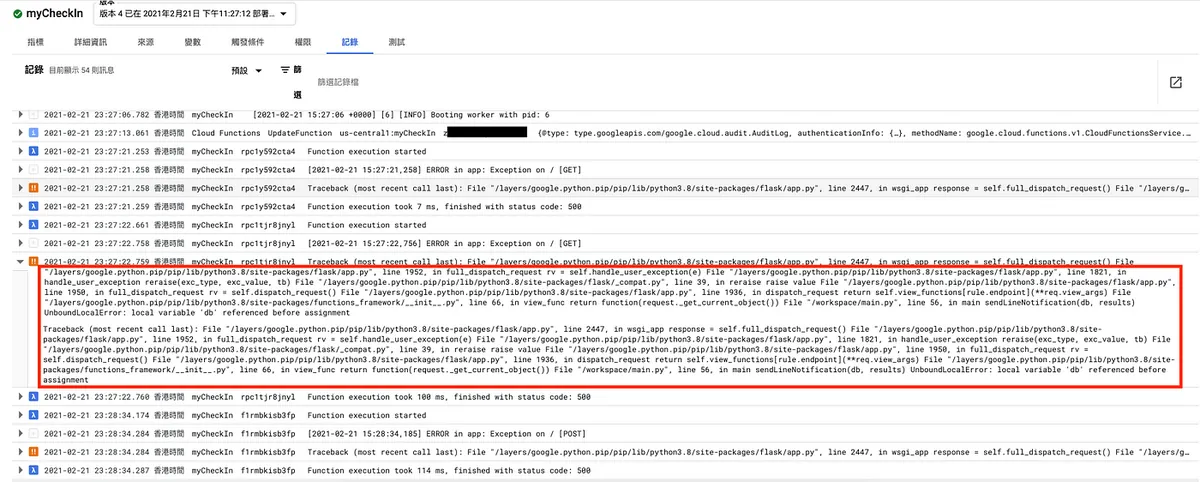
UnboundLocalError: local variable 'db' referenced before assignment
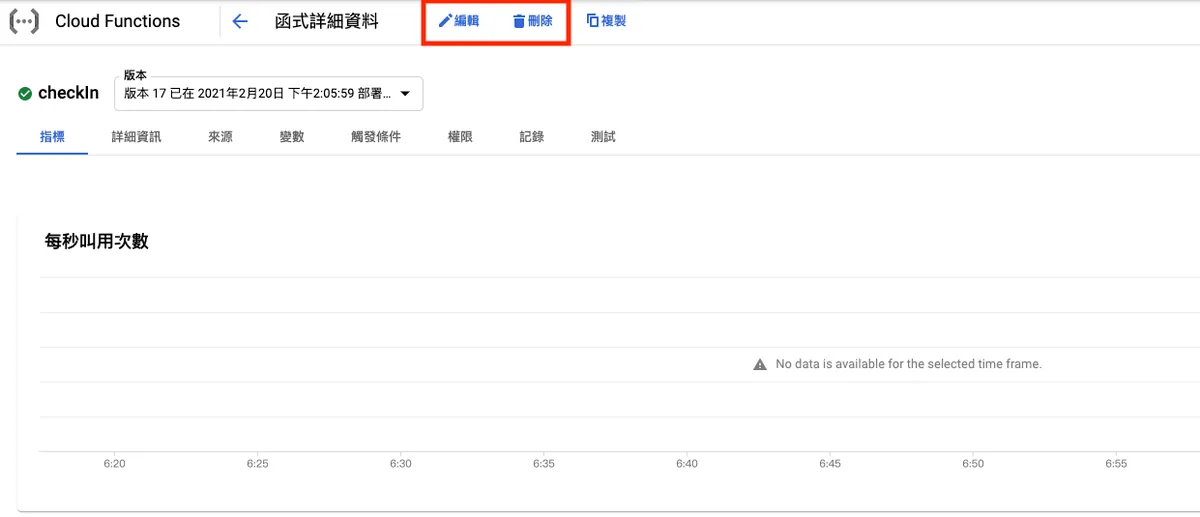
- Click the name to enter, then click “Edit” to modify the script content.
Once testing is successful, it’s done! We have successfully moved the Python script to the cloud.
Additional Notes on Variables
According to our requirements, we need a place to store and read the token for the check-in app; since the token may expire, it needs to be refreshed and written back for use in the next execution.
To dynamically pass variables from outside into the script, you can use the following methods:
-
[Read Only] Runtime Environment Variables Mentioned Above
-
[Temp] Cloud Functions provides a /tmp directory for writing and reading files during execution, but it will be deleted after completion. For details, please refer to the official documentation.
-
[Read Only] GET/POST Data Transmission
-
[Read Only] Attach Additional File
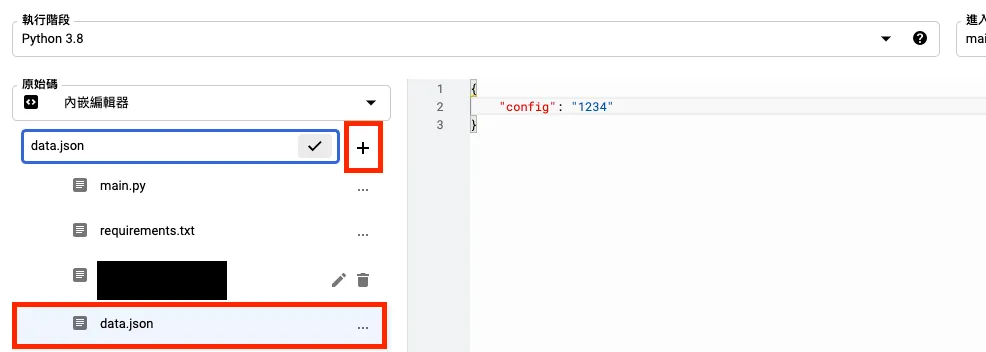
Using relative paths ./ in the code allows reading files, but only for reading, not for dynamic modification; to make changes, you must modify in the console and redeploy.
To enable reading and dynamic modification, you need to connect with other GCP services, such as Cloud SQL, Google Storage, Firebase Cloud Firestore…
- [Read & Write] Here, I chose Firebase Cloud Firestore because it is currently the only option with a free usage quota.
After creating a Firebase project following the Getting Started guide, go to the Firebase console:
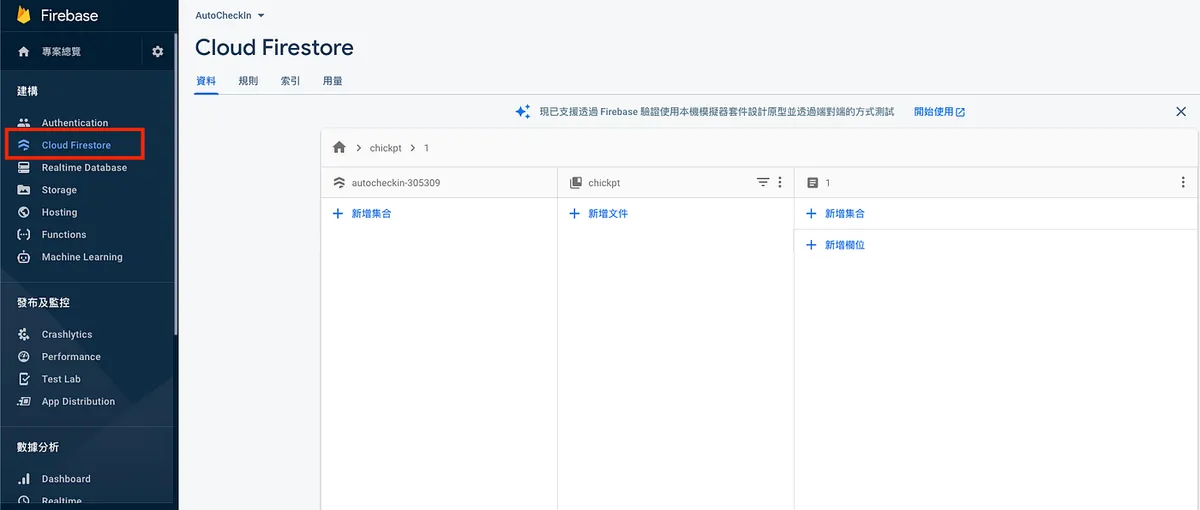
In the left sidebar, find “Cloud Firestore” -> “Create Collection”
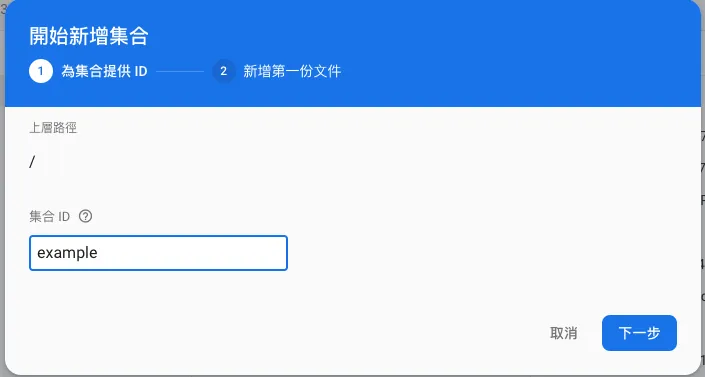
Enter the collection ID.
Input data content.
A collection can have multiple documents, and each document can have its own fields; this offers great flexibility in usage.
Usage in Python:
First, go to GCP Console -> IAM & Admin -> Service Accounts and follow the steps below to download the authentication private key file:
First, select the account:

Under “Add Key” -> “Create New Key”
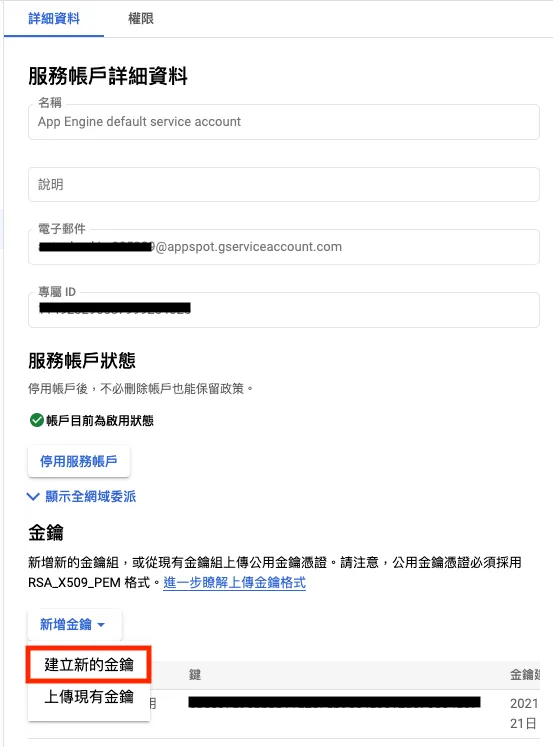
Choose “JSON” to download the file.
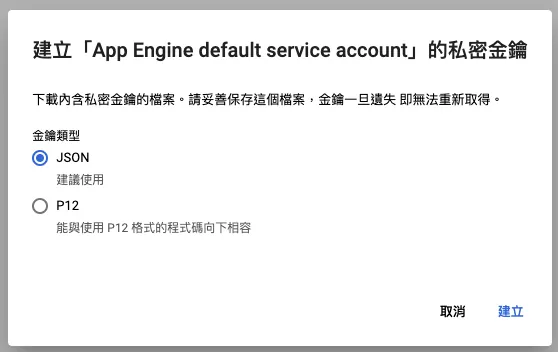
Place this JSON file in the same project directory as the Python files.
In Local Development Environment:
pip install --upgrade firebase-admin
Install the firebase-admin package.
In Cloud Functions, you need to add firebase-admin to the requirements.txt file.
After setting up the environment, we can now read the data we just added:
firebase_admin.py:
import firebase_admin
from firebase_admin import credentials
from firebase_admin import firestore

if not firebase_admin._apps:
  cred = credentials.Certificate('./身份驗證.json')
  firebase_admin.initialize_app(cred)
# Initializing app multiple times causes the following error:
# providing an app name as the second argument. In most cases you only need to call initialize_app() once. But if you do want to initialize multiple apps, pass a second argument to initialize_app() to give each app a unique name.
# So to be safe, check if initialized before calling initialize_app

db = firestore.client()
ref = db.collection(u'example') # collection name
stream = ref.stream()
for data in stream:
  print("id:"+data.id+","+data.to_dict())
If you are using Cloud Functions, you can upload the authentication JSON file together, or modify the connection syntax as follows when using it:
cred = credentials.ApplicationDefault()
firebase_admin.initialize_app(cred, {
  'projectId': project_id,
})

db = firestore.client()
If you encounter
Failed to initialize a certificate credential., please check whether the authentication JSON is correct.
For adding or deleting more operations, please refer to the official documentation.
4. Set Up Automatic Scheduling on Google Cloud
After having the script, the next step is to automate its execution to achieve our final goal.
-
Go to the Google Cloud Scheduler console homepage.
-
Click on “Create Job” at the top.

- Enter basic job information
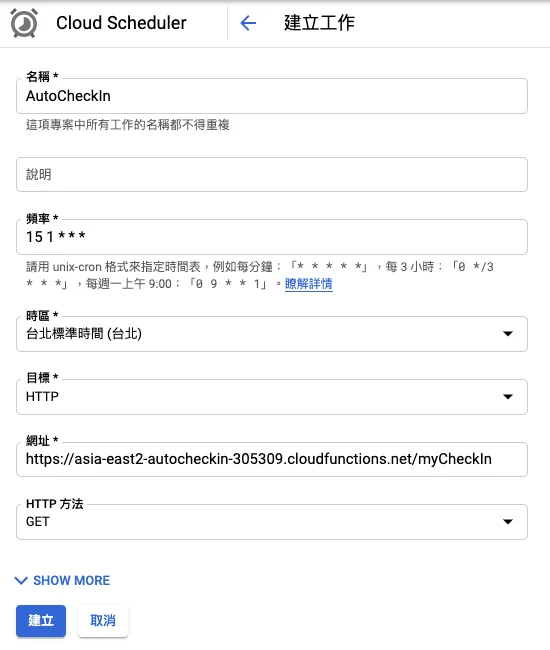
Execution Frequency: Same as crontab input format. If you are not familiar with crontab syntax, you can directly use this handy website crontab.guru:
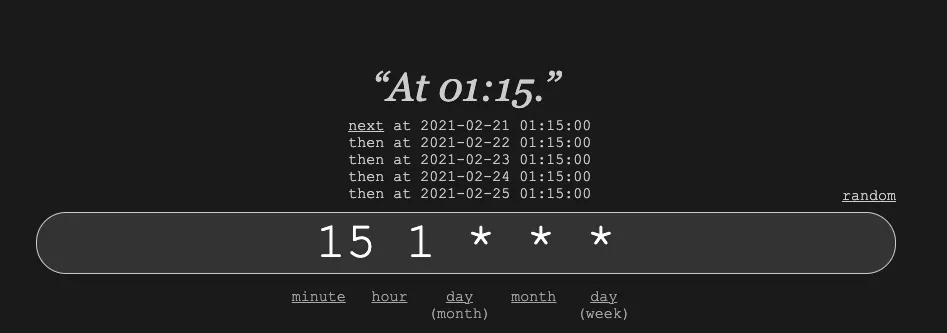
It can straightforwardly translate the actual meaning of the syntax you set. (Click next to see the next execution time)
Here I set
15 1 * * *because the check-in only needs to run once a day, scheduled at 1:15 AM daily.
URL Section: Enter the previously noted “Trigger URL”
Time Zone: Enter “Taiwan” and select Taipei Standard Time
HTTP Method: According to the previous Python code, we can just use Get.
If you set up “Authentication” earlier, remember to expand “SHOW MORE” to configure the authentication settings.
After filling everything in, click “Create”.
- After successful creation, you can choose “Run Now” to test if it works properly.
![]()
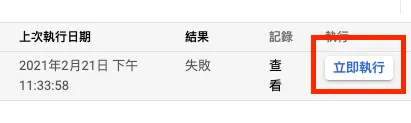
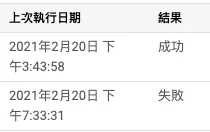
- You can check the execution results and the date of the last run
⚠️ Please note that a “failure” result only applies when the web status code is between 400 and 500 or there is an error in the Python script.
All Done!
We have successfully uploaded the routine Python script to the cloud and set up automatic scheduling for execution.
Pricing Model
Another important part is the pricing model; Google Cloud and Linebot are not entirely free services, so understanding their charges is crucial. Otherwise, spending too much money on a small script is not worth it compared to just leaving your computer running.
Linebot
Refer to the official pricing information, which offers 500 messages free per month.
Google Cloud Functions
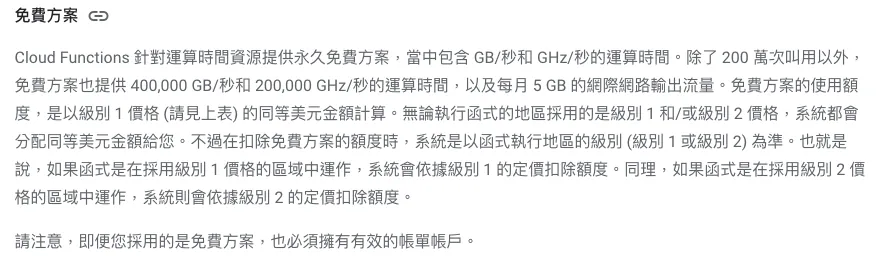
Refer to the official pricing information, which includes 2 million invocations per month, 400,000 GB-seconds and 200,000 GHz-seconds of compute time, and 5 GB of internet egress traffic.
Google Firebase Cloud Firestore

Refer to the official pricing for details. It includes 1 GB storage, 10 GB monthly bandwidth, 50,000 reads per day, and 20,000 writes/deletes per day; more than enough for light use!
Google Cloud Scheduler
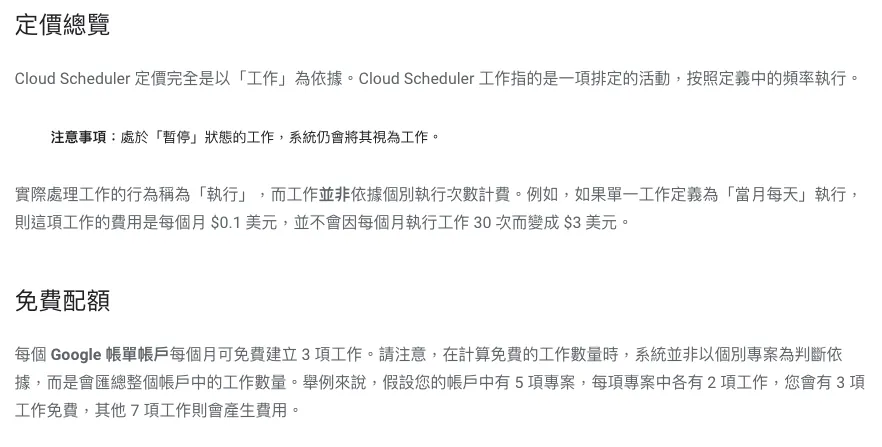
Refer to the official pricing information, each account can set up 3 free jobs.
The above free quotas are more than enough for the script!
Google Cloud Storage Conditional Free Tier
Hiding here and there, you still can’t avoid potentially chargeable services.
After creating Cloud Functions, two Cloud Storage instances will be automatically created:

If you selected US-WEST1, US-CENTRAL1, or US-EAST1 for Cloud Functions, you can enjoy the free usage quota:
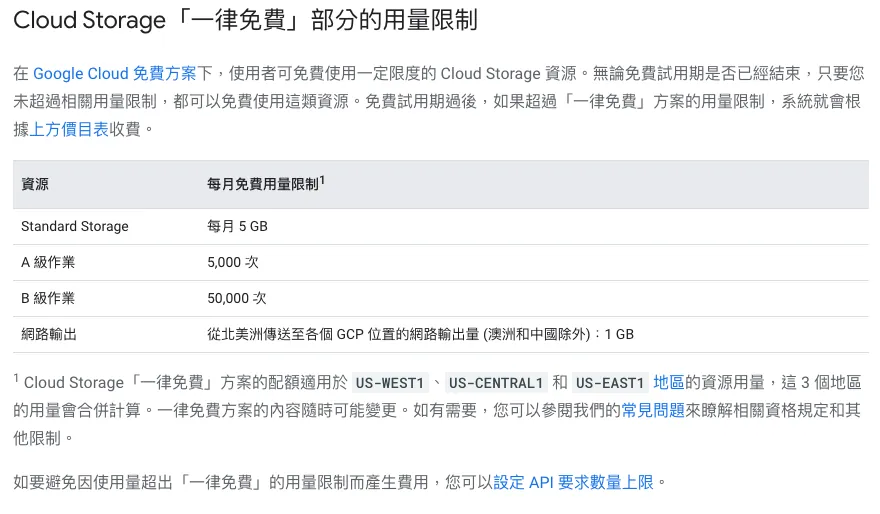
I chose US-CENTRAL1 correctly, and you can see the first Cloud Storage instance is indeed in US-CENTRAL1, but the second one is labeled Multiple US regions; I estimate this one will incur charges.
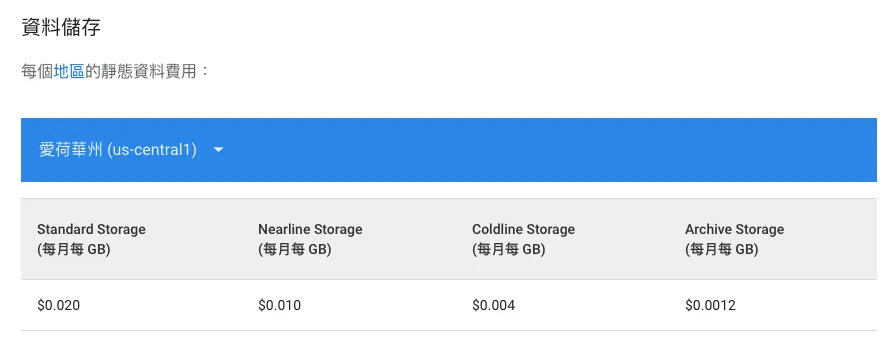
Refer to the official pricing for details. Prices vary based on the hosting region.
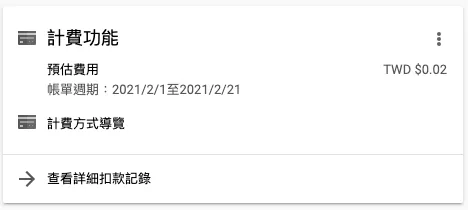
The code is not large, so the estimated minimum monthly charge should be around 0.0X0 dollars (?
⚠️ The above information was recorded as of 2021/02/21. Please refer to the current prices for accuracy. This is for reference only.
Pricing and Budget Control Notifications
just in case… If the usage exceeds the free tier and billing starts, I want to receive a notification; this prevents unexpected program errors from causing a sudden spike in the bill without my awareness…
-
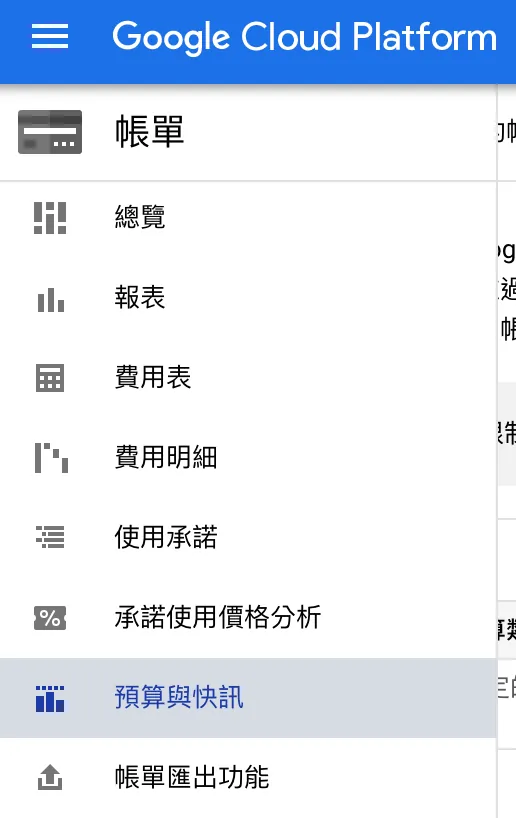
Go to the Console
-
Find the “Billing Features” Card:
Click “View detailed billing records” to enter.
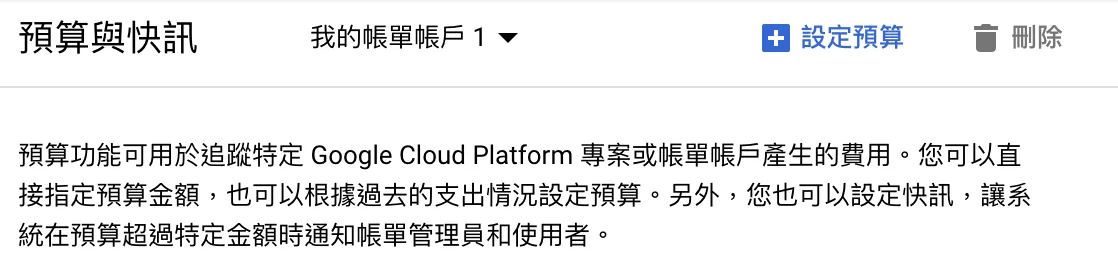
- Expand the left menu and go to the “Budget & Alerts” feature
- Click the “Set Budget” button above
- Enter a custom name
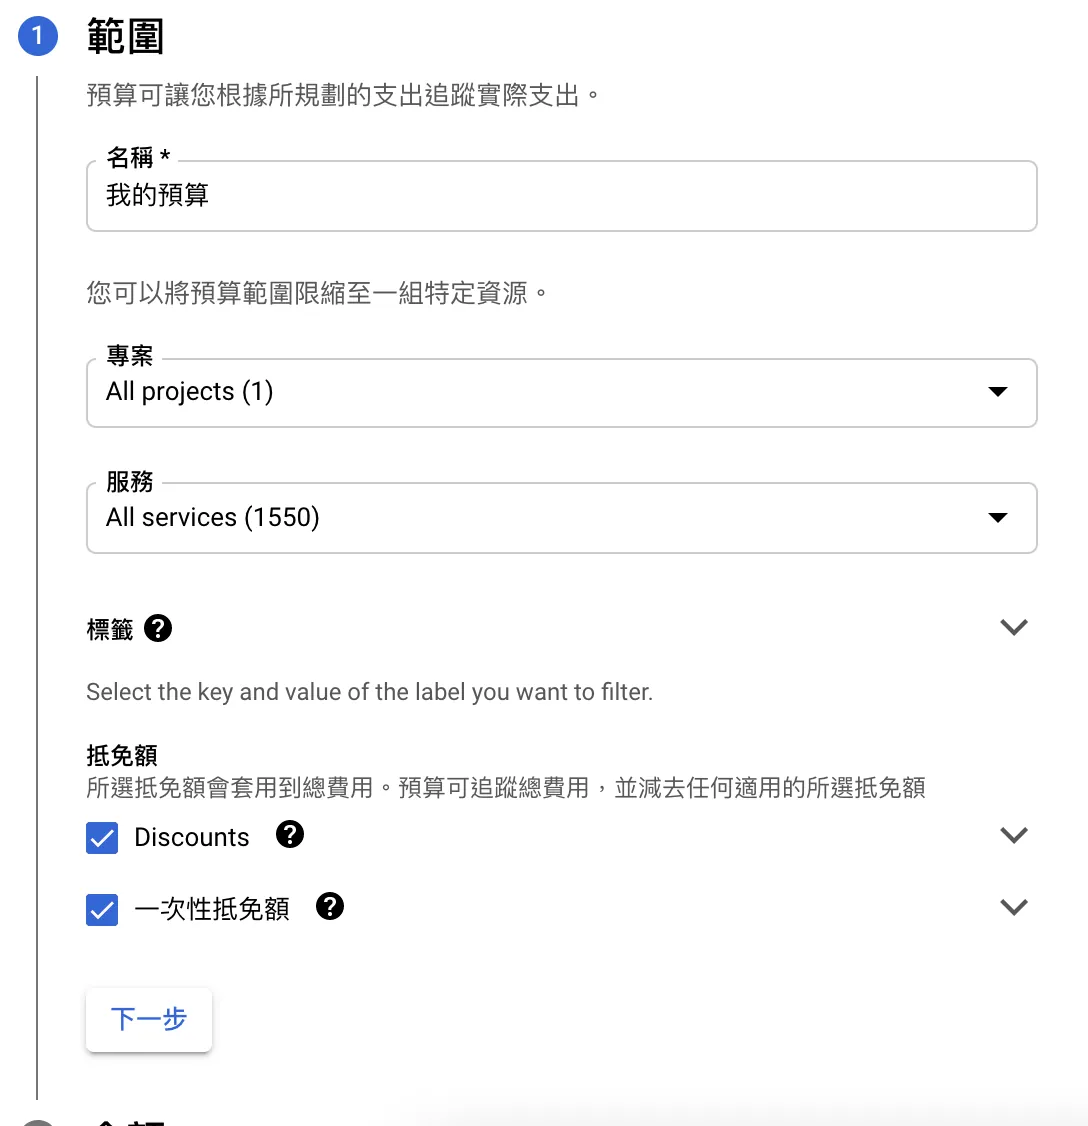
Next step.
- Amount: enter “Target Amount”, you can input $1 or $10; we don’t want to spend too much on small things.
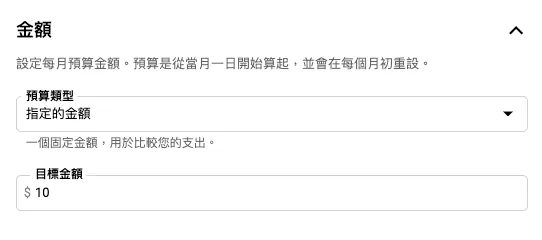
Next step.
You can set the action to trigger a notification when the budget reaches a certain percentage.
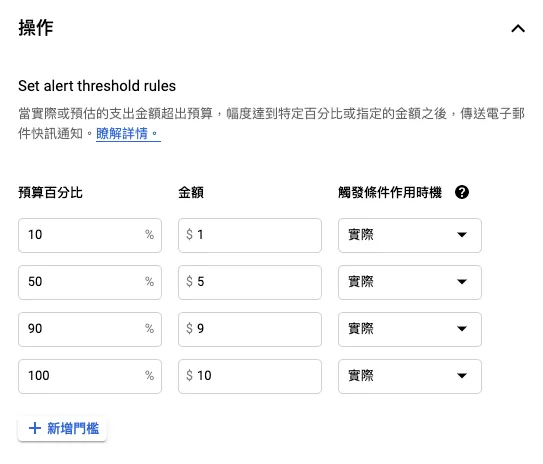
Check “ Send alerts to billing administrators and users via email “ so you can receive notifications immediately when conditions are met.
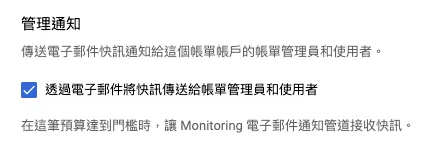
Click “Done” to submit and save.


We can immediately know when the budget is exceeded, preventing further costs.
Summary
Human energy is limited. In today’s flood of technology and information, every platform and service tries to drain our finite energy. If we can use automation scripts to share the load of daily tasks, accumulating small savings, we can save more energy to focus on what truly matters!
Further Reading
-
Slack Builds a Fully Automated WFH Employee Health Reporting System
-
Crashlytics + Big Query: Building a More Real-Time and Convenient Crash Tracking Tool
-
Crashlytics + Google Analytics Automated Query for App Crash-Free Users Rate
-
The app uses HTTPS transmission, but the data was still stolen.
-
iOS 14 Clipboard Privacy Panic: The Dilemma Between Privacy and Convenience
If you have automation-related optimization needs, feel free to contact me. Thank you.

Comments