
Seamless Migration from Medium to Self-Hosted Website
Migrating Medium Content to Github Pages (with Jekyll/Chirpy)
Background
In my fourth year of running Medium, I have accumulated over 65 articles and nearly 1000+ hours of effort. I initially chose Medium because it was simple and convenient, allowing me to focus on writing without worrying about other issues. Before that, I tried self-hosting WordPress, but I spent most of my time dealing with the environment, styles, and plugins. No matter how I adjusted it, I was never satisfied. After fixing those issues, I found the loading speed too slow, the reading experience poor, and the backend writing interface not user-friendly, so I stopped updating it.
As I wrote more articles on Medium and gained some traffic and followers, I wanted to take control of my work instead of relying on a third-party platform (e.g., losing everything if Medium shuts down). So, since the year before last, I have been looking for a secondary backup website. I continue to maintain Medium but also publish content on a site I control. The solution I found back then was — Google Site — but honestly, it can only serve as a personal “portal.” Its writing interface is limited and can’t fully migrate all my articles.
In the end, I still chose to self-host, but instead of using a dynamic website (e.g., WordPress), I opted for a static site. Although it supports fewer features, all I need is the ability to write articles and a clean, smooth, customizable browsing experience—nothing else!
The workflow of a static website is: write articles locally in Markdown format, then convert them into static web pages using a static site generator and upload them to the server; done. Static web pages offer a fast browsing experience!
Writing in Markdown format allows your articles to be compatible with more platforms; if you’re not used to it, you can also find online or offline Markdown editors to get the same experience as writing directly on Medium!
In summary, this solution meets my needs for both a smooth browsing experience and a convenient writing interface.
Results
-
Supports Custom Display Styles
-
Supports custom page adjustments (e.g., inserting ads, js widgets)
-
Support Custom Pages
-
Support Custom Domains
-
Static pages load quickly and provide a smooth browsing experience
-
Using Git version control, all historical versions of the articles can be preserved and restored.
-
Fully Automated Scheduled Sync of Medium Articles to Website
2025/01/18 Update 🎉🎉🎉
-
Please refer to the quick start guide for Medium to Jekyll setup
-
Please refer to the quick start guide for Medium to Jekyll setup
-
Please refer to the quick start guide for Medium to Jekyll setup
Environment and Tools
-
Environment Language: Ruby
-
Dependency Management Tools: RubyGems.org, Bundler
-
Static Site Engine: Jekyll (Based on Ruby)
-
Article Format: Markdown
-
Server: Github Page (Free, unlimited traffic/storage static website hosting)
-
CI/CD : Github Action (free 2,000 mins+/month)
-
Medium Article to Markdown Tool: ZMediumToMarkdown (Based on Ruby)
-
Version Control: Git
-
(Optional) Git GUI: Git Fork
-
(Optional) Domain Service: Namecheap
Install Ruby
Here I only use my own environment as an example. For other operating systems and versions, please Google how to install Ruby.
-
macOS Monterey 12.1
-
rbenv
-
ruby 2.6.5
Install Brew
/bin/bash -c "$(curl -fsSL https://raw.githubusercontent.com/Homebrew/install/HEAD/install.sh)"
Enter the above command in Terminal to install Brew.
Install rbenv
brew install rbenv ruby-build
MacOS comes with Ruby pre-installed, but it is recommended to use rbenv to install a separate Ruby version to keep it isolated from the system Ruby. Enter the above command in Terminal to install rbenv.
rbenv init
In the Terminal, enter the above command to initialize rbenv
- Close & reopen the Terminal.
In the Terminal, type rbenv to check if the installation was successful!
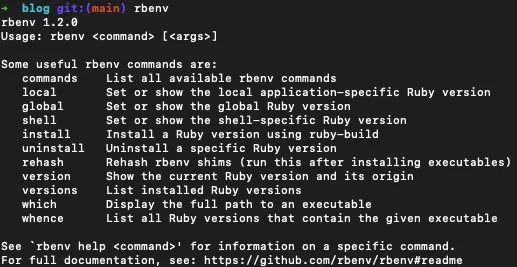
Success!
Installing Ruby with rbenv
rbenv install 2.6.5
In the Terminal, enter the above command to install Ruby version 2.6.5.
rbenv global 2.6.5
In the Terminal, enter the above command to switch the Ruby version used by the Terminal from the system default to the rbenv version.
In the Terminal, enter rbenv versions to check the current settings:

In the Terminal, enter ruby -v to check the current Ruby version, and gem -v to check the current RubyGems status:

*After installing Ruby, RubyGems should also be installed.
Success!
Install Jekyll & Bundler & ZMediumToMarkdown
gem install jekyll bundler ZMediumToMarkdown
In the Terminal, enter the above command to install Jekyll, Bundler, and ZMediumToMarkdown.
Done!
Create a Jekyll Blog from a Template
The default Jekyll blog style is very simple. You can find styles you like from the following websites and apply them:
The installation method generally uses gem-based themes, while some Repos offer installation via Fork; some even provide one-click installation. In short, each theme may have a different installation method, so please refer to the theme’s documentation for usage.
Also, note that since we are deploying to GitHub Pages, according to the official documentation, not all themes are supported.
Chirpy Template
Here, I use the template Chirpy adopted by my blog as an example. This template offers the simplest one-click installation method and can be used directly.
Other templates rarely offer a similar one-click installation. For those unfamiliar with Jekyll and GitHub Pages, using this template first is a better way to get started. I will update the article later to cover installation methods for other templates when there is a chance.
Alternatively, you can find templates on Github that can be directly forked (e.g. al-folio) and used right away. If none fit your needs and you have to install a template manually, you will need to figure out how to configure Github Pages deployment yourself. I tried a bit but didn’t succeed, so I will update this article with my findings later.
Create Git Repo from Git Template
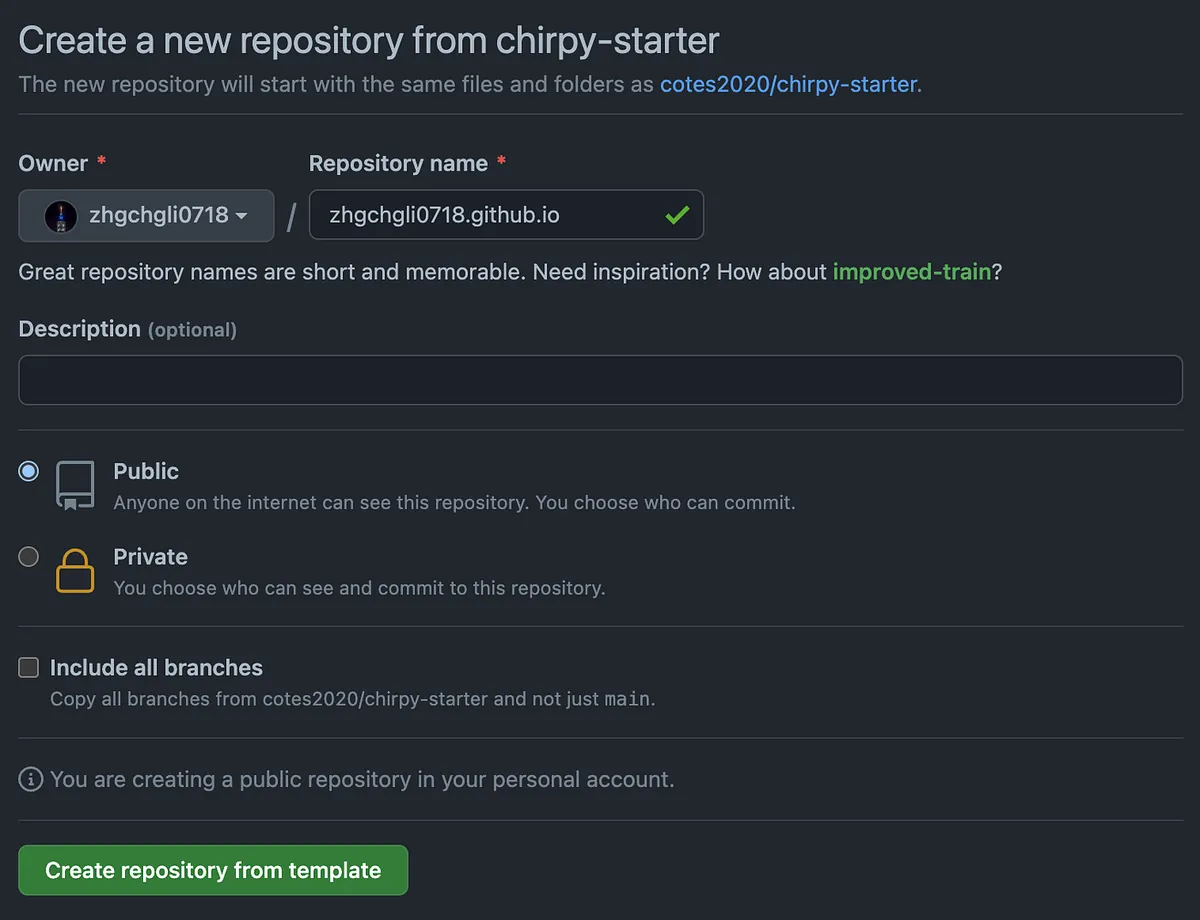
https://github.com/cotes2020/chirpy-starter/generate
-
Repository name:
GithubUsername/OrganizationName.github.io( Be sure to use this format ) -
Be sure to select the “Public” visibility for the repository.
Click “Create repository from template”
Complete the Repo setup.
Git Clone the Project
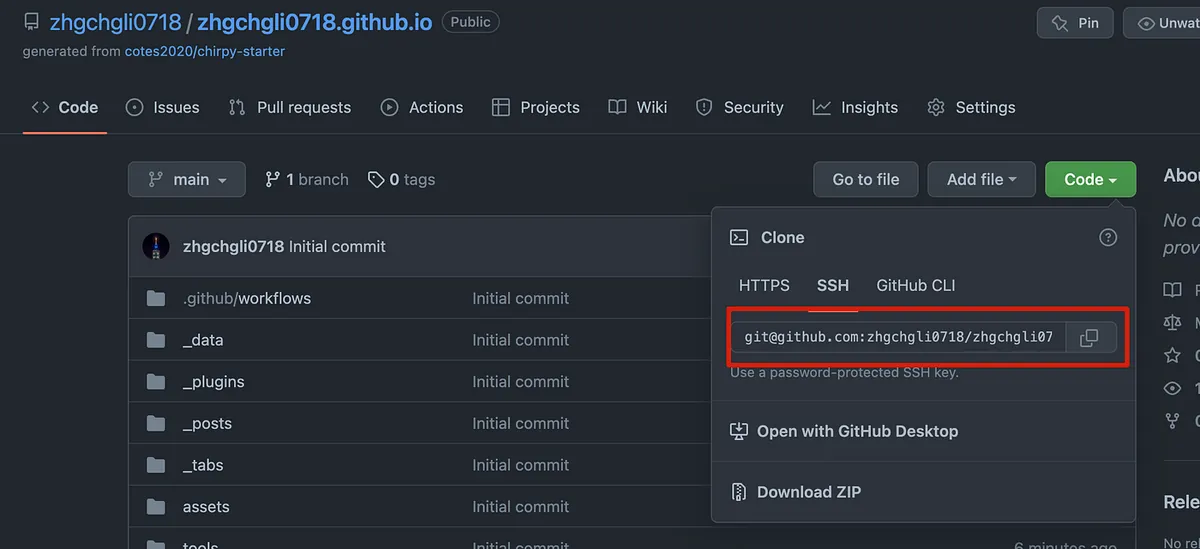
git clone [email protected]:zhgchgli0718/zhgchgli0718.github.io.git
git clone the newly created Repo.
Run bundle to install dependencies:

Run bundle lock — add-platform x86_64-linux to lock the version

Modify Website Settings
Open the _config.yml configuration file to set up:
# The Site Configuration

# Import the theme
theme: jekyll-theme-chirpy

# Change the following value to '/PROJECT_NAME' ONLY IF your site type is GitHub Pages Project sites
# and doesn't have a custom domain.
# baseurl: ''

# The language of the webpage › http://www.lingoes.net/en/translator/langcode.htm
# If it has the same name as one of the files in folder `_data/locales`, the layout language will also be changed,
# otherwise, the layout language will use the default value of 'en'.
lang: en

# Additional parameters for datetime localization, optional. › https://github.com/iamkun/dayjs/tree/dev/src/locale
prefer_datetime_locale:

# Change to your timezone › http://www.timezoneconverter.com/cgi-bin/findzone/findzone
timezone:

# jekyll-seo-tag settings › https://github.com/jekyll/jekyll-seo-tag/blob/master/docs/usage.md
# ↓ --------------------------

title: ZhgChgLi                          # the main title

tagline: Live a life you will remember.   # it will display as the sub-title

description: >-                        # used by seo meta and the atom feed
    ZhgChgLi iOS Developer eager to learn, teaching and learning together, loves movies/TV series/classical music/sports/life

# fill in the protocol & hostname for your site, e.g., 'https://username.github.io'
url: 'https://zhgchg.li'

github:
  username: ZhgChgLi             # change to your github username

twitter:
  username: zhgchgli            # change to your twitter username

social:
  # Change to your full name.
  # It will be displayed as the default author of the posts and the copyright owner in the Footer
  name: ZhgChgLi
  email: [email protected]             # change to your email address
  links:
    - https://medium.com/@zhgchgli
    - https://github.com/ZhgChgLi
    - https://www.linkedin.com/in/zhgchgli

google_site_verification:               # fill in your verification string

# ↑ --------------------------
# The end of `jekyll-seo-tag` settings

google_analytics:
  id: G-6WZJENT8WR                 # fill in your Google Analytics ID
  # Google Analytics pageviews report settings
  pv:
    proxy_endpoint:   # fill in the Google Analytics superProxy endpoint of Google App Engine
    cache_path:       # the local PV cache data, friendly to visitors from GFW region

# Prefer color scheme setting.
#
# Note: Keep empty will follow the system prefer color by default,
# and there will be a toggle to switch the theme between dark and light
# on the bottom left of the sidebar.
#
# Available options:
#
#     light  - Use the light color scheme
#     dark   - Use the dark color scheme
#
theme_mode:   # [light\\|dark]

# The CDN endpoint for images.
# Notice that once it is assigned, the CDN url
# will be added to all image (site avatar & posts' images) paths starting with '/'
#
# e.g. 'https://cdn.com'
img_cdn:

# the avatar on sidebar, support local or CORS resources
avatar: '/assets/images/zhgchgli.jpg'

# boolean type, the global switch for ToC in posts.
toc: true

comments:
  active: disqus        # The global switch for posts comments, e.g., 'disqus'.  Keep it empty means disable
  # The active options are as follows:
  disqus:
    shortname: zhgchgli    # fill with the Disqus shortname. › https://help.disqus.com/en/articles/1717111-what-s-a-shortname
  # utterances settings › https://utteranc.es/
  utterances:
    repo:         # <gh-username>/<repo>
    issue_term:   # < url \\| pathname \\| title \\| ...>
  # Giscus options › https://giscus.app
  giscus:
    repo:             # <gh-username>/<repo>
    repo_id:
    category:
    category_id:
    mapping:          # optional, default to 'pathname'
    input_position:   # optional, default to 'bottom'
    lang:             # optional, default to the value of `site.lang`

# Self-hosted static assets, optional › https://github.com/cotes2020/chirpy-static-assets
assets:
  self_host:
    enabled:      # boolean, keep empty means false
    # specify the Jekyll environment, empty means both
    # only works if `assets.self_host.enabled` is 'true'
    env:          # [development\\|production]

paginate: 10

# ------------ The following options are not recommended to be modified ------------------

kramdown:
  syntax_highlighter: rouge
  syntax_highlighter_opts:   # Rouge Options › https://github.com/jneen/rouge#full-options
    css_class: highlight
    # default_lang: console
    span:
      line_numbers: false
    block:
      line_numbers: true
      start_line: 1

collections:
  tabs:
    output: true
    sort_by: order

defaults:
  - scope:
      path: ''          # An empty string here means all files in the project
      type: posts
    values:
      layout: post
      comments: true    # Enable comments in posts.
      toc: true         # Display TOC column in posts.
      # DO NOT modify the following parameter unless you are confident enough
      # to update the code of all other post links in this project.
      permalink: /posts/:title/
  - scope:
      path: _drafts
    values:
      comments: false
  - scope:
      path: ''
      type: tabs             # see `site.collections`
    values:
      layout: page
      permalink: /:title/
  - scope:
      path: assets/img/favicons
    values:
      swcache: true
  - scope:
      path: assets/js/dist
    values:
      swcache: true

sass:
  style: compressed

compress_html:
  clippings: all
  comments: all
  endings: all
  profile: false
  blanklines: false
  ignore:
    envs: [development]

exclude:
  - '*.gem'
  - '*.gemspec'
  - tools
  - README.md
  - LICENSE
  - gulpfile.js
  - node_modules
  - package*.json

jekyll-archives:
  enabled: [categories, tags]
  layouts:
    category: category
    tag: tag
  permalinks:
    tag: /tags/:name/
    category: /categories/:name/
Please replace the settings with your own content as indicated in the comments.
⚠️ Changes to _config.yml require restarting the local site to take effect!
Preview the Website
After installing the dependencies,
You can start the local site with bundle exec jekyll s:
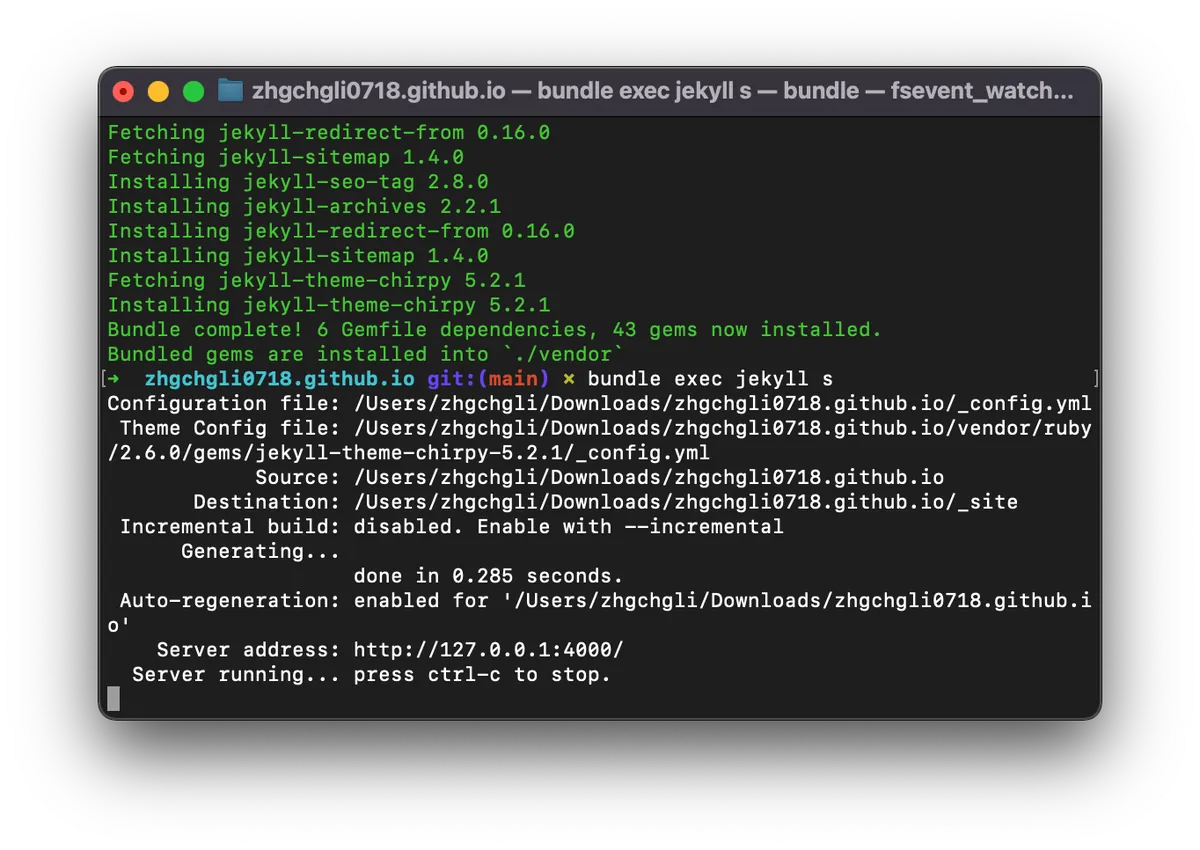
Copy the URL http://127.0.0.1:4000/ and open it in your browser.
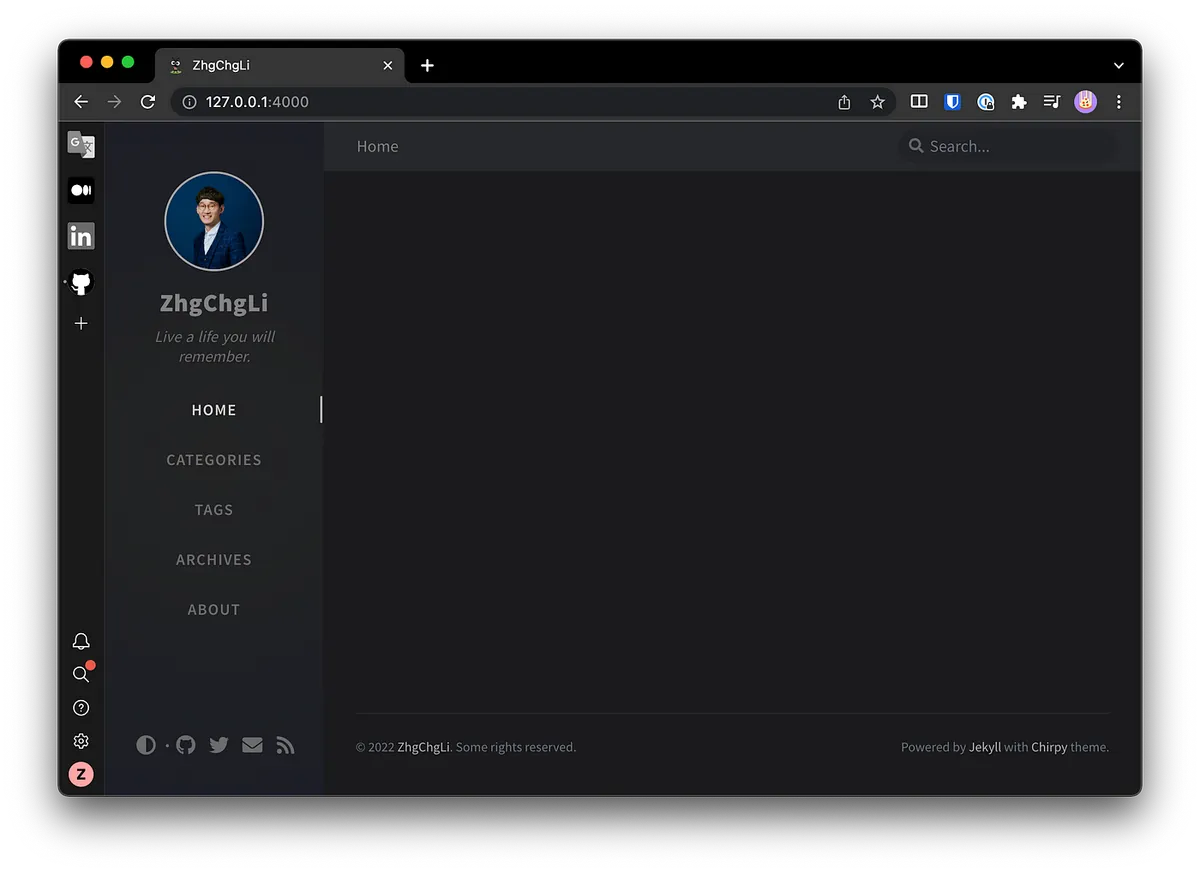
Local preview successful!
As long as this Terminal is open, the local website will be running. The Terminal will continuously update the website access logs, making it easier for us to debug.
We can open a new Terminal for other subsequent operations.
Jekyll Directory Structure
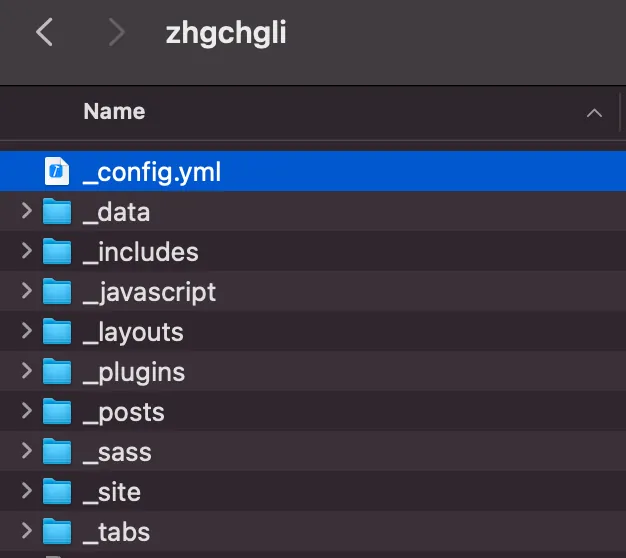
Depending on the template, there may be different folders and configuration files. The article directory is:
-
_posts/: Articles are stored in this directory
Article file naming convention:YYYY–MM–DD-article-filename.md -
assets/:
Website resource directory. All images used by the site or images within articles should be placed here.
Other directories like _includes, _layouts, _sites, _tabs… allow you to make advanced extensions and modifications.
Jekyll uses Liquid as its page template engine. Page templates are composed in a way similar to inheritance:
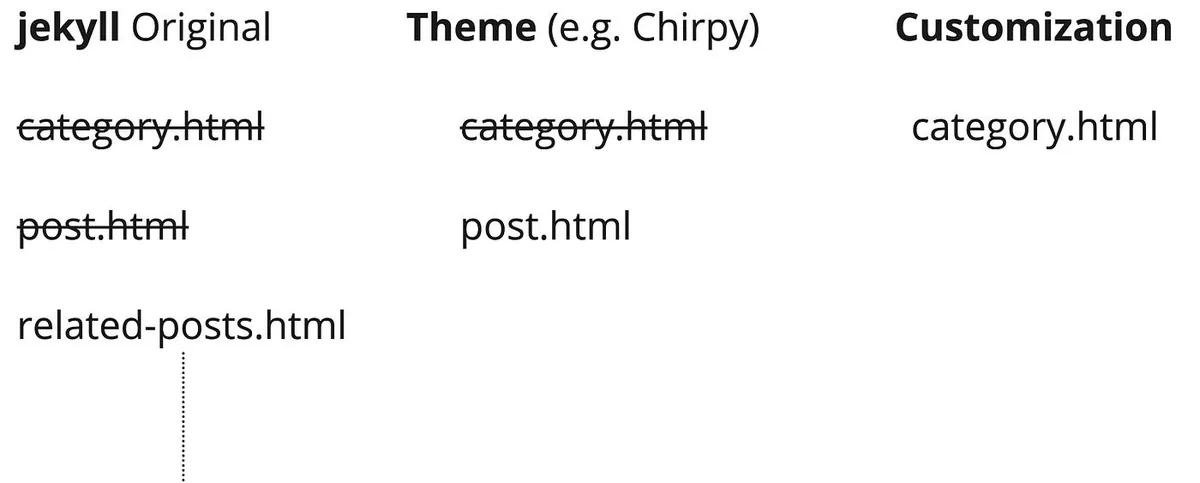
Users can freely customize pages. The engine first checks if the user has created a custom file for the page -> if not, it checks the template -> if still not, it displays using the original Jekyll style.
So we can easily customize any page by simply creating a file with the same name in the corresponding directory!
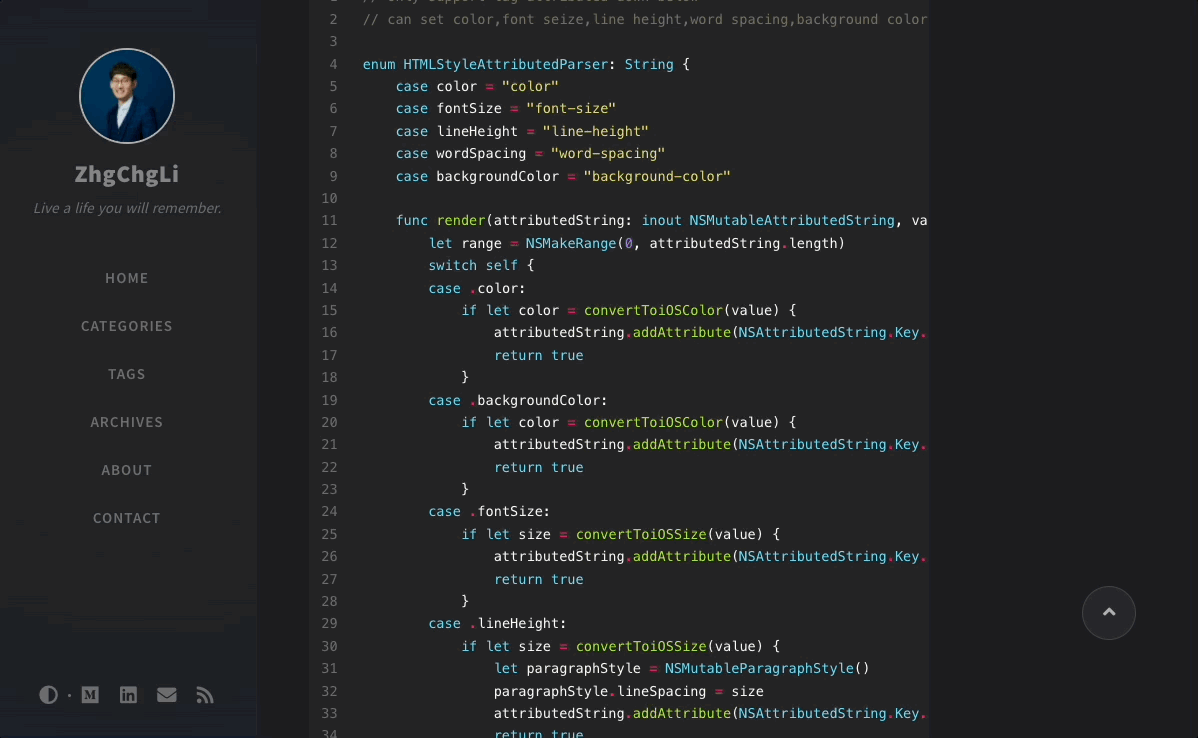
Create/Edit Articles
- We can first delete all example article files under the
_posts/directory.
Use Visual Code (free) or Typora (paid) to create Markdown files. Here, we use Visual Code as an example:
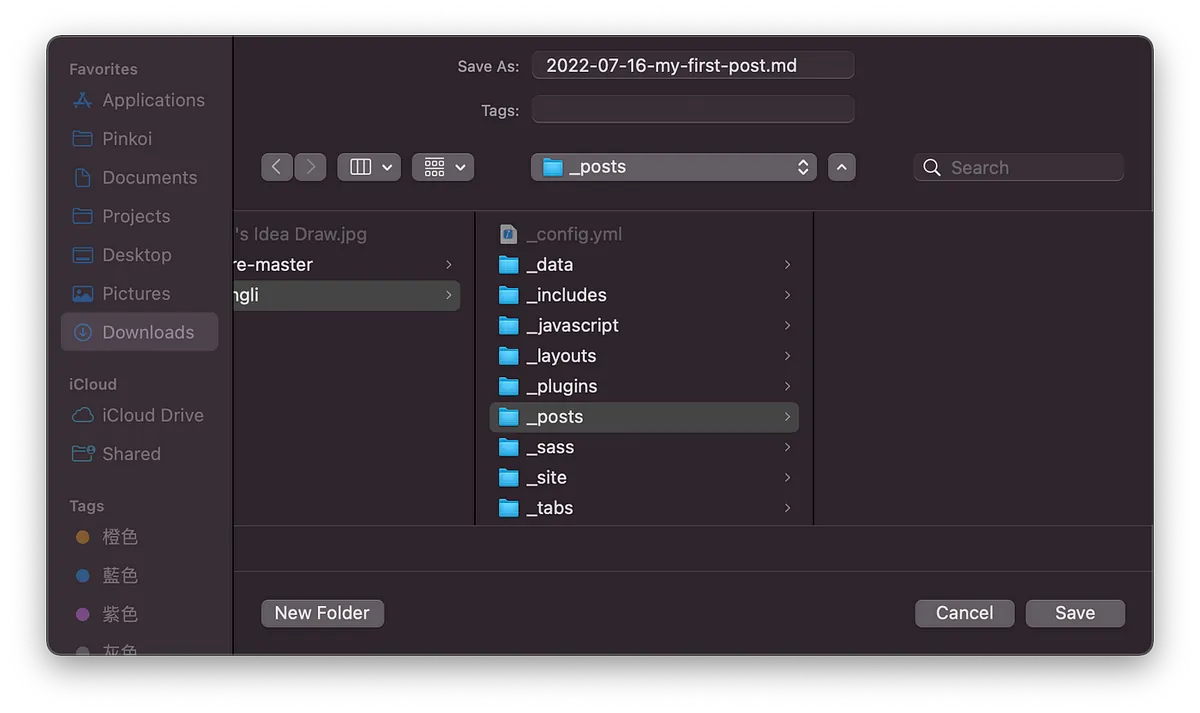
-
Article file naming convention:
YYYY–MM–DD-article-file-name.md -
It is recommended to use English for file names (for SEO optimization), as this name will be the URL path.
Article Content Top Meta:
---
layout: post
title:  "Hello"
description: ZhgChgLi's first article
date:   2022-07-16 10:03:36 +0800
categories: Jeklly Life
author: ZhgChgLi
tags: [ios]
---
-
layout: post
-
title: Article Title (og:title)
-
description: Article description (og:description)
-
date: Article publication date (cannot be in the future)
-
author: Author (meta:author)
-
tags: Tags (multiple allowed)
-
categories: Categories (single, separate subcategories with spaces, e.g.,
Jekyll Lifemeans the Life folder under the Jekyll directory)
Article Content:
Write using Markdown format:
---
layout: post
title: "Hello"
description: ZhgChgLi's first article
date: 2022-07-16 10:03:36 +0800
categories: Jeklly Life
author: ZhgChgLi
tags: [ios]
---
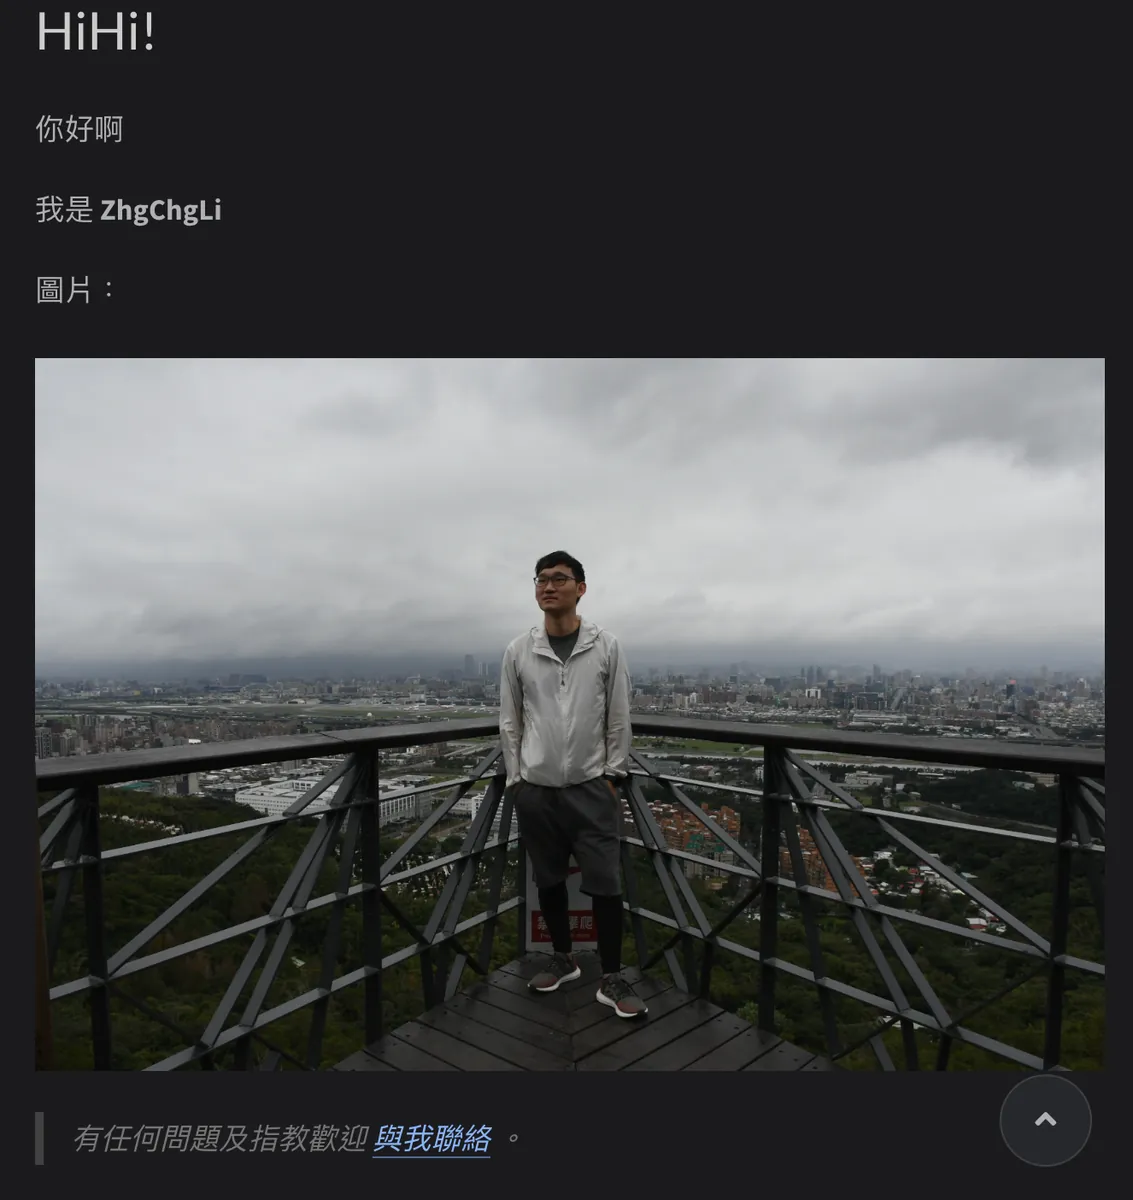
# HiHi!
Hello there
I am **ZhgChgLi**
Image:
{: loading="lazy" decoding="async" width="1200" height="800" lqip="data:image/svg+xml;base64,PHN2ZyB4bWxucz0iaHR0cDovL3d3dy53My5vcmcvMjAwMC9zdmciIHdpZHRoPSIxMjAwIiBoZWlnaHQ9IjgwMCI+PHJlY3Qgd2lkdGg9IjEwMCUiIGhlaWdodD0iMTAwJSIgZmlsbD0iI2VkZTJjZiIvPjwvc3ZnPg==" }
> _If you have any questions or feedback, feel free to [contact me](https://www.zhgchg.li/contact)._
Result:
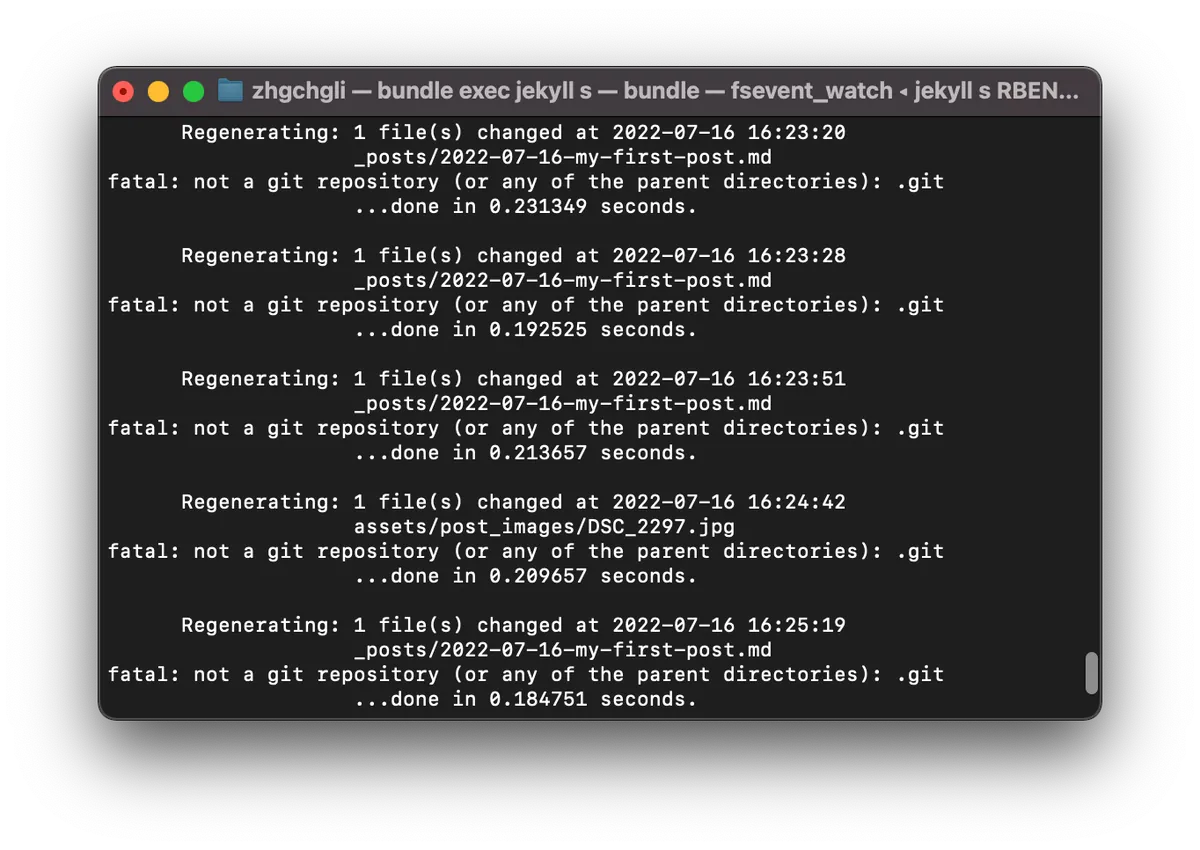
⚠️ No need to restart the site after editing articles. Changes will be rendered and displayed immediately. If updates don’t appear after a while, the article format might be incorrect, causing rendering failure. Check the Terminal for error details.
Download Articles from Medium and Convert to Markdown for Jekyll
With basic Jekyll knowledge, we move forward by using the ZMediumToMarkdown tool to download existing articles from the Medium website and convert them into Markdown format, placing them into our Blog folder.
After cd into the blog directory, run the following command to download all articles of that user from Medium:
ZMediumToMarkdown -j your Medium username
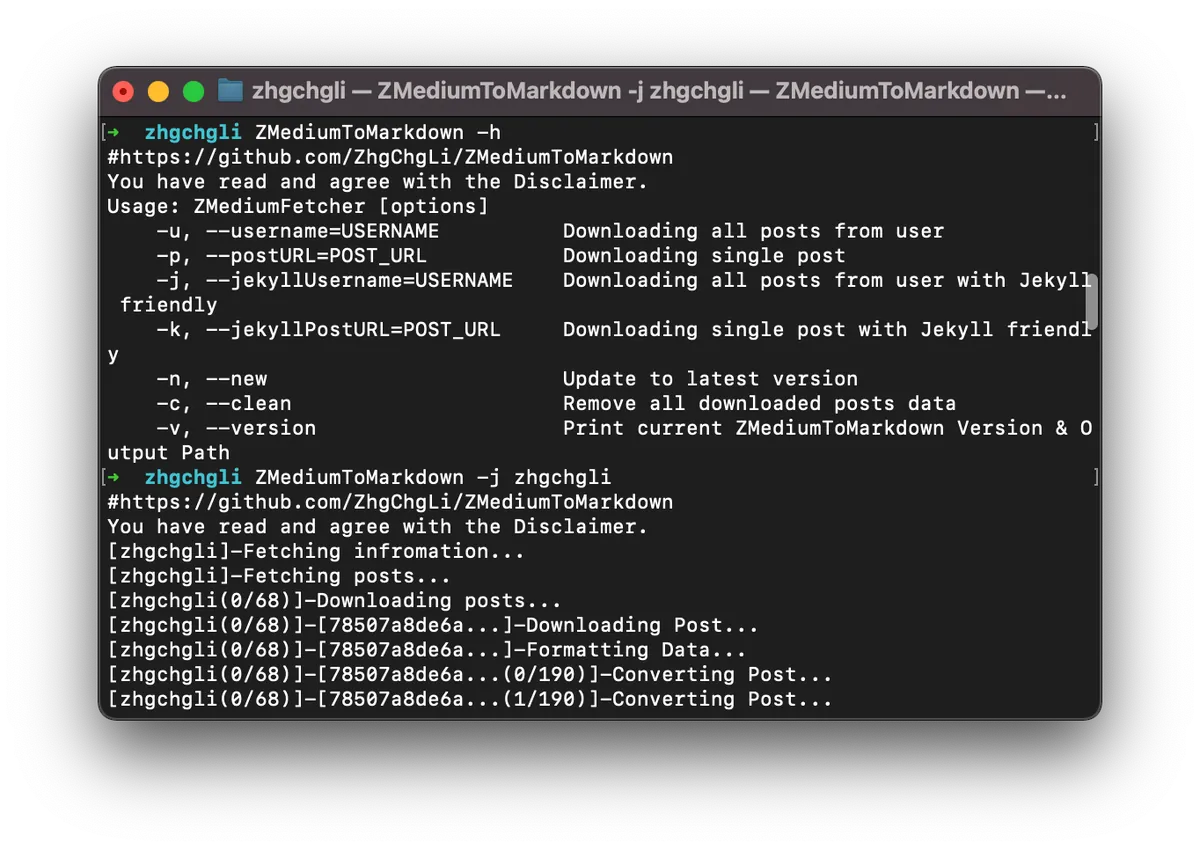
Waiting for all articles to finish downloading…
If you encounter any download issues or unexpected errors, feel free to contact me. This downloader was created by me ( development insights ) and can help you solve problems quickly and directly.

After downloading, you can preview the results on your local website.
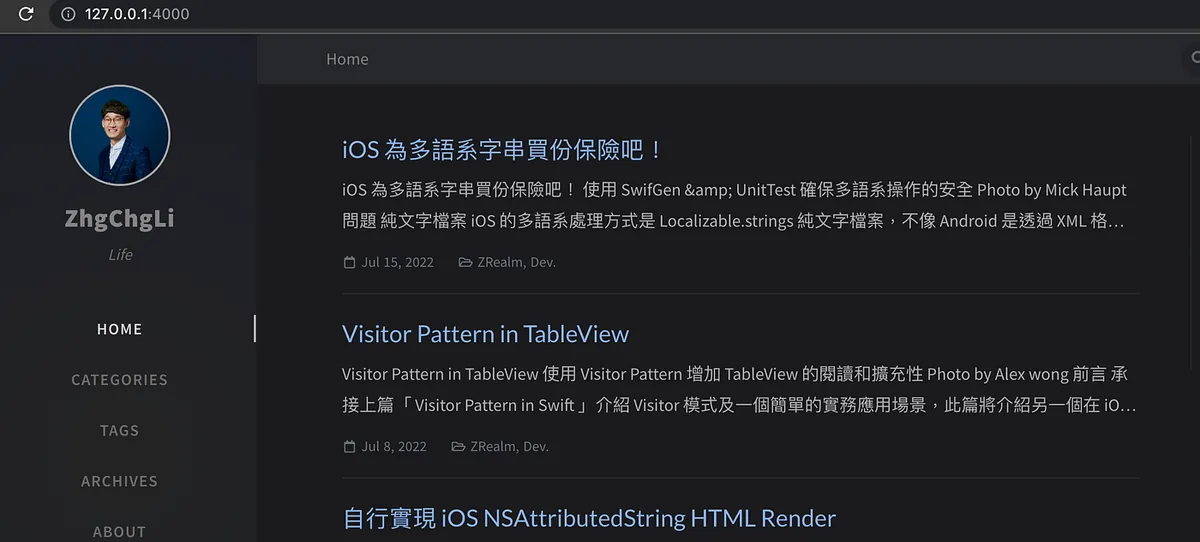
Done!! We have successfully imported Medium articles into Jekyll without any hassle!
Please check if the article layout is broken or if any images are missing. If so, feel free to report to me to help fix it.
Upload Content to Repo
After confirming the local preview looks good, we can push the content to the GitHub Repo.
Use the following Git commands in order:
git add .
git commit -m "update post"
git push
After the push is complete, return to GitHub and you can see the Actions running the CD again:
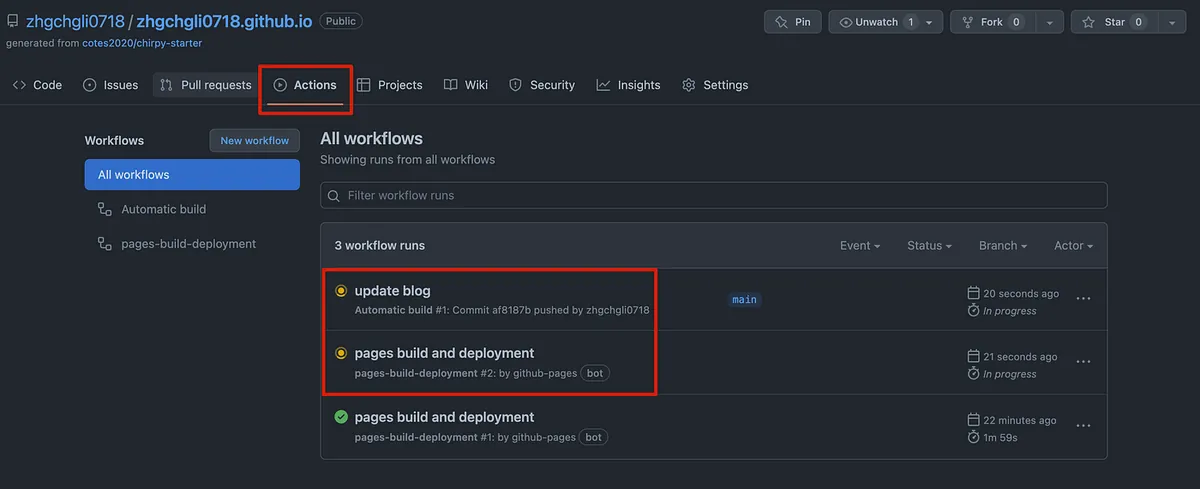
Wait about 5 minutes…
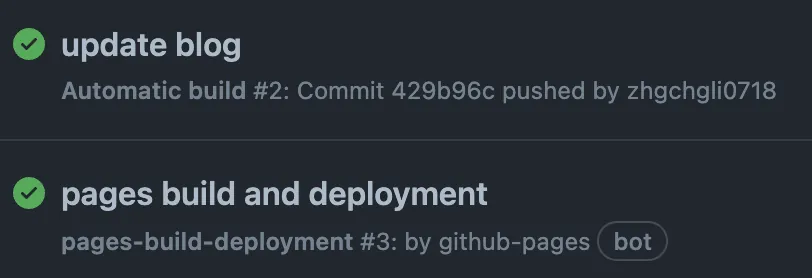
Deployment complete!
Initial Deployment and Configuration Completion
After the first deployment, change the following settings:
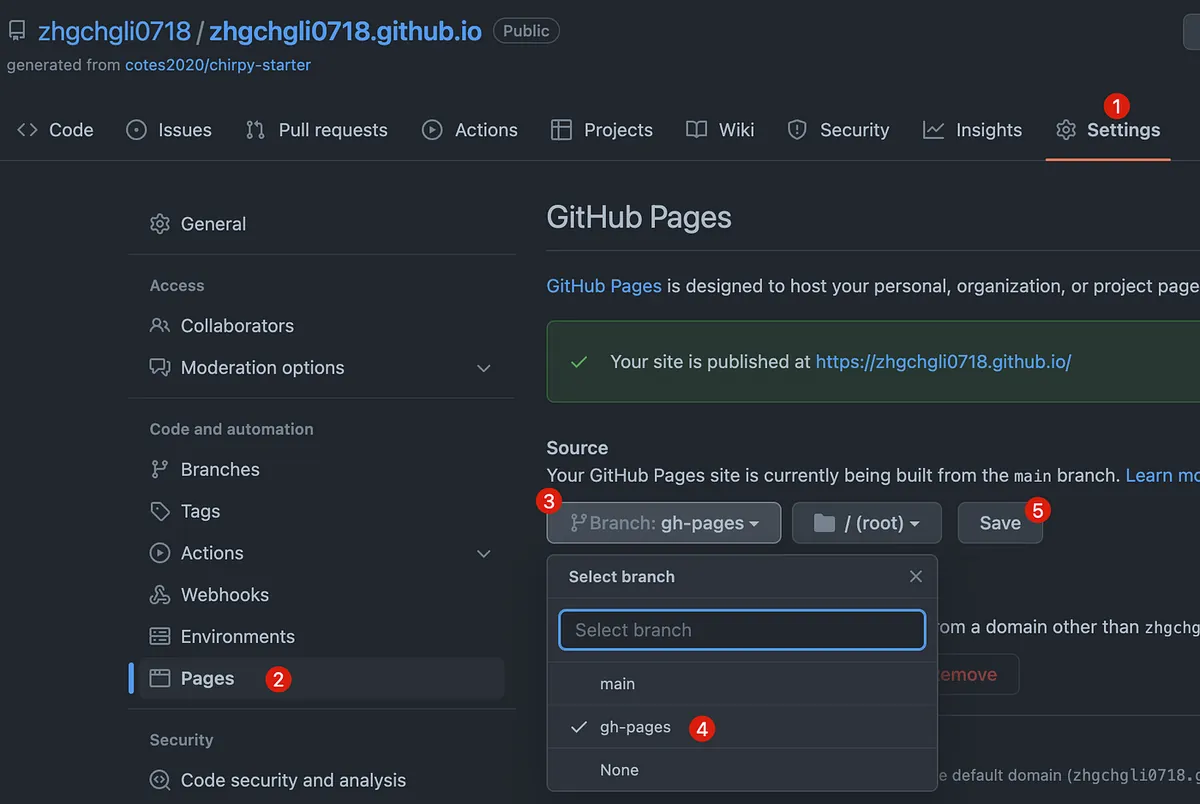
Otherwise, the website will only show:
--- layout: home # Index page ---
After clicking “Save,” the changes won’t take effect immediately. You need to go back to the “Actions” page and wait for the deployment again.
After redeployment, you can successfully access the website:
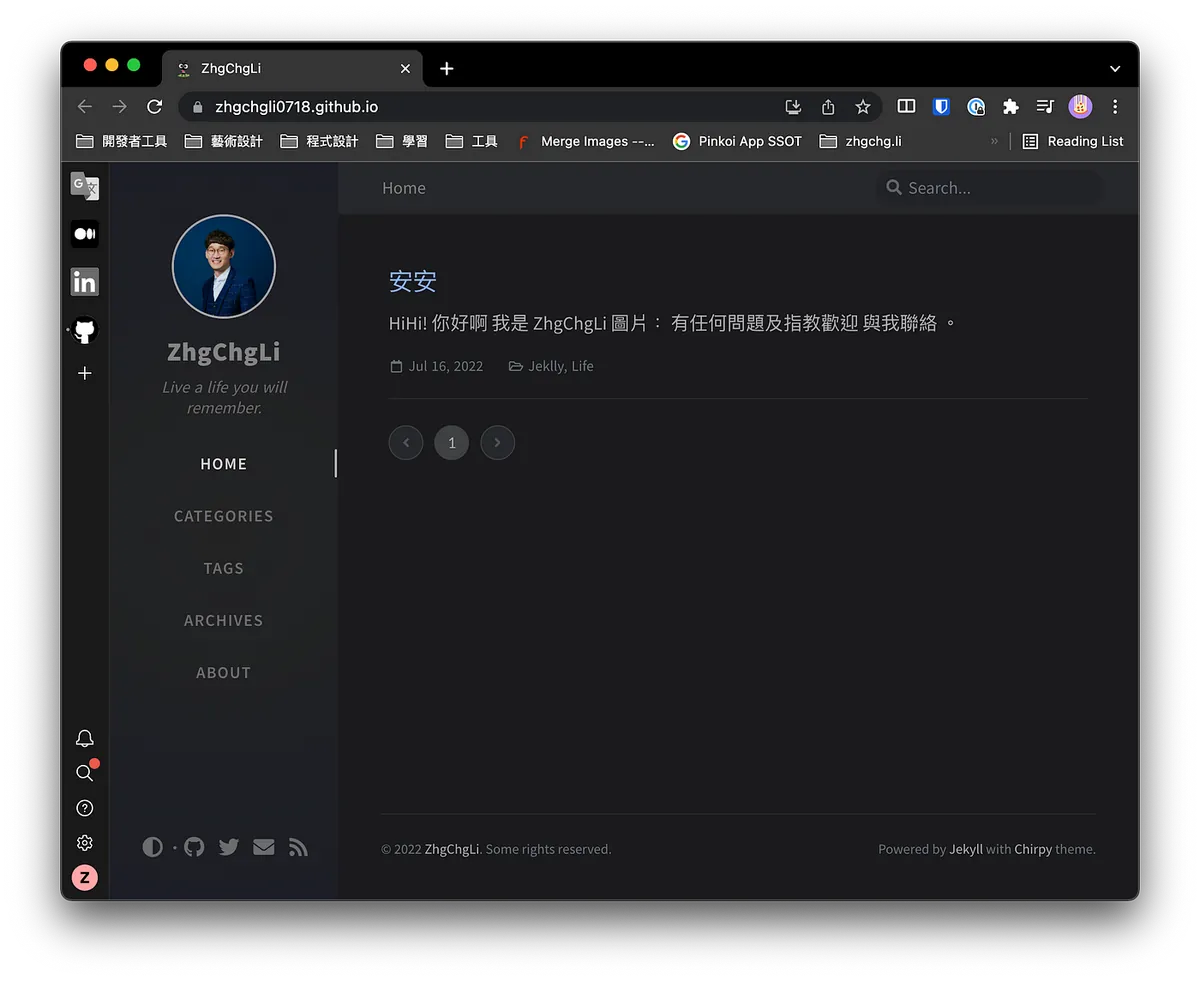
Demo -> zhgchg.li
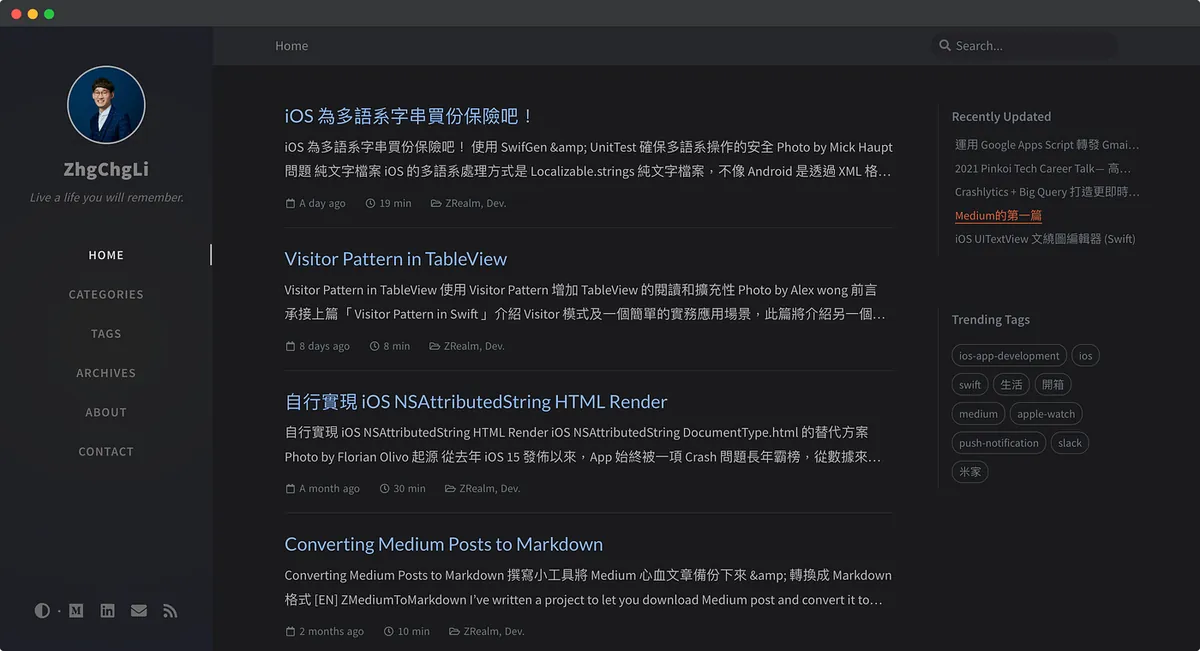
Now you also have a free Jekyll personal blog!!
About Deployment
Every time content is pushed to the Repo, it triggers a redeployment. You need to wait for the deployment to succeed before changes take effect.
Binding a Custom Domain
If you don’t like the GitHub URL zhgchgli0718.github.io, you can buy a domain you like from Namecheap or register a free .tk domain using Dot.tk.
After purchasing a domain, go to the domain management dashboard:
Add the following four Type A Record entries
A Record @ 185.199.108.153
A Record @ 185.199.109.153
A Record @ 185.199.110.153
A Record @ 185.199.111.153
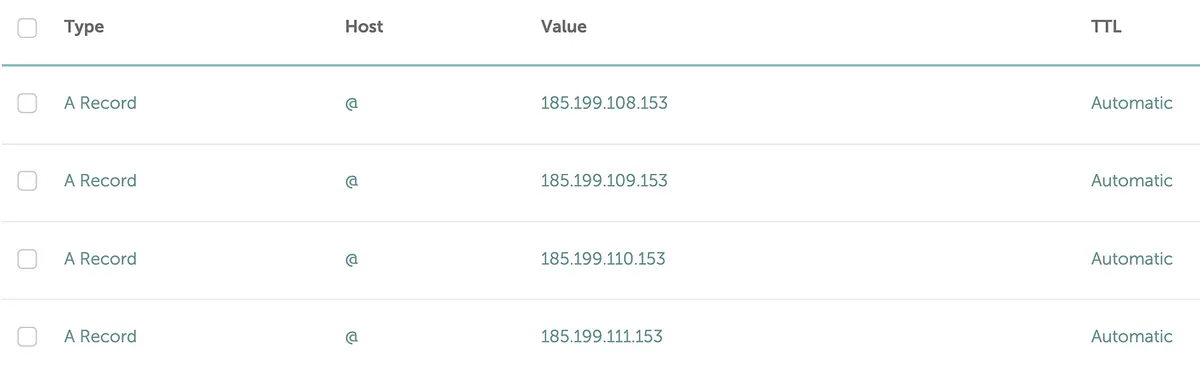
After adding and configuring the domain in the domain backend, return to the GitHub Repo Settings:

Enter your domain in the Custom domain field, then click “Save”.

After the DNS is set up, you can use zhgchg.li to replace the original github.io URL.
⚠️ DNS settings take at least 5 minutes to 72 hours to take effect. If verification keeps failing, please try again later.
Cloud-Based, Fully Automated Medium Sync Mechanism
Every time there is a new article, you have to manually run ZMediumToMarkdown on your computer and then push it to the project. Sounds troublesome?
ZMediumToMarkdown also offers a convenient Github Action feature, allowing you to free your computer and automatically sync Medium articles to your website.
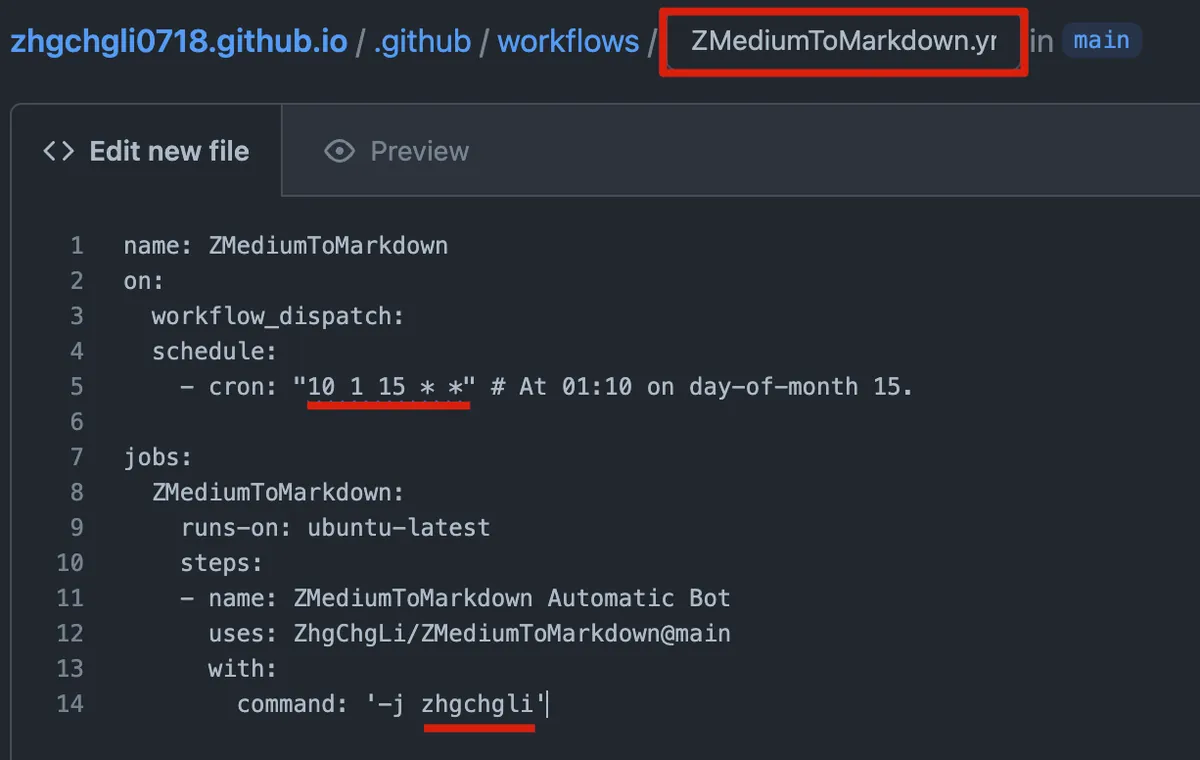
Go to the Actions settings of the Repo:

Click “New workflow”

Click “set up a workflow yourself”
-
Rename the file to:
ZMediumToMarkdown.yml -
Please provide the Markdown content you want me to translate.
name: ZMediumToMarkdown
on:
  workflow_dispatch:
  schedule:
    - cron: "10 1 15 * *" # At 01:10 on day-of-month 15.

jobs:
  ZMediumToMarkdown:
    runs-on: ubuntu-latest
    steps:
    - name: ZMediumToMarkdown Automatic Bot
      uses: ZhgChgLi/ZMediumToMarkdown@main
      with:
        command: '-j your Medium username'
-
cron: Set the execution schedule (weekly? monthly? daily?). Here it is set to run automatically at 1:15 AM on the 15th of every month.
-
command: Enter your Medium username after -j
Click the top right “Start commit” -> “Commit new file”
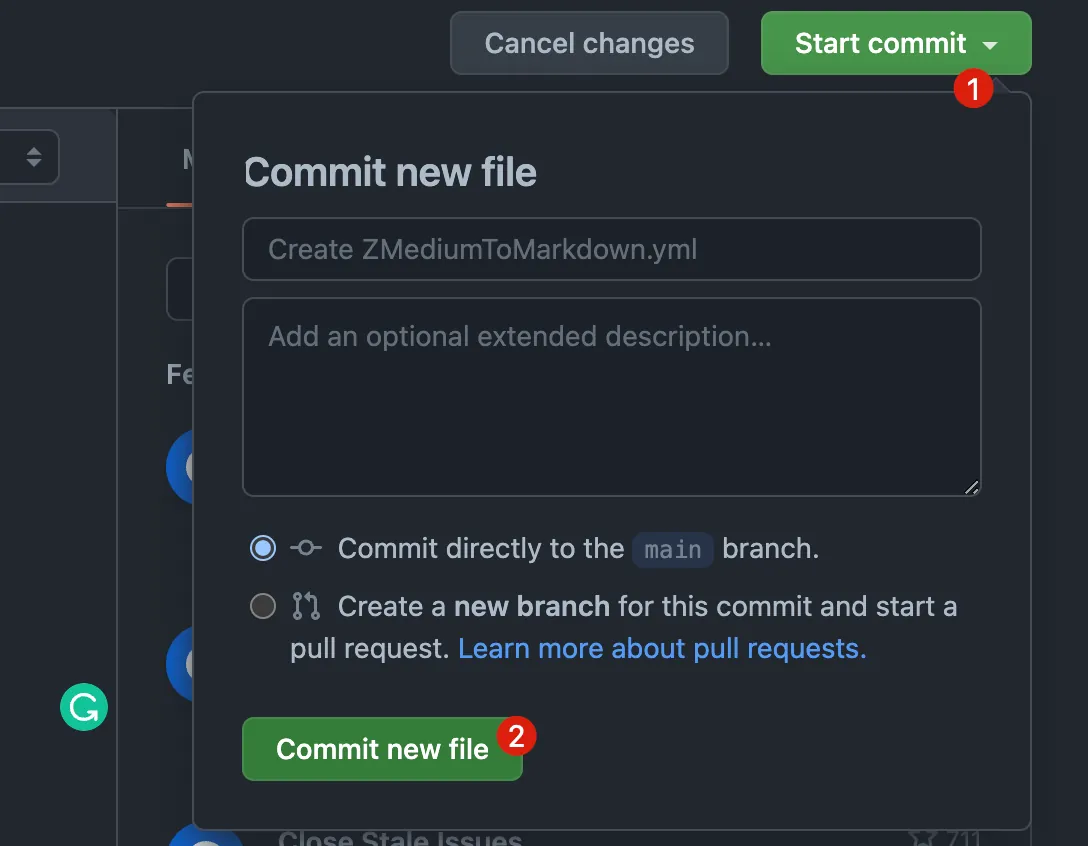
Complete GitHub Action setup.
After creation, the ZMediumToMarkdown Action will appear in Actions.
Besides automatic execution at scheduled times, you can also manually trigger execution by following these steps:
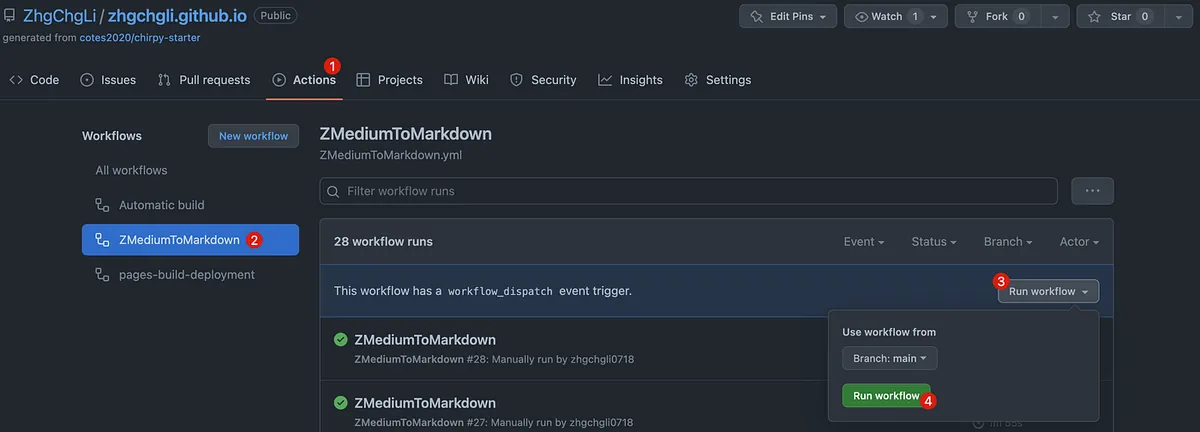
Actions -> ZMediumToMarkdown -> Run workflow -> Run workflow.
After running, ZMediumToMarkdown will directly use the GitHub Action runner to sync Medium articles to the Repo with the script:
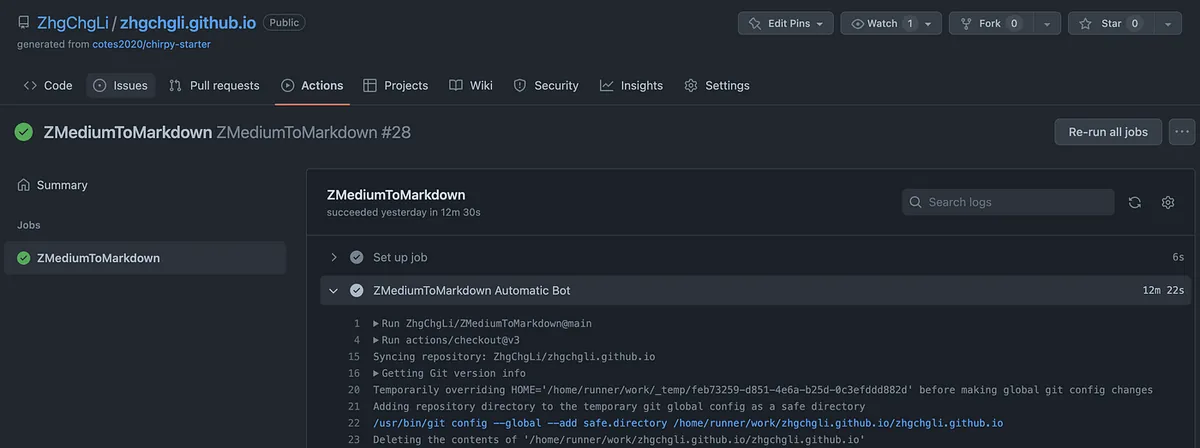
After running, it will also trigger a redeployment. Once redeployment is complete, the latest content will appear on the website. 🚀
No manual operation needed at all! This means you can continue updating your Medium articles, and the script will automatically and conveniently sync the content from the cloud to your own website!


Comments