Universal Links 新鮮事
iOS 13, iOS 14 Universal Links 新鮮事&建立本地測試環境
Universal Links 新鮮事
iOS 13, iOS 14 Universal Links 新鮮事&建立本地測試環境
{:target="_blank"}](/assets/12c5026da33d/1*HYAd1aal5Et1A-Qzs6VAtQ.jpeg)
Photo by NASA
前言
對於一個有網站又有 APP 的服務, Universal Links 的功能對於使用者體驗來說無比的重要,能達到 Web 與 APP 之間的無縫接軌;但一直以來都只有簡單設置,沒有太多的著墨;前陣子剛好又遇到花了點時間研究了一下,把一些有趣的事記錄下來。
常見考量
經手過的服務,對於實作 Universal Links 的考量都是 APP 上並沒有實作完整的網站功能,Universal Links 認的是域名,只要域名匹配到就會開啟 APP;關於這個問題可以下 NOT 排除 APP 上沒有相應功能的網址,若網站服務網址很極端,那乾脆新建一個 subdomain 用來做 Universal Links。
apple-app-site-association 何時更新?
- iOS < 14,APP 在第一次安裝、更新時會去詢問 Universal Links 網站的 apple-app-site-association。
- iOS ≥ 14 ,則是由 Apple CDN 做快取定期更新 Universal Links 網站的 apple-app-site-association;APP 在第一次安裝、更新時會去跟 Apple CDN 拿取;但這邊就會有個問題,Apple CDN 的 apple-app-site-association 可能還是舊的。
關於 Apple CDN 的更新機制,查了一下文件,沒有提到;查了下 討論 ,官方也只回應「會定期更新」細節之後會發佈在文件…但至今依然還沒看到。
我自己覺得應該最慢 48 小時,就會更新吧。。。所以下次有更改到 apple-app-site-association 的話建議在 APP 上架更新前幾天就先改好 apple-app-site-association 上線。
apple-app-site-association Apple CDN 確認:
1
2
Headers: HOST=app-site-association.cdn-apple.com
GET https://app-site-association.cdn-apple.com/a/v1/你的網域
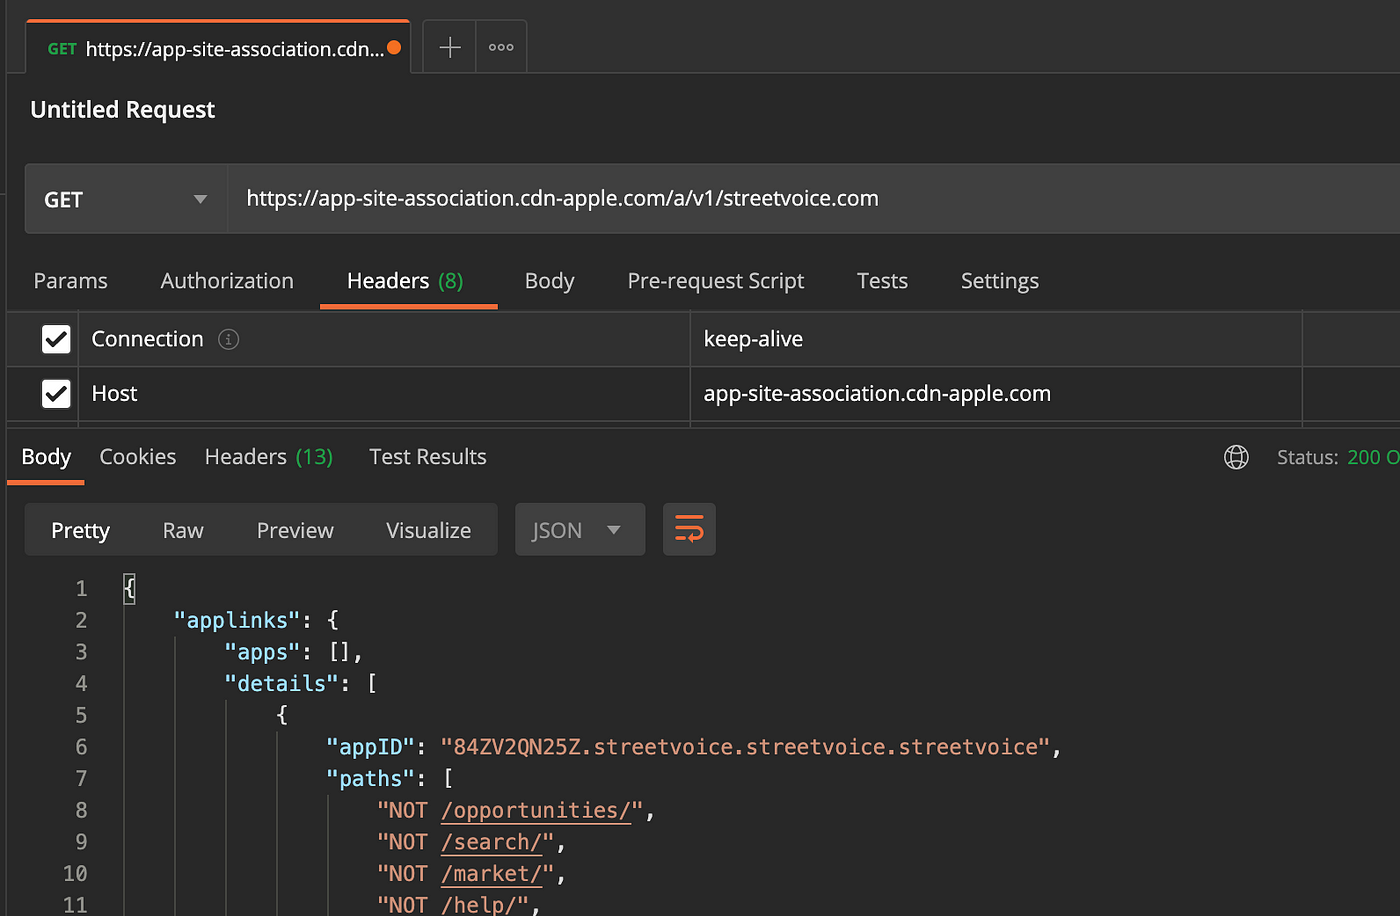
可以取得當前 Apple CDN 上的版本長怎樣。(記得加上 Request Header Host=https://app-site-association.cdn-apple.com/ )
iOS ≥ 14 Debug
因前述的 CDN 問題,那我們在開發階段該如何 debug 呢?
還好這部分蘋果有給解決方法,不然沒辦法即時更新真的要吐血了;我們只需要再 applinks:domain.com 加上 ?mode=developer 即可,另外還有 managed(for 企業內部 APP) , or developer+managed 模式可設定。

加上 mode=developer 後,APP 在模擬器上每次 Build & Run 時都會直接跟網站拿最新的 app-site-association 來用。
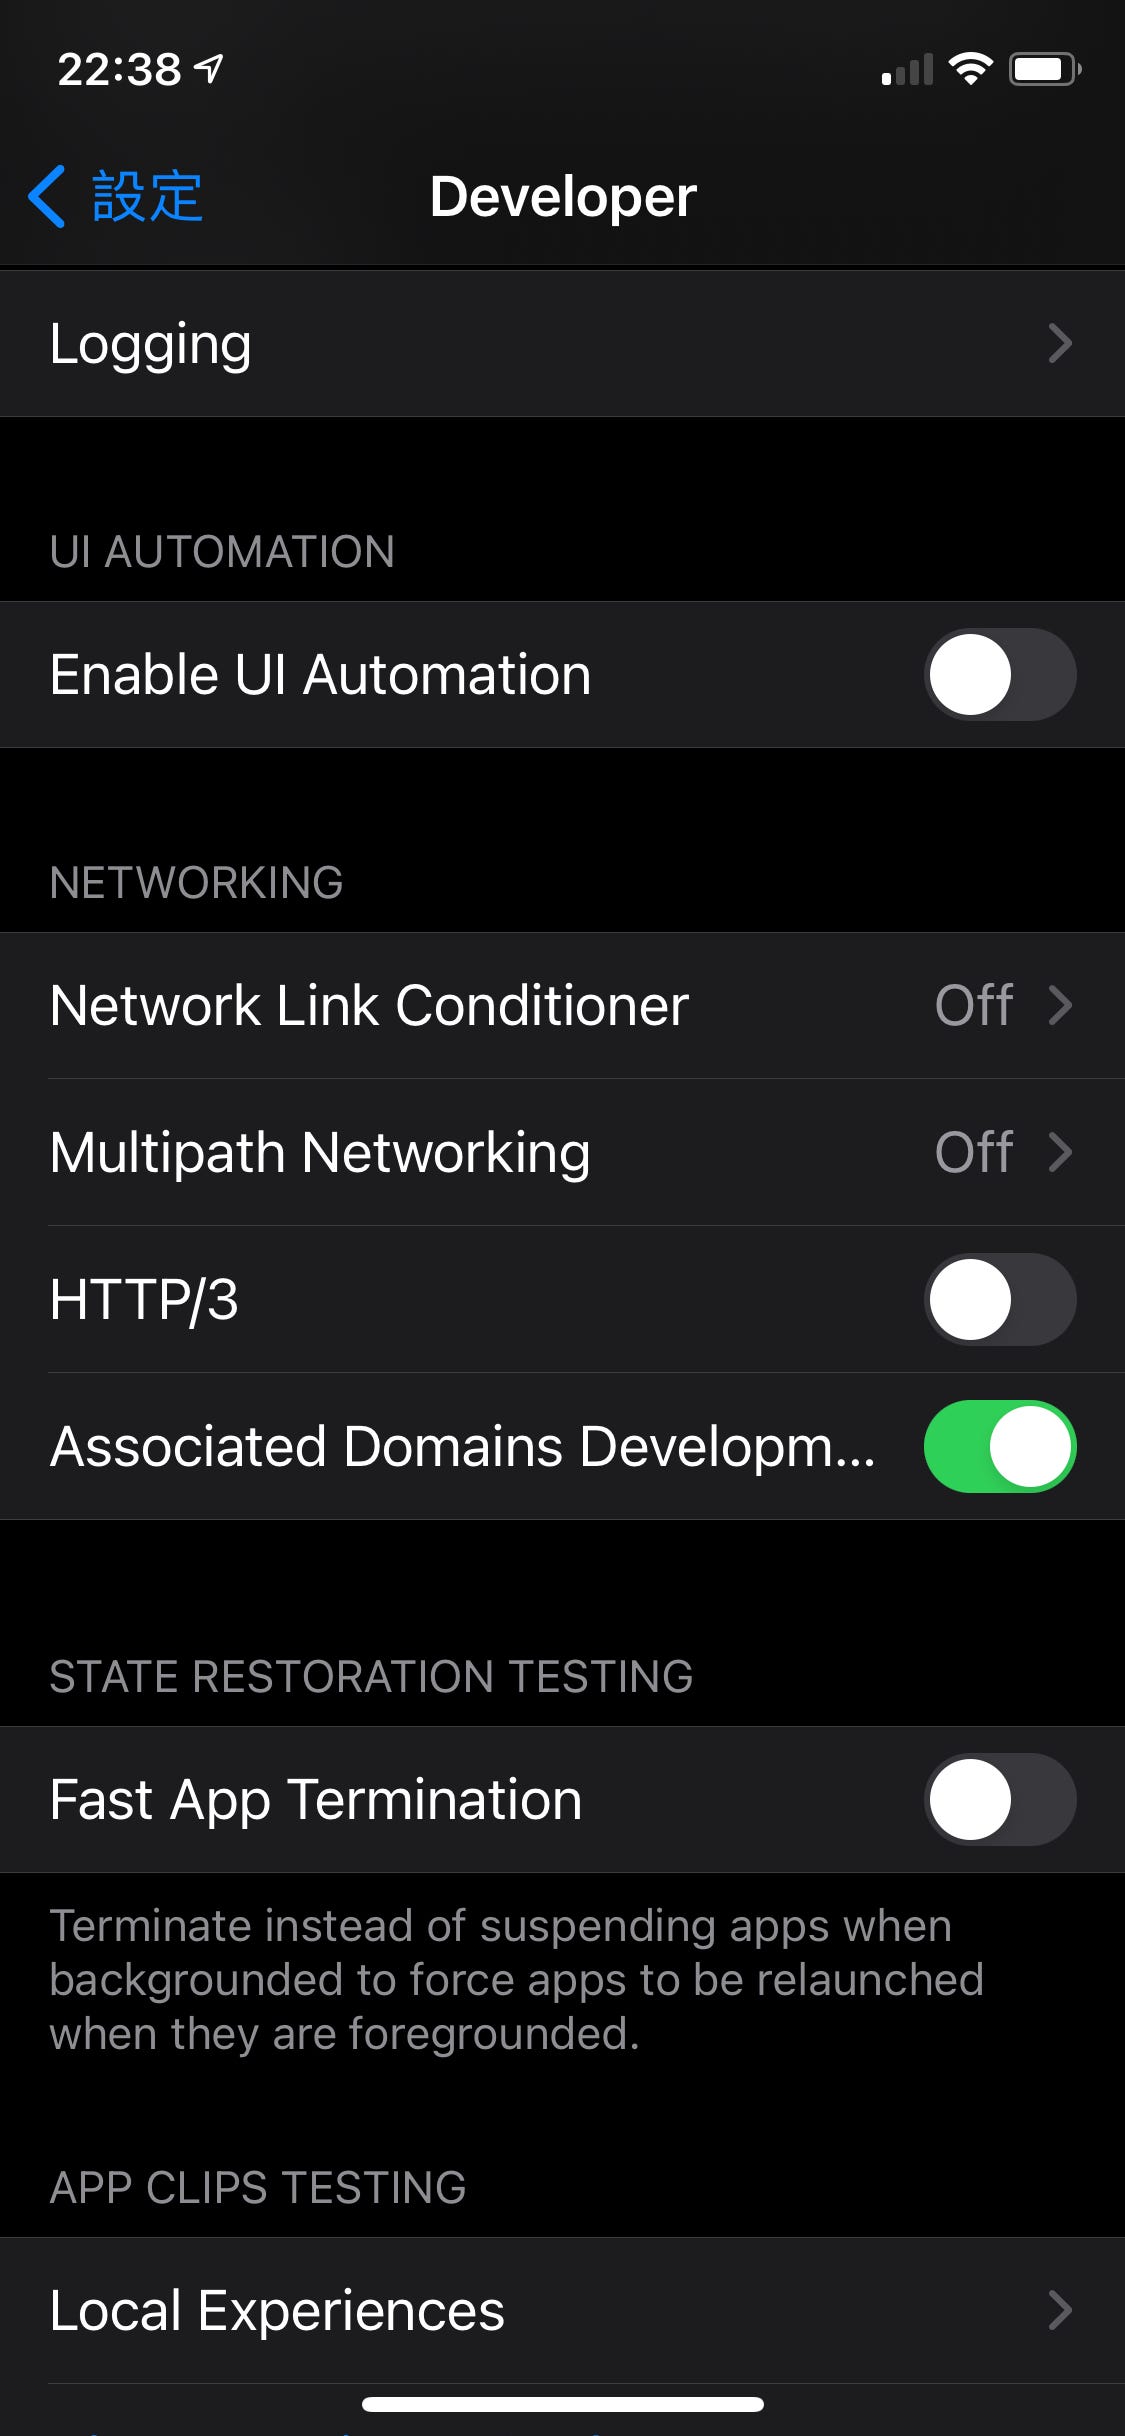
如果要 Build & Run 在實機則要先去「設定」->「開發者」-> 打開「Associated Domains Development」選項即可。
⚠️ 這邊有個坑 ,app-site-association 可以放在網站根目錄或是
./.well-known目錄下;但在 mode=developer 下他只會問./.well-known/app-site-association,害我以為怎麼沒效。
開發測試
如果是 iOS <14 記得有更改過 app-site-association 的話要刪掉再重 Build & Run APP 才會去抓最新的回來,iOS ≥ 14 請參考前述方法加上 mode=developer。
app-site-association 內容的修改,好一點的話可以自行修改伺服器上的檔;但對於有時候碰不到伺服器端的我們來說,如果要做 universal links 的測試會非常的麻煩,要不停的麻煩後端同事幫忙,變成要很確定 app-site-association 內容後一次上線,一直改來改去會把同事逼瘋。
在本地建一個模擬環境
為了解決上述問題,我們可以在本地起一個小服務。
首先在 mac 上安裝 nginx:
1
brew install nginx
如果沒安裝過 brew 可先安裝:
1
/bin/bash -c "$(curl -fsSL https://raw.githubusercontent.com/Homebrew/install/HEAD/install.sh)"
安裝完 nginx 後,前往 /usr/local/etc/nginx/ 打開編輯 nginx.conf 檔案:
1
2
3
4
5
6
7
8
9
10
11
...略
server {
        listen       8080;
        server_name  localhost;
#charset koi8-r;
#access_log  logs/host.access.log  main;
location / {
            root   /Users/zhgchgli/Documents;
            index  index.html index.htm;
        }
...略
大概在第 44 行的位置將 location / 裡的 root 換成你想要的目錄位置(這邊以 Documents 為例)。
listen on 8080 port ,如果沒有衝突則不需要修改。
儲存修改完後,下指令啟動 nginx:
1
nginx
若要停止時,則下:
1
nginx -s stop
停止。
如果有更改 nginx.conf 記得要下:
1
nginx -s reload
重新啟用服務。
建立一個 ./.well-known 目錄在剛設定的 root 目錄內,並將 apple-app-site-association 檔案放到 ./.well-known 內。
⚠️
.well-known建立後若消失,請注意 Mac 要打開「顯示隱藏資料夾」功能:
在 terminal 下:
1
defaults write com.apple.finder AppleShowAllFiles TRUE
再下 killall finder 重啟所有 finder,即可。

⚠️
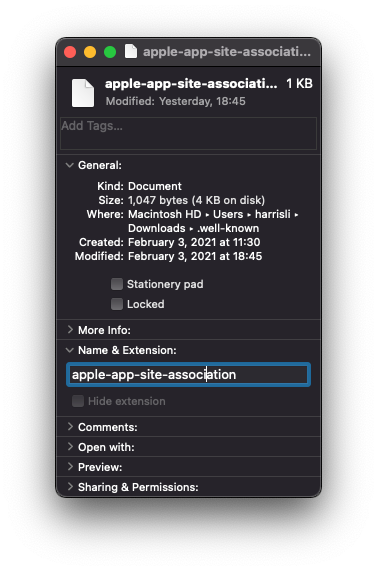
apple-app-site-association看起來沒有副檔名,但實際還是有 .json 副檔名:
在檔案上按右鍵 -> 「取得資訊 Get Info」->「Name & Extension」-> 檢查有無副檔名&同時可取消勾選「隱藏檔案類型 Hide extension」
沒問題後,打開瀏覽器測試以下連結是否正常下載 apple-app-site-association:
1
http://localhost:8080/.well-known/apple-app-site-association
如果能正常下載代表本地環境模擬成功!
如果出現 404/403 錯誤則請檢查 root 目錄是否正確、目錄/檔案是否有放入、apple-app-site-association 是否不小心帶了副檔名( .json)。
註冊&下載 Ngrok
{:target="_blank"}](/assets/12c5026da33d/1*Shk9u59HgRRSiMw0wt899Q.png)
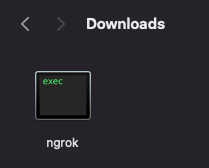
解壓縮出 ngrok 執行檔
{:target="_blank"} 執行 Config 設定](/assets/12c5026da33d/1*fnEUyJMtVhUGurU5vX5K6A.png)
進入 Dashboard 頁面 執行 Config 設定
1
./ngrok authtoken 你的TOKEN
設定好之後,下:
1
./ngrok http 8080
因我們的 nginx 在 8080 port。
啟動服務。
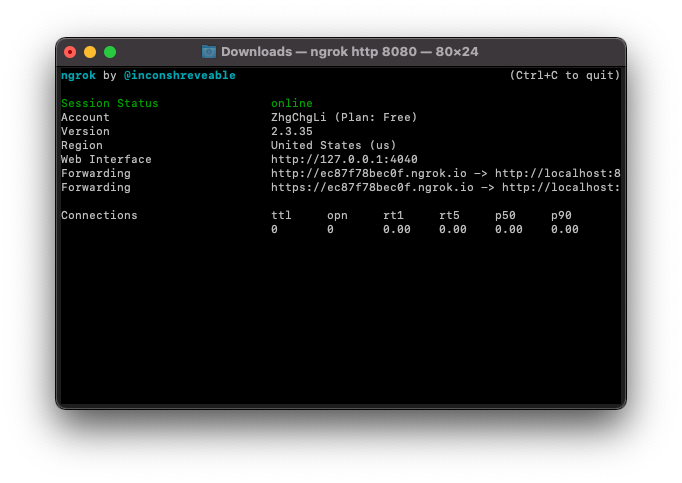
這時候我們會看到一個服務啟動狀態視窗,可以從 Forwarding 中取的此次分配到的公開網址。
⚠️ 每次啟動分配到的網址都會變,所以僅能作為開發測試使用。
這邊以此次分配到的網址
https://ec87f78bec0f.ngrok.io/為例
回到瀏覽器改輸入 https://ec87f78bec0f.ngrok.io/.well-known/apple-app-site-association 看看能不能正常下載瀏覽 apple-app-site-association 檔案,如果沒問題則可繼續下一步。
將 ngrok 分配到的網址輸入到 Associated Domains applinks: 設定中。

記得帶上 ?mode=developer 方便我們測試。
重新 Build & Run APP:
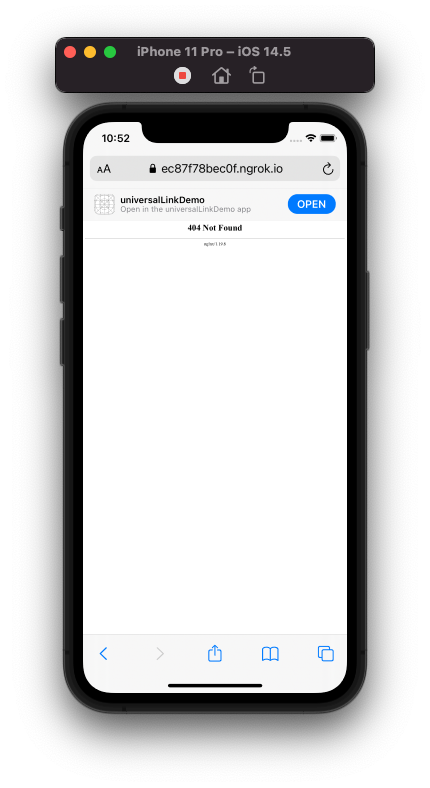
打開瀏覽器輸入相應的 Universal Links 測試網址(EX: https://ec87f78bec0f.ngrok.io/buy/123 )查看效果。
頁面出現 404 不要理他,因為我們實際沒有那一頁;我們只是要測 iOS 對網址匹配的功能符不符合我們預期;如果上方有出現 「Open」代表匹配成功,另外也可以測 NOT 反向的狀況。
點擊「Open」後開啟 APP -> 測試成功!
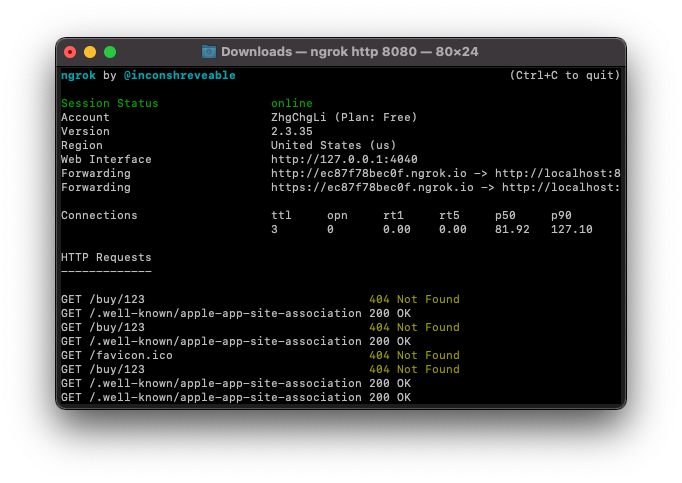
開發階段都測試 OK 後,將確認修改過之後的 apple-app-site-association 檔案再交給後端上傳到伺服器就能確保萬無一失囉~
最後記得將 Associated Domains applinks: 改為正試機網址。
另外我們也可以從 ngrok 運行狀態視窗中看到每次 APP Build & Run 有沒有跟我們要 apple-app-site-association 檔案:
Applinks 設定內容
iOS < 13 之前:
設定檔較簡單,只有以下內容可設定:
1
2
3
4
5
6
7
8
9
10
11
12
13
14
{
  "applinks": {
      "apps": [],
      "details": [
           {
             "appID" : "TeamID.BundleID",
             "paths": [
               "NOT /help/",
               "*"
             ]
           }
       ]
   }
}
將 TeamID.BundleId 換成你的專案設定 (ex: TeamID = ABCD , BundleID = li.zhgchg.demoapp => ABCD.li.zhgchg.demoapp )。
如果有多個 appID 則要重複加入多組。
paths 部分則為匹配規則,能支援以下幾種語法:
*:匹配 0~多個字元,ex:/home/*(home/alan…)?:匹配 1 個字元,ex:201?(2010~2019)?*:匹配 1 個~多個字元,ex:/?*(/test、/home. . )NOT:反向排除,ex:NOT /help(any url but /help)
更多玩法組合可自己依照實際情況決定,更多資訊可參考 官方文件 。
- 請注意,他不是 Regex,不支援任何 Regex 寫法。
- 舊版不支援 Query (?name=123)、Anchor ( #title)。
- 中文網址須先轉成 ASCII 後才能放在 paths 中 (所有url 字元均要是 ASCII)。
iOS ≥ 13 之後:
強化了設定檔內容的功能,多增加支援 Query/Anchor、字符集、編碼處理。
1
2
3
4
5
6
7
8
9
10
11
12
13
14
15
16
17
18
19
20
21
22
23
24
25
26
27
28
"applinks": {
  "details": [
    {
      "appIDs": [ "TeamID.BundleID" ],
      "components": [
        {
          "#": "no_universal_links",
          "exclude": true,
          "comment": "Matches any URL whose fragment equals no_universal_links and instructs the system not to open it as a universal link"
        },
        {
          "/": "/buy/*",
          "comment": "Matches any URL whose path starts with /buy/"
        },
        {
          "/": "/help/website/*",
          "exclude": true,
          "comment": "Matches any URL whose path starts with /help/website/ and instructs the system not to open it as a universal link"
        },
        {
          "/": "/help/*",
          "?": { "articleNumber": "????" },
          "comment": "Matches any URL whose path starts with /help/ and that has a query item with name 'articleNumber' and a value of exactly 4 characters"
        }
      ]
    }
  ]
}
轉貼自官方文件,可以看到格式有所改變。
appIDs 為陣列,可放入多組 appID,這樣就不用像以前一樣只能整個區塊重複輸入。
WWDC 有提到與舊版兼容, 當 iOS ≥ 13 有讀到新的格式就會忽略舊的 paths 。
匹配規則改放在 components 中;支援 3 種類型:
/: URL?:Query,ex: ?name=123&place=tw#:Anchor,ex: #title
並且可以搭配使用,假設今天 /user/?id=100#detail 才需要跳到 APP 則可寫成:
1
2
3
4
5
{
  "/": "/user/*",
  "?": { "id": "*" },
  "#": "detail"
}
其中匹配語法同原本語法,也是支援 * ? ?* 。
新增 comment 註解欄位,可輸入註解方便辨識。(但請注意這是公開的,別人也看得到)
反向排除則改為指定 exclude: true 。
新增 caseSensitive 指定功能,可指定匹配規則是否對大小寫敏感, 預設:true ,有這需求的話可以少寫許多規則。
新增 percentEncoded 前面說到的,舊版需要先將網址轉為 ASCII 放到 paths 中(如果是中文字會變得很醜無法辨識);這個參數就是是否要幫我們自動 encode, 預設是 true 。 假設是中文網址就能直接放入了(ex: /客服中心 )。
詳細官方文件可 參考此 。
預設字符集:
這算是這次更新蠻重要的功能之一,新增支援字符集。
系統幫我們定義好的字符集:
$(alpha):A-Z 和 a-z$(upper):A-Z$(lower):a-z$(alnum):A-Z 和 a-z 和 0–9$(digit):0–9$(xdigit):十六進制字符,0–9 和 a,b,c,d,e,f,A,B,C,D,E,F$(region):ISO 地區編碼 isoRegionCodes ,Ex: TW$(lang):ISO 語言編碼 isoLanguageCodes ,Ex: zh
假設我們的網址有多語系,我想要支援 Universal links 時,可以這樣設定:
1
2
3
"components": [
     { "/" : "/$(lang)-$(region)/$(food)/home" }
]
這樣不管是 /zh-TW/home 、 /en-US/home 都能支援,非常方便,不用自己寫一整排規則!
自訂字符集:
除了預設字符集之外,我們也能自訂字符集,增加設定檔復用、可讀性。
在 applinks 中加入 substitutionVariables 即可:
1
2
3
4
5
6
7
8
9
10
11
12
13
{
  "applinks": {
    "substitutionVariables": {
      "food": [ "burrito", "pizza", "sushi", "samosa" ]
    },
    "details": [{
      "appIDs": [ ... ],
      "components": [
        { "/" : "/$(food)/" }
      ]
    }]
  }
}
範例中自訂了一個 food 字符集,並在後續 components 中使用。
以上範例可匹配 /burrito , /pizza , /sushi , /samosa 。
細節可參考 此篇 官方文件。
沒有靈感?
如果對設定檔內容沒有靈感,可偷偷參考其他網站福的內容,只要在服務網站首頁網址加上 /app-site-association 或 /.well-known/app-site-association 即可讀取他們的設定。
例如: https://www.netflix.com/apple-app-site-association
補充
在有使用 SceneDelegate 的情況下,open universal link 的進入點是在SceneDelegate 中:
1
func scene(_ scene: UIScene, continue userActivity: NSUserActivity)
而非 AppDelegate 的:
1
func application(_ application: UIApplication, continue userActivity: NSUserActivity, restorationHandler: @escaping ([UIUserActivityRestoring]?) -> Void) -> Bool
延伸閱讀
參考資料
有任何問題及指教歡迎 與我聯絡 。
本文首次發表於 Medium ➡️ 前往查看
由 ZMediumToMarkdown 與 Medium-to-jekyll-starter 提供自動轉換與同步技術。
